quarkslab/proxyblob
GitHub: quarkslab/proxyblob
一款利用 Azure Storage 服务作为隐蔽通信信道的 SOCKS5 代理隧道工具,用于在受限网络环境中绕过出站连接限制。
Stars: 356 | Forks: 45
# ProxyBlob v2
🎉 新版本发布 ! _查看 [更新日志](#changelog)_ 🎉
# native agent with embedded connection string
make wasm TOKEN= # WASM agent with embedded connection string
```
## 配置
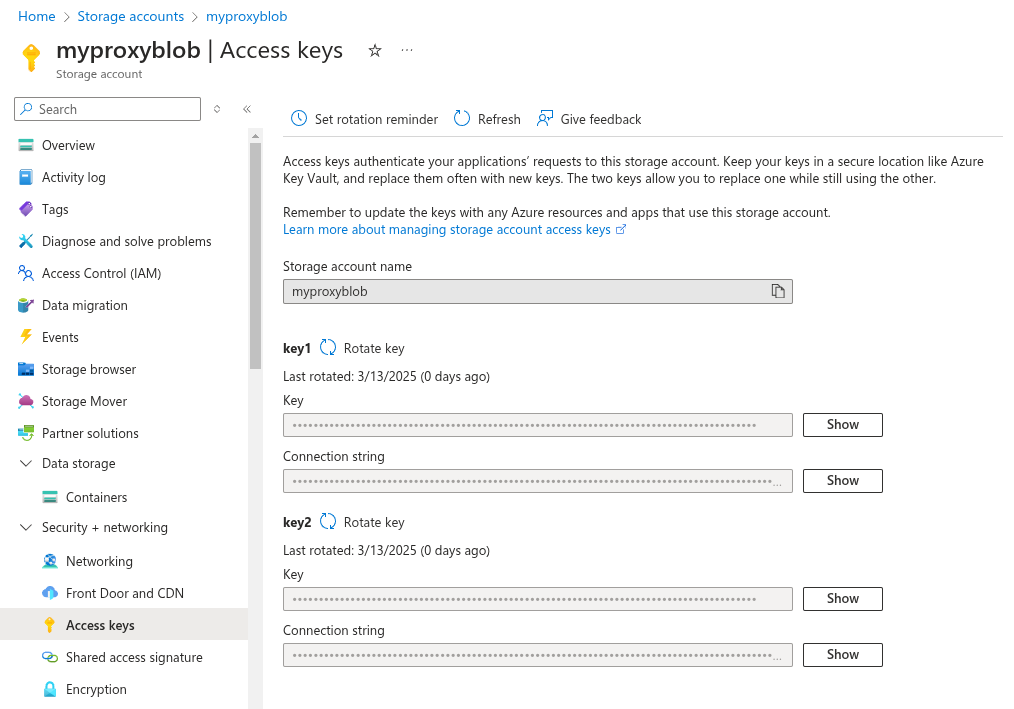
根据[示例](example_config.json)使用您的 Azure Storage 凭证创建一个 `config.json` 文件:
```
{
"listeners": [
{
"name": "blob-listener",
"driver": "azblob",
"address": "https://proxyblob.blob.core.windows.net",
"storage_account": "proxyblob",
"storage_account_key": "your_account_key"
},
{
"name": "queue-listener",
"driver": "azqueue",
"address": "http://127.0.0.1:10001",
"storage_account": "devstoreaccount1",
"storage_account_key": "Eby8vdM02xNOcqFlqUwJPLlmEtlCDXJ1OUzFT50uSRZ6IFsuFq2UVErCz4I6tq/K1SZFPTOtr/KBHBeksoGMGw=="
}
]
}
```
您可以配置多个监听器并在代理 CLI 中管理它们。
## 使用
### 启动 Proxy Server
```
./proxy -c my-config.json # if omitted, config.json is used by default
```
这将启动一个带有以下命令的交互式 CLI:
```
Commands:
agent manage agents
clear clear the screen
exit exit the shell
help use 'help [command]' for command help
listener manage listeners
new generate a new connection string for an agent
```
代理服务器运行后,启动一个监听器。启动的监听器会自动成为后续命令的默认监听器。
```
proxyblob » listener start blob-local-listener
21:23:25 INF Aznet listener started and set as default addr=http://127.0.0.1:10000 driver=azblob listener_id=blob-local-listener
```
然后您可以使用 `new` 命令生成一个连接字符串。
```
proxyblob » new
21:25:10 INF Connection string generated connection_string=YXpibG9ifGh0dHA6Ly8xMjcuMC4wLjE6MTAwMDAvZGV2c3RvcmVhY2NvdW50MT9oYW5kc2hha2U9YzJVOU1qQXlOaTB3TWkweE5sUXlNQ1V6UVRJMUpUTkJNVEJhSm5OcFp6MDRlR3ByVjJFeVNXdHhWWEJxUlU1cGJIVmtOVGhuWXpkNU5raDNXWEZNUmpZNVFrNDVaMUphT1ZNMEpUTkVKbk53UFdGamR5WnpjSEk5YUhSMGNITWxNa05vZEhSd0puTnlQV01tYzNROU1qQXlOaTB3TWkweE5WUXlNQ1V6UVRJd0pUTkJNVEJhSm5OMlBUSXdNalV0TVRFdE1EVSUzRCZ0b2tlbj1jMlU5TWpBeU5pMHdNaTB4TmxReU1DVXpRVEkxSlROQk1UQmFKbk5wWnowM2NXZ3dZVWgxV1dKTE1rcGlOVVYyVG5WTk1XdEpTMFJFVTFkVGNFWlllVXd5ZUV0dWRYaG9jVWc0SlRORUpuTndQWEpzSm5Od2NqMW9kSFJ3Y3lVeVEyaDBkSEFtYzNJOVl5WnpkRDB5TURJMkxUQXlMVEUxVkRJd0pUTkJNakFsTTBFeE1Gb21jM1k5TWpBeU5TMHhNUzB3TlElM0QlM0Q listener_id=blob-local-listener
```
将生成的连接字符串与代理端一起使用(见下文 [启动 Agent](#starting-the-agent))。如果代理端连接成功,当您列出代理端时,您应该会在 "Info" 列中看到其身份(`user@host`)。
```
proxyblob » agent ls
╭──────────────────────────────────────┬─────────────────┬──────────────────────┬────────────┬─────────────────────┬───────────╮
│ AGENT ID │ INFO │ LISTENER │ PROXY PORT │ CONNECTED AT │ LAST SEEN │
├──────────────────────────────────────┼─────────────────┼──────────────────────┼────────────┼─────────────────────┼───────────┤
│ 7b5af883-7cc7-45a4-8599-da906753005d │ atsika@mac.home │ blob-local-listener │ 1080 │ 2026-02-15 21:50:04 │ 2m ago │
╰──────────────────────────────────────┴─────────────────┴──────────────────────┴────────────┴─────────────────────┴───────────╯
```
使用 `agent select ` 选择代理端,并使用 `agent start` 命令启动代理监听器(默认监听 localhost:1080)。
```
proxyblob » agent select 7b5af883-7cc7-45a4-8599-da906753005d
22:10:40 INF Agent selected agent_id=7b5af883-7cc7-45a4-8599-da906753005d
7b5af883 » agent start
22:10:46 INF Proxy started agent_id=7b5af883-7cc7-45a4-8599-da906753005d port=1080
```
您现在可以使用例如 [proxychains](https://github.com/rofl0r/proxychains-ng) 等工具通过 SOCKS 代理隧道传输流量。
```
proxychains xfreerdp /v:dc01.domain.local /u:Administrator
```
### 启动 Agent
为了运行,代理端需要一个可以通过代理生成的连接字符串。您可以将其作为参数传递,或者直接在编译时嵌入它。
```
# 通过参数
./agent -c
# 构建内嵌连接字符串的 agent
make agent TOKEN=
./agent
```
## 架构
通信流程如下:
1. 代理端定期轮询 Azure Blob 容器,在请求 blob 中查找编码数据包
2. 代理将编码数据包写入 Azure Blob 容器中的请求 blob
3. 当代理端发现数据包时,它会处理它并将响应写回响应 blob
4. 代理读取响应并与客户端应用程序维持 SOCKS 连接
总体流程如下:
```
graph TB
%% Client applications
Client1[Client Application] -->|SOCKS5 Request| SocksServer
Client2[Web Browser] -->|SOCKS5 Request| SocksServer
%% Proxy Server Components
subgraph "Proxy Server (Local Machine)"
SocksServer[SOCKS5 Server]
CLI[Interactive CLI]
ProxyHandler[Proxy Handler]
TransportP[Blob Transport]
end
%% Connection between components
CLI -->|Commands| SocksServer
SocksServer -->|Process Request| ProxyHandler
ProxyHandler -->|Encode Packets| TransportP
TransportP -->|Receive Responses| ProxyHandler
ProxyHandler -->|Return Data| SocksServer
%% Azure Blob Storage
subgraph "Azure Blob Storage"
RequestBlob[Request Blob]
ResponseBlob[Response Blob]
end
%% Connection to Azure
TransportP -->|Write| RequestBlob
ResponseBlob -->|Read| TransportP
%% Agent Components
subgraph "Agent (Target Network)"
AgentPoller[Polling Component]
TransportA[Blob Transport]
SocksHandler[SOCKS Handler]
CommandProcessor[Command Processor]
end
%% Agent connections
RequestBlob -->|Poll| AgentPoller
AgentPoller -->|Process| TransportA
TransportA -->|Decode Packets| SocksHandler
SocksHandler -->|Process Commands| CommandProcessor
%% Command Processing
subgraph "Command Processing"
Connect["CONNECT"]
Bind["TODO: BIND"]
UDP["UDP ASSOCIATE"]
end
CommandProcessor -->|Route| Connect
CommandProcessor -->|Route| Bind
CommandProcessor -->|Route| UDP
%% Target Connections
Connect -->|TCP Connection| TargetServer1[Target Server]
UDP -->|UDP Connection| TargetServer2[Target Server]
%% Return path
TargetServer1 -->|Response Data| SocksHandler
TargetServer2 -->|UDP Data| SocksHandler
SocksHandler -->|Encode Response| TransportA
TransportA -->|Write| ResponseBlob
```
CONNECT 操作的示例如下:
```
sequenceDiagram
participant Client as Client Application
participant Proxy as Proxy Server
participant AzureStor as Azure Blob Storage
participant Agent as Agent
participant Target as Target Server
Note over Client,Target: SOCKS5 Protocol Flow
%% Proxy Server and Agent Initialization
Proxy->>AzureStor: Initialize connection
Agent->>AzureStor: Start polling for requests
%% Client Connection and Authentication
Client->>Proxy: TCP Connection
Proxy->>Client: Auth methods (NoAuth supported)
Client->>Proxy: Select Auth method
%% Command Processing
Client->>Proxy: CONNECT command + target address
Proxy->>AzureStor: Write CONNECT request packet to Request Blob
Agent->>AzureStor: Poll and retrieve CONNECT request
%% Target Connection
Agent->>Target: Establish TCP connection
Target->>Agent: Connection established
Agent->>AzureStor: Write connection success to Response Blob
Proxy->>AzureStor: Poll and retrieve response
Proxy->>Client: CONNECT success response
%% Data Transfer (Bidirectional)
Client->>Proxy: Send data
Proxy->>AzureStor: Write data packet to Request Blob
Agent->>AzureStor: Poll and retrieve data packet
Agent->>Target: Forward data
Target->>Agent: Response data
Agent->>AzureStor: Write response data to Response Blob
Proxy->>AzureStor: Poll and retrieve response data
Proxy->>Client: Forward response data
```
## 故障排除
**为什么我的代理端立即停止运行?**
您的代理端在运行后立即停止可能有多种原因。请检查其退出代码:
```
# Bash
echo $?
```
```
REM CMD
echo %ERRORLEVEL%
```
```
# PowerShell
echo $LastExitCode
```
每个退出代码描述了代理端停止运行的原因:
| 退出代码 | 原因 |
| --------- | ------------------------------------------- |
| 0 | 无错误 |
| 1 | 上下文已被取消 |
| 2 | 缺少连接字符串 |
| 3 | 连接字符串无效或已过期 |
如果您遇到问题:
1. 检查 Azure 凭证和权限
2. 验证与 Azure Blob Storage 的连接性
3. 检查是否有任何防火墙规则阻止出站连接
4. 确保代理端正在运行且已正确连接
## 待办事项
- BIND 命令(尚未实现)
- 进一步提高代理速度
## 更新日志
**ProxyBlob v2.1 (WASM agent) - 19/03/2026:**
- WebAssembly 代理端构建目标(`agent.wasm`),用于在 JavaScript 运行时(Bun、Node.js 等)中部署
- 针对 JS/原生网络和 UDP 代码的构建标签分离
- 将 UDP 中继重构为共享的、平台无关的层
**ProxyBlob v2 (aznet boosted) - 16/02/2026:**
- 使用 aznet 网络层完全重写架构
- 多 Azure Storage 后端(Blob、Queue、Table Storage)
- 已连接代理端的最后在线时间戳
- 增强的连接管理和生命周期
- 更好的错误处理和恢复机制
- 通过自适应间隔提高轮询效率
- 自动连接清理和资源管理
- 显著更高的吞吐量和更低的延迟
- 通过后端选择进行成本优化
- 多监听器配置支持
**ProxyBlob 公开发布 - 29/04/2025:**
- SOCKS5 协议(CONNECT 和 UDP ASSOCIATE)
- 反向客户端-服务器架构
- Azure Blob Storage 通信
- 带有自动补全功能的交互式 CLI
- 多代理端管理
- 本地或远程代理服务器
- 基于容器的通信
- 连接字符串身份验证
- 错误处理
- 用于本地开发的 Azurite 支持
## 许可证
[GNU GPLv3 许可证](LICENSE)
由 [@_atsika](https://x.com/_atsika) 用 ❤️ 制作

SOCKS proxy over Azure Storage service
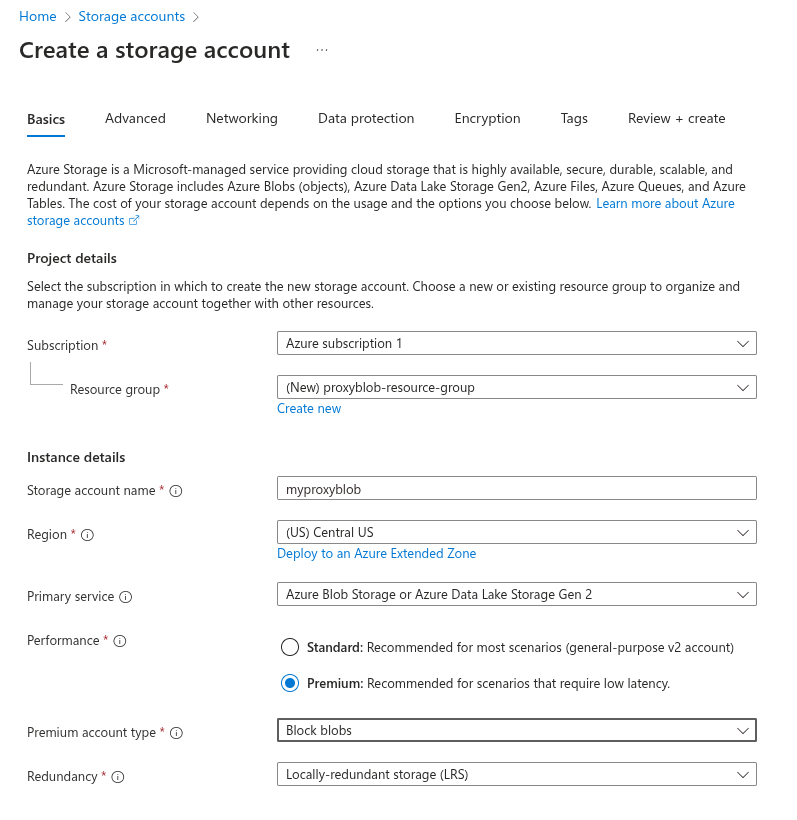
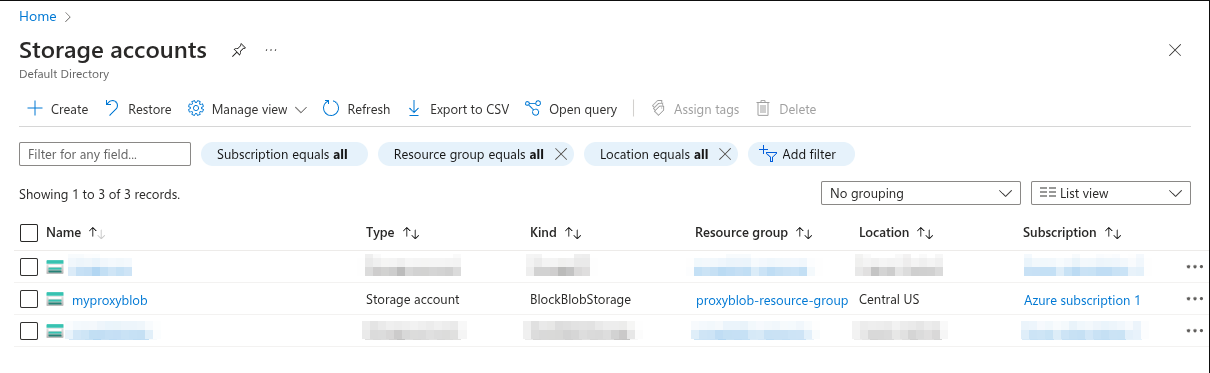
## 概述 ProxyBlob 是一款旨在通过 Azure Storage 服务创建 SOCKS 代理隧道的工具。这在直接网络连接受限但可访问 `*.core.windows.net` 的环境中特别有用。 该系统由两个组件组成: 1. **Proxy Server(代理服务器)**:运行在您的本地机器或远程服务器上,为您的应用程序提供 SOCKS 接口 2. **Agent(代理端)**:运行在目标网络内部,通过 Azure Storage 服务与代理进行通信 ## 功能特性 - SOCKS5 协议 (CONNECT 和 UDP ASSOCIATE) - 通过 Azure Storage 服务进行通信(感谢 [aznet](https://github.com/atsika/aznet)!) - 带有自动补全功能的交互式 CLI - 多代理端管理 - 本地或远程代理服务器 - WebAssembly (WASM) 代理端,用于在 JavaScript 运行时(Bun、Node.js 等)中部署 ## 前置条件 - Go 1.25 或更高版本 - 一个 Azure Storage Account ### 存储账户 #### Azure 为了使用 ProxyBlob,您需要一个 Azure 订阅来创建 Azure Storage Account。拥有订阅后,您可以在 Azure Portal 或使用 Azure CLI 创建存储账户。 以下是使用 Azure Portal 创建存储账户的步骤: 1. 访问 [https://portal.azure.com](https://portal.azure.com) 2. 使用您的 Azure 账户登录 3. 在顶部搜索栏中,输入 "Storage accounts" 4. 点击 "+ Create" 5. 填写必填字段 6. 点击 "Review + create" 7. 点击 "Create" 存储账户设置: - **Subscription(订阅)**:选择您的 Azure 订阅 - **Resource Group(资源组)**:创建新的资源组或选择现有资源组 - **Storage account name(存储账户名称)**:为您的存储账户选择一个名称 - **Location(位置)**:选择离您较近的位置 - **Performance(性能)**:Premium ⚠️ 我们需要低延迟和高吞吐量 - **Premium account type(高级账户类型)**:Block blobs(高事务率) - **Redundancy(冗余)**:Locally-redundant Storage (LRS)
标签:AI工具, Azure云服务, Azure存储, C2通信, EVTX分析, Go语言, IP 地址批量处理, MITM代理, SOCKS5代理, WebAssembly, 云计算, 交互式CLI, 代理转发, 内网穿透, 反向代理, 命令控制, 安全测试, 攻击性安全, 数据可视化, 数据渗透, 数据采集, 日志审计, 横向移动, 流量中转, 流量伪装, 程序破解, 编程规范, 网络安全, 规则引擎, 隐私保护, 隧道工具