dependabot/dependabot-core
GitHub: dependabot/dependabot-core
Dependabot-Core 是 GitHub Dependabot 的核心逻辑库,用于自动检测项目依赖更新并生成包含变更日志的拉取请求。
Stars: 5692 | Forks: 1461

欢迎来到 Dependabot 的公开主页 :dependabot:。
# 目录
- [什么是 Dependabot-Core?](#what-is-dependabot-core)
- [如何运行 Dependabot](#how-to-run-dependabot)
- [为 Dependabot 贡献代码](#contributing-to-dependabot)
- [报告问题和功能请求](#reporting-issues-and-feature-requests)
- [提交 Pull Request](#submitting-pull-requests)
- [新生态系统](#new-ecosystems)
- [开发指南](#development-guide)
- [启动开发环境](#getting-a-development-environment-running)
- [调试问题](#debugging-problems)
- [运行测试](#running-tests)
- [性能分析](#profiling)
- [架构与代码布局](#architecture-and-code-layout)
- [商标](#trademarks)
- [项目维护者注意事项](#notes-for-project-maintainers)
# 什么是 Dependabot-Core?
Dependabot-Core 是 [Dependabot](https://docs.github.com/en/code-security/dependabot) 安全/版本更新核心的库。
使用它可以为使用 Ruby、JavaScript、Python、PHP、Dart、Elixir、Elm、Go、Rust、Java、Julia 和 .NET 编写的项目生成自动更新依赖的 pull request。它还可以更新 git submodule、Docker 文件、Opentofu、Terraform 文件和 Pre-Commit 钩子。
功能包括:
- 检查依赖项的最新版本,*且该版本在项目的其他依赖项限制下必须是可解析的*
- 为新的依赖版本生成更新后的清单和 lockfile
- 生成 PR 描述,其中包含更新后依赖项的更新日志、发布说明和提交记录
# 如何运行 Dependabot
大多数人熟悉在 GitHub.com 和 GitHub Enterprise 上运行的 Dependabot 服务。启用它非常简单,只需[将 `dependabot.yml` 配置文件提交到您仓库的 `.github` 目录中](https://docs.github.com/en/code-security/dependabot/dependabot-version-updates/configuring-dependabot-version-updates)即可。
但是,如果您想运行自定义版本的 Dependabot 或在其他平台上运行它,我们也提供了支持。
本仓库提供了托管您自己独立 Dependabot 所需的逻辑。它目前支持针对托管在 GitHub、Github Enterprise、Azure DevOps、GitLab、BitBucket 和 AWS CodeCommit 上的仓库开启 Pull Request。
Dependabot-Core 是一个库,因此您需要某种入口脚本。以下是一些帮助您入门的示例。
## Dependabot CLI
开源的 [Dependabot CLI](https://github.com/dependabot/cli) 是我们推荐的用于独立使用场景的入口。
我们在 GitHub 这里将其用于生产环境,高级用户也可以利用它在自己的项目/CI 系统中运行自托管的 Dependabot 版本。
它会创建依赖差异,但不会创建 PR。因此,您需要自己编写相关逻辑来实现这一点。
为了协助解决这个问题,我们创建了 [example-cli-usage](https://github.com/dependabot/example-cli-usage) 仓库,其中演示了如何将这些差异转换为实际的 PR。
## 编写您自己的基于 Ruby 的工具
或者,由于 Dependabot-Core 是一个 Ruby 库,您可以编写自己基于 Ruby 的封装来利用 Dependabot-core 代码。棘手的是,Dependabot 假定它是在一个隔离的、一次性的环境中运行的,因此您必须自己处理所有这些情况。例如,防范任意代码执行导致凭据泄露的安全风险,确保有合适版本的 Go 或 Python 或您需要的任何语言环境,以及处理 Dependabot 对其运行时环境进行的更改。
## CI 上的 Dependabot
在 GitHub 这样 Dependabot 运行在容器内的环境中,如果您想根据其是否在 Dependabot 容器上下文中运行来更改构建或安装过程,可以检查是否存在 `DEPENDABOT` 环境变量。
# 开发指南
## 启动开发环境
调试问题或编写新功能的第一步是启动开发环境。我们提供了一个自定义的、基于 [Docker](https://www.docker.com/products/docker-desktop/) 的开发者 shell,其中内置了所有必需的依赖项。
在大多数情况下,这是使用该项目的最佳方式。
开发者 shell 使用卷挂载来合并您对 Dependabot 源代码的本地更改。这样您就可以使用最喜欢的编辑器在本地进行编辑,并且更改会立即反映在 Docker 容器中,以便执行[模拟运行](#debugging-problems)或运行[测试](#running-tests)。
注意:有关[编辑原生包管理器辅助脚本](#making-changes-to-native-package-manager-helpers)的注意事项,请参见相关说明。
### 快速开始
如果本地找不到 Docker 镜像,启动开发者 shell 的脚本将从零开始构建 Docker 镜像。这可能需要一些时间。
通过拉取您想要处理的生态系统的预构建镜像来跳过等待。镜像名称使用 [YAML 生态系统名称](https://docs.github.com/en/code-security/dependabot/dependabot-version-updates/configuration-options-for-the-dependabot.yml-file#package-ecosystem)来指定生态系统。例如,对于 Go Modules,YAML 名称为 `gomod`:
```
$ docker pull ghcr.io/dependabot/dependabot-updater-gomod
```
接下来,运行开发者 shell,_使用本项目中该生态系统的顶级目录名_ 来指定所需的生态系统。例如,对于 Go Modules,顶级目录名为 `go_modules`:
```
$ bin/docker-dev-shell go_modules
=> running docker development shell
[dependabot-core-dev] ~ $ cd go_modules && rspec spec # to run tests for a particular package
```
### 从零开始构建镜像
通常情况下,[快速开始](#quickstart)就足够了,但有时您需要重新构建底层镜像。
例如,虽然我们还没有发布特定于 ARM 的镜像,但如果您_正在_ 基于 ARM 的平台上工作,我们建议手动构建镜像,因为生成的容器运行速度要快得多。
开发者 shell 在 Dependabot 开发 Docker 镜像内运行,该镜像构建于生态系统镜像之上。
```
flowchart LR
A["docker-dev-shell script"] --> B("Dependabot Development docker image")
B --> C("Dependabot Updater Ecosystem docker image (ecosystem specific)")
C --> D("Dependabot Updater Core docker image")
```
对上述任何一个镜像的 Docker 文件进行更改都需要在本地构建一个或多个镜像,以便在开发 shell 中生效。
一种简单但缓慢的方法是删除现有镜像,然后运行 `bin/docker-dev-shell`,它会自动构建缺失的镜像。
更快捷的方法是拉取您实际需要构建的镜像所依赖的所有预构建镜像。
要(重新)构建特定镜像:
- Updater 核心镜像:
$ docker pull ghcr.io/dependabot/dependabot-updater-core # 或者
$ docker build -f Dockerfile.updater-core . --tag=dependabot-manual-build/updater-core # 在 ARM 上推荐
每种语言/生态系统都位于核心镜像之上。您需要重新构建正在处理的那一个,以便它能采用您新的核心代码。例如,如果您正在处理 **Go Modules**:
- Updater 生态系统镜像:
$ docker pull ghcr.io/dependabot/dependabot-updater-gomod # 或者
$ script/build go_modules # 在 ARM 上推荐
或者显式构建:
$ docker build \
--platform linux/amd64 \
--file go_modules/Dockerfile \
--build-arg UPDATER_CORE_IMAGE=dependabot-manual-build/updater-core \
--tag dependabot-manual-build/updater-gomod \
.
- 使用 `--rebuild` 标志启动开发容器:
$ bin/docker-dev-shell go_modules --rebuild
如果成功,您应该会在 shell 内:
=> running docker development shell
[dependabot-core-dev] ~ $
- 进入 shell 后,您可以运行测试,例如:
rspec common/spec/dependabot/file_fetchers/base_exclude_spec.rb
### 更改原生包管理器辅助脚本
几个 Dependabot 包使用了“原生辅助程序”,即用其宿主语言编写的小型可执行文件。
**对这些文件的更改不会自动反映在开发容器中。**
对辅助文件进行任何编辑后,运行适当的构建脚本,用您的更改更新已安装的版本,如下所示:
```
$ bin/docker-dev-shell bundler
=> running docker development shell
$ bundler/helpers/v2/build
$ bin/dry-run.rb bundler dependabot/demo --dir="/ruby"
```
要查看来自原生包管理器辅助程序的日志和 stdout,请参阅[调试原生辅助程序](#debugging-native-package-manager-helpers)。
# 调试问题
调试的第一步是[启动开发环境](#getting-a-development-environment-running)。
在开发环境中,您有两个选项可以模拟依赖项更新任务:
您可以使用新开发的 [CLI 工具](#cli-tool)或原始的[模拟运行脚本](#dry-run-script)。
## CLI 工具
[Dependabot CLI](https://github.com/dependabot/cli) 是一款新开发的工具,它集成了 [GitHub 凭据代理](#private-registry-credential-management),可以更真实地模拟在 GitHub 上的 Dependabot 服务在与私有注册表通信时的内部行为。
它有一个[专门的调试指南](https://github.com/dependabot/cli#debugging-with-the-cli),包括支持进入 Ruby 调试器。
## 模拟运行脚本
您可以使用 `bin/dry-run.rb` 脚本来模拟依赖项更新任务,并将将要生成的差异打印到终端。它接受两个位置参数:[包管理器](https://docs.github.com/en/code-security/dependabot/dependabot-version-updates/configuration-options-for-the-dependabot.yml-file#package-ecosystem)和 GitHub 仓库名称(包括账户名):
```
$ bin/docker-dev-shell go_modules
=> running docker development shell
$ bin/dry-run.rb go_modules rsc/quote
=> fetching dependency files
=> parsing dependency files
=> updating 2 dependencies
...
```
### 加速模拟运行测试的有用选项
[模拟运行脚本](#dry-run-script)支持许多其他选项,所有这些选项都记录在[脚本源代码的顶部](bin/dry-run.rb)。例如:
1. `LOCAL_GITHUB_ACCESS_TOKEN="fake-GitHub-PAT"` 允许指定一个 [GitHub 个人访问令牌 (PAT)](https://docs.github.com/en/authentication/keeping-your-account-and-data-secure/creating-a-personal-access-token) 以避免触发速率限制。
2. 如果清单文件位于子目录中,则必须使用 `--dir="path/to/subdir/containing/manifest`。
3. `--dep="dep-name-that-I-want-to-test"` 允许指定单个依赖项进行更新尝试,并忽略所有其他依赖项。
4. `--cache=files` 允许在本地缓存远程依赖文件,以便在测试本地逻辑更改时更快地重新运行。
5. `--updater-options=feature_flag_name` 允许传入功能标志。
这是一个将所有这些内容串联起来的示例:
```
LOCAL_GITHUB_ACCESS_TOKEN=github_pat_123_fake_string \
bin/dry-run.rb docker jeffwidman/secrets-store-driver \
--dir "/manifest_staging/charts/secrets-store-provider" \
--cache=files \
--dep="secrets-store" \
--updater-options=kubernetes_updates
```
### 添加调试断点
您可以在 Ruby 代码的任何位置添加 `debugger` 语句,例如:
```
def latest_resolvable_version
debugger
latest_version_finder.latest_version
end
```
当您执行该任务时,Ruby 调试器将会打开。它看起来应该是这样的:
```
[11, 20] in ~/go_modules/lib/dependabot/go_modules/update_checker.rb
11| module GoModules
12| class UpdateChecker < Dependabot::UpdateCheckers::Base
13| require_relative "update_checker/latest_version_finder"
14|
15| def latest_resolvable_version
=> 16| debugger
17| latest_version_finder.latest_version
18| end
19|
20| # This is currently used to short-circuit latest_resolvable_version,
=>#0 Dependabot::GoModules::UpdateChecker#latest_resolvable_version at ~/go_modules/lib/dependabot/go_modules/update_checker.rb:16
#1 Dependabot::GoModules::UpdateChecker#latest_version at ~/go_modules/lib/dependabot/go_modules/update_checker.rb:24
# and 9 frames (use `bt' command for all frames)
(rdbg)
```
在此提示符下,您可以运行[调试器命令](https://github.com/ruby/debug)进行导航,或者输入方法和变量以查看它们包含的内容。尝试输入 `dependency` 查看 Dependabot 当前正在处理的依赖项。
### 调试原生包管理器辅助程序
当您调试问题时,通常需要查看这些在单独进程中运行的脚本的内部情况。
使用 `DEBUG_HELPERS=true` 打印来自原生辅助程序的所有日志语句:
```
DEBUG_HELPERS=true bin/dry-run.rb bundler dependabot/demo --dir="/ruby"
```
使用 `DEBUG_FUNCTION=
` 暂停执行以调试单个原生辅助程序函数。该函数映射到一个原生辅助程序的函数名,例如 `bundler/helpers/v2/lib/functions.rb` 中的一个函数。
当执行此函数时,会插入一个 `debugger`,暂停 `bin/dry-run.rb` 脚本的执行,这会保留当前更新的 `tmp` 目录,允许您 `cd` 进入该目录并直接运行原生辅助程序函数:
```
DEBUG_FUNCTION=parsed_gemfile bin/dry-run.rb bundler dependabot/demo --dir="/ruby"
=> fetching dependency files
=> dumping fetched dependency files: ./dry-run/dependabot/demo/ruby
=> parsing dependency files
$ cd /home/dependabot/dependabot-core/tmp/dependabot_TEMP/ruby && echo "{\"function\":\"parsed_gemfile\",\"args\":{\"gemfile_name\":\"Gemfile\",\"lockfile_name\":\"Gemfile.lock\",\"dir\":\"/home/dependabot/dependabot-core/tmp/dependabot_TEMP/ruby\"}}" | BUNDLER_VERSION=1.17.3 BUNDLE_GEMFILE=/opt/bundler/v1/Gemfile GEM_HOME=/opt/bundler/v1/.bundle bundle exec ruby /opt/bundler/v1/run.rb
```
复制并运行 `cd...` 命令:
```
cd /home/dependabot/dependabot-core/tmp/dependabot_TEMP/ruby && echo "{\"function\":\"parsed_gemfile\",\"args\":{\"gemfile_name\":\"Gemfile\",\"lockfile_name\":\"Gemfile.lock\",\"dir\":\"/home/dependabot/dependabot-core/tmp/dependabot_TEMP/ruby\"}}" | BUNDLER_VERSION=1.17.3 BUNDLE_GEMFILE=/opt/bundler/v1/Gemfile GEM_HOME=/opt/bundler/v1/.bundle bundle exec ruby /opt/bundler/v1/run.rb
```
这应该会输出 `parsed_gemfile` 函数的日志输出:
```
{"result":[{"name":"business","requirement":"~> 1.0.0","groups":["default"],"source":null,"type":"runtime"},{"name":"uk_phone_numbers","requirement":"~> 0.1.0","groups":["default"],"source":null,"type":"runtime"}]}
```
请记住,与 Ruby 源代码的更改不同,您在主机上对原生辅助程序源代码的更改不会同步到开发容器中。因此,您有两种选择来编辑原生辅助程序:
- 您可以直接编辑开发容器内原生辅助程序的临时副本,例如:`vi /opt/bundler/v1/lib/functions/file_parser.rb`。然后重新运行 `cd...` 命令。这是最快的调试方法,但任何更改都不会保存在容器外部。
- 您可以编辑本地副本,然后[重新构建原生辅助程序](#making-changes-to-native-package-manager-helpers)。这需要重新运行模拟运行脚本以使更改生效。
### 调试忽略条件
Dependabot-Core 中的大多数生态系统都支持 `ignore` 条件,允许用户指定要从升级中排除的依赖项名称或版本。GitHub 上的 Dependabot 服务文档[更详细地描述了该功能](https://docs.github.com/en/code-security/dependabot/dependabot-version-updates/configuration-options-for-the-dependabot.yml-file#ignore)。
[Dependabot CLI](#cli-tool) 支持作为任务定义的一部分传入忽略条件。参见[示例](https://github.com/dependabot/cli#scenario-file)。
[模拟运行脚本](#dry-run-script)支持通过环境变量 `IGNORE_CONDITIONS` 传入一个或多个忽略条件:
```
IGNORE_CONDITIONS='[{"dependency-name":"*","update-types": ["version-update:semver-major"]}]' \
bin/dry-run.rb docker test_org/test-dependabot`
```
### 调试安全更新
Dependabot-Core 中的许多生态系统都支持[安全更新](https://docs.github.com/en/code-security/dependabot/dependabot-security-updates/about-dependabot-security-updates)。这是版本更新的一种特殊形式,其中传入了依赖项名称和易受攻击的版本范围。Dependabot-Core 会尝试将该依赖项的任何实例升级到_最低_的非易受攻击版本。这与尝试更新到_最新_版本的普通版本更新形成对比。
环境变量 `SECURITY_ADVISORIES` 允许向[模拟运行脚本](#dry-run-script)传递一个或多个安全警报通知,以模拟安全更新:
```
SECURITY_ADVISORIES='[{"dependency-name":"buffer","patched-versions":[],"unaffected-versions":[],"affected-versions":["<= 2.0.0"]}]' \
bin/dry-run.rb pub dart-lang/pub-dev --dir "/app" --cache=files --dep="buffer"
```
### Visual Studio Code 和 Docker
内置支持利用 Visual Studio Code 在 Docker 容器内[进行调试](https://code.visualstudio.com/docs/devcontainers/containers)的能力。
安装推荐的 [`Dev Containers` 扩展](https://marketplace.visualstudio.com/items?itemName=ms-vscode-remote.remote-containers)后,只需按 `Ctrl+Shift+P`(在 macOS 上为 `⇧⌘P`)并选择 `Dev Containers: Reopen in Container` 即可。
您也可以通过单击编辑器左下角的绿色按钮来访问下拉菜单。
如果您的机器上不存在开发 Docker 镜像,它将自动构建。
完成后,启动 `Debug Dry` 配置 `(F5)`,系统会提示您选择包管理器和仓库来执行模拟运行。
请随意在代码上设置断点。
还支持通过运行 `Debug Tests` 配置 `(F5)` 来调试单个测试运行,系统会提示您选择生态系统并提供 rspec 路径。
⚠️ Remote Containers 扩展的 `Clone Repository ...` 命令目前缺少某些功能,因此不受支持。您必须手动克隆仓库并使用 `Reopen in Container` 或 `Open Folder in Container...` 命令。
## 运行测试
一旦您[启动了特定生态系统的开发环境](#getting-a-development-environment-running),通过在该生态系统的文件夹中运行 `rspec spec` 来执行该生态系统的测试,例如
```
$ cd go_modules
$ rspec spec
```
您还可以将测试限制为您正在处理的文件,或者限制为之前失败的测试,例如:
```
$ rspec spec/dependabot/file_updaters/elixir --only-failures
```
代码风格由 [RuboCop](https://rubocop.org/) 强制执行。要检查风格违规,只需在每个包中运行 `rubocop`,例如
```
$ cd go_modules
$ rubocop
```
## 性能分析
您可以在运行 [dry-run](#dry-run-script) 时通过传入 `--profile` 标志对其进行性能分析,或者使用 `:profile` 标记 `rspec` 测试。
这将在 `tmp/` 文件夹中生成一个 `stackprof-.dump` 文件,您可以通过运行以下命令从中生成火焰图:
```
stackprof --d3-flamegraph tmp/stackprof-.dump > tmp/flamegraph.html
```
# 架构与代码布局
Dependabot-Core 是一组 Ruby 包,其中包含用于更新多种语言依赖项的逻辑。
### `dependabot-common`
`common` 包含所有通用/共享功能。例如,用于为不同受支持的平台创建 pull request 的代码位于此处,大部分处理 Git 依赖项的逻辑(因为大多数语言都以某种方式支持 Git 依赖项)也位于此处。此处还定义了为语言或包管理器实现支持所需的各项主要关注点的基类。
### `dependabot-{package-manager}`
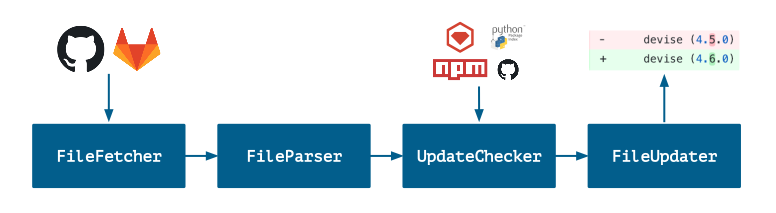
Dependabot 支持的每个包管理器或语言都有一个对应的 gem。至少,这些 gem 中的每一个都将实现以下类:
| 服务 | 描述 |
|------------------|-----------------------------------------------------------------------------------------------|
| `FileFetcher` | 获取项目相关的依赖文件(例如 `Gemfile` 和 `Gemfile.lock`)。有关详细信息,请参阅 [README](common/lib/dependabot/file_fetchers/README.md)。 |
| `FileParser` | 解析依赖文件并提取项目的依赖项列表。有关详细信息,请参阅 [README](common/lib/dependabot/file_parsers/README.md)。 |
| `UpdateChecker` | 检查给定的依赖项是否是最新的。有关详细信息,请参阅 [README](common/lib/dependabot/update_checkers/README.md)。 |
| `FileUpdater` | 更新依赖文件以使用给定依赖项的最新版本。有关详细信息,请参阅 [README](common/lib/dependabot/file_updaters/README.md)。 |
| `MetadataFinder` | 查找有关依赖项的元数据,例如其 GitHub URL。有关详细信息,请参阅 [README](common/lib/dependabot/metadata_finders/README.md)。 |
| `Version` | 描述比较依赖项版本的逻辑。有关示例,请参见 [hex Version 类](hex/lib/dependabot/hex/version.rb)。 |
| `Requirement` | 描述依赖项要求的格式(例如 `>= 1.2.3`)。有关示例,请参见 [hex Requirement 类](hex/lib/dependabot/hex/requirement.rb)。 |
高级流程如下所示:
### `dependabot-omnibus`
这是一个“元”gem,它简单地依赖于所有其他的 gem。如果您想自动包含对所有语言的支持,只需包含此 gem 即可获得所需的一切。
## 私有注册表凭据管理
对于许多生态系统,Dependabot-Core 支持私有注册表。有时,这是通过将私有注册表凭据直接传递给原生包管理器(`npm`、`pip`、`bundler` 等)来实现的;其他时候,这是在 Dependabot-Core 的 Ruby 代码中实现的。
```
sequenceDiagram
Private Registry Credentials->>Dependabot-Core:
Dependabot-Core->>Native Package Managers:
Native Package Managers->>Package Registries:
Dependabot-Core->>Package Registries:
```
虽然这简单直接,但对于允许在其清单文件中运行不受信任代码的生态系统来说,这是一种安全风险。例如,`setup.py` 和 `.gemspec` 允许运行原生的 Python 和 Ruby 代码。如果依赖项树中的某个包被黑客攻击,攻击者可能会推送恶意的清单文件,迫使原生包管理器暴露凭据。
为了防范这一点,对于 GitHub 运行的 Dependabot 服务,我们使用凭据代理对 Dependabot-Core 进行封装,从而使这些私有注册表的密钥永远不会暴露给 Dependabot-Core。
```
sequenceDiagram
Dependabot-Core->>Credentials Proxy: All requests are unauthenticated
Credentials Proxy->>Package Registries: Creds are injected by the Proxy
Note left of Dependabot-Core: The Dependabot Service
that GitHub Runs
Package Registries->>Credentials Proxy: Creds are stripped by the Proxy
Credentials Proxy->>Dependabot-Core: Dependabot-Core never sees private registry credentials
```
这也意味着,如果 Dependabot-Core 出现安全漏洞,这些凭据仍然不会有暴露的风险。
# 商标
本项目可能包含项目、产品或服务的商标或徽标。授权使用 GitHub 的商标或徽标受 [GitHub Logos and Usage](https://github.com/logos) 的约束并必须遵循其规定。在本项目的修改版本中使用 GitHub 的商标或徽标不得引起混淆或暗示 GitHub 的赞助。任何第三方商标或徽标的使用均受该第三方政策的约束。
# 历史
Dependabot 和 dependabot-core 最初以 [Bump](https://github.com/gocardless/bump) 和 [Bump Core](https://github.com/gocardless/bump-core) 的名义起步,当时 @hmarr 和 @greysteil 还在 [GoCardless](https://gocardless.com) 工作。
Dependabot 于 2019 年成为 GitHub 的一部分!
# 项目维护者注意事项
:book: 发布指南
通过运行 [`Gems - Bump Version`](https://github.com/dependabot/dependabot-core/actions/workflows/gems-bump-version.yml) 工作流并按照作业摘要上的说明进行操作,将新版本发布到 RubyGems。
简而言之,流程将是:
1. 运行该操作以生成版本升级 PR。
2. 合并该 PR。
3. 使用 `v1.2.3` 格式将该合并提交标记为新版本。作业摘要包含一个 URL,该 URL 已预先填充了正确的标题和标签版本。
4. 一旦标记了版本,另一个 GitHub Action 工作流就会自动将其推送到 RubyGems。
标签:DevSecOps, SOC Prime, 上游代理, 依赖管理, 开发工具, 网络调试, 自动化, 请求拦截