自托管的事件管理工具,通过 AI SRE Agent 学习日志正常模式并自动发现异常创建事件,同时支持 Webhook 告警接入、多渠道通知和 On-Call 升级。


Versus Incident 是自托管的 AI SRE agent。 它会学习您的日志
通常的模样,并且只上报新的或意外的问题——将其路由到您的聊天频道和
on-call 平台。
采用 MIT 许可证免费 · 按监控的服务定价,永不按人头收费 ·
定价
## Versus 如何创建 Incident
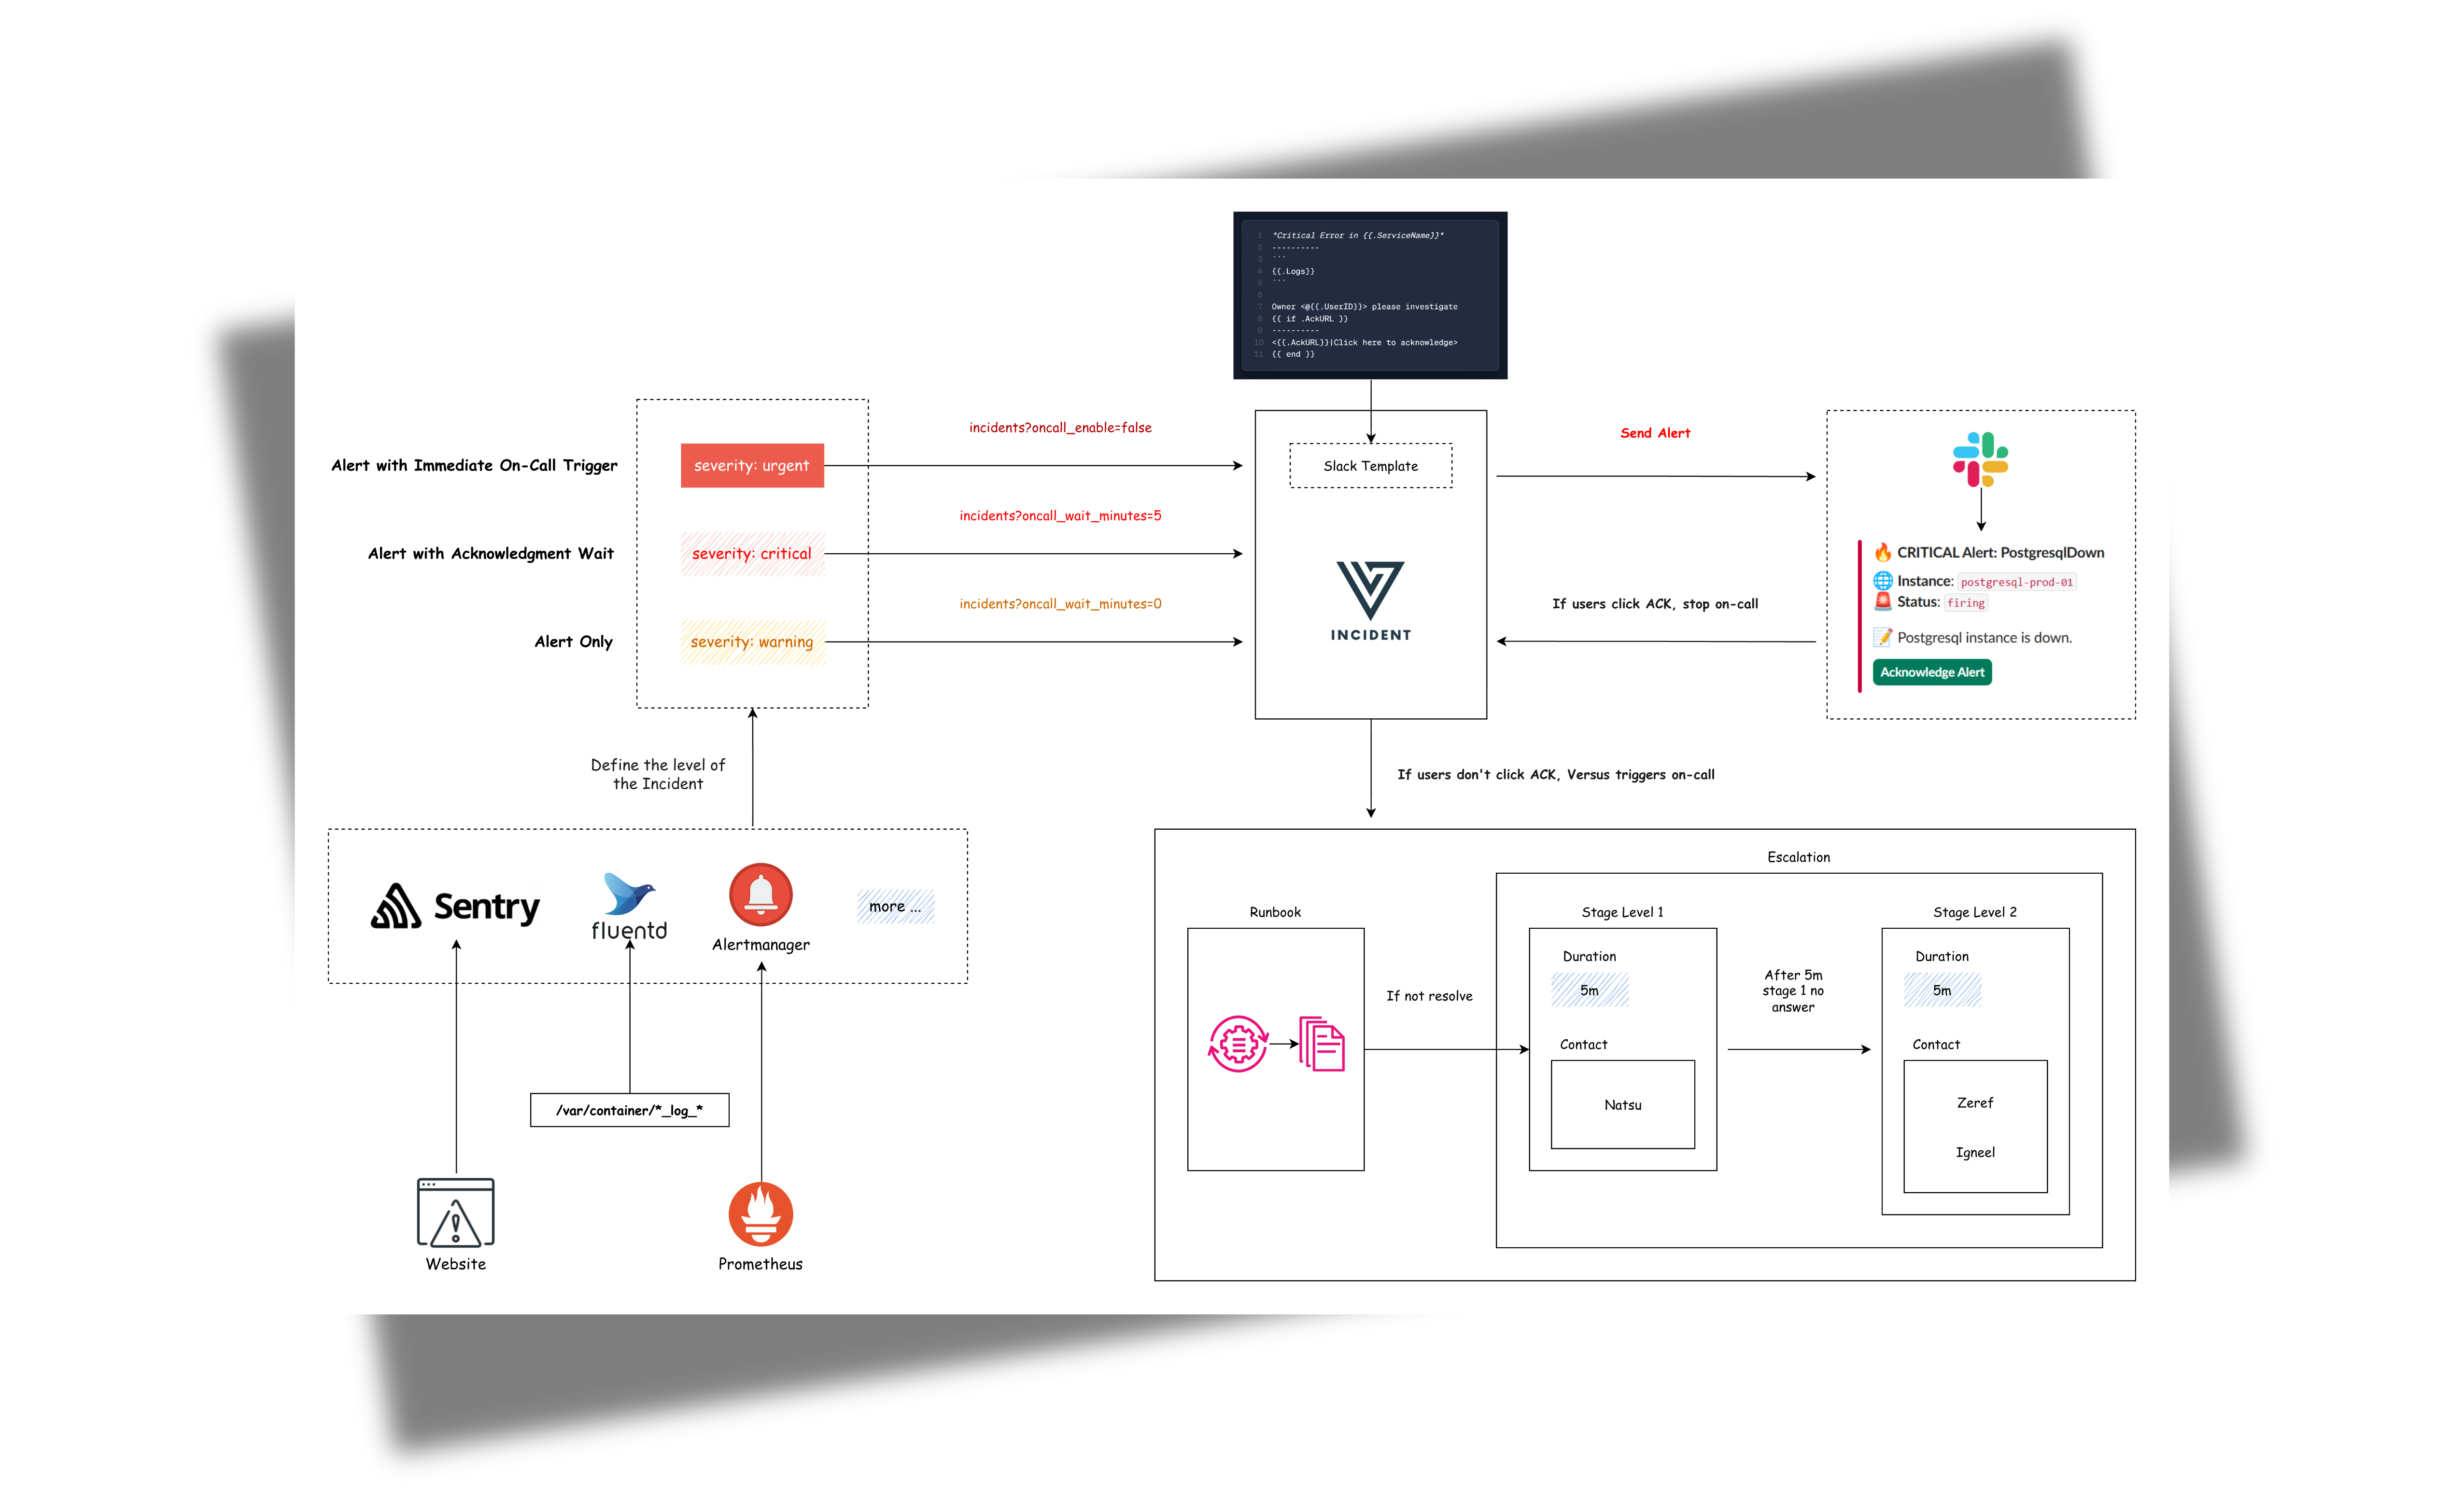
Incident 通过两种方式到达 Versus,并且两者都由相同的通知、模板和 on-call 逻辑处理:
- **AI SRE Agent(自动检测)** — 将 agent 指向您的日志,它会学习您的正常模式,然后在出现全新的错误或异常时自动发起 incident。无需维护告警规则。
- **Webhook 告警(您自定义)** — 任何可以 POST webhook 的工具(Alertmanager、Grafana、Sentry、CloudWatch SNS、FluentBit 或您自己的脚本)都可以将 incident 直接发送到 Versus,并使用您自己的模板进行格式化。
无论由哪个源发起,incident 都会被模板化,分发到您启用的每个频道,并且如果未被及时确认,将被上报给 on-call。
## 功能
- 🤖 **AI SRE Agent** *(Beta)*:一个 AI agent,它可以读取您的日志,学习正常的情况,并且只有在出现新的意外情况时才会自动打开 incident。
- 🌐 **Webhook 告警**:接收来自任何可以 POST webhook 的工具的 incident — Alertmanager、Grafana、Sentry、CloudWatch SNS、FluentBit 等。
- 🚨 **多渠道通知**:将每个 incident 分发到 Slack、Microsoft Teams、Telegram、Viber、Email 和 Lark(更多频道即将推出!)
- 📝 **自定义模板**:使用 Go 模板定义您自己的告警消息
- 🔧 **易于配置**:基于 YAML 的配置,支持环境变量
- 📡 **REST API**:用于接收告警的简单 HTTP 接口
- 📞 **On-Call**:On-Call 集成(PagerDuty、Opsgenie、incident.io、ServiceNow)
## 目录
- [入门指南](#get-started)
- [AI Agent](#ai-agent)
- [Webhook 告警](#webhook-alerts)
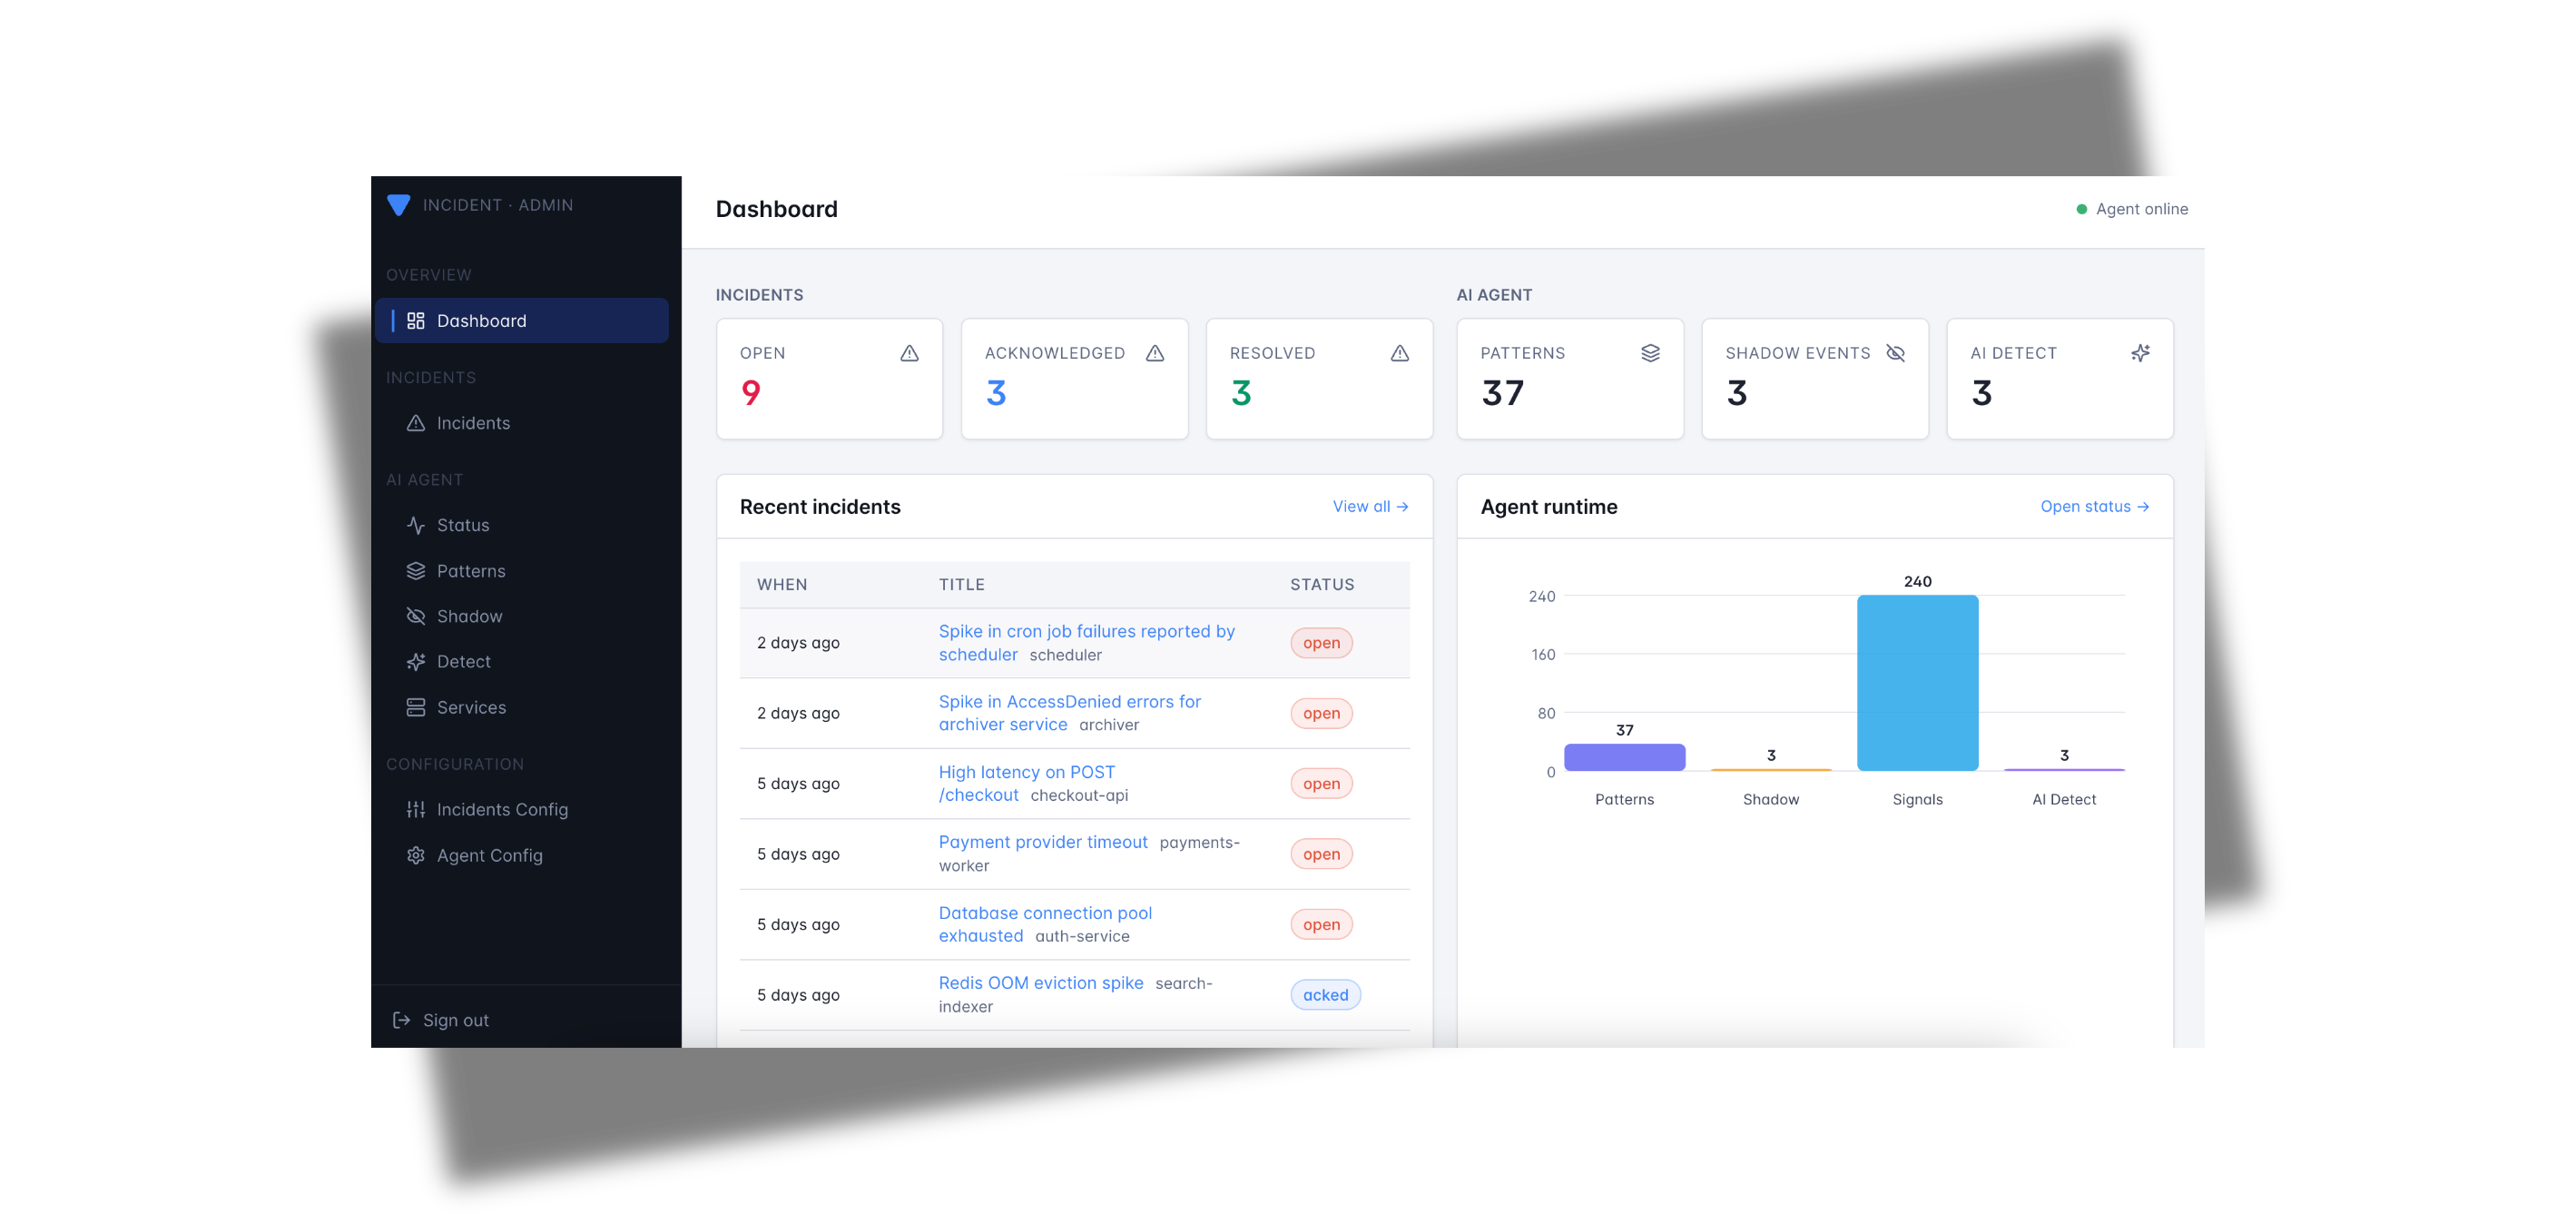
- [Admin Dashboard](https://docs.versusincident.com/#/configuration/admin-ui)
- [开发自定义模板](#development-custom-templates)
- [On-Call](#on-call)
- [配置](#complete-configuration)
- [路线图](#roadmap)
- [贡献](#contributing)
- [许可证](#license)
## 开始使用
### 使用 AI SRE Agent 自动检测 incident
让 agent 学习您的日志并浮现出新内容。AI SRE Agent 有三种模式:
- **`training`** — 只是观察和学习。无告警。
- **`shadow`** — 观察和学习,加上每次有一行日志
本来会触发告警时,都会写入一条“本应该告警”的
日志条目。依然
没有真正的告警。适合在
正式上线前检查 agent 的判断。
- **`detect`** — 真正为 agent 以前
从未见过的行创建 incident。AI SRE 会对每一个进行分类(triage),并编写
摘要、严重性和建议的后续步骤,然后 incident
才会被发送到每个配置的频道。
从 **training mode** 开始 — 它只会观察和学习,并且在您准备好之前绝不会发送告警。
```
# Redis 用于记录 agent 在每个日志源中中断的位置。
docker run -d --name versus-redis -p 6379:6379 redis:7
docker run -p 3000:3000 \
-e GATEWAY_SECRET=change-me \
-e AGENT_ENABLE=true \
-e AGENT_MODE=training \
-e REDIS_HOST=host.docker.internal \
-e REDIS_PORT=6379 \
-v $(pwd)/config:/app/config \
-v $(pwd)/data:/app/data \
ghcr.io/versuscontrol/versus-incident
```
agent 需要一个指向您的日志的 `config.yaml` 和 `agent_sources.yaml`。一旦它运行起来,在
的 **admin dashboard** 上查看它学习的模式,然后在您信任它时,将 `AGENT_MODE` 从 `training` 切换为 `shadow`,再切换为 `detect`。
完整的演练(带有可直接复制的配置和示例日志生成器):[AI Agent — 入门指南](https://docs.versusincident.com/#/agent/getting-started)。
### 从您现有的工具转发告警
已经有监控了?运行 Versus 并将您的告警 POST 到它的 webhook endpoint。
```
docker run -p 3000:3000 \
-e GATEWAY_SECRET=change-me \
-e SLACK_ENABLE=true \
-e SLACK_TOKEN=your_token \
-e SLACK_CHANNEL_ID=your_channel \
ghcr.io/versuscontrol/versus-incident
```
Versus 默认监听 3000 端口并公开:
- `POST /api/incidents` — 用于监控工具的 webhook endpoint。
- `GET /` — 嵌入的 **admin dashboard**,在您的浏览器中打开
。有关完整的 UI 演练和构建/监听脚本,请参见 [Admin Dashboard](https://docs.versusincident.com/#/configuration/admin-ui)。
## AI Agent
**AI SRE agent** 是 Versus 与众不同的地方:将其指向您的日志,它就会学习什么是*正常*的,然后在出现全新的错误或异常的那一刻自动打开 incident——无需维护告警规则。
带有 agent 功能的配置示例:
```
name: versus
host: 0.0.0.0
port: 3000
# ... 现有的 alert 配置 ...
# 所有 admin endpoint(`/api/admin/*` 和
# `/api/agent/*`)所需的 Shared secret。由客户端通过 `X-Gateway-Secret` header 发送。
gateway_secret: ${GATEWAY_SECRET}
# Pattern catalog、shadow log 和 incident
# history 的 Storage backend。目前仅实现了 `file`;`redis` 和 `database`
# 是配置存根。
storage:
type: file # file | redis | database (env: STORAGE_TYPE)
file:
max_incidents: 1000 # rolling cap on persisted incidents
agent:
enable: false # Use this to enable or disable the agent for all sources
mode: training # Valid values: "training", "shadow", or "detect"
poll_interval: 30s
# Sources are kept in a separate file so they can be managed independently
# (e.g. swap fixtures, per-environment lists). Path is resolved relative to
# this config file. Override via env: AGENT_SOURCES_PATH.
sources_path: ./agent_sources.yaml
catalog:
persist_interval: 30s
auto_promote_after: 100 # In detect mode, this many sightings = "known"
redaction:
enable: true
redact_ips: false
extra_patterns: # Optional: extra regex rules to scrub before clustering
- "(?i)password=\\S+"
- "Authorization:\\s*Bearer\\s+\\S+"
miner:
similarity_threshold: 0.4
tree_depth: 4
max_children: 100
regex:
# Optional: tag any signal whose message matches this pattern
# if none of the named rules below hit. Leave empty to disable.
default_pattern: "(?i)error|exception|fatal|panic"
# Named rules are tried first, in order. The first match wins.
rules:
- name: oom
pattern: "(?i)out of memory|OOMKilled|java\\.lang\\.OutOfMemoryError"
- name: db-timeout
pattern: "(?i)(connection|query) timeout|deadlock detected"
- name: auth-failure
pattern: "(?i)401 unauthorized|invalid credentials|permission denied"
redis: # Required for the agent to persist source cursors across restarts
host: ${REDIS_HOST}
port: ${REDIS_PORT}
password: ${REDIS_PASSWORD}
db: 0
```
**说明:**
`agent` 部分包括:
1. `enable`:打开或关闭 agent(默认值:`false`)。禁用时,不会运行任何额外的内容——没有后台进程,也不会写入额外的文件。
2. `mode`:agent 在学习了您的日志模式之后的行为方式:
- `training`:仅观察——agent 学习模式并保存它们,但不发送告警。
- `shadow`:与 training 相同,但每次本应该发送告警时也会记录一条日志。适合在正式上线前进行审查。
- `detect`:agent 会主动为其以前从未见过的任何模式发送告警。
3. `poll_interval`:agent 检查您的日志源是否有新条目的频率。
4. `catalog`:agent 存储已知模式列表的位置以及写入更新的频率。`mode` 选择存储后端——目前仅支持 `file`,它会写入到 `data/patterns.json`(文件名和目录是固定的)。
5. `redaction`:在 agent 处理之前,自动从日志中删除敏感信息(密码、token、电子邮件等)的规则。
6. `miner`:控制 agent 将相似日志行进行分组的激进程度。默认值适用于大多数设置。
7. `regex`:作为 agent 的**前置过滤器**。只有消息至少匹配一条规则(`rules` 下的命名条目或 `default_pattern`)的信号才会被转发到 pattern miner 并存储在 catalog 中。任何不匹配的内容都会在聚类之前被丢弃,因此无聊的噪音(200-OK 请求、debug 行等)永远不会使 `patterns.json` 膨胀。
- 命名的 `rules` 会按顺序尝试;第一个匹配的规则获胜,并使用该 `name` 标记信号(作为 `rule_name` 存储在 pattern 上)。
- 如果没有命中任何命名规则,则会尝试 `default_pattern`。那里的匹配项会被标记为 `name=default`。
- **要从每一行中学习,请设置 `default_pattern: ".*"`。** 这在您还不知道什么是令人感兴趣的早期训练中非常有用。
- **要进行严格过滤,请设置 `default_pattern: ""`(空)** 并依赖于您的命名规则——任何不匹配明确规则的内容都会被丢弃。
8. `sources_path`:指向一个单独的 YAML 文件的路径,该文件列出了 agent 应该读取的日志源。将源保存在它们自己的文件中,可以更容易地管理每个环境的源列表或在不影响其余配置的情况下替换 fixtures。该路径是相对于主配置文件解析的。通过 `AGENT_SOURCES_PATH` 环境变量覆盖。
源文件(默认为 `./agent_sources.yaml`)具有一个顶级的 `sources:` 列表。每个条目都需要 `name`、`type`(`file` 或 `elasticsearch`)、`enable`,以及一个匹配的 `file:` 或 `elasticsearch:` 块。示例:
```
sources:
- name: prod-app
type: elasticsearch
enable: true
elasticsearch:
addresses:
- https://es.example.internal:9200
username: ${ES_USERNAME}
password: ${ES_PASSWORD}
index: "logs-app-*"
time_field: "@timestamp"
query: 'log.level:(error OR warn)'
message_field: message
page_size: 500
- name: sample-app
type: file
enable: true
file:
path: ./local/resource/sample-app.log
format: text
from_beginning: true
```
当 `agent.enable` 为 `true` 时,必须配置 `redis` 部分。Redis 用于记住 agent 在每个日志源中停下的位置,以便它在重启后可以从正确的位置继续处理。
有关集成的详细信息,请参阅此处的文档:[启用 AI Agent](https://docs.versusincident.com/#/agent/agent-introduction)。
## Webhook 告警
已经在使用其他监控工具了?Versus 还可以接受来自任何可以向 `/api/incidents` POST JSON 的实体的 incident,因此您可以通过相同的渠道、模板和 on-call 路由现有的告警。
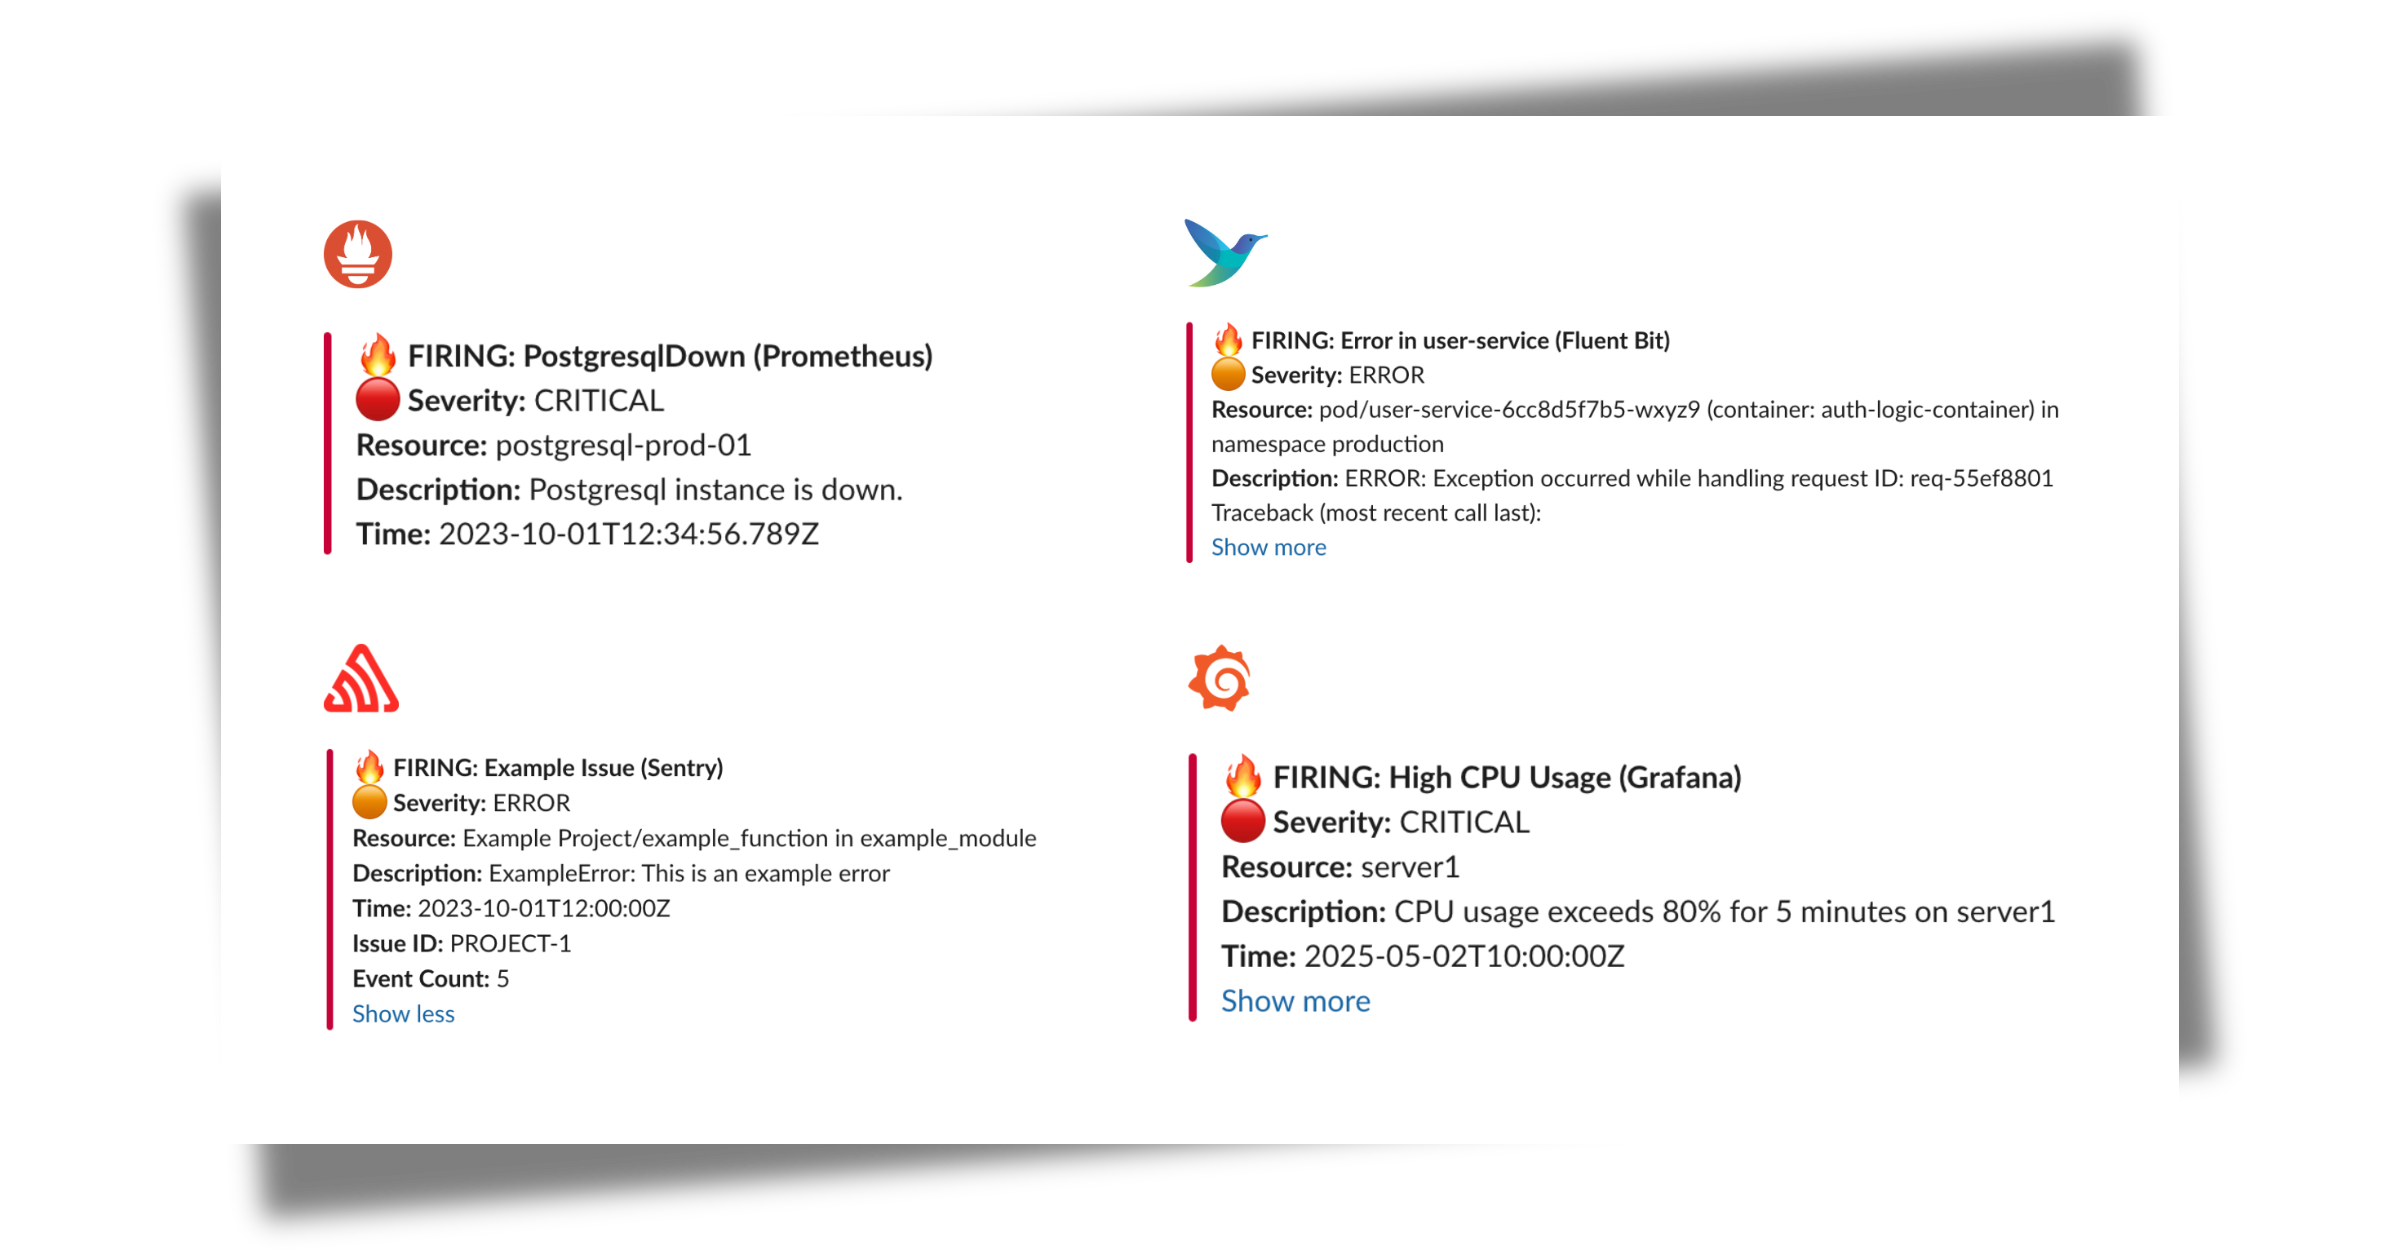
### 通用告警模板支持
我们的默认模板(Slack、Telegram)会自动处理来自多个来源的告警,包括:
- Alertmanager (Prometheus)
- Grafana Alerts
- Sentry
- CloudWatch SNS
- FluentBit
#### Alertmanager 发送的 JSON Payload 示例
```
curl -X POST "http://localhost:3000/api/incidents" \
-H "Content-Type: application/json" \
-d '{
"receiver": "webhook-incident",
"status": "firing",
"alerts": [
{
"status": "firing",
"labels": {
"alertname": "PostgresqlDown",
"instance": "postgresql-prod-01",
"severity": "critical"
},
"annotations": {
"summary": "Postgresql down (instance postgresql-prod-01)",
"description": "Postgresql instance is down."
},
"startsAt": "2023-10-01T12:34:56.789Z",
"endsAt": "2023-10-01T12:44:56.789Z",
"generatorURL": ""
}
],
"groupLabels": {
"alertname": "PostgresqlDown"
},
"commonLabels": {
"alertname": "PostgresqlDown",
"severity": "critical",
"instance": "postgresql-prod-01"
},
"commonAnnotations": {
"summary": "Postgresql down (instance postgresql-prod-01)",
"description": "Postgresql instance is down."
},
"externalURL": ""
}'
```
#### Sentry 发送的 JSON Payload 示例
```
curl -X POST "http://localhost:3000/api/incidents" \
-H "Content-Type: application/json" \
-d '{
"action": "created",
"data": {
"issue": {
"id": "123456",
"title": "Example Issue",
"culprit": "example_function in example_module",
"shortId": "PROJECT-1",
"project": {
"id": "1",
"name": "Example Project",
"slug": "example-project"
},
"metadata": {
"type": "ExampleError",
"value": "This is an example error"
},
"status": "unresolved",
"level": "error",
"firstSeen": "2023-10-01T12:00:00Z",
"lastSeen": "2023-10-01T12:05:00Z",
"count": 5,
"userCount": 3
}
},
"installation": {
"uuid": "installation-uuid"
},
"actor": {
"type": "user",
"id": "789",
"name": "John Doe"
}
}'
```
**结果:**
## 开发自定义模板
有关自定义模板,请参见[开发自定义模板](https://docs.versusincident.com/#/webhook/getting-started?id=development-custom-templates)
## Kubernetes
有关完整的 `Deployment` + `Service` + `PersistentVolumeClaim`
清单(带有 admin dashboard 所需的持久化数据卷),
请参见[在 Kubernetes 上部署](https://docs.versusincident.com/#/configuration/kubernetes)。
## Helm Chart
有关打包安装,请参见 [Helm Chart](https://docs.versusincident.com/#/configuration/helm)
或位于 [helm/versus-incident](https://github.com/VersusControl/versus-incident/blob/main/helm/versus-incident) 下的 chart 源码。
## On-Call
Versus 支持与 AWS Incident Manager 和 PagerDuty 的 on-call 集成。更新后的带有 on-call 功能的配置示例:
```
name: versus
host: 0.0.0.0
port: 3000
public_host: https://your-ack-host.example # Required for on-call ack
# ... 现有的 alert 配置 ...
oncall:
### Enable overriding using query parameters
# /api/incidents?oncall_enable=false => Set to `true` or `false` to enable or disable on-call for a specific alert
# /api/incidents?oncall_wait_minutes=0 => Set the number of minutes to wait for acknowledgment before triggering on-call. Set to `0` to trigger immediately
initialized_only: true # Initialize on-call feature but don't enable by default; use query param oncall_enable=true to enable for specific requests
enable: false # Use this to enable or disable on-call for all alerts
wait_minutes: 3 # If you set it to 0, it means there's no need to check for an acknowledgment, and the on-call will trigger immediately
provider: aws_incident_manager # Valid values: "aws_incident_manager" or "pagerduty"
aws_incident_manager: # Used when provider is "aws_incident_manager"
response_plan_arn: ${AWS_INCIDENT_MANAGER_RESPONSE_PLAN_ARN}
other_response_plan_arns: # Optional: Enable overriding the default response plan ARN using query parameters, eg /api/incidents?awsim_other_response_plan=prod
prod: ${AWS_INCIDENT_MANAGER_OTHER_RESPONSE_PLAN_ARN_PROD}
dev: ${AWS_INCIDENT_MANAGER_OTHER_RESPONSE_PLAN_ARN_DEV}
staging: ${AWS_INCIDENT_MANAGER_OTHER_RESPONSE_PLAN_ARN_STAGING}
pagerduty: # Used when provider is "pagerduty"
routing_key: ${PAGERDUTY_ROUTING_KEY} # Integration/Routing key for Events API v2 (REQUIRED)
other_routing_keys: # Optional: Enable overriding the default routing key using query parameters, eg /api/incidents?pagerduty_other_routing_key=infra
infra: ${PAGERDUTY_OTHER_ROUTING_KEY_INFRA}
app: ${PAGERDUTY_OTHER_ROUTING_KEY_APP}
db: ${PAGERDUTY_OTHER_ROUTING_KEY_DB}
redis: # Required for on-call functionality
insecure_skip_verify: true # dev only
host: ${REDIS_HOST}
port: ${REDIS_PORT}
password: ${REDIS_PASSWORD}
db: 0
```
**说明:**
`oncall` 部分包括:
1. `enable`:一个布尔值,用于为所有 incident 切换 on-call 功能(默认值:`false`)。
2. `initialized_only`:初始化 on-call 功能,但默认保持禁用状态。当设置为 `true` 时,仅针对在 URL 中明确包含 `?oncall_enable=true` 的请求触发 on-call。这适用于准备好 on-call 但不打算为所有告警都启用它的情况。
3. `wait_minutes`:在升级之前等待确认的时间(以分钟为单位)(默认值:`3`)。将其设置为 `0` 会立即触发 on-call。
4. `provider`:指定要使用哪个 on-call provider("aws_incident_manager" 或 "pagerduty")。
5. `aws_incident_manager`:当其作为选定的 provider 时,用于 AWS Incident Manager 的配置,包括 `response_plan_arn` 和 `other_response_plan_arns`。
6. `pagerduty`:当其作为选定的 provider 时,用于 PagerDuty 的配置,包括路由密钥(routing keys)。
当 `oncall.enable` 或 `oncall.initialized_only` 为 true 时,必须配置 redis 部分。它配置用于状态管理或排队的 Redis 实例,包含 host、port、password 和 db 等设置。
有关集成的详细信息,请参阅此处的文档:[使用 Versus 设置 On-Call](https://docs.versusincident.com/#/oncall/on-call-introduction)。
## 完整配置
示例配置文件位于 `config/config.yaml`:
```
name: versus
host: 0.0.0.0
port: 3000
public_host: https://your-ack-host.example # Required for on-call ack
# Proxy 配置(全局设置)
# 当您的网络阻止访问 Telegram、Viber 或 Lark 等消息服务时,请使用此选项
proxy:
url: ${PROXY_URL} # HTTP/HTTPS/SOCKS5 proxy URL (e.g., http://proxy.example.com:8080)
username: ${PROXY_USERNAME} # Optional proxy username for authenticated proxies
password: ${PROXY_PASSWORD} # Optional proxy password for authenticated proxies
alert:
debug_body: true # Default value, will be overridden by DEBUG_BODY env var
slack:
enable: false # Default value, will be overridden by SLACK_ENABLE env var
token: ${SLACK_TOKEN} # From environment
channel_id: ${SLACK_CHANNEL_ID} # From environment
template_path: "config/slack_message.tmpl"
message_properties:
button_text: "Acknowledge Alert" # Custom text for the acknowledgment button
button_style: "primary" # Button style: "primary" (default blue), "danger" (red), or empty for default gray
disable_button: false # Set to true to disable the button, if you want to handle acknowledgment differently
telegram:
enable: false # Default value, will be overridden by TELEGRAM_ENABLE env var
bot_token: ${TELEGRAM_BOT_TOKEN} # From environment
chat_id: ${TELEGRAM_CHAT_ID} # From environment
template_path: "config/telegram_message.tmpl"
use_proxy: false # Set to true to use global proxy settings for Telegram API calls
viber:
enable: false # Default value, will be overridden by VIBER_ENABLE env var
bot_token: ${VIBER_BOT_TOKEN} # From environment (token for bot or channel)
api_type: ${VIBER_API_TYPE} # From environment - "channel" (default) or "bot"
# Channel API (recommended for incident management)
channel_id: ${VIBER_CHANNEL_ID} # From environment (required for channel API)
# Bot API (for individual user notifications)
user_id: ${VIBER_USER_ID} # From environment (required for bot API)
template_path: "config/viber_message.tmpl"
use_proxy: false # Set to true to use global proxy settings for Viber API calls
email:
enable: false # Default value, will be overridden by EMAIL_ENABLE env var
smtp_host: ${SMTP_HOST} # From environment
smtp_port: ${SMTP_PORT} # From environment
username: ${SMTP_USERNAME} # From environment
password: ${SMTP_PASSWORD} # From environment
to: ${EMAIL_TO} # From environment, can contain multiple comma-separated email addresses
subject: ${EMAIL_SUBJECT} # From environment
template_path: "config/email_message.tmpl"
msteams:
enable: false # Default value, will be overridden by MSTEAMS_ENABLE env var
power_automate_url: ${MSTEAMS_POWER_AUTOMATE_URL} # Automatically works with both Power Automate workflow URLs and legacy Office 365 webhooks
template_path: "config/msteams_message.tmpl"
other_power_urls: # Optional: Define additional Power Automate URLs for multiple MS Teams channels
qc: ${MSTEAMS_OTHER_POWER_URL_QC} # Power Automate URL for QC team
ops: ${MSTEAMS_OTHER_POWER_URL_OPS} # Power Automate URL for Ops team
dev: ${MSTEAMS_OTHER_POWER_URL_DEV} # Power Automate URL for Dev team
lark:
enable: false # Default value, will be overridden by LARK_ENABLE env var
webhook_url: ${LARK_WEBHOOK_URL} # Lark webhook URL (required)
template_path: "config/lark_message.tmpl"
use_proxy: false # Set to true to use global proxy settings for Lark API calls
other_webhook_urls: # Optional: Enable overriding the default webhook URL using query parameters, eg /api/incidents?lark_other_webhook_url=dev
dev: ${LARK_OTHER_WEBHOOK_URL_DEV}
prod: ${LARK_OTHER_WEBHOOK_URL_PROD}
queue:
enable: true
debug_body: true
# AWS SNS
sns:
enable: false
https_endpoint_subscription_path: /sns # URI to receive SNS messages, e.g. ${host}:${port}/sns or ${https_endpoint_subscription}/sns
# Options If you want to automatically create an sns subscription
https_endpoint_subscription: ${SNS_HTTPS_ENDPOINT_SUBSCRIPTION} # If the user configures an HTTPS endpoint, then an SNS subscription will be automatically created, e.g. https://your-domain.com
topic_arn: ${SNS_TOPIC_ARN}
# AWS SQS
sqs:
enable: false
queue_url: ${SQS_QUEUE_URL}
# GCP Pub Sub
pubsub:
enable: false
# Azure Event Bus
azbus:
enable: false
oncall:
### Enable overriding using query parameters
# /api/incidents?oncall_enable=false => Set to `true` or `false` to enable or disable on-call for a specific alert
# /api/incidents?oncall_wait_minutes=0 => Set the number of minutes to wait for acknowledgment before triggering on-call. Set to `0` to trigger immediately
initialized_only: false # Initialize on-call feature but don't enable by default; use query param oncall_enable=true to enable for specific requests
enable: false # Use this to enable or disable on-call for all alerts
wait_minutes: 3 # If you set it to 0, it means there's no need to check for an acknowledgment, and the on-call will trigger immediately
provider: aws_incident_manager # Valid values: "aws_incident_manager" or "pagerduty"
aws_incident_manager: # Used when provider is "aws_incident_manager"
response_plan_arn: ${AWS_INCIDENT_MANAGER_RESPONSE_PLAN_ARN}
other_response_plan_arns: # Optional: Enable overriding the default response plan ARN using query parameters, eg /api/incidents?awsim_other_response_plan=prod
prod: ${AWS_INCIDENT_MANAGER_OTHER_RESPONSE_PLAN_ARN_PROD}
dev: ${AWS_INCIDENT_MANAGER_OTHER_RESPONSE_PLAN_ARN_DEV}
staging: ${AWS_INCIDENT_MANAGER_OTHER_RESPONSE_PLAN_ARN_STAGING}
pagerduty: # Used when provider is "pagerduty"
routing_key: ${PAGERDUTY_ROUTING_KEY} # Integration/Routing key for Events API v2 (REQUIRED)
other_routing_keys: # Optional: Enable overriding the default routing key using query parameters, eg /api/incidents?pagerduty_other_routing_key=infra
infra: ${PAGERDUTY_OTHER_ROUTING_KEY_INFRA}
app: ${PAGERDUTY_OTHER_ROUTING_KEY_APP}
db: ${PAGERDUTY_OTHER_ROUTING_KEY_DB}
redis: # Required for on-call functionality
insecure_skip_verify: true # dev only
host: ${REDIS_HOST}
port: ${REDIS_PORT}
password: ${REDIS_PASSWORD}
db: 0
# -----------------------------------------------------------------------------
# AI agent 模式(training | shadow | detect)— opt-in。
# # 当 agent.enable=false(默认值)时,没有任何变化:不会启动 goroutines,
# 不会加载新的依赖项,也不会创建 Redis 键。
# # 推荐的 rollout:
# 1:mode=training,通过 /api/agent/patterns 审查 catalog
# 2:mode=shadow,审查日志行 `agent[shadow]: would alert ...`
# 3:mode=detect(AI 发射将在后续的 milestone 中交付)
# # -----------------------------------------------------------------------------
agent:
enable: false # master switch (env: AGENT_ENABLE)
mode: training # training | shadow | detect (env: AGENT_MODE)
poll_interval: 30s # how often each source is pulled
lookback: 5m # initial backfill window on startup
batch_max: 1000 # safety cap per tick
signal_max_bytes: 8192 # cap on Signal.Raw
# Signal sources are kept in a separate file so users can manage them
# independently of the main config. Path is resolved relative to this
# config file. Override via env: AGENT_SOURCES_PATH.
sources_path: ./agent_sources.yaml
redaction:
enable: true
redact_ips: false # IPs are usually useful context; opt-in
extra_patterns:
- "(?i)password=\\S+"
- "Authorization:\\s*Bearer\\s+\\S+"
catalog:
persist_interval: 30s
auto_promote_after: 100 # in detect mode, this many sightings = "known"
miner:
similarity_threshold: 0.4
tree_depth: 4
max_children: 100
regex:
# Set to ".*" to train on every line; leave empty to require
# an explicit named rule match.
default_pattern: "(?i).*error.*"
rules:
- name: oom-killer
pattern: "Out of memory: Killed process"
- name: panic
pattern: "(?i)panic:"
- name: 5xx-burst
pattern: "HTTP/[0-9.]+\\s+5\\d\\d"
```
**有关详细的配置,请参见[详细配置](https://docs.versusincident.com/#/configuration/configuration)**
## 路线图
请参见 [ROADMAP.md](ROADMAP.md) 获取已发布功能、正在进行的工作和计划阶段(更多日志源、指标、traces、跨信号关联)的完整列表。
## 贡献
欢迎您的贡献。请阅读 [CONTRIBUTING.md](CONTRIBUTING.md)
以了解开发设置、编码标准和 PR 流程,并在报告漏洞之前查阅
[行为准则](CODE_OF_CONDUCT.md) 和 [安全政策](SECURITY.md)。
项目治理记录在 [GOVERNANCE.md](GOVERNANCE.md) 中。
## 许可证
采用 MIT 许可证分发。更多信息请参见 `LICENSE`。