malwarekid/SOAR-Flow
GitHub: malwarekid/SOAR-Flow
Stars: 132 | Forks: 33
# 🚀 SOAR-Flow
## 📌 项目描述
本项目演示了如何集成 **Shuffle SOAR**、**Wazuh SIEM** 和 **TheHive** 以实现自动化的事件响应。
✅ **接收**来自 Wazuh 的安全告警。
✅ 使用外部威胁情报(VirusTotal, AbuseIPDB)**丰富告警信息**。
✅ 在 TheHive 中**创建事件**以进行案例管理。
✅ 向 Discord 频道**发送通知**。
✅ **(附加功能)** 自动缓解威胁(例如,拦截恶意 IP)。
通过实施此 SOAR 工作流,您可以**自动化安全运营**,缩短响应时间,并提高 **SOC 环境**中的效率。
## 🔧 使用的工具
| 工具 | 描述 |
|----------------|------------|
| **Wazuh SIEM** | 用于威胁检测的安全信息与事件管理 (SIEM) 解决方案。 |
| **TheHive** | 开源安全事件响应平台 (SIRP)。 |
| **Shuffle** | 开源安全编排、自动化与响应 (SOAR) 平台。 |
| **VirusTotal API** | 用于恶意软件和 URL 信誉检查。 |
| **AbuseIPDB API** | 用于检查 IP 地址是否为恶意地址。 |
| **Discord Webhook** | 向 Discord 频道发送告警以进行实时监控。 |
## 🛠️ 安装与设置
### VM-1 用于 Wazuh 和 TheHive
**配置规格**
- **RAM:** 12GB+
- **HDD:** 60GB+
- **OS:** Ubuntu 24.04 LTS
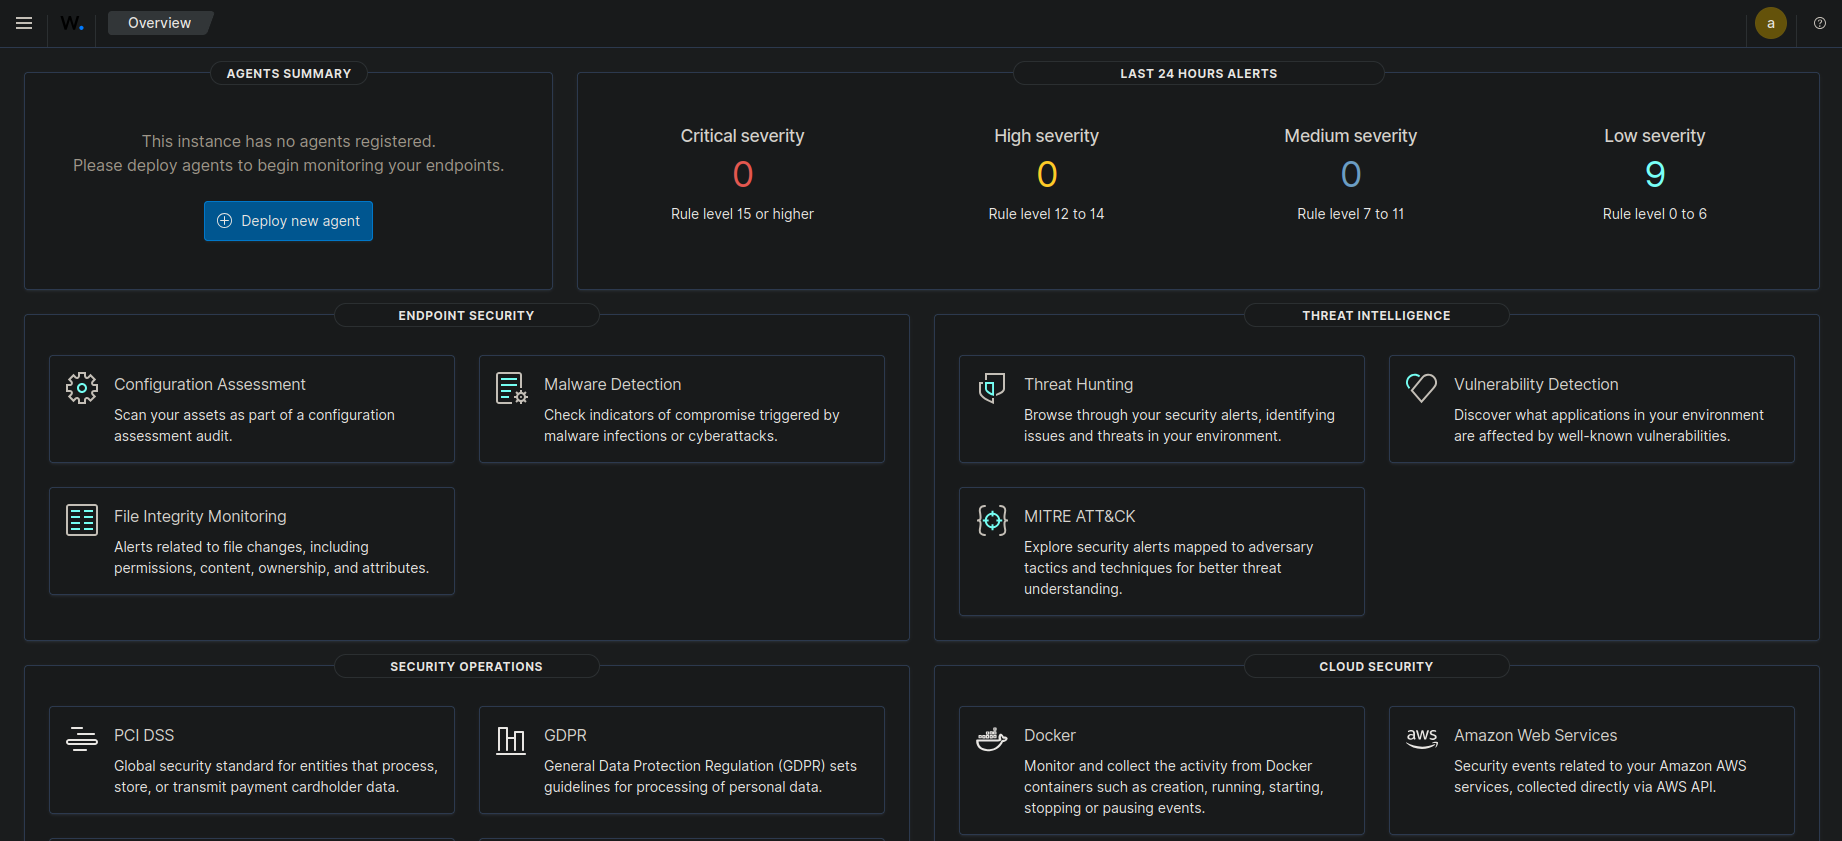
### **1️⃣ 安装 Wazuh SIEM**
请遵循官方 Wazuh 安装指南:
🔗 [Wazuh 安装指南](https://documentation.wazuh.com/current/installation-guide/index.html)
1. **更新和升级系统:**
apt-get update && apt-get upgrade
2. **安装 Wazuh 4.10:**
curl -sO https://packages.wazuh.com/4.10/wazuh-install.sh && sudo bash ./wazuh-install.sh -a
3. **解压 Wazuh 凭证:**
sudo tar -xvf wazuh-install-files.tar
4. **Wazuh Dashboard 凭证:**
- **User:** admin
- **Password:** ***************
5. **访问 Wazuh Dashboard:**
- 打开浏览器并访问:`https://`
### **2️⃣ 安装 TheHive**
请遵循官方 TheHive 安装文档:
🔗 [TheHive 安装指南](https://docs.strangebee.com/thehive/installation/)
1. **安装依赖项:**
apt install wget gnupg apt-transport-https git ca-certificates ca-certificates-java curl software-properties-common python3-pip lsb-release
2. **安装 Java:**
wget -qO- https://apt.corretto.aws/corretto.key | sudo gpg --dearmor -o /usr/share/keyrings/corretto.gpg
echo "deb [signed-by=/usr/share/keyrings/corretto.gpg] https://apt.corretto.aws stable main" | sudo tee -a /etc/apt/sources.list.d/corretto.sources.list
sudo apt update
sudo apt install java-common java-11-amazon-corretto-jdk
echo JAVA_HOME="/usr/lib/jvm/java-11-amazon-corretto" | sudo tee -a /etc/environment
export JAVA_HOME="/usr/lib/jvm/java-11-amazon-corretto"
3. **安装 Cassandra:**
wget -qO - https://downloads.apache.org/cassandra/KEYS | sudo gpg --dearmor -o /usr/share/keyrings/cassandra-archive.gpg
echo "deb [signed-by=/usr/share/keyrings/cassandra-archive.gpg] https://debian.cassandra.apache.org 40x main" | sudo tee -a /etc/apt/sources.list.d/cassandra.sources.list
sudo apt update
sudo apt install cassandra
4. **安装 ElasticSearch:**
wget -qO - https://artifacts.elastic.co/GPG-KEY-elasticsearch | sudo gpg --dearmor -o /usr/share/keyrings/elasticsearch-keyring.gpg
sudo apt-get install apt-transport-https
echo "deb [signed-by=/usr/share/keyrings/elasticsearch-keyring.gpg] https://artifacts.elastic.co/packages/7.x/apt stable main" | sudo tee /etc/apt/sources.list.d/elastic-7.x.list
sudo apt update
sudo apt install elasticsearch
5. **安装 TheHive:**
wget -O- https://archives.strangebee.com/keys/strangebee.gpg | sudo gpg --dearmor -o /usr/share/keyrings/strangebee-archive-keyring.gpg
echo 'deb [signed-by=/usr/share/keyrings/strangebee-archive-keyring.gpg] https://deb.strangebee.com thehive-5.2 main' | sudo tee -a /etc/apt/sources.list.d/strangebee.list
sudo apt-get update
sudo apt-get install -y thehive
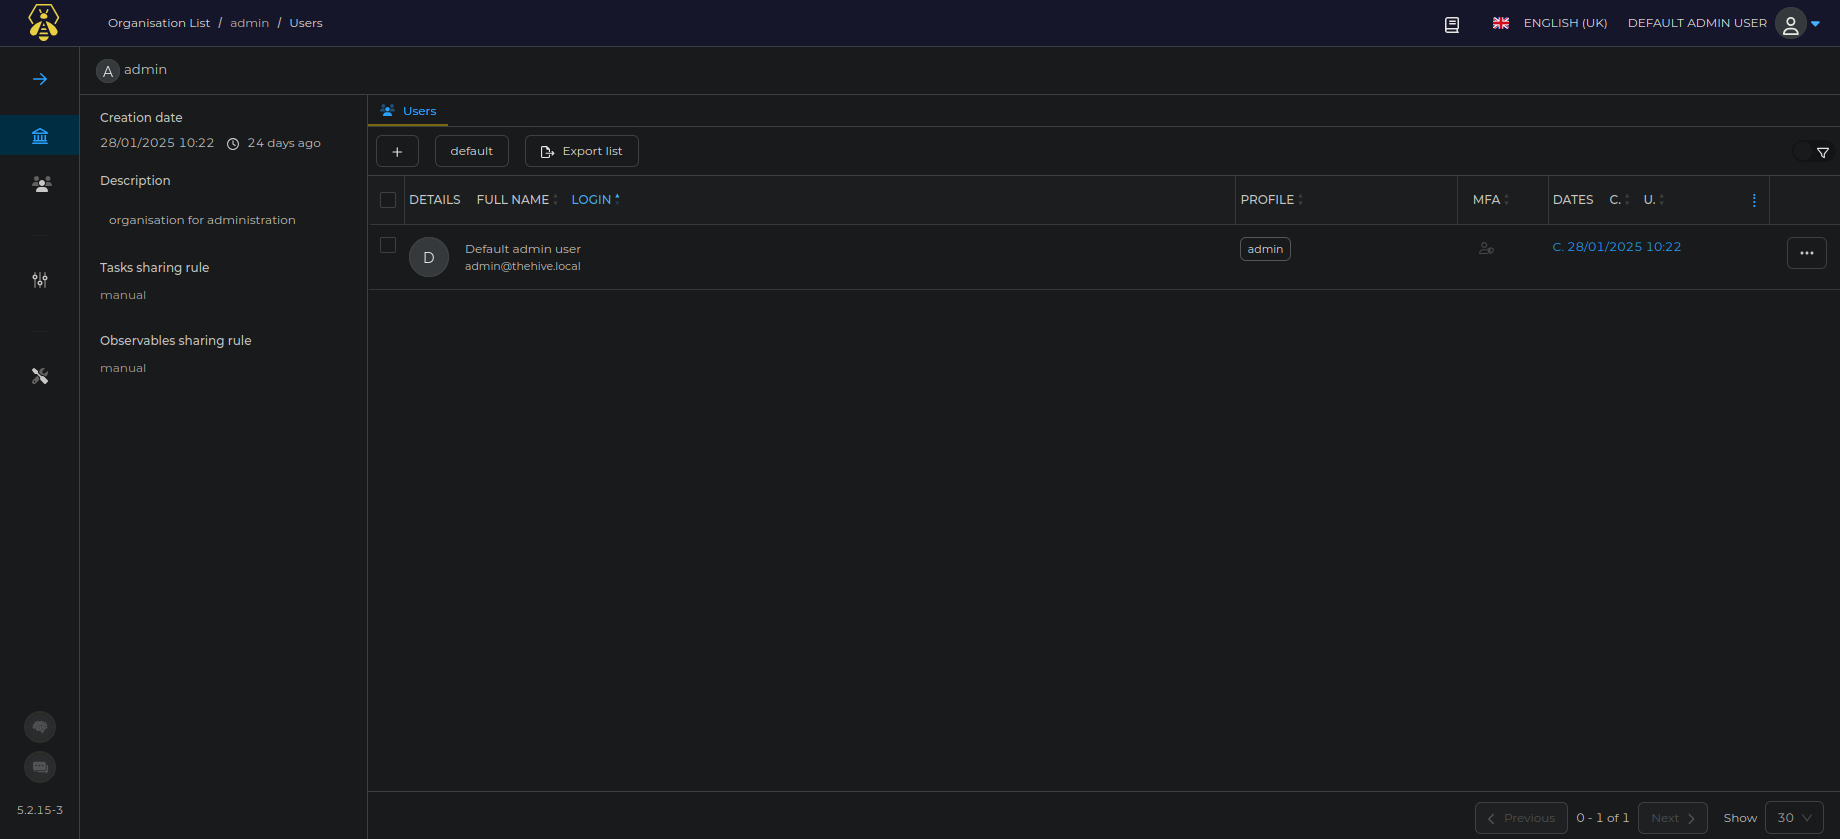
6. **TheHive 默认凭证:**
- **端口:** 9000
- **凭证:** 'admin@thehive.local',密码为 'secret'
### VM-2 用于 Shuffle
**配置规格**
- **RAM:** 4GB+
- **HDD:** 40GB+
- **OS:** Ubuntu 24.04 LTS
### **3️⃣ 安装 Shuffle SOAR**
运行以下命令在 Ubuntu 上安装 **Shuffle SOAR**:
🔗 [Shuffle 安装指南](https://shuffler.io/docs)
```
# 安装 Docker(如果尚未安装)
sudo apt update && sudo apt install -y docker.io docker-compose
# 启用并启动 Docker
sudo systemctl enable docker
sudo systemctl start docker
# 克隆 Shuffle 仓库
git clone https://github.com/Shuffle/Shuffle.git
cd Shuffle
# 使用 Docker Compose 构建并运行 Shuffle
sudo docker-compose up -d
```
通过 http://YOUR-IP:3001 访问 Shuffle Web UI
### **4️⃣ 创建 Discord Webhook**
1. 进入您的 **Discord Server** → **Settings** → **Integrations** → **Webhooks**
2. 点击 **New Webhook** → 将其命名为 **SOC Alerts**
3. 复制 **Webhook URL**(稍后需要用到)
## TheHive 配置
### 配置 Cassandra
1. **编辑 Cassandra 配置文件:**
nano /etc/cassandra/cassandra.yaml
2. **更改 Cluster Name:**
cluster_name: 'SOAR-Flow'
3. **更新 Listen Address:**
listen_address:
4. **更新 RPC Address:**
rpc_address:
5. **更新 Seed Provider:**
- seeds: ":7000"
6. **停止 Cassandra 服务:**
systemctl stop cassandra.service
7. **删除旧文件:**
rm -rf /var/lib/cassandra/*
8. **重启 Cassandra 服务:**
systemctl start cassandra.service
### 配置 ElasticSearch
1. **编辑 ElasticSearch 配置文件:**
nano /etc/elasticsearch/elasticsearch.yml
2. **更新 Cluster Name 和 Host:**
cluster.name: thehive
node.name: node-1
network.host: <您的 TheHive 实例的公网 IP>
http.port: 9200
discovery.seed_hosts: ["127.0.0.1"]
cluster.initial_master_nodes: ["node-1"]
3. **启动 ElasticSearch 服务:**
systemctl start elasticsearch
systemctl enable elasticsearch
systemctl status elasticsearch
## 配置 TheHive
1. **确保所有权正确:**
ls -la /opt/thp
chown -R thehive:thehive /opt/thp
2. **编辑 TheHive 配置文件:**
nano /etc/thehive/application.conf
3. **更新数据库和索引配置:**
db.janusgraph {
storage {
backend = cql
hostname = [""]
cql {
cluster-name = SOAR-Flow
keyspace = thehive
}
}
}
index.search {
backend = elasticsearch
hostname = [""]
index-name = thehive
}
application.baseUrl = "http://:9000"
4. **启动 TheHive 服务:**
systemctl start thehive
systemctl enable thehive
systemctl status thehive
## 🔄 工作流 - 自动化事件响应
### **📌 工作流概述**
此工作流使用 Shuffle 自动化事件响应:
1️⃣ 当检测到可疑活动时,从 Wazuh SIEM **接收告警**。
2️⃣ 使用 VirusTotal & AbuseIPDB API **丰富告警数据**。
3️⃣ 在 TheHive 中**创建事件**以进行案例追踪。
4️⃣ 向 Discord **发送包含告警详情的通知**。
5️⃣ **(可选)** 执行自动缓解(例如,拦截恶意 IP)。
### **📌 Shuffle 工作流步骤**
🔹 **步骤 1:添加 Wazuh 告警作为触发器**
- 在 Shuffle 中,创建一个**新工作流**并添加一个 **Webhook trigger**。
- 配置 Wazuh 通过 **webhooks** 发送告警。
🔹 **步骤 2:使用 VirusTotal & AbuseIPDB 丰富数据**
- 添加一个 **HTTP Request** 节点,使用 VirusTotal API 检查 IP/哈希。
- 添加另一个 HTTP Request 以查询 AbuseIPDB 中的恶意 IP。
🔹 **步骤 3:在 TheHive 中创建事件**
- 使用 TheHive API 创建一个包含告警详情的**新案例 (case)**。
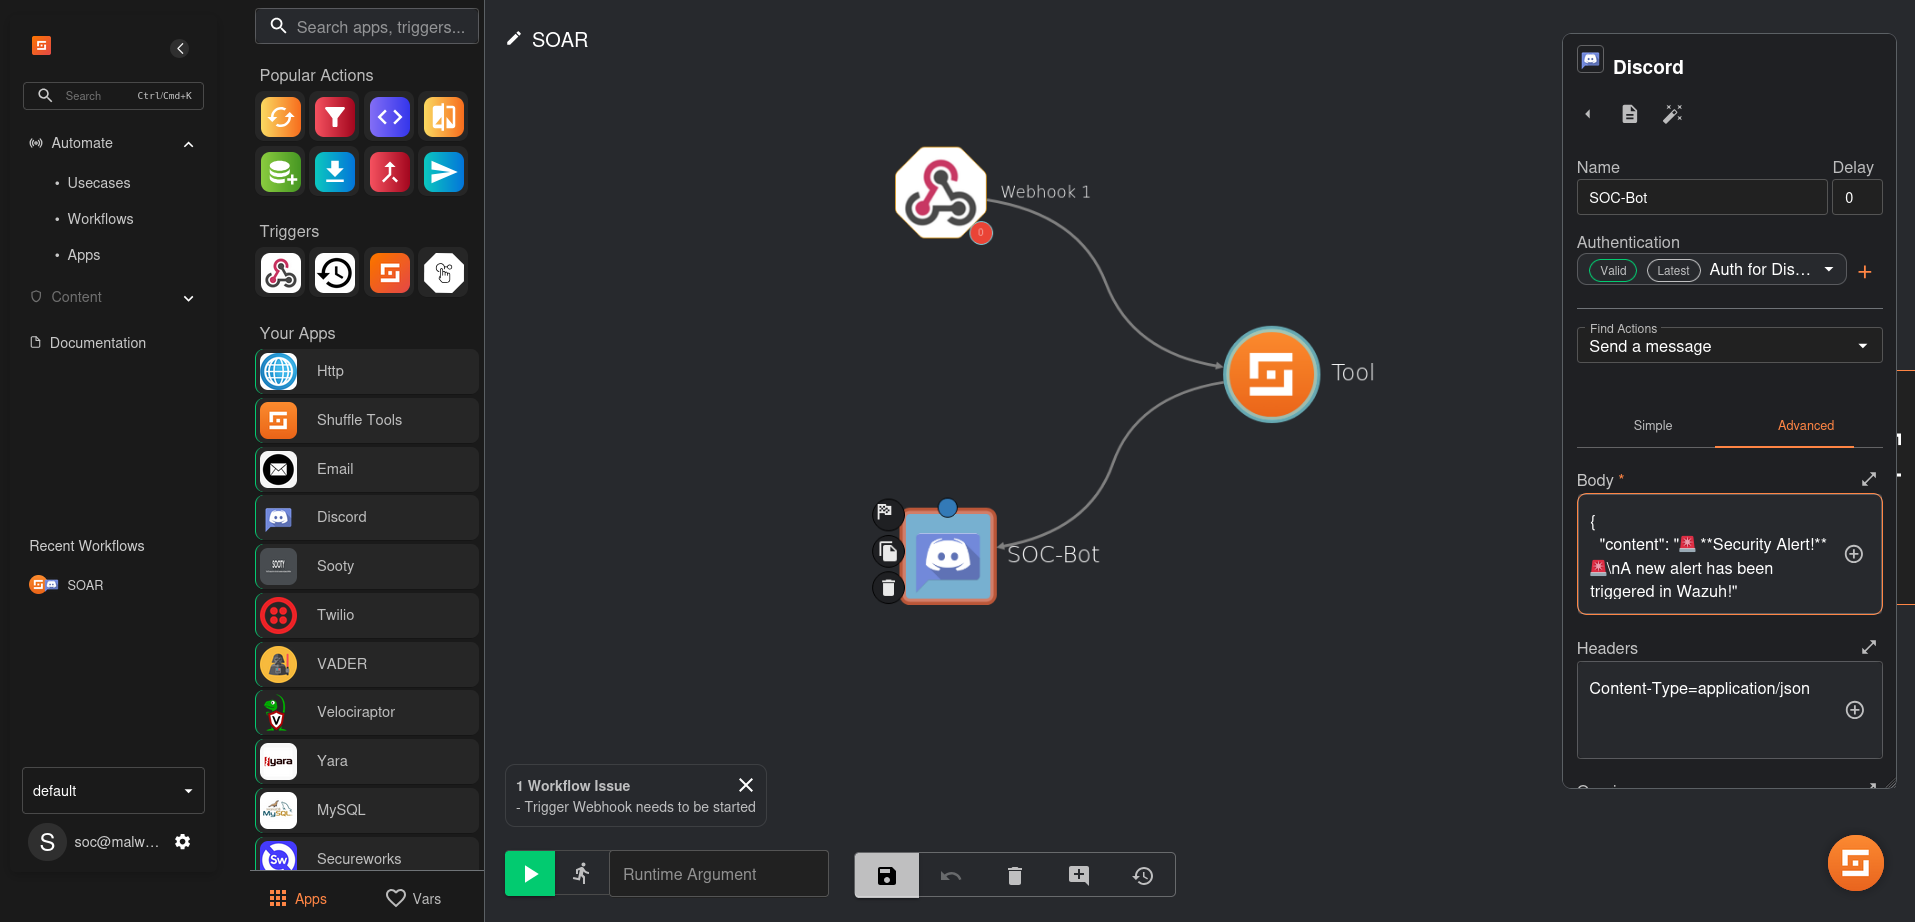
🔹 **步骤 4:发送告警到 Discord**
- 使用 Discord Webhook 向 SOC 频道发送格式化的消息。
🔹 **步骤 5:(可选) 自动缓解**
- 如果 IP **高风险**,触发防火墙规则以**拦截攻击者**。
## 🚀 运行工作流
### **步骤 1:配置 Wazuh 发送告警到 Shuffle**
编辑 Wazuh **ossec.conf** 文件以发送 webhook 告警:
```
custom-webhook
http://:5001/webhook
json
```
重启 Wazuh 以应用更改:
```
sudo systemctl restart wazuh-manager
```
### **步骤 2:配置 TheHive API Key**
在 TheHive 中生成 API key 并将其添加到 Shuffle 的 HTTP Request 节点中。
### **步骤 3:在 Shuffle 中配置 Discord Webhook**
在 Shuffle 的 **HTTP Request** 节点中使用 **Discord Webhook URL**。
示例 payload:
```
{
"content": "**🚨 New Security Alert 🚨**\n\nIP: 192.168.1.100\nSeverity: High\nSource: Wazuh SIEM"
}
```
### **步骤 4:测试工作流**
- 在 Wazuh 中触发告警(例如,SSH 登录失败)。
- 验证 TheHive 中是否创建了事件。
- 检查告警是否发送到 Discord。
## 📌 示例输出
✅ **TheHive 事件已创建:**
```
[INFO] New Incident Created in TheHive:
- Title: Suspicious SSH Login Attempts
- Severity: High
- Source: Wazuh SIEM
```
✅ **Discord 告警:**

## 🎯 未来增强计划
🔹 添加自动缓解功能(例如,通过防火墙规则拦截攻击者 IP)。
🔹 集成更多威胁情报源(例如 MISP, Shodan API)。
🔹 扩展自动化以处理不同类型的事件。
## 📜 许可证
本项目基于 **MIT License** 授权。
## 📬 联系方式
👤 **作者:** [Nitin Sharma](https://github.com/malwarekid)
💻 **Instagram:** [Malwarekid](https://instagram.com/malwarekid)
📧 **LinkedIn:** [Connect](https://www.linkedin.com/in/-nitinsharma/)
标签:AbuseIPDB, Ask搜索, CIDR查询, Discord通知, IP信誉检查, Shuffle, SOAR, TheHive, VirusTotal, Wazuh, Wazuh安装, 告警丰富, 威胁情报, 安全编排与自动化响应, 安全运营中心, 开发者工具, 开源安全工具, 版权保护, 网络安全, 网络映射, 自动化响应, 自动化封禁, 请求拦截, 逆向工程平台, 隐私保护