xob0t/gpmc
GitHub: xob0t/gpmc
GPMC 是一款基于逆向移动端 API 的 Google Photos 跨平台 Python 库和 CLI 工具,解决了官方 API 限制下的原图批量上传问题。
Stars: 318 | Forks: 48
# GPMC
基于逆向工程移动端 API 的 Google Photos 移动客户端。“移动端”指的是它使用的 API,而不是它运行的平台——GPMC 是一个跨平台的 Python 库和 CLI。
## CLI 演示
## 功能
- 无限制上传原图画质(可禁用)。
- 可作为 CLI 工具或 Python 库使用。
- 跳过您账户中已存在的文件(基于哈希校验)。
- 可选的基于文件名的重复检查(`--skip-existing-filenames`),如果目标位置已存在同名文件,则可防止重新上传修改了 EXIF 元数据的文件。
- 上传单个文件或整个目录,支持可选的递归扫描。
- 基于目录结构或自定义相册名称创建相册。
- 实时进度跟踪。
- 可配置线程以加快上传速度(默认:1)。
### 如果您更喜欢 GUI 客户端,请使用 [https://github.com/xob0t/gotohp](https://github.com/xob0t/gotohp)
## 安装
运行以下命令:
```
pip install https://github.com/xob0t/gpmc/archive/refs/heads/main.zip --force-reinstall
```
## 使用示例
### Python 客户端
```
from gpmc import Client
path = "/path/to/media_file.jpg" # file or dir path
auth_data = "androidId=216e583113f43c75&app=com.google.android.app..."
client = Client(auth_data=auth_data)
output = client.upload(target=path, show_progress=True)
print(output)
# {"/absolute/path/to/media_file.jpg": "google_photos_media_key"}
```
### CLI
```
gpmc "/path/to/media_file.jpg" --progress --auth_data "androidId=216e583113f43c75&app=com.google.android.app..."
```
对于编程式调用者,`--json-progress` 会在每行向 stderr 写入一个带版本的 JSON 对象(NDJSON),同时将最终结果保留在 stdout:
```
gpmc "/path/to/media_file.jpg" --json-progress 2>progress.ndjson
```
每个事件都有一个稳定的标识符和版本,例如:
```
{"version":1,"type":"progress","operation":"upload","phase":"uploading","path":"/path/to/media_file.jpg","filename":"media_file.jpg","bytes_completed":1048576,"bytes_total":8388608}
```
```
usage: gpmc [-h] [--auth_data AUTH_DATA] [--album ALBUM] [--proxy PROXY] [--progress] [--recursive] [--threads THREADS] [--force-upload] [--delete-from-host] [--use-quota] [--saver] [--timeout TIMEOUT]
[--log-level {DEBUG,INFO,WARNING,ERROR,CRITICAL}] [--filter FILTER] [--exclude] [--regex] [--ignore-case] [--match-path]
path
Google Photos mobile client.
positional arguments:
path Path to the file or directory to upload.
options:
-h, --help show this help message and exit
--auth_data AUTH_DATA
Google auth data for authentication. If not provided, `GP_AUTH_DATA` env variable will be used.
--album ALBUM Add uploaded media to an album with given name. If set to 'AUTO', albums will be created based on the immediate parent directory of each file.
Example for using 'AUTO':
When uploading '/foo':
'/foo/image1.jpg' goes to 'foo'
'/foo/bar/image2.jpg' goes to 'bar'
'/foo/bar/foo/image3.jpg' goes to 'foo' (distinct from the first 'foo' album)
--proxy PROXY Proxy to use. Format: `protocol://username:password@host:port`
--progress Display upload progress.
--recursive Scan the directory recursively.
--threads THREADS Number of threads to run uploads with. Defaults to 1.
--force-upload Upload files regardless of their presence in Google Photos (determined by hash).
--delete-from-host Delete uploaded files from source path.
--use-quota Uploaded files will count against your Google Photos storage quota.
--saver Upload files in storage saver quality.
--timeout TIMEOUT Requests timeout, seconds. Defaults to 60.
--skip-existing-filenames
Synchronize local media cache and skip uploading files
with duplicate filenames.
--log-level {DEBUG,INFO,WARNING,ERROR,CRITICAL}
Set the logging level (default: INFO)
File Filter Options:
--filter FILTER Filter expression.
--exclude Exclude files matching the filter.
--regex Use regex for filtering.
--ignore-case Perform case-insensitive matching.
--match-path Check for matches in the path, not just the filename.
```
## auth_data?我该如何获取?
您只需要执行一次此操作。
### 选项 1 - ReVanced。无需 root
1. 在您的设备上安装 Google Photos ReVanced。
- 安装 GmsCore [https://github.com/ReVanced/GmsCore/releases](https://github.com/ReVanced/GmsCore/releases)
- 安装修补过的 apk [https://github.com/j-hc/revanced-magisk-module/releases](https://github.com/j-hc/revanced-magisk-module/releases) 或自行修补
2. 通过 ADB 将设备连接到 PC。
3. 在 PC 上打开终端并执行
Windows
adb logcat | FINDSTR "auth%2Fphotos.native"
Linux/Mac
adb logcat | grep "auth%2Fphotos.native"
4. 如果您已经在使用 ReVanced - 请从 GmsCore 中移除 Google 账号。
5. 在您的设备上打开 Google Photos ReVanced 并登录您的账号。
6. 终端中应该会出现一条或多条相同的 GmsCore 日志。
7. 从任意日志中复制从 `androidId=` 到行尾的文本。
8. 大功告成!🎉
### 选项 2 - 官方 apk。需要 root
## 基于 gpmc 的工具
- Docker 化的文件夹监控 [Google Photos Uploader](https://github.com/giuseppe99barchetta/Google-Photos-Uploader),作者 @giuseppe99barchetta
## 我编写的其他 Google Photos 脚本和工具
- Web API Python 客户端:[https://github.com/xob0t/google_photos_web_client](https://github.com/xob0t/google_photos_web_client)
- 将任何文件伪装成媒体文件让 GP 接收并存储:[https://github.com/xob0t/gp-file-hide](https://github.com/xob0t/gp-file-hide)
- 通过批量操作管理库:[https://github.com/xob0t/Google-Photos-Toolkit](https://github.com/xob0t/Google-Photos-Toolkit)
点击展开
1. 准备一台已 root 的 Android 设备或模拟器。推荐的 Android 版本为 9-13 2. 通过 ADB 将设备连接到 PC。 3. 安装 [HTTP Toolkit](https://httptoolkit.com) 4. 在 HTTP Toolkit 中,选择 Intercept - `Android Device via ADB`。过滤流量: contains(https://www.googleapis.com/auth/photos.native) 或者,如果您使用的是较旧版本的 Google Photos,请尝试 contains(www.googleapis.com%2Fauth%2Fplus.photos.readwrite) 5. 打开 Google Photos 应用并使用您的账号登录。 6. 此时应该会出现一个请求。 将请求体复制为文本。 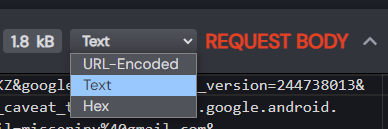 7. 现在您就获得了您的 auth_data!🎉 #### 故障排除 - __未拦截到 Auth 请求__ 1. 退出您的 Google 账号。 2. 重新登录。 3. 在 HTTP Toolkit 中尝试使用 `Android App via Frida` 拦截方法。标签:API客户端, Google相册, 文件上传, 文档结构分析, 逆向工具