FlyingPhish/YetAnotherPentestParser
GitHub: FlyingPhish/YetAnotherPentestParser
YAPP 是一款渗透测试数据解析工具,支持将 Nessus、Nmap 和 BloodHound 输出转化为结构化的 JSON 和 Excel 报告,并提供无服务器的 AD 攻击路径分析 TUI。
Stars: 9 | Forks: 1
# YAPP - Yet Another Pentest Parser


**一个强大的 Python 库和 CLI 工具,用于解析和处理多种渗透测试工具的输出。**
YAPP 将 Nessus、Nmap 和 BloodHound 数据解析为可操作、可导出的结果。V7 版本增加了一个无服务器的 Active Directory 操作员 TUI,用于优先处理攻击路径、权限暴露、本地管理员访问和已控制用户分析——无需 Neo4j 或 BloodHound 服务器。
## 🎯 为什么要有 YAPP
渗透测试行业存在多方面的工具问题 (CAPDEV)。大多数企业将能力开发视为事后才考虑的事情——他们宁愿雇更多的人来解决性能和资源问题,也不愿修复其糟糕的工作流程和能力。
- **为什么?** 💰C.R.E.A.M.💰
- 未计费顾问 = 企业的成本
- 这是一个糟糕的心态,因为商业常识告诉我们,你需要花钱才能赚钱。
- **结果?**
- 顾问无偿加班,因为基本的数据处理就消耗了他们半天的时间
- 延误,大量的延误。这些延误随后会产生连锁反应,影响到下一个项目。
- 为了赶截止日期而偷工减料。
- 职业倦怠和普遍的负面情绪。
 ## ✨ 功能
### 🔧 **多工具支持**
- **Nessus XML**:全面的漏洞解析,支持合并和 API 格式化
- **Nmap XML**:包含端口过滤、扁平化 JSON 输出以及两次扫描间对比电子表格的服务发现
- **BloodHound ZIP**:离线 AD 分析、有界攻击路径、权限暴露和报告生成
- **可扩展框架**:易于按照既定模式添加新解析器
- **自动检测**:自动识别文件类型
### 🖥️ **双接口设计**
- **CLI 工具**:具有彩色输出和特定工具选项的精美命令行界面
- **TUI 模式**:操作员优先的 Nessus 分流和 BloodHound AD 调查 (`yapp tui`)
- **Python 库**:简洁的编程 API,可集成到您的项目中
- **内存中处理**:直接解析原始 XML 字符串——无需文件系统(非常适合通过 `process_data()` 与数据库/API 集成)
- **无服务器 AD 分析**:无需 Neo4j 或 BloodHound 服务器;Textual、Kuzu 和 OpenPyXL 作为包依赖项提供
### 📊 **高级 Nessus 处理**
- 将 Nessus XML 文件解析为结构化的 JSON/Python 字典
- 具有智能漏洞分组的先进合并引擎
- 插件输出模式匹配和过滤
- 基于规则的漏洞分类
- 具有实体限制的 API 就绪输出格式化
- **内联 Excel 报告生成**(`-x` 标志)——不再需要两步工作流
- **合并的单文件输出**(`-sf` 标志)——将所有选定的输出合并在一个 JSON 中
### 🗺️ **全面的 Nmap 支持**
- 将 Nmap XML 解析为包含服务详情的结构化格式
- 端口状态过滤(开放、关闭、被过滤)
- 用于兼容旧工具的扁平化 JSON 输出
- 服务枚举和脚本输出捕获
- 比较两个 Nmap XML 文件并将差异输出到电子表格
### 🩸 **Active Directory / BloodHound**
- 直接加载 BloodHound ZIP 集合;无需数据库或 Web 服务器
- 通往高价值目标的优先、有界路径,并提供确切的证据关系
- 使用任务、探索、暴露和已保存的工作区,而不是 Nessus 式的表格层级
- 全局对象搜索、任意源/目标路径规划、反向路径和边缘过滤
- 带有路径树、持久对象检查器和安全大纲回退的 Graphviz 聚焦布局
- 用于广泛的管理员成员资格、特权对象控制和本地管理员扇出的权限暴露队列
- 通过 CLI、文件或 TUI 设定已控制用户,并在会话内快速重新计算
- 有界节点枢纽、持久的分流/书签、集合差异警告,以及 JSON/API/Excel 导出
### 🎯 **情报与分析**
- 全局和按主机跟踪漏洞 (Nessus)
- 适用于两种工具的全面统计信息和指标
- 每个主机支持多个 FQDN
- 详细的漏洞信息(CVE、CVSS、受影响的系统)
- 带有插件/服务名称的易读输出
- **合并规则日志记录——通过查看哪些内容未匹配及其原因,轻松调试合并规则**
### ⚡ **性能**
**基准测试结果 (Nessus):**
- **文件大小**:118 MB Nessus XML(1005 台主机,214 项发现,17 项修复建议)
- **处理时间**:总计 9.18 秒(5.76 秒处理 + 0.45 秒 I/O)
- **吞吐量**:~13 MB/秒(总计)/ ~20 MB/秒(仅处理)
- **内存高效**:使用流式解析器,内存占用低
- **包含**:完整解析 + 合并引擎 + API 格式化 + JSON 输出(3 个文件)
*测试环境:Windows 宿主机上的 WSL2 (Debian)*
## 🚀 安装
### 仅限 CLI 使用
```
# 使用 pipx 全局安装(推荐仅用于 CLI)
git clone https://github.com/FlyingPhish/YetAnotherPentestParser && cd YetAnotherPentestParser
pipx install .
```
或
```
pipx install git+https://github.com/FlyingPhish/YetAnotherPentestParser.git
# pipx install git+https://github.com/FlyingPhish/YetAnotherPentestParser.git@branch
```
### 用于编程使用
```
# 在你的 virtual environment 中
pip install git+https://github.com/FlyingPhish/YetAnotherPentestParser.git
# pip install git+https://github.com/FlyingPhish/YetAnotherPentestParser.git@branch
```
### 升级
```
# 使用 pipx 安装时
pipx upgrade yapp
# 使用 pip 安装时
pip install git+https://github.com/FlyingPhish/YetAnotherPentestParser.git --force-reinstall
```
### 用于 AD 探索的 Graphviz
强烈建议使用 Graphviz 进行聚焦的图形布局。请按照[官方 Graphviz 平台说明](https://graphviz.org/download/)进行安装,并确保 `dot -V` 执行成功。当 Graphviz 不可用时,YAPP 将回退到关系大纲显示。
## 💡 用法
### 🖥️ 命令行界面
```
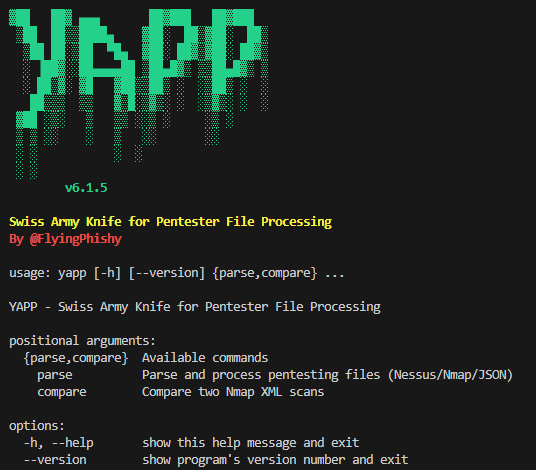
usage: yapp [-h] [--version] {parse,ad,excel,compare,tui} ...
YAPP - Swiss Army Knife for Pentester File Processing
positional arguments:
{parse,ad,excel,compare,tui} Available commands
parse Parse and process pentesting files (Nessus/Nmap/JSON)
ad Analyse a BloodHound ZIP collection without a server
excel Generate Excel report from YAPP JSON output
compare Compare two Nmap XML scans
tui Launch Nessus triage or BloodHound AD operator TUI
options:
-h, --help show this help message and exit
--version show program's version number and exit
```
### 🖥️ 命令行界面 - 解析
```
yapp parse -h
options:
-h, --help show this help message and exit
-i, --input-file INPUT_FILE
Path to input file (Nessus .nessus, Nmap .xml, Consolidated JSON)
-t, --file-type {auto,nessus,nmap,consolidated_json}
Input file type (default: auto-detect)
-of, --output-folder OUTPUT_FOLDER
Output folder path (default: ./output)
-on, --output-name OUTPUT_NAME
Output base name (default: timestamp_
## ✨ 功能
### 🔧 **多工具支持**
- **Nessus XML**:全面的漏洞解析,支持合并和 API 格式化
- **Nmap XML**:包含端口过滤、扁平化 JSON 输出以及两次扫描间对比电子表格的服务发现
- **BloodHound ZIP**:离线 AD 分析、有界攻击路径、权限暴露和报告生成
- **可扩展框架**:易于按照既定模式添加新解析器
- **自动检测**:自动识别文件类型
### 🖥️ **双接口设计**
- **CLI 工具**:具有彩色输出和特定工具选项的精美命令行界面
- **TUI 模式**:操作员优先的 Nessus 分流和 BloodHound AD 调查 (`yapp tui`)
- **Python 库**:简洁的编程 API,可集成到您的项目中
- **内存中处理**:直接解析原始 XML 字符串——无需文件系统(非常适合通过 `process_data()` 与数据库/API 集成)
- **无服务器 AD 分析**:无需 Neo4j 或 BloodHound 服务器;Textual、Kuzu 和 OpenPyXL 作为包依赖项提供
### 📊 **高级 Nessus 处理**
- 将 Nessus XML 文件解析为结构化的 JSON/Python 字典
- 具有智能漏洞分组的先进合并引擎
- 插件输出模式匹配和过滤
- 基于规则的漏洞分类
- 具有实体限制的 API 就绪输出格式化
- **内联 Excel 报告生成**(`-x` 标志)——不再需要两步工作流
- **合并的单文件输出**(`-sf` 标志)——将所有选定的输出合并在一个 JSON 中
### 🗺️ **全面的 Nmap 支持**
- 将 Nmap XML 解析为包含服务详情的结构化格式
- 端口状态过滤(开放、关闭、被过滤)
- 用于兼容旧工具的扁平化 JSON 输出
- 服务枚举和脚本输出捕获
- 比较两个 Nmap XML 文件并将差异输出到电子表格
### 🩸 **Active Directory / BloodHound**
- 直接加载 BloodHound ZIP 集合;无需数据库或 Web 服务器
- 通往高价值目标的优先、有界路径,并提供确切的证据关系
- 使用任务、探索、暴露和已保存的工作区,而不是 Nessus 式的表格层级
- 全局对象搜索、任意源/目标路径规划、反向路径和边缘过滤
- 带有路径树、持久对象检查器和安全大纲回退的 Graphviz 聚焦布局
- 用于广泛的管理员成员资格、特权对象控制和本地管理员扇出的权限暴露队列
- 通过 CLI、文件或 TUI 设定已控制用户,并在会话内快速重新计算
- 有界节点枢纽、持久的分流/书签、集合差异警告,以及 JSON/API/Excel 导出
### 🎯 **情报与分析**
- 全局和按主机跟踪漏洞 (Nessus)
- 适用于两种工具的全面统计信息和指标
- 每个主机支持多个 FQDN
- 详细的漏洞信息(CVE、CVSS、受影响的系统)
- 带有插件/服务名称的易读输出
- **合并规则日志记录——通过查看哪些内容未匹配及其原因,轻松调试合并规则**
### ⚡ **性能**
**基准测试结果 (Nessus):**
- **文件大小**:118 MB Nessus XML(1005 台主机,214 项发现,17 项修复建议)
- **处理时间**:总计 9.18 秒(5.76 秒处理 + 0.45 秒 I/O)
- **吞吐量**:~13 MB/秒(总计)/ ~20 MB/秒(仅处理)
- **内存高效**:使用流式解析器,内存占用低
- **包含**:完整解析 + 合并引擎 + API 格式化 + JSON 输出(3 个文件)
*测试环境:Windows 宿主机上的 WSL2 (Debian)*
## 🚀 安装
### 仅限 CLI 使用
```
# 使用 pipx 全局安装(推荐仅用于 CLI)
git clone https://github.com/FlyingPhish/YetAnotherPentestParser && cd YetAnotherPentestParser
pipx install .
```
或
```
pipx install git+https://github.com/FlyingPhish/YetAnotherPentestParser.git
# pipx install git+https://github.com/FlyingPhish/YetAnotherPentestParser.git@branch
```
### 用于编程使用
```
# 在你的 virtual environment 中
pip install git+https://github.com/FlyingPhish/YetAnotherPentestParser.git
# pip install git+https://github.com/FlyingPhish/YetAnotherPentestParser.git@branch
```
### 升级
```
# 使用 pipx 安装时
pipx upgrade yapp
# 使用 pip 安装时
pip install git+https://github.com/FlyingPhish/YetAnotherPentestParser.git --force-reinstall
```
### 用于 AD 探索的 Graphviz
强烈建议使用 Graphviz 进行聚焦的图形布局。请按照[官方 Graphviz 平台说明](https://graphviz.org/download/)进行安装,并确保 `dot -V` 执行成功。当 Graphviz 不可用时,YAPP 将回退到关系大纲显示。
## 💡 用法
### 🖥️ 命令行界面
```
usage: yapp [-h] [--version] {parse,ad,excel,compare,tui} ...
YAPP - Swiss Army Knife for Pentester File Processing
positional arguments:
{parse,ad,excel,compare,tui} Available commands
parse Parse and process pentesting files (Nessus/Nmap/JSON)
ad Analyse a BloodHound ZIP collection without a server
excel Generate Excel report from YAPP JSON output
compare Compare two Nmap XML scans
tui Launch Nessus triage or BloodHound AD operator TUI
options:
-h, --help show this help message and exit
--version show program's version number and exit
```
### 🖥️ 命令行界面 - 解析
```
yapp parse -h
options:
-h, --help show this help message and exit
-i, --input-file INPUT_FILE
Path to input file (Nessus .nessus, Nmap .xml, Consolidated JSON)
-t, --file-type {auto,nessus,nmap,consolidated_json}
Input file type (default: auto-detect)
-of, --output-folder OUTPUT_FOLDER
Output folder path (default: ./output)
-on, --output-name OUTPUT_NAME
Output base name (default: timestamp_)
--no-output Skip writing files, only display results
Output options:
-sf, --single-file Write all selected outputs into one combined JSON file
instead of separate files
Nessus options:
-c, --consolidate Generate consolidated findings file
-a, --api-output Generate API-ready JSON (requires --consolidate)
-r, --rules-file RULES_FILE
Custom consolidation rules file
-el, --entity-limit ENTITY_LIMIT
Max entities per API finding
--log-exclusions Enable detailed exclusion logging
Nmap options:
-s, --port-status {all,open,closed,filtered}
Filter by port status (default: all)
-fj, --flat-json Generate flat JSON format
Excel options:
-x, --excel Also generate Excel report (Nessus: requires -c;
or consolidated JSON input)
```
### 🖥️ 命令行界面 - Excel
```
yapp excel -h
options:
-h, --help show this help message and exit
-i, --input-file INPUT_FILE
Path to YAPP JSON file (consolidated, combined, or parsed)
-of, --output-folder OUTPUT_FOLDER
Output folder path (default: ./output)
-on, --output-name OUTPUT_NAME
Custom output filename (without extension)
```
### 🖥️ 命令行界面 - 对比
```
yapp compare -h
options:
-h, --help show this help message and exit
-ff, --first-file FIRST_FILE
Path to first Nmap XML file
-lf, --last-file LAST_FILE
Path to second Nmap XML file
-of, --output-folder OUTPUT_FOLDER
Output folder path (default: ./output)
-on, --output-name OUTPUT_NAME
Custom output filename (without extension)
```
### 🩸 命令行界面 - Active Directory
```
# 批量分析和报告
yapp ad -i bloodhound.zip --paths --owned-users cracked-users.txt -a -x
# 交互式操作流程(自动检测 ZIP)
yapp tui -i bloodhound.zip --owned-users cracked-users.txt
```
TUI 会在优先显示的任务视图中打开。按 `2` 或 `x` 进入以对象为主导的探索,按 `3` 或 `v` 查看权限暴露,按 `o` 更新已控制用户。探索支持输入对象搜索、任意路径端点、关系过滤、路径树和聚焦的 Graphviz 布局。有关完整的工作流和安全模型,请参见 [TUI 用法](yapp/docs/TUI%20Usage.md)。
编程用户可以直接调用 `analyze_bloodhound()` 并接收一个可直接用于 JSON 的报告,而无需写入文件。有关已控制用户路径、策略控制、API 映射、Excel 输出和错误处理,请参见[库用法](yapp/docs/Library%20Usage.md#bloodhound--active-directory-processing)。
## 🔬 Nessus 合并引擎
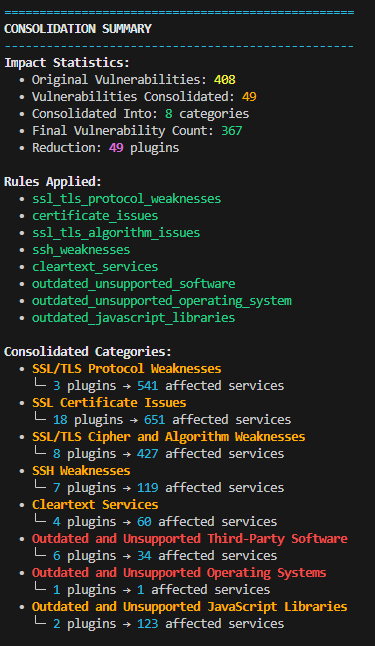
合并引擎能智能地将相关漏洞进行分组,从而减少干扰信息并提升漏洞管理效率。
### 功能:
- **智能模式匹配**:针对漏洞名称和插件输出的正则表达式模式
- **插件输出过滤**:搜索实际的 Nessus 插件输出内容
- **灵活分组**:按 IP、端口、服务或自定义条件分组
- **基于规则的配置**:针对不同漏洞类型的 JSON 规则
- **高级逻辑**:AND/OR 模式匹配,排除规则
- **实体限制**:通过可配置的实体限制来控制 API 输出大小
### 常见合并规则:
- **过时软件**:将带有版本更新模式的软件归为一组
- **证书问题**:合并 SSL/TLS 证书问题
- **弱加密**:将协议和密码漏洞归为一组
- **JavaScript 库**:分离 Web 应用程序库的问题
- **操作系统**:将特定于操作系统的更新和补丁归为一组
## 📊 Excel 报告生成
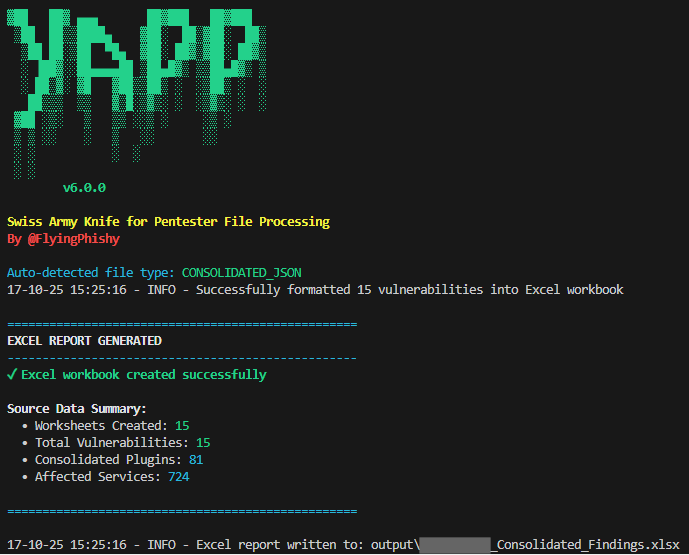
将合并后的漏洞数据转换为结构化的 Excel 工作簿,以便于分析和验证。
 ### 功能:
- **矩阵布局**:每个漏洞一个工作表,带有“是/否”插件指示器
- **服务级别详情**:每行显示 FQDN、IP、端口以及哪些插件影响了它
- **合并验证**:快速验证哪些插件被分在了一起
- **对分析师友好的格式**:熟悉的电子表格格式,便于审查和签字
- **一致的命名**:输出文件名遵循统一的 `{base}_Report.xlsx` 命名约定
### 工作流:
**选项 A — 内联(单条命令):**
```
yapp parse -i scan.nessus -c -x # Parse, consolidate, and generate Excel in one shot
yapp parse -i scan.nessus -c -a -x # Full pipeline with API output + Excel
yapp parse -i scan.nessus -c -a -x -sf # Everything above, combined into one JSON + Excel
```
**选项 B — 独立运行(从现有 JSON):**
```
yapp excel -i scan_Consolidated.json # From a consolidated JSON file
yapp excel -i scan_Combined.json # From a combined JSON file (extracts consolidated data)
```
## 🔬 Nessus 合并引擎 + API 格式化程序
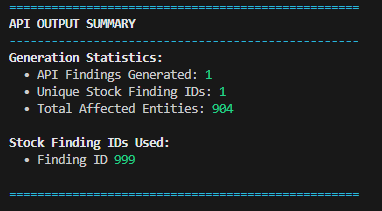
您可以使用 `-a` 或 `--api-output`,这会将您合并规则的结果转换为一个基本的 JSON 结构,该结构可与报告引擎配合使用,将 Nessus 结果转化为渗透测试报告引擎中的发现。该输出旨在与我为 [Ghostwriter](https://github.com/GhostManager/Ghostwriter) 定制的 API 配合使用。(如果您想了解更多相关信息,请在 Twatter (x) 上私信我)
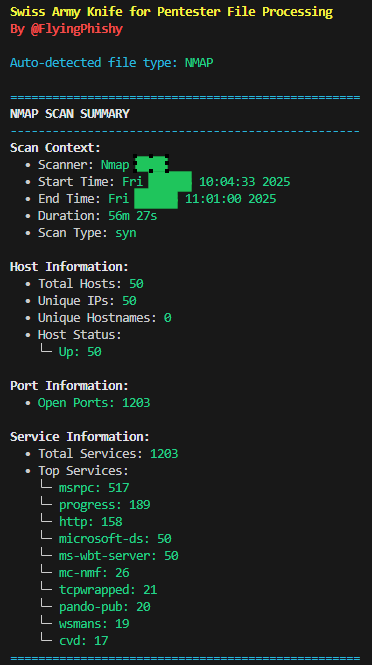
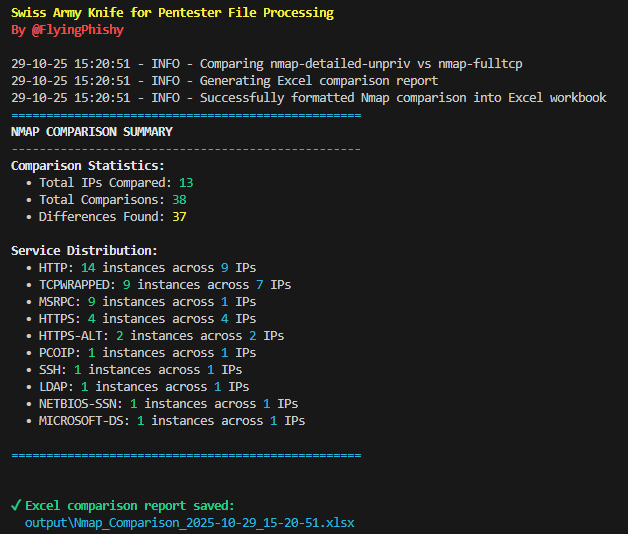
## 🔬 Nmap 解析器
您可以在以下章节中看到正确的输出
### 📊 Nmap 结果对比
### 功能:
- **矩阵布局**:每个漏洞一个工作表,带有“是/否”插件指示器
- **服务级别详情**:每行显示 FQDN、IP、端口以及哪些插件影响了它
- **合并验证**:快速验证哪些插件被分在了一起
- **对分析师友好的格式**:熟悉的电子表格格式,便于审查和签字
- **一致的命名**:输出文件名遵循统一的 `{base}_Report.xlsx` 命名约定
### 工作流:
**选项 A — 内联(单条命令):**
```
yapp parse -i scan.nessus -c -x # Parse, consolidate, and generate Excel in one shot
yapp parse -i scan.nessus -c -a -x # Full pipeline with API output + Excel
yapp parse -i scan.nessus -c -a -x -sf # Everything above, combined into one JSON + Excel
```
**选项 B — 独立运行(从现有 JSON):**
```
yapp excel -i scan_Consolidated.json # From a consolidated JSON file
yapp excel -i scan_Combined.json # From a combined JSON file (extracts consolidated data)
```
## 🔬 Nessus 合并引擎 + API 格式化程序
您可以使用 `-a` 或 `--api-output`,这会将您合并规则的结果转换为一个基本的 JSON 结构,该结构可与报告引擎配合使用,将 Nessus 结果转化为渗透测试报告引擎中的发现。该输出旨在与我为 [Ghostwriter](https://github.com/GhostManager/Ghostwriter) 定制的 API 配合使用。(如果您想了解更多相关信息,请在 Twatter (x) 上私信我)

## 🔬 Nmap 解析器
您可以在以下章节中看到正确的输出

### 📊 Nmap 结果对比
 ## 📋 输出格式
### Nessus 标准解析输出
```
{
"context": {
"scan_id": "string",
"scan_start": "DD-MM-YYYY HH:MM:SS",
"scan_duration": "H:MM:SS",
"policy_name": "string"
},
"stats": {
"hosts": {
"total": 100,
"credentialed_checks": 95,
"multi_fqdn_hosts": 10
},
"vulnerabilities": {
"total": 500,
"by_severity": {
"Critical": 5,
"High": 25,
"Medium": 150,
"Low": 200,
"None": 120
}
}
},
"hosts": {
"1": {
"ip": "string",
"fqdns": ["string"],
"os": "string",
"scan_start": "string",
"scan_end": "string",
"credentialed_scan": bool,
"vulnerabilities": {
"Critical": int,
"High": int,
"Medium": int,
"Low": int,
"None": int
},
"ports": {
"443/tcp": {
"service": "string",
"vulnerabilities": ["string"]
}
}
}
},
"vulnerabilities": {
"142960": {
"name": "string",
"family": "string",
"severity": int,
"risk_factor": "string",
"cvss": {
"base_score": float,
"temporal_score": float,
"vector": "string"
},
"cvss3": {
"base_score": float,
"temporal_score": float,
"vector": "string"
},
"description": "string",
"synopsis": "string",
"solution": "string",
"see_also": ["string"],
"cve": [],
"cwe": [],
"xref": [],
"affected_hosts": {
"1": {
"ip": "string",
"fqdn": "string",
"ports": ["string"],
"plugin_output": "string"
}
}
}
}
}
```
### Nessus 合并输出(使用 -c 标志)
当使用 `-c` 标志时,将生成一个额外的合并发现文件:
```
{
"consolidation_metadata": {
"rules_applied": ["rule_name1", "rule_name2"],
"original_plugins_count": int,
"consolidated_count": int,
"consolidation_timestamp": "string"
},
"consolidated_vulnerabilities": {
"rule_name": {
"title": "Human-Readable Title",
"severity": int,
"risk_factor": "string",
"cvss": {},
"cvss3": {},
"consolidated_plugins": {
"plugin_id": "Plugin Name"
},
"cve": [],
"cwe": [],
"solutions": [],
"affected_services": {
"192.168.1.100:443": {
"ip": "string",
"fqdn": "string",
"port": "string",
"issues_found": [
{
"id": "plugin_id",
"name": "Plugin Name"
}
],
"plugin_outputs": {
"plugin_id": {
"name": "Plugin Name",
"output": "string"
}
}
}
}
}
}
}
```
### Nmap 标准解析输出
```
{
"context": {
"scanner": "nmap",
"scanner_version": "7.97",
"scan_start": "string",
"scan_end": "string",
"scan_duration": "5m 30s",
"scan_type": "syn"
},
"stats": {
"hosts": {
"total": 50,
"unique_ips": 50,
"by_status": {"up": 45, "down": 5}
},
"ports": {
"by_status": {
"open": 1203
},
"by_port": {
"tcp/135": 50,
}
},
"services": {
"total": 150,
"by_service": {"http": 25, "https": 20, "ssh": 30}
}
},
"hosts": {
"1": {
"ip": "192.168.1.100",
"hostname": "server.example.com",
"status": "up",
"ports": {
"tcp/443": {
"port_id": "443",
"protocol": "tcp",
"status": "open",
"service_name": "https",
"service_details": {
"product": "Microsoft Windows RPC",
"method": "probed",
"conf": "10",
"combined_info": "Microsoft Windows RPC"
},
"script_output": {}
}
},
"port_summary": {
"open": 15,
"closed": 0,
"filtered": 0
}
}
},
"services": {
"service_1": {
"host_ip": "10.10.0.12",
"host_hostname": "",
"port": "tcp/135",
"port_status": "open",
"service_name": "msrpc",
"service_details": {
"product": "Microsoft Windows RPC",
"method": "probed",
"conf": "10",
"combined_info": "Microsoft Windows RPC"
},
"script_output": {}
}
}
}
```
### Nmap 扁平化 JSON 输出(兼容旧版)
```
[
{
"fqdn": "example.com",
"ip": "192.168.1.1",
"port": "TCP/80",
"port_status": "open",
"service": "http",
"detailed_service_info": {
"product": "nginx",
"version": "1.18.0",
"combined_info": "nginx 1.18.0",
"extrainfo": "Ubuntu",
"method": "probed",
"conf": "10"
},
"script_output": {
"http-server-header": "nginx/1.18.0 (Ubuntu)",
"http-title": "Welcome to nginx!"
}
},
]
```
### Nessus API 就绪输出(带实体限制)
```
[
{
"type": "stock",
"finding_id": 999,
"affected_entities": "
## 📋 输出格式
### Nessus 标准解析输出
```
{
"context": {
"scan_id": "string",
"scan_start": "DD-MM-YYYY HH:MM:SS",
"scan_duration": "H:MM:SS",
"policy_name": "string"
},
"stats": {
"hosts": {
"total": 100,
"credentialed_checks": 95,
"multi_fqdn_hosts": 10
},
"vulnerabilities": {
"total": 500,
"by_severity": {
"Critical": 5,
"High": 25,
"Medium": 150,
"Low": 200,
"None": 120
}
}
},
"hosts": {
"1": {
"ip": "string",
"fqdns": ["string"],
"os": "string",
"scan_start": "string",
"scan_end": "string",
"credentialed_scan": bool,
"vulnerabilities": {
"Critical": int,
"High": int,
"Medium": int,
"Low": int,
"None": int
},
"ports": {
"443/tcp": {
"service": "string",
"vulnerabilities": ["string"]
}
}
}
},
"vulnerabilities": {
"142960": {
"name": "string",
"family": "string",
"severity": int,
"risk_factor": "string",
"cvss": {
"base_score": float,
"temporal_score": float,
"vector": "string"
},
"cvss3": {
"base_score": float,
"temporal_score": float,
"vector": "string"
},
"description": "string",
"synopsis": "string",
"solution": "string",
"see_also": ["string"],
"cve": [],
"cwe": [],
"xref": [],
"affected_hosts": {
"1": {
"ip": "string",
"fqdn": "string",
"ports": ["string"],
"plugin_output": "string"
}
}
}
}
}
```
### Nessus 合并输出(使用 -c 标志)
当使用 `-c` 标志时,将生成一个额外的合并发现文件:
```
{
"consolidation_metadata": {
"rules_applied": ["rule_name1", "rule_name2"],
"original_plugins_count": int,
"consolidated_count": int,
"consolidation_timestamp": "string"
},
"consolidated_vulnerabilities": {
"rule_name": {
"title": "Human-Readable Title",
"severity": int,
"risk_factor": "string",
"cvss": {},
"cvss3": {},
"consolidated_plugins": {
"plugin_id": "Plugin Name"
},
"cve": [],
"cwe": [],
"solutions": [],
"affected_services": {
"192.168.1.100:443": {
"ip": "string",
"fqdn": "string",
"port": "string",
"issues_found": [
{
"id": "plugin_id",
"name": "Plugin Name"
}
],
"plugin_outputs": {
"plugin_id": {
"name": "Plugin Name",
"output": "string"
}
}
}
}
}
}
}
```
### Nmap 标准解析输出
```
{
"context": {
"scanner": "nmap",
"scanner_version": "7.97",
"scan_start": "string",
"scan_end": "string",
"scan_duration": "5m 30s",
"scan_type": "syn"
},
"stats": {
"hosts": {
"total": 50,
"unique_ips": 50,
"by_status": {"up": 45, "down": 5}
},
"ports": {
"by_status": {
"open": 1203
},
"by_port": {
"tcp/135": 50,
}
},
"services": {
"total": 150,
"by_service": {"http": 25, "https": 20, "ssh": 30}
}
},
"hosts": {
"1": {
"ip": "192.168.1.100",
"hostname": "server.example.com",
"status": "up",
"ports": {
"tcp/443": {
"port_id": "443",
"protocol": "tcp",
"status": "open",
"service_name": "https",
"service_details": {
"product": "Microsoft Windows RPC",
"method": "probed",
"conf": "10",
"combined_info": "Microsoft Windows RPC"
},
"script_output": {}
}
},
"port_summary": {
"open": 15,
"closed": 0,
"filtered": 0
}
}
},
"services": {
"service_1": {
"host_ip": "10.10.0.12",
"host_hostname": "",
"port": "tcp/135",
"port_status": "open",
"service_name": "msrpc",
"service_details": {
"product": "Microsoft Windows RPC",
"method": "probed",
"conf": "10",
"combined_info": "Microsoft Windows RPC"
},
"script_output": {}
}
}
}
```
### Nmap 扁平化 JSON 输出(兼容旧版)
```
[
{
"fqdn": "example.com",
"ip": "192.168.1.1",
"port": "TCP/80",
"port_status": "open",
"service": "http",
"detailed_service_info": {
"product": "nginx",
"version": "1.18.0",
"combined_info": "nginx 1.18.0",
"extrainfo": "Ubuntu",
"method": "probed",
"conf": "10"
},
"script_output": {
"http-server-header": "nginx/1.18.0 (Ubuntu)",
"http-title": "Welcome to nginx!"
}
},
]
```
### Nessus API 就绪输出(带实体限制)
```
[
{
"type": "stock",
"finding_id": 999,
"affected_entities": "
## ✨ 功能
### 🔧 **多工具支持**
- **Nessus XML**:全面的漏洞解析,支持合并和 API 格式化
- **Nmap XML**:包含端口过滤、扁平化 JSON 输出以及两次扫描间对比电子表格的服务发现
- **BloodHound ZIP**:离线 AD 分析、有界攻击路径、权限暴露和报告生成
- **可扩展框架**:易于按照既定模式添加新解析器
- **自动检测**:自动识别文件类型
### 🖥️ **双接口设计**
- **CLI 工具**:具有彩色输出和特定工具选项的精美命令行界面
- **TUI 模式**:操作员优先的 Nessus 分流和 BloodHound AD 调查 (`yapp tui`)
- **Python 库**:简洁的编程 API,可集成到您的项目中
- **内存中处理**:直接解析原始 XML 字符串——无需文件系统(非常适合通过 `process_data()` 与数据库/API 集成)
- **无服务器 AD 分析**:无需 Neo4j 或 BloodHound 服务器;Textual、Kuzu 和 OpenPyXL 作为包依赖项提供
### 📊 **高级 Nessus 处理**
- 将 Nessus XML 文件解析为结构化的 JSON/Python 字典
- 具有智能漏洞分组的先进合并引擎
- 插件输出模式匹配和过滤
- 基于规则的漏洞分类
- 具有实体限制的 API 就绪输出格式化
- **内联 Excel 报告生成**(`-x` 标志)——不再需要两步工作流
- **合并的单文件输出**(`-sf` 标志)——将所有选定的输出合并在一个 JSON 中
### 🗺️ **全面的 Nmap 支持**
- 将 Nmap XML 解析为包含服务详情的结构化格式
- 端口状态过滤(开放、关闭、被过滤)
- 用于兼容旧工具的扁平化 JSON 输出
- 服务枚举和脚本输出捕获
- 比较两个 Nmap XML 文件并将差异输出到电子表格
### 🩸 **Active Directory / BloodHound**
- 直接加载 BloodHound ZIP 集合;无需数据库或 Web 服务器
- 通往高价值目标的优先、有界路径,并提供确切的证据关系
- 使用任务、探索、暴露和已保存的工作区,而不是 Nessus 式的表格层级
- 全局对象搜索、任意源/目标路径规划、反向路径和边缘过滤
- 带有路径树、持久对象检查器和安全大纲回退的 Graphviz 聚焦布局
- 用于广泛的管理员成员资格、特权对象控制和本地管理员扇出的权限暴露队列
- 通过 CLI、文件或 TUI 设定已控制用户,并在会话内快速重新计算
- 有界节点枢纽、持久的分流/书签、集合差异警告,以及 JSON/API/Excel 导出
### 🎯 **情报与分析**
- 全局和按主机跟踪漏洞 (Nessus)
- 适用于两种工具的全面统计信息和指标
- 每个主机支持多个 FQDN
- 详细的漏洞信息(CVE、CVSS、受影响的系统)
- 带有插件/服务名称的易读输出
- **合并规则日志记录——通过查看哪些内容未匹配及其原因,轻松调试合并规则**
### ⚡ **性能**
**基准测试结果 (Nessus):**
- **文件大小**:118 MB Nessus XML(1005 台主机,214 项发现,17 项修复建议)
- **处理时间**:总计 9.18 秒(5.76 秒处理 + 0.45 秒 I/O)
- **吞吐量**:~13 MB/秒(总计)/ ~20 MB/秒(仅处理)
- **内存高效**:使用流式解析器,内存占用低
- **包含**:完整解析 + 合并引擎 + API 格式化 + JSON 输出(3 个文件)
*测试环境:Windows 宿主机上的 WSL2 (Debian)*
## 🚀 安装
### 仅限 CLI 使用
```
# 使用 pipx 全局安装(推荐仅用于 CLI)
git clone https://github.com/FlyingPhish/YetAnotherPentestParser && cd YetAnotherPentestParser
pipx install .
```
或
```
pipx install git+https://github.com/FlyingPhish/YetAnotherPentestParser.git
# pipx install git+https://github.com/FlyingPhish/YetAnotherPentestParser.git@branch
```
### 用于编程使用
```
# 在你的 virtual environment 中
pip install git+https://github.com/FlyingPhish/YetAnotherPentestParser.git
# pip install git+https://github.com/FlyingPhish/YetAnotherPentestParser.git@branch
```
### 升级
```
# 使用 pipx 安装时
pipx upgrade yapp
# 使用 pip 安装时
pip install git+https://github.com/FlyingPhish/YetAnotherPentestParser.git --force-reinstall
```
### 用于 AD 探索的 Graphviz
强烈建议使用 Graphviz 进行聚焦的图形布局。请按照[官方 Graphviz 平台说明](https://graphviz.org/download/)进行安装,并确保 `dot -V` 执行成功。当 Graphviz 不可用时,YAPP 将回退到关系大纲显示。
## 💡 用法
### 🖥️ 命令行界面
```
usage: yapp [-h] [--version] {parse,ad,excel,compare,tui} ...
YAPP - Swiss Army Knife for Pentester File Processing
positional arguments:
{parse,ad,excel,compare,tui} Available commands
parse Parse and process pentesting files (Nessus/Nmap/JSON)
ad Analyse a BloodHound ZIP collection without a server
excel Generate Excel report from YAPP JSON output
compare Compare two Nmap XML scans
tui Launch Nessus triage or BloodHound AD operator TUI
options:
-h, --help show this help message and exit
--version show program's version number and exit
```
### 🖥️ 命令行界面 - 解析
```
yapp parse -h
options:
-h, --help show this help message and exit
-i, --input-file INPUT_FILE
Path to input file (Nessus .nessus, Nmap .xml, Consolidated JSON)
-t, --file-type {auto,nessus,nmap,consolidated_json}
Input file type (default: auto-detect)
-of, --output-folder OUTPUT_FOLDER
Output folder path (default: ./output)
-on, --output-name OUTPUT_NAME
Output base name (default: timestamp_
### 功能:
- **矩阵布局**:每个漏洞一个工作表,带有“是/否”插件指示器
- **服务级别详情**:每行显示 FQDN、IP、端口以及哪些插件影响了它
- **合并验证**:快速验证哪些插件被分在了一起
- **对分析师友好的格式**:熟悉的电子表格格式,便于审查和签字
- **一致的命名**:输出文件名遵循统一的 `{base}_Report.xlsx` 命名约定
### 工作流:
**选项 A — 内联(单条命令):**
```
yapp parse -i scan.nessus -c -x # Parse, consolidate, and generate Excel in one shot
yapp parse -i scan.nessus -c -a -x # Full pipeline with API output + Excel
yapp parse -i scan.nessus -c -a -x -sf # Everything above, combined into one JSON + Excel
```
**选项 B — 独立运行(从现有 JSON):**
```
yapp excel -i scan_Consolidated.json # From a consolidated JSON file
yapp excel -i scan_Combined.json # From a combined JSON file (extracts consolidated data)
```
## 🔬 Nessus 合并引擎 + API 格式化程序
您可以使用 `-a` 或 `--api-output`,这会将您合并规则的结果转换为一个基本的 JSON 结构,该结构可与报告引擎配合使用,将 Nessus 结果转化为渗透测试报告引擎中的发现。该输出旨在与我为 [Ghostwriter](https://github.com/GhostManager/Ghostwriter) 定制的 API 配合使用。(如果您想了解更多相关信息,请在 Twatter (x) 上私信我)

## 🔬 Nmap 解析器
您可以在以下章节中看到正确的输出

### 📊 Nmap 结果对比
## 📋 输出格式
### Nessus 标准解析输出
```
{
"context": {
"scan_id": "string",
"scan_start": "DD-MM-YYYY HH:MM:SS",
"scan_duration": "H:MM:SS",
"policy_name": "string"
},
"stats": {
"hosts": {
"total": 100,
"credentialed_checks": 95,
"multi_fqdn_hosts": 10
},
"vulnerabilities": {
"total": 500,
"by_severity": {
"Critical": 5,
"High": 25,
"Medium": 150,
"Low": 200,
"None": 120
}
}
},
"hosts": {
"1": {
"ip": "string",
"fqdns": ["string"],
"os": "string",
"scan_start": "string",
"scan_end": "string",
"credentialed_scan": bool,
"vulnerabilities": {
"Critical": int,
"High": int,
"Medium": int,
"Low": int,
"None": int
},
"ports": {
"443/tcp": {
"service": "string",
"vulnerabilities": ["string"]
}
}
}
},
"vulnerabilities": {
"142960": {
"name": "string",
"family": "string",
"severity": int,
"risk_factor": "string",
"cvss": {
"base_score": float,
"temporal_score": float,
"vector": "string"
},
"cvss3": {
"base_score": float,
"temporal_score": float,
"vector": "string"
},
"description": "string",
"synopsis": "string",
"solution": "string",
"see_also": ["string"],
"cve": [],
"cwe": [],
"xref": [],
"affected_hosts": {
"1": {
"ip": "string",
"fqdn": "string",
"ports": ["string"],
"plugin_output": "string"
}
}
}
}
}
```
### Nessus 合并输出(使用 -c 标志)
当使用 `-c` 标志时,将生成一个额外的合并发现文件:
```
{
"consolidation_metadata": {
"rules_applied": ["rule_name1", "rule_name2"],
"original_plugins_count": int,
"consolidated_count": int,
"consolidation_timestamp": "string"
},
"consolidated_vulnerabilities": {
"rule_name": {
"title": "Human-Readable Title",
"severity": int,
"risk_factor": "string",
"cvss": {},
"cvss3": {},
"consolidated_plugins": {
"plugin_id": "Plugin Name"
},
"cve": [],
"cwe": [],
"solutions": [],
"affected_services": {
"192.168.1.100:443": {
"ip": "string",
"fqdn": "string",
"port": "string",
"issues_found": [
{
"id": "plugin_id",
"name": "Plugin Name"
}
],
"plugin_outputs": {
"plugin_id": {
"name": "Plugin Name",
"output": "string"
}
}
}
}
}
}
}
```
### Nmap 标准解析输出
```
{
"context": {
"scanner": "nmap",
"scanner_version": "7.97",
"scan_start": "string",
"scan_end": "string",
"scan_duration": "5m 30s",
"scan_type": "syn"
},
"stats": {
"hosts": {
"total": 50,
"unique_ips": 50,
"by_status": {"up": 45, "down": 5}
},
"ports": {
"by_status": {
"open": 1203
},
"by_port": {
"tcp/135": 50,
}
},
"services": {
"total": 150,
"by_service": {"http": 25, "https": 20, "ssh": 30}
}
},
"hosts": {
"1": {
"ip": "192.168.1.100",
"hostname": "server.example.com",
"status": "up",
"ports": {
"tcp/443": {
"port_id": "443",
"protocol": "tcp",
"status": "open",
"service_name": "https",
"service_details": {
"product": "Microsoft Windows RPC",
"method": "probed",
"conf": "10",
"combined_info": "Microsoft Windows RPC"
},
"script_output": {}
}
},
"port_summary": {
"open": 15,
"closed": 0,
"filtered": 0
}
}
},
"services": {
"service_1": {
"host_ip": "10.10.0.12",
"host_hostname": "",
"port": "tcp/135",
"port_status": "open",
"service_name": "msrpc",
"service_details": {
"product": "Microsoft Windows RPC",
"method": "probed",
"conf": "10",
"combined_info": "Microsoft Windows RPC"
},
"script_output": {}
}
}
}
```
### Nmap 扁平化 JSON 输出(兼容旧版)
```
[
{
"fqdn": "example.com",
"ip": "192.168.1.1",
"port": "TCP/80",
"port_status": "open",
"service": "http",
"detailed_service_info": {
"product": "nginx",
"version": "1.18.0",
"combined_info": "nginx 1.18.0",
"extrainfo": "Ubuntu",
"method": "probed",
"conf": "10"
},
"script_output": {
"http-server-header": "nginx/1.18.0 (Ubuntu)",
"http-title": "Welcome to nginx!"
}
},
]
```
### Nessus API 就绪输出(带实体限制)
```
[
{
"type": "stock",
"finding_id": 999,
"affected_entities": "192.168.1.100:443
server.example.com
Please refer to external document named 'replaceMe'.csv
" // This is what happens when you use -el and the result is > than your int } ] ``` ### 合并的单文件输出(使用 -sf 标志) 当使用 `-sf` 时,所有选定的输出都会合并到一个单一的 JSON 文件中。只有您选择的输出才会作为顶级键被包含进去: ``` { "parsed": { ... }, "consolidated": { ... }, "api": [ ... ] } ``` **示例:** - `yapp parse -i scan.nessus -sf` → `{"parsed": {...}}` - `yapp parse -i scan.nessus -c -sf` → `{"parsed": {...}, "consolidated": {...}}` - `yapp parse -i scan.nessus -c -a -sf` → `{"parsed": {...}, "consolidated": {...}, "api": [...]}` ### 输出文件命名 YAPP 对所有输出文件使用一致的命名约定: | 标志 | 默认名称 | 使用 `-on my_scan` | |---|---|---| | *(base)* | `{timestamp}_{input}_Parsed.json` | `my_scan_Parsed.json` | | `-c` | `{timestamp}_{input}_Consolidated.json` | `my_scan_Consolidated.json` | | `-a` | `{timestamp}_{input}_API.json` | `my_scan_API.json` | | `-fj` | `{timestamp}_{input}_Flat.json` | `my_scan_Flat.json` | | `-sf` | `{timestamp}_{input}_Combined.json` | `my_scan_Combined.json` | | `-x` | `{timestamp}_{input}_Report.xlsx` | `my_scan_Report.xlsx` | `-on` 标志用于设置**基础名称**——YAPP 始终会自动附加适当的后缀和扩展名。无论是传递 `my_scan`、`my_scan.json` 还是 `my_scan.xlsx`,它们最终都会解析为相同的基础名称 `my_scan`。 ## 🏗️ 项目结构 ``` yapp/ ├── __init__.py # Main package API ├── cli.py # CLI interface ├── core/ # Core processing modules │ ├── __init__.py │ ├── processor.py # Main processing pipeline (process_file + process_data) │ ├── nessus_parser.py # Nessus XML parsing │ ├── nmap_comparator.py # Nmap comparison │ ├── nmap_parser.py # Nmap XML parsing │ ├── excel_formatter.py # Excel logic │ ├── consolidator.py # Vulnerability consolidation │ └── formatter.py # API output formatting ├── utils/ # Utility modules │ ├── __init__.py │ ├── file_utils.py # File operations & detection │ ├── json_utils.py # JSON handling │ ├── display.py # CLI output formatting │ └── logger.py # Logging utilities └── config/ # Configuration ├── __init__.py ├── default_rules.json # Default consolidation rules └── consolidation_README.md ``` ### 🐍 Python 库 ``` from yapp import process_file # 自动检测和解析任何受支持的文件 results = process_file('scan.nessus') # or scan.xml # 带有完整 pipeline 的 Nessus(包括 inline Excel) nessus_results = process_file( 'scan.nessus', consolidate=True, api_format=True, excel_format=True, entity_limit=10 ) # 带有过滤和扁平 JSON 的 Nmap nmap_results = process_file( 'scan.xml', port_status='open', flat_json=True ) # 访问解析后的数据 nessus_data = nessus_results['parsed'] consolidated = nessus_results.get('consolidated') api_ready = nessus_results.get('api_ready') nmap_data = nmap_results['parsed'] flat_json = nmap_results.get('flat_json') ``` #### 从内存中处理原始 XML 用于与数据库、API 或消息队列集成——无需文件系统: ``` from yapp import process_data # 来自数据库列的 Nessus XML xml_str = db.fetch_xml(scan_id) results = process_data(xml_str, file_type='nessus', consolidate=True, api_format=True) # 来自 HTTP 响应的 Nmap XML results = process_data(response.text, file_type='nmap', port_status='open') ``` #### 直接使用单个解析器类 ``` from yapp import NessusParser, NmapParser, VulnerabilityConsolidator, APIFormatter # 来自文件 nessus_parser = NessusParser('scan.nessus') nessus_data = nessus_parser.parse() # 来自原始 XML 字符串(例如从 DB 中提取) nessus_parser = NessusParser(xml_data=raw_xml_string) nessus_data = nessus_parser.parse() nmap_parser = NmapParser(xml_data=nmap_xml_string) nmap_data = nmap_parser.parse(port_status_filter='open') # 手动合并 + API 格式化 consolidator = VulnerabilityConsolidator() consolidated = consolidator.consolidate(nessus_data) formatter = APIFormatter(entity_limit=5) api_data = formatter.format_for_api(consolidated) ``` 有关更全面的示例,请参见[库用法示例](examples/library_usage.py)、[库文档](yapp/docs/Library%20Usage.md)和 [TUI 用法](yapp/docs/TUI%20Usage.md)。 ## 🔧 框架扩展 YAPP 被设计为一个可扩展的框架。为新渗透测试工具添加支持遵循一致的模式: 1. 在 `core/your_tool_parser.py` 中创建解析器类 2. 更新 `utils/file_utils.py` 中的文件检测逻辑 3. 在 `core/processor.py` 中添加工具支持 4. 更新 CLI 参数和显示函数 5. 在模块的 `__init__.py` 文件导出 有关详细说明,请参见[模块扩展指南](yapp/docs/Module%20Expansion.md)。 ## 📈 路线图 ### 支持的工具: - ✅ **Nessus**(.nessus XML 文件) - ✅ **Nmap**(.xml XML 文件) - ✅ **BloodHound**(ZIP 集合;离线分析和操作员 TUI) - 🔄 **Burp**:已创建包含核心 Burp 功能的分支 - 待定 - 🔄 **已准备好扩展的框架**:Masscan、Nuclei、OpenVAS 等 ### 当前版本功能: - [X] V7 离线 BloodHound 分析和操作员主导的 AD TUI - [X] 优先级的攻击路径、权限暴露和本地管理员访问 - [X] 已控制用户重新计算、节点枢纽、分流、书签和 AD 导出 - [X] 任务、探索、暴露和已保存的 AD 工作区 - [X] Graphviz 聚焦布局、任意路径规划、边缘过滤和对象搜索 - [X] 做出这个该死的工具 - [X] 专门给讨厌它的人准备的 ASCII 艺术横幅(没有它就算不上一个正经的工具) - [X] 让它变得漂亮 👉👈 - [X] 多工具解析框架 - [X] 带有合并功能的 Nessus 解析 - [X] 带有扁平化 JSON 支持的 Nmap 解析 - [X] 自动文件类型检测 - [X] 用于 API 输出的实体限制 - [X] 可扩展架构 - [X] Excel/XLSX 输出格式 - [X] 详细的合并报告 - [x] 集成来自 [Nmap-Analysis](https://github.com/FlyingPhish/Nmap-Analysis) 的对比功能 - [X] 用于数据库/API 集成的内存 XML 处理(`process_data()` / `xml_data=` 参数) - [X] 合并的单文件 JSON 输出(`-sf` / `--single-file`) - [X] 从解析流水线生成内联 Excel(`-x` / `--excel`) - [X] 独立的 `yapp excel` 子命令,用于事后生成 Excel - [X] 一致的输出文件命名(修复了 `-on` 扩展名处理问题) ### 未来增强: - [ ] 增强的类型注解 - [ ] 额外的工具解析器 - [ ] 高级过滤和查询 - [ ] 集成来自 [NessCIS](https://github.com/FlyingPhish/NessCIS) 的功能 - [ ] (也许)使用 [Fabric](https://github.com/danielmiessler/fabric) 或类似工具进行 AI 报告(发现项 + 高管摘要/顾问评论)。 ## 🤝 贡献 我们欢迎您的贡献!有关添加新解析器的信息,请参见[模块扩展指南](yapp/docs/Module%20Expansion.md)。 1. Fork 该仓库 2. 创建功能分支 (`git checkout -b feature/amazing-feature`) 3. 遵循现有模式以保持一致性 4. 添加测试和文档 5. 提交 Pull Request ### 关键设计原则: - **KISS**:保持实现简单易读 - **DRY**:模块化、可重用的组件 - **经过考量后的依赖**:使用 OpenPyXL 处理工作簿,Textual 用于 TUI,Kuzu 用于图形分析 - **可扩展**:基于框架的架构,易于扩展 ## 📄 许可证 本项目基于 GNU Affero General Public License v3.0 授权 - 有关详细信息,请参见 [LICENSE](LICENSE) 文件。 ## 🙏 致谢 - 为渗透测试和安全社区而构建。 - 源于对简洁、无依赖、多工具解析器框架的需求。我们知道大多数公司都在克扣内部研发投入。 **YAPP**:*Yet Another Pentest Parser* - 一个用于解析渗透测试工具输出的统一框架! 🔧🐍✨标签:Python, 无后门, 逆向工具