# Tile Language
[](https://badge.fury.io/py/tilelang)
[](https://deepwiki.com/tile-ai/tilelang)
[](https://discord.gg/TUrHyJnKPG)
[](https://github.com/tile-ai/tilelang-puzzles)
Tile Language (**tile-lang**) 是一种简洁的领域特定语言,旨在简化高性能 GPU/CPU kernel(例如 GEMM、Dequant GEMM、FlashAttention、LinearAttention)的开发。通过采用 Pythonic 的语法以及基于 [TVM](https://tvm.apache.org/) 的底层编译器基础设施,tile-lang 允许开发者在不牺牲实现最先进性能所需的底层优化的前提下,专注于提升生产力。

## 最新动态
- 02/02/2026 🧩: 快来体验 [TileLang Puzzles](https://github.com/tile-ai/tilelang-puzzles),这是一种有趣且互动的 TileLang 编程学习方式,包含 10 个难度逐渐递增的谜题!
- 12/18/2025 🚀: 新增了对 [CuTeDSL backend](https://github.com/tile-ai/tilelang/pull/1421) 的支持,能够编译为 NVIDIA CUTLASS CuTe DSL!欢迎加入我们共同构建和优化这个令人兴奋的新后端:[Issue #1454](https://github.com/tile-ai/tilelang/issues/1454)。
- 12/17/2025 🔬: 将 [Z3 theorem prover](https://github.com/tile-ai/tilelang/pull/1367) 集成到 TVM Arith Analyzer 中,带来了基于 SMT 的符号推理,以增强优化和自动正确性验证!
- 10/31/2025 🔧: 迁移至 [apache-tvm-ffi](https://github.com/tile-ai/tilelang/pull/1108),显著降低了 CPU 开销!
- 10/30/2025 📦: 我们发布了 v0.1.6.post2,这是最后一个兼容 Python 3.8 的版本。
- 10/07/2025 🍎: 新增了对 Apple Metal Device 的支持,详情请查看 [Pull Request #799](https://github.com/tile-ai/tilelang/pull/799)。
- 09/29/2025 🎉: 很高兴地宣布,现已支持针对华为 Ascend 芯片的 AscendC 和 AscendNPU IR backends!
在此处查看预览:
🔗 [链接](https://github.com/tile-ai/tilelang-ascend)。
这包括了跨两个分支的实现:
[ascendc_pto](https://github.com/tile-ai/tilelang-ascend) 和
[npuir](https://github.com/tile-ai/tilelang-ascend/tree/npuir)。
欢迎探索并分享您的反馈!
- 07/04/2025 🚀: 引入了用于 2:4 稀疏 tensor core 支持的 `T.gemm_sp`,详情请查看 [Pull Request #526](https://github.com/tile-ai/tilelang/pull/526)。
- 06/05/2025 ✨: 添加了 [NVRTC Backend](https://github.com/tile-ai/tilelang/pull/461) 以显著减少 cute 模板的编译时间!
- 04/14/2025 🚀: 添加了针对 AMD MI300X 的高性能 FlashMLA 实现,实现了与 Aiter 手工优化的汇编 kernel 相媲美的性能!详情请参见 [example_mla_amd](./examples/deepseek_mla/amd/README.md)。
- 03/03/2025 🚀: 仅使用 80 行 Python 代码添加了高性能 MLA Decoding 支持,在 H100 上实现了与 FlashMLA 相当的性能(参见 [example_mla_decode.py](./examples/deepseek_mla/example_mla_decode.py))!我们还提供了[文档](./examples/deepseek_mla/README.md)解释 TileLang 是如何实现这一点的。
- 02/15/2025 ✨: 添加了 WebGPU Codegen 支持,参见 [Pull Request #86](https://github.com/tile-ai/tilelang/pull/86)!
- 02/12/2025 ✨: 很高兴地宣布 [v0.1.0](https://github.com/tile-ai/tilelang/releases/tag/v0.1.0) 发布!
- 02/10/2025 🚀: 为 TileLang 添加了调试工具——用于打印变量/buffer 的 `T.print`([文档](https://tilelang.com/tutorials/debug_tools_for_tilelang.html))以及内存布局绘图工具([examples/plot_layout](./examples/plot_layout))。
- 01/20/2025 ✨: 我们很高兴地宣布,用于高性能 AI 工作负载的 dsl tile-lang 现已开源并向公众开放!
## 已测试设备
尽管 tile-lang 致力于在各种设备上实现可移植性,但它已在以下设备上进行了专门的测试和验证:对于 NVIDIA GPU,包括 H100(支持 Auto TMA/WGMMA)、A100、V100、RTX 4090、RTX 3090 和 RTX A6000;对于 AMD GPU,包括 MI250(支持 Auto MatrixCore)和 MI300X(支持 Async Copy)。
## 算子实现示例
**tile-lang** 提供了用于实现各种算子的基础构建块。部分示例包括:
- [矩阵乘法](./examples/gemm/)
- [反量化 GEMM](./examples/dequantize_gemm/)
- [Flash Attention](./examples/flash_attention/)
- [Flash Linear Attention](./examples/linear_attention/)
- [Flash MLA Decoding](./examples/deepseek_mla/)
- [Native Sparse Attention](./examples/deepseek_nsa/)
在 `examples` 目录中,您还会发现其他复杂的 kernel——例如卷积、FlashAttention 的前向/反向传播,未来将持续添加更多算子。
## 基准测试摘要
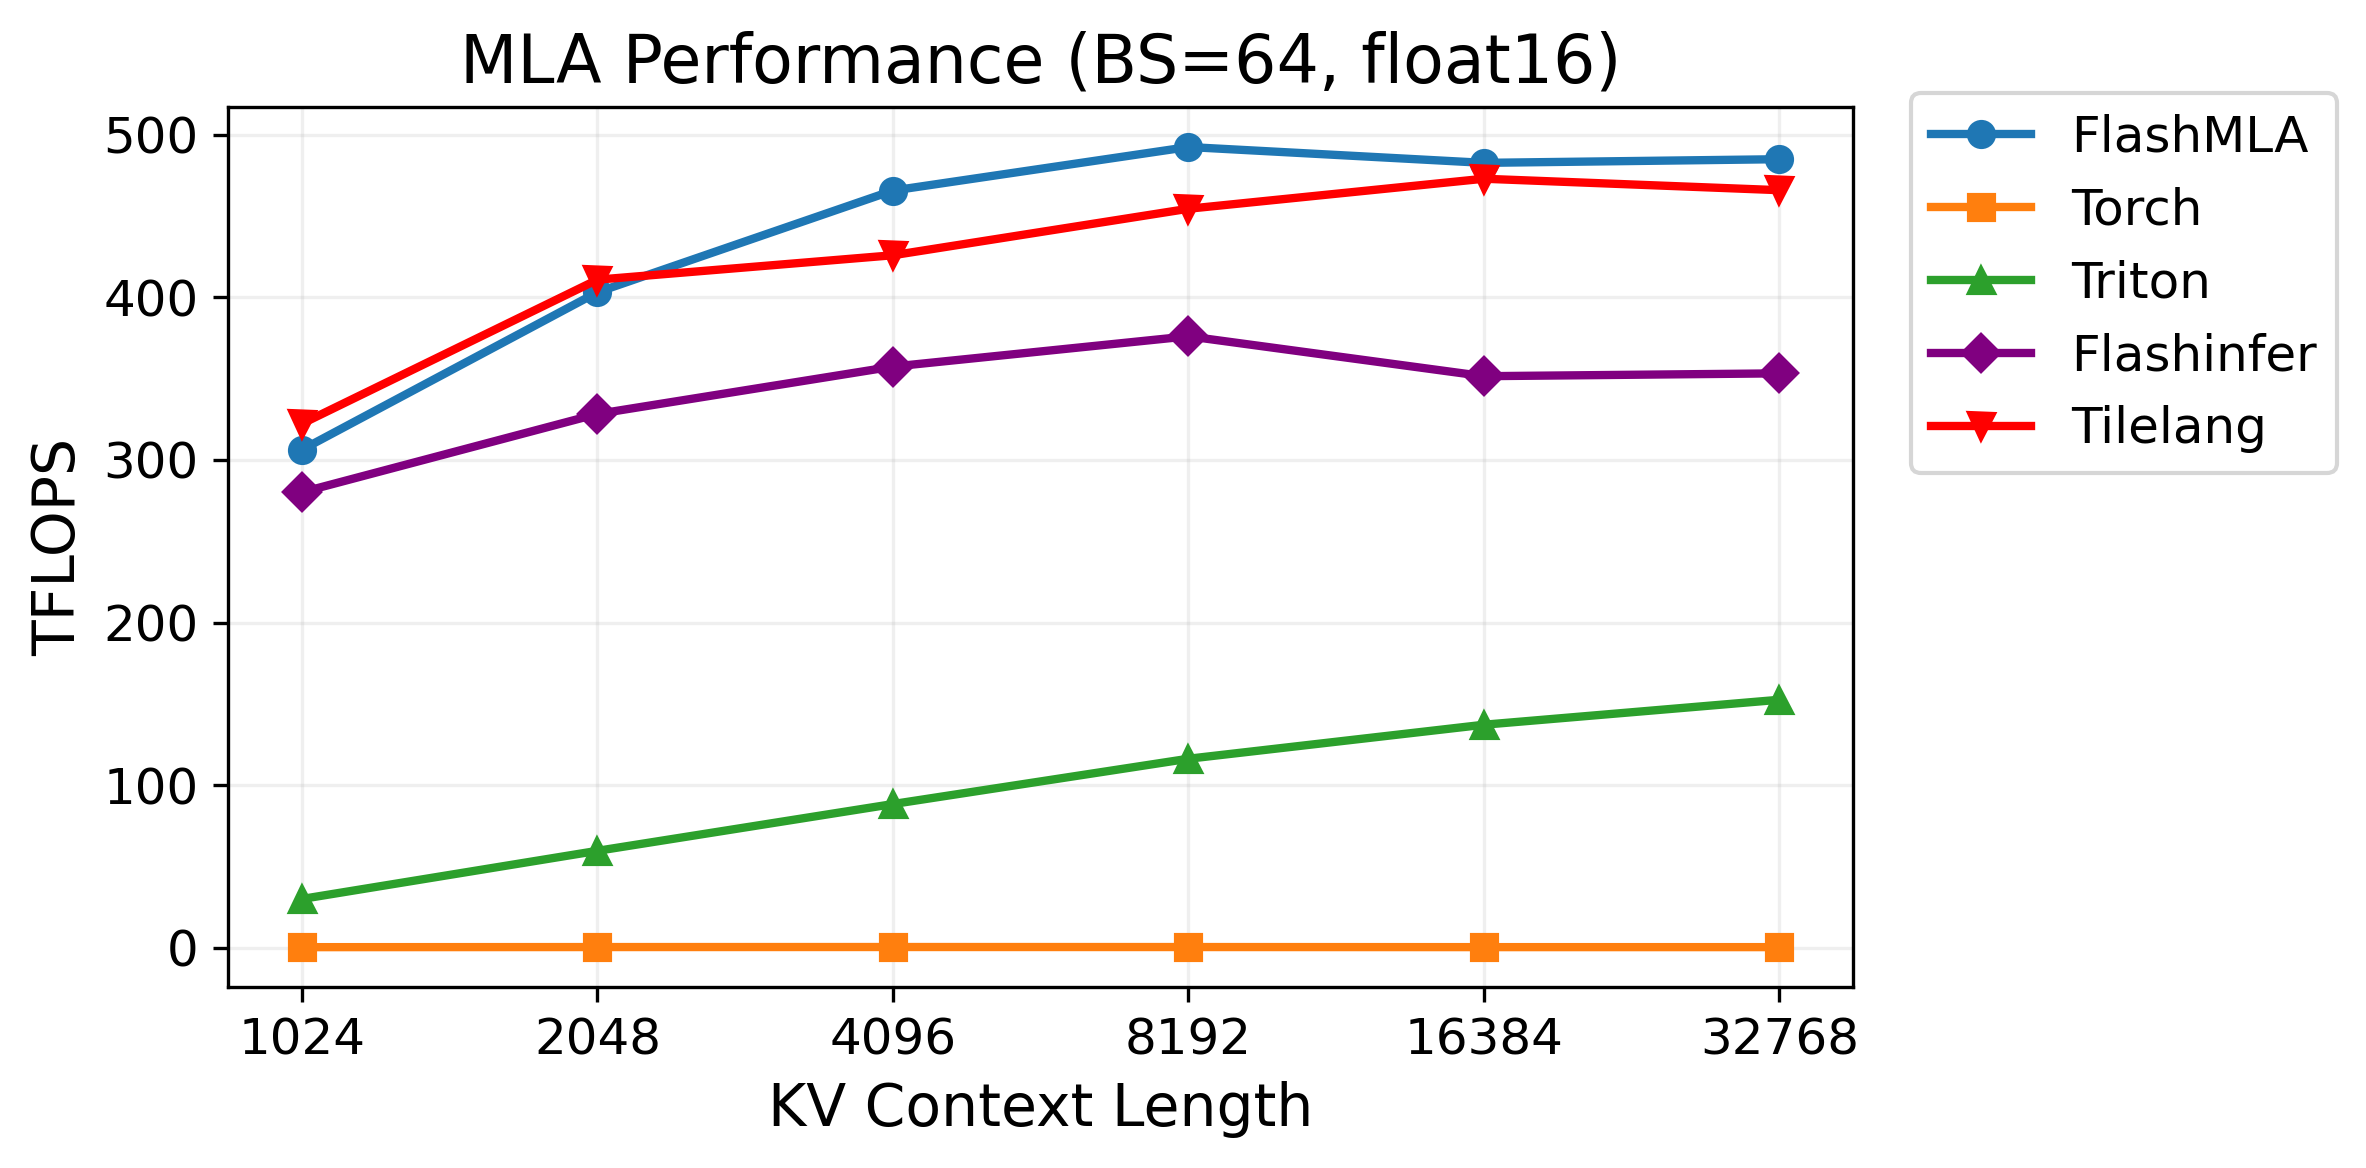
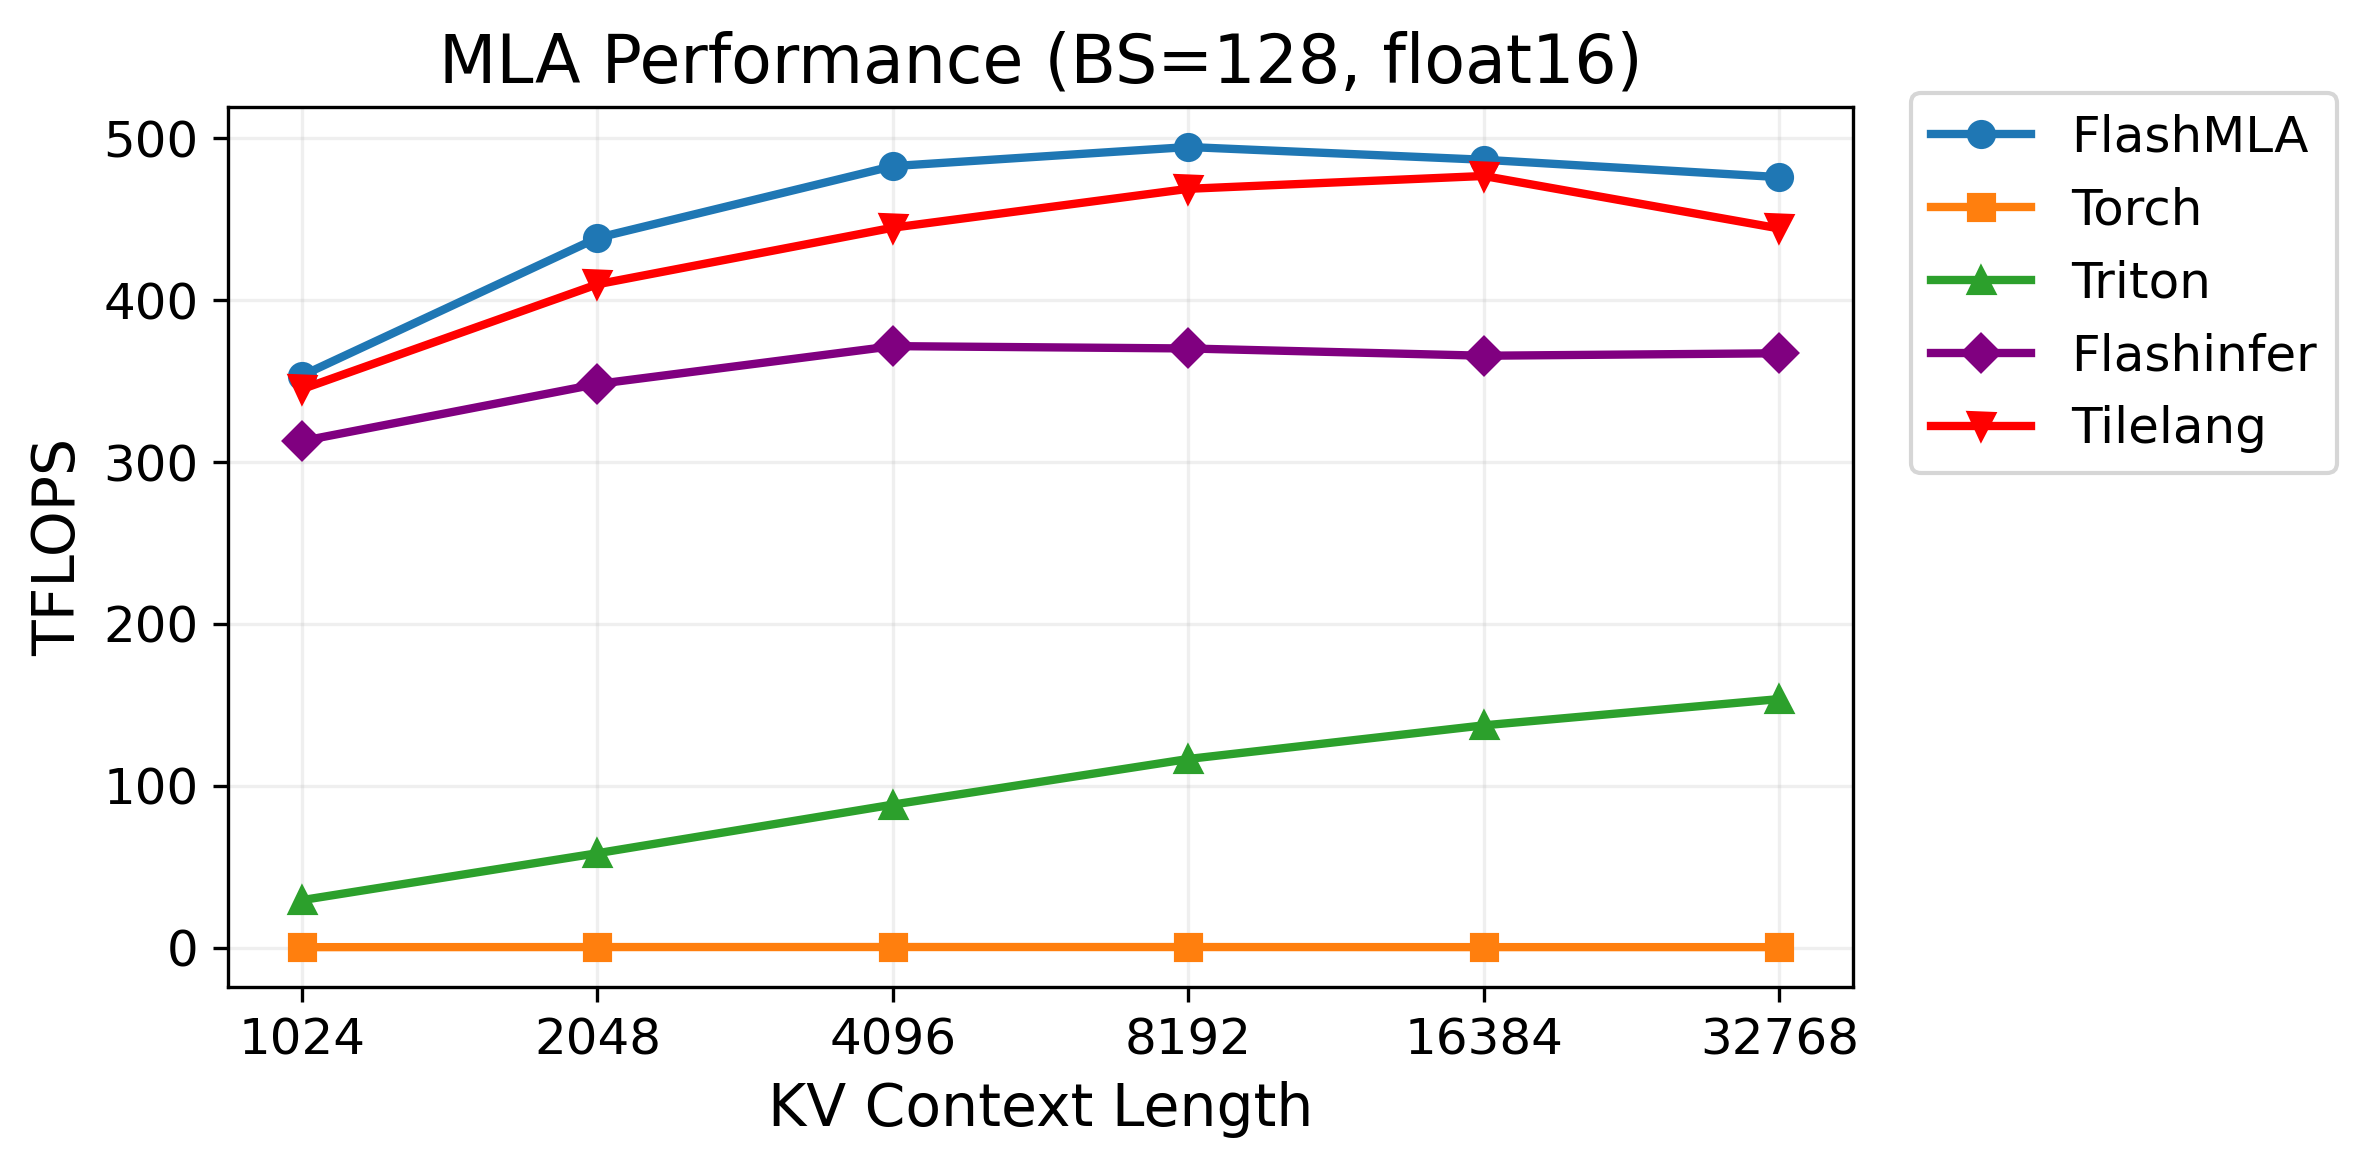
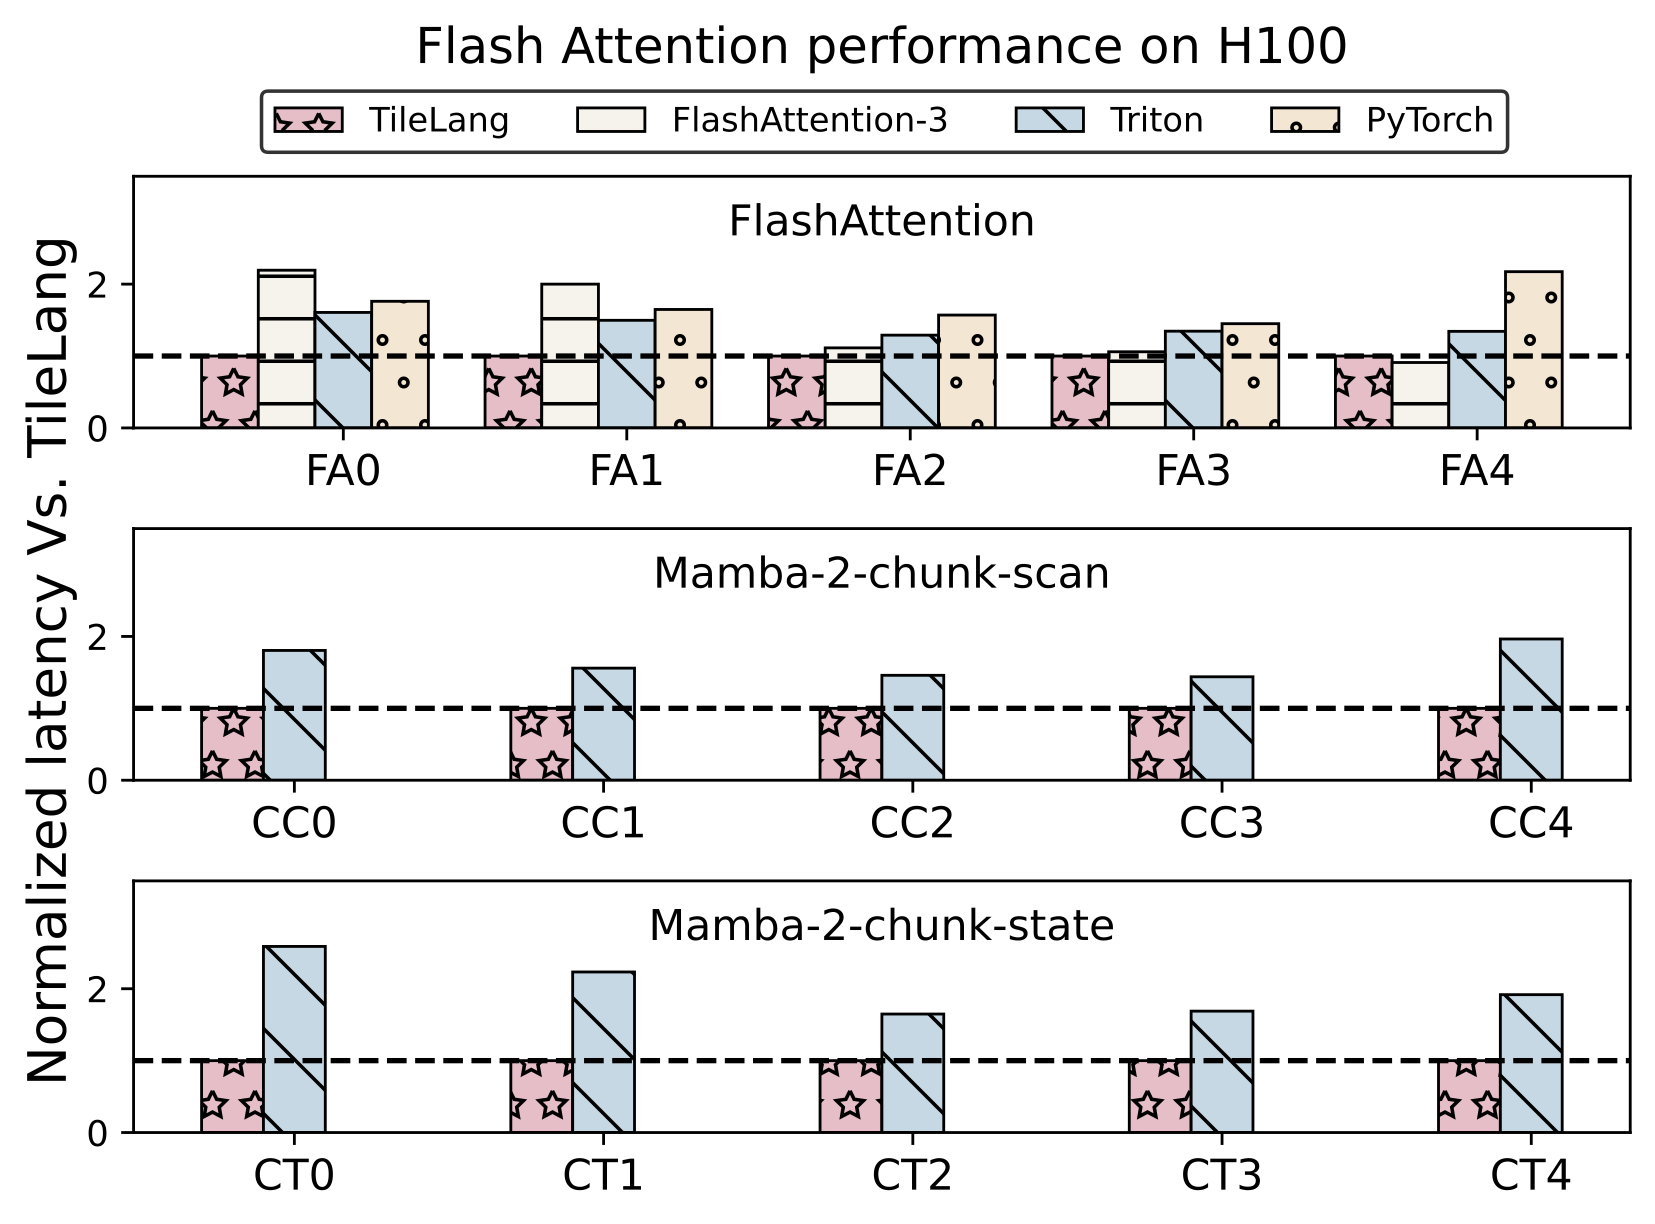
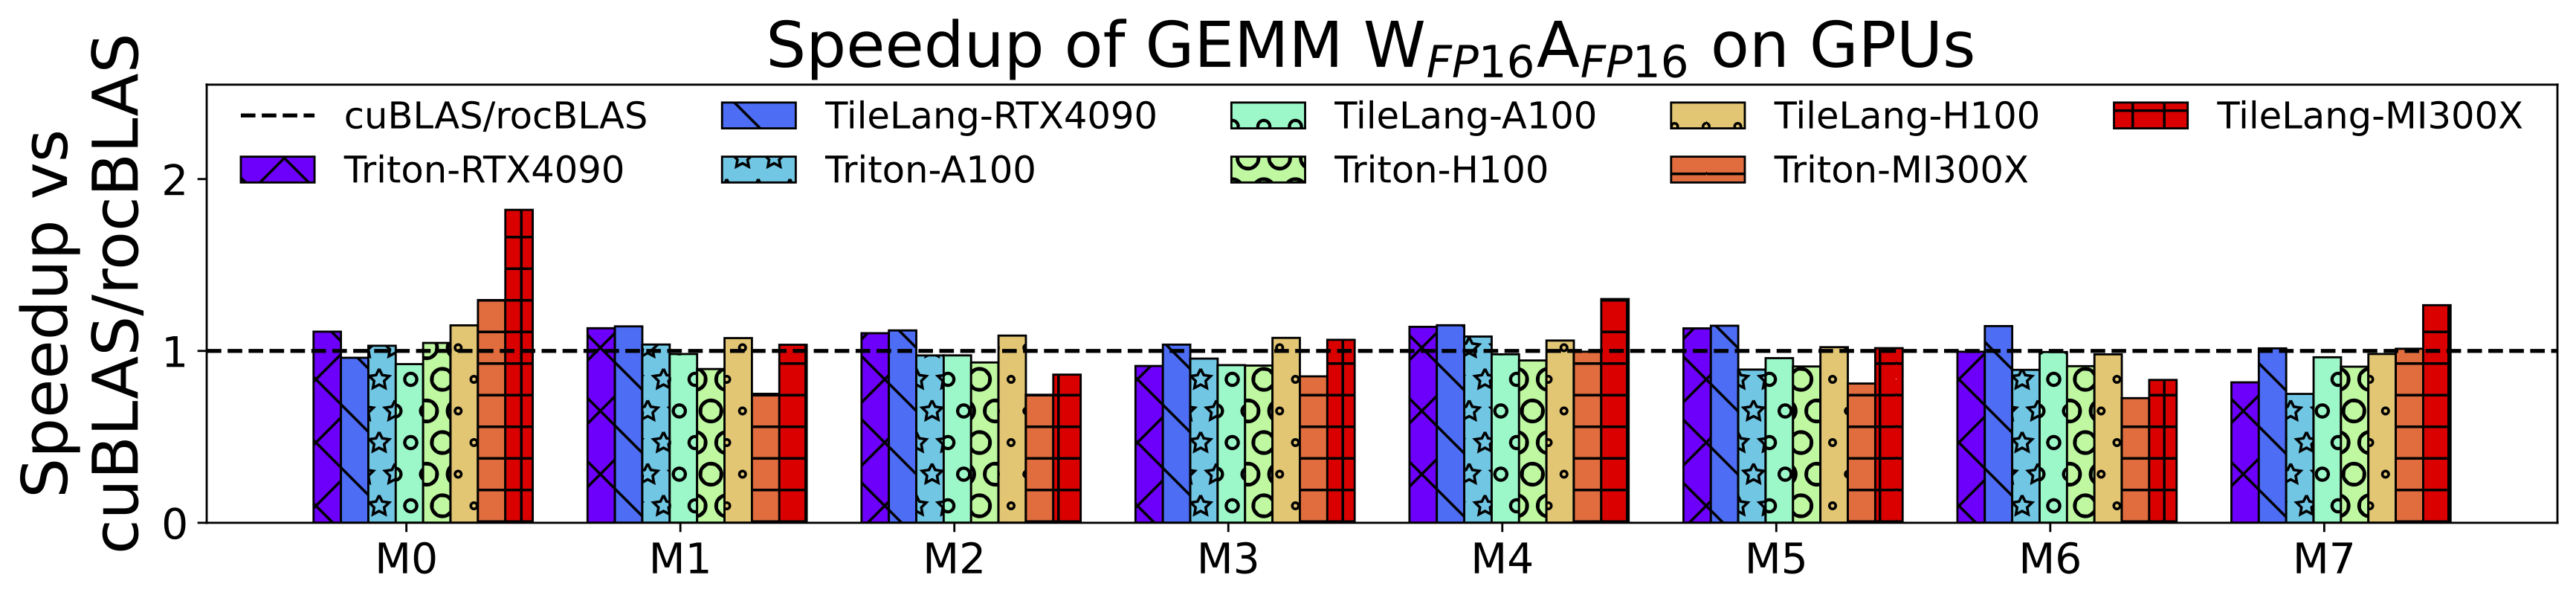
TileLang 在各种计算模式下都实现了卓越的性能。完整的基准测试脚本和设置可在 [tilelang-benchmark](https://github.com/tile-ai/tilelang-benchmark) 中获取。以下展示了体现其能力的部分精选结果:
- H100 上的 MLA Decoding 性能
- H100 上的 Flash Attention 性能
- GPU(RTX 4090、A100、H100、MI300X)上的 Matmul 性能
- A100 上的反量化 Matmul 性能
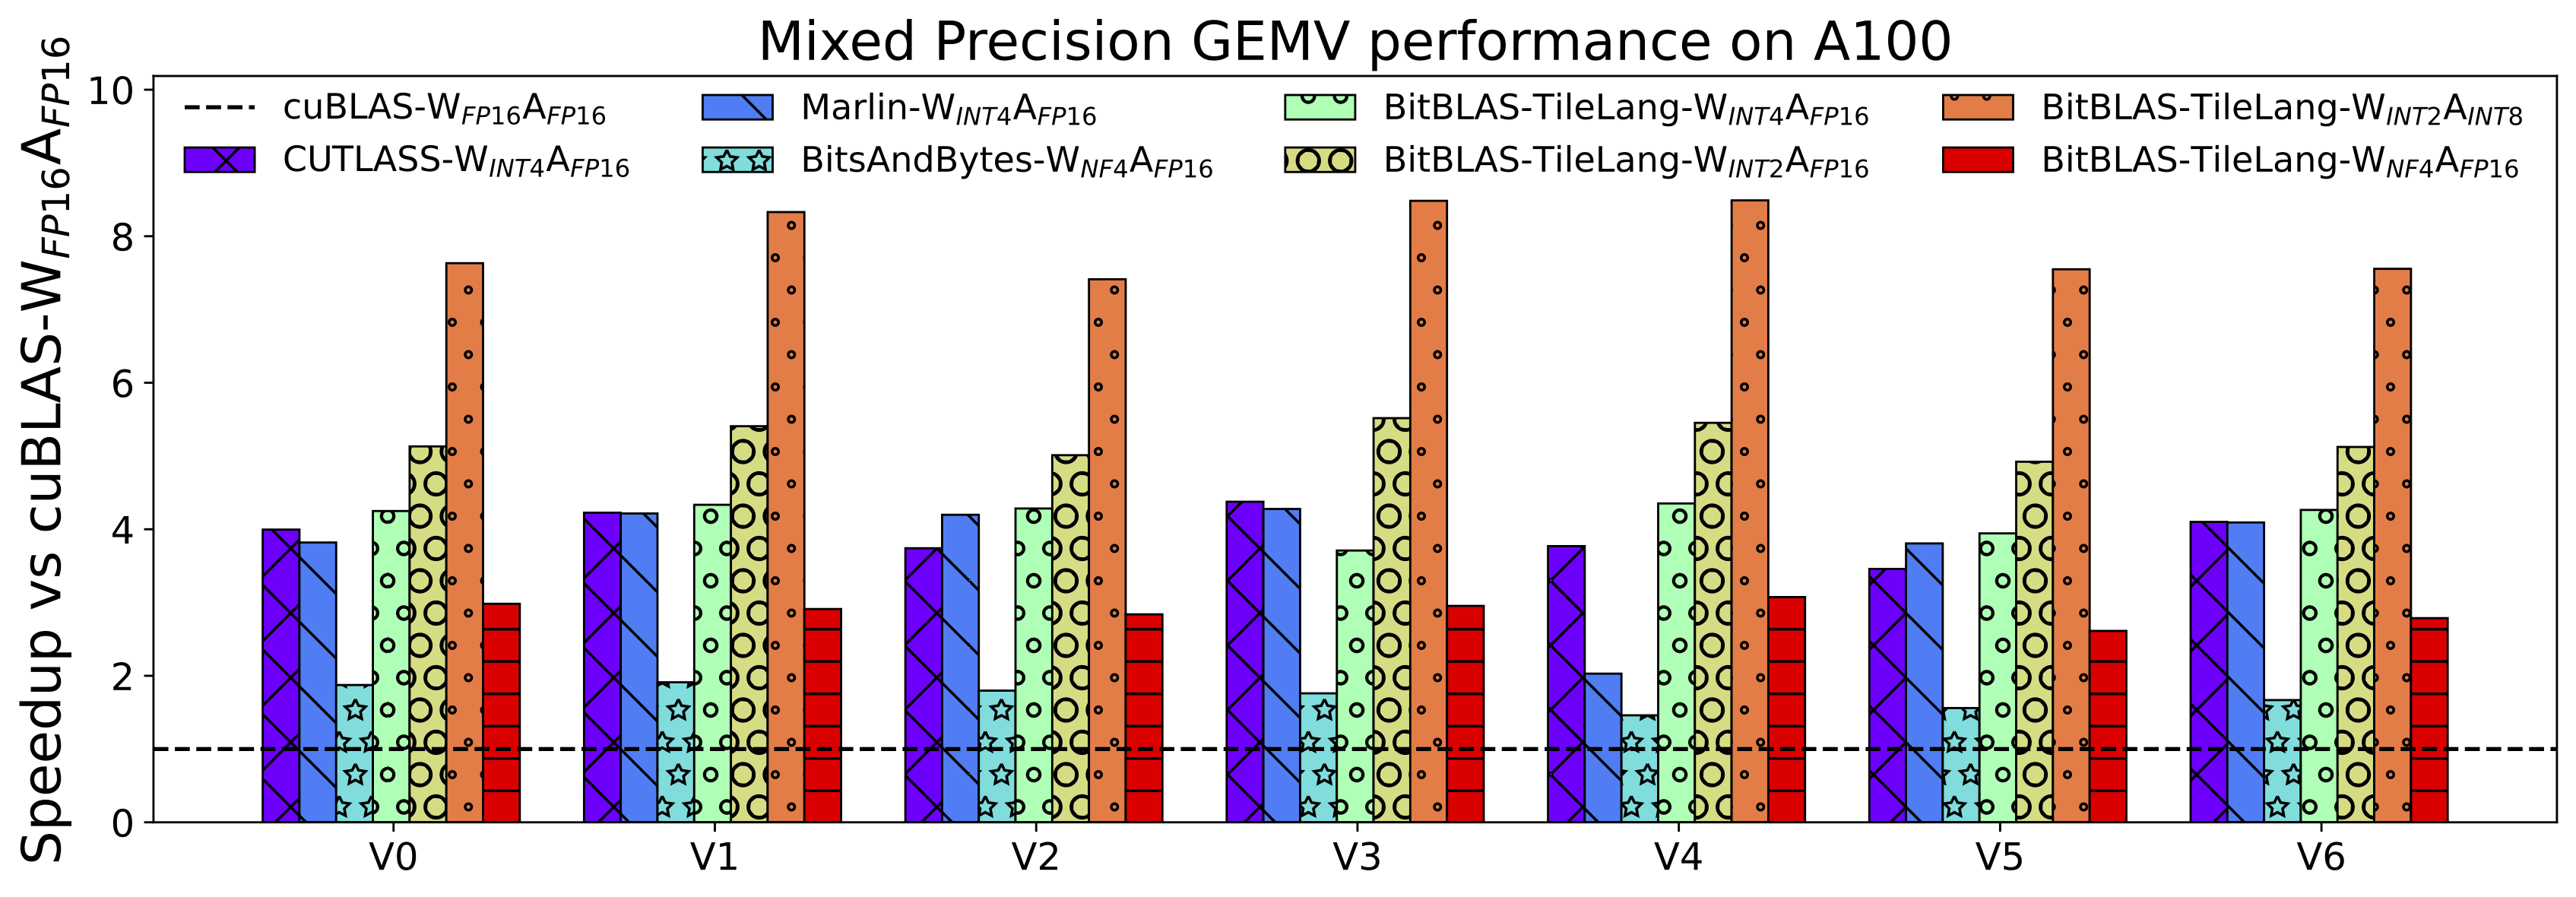
## 安装
### 方法 1:使用 Pip 安装
最快速的入门方式是从 PyPI 安装最新版本:
```
pip install tilelang
```
或者,您可以直接从 GitHub 仓库安装:
```
pip install git+https://github.com/tile-ai/tilelang
```
或者进行本地安装:
```
# 安装所需的系统依赖
sudo apt-get update
sudo apt-get install -y python3-setuptools gcc libtinfo-dev zlib1g-dev build-essential cmake libedit-dev libxml2-dev
pip install -e . -v # remove -e option if you don't want to install in editable mode, -v for verbose output
```
### 方法 2:从源码构建
我们目前提供了三种从源码安装 **tile-lang** 的方法:
- [从源码安装(使用您自己的 TVM 安装)](./docs/get_started/Installation.md#method-1-install-from-source-using-your-own-tvm-installation)
- [从源码安装(使用内置的 TVM 子模块)](./docs/get_started/Installation.md#method-2-install-from-source-using-the-bundled-tvm-submodule)
- [使用提供的脚本安装](./docs/get_started/Installation.md#method-3-install-using-the-provided-script)
### 方法 3:安装每日构建版本
对于希望在正式发布之前使用最新功能和改进的用户,我们提供了 **tile-lang** 的每日构建版本。
```
pip install tilelang -f https://tile-ai.github.io/whl/nightly
# 或者 pip install tilelang --find-links https://tile-ai.github.io/whl/nightly
```
## 快速入门
在本节中,您将学习如何使用 tile-lang 编写和执行一个简单的 GEMM(矩阵乘法)kernel,随后介绍布局优化、流水线以及 L2 cache 友好的 swizzling 技术。
### 带注解的 GEMM 示例(布局、L2 Cache Swizzling 和流水线等)
以下示例演示了更多高级功能:布局注解、并行拷贝以及用于提升 L2 cache 局部性的 swizzle。此代码片段展示了如何调整您的 kernel 以在复杂的硬件上最大化性能。
```
# @tilelang.jit(target="cuda")
# target 可以是 "auto"、如 "cuda" 这样的裸类型,或者是如
# {"kind": "cuda", "arch": "sm_90"} 这样的 config dict。
@tilelang.jit
def matmul_relu(
A, B,
block_M: int = 64,
block_N: int = 64,
block_K: int = 64,
dtype: T.dtype = T.float16,
accum_dtype: T.dtype = T.float32,
):
# declare compilation shape constant
M, N, K = T.const('M, N, K')
# annotate input tensor shape
A: T.Tensor[[M, K], dtype]
B: T.Tensor[[K, N], dtype]
# allocate output tensor
C = T.empty([M, N], dtype)
with T.Kernel(T.ceildiv(N, block_N), T.ceildiv(M, block_M), threads=128) as (bx, by):
A_shared = T.alloc_shared((block_M, block_K), dtype)
B_shared = T.alloc_shared((block_K, block_N), dtype)
C_local = T.alloc_fragment((block_M, block_N), accum_dtype)
# Enable rasterization for better L2 cache locality (Optional)
# T.use_swizzle(panel_size=10, enable=True)
# Clear local accumulation
T.clear(C_local)
for ko in T.Pipelined(T.ceildiv(K, block_K), num_stages=3):
# Copy tile of A
# This is a sugar syntax for parallelized copy
T.copy(A[by * block_M, ko * block_K], A_shared)
# Copy tile of B
T.copy(B[ko * block_K, bx * block_N], B_shared)
# Perform a tile-level GEMM on the shared buffers
# Currently we dispatch to the cute/hip on Nvidia/AMD GPUs
T.gemm(A_shared, B_shared, C_local)
# relu
for i, j in T.Parallel(block_M, block_N):
C_local[i, j] = T.max(C_local[i, j], 0)
# Copy result back to global memory
T.copy(C_local, C[by * block_M, bx * block_N])
# You can write multiple cuda kernel in one function, they execute sequentially
# with T.Kernel(...) as ...
# Return the tensor, you can also return multiple tensors
return C
M, N, K = 1024, 1024, 1024
a = torch.randn(M, K, device="cuda", dtype=torch.float16)
b = torch.randn(K, N, device="cuda", dtype=torch.float16)
c_ref = torch.relu(a @ b)
# 调用 kernel
c = matmul_relu(a, b)
torch.testing.assert_close(c, c_ref, rtol=1e-2, atol=1e-2)
# 使用覆盖的编译常量调用 kernel
c = matmul_relu(a, b, block_M=128, block_N=128, block_K=64)
torch.testing.assert_close(c, c_ref, rtol=1e-2, atol=1e-2)
# 获取已编译的 kernel
kernel = matmul_relu.compile(a, b) # use torch.Tensor
kernel = matmul_relu.compile( # use T.Tensor as placeholder
T.Tensor((M, K), T.float16),
T.Tensor((K, N), T.float16)
)
kernel = matmul_relu.compile( # directly specify the shape constants
M=M, N=N, K=K,
block_M=128, block_N=128, block_K=64
)
print(kernel.get_kernel_source())
c = kernel(a, b)
# 9.使用 kernel 测试 latency
profiler = kernel.get_profiler(tensor_supply_type=tilelang.TensorSupplyType.Normal)
latency = profiler.do_bench()
print(f"Latency: {latency} ms")
```
### 深入探索 GEMM 之外的 TileLang
除了 GEMM 之外,我们还提供了各种示例来展示 TileLang 的多功能性和强大功能,包括:
- [反量化 GEMM](./examples/dequantize_gemm/):通过**对每个线程操作的细粒度控制**实现高性能反量化,其中许多功能现已被 [BitBLAS](https://github.com/microsoft/BitBLAS) 采纳为默认行为,该库利用魔法布局转换和 intrins 来加速反量化 GEMM。
- [FlashAttention](./examples/flash_attention/):使用简单直观的语法实现跨算子融合,我们还提供了一个自动调优的示例。
- [LinearAttention](./examples/linear_attention/):示例包括 RetNet 和 Mamba 实现。
- [卷积](./examples/convolution/):使用 IM2Col 的卷积实现。
## 即将推出的功能
请查看我们的 [tilelang v0.2.0 发布计划](https://github.com/tile-ai/tilelang/issues/79) 了解即将推出的功能。
TileLang 现已应用于项目 [BitBLAS](https://github.com/microsoft/BitBLAS) 和 [AttentionEngine](https://github.com/microsoft/AttentionEngine)。
## 加入讨论
欢迎加入我们的 Discord 社区进行讨论、获取支持与合作!
[](https://discord.gg/TUrHyJnKPG)
## 致谢
我们要对 [TVM](https://github.com/apache/tvm) 社区表达衷心的感谢,感谢他们做出的宝贵贡献。本项目的初始版本主要由北京大学的 [LeiWang1999](https://github.com/LeiWang1999)、[chengyupku](https://github.com/chengyupku) 和 [nox-410](https://github.com/nox-410) 在 [Zhi Yang](https://yangzhihome.github.io) 教授的指导下开发。这项工作的部分内容是在微软研究院实习期间完成的,在此期间 Lingxiao Ma 博士、Yuqing Xia 博士、Jilong Xue 博士和 Fan Yang 博士提供了宝贵的建议和支持。我们对他们的指导和贡献表示深深的感谢。