HKUDS/LightRAG
GitHub: HKUDS/LightRAG
港大开源的轻量级 RAG 框架,结合知识图谱与向量检索实现高效文档问答
Stars: 36755 | Forks: 5186


|
|
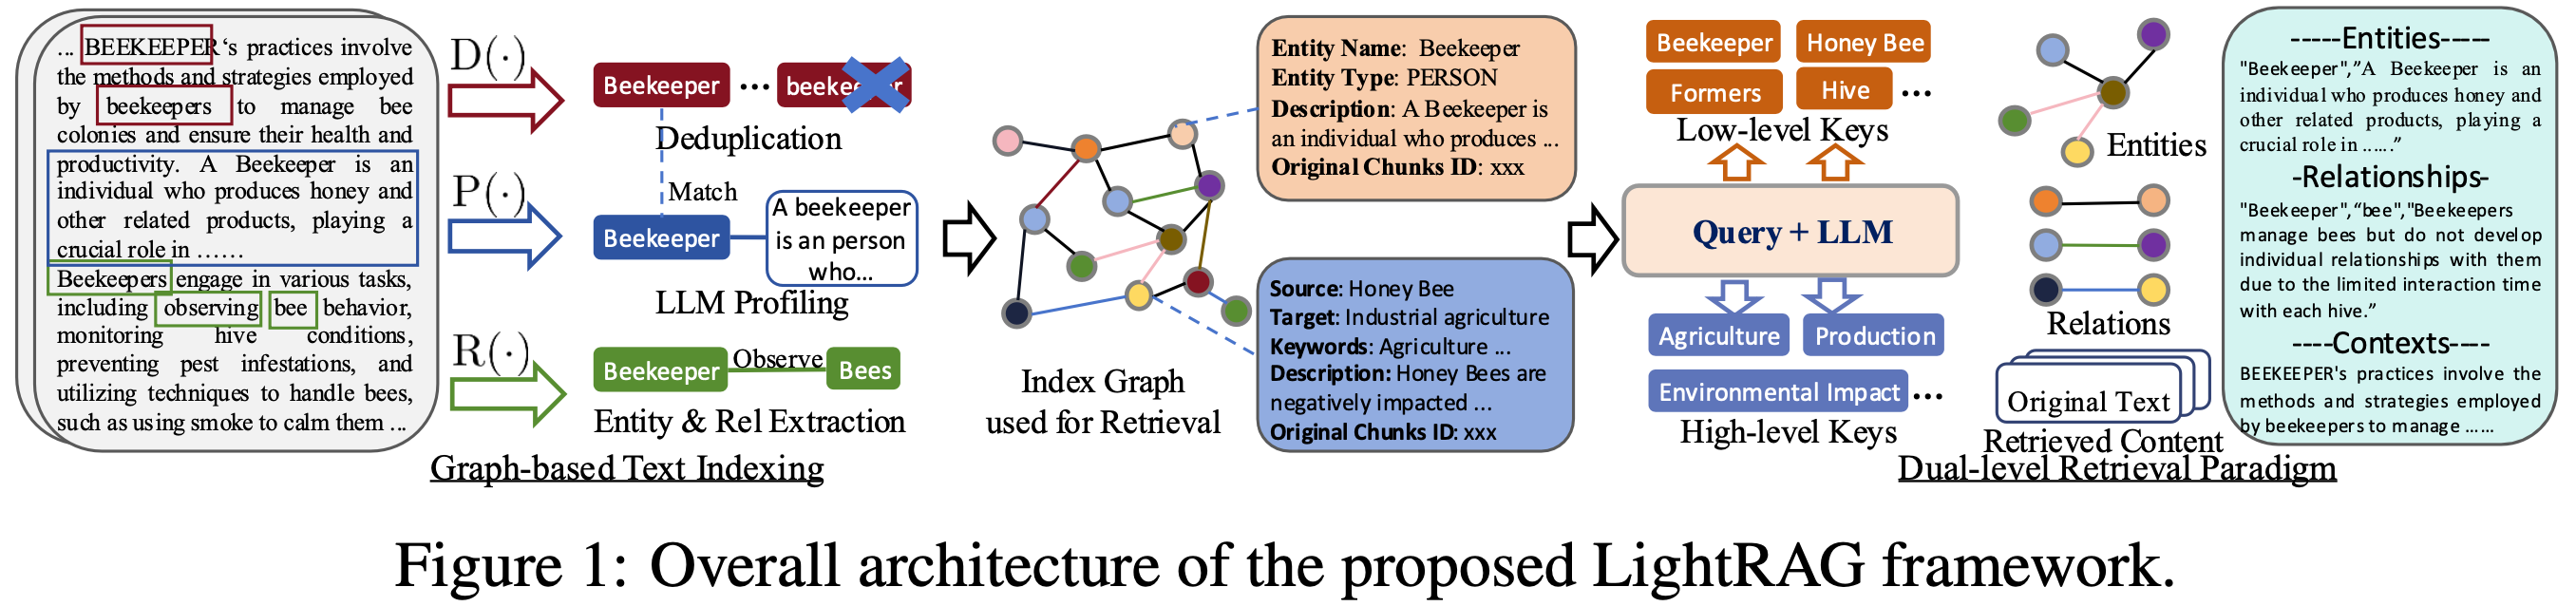
算法流程图
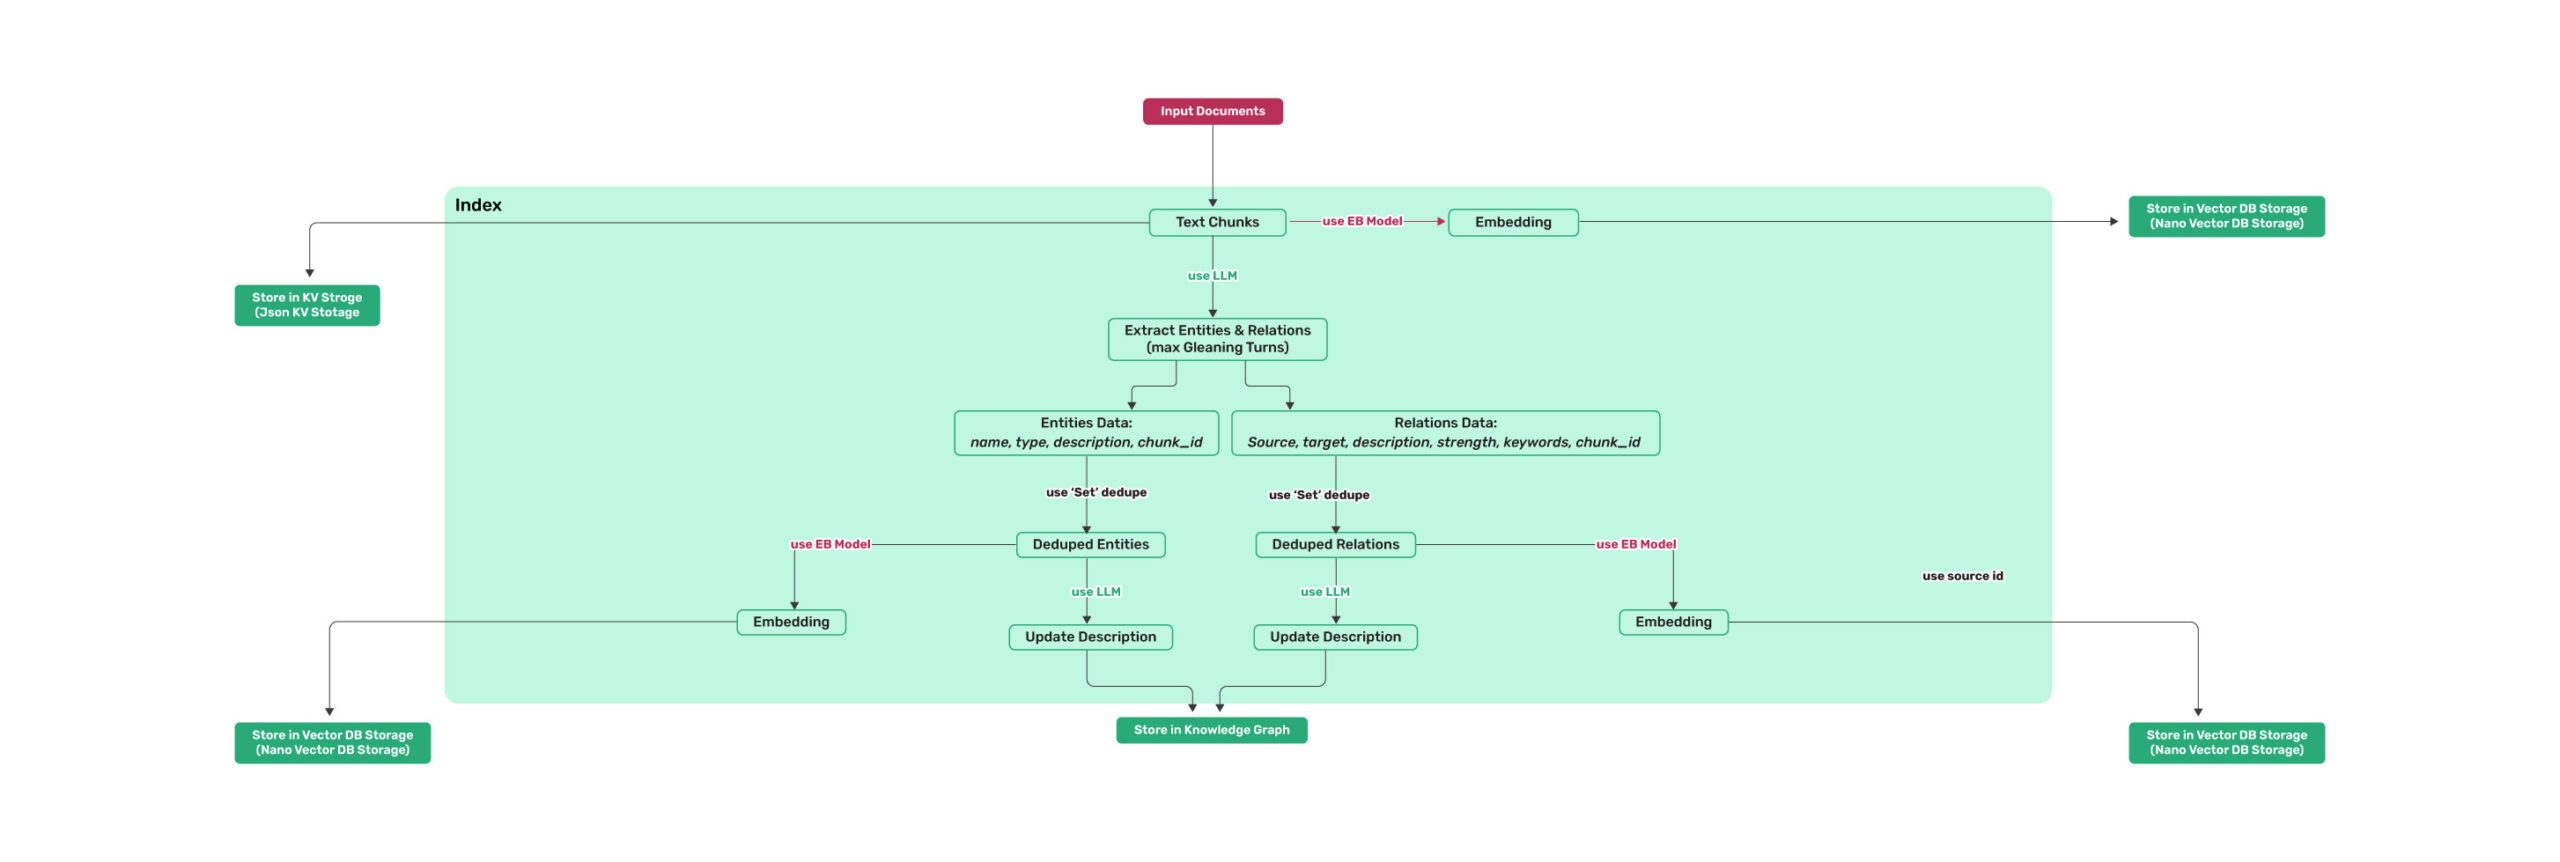 *图 1: LightRAG 索引流程图 - 图片说明 : [来源](https://learnopencv.com/lightrag/)* 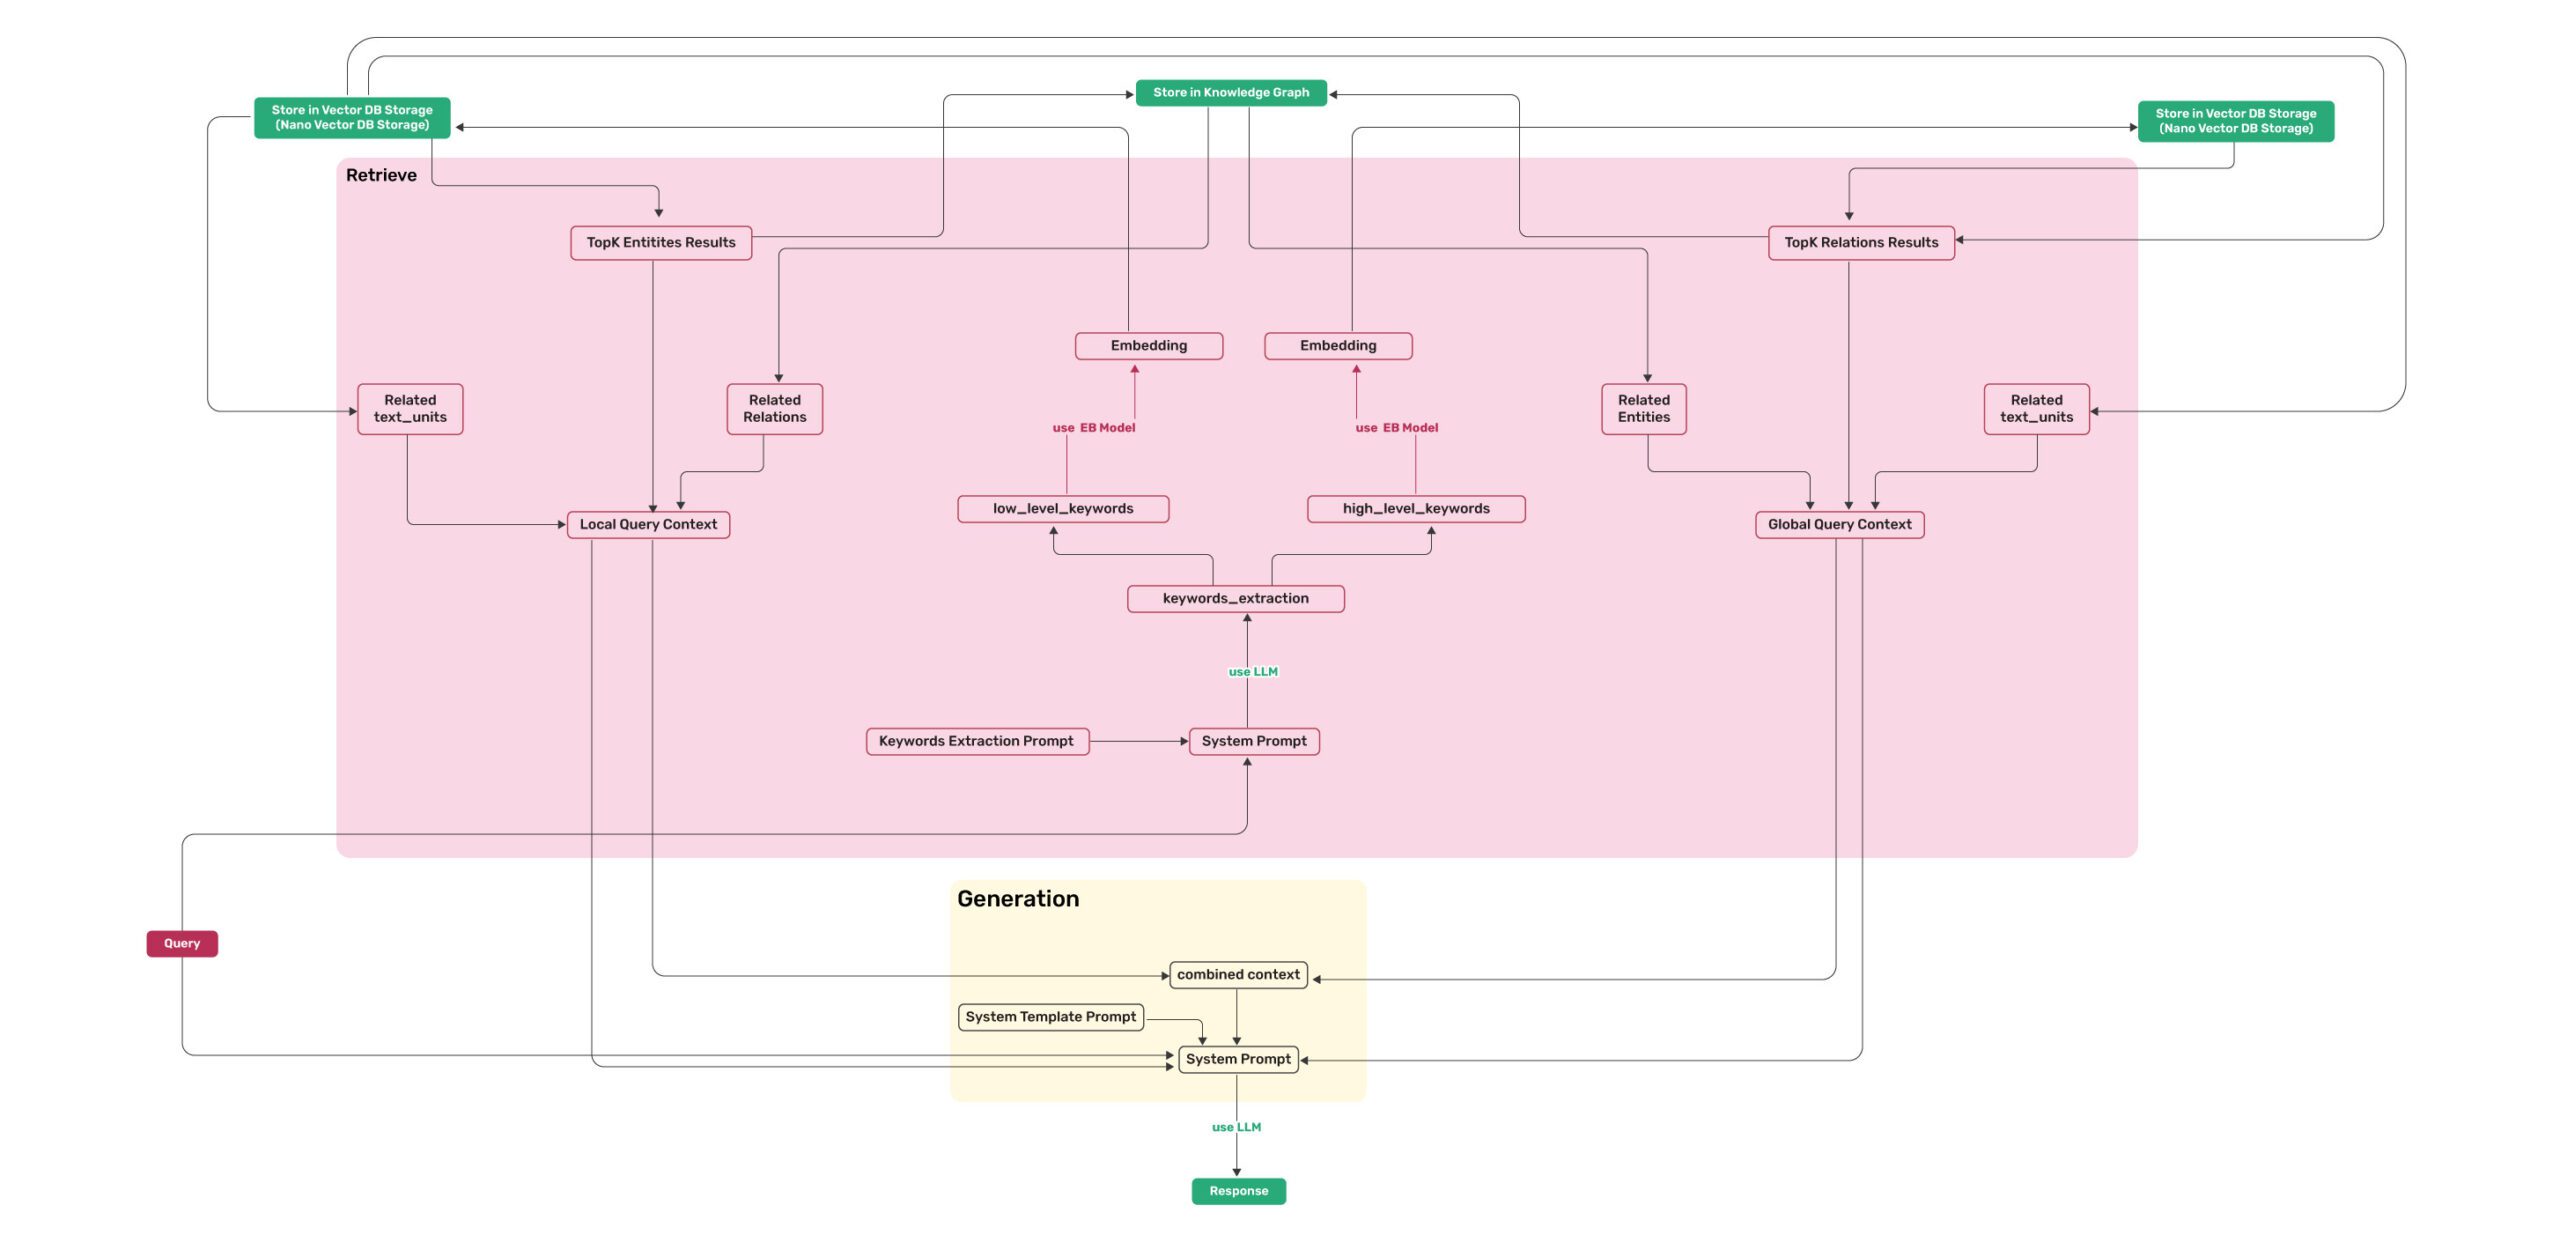 *图 2: LightRAG 检索和查询流程图 - 图片说明 : [来源](https://learnopencv.com/lightrag/)*参数
| **参数** | **类型** | **说明** | **默认值** | | -------------- | ---------- | ----------------- | ------------- | | **working_dir** | `str` | 存储缓存的目录 | `lightrag_cache+timestamp` | | **workspace** | str | 用于不同 LightRAG 实例之间数据隔离的工作区名称 | | | **kv_storage** | `str` | 文档和文本块的存储类型。支持的类型: `JsonKVStorage`,`PGKVStorage`,`RedisKVStorage`,`MongoKVStorage`,`OpenSearchKVStorage` | `JsonKVStorage` | | **vector_storage** | `str` | Embedding 向量的存储类型。支持的类型: `NanoVectorDBStorage`,`PGVectorStorage`,`MilvusVectorDBStorage`,`ChromaVectorDBStorage`,`FaissVectorDBStorage`,`MongoVectorDBStorage`,`QdrantVectorDBStorage`,`OpenSearchVectorDBStorage` | `NanoVectorDBStorage` | | **graph_storage** | `str` | 图边和节点的存储类型。支持的类型: `NetworkXStorage`,`Neo4JStorage`,`PGGraphStorage`,`AGEStorage`,`OpenSearchGraphStorage` | `NetworkXStorage` | | **doc_status_storage** | `str` | 文档处理状态的存储类型。支持的类型: `JsonDocStatusStorage`,`PGDocStatusStorage`,`MongoDocStatusStorage`,`OpenSearchDocStatusStorage` | `JsonDocStatusStorage` | | **chunk_token_size** | `int` | 拆分文档时每个块的最大 token 大小 | `1200` | | **chunk_overlap_token_size** | `int` | 拆分文档时两个块之间的重叠 token 大小 | `100` | | **tokenizer** | `Tokenizer` | 用于遵循 `TokenizerInterface` 协议的 .encode() 和 .decode() 函数将文本转换为 token (数字) 并转换回来的函数。如果不指定,它将使用默认的 Tiktoken tokenizer。 | `TiktokenTokenizer` | | **tiktoken_model_name** | `str` | 如果您使用的是默认 Tiktoken tokenizer,这是要使用的特定 Tiktoken 模型的名称。如果您提供自己的 tokenizer,则忽略此设置。 | `gpt-4o-mini` | | **entity_extract_max_gleaning** | `int` | 实体提取过程中的循环次数,追加历史消息 | `1` | | **node_embedding_algorithm** | `str` | 节点嵌入算法(当前未使用) | `node2vec` | | **node2vec_params** | `dict` | 节点嵌入的参数 | `{"dimensions": 1536,"num_walks": 10,"walk_length": 40,"window_size": 2,"iterations": 3,"random_seed": 3,}` | | **embedding_func** | `EmbeddingFunc` | 从文本生成 Embedding 向量的函数 | `openai_embed` | | **embedding_batch_num** | `int` | Embedding 处理的最大批大小(每批发送多个文本) | `32` | | **embedding_func_max_async** | `int` | 并发异步 Embedding 处理的最大数量 | `16` | | **llm_model_func** | `callable` | 用于 LLM 生成的函数 | `gpt_4o_mini_complete` | | **llm_model_name** | `str` | 用于生成的 LLM 型名称 | `meta-llama/Llama-3.2-1B-Instruct` | | **summary_context_size** | `int` | 发送给 LLM 用于实体关系合并生成摘要的最大 token | `10000`(由环境变量 SUMMARY_CONTEXT_SIZE 配置) | | **summary_max_tokens** | `int` | 实体/关系描述的最大 token 大小 | `500`(由环境变量 SUMMARY_MAX_TOKENS 配置) | | **llm_model_max_async** | `int` | 并发异步 LLM 进程的最大数量 | `4`(默认值由环境变量 MAX_ASYNC 更改) | | **llm_model_kwargs** | `dict` | LLM 生成的附加参数 | | | **vector_db_storage_cls_kwargs** | `dict` | 向量数据库的附加参数,例如设置节点和关系检索的阈值 | cosine_better_than_threshold: 0.2(默认值由环境变量 COSINE_THRESHOLD 更改) | | **enable_llm_cache** | `bool` | 如果为 `TRUE`,则将 LLM 结果存储在缓存中;重复的提示返回缓存的响应 | `TRUE` | | **enable_llm_cache_for_entity_extract** | `bool` | 如果为 `TRUE`,则将实体提取的 LLM 结果存储在缓存中;适合初学者调试您的应用程序 | `TRUE` | | **addon_params** | `dict` | 附加参数,例如,`{"language": "Simplified Chinese", "entity_types": ["organization", "person", "location", "event"]}`:设置示例限制,实体/关系提取输出语言 | language: English` | | **embedding_cache_config** | `dict` | 问答缓存配置。包含三个参数:`enabled`:启用/禁用缓存查找功能的布尔值。启用后,系统将在生成新答案之前检查缓存的响应。`similarity_threshold`:浮点值 (0-1),相似度阈值。当新问题与缓存问题的相似度超过此阈值时,将直接返回缓存的答案,而无需调用 LLM。`use_llm_check`:启用/禁用 LLM 相似度验证的布尔值。启用后,LLM 将用作二次检查,以在返回缓存答案之前验证问题之间的相似度。 | 默认值: `{"enabled": False, "similarity_threshold": 0.95, "use_llm_check": False}` |使用类 OpenAI API
* LightRAG 还支持类 OpenAI 的 chat/embeddings API: ``` import os import numpy as np from lightrag.utils import wrap_embedding_func_with_attrs from lightrag.llm.openai import openai_complete_if_cache, openai_embed async def llm_model_func( prompt, system_prompt=None, history_messages=[], keyword_extraction=False, **kwargs ) -> str: return await openai_complete_if_cache( "solar-mini", prompt, system_prompt=system_prompt, history_messages=history_messages, api_key=os.getenv("UPSTAGE_API_KEY"), base_url="https://api.upstage.ai/v1/solar", **kwargs ) @wrap_embedding_func_with_attrs(embedding_dim=4096, max_token_size=8192, model_name="solar-embedding-1-large-query") async def embedding_func(texts: list[str]) -> np.ndarray: return await openai_embed.func( texts, model="solar-embedding-1-large-query", api_key=os.getenv("UPSTAGE_API_KEY"), base_url="https://api.upstage.ai/v1/solar" ) async def initialize_rag(): rag = LightRAG( working_dir=WORKING_DIR, llm_model_func=llm_model_func, embedding_func=embedding_func # Pass the decorated function directly ) await rag.initialize_storages() return rag ```使用 Hugging Face 模型
* 如果您想使用 Hugging Face 模型,您只需要按如下方式设置 LightRAG: 见 `lightrag_hf_demo.py` ``` from functools import partial from transformers import AutoTokenizer, AutoModel # 预加载 tokenizer 和模型 tokenizer = AutoTokenizer.from_pretrained("sentence-transformers/all-MiniLM-L6-v2") embed_model = AutoModel.from_pretrained("sentence-transformers/all-MiniLM-L6-v2") # 使用 Hugging Face 模型初始化 LightRAG rag = LightRAG( working_dir=WORKING_DIR, llm_model_func=hf_model_complete, # Use Hugging Face model for text generation llm_model_name='meta-llama/Llama-3.1-8B-Instruct', # Model name from Hugging Face # Use Hugging Face embedding function embedding_func=EmbeddingFunc( embedding_dim=384, max_token_size=2048, model_name="sentence-transformers/all-MiniLM-L6-v2", func=partial( hf_embed.func, # Use .func to access the unwrapped function tokenizer=tokenizer, embed_model=embed_model ) ), ) ```使用 Ollama 模型
**概述** 如果您想使用 Ollama 模型,您需要拉取您计划使用的模型和 Embedding 模型,例如 `nomic-embed-text`。 然后您只需要按如下方式设置 LightRAG: ``` import numpy as np from lightrag.utils import wrap_embedding_func_with_attrs from lightrag.llm.ollama import ollama_model_complete, ollama_embed @wrap_embedding_func_with_attrs(embedding_dim=768, max_token_size=8192, model_name="nomic-embed-text") async def embedding_func(texts: list[str]) -> np.ndarray: return await ollama_embed.func(texts, embed_model="nomic-embed-text") # 使用 Ollama 模型初始化 LightRAG rag = LightRAG( working_dir=WORKING_DIR, llm_model_func=ollama_model_complete, # Use Ollama model for text generation llm_model_name='your_model_name', # Your model name embedding_func=embedding_func, # Pass the decorated function directly ) ``` * **增加上下文大小** 为了使 LightRAG 工作,上下文应至少为 32k token。默认情况下,Ollama 模型的上下文大小为 8k。您可以通过以下两种方式之一来实现: * **在 Modelfile 中增加 `num_ctx` 参数** 1. 拉取模型: ``` ollama pull qwen2 ``` 2. 显示模型文件: ``` ollama show --modelfile qwen2 > Modelfile ``` 3. 通过添加以下行来编辑 Modelfile: ``` PARAMETER num_ctx 32768 ``` 4. 创建修改后的模型: ``` ollama create -f Modelfile qwen2m ``` * **通过 Ollama API 设置 `num_ctx`** 您可以使用 `llm_model_kwargs` 参数来配置 ollama: ``` import numpy as np from lightrag.utils import wrap_embedding_func_with_attrs from lightrag.llm.ollama import ollama_model_complete, ollama_embed @wrap_embedding_func_with_attrs(embedding_dim=768, max_token_size=8192, model_name="nomic-embed-text") async def embedding_func(texts: list[str]) -> np.ndarray: return await ollama_embed.func(texts, embed_model="nomic-embed-text") rag = LightRAG( working_dir=WORKING_DIR, llm_model_func=ollama_model_complete, # Use Ollama model for text generation llm_model_name='your_model_name', # Your model name llm_model_kwargs={"options": {"num_ctx": 32768}}, embedding_func=embedding_func, # Pass the decorated function directly ) ``` * **低显存 GPU** 为了在低显存 GPU 上运行此实验,您应该选择小模型并调整上下文窗口(增加上下文会增加内存消耗)。例如,在具有 6Gb RAM 的翻新矿卡上运行此 ollama 示例时,需要在使用 `gemma2:2b` 时将上下文大小设置为 26k。它在 `book.txt` 上能够找到 197 个实体和 19 个关系。LlamaIndex
LightRAG 支持与 LlamaIndex 集成 (`llm/llama_index_impl.py`): - 通过 LlamaIndex 与 OpenAI 和其他提供商集成 - 有关详细设置,请参阅 [LlamaIndex 文档](https://developers.llamaindex.ai/python/framework/) 或 [示例](examples/unofficial-sample/) **示例用法** ``` # 使用 LlamaIndex 直接访问 OpenAI import asyncio from lightrag import LightRAG from lightrag.llm.llama_index_impl import llama_index_complete_if_cache, llama_index_embed from llama_index.embeddings.openai import OpenAIEmbedding from llama_index.llms.openai import OpenAI from lightrag.utils import setup_logger # 为 LightRAG 设置日志处理器 setup_logger("lightrag", level="INFO") async def initialize_rag(): rag = LightRAG( working_dir="your/path", llm_model_func=llama_index_complete_if_cache, # LlamaIndex-compatible completion function embedding_func=EmbeddingFunc( # LlamaIndex-compatible embedding function embedding_dim=1536, max_token_size=2048, model_name=embed_model, func=partial(llama_index_embed.func, embed_model=embed_model) # Use .func to access the unwrapped function ), ) await rag.initialize_storages() return rag def main(): # Initialize RAG instance rag = asyncio.run(initialize_rag()) with open("./book.txt", "r", encoding="utf-8") as f: rag.insert(f.read()) # Perform naive search print( rag.query("What are the top themes in this story?", param=QueryParam(mode="naive")) ) # Perform local search print( rag.query("What are the top themes in this story?", param=QueryParam(mode="local")) ) # Perform global search print( rag.query("What are the top themes in this story?", param=QueryParam(mode="global")) ) # Perform hybrid search print( rag.query("What are the top themes in this story?", param=QueryParam(mode="hybrid")) ) if __name__ == "__main__": main() ``` **有关详细的文档和示例,请参阅:** - [LlamaIndex 文档](https://developers.llamaindex.ai/python/framework/) - [Direct OpenAI Example](examples/unofficial-sample/lightrag_llamaindex_direct_demo.py) - [LiteLLM Proxy Example](examples/unofficial-sample/lightrag_llamaindex_litellm_demo.py) - [LiteLLM Proxy with Opik Example](examples/unofficial-sample/lightrag_llamaindex_litellm_opik_demo.py)使用 Azure OpenAI 模型
如果您想使用 Azure OpenAI 模型,您只需要按如下方式设置 LightRAG: ``` import os import numpy as np from lightrag.utils import wrap_embedding_func_with_attrs from lightrag.llm.azure_openai import azure_openai_complete_if_cache, azure_openai_embed # 配置生成模型 async def llm_model_func( prompt, system_prompt=None, history_messages=[], keyword_extraction=False, **kwargs ) -> str: return await azure_openai_complete_if_cache( prompt, system_prompt=system_prompt, history_messages=history_messages, api_key=os.getenv("AZURE_OPENAI_API_KEY"), azure_endpoint=os.getenv("AZURE_OPENAI_ENDPOINT"), api_version=os.getenv("AZURE_OPENAI_API_VERSION"), deployment_name=os.getenv("AZURE_OPENAI_DEPLOYMENT_NAME"), **kwargs ) # 配置 embedding 模型 @wrap_embedding_func_with_attrs( embedding_dim=1536, max_token_size=8192, model_name=os.getenv("AZURE_OPENAI_EMBEDDING_MODEL") ) async def embedding_func(texts: list[str]) -> np.ndarray: return await azure_openai_embed.func( texts, api_key=os.getenv("AZURE_OPENAI_API_KEY"), azure_endpoint=os.getenv("AZURE_OPENAI_ENDPOINT"), api_version=os.getenv("AZURE_OPENAI_API_VERSION"), deployment_name=os.getenv("AZURE_OPENAI_EMBEDDING_DEPLOYMENT_NAME") ) rag = LightRAG( working_dir=WORKING_DIR, llm_model_func=llm_model_func, embedding_func=embedding_func ) ```使用 Google Gemini 模型
如果您想使用 Google Gemini 模型,您只需要按如下方式设置 LightRAG: ``` import os import numpy as np from lightrag.utils import wrap_embedding_func_with_attrs from lightrag.llm.gemini import gemini_model_complete, gemini_embed # 配置生成模型 async def llm_model_func( prompt, system_prompt=None, history_messages=[], keyword_extraction=False, **kwargs ) -> str: return await gemini_model_complete( prompt, system_prompt=system_prompt, history_messages=history_messages, api_key=os.getenv("GEMINI_API_KEY"), model_name="gemini-2.0-flash", **kwargs ) # 配置 embedding 模型 @wrap_embedding_func_with_attrs( embedding_dim=768, max_token_size=2048, model_name="models/text-embedding-004" ) async def embedding_func(texts: list[str]) -> np.ndarray: return await gemini_embed.func( texts, api_key=os.getenv("GEMINI_API_KEY"), model="models/text-embedding-004" ) rag = LightRAG( working_dir=WORKING_DIR, llm_model_func=llm_model_func, llm_model_name="gemini-2.0-flash", embedding_func=embedding_func ) ```基本插入
``` # 基本插入 rag.insert("Text") ```批量插入
``` # 基本批量插入:一次插入多个文本 rag.insert(["TEXT1", "TEXT2",...]) # 带有自定义批量大小配置的批量插入 rag = LightRAG( ... working_dir=WORKING_DIR, max_parallel_insert = 4 ) rag.insert(["TEXT1", "TEXT2", "TEXT3", ...]) # Documents will be processed in batches of 4 ``` `max_parallel_insert` 参数决定了文档索引 pipeline 中并发处理的文档数量。如果未指定,默认值为 **2**。我们建议将此设置保持在 **10 以下**,因为性能瓶颈通常在于 LLM (大型语言模型) 的处理。带 ID 插入
如果您想为您的文档提供自己的 ID,文档数量和 ID 数量必须相同。 ``` # 插入单个文本,并为其提供 ID rag.insert("TEXT1", ids=["ID_FOR_TEXT1"]) # 插入多个文本,并为它们提供 ID rag.insert(["TEXT1", "TEXT2",...], ids=["ID_FOR_TEXT1", "ID_FOR_TEXT2"]) ```使用 Pipeline 插入
`apipeline_enqueue_documents` 和 `apipeline_process_enqueue_documents` 函数允许您将文档增量插入到图中。这对于您希望在后台处理文档同时仍允许主线程继续执行的场景非常有用。 ``` rag = LightRAG(..) await rag.apipeline_enqueue_documents(input) # 循环中的例程 await rag.apipeline_process_enqueue_documents(input) ```插入多文件类型支持
`textract` 支持读取 TXT、DOCX、PPTX、CSV 和 PDF 等文件类型。 ``` import textract file_path = 'TEXT.pdf' text_content = textract.process(file_path) rag.insert(text_content.decode('utf-8')) ```引用功能
通过提供文件路径,系统确保可以将来源追溯回其原始文档。 ``` # 定义文档及其文件路径 documents = ["Document content 1", "Document content 2"] file_paths = ["path/to/doc1.txt", "path/to/doc2.txt"] # 插入带有文件路径的文档 rag.insert(documents, file_paths=file_paths) ```使用 Neo4J 存储
* 对于生产级场景,您很可能希望利用企业解决方案 * 进行 KG 存储。推荐在 Docker 中运行 Neo4J,以实现无缝的本地测试。 * 参见:https://hub.docker.com/_/neo4j ``` export NEO4J_URI="neo4j://localhost:7687" export NEO4J_USERNAME="neo4j" export NEO4J_PASSWORD="password" export NEO4J_DATABASE="neo4j" #<----------- If you are using community edition neo4j docker image. # 为 LightRAG 设置日志记录器 setup_logger("lightrag", level="INFO") # 当你启动项目时,务必通过指定 graph_storage="Neo4JStorage" 来覆盖默认的 KG。 # 使用 Neo4J 实现初始化 LightRAG。 async def initialize_rag(): rag = LightRAG( working_dir=WORKING_DIR, llm_model_func=gpt_4o_mini_complete, # Use gpt_4o_mini_complete LLM model graph_storage="Neo4JStorage", #<-----------override KG default ) # Initialize database connections await rag.initialize_storages() # Initialize pipeline status for document processing return rag ``` 有关工作示例,请参见 test_neo4j.py。使用 PostgreSQL 存储
对于生产级场景,您很可能希望利用企业解决方案。PostgreSQL 可以为您提供一站式解决方案,作为 KV 存储、VectorDB (pgvector) 和 GraphDB (apache AGE)。支持 PostgreSQL 版本 16.6 或更高版本。 * PostgreSQL 轻量级,包括所有必要插件在内的整个二进制分发版可以压缩到 40MB:参考 [Windows 版本](https://github.com/ShanGor/apache-age-windows/releases/tag/PG17%2Fv1.5.0-rc0),因为它易于在 Linux/Mac 上安装。 * 如果您更喜欢 docker,如果您是初学者,请从此镜像开始,以避免遇到问题(默认用户密码:rag/rag):https://hub.docker.com/r/gzdaniel/postgres-for-rag * 如何开始?参考:[examples/lightrag_gemini_postgres_demo.py](https://github.com/HKUDS/LightRAG/blob/main/examples/lightrag_gemini_postgres_demo.py) * 对于高性能图数据库需求,推荐使用 Neo4j,因为 Apache AGE 的性能竞争力不强。使用 Faiss 存储
在使用 Faiss 向量数据库之前,您必须手动安装 `faiss-cpu` 或 `faiss-gpu`。 - 安装所需的依赖项: ``` pip install faiss-cpu ``` 如果您有 GPU 支持,也可以安装 `faiss-gpu`。 - 这里我们使用 `sentence-transformers`,但您也可以使用 `3072` 维度的 `OpenAIEmbedding` 模型。 ``` async def embedding_func(texts: list[str]) -> np.ndarray: model = SentenceTransformer('all-MiniLM-L6-v2') embeddings = model.encode(texts, convert_to_numpy=True) return embeddings # 使用 LLM 模型函数和 embedding 函数初始化 LightRAG rag = LightRAG( working_dir=WORKING_DIR, llm_model_func=llm_model_func, embedding_func=EmbeddingFunc( embedding_dim=384, max_token_size=2048, model_name="all-MiniLM-L6-v2", func=embedding_func, ), vector_storage="FaissVectorDBStorage", vector_db_storage_cls_kwargs={ "cosine_better_than_threshold": 0.3 # Your desired threshold } ) ```使用 Memgraph 进行存储
* Memgraph 是一个高性能的内存图数据库,兼容 Neo4j Bolt 协议。 * 您可以使用 Docker 在本地运行 Memgraph 以便轻松测试: * 参见:https://memgraph.com/download ``` export MEMGRAPH_URI="bolt://localhost:7687" # 为 LightRAG 设置日志记录器 setup_logger("lightrag", level="INFO") # 当你启动项目时,覆盖默认的 KG:NetworkX # 通过指定 kg="MemgraphStorage"。 # 注意:默认设置使用 NetworkX # 使用 Memgraph 实现初始化 LightRAG。 async def initialize_rag(): rag = LightRAG( working_dir=WORKING_DIR, llm_model_func=gpt_4o_mini_complete, # Use gpt_4o_mini_complete LLM model graph_storage="MemgraphStorage", #<-----------override KG default ) # Initialize database connections await rag.initialize_storages() # Initialize pipeline status for document processing return rag ```使用 Milvus 进行向量存储
Milvus 是一个高性能、可扩展的向量数据库,用于生产级向量存储。LightRAG 提供了三种配置 Milvus 的方法,外加支持可配置的索引类型以优化性能和内存使用。 ### 支持的索引类型 - `AUTOINDEX` (默认): Milvus 自动选择最佳索引 - `HNSW`: Hierarchical Navigable Small World graph,用于高召回率 - `HNSW_SQ`: 带有标量量化的 HNSW,用于节省内存(需要 Milvus 2.6.8+) - `HNSW_PQ`, `HNSW_PRQ`: 带有乘积/乘积残差量化的 HNSW - `IVF_FLAT`, `IVF_SQ8`, `IVF_PQ`: 倒排文件系列索引 - `DISKANN`: 基于磁盘的近似最近邻 - `SCANN`: 可扩展最近邻 ### 支持的度量类型 `COSINE` (默认), `L2`, `IP` ### 配置方法 1 — 环境变量(`.env` 文件) 最适用于:**LightRAG Server 部署和 Docker/k8s 设置**。 ``` # 连接 MILVUS_URI=http://localhost:19530 MILVUS_DB_NAME=lightrag # MILVUS_USER=root # MILVUS_PASSWORD=your_password # MILVUS_TOKEN=your_token # 存储选择 LIGHTRAG_VECTOR_STORAGE=MilvusVectorDBStorage # Index 配置(均为可选 —— 适用合理的默认值) MILVUS_INDEX_TYPE=HNSW # Default: AUTOINDEX MILVUS_METRIC_TYPE=COSINE # Default: COSINE MILVUS_HNSW_M=16 # Default: 16, range [2-2048] MILVUS_HNSW_EF_CONSTRUCTION=360 # Default: 360 MILVUS_HNSW_EF=200 # Default: 200 # HNSW_SQ 选项(需要 Milvus 2.6.8+) # MILVUS_INDEX_TYPE=HNSW_SQ # MILVUS_HNSW_SQ_TYPE=SQ8 # SQ4U, SQ6, SQ8, BF16, FP16 # MILVUS_HNSW_SQ_REFINE=false # 启用细化 # MILVUS_HNSW_SQ_REFINE_TYPE=FP32 # 细化精度 # MILVUS_HNSW_SQ_REFINE_K=10 # 细化扩展因子 # IVF 选项 # MILVUS_IVF_NLIST=1024 # MILVUS_IVF_NPROBE=16 ``` 然后在 Python 代码中: ``` from lightrag import LightRAG async def initialize_rag(): rag = LightRAG( working_dir="./rag_storage", llm_model_func=..., embedding_func=..., vector_storage="MilvusVectorDBStorage", ) await rag.initialize_storages() return rag ``` ### 配置方法 2 — `vector_db_storage_cls_kwargs` (Python SDK) 最适用于:**Python SDK / 框架集成**,您希望所有配置都在代码中。 ``` from lightrag import LightRAG async def initialize_rag(): rag = LightRAG( working_dir="./rag_storage", llm_model_func=..., embedding_func=..., vector_storage="MilvusVectorDBStorage", vector_db_storage_cls_kwargs={ "milvus_uri": "http://localhost:19530", "milvus_db_name": "lightrag", "index_type": "HNSW", "metric_type": "COSINE", "hnsw_m": 16, "hnsw_ef_construction": 360, "hnsw_ef": 200, "cosine_better_than_threshold": 0.2, }, ) await rag.initialize_storages() return rag ``` ### 配置方法 3 — `config.ini` (遗留) 仅连接参数;索引设置使用环境变量或 kwargs。 ``` [milvus] uri = http://localhost:19530 db_name = lightrag # user = root # password = your_password # token = your_token ``` ### 配置优先级 | 设置 | 第 1 (最高) | 第 2 | 第 3 (最低) | |---|---|---|---| | 连接 (`uri`, …) | `vector_db_storage_cls_kwargs` 环境变量 | `config.ini` | | 索引 (`index_type`, …) | `vector_db_storage_cls_kwargs` | 环境变量 | 默认值 | ### HNSW_SQ 压缩权衡 | SQ 类型 | 压缩率 | 精度 | 备注 | |---|---|---|---| | `SQ4U` | ~8× | 较低 | 节省内存最佳 | | `SQ6` | ~5.3× | 平衡 | 良好的权衡 | | `SQ8` | ~4× | 良好 | **推荐** | | `BF16` / `FP16` | ~2× | 高 | 接近无损 | **版本要求:** - HNSW_SQ 索引类型需要 **Milvus 2.6.8 或更高版本** - LightRAG 将自动验证服务器版本,如果不满足要求将引发错误 - 其他索引类型适用于 Milvus 2.0+ **向后兼容性:** - 如果未提供索引配置,LightRAG 使用 AUTOINDEX(Milvus 默认行为) - 现有集合不受影响;索引配置仅适用于新创建的集合 有关完整的配置选项,请参阅 `env.example` 和 `docs/MilvusConfigurationGuide.md`。使用 MongoDB 存储
MongoDB 为 LightRAG 提供一站式存储解决方案。MongoDB 提供原生的 KV 存储和向量存储。LightRAG 使用 MongoDB 集合来实现简单的图存储。`MongoVectorDBStorage` 需要具有 Atlas Search / Vector Search 支持的 MongoDB 部署,例如 MongoDB Atlas 或 Atlas local。设置向导捆绑的本地 Docker MongoDB 服务是 MongoDB Community Edition,因此它可用于 KV/graph/doc-status 存储,但不能用于 `MongoVectorDBStorage`。使用 Redis 存储
LightRAG 支持使用 Redis 作为 KV 存储。使用 Redis 存储时,应注意持久化配置和内存使用配置。以下是推荐的 Redis 配置: ``` save 900 1 save 300 10 save 60 1000 stop-writes-on-bgsave-error yes maxmemory 4gb maxmemory-policy noeviction maxclients 500 ``` 当交互式设置管理本地 Redis 容器时,它会在 `./data/config/redis.conf` 暂存一个用户可编辑的配置,并将其挂载到容器中。设置在重新运行时会保留该文件,以便可以在不丢失手动编辑的情况下调整本地 Redis 调优。使用 OpenSearch 存储
OpenSearch 为所有四种 LightRAG 存储类型(KV、Vector、Graph、DocStatus)提供统一的存储解决方案。它提供原生的 k-NN 向量搜索、全文搜索和水平可扩展性 —— 所有这些都无需云专属限制。 * **要求**: 启用了 k-NN 插件的 OpenSearch 3.x 或更高版本。 使用 Docker 安装(不带插件): ``` docker run -d -p 9200:9200 -e "discovery.type=single-node" \ -e "OPENSEARCH_INITIAL_ADMIN_PASSWORD=创建实体和关系
``` # 创建新实体 entity = rag.create_entity("Google", { "description": "Google is a multinational technology company specializing in internet-related services and products.", "entity_type": "company" }) # 创建另一个实体 product = rag.create_entity("Gmail", { "description": "Gmail is an email service developed by Google.", "entity_type": "product" }) # 在实体之间创建关系 relation = rag.create_relation("Google", "Gmail", { "description": "Google develops and operates Gmail.", "keywords": "develops operates service", "weight": 2.0 }) ```编辑实体和关系
``` # 编辑现有实体 updated_entity = rag.edit_entity("Google", { "description": "Google is a subsidiary of Alphabet Inc., founded in 1998.", "entity_type": "tech_company" }) # 重命名实体(及其所有关系被正确迁移) renamed_entity = rag.edit_entity("Gmail", { "entity_name": "Google Mail", "description": "Google Mail (formerly Gmail) is an email service." }) # 编辑实体之间的关系 updated_relation = rag.edit_relation("Google", "Google Mail", { "description": "Google created and maintains Google Mail service.", "keywords": "creates maintains email service", "weight": 3.0 }) ``` 所有操作都有同步和异步版本。异步版本带有前缀 "a"(例如,`acreate_entity`, `aedit_relation`)。插入自定义 KG
``` custom_kg = { "chunks": [ { "content": "Alice and Bob are collaborating on quantum computing research.", "source_id": "doc-1", "file_path": "test_file", } ], "entities": [ { "entity_name": "Alice", "entity_type": "person", "description": "Alice is a researcher specializing in quantum physics.", "source_id": "doc-1", "file_path": "test_file" }, { "entity_name": "Bob", "entity_type": "person", "description": "Bob is a mathematician.", "source_id": "doc-1", "file_path": "test_file" }, { "entity_name": "Quantum Computing", "entity_type": "technology", "description": "Quantum computing utilizes quantum mechanical phenomena for computation.", "source_id": "doc-1", "file_path": "test_file" } ], "relationships": [ { "src_id": "Alice", "tgt_id": "Bob", "description": "Alice and Bob are research partners.", "keywords": "collaboration research", "weight": 1.0, "source_id": "doc-1", "file_path": "test_file" }, { "src_id": "Alice", "tgt_id": "Quantum Computing", "description": "Alice conducts research on quantum computing.", "keywords": "research expertise", "weight": 1.0, "source_id": "doc-1", "file_path": "test_file" }, { "src_id": "Bob", "tgt_id": "Quantum Computing", "description": "Bob researches quantum computing.", "keywords": "research application", "weight": 1.0, "source_id": "doc-1", "file_path": "test_file" } ] } rag.insert_custom_kg(custom_kg) ```其他实体和关系操作
- **create_entity**: 使用指定属性创建新实体 - **edit_entity**: 更新现有实体的属性或重命名它 - **create_relation**: 在现有实体之间创建新关系 - **edit_relation**: 更新现有关系的属性 这些操作在图数据库和向量数据库组件之间保持数据一致性,确保您的知识图谱保持连贯。删除实体
您可以按名称删除实体以及所有关联的关系: ``` # 删除实体及其所有关系(同步版本) rag.delete_by_entity("Google") # 异步版本 await rag.adelete_by_entity("Google") ``` 删除实体时: - 从知识图谱中移除实体节点 - 删除所有关联的关系 - 从向量数据库中移除相关的 Embedding 向量 - 维护知识图谱完整性删除关系
您可以删除两个特定实体之间的关系: ``` # 删除两个实体之间的关系(同步版本) rag.delete_by_relation("Google", "Gmail") # 异步版本 await rag.adelete_by_relation("Google", "Gmail") ``` 删除关系时: - 移除指定的关系边 - 从向量数据库中删除关系的 Embedding 向量 - 保留两个实体节点及其其他关系按文档 ID 删除
您可以通过文档 ID 删除整个文档及其所有相关知识: ``` # 按文档 ID 删除(异步版本) await rag.adelete_by_doc_id("doc-12345") ``` 按文档 ID 删除时的优化处理: - **智能清理**: 自动识别并删除仅属于此文档的实体和关系 - **保留共享知识**: 如果实体或关系存在于其他文档中,它们将被保留并重建其描述 - **缓存优化**: 清除相关的 LLM 缓存以减少存储开销 - **增量重建**: 从剩余文档中重建受影响的实体和关系描述 删除过程包括: 1. 删除与文档相关的所有文本块 2. 识别并删除仅属于此文档的实体和关系 3. 重建仍然存在于其他文档中的实体和关系 4. 更新所有相关的向量索引 5. 清理文档状态记录 注意:按文档 ID 删除是一个异步操作,因为它涉及复杂的知识图谱重建过程。合并实体及其关系
LightRAG 现在支持将多个实体合并为单个实体,自动处理所有关系: ``` # 基本实体合并 rag.merge_entities( source_entities=["Artificial Intelligence", "AI", "Machine Intelligence"], target_entity="AI Technology" ) ``` 使用自定义合并策略: ``` # 为不同字段定义自定义合并策略 rag.merge_entities( source_entities=["John Smith", "Dr. Smith", "J. Smith"], target_entity="John Smith", merge_strategy={ "description": "concatenate", # Combine all descriptions "entity_type": "keep_first", # Keep the entity type from the first entity "source_id": "join_unique" # Combine all unique source IDs } ) ``` 使用自定义目标实体数据: ``` # 为合并后的实体指定确切值 rag.merge_entities( source_entities=["New York", "NYC", "Big Apple"], target_entity="New York City", target_entity_data={ "entity_type": "LOCATION", "description": "New York City is the most populous city in the United States.", } ) ``` 结合两种方法的高级用法: ``` # 结合策略和自定义数据合并公司实体 rag.merge_entities( source_entities=["Microsoft Corp", "Microsoft Corporation", "MSFT"], target_entity="Microsoft", merge_strategy={ "description": "concatenate", # Combine all descriptions "source_id": "join_unique" # Combine source IDs }, target_entity_data={ "entity_type": "ORGANIZATION", } ) ``` 合并实体时: * 来自源实体的所有关系都重定向到目标实体 * 重复的关系被智能合并 * 防止自关系(循环) * 合并后移除源实体 * 保留关系权重和属性RAGAnything 使用示例
import asyncio from raganything import RAGAnything from lightrag import LightRAG from lightrag.llm.openai import openai_complete_if_cache, openai_embed from lightrag.utils import EmbeddingFunc import os async def load_existing_lightrag(): # First, create or load an existing LightRAG instance lightrag_working_dir = "./existing_lightrag_storage" # Check if previous LightRAG instance exists if os.path.exists(lightrag_working_dir) and os.listdir(lightrag_working_dir): print("✅ Found existing LightRAG instance, loading...") else: print("❌ No existing LightRAG instance found, will create new one") from functools import partial # Create/Load LightRAG instance with your configurations lightrag_instance = LightRAG( working_dir=lightrag_working_dir, ll_model_func=lambda prompt, system_prompt=None, history_messages=[], **kwargs: openai_complete_if_cache( "gpt-4o-mini", prompt, system_prompt=system_prompt, history_messages=history_messages, api_key="your-api-key", **kwargs, ), embedding_func=EmbeddingFunc( embedding_dim=3072, max_token_size=8192, model="text-embedding-3-large", func=partial( openai_embed.func, # Use .func to access the unwrapped function model="text-embedding-3-large", api_key=api_key, base_url=base_url, ), ) ) # Initialize storage (this will load existing data if available) await lightrag_instance.initialize_storages() # Now initialize RAGAnything with the existing LightRAG instance rag = RAGAnything( lightrag=lightrag_instance, # Pass the existing LightRAG instance # Only need vision model for multimodal processing vision_model_func=lambda prompt, system_prompt=None, history_messages=[], image_data=None, **kwargs: openai_complete_if_cache( "gpt-4o", "", system_prompt=None, history_messages=[], messages=[ {"role": "system", "content": system_prompt} if system_prompt else None, {"role": "user", "content": [ {"type": "text", "text": prompt}, {"type": "image_url", "image_url": {"url": f"data:image/jpeg;base64,{image_data}"}} ]} if image_data else {"role": "user", "content": prompt} ], api_key="your-api-key", **kwargs, ) if image_data else openai_complete_if_cache( "gpt-4o-mini", prompt, system_prompt=system_prompt, history_messages=history_messages, api_key="your-api-key", **kwargs, ) # Note: working_dir, llm_model_func, embedding_func, etc. are inherited from lightrag_instance ) # Query the existing knowledge base result = await rag.query_with_multimodal( "What data has been processed in this LightRAG instance?", mode="hybrid" ) print("Query result:", result) # Add new multimodal documents to the existing LightRAG instance await rag.process_document_complete( file_path="path/to/new/multimodal_document.pdf", output_dir="./output" ) if __name__ == "__main__": asyncio.run(load_existing_lightrag())概述和用法
LightRAG 提供了一个 TokenTracker 工具来监控和管理大型语言模型的 Token 消耗。此功能对于控制 API 成本和优化性能特别有用。 ### 用法 ``` from lightrag.utils import TokenTracker # 创建 TokenTracker 实例 token_tracker = TokenTracker() # 方法 1:使用上下文管理器(推荐) # 适用于需要自动 token 使用跟踪的场景 with token_tracker: result1 = await llm_model_func("your question 1") result2 = await llm_model_func("your question 2") # 方法 2:手动添加 token 使用记录 # 适用于需要对 token 统计进行更精细控制的场景 token_tracker.reset() rag.insert() rag.query("your question 1", param=QueryParam(mode="naive")) rag.query("your question 2", param=QueryParam(mode="mix")) # 显示总 token 使用量(包括插入和查询操作) print("Token usage:", token_tracker.get_usage()) ``` ### 使用技巧 - 对长时间会话或批处理操作使用上下文管理器,以自动追踪所有 Token 消耗 - 对于需要分段统计的场景,使用手动模式并在适当时调用 reset() - 定期检查 Token 使用情况有助于及早发现异常消耗 - 在开发和测试期间积极使用此功能,以优化生产成本 ### 实践示例 您可以参考这些示例来实现 Token 追踪: - `examples/lightrag_gemini_track_token_demo.py`: 使用 Google Gemini 模型的 Token 追踪示例 - `examples/lightrag_siliconcloud_track_token_demo.py`: 使用 SiliconCloud 模型的 Token 追踪示例 这些示例演示了如何在不同模型和场景下有效使用 TokenTracker 功能。基本用法
``` # 基本 CSV 导出(默认格式) rag.export_data("knowledge_graph.csv") # 指定任意格式 rag.export_data("output.xlsx", file_format="excel") ```支持的不同文件格式
``` #Export data in CSV format rag.export_data("graph_data.csv", file_format="csv") # 将数据导出到 Excel 表格 rag.export_data("graph_data.xlsx", file_format="excel") # 以 markdown 格式导出数据 rag.export_data("graph_data.md", file_format="md") # 以文本格式导出数据 rag.export_data("graph_data.txt", file_format="txt") ```附加选项
在导出中包含向量 Embedding(可选): ``` rag.export_data("complete_data.csv", include_vector_data=True) ```清除缓存
您可以使用 `aclear_cache()` 清除已配置的 LLM 响应缓存存储。此 API 清除 `llm_response_cache` 中的所有缓存条目,不支持按模式或缓存类型进行选择性清理。 ``` # 清除所有缓存 await rag.aclear_cache() # 同步版本 rag.clear_cache() ``` 要对查询相关缓存进行选择性清理,请使用 `lightrag.tools.clean_llm_query_cache` 工具,并参阅 [lightrag/tools/README_CLEAN_LLM_QUERY_CACHE.md](./lightrag/tools/README_CLEAN_LLM_QUERY_CACHE.md) 中的指南。它管理 `mix`, `hybrid`, `local`, 和 `global` 模式的查询缓存和关键字缓存。它不会清理提取缓存,例如 `default:extract:*` 和 `default:summary:*`。提示
``` Given the following description of a dataset: {description} Please identify 5 potential users who would engage with this dataset. For each user, list 5 tasks they would perform with this dataset. Then, for each (user, task) combination, generate 5 questions that require a high-level understanding of the entire dataset. Output the results in the following structure: - User 1: [user description] - Task 1: [task description] - Question 1: - Question 2: - Question 3: - Question 4: - Question 5: - Task 2: [task description] ... - Task 5: [task description] - User 2: [user description] ... - User 5: [user description] ... ```提示
``` ---Role--- You are an expert tasked with evaluating two answers to the same question based on three criteria: **Comprehensiveness**, **Diversity**, and **Empowerment**. ---Goal--- You will evaluate two answers to the same question based on three criteria: **Comprehensiveness**, **Diversity**, and **Empowerment**. - **Comprehensiveness**: How much detail does the answer provide to cover all aspects and details of the question? - **Diversity**: How varied and rich is the answer in providing different perspectives and insights on the question? - **Empowerment**: How well does the answer help the reader understand and make informed judgments about the topic? For each criterion, choose the better answer (either Answer 1 or Answer 2) and explain why. Then, select an overall winner based on these three categories. Here is the question: {query} Here are the two answers: **Answer 1:** {answer1} **Answer 2:** {answer2} Evaluate both answers using the three criteria listed above and provide detailed explanations for each criterion. Output your evaluation in the following JSON format: {{ "Comprehensiveness": {{ "Winner": "[Answer 1 or Answer 2]", "Explanation": "[Provide explanation here]" }}, "Empowerment": {{ "Winner": "[Answer 1 or Answer 2]", "Explanation": "[Provide explanation here]" }}, "Overall Winner": {{ "Winner": "[Answer 1 or Answer 2]", "Explanation": "[Summarize why this answer is the overall winner based on the three criteria]" }} }} ```代码
``` def extract_unique_contexts(input_directory, output_directory): os.makedirs(output_directory, exist_ok=True) jsonl_files = glob.glob(os.path.join(input_directory, '*.jsonl')) print(f"Found {len(jsonl_files)} JSONL files.") for file_path in jsonl_files: filename = os.path.basename(file_path) name, ext = os.path.splitext(filename) output_filename = f"{name}_unique_contexts.json" output_path = os.path.join(output_directory, output_filename) unique_contexts_dict = {} print(f"Processing file: {filename}") try: with open(file_path, 'r', encoding='utf-8') as infile: for line_number, line in enumerate(infile, start=1): line = line.strip() if not line: continue try: json_obj = json.loads(line) context = json_obj.get('context') if context and context not in unique_contexts_dict: unique_contexts_dict[context] = None except json.JSONDecodeError as e: print(f"JSON decoding error in file {filename} at line {line_number}: {e}") except FileNotFoundError: print(f"File not found: {filename}") continue except Exception as e: print(f"An error occurred while processing file {filename}: {e}") continue unique_contexts_list = list(unique_contexts_dict.keys()) print(f"There are {len(unique_contexts_list)} unique `context` entries in the file {filename}.") try: with open(output_path, 'w', encoding='utf-8') as outfile: json.dump(unique_contexts_list, outfile, ensure_ascii=False, indent=4) print(f"Unique `context` entries have been saved to: {output_filename}") except Exception as e: print(f"An error occurred while saving to the file {output_filename}: {e}") print("All files have been processed.") ```代码
``` def insert_text(rag, file_path): with open(file_path, mode='r') as f: unique_contexts = json.load(f) retries = 0 max_retries = 3 while retries < max_retries: try: rag.insert(unique_contexts) break except Exception as e: retries += 1 print(f"Insertion failed, retrying ({retries}/{max_retries}), error: {e}") time.sleep(10) if retries == max_retries: print("Insertion failed after exceeding the maximum number of retries") ```代码
``` tokenizer = GPT2Tokenizer.from_pretrained('gpt2') def get_summary(context, tot_tokens=2000): tokens = tokenizer.tokenize(context) half_tokens = tot_tokens // 2 start_tokens = tokens[1000:1000 + half_tokens] end_tokens = tokens[-(1000 + half_tokens):1000] summary_tokens = start_tokens + end_tokens summary = tokenizer.convert_tokens_to_string(summary_tokens) return summary ```代码
``` def extract_queries(file_path): with open(file_path, 'r') as f: data = f.read() data = data.replace('**', '') queries = re.findall(r'- Question \d+: (.+)', data) return queries ```
我们感谢所有贡献者的宝贵贡献。
⭐
感谢您访问 LightRAG!
⭐
标签:AI风险缓解, Apex, DLL 劫持, DNS解析, EMNLP2025, GraphRAG, HKUDS, LightRAG, Petitpotam, Python, RAG, 人工智能, 向量数据库, 大语言模型, 开源搜索引擎, 开源项目, 搜索引擎查询, 文本生成, 无后门, 智能问答, 机器学习, 检索增强生成, 测试用例, 深度学习, 用户模式Hook绕过, 语义检索, 请求拦截, 逆向工具