nicbarker/clay
GitHub: nicbarker/clay
一个用 C 语言编写的高性能、零依赖 UI 布局库,采用类 Flexbox 的声明式语法,专注于布局计算并输出渲染无关的原语列表。
Stars: 17441 | Forks: 687
# Clay,一个 UI 布局库
**_Clay_**(**C Layout** 的缩写)是一个高性能的 2D UI 布局库。
### 主要特性
- 微秒级布局性能
- 类 Flex-box 的布局模型,支持复杂、响应式布局,包括文本换行、滚动容器和纵横比缩放
- 单个约 4k LOC 的 **clay.h** 文件,**零**依赖(包括不依赖标准库)
- Wasm 支持:使用 clang 编译为 15kb 未压缩的 **.wasm** 文件,可在浏览器中使用
- 基于静态 arena 的内存使用,无 malloc / free,且总内存开销低(例如 8192 个布局元素约需 3.5mb)。
- 类 React 的嵌套声明式语法
- 渲染器无关:输出一个排序后的渲染原语列表,可在任何 3D 引擎中轻松合成,甚至编译为 HTML(提供了示例)
请访问 [clay 网站](https://nicbarker.com/clay) 查看 clay 编译为 wasm 并在浏览器中运行的示例,或查看 [examples 目录](https://github.com/nicbarker/clay/tree/main/examples) 中的其他示例。
您还可以观看 [介绍视频](https://youtu.be/DYWTw19_8r4),了解 Clay 开发背后的动机及其用法的简短演示。
 _一个使用 clay 构建的 GUI 应用程序示例_
## 快速开始
下载或克隆 clay.h,并在一个文件中定义 `CLAY_IMPLEMENTATION` 后包含它。
```
// Must be defined in one file, _before_ #include "clay.h"
#define CLAY_IMPLEMENTATION
#include "../../clay.h"
const Clay_Color COLOR_LIGHT = (Clay_Color) {224, 215, 210, 255};
const Clay_Color COLOR_RED = (Clay_Color) {168, 66, 28, 255};
const Clay_Color COLOR_ORANGE = (Clay_Color) {225, 138, 50, 255};
void HandleClayErrors(Clay_ErrorData errorData) {
// See the Clay_ErrorData struct for more information
printf("%s", errorData.errorText.chars);
switch(errorData.errorType) {
// etc
}
}
// Example measure text function
static inline Clay_Dimensions MeasureText(Clay_StringSlice text, Clay_TextElementConfig *config, uintptr_t userData) {
// Clay_TextElementConfig contains members such as fontId, fontSize, letterSpacing etc
// Note: Clay_String->chars is not guaranteed to be null terminated
return (Clay_Dimensions) {
.width = text.length * config->fontSize, // <- this will only work for monospace fonts, see the renderers/ directory for more advanced text measurement
.height = config->fontSize
};
}
// Layout config is just a struct that can be declared statically, or inline
Clay_ElementDeclaration sidebarItemConfig = (Clay_ElementDeclaration) {
.layout = {
.sizing = { .width = CLAY_SIZING_GROW(0), .height = CLAY_SIZING_FIXED(50) }
},
.backgroundColor = COLOR_ORANGE
};
// Re-useable components are just normal functions
void SidebarItemComponent() {
CLAY(id, sidebarItemConfig) {
// children go here...
}
}
int main() {
// Note: malloc is only used here as an example, any allocator that provides
// a pointer to addressable memory of at least totalMemorySize will work
uint64_t totalMemorySize = Clay_MinMemorySize();
Clay_Arena arena = Clay_CreateArenaWithCapacityAndMemory(totalMemorySize, malloc(totalMemorySize));
// Note: screenWidth and screenHeight will need to come from your environment, Clay doesn't handle window related tasks
Clay_Initialize(arena, (Clay_Dimensions) { screenWidth, screenHeight }, (Clay_ErrorHandler) { HandleClayErrors });
while(renderLoop()) { // Will be different for each renderer / environment
// Optional: Update internal layout dimensions to support resizing
Clay_SetLayoutDimensions((Clay_Dimensions) { screenWidth, screenHeight });
// Optional: Update internal pointer position for handling mouseover / click / touch events - needed for scrolling & debug tools
Clay_SetPointerState((Clay_Vector2) { mousePositionX, mousePositionY }, isMouseDown);
// Optional: Update internal pointer position for handling mouseover / click / touch events - needed for scrolling and debug tools
Clay_UpdateScrollContainers(true, (Clay_Vector2) { mouseWheelX, mouseWheelY }, deltaTime);
// All clay layouts are declared between Clay_BeginLayout and Clay_EndLayout
Clay_BeginLayout();
// An example of laying out a UI with a fixed width sidebar and flexible width main content
CLAY(CLAY_ID("OuterContainer"), { .layout = { .sizing = {CLAY_SIZING_GROW(0), CLAY_SIZING_GROW(0)}, .padding = CLAY_PADDING_ALL(16), .childGap = 16 }, .backgroundColor = {250,250,255,255} }) {
CLAY(CLAY_ID("SideBar"), {
.layout = { .layoutDirection = CLAY_TOP_TO_BOTTOM, .sizing = { .width = CLAY_SIZING_FIXED(300), .height = CLAY_SIZING_GROW(0) }, .padding = CLAY_PADDING_ALL(16), .childGap = 16 },
.backgroundColor = COLOR_LIGHT
}) {
CLAY(CLAY_ID("ProfilePictureOuter"), { .layout = { .sizing = { .width = CLAY_SIZING_GROW(0) }, .padding = CLAY_PADDING_ALL(16), .childGap = 16, .childAlignment = { .y = CLAY_ALIGN_Y_CENTER } }, .backgroundColor = COLOR_RED }) {
CLAY(CLAY_ID("ProfilePicture"), {.layout = { .sizing = { .width = CLAY_SIZING_FIXED(60), .height = CLAY_SIZING_FIXED(60) }}, .image = { .imageData = &profilePicture } }) {}
CLAY_TEXT(CLAY_STRING("Clay - UI Library"), CLAY_TEXT_CONFIG({ .fontSize = 24, .textColor = {255, 255, 255, 255} }));
}
// Standard C code like loops etc work inside components
for (int i = 0; i < 5; i++) {
SidebarItemComponent();
}
CLAY(CLAY_ID("MainContent"), { .layout = { .sizing = { .width = CLAY_SIZING_GROW(0), .height = CLAY_SIZING_GROW(0) } }, .backgroundColor = COLOR_LIGHT }) {}
}
}
// All clay layouts are declared between Clay_BeginLayout and Clay_EndLayout
Clay_RenderCommandArray renderCommands = Clay_EndLayout();
// More comprehensive rendering examples can be found in the renderers/ directory
for (int i = 0; i < renderCommands.length; i++) {
Clay_RenderCommand *renderCommand = &renderCommands.internalArray[i];
switch (renderCommand->commandType) {
case CLAY_RENDER_COMMAND_TYPE_RECTANGLE: {
DrawRectangle( renderCommand->boundingBox, renderCommand->renderData.rectangle.backgroundColor);
}
// ... Implement handling of other command types
}
}
}
}
```
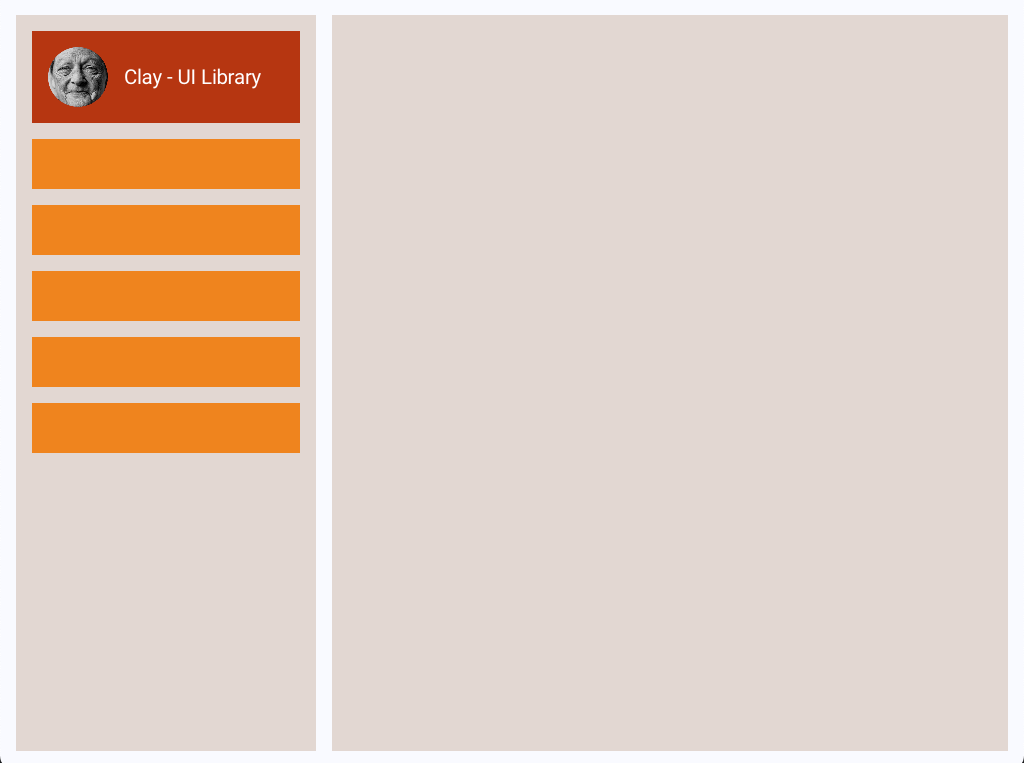
上面的示例如果正确渲染,将如下所示:
总之,一般的步骤顺序是:
1. [Clay_SetLayoutDimensions(dimensions)](#clay_setlayoutdimensions)
2. [Clay_SetPointerState(pointerPosition, isPointerDown)](#clay_setpointerstate)
3. [Clay_UpdateScrollContainers(enableDragScrolling, scrollDelta, deltaTime)](#clay_updatescrollcontainers)
4. [Clay_BeginLayout()](#clay_beginlayout)
5. 使用提供的 [Element Macros](#element-macros) 声明您的布局
6. [Clay_EndLayout()](#clay_endlayout)
7. 使用输出的 [Clay_RenderCommandArray](#clay_rendercommandarray) 渲染结果
如需入门帮助或讨论 clay,请考虑加入 [Discord 服务器](https://discord.gg/b4FTWkxdvT)。
## 概要
- [高级文档](#high-level-documentation)
- [构建 UI 层次结构](#building-ui-hierarchies)
- [配置布局和样式 UI 元素](#configuring-layout-and-styling-ui-elements)
- [Element IDs](#element-ids)
- [Mouse, Touch and Pointer Interactions](#mouse-touch-and-pointer-interactions)
- [Scrolling Elements](#scrolling-elements)
- [Floating Elements](#floating-elements-absolute-positioning)
- [Custom Elements](#laying-out-your-own-custom-elements)
- [Retained Mode Rendering](#retained-mode-rendering)
- [Visibility Culling](#visibility-culling)
- [Preprocessor Directives](#preprocessor-directives)
- [Bindings](#bindings-for-non-c)
- [Debug Tools](#debug-tools)
- [API](#api)
- [Naming Conventions](#naming-conventions)
- [Public Functions](#public-functions)
- [Lifecycle](#lifecycle-for-public-functions)
- [Clay_MinMemorySize](#clay_minmemorysize)
- [Clay_CreateArenaWithCapacityAndMemory](#clay_createarenawithcapacityandmemory)
- [Clay_SetMeasureTextFunction](#clay_setmeasuretextfunction)
- [Clay_ResetMeasureTextCache](#clay_resetmeasuretextcache)
- [Clay_SetMaxElementCount](#clay_setmaxelementcount)
- [Clay_SetMaxMeasureTextCacheWordCount](#clay_setmaxmeasuretextcachewordcount)
- [Clay_Initialize](#clay_initialize)
- [Clay_GetCurrentContext](#clay_getcurrentcontext)
- [Clay_SetCurrentContext](#clay_setcurrentcontext)
- [Clay_SetLayoutDimensions](#clay_setlayoutdimensions)
- [Clay_SetPointerState](#clay_setpointerstate)
- [Clay_UpdateScrollContainers](#clay_updatescrollcontainers)
- [Clay_BeginLayout](#clay_beginlayout)
- [Clay_EndLayout](#clay_endlayout)
- [Clay_Hovered](#clay_hovered)
- [Clay_OnHover](#clay_onhover)
- [Clay_PointerOver](#clay_pointerover)
- [Clay_GetScrollContainerData](#clay_getscrollcontainerdata)
- [Clay_GetElementData](#clay_getelementdata)
- [Clay_GetElementId](#clay_getelementid)
- [Element Macros](#element-macros)
- [CLAY](#clay)
- [CLAY_ID](#clay_id)
- [CLAY_IDI](#clay_idi)
- [Data Structures & Defs](#data-structures--definitions)
- [Clay_String](#clay_string)
- [Clay_ElementId](#clay_elementid)
- [Clay_RenderCommandArray](#clay_rendercommandarray)
- [Clay_RenderCommand](#clay_rendercommand)
- [Clay_ScrollContainerData](#clay_scrollcontainerdata)
- [Clay_ErrorHandler](#clay_errorhandler)
- [Clay_ErrorData](#clay_errordata)
## 高级文档
### 构建 UI 层次结构
Clay UI 使用 C 宏 `CLAY(id, { configuration })` 构建。该宏在 UI 层次结构中创建一个新的空元素,并支持模块化自定义布局、样式和功能。`CLAY()` 宏也可以_嵌套_,类似于 HTML 等其他声明式 UI 系统。
子元素通过在调用 `CLAY()` 宏后打开一个块:`{}`(就像您使用 `if` 语句或 `for` 循环一样),并在大括号内声明子组件来添加。
```
// Parent element with 8px of padding
CLAY(CLAY_ID("parent"), { .layout = { .padding = CLAY_PADDING_ALL(8) } }) {
// Child element 1
CLAY_TEXT(CLAY_STRING("Hello World"), CLAY_TEXT_CONFIG({ .fontSize = 16 }));
// Child element 2 with red background
CLAY((CLAY_ID("child"), { .backgroundColor = COLOR_RED }) {
// etc
}
}
```
然而,与 HTML 和其他声明式 DSL 不同,这个宏只是 C 代码。因此,您可以在布局声明代码中使用任意 C 代码,例如循环、函数和条件:
```
// Re-usable "components" are just functions that declare more UI
void ButtonComponent(Clay_String buttonText) {
// Red box button with 8px of padding
CLAY_AUTO_ID({ .layout = { .padding = CLAY_PADDING_ALL(8) }, .backgroundColor = COLOR_RED }) {
CLAY_TEXT(buttonText, textConfig);
}
}
// Parent element
CLAY(CLAY_ID("parent"), { .layout = { .layoutDirection = CLAY_TOP_TO_BOTTOM } }) {
// Render a bunch of text elements
for (int i = 0; i < textArray.length; i++) {
CLAY_TEXT(textArray.elements[i], textConfig);
}
// Only render this element if we're on a mobile screen
if (isMobileScreen) {
CLAY(0) {
// etc
}
}
// Re-usable components
ButtonComponent(CLAY_STRING("Click me!"));
ButtonComponent(CLAY_STRING("No, click me!"));
});
```
### 配置布局和样式 UI 元素
clay 元素的布局和样式通过传递给 `CLAY()` 宏的 [Clay_ElementDeclaration](#clay_elementdeclaration) 结构体进行配置。
```
CLAY(CLAY_ID("box"), { .layout = { .padding = { 8, 8, 8, 8 }, .layoutDirection = CLAY_TOP_TO_BOTTOM } }) {
// Children are 8px inset into parent, and laid out top to bottom
}
```
这个宏并不神奇——它所做的只是包装标准的指定初始化语法。例如 `(Clay_ElementDeclaration) { .layout = { .padding = { .left = 8, .right = 8 } ...`。
有关完整的选项列表,请参阅 [Clay_ElementDeclaration](#clay_elementdeclaration) API。
`Clay_ElementDeclaration` 结构体可以在文件作用域或其他地方定义并重用。
```
// Define a style in the global / file scope
Clay_ElementDeclaration reuseableStyle = (Clay_ElementDeclaration) {
.layout = { .padding = { .left = 12 } },
.backgroundColor = { 120, 120, 120, 255 },
.cornerRadius = { 12, 12, 12, 12 }
};
CLAY(CLAY_ID("box"), reuseableStyle) {
// ...
}
```
### Element ID
Clay 宏默认接受一个 ID 作为其第一个参数,该参数通常由便捷宏 [CLAY_ID()](#clay_id) 提供。也可以使用 [CLAY_AUTO_ID()](#clay-auto-id) 宏创建具有自动生成 ID 的元素。
```
// Will always produce the same ID from the same input string
CLAY(CLAY_ID("OuterContainer"), { ...configuration }) {}
// Generates a unique ID that may not be the same between two layout calls
CLAY_AUTO_ID({ ...configuration }) {}
```
Element IDs 有两个主要用例。首先,使用 ID 标记元素允许您稍后查询有关该元素的信息,例如其 [mouseover state](#clay_pointerover) 或尺寸。
其次,ID 在尝试阅读和修改 UI 代码时具有视觉上的实用性,以及在使用内置的 [debug tools](#debug-tools) 时也是如此。
为了避免在运行时构建动态字符串以区分循环中的 ID,clay 提供了 [CLAY_IDI(string, index)](#clay_idi) 宏,用于从单个输入字符串生成不同的 ID。将 IDI 视为 "**ID** + **I**ndex"。
```
// This is the equivalent of calling CLAY_ID("Item0"), CLAY_ID("Item1") etc
for (int index = 0; index < items.length; index++) {
CLAY(CLAY_IDI("Item", index), { ..configuration }) {}
}
```
此 ID 将被转发到最终的 `Clay_RenderCommandArray`,供 retained mode UIs 使用。使用重复的 ID 可能会导致某些功能行为异常(即,如果您尝试将浮动容器附加到具有重复 ID 的特定元素,它可能不会附加到您期望的那个元素上)。
### 鼠标、触摸和指针交互
Clay 提供了几个用于处理鼠标和指针交互的函数。
所有指针交互都依赖于函数 `void Clay_SetPointerState(Clay_Vector2 position, bool isPointerDown)`,该函数必须在每次鼠标位置更新后以及调用任何其他 clay 函数之前被调用。
**在 UI 声明期间**
函数 `bool Clay_Hovered()` 可以在元素构造期间或元素主体中调用,如果鼠标/指针位于当前打开的元素上,则返回 `true`。
```
// An orange button that turns blue when hovered
CLAY(CLAY_ID("Button"), { .backgroundColor = Clay_Hovered() ? COLOR_BLUE : COLOR_ORANGE }) {
bool buttonHovered = Clay_Hovered();
CLAY_TEXT(buttonHovered ? CLAY_STRING("Hovered") : CLAY_STRING("Hover me!"), headerTextConfig);
}
```
函数 `void Clay_OnHover()` 允许您将一个函数指针附加到当前打开的元素,如果鼠标/指针位于该元素上,则会调用该函数。
```
void HandleButtonInteraction(Clay_ElementId elementId, Clay_PointerData pointerInfo, void *userData) {
ButtonData *buttonData = (ButtonData *)userData;
// Pointer state allows you to detect mouse down / hold / release
if (pointerInfo.state == CLAY_POINTER_DATA_PRESSED_THIS_FRAME) {
// Do some click handling
NavigateTo(buttonData->link);
}
}
ButtonData linkButton = (ButtonData) { .link = "https://github.com/nicbarker/clay" };
// HandleButtonInteraction will be called for each frame the mouse / pointer / touch is inside the button boundaries
CLAY(CLAY_ID("Button"), { .layout = { .padding = CLAY_PADDING_ALL(8) } }) {
Clay_OnHover(HandleButtonInteraction, &linkButton);
CLAY_TEXT(CLAY_STRING("Button"), &headerTextConfig);
}
```
**在 UI 声明之前/之后**
如果您想在布局声明之外查询鼠标/指针重叠,可以使用函数 `bool Clay_PointerOver(Clay_ElementId id)`,它接受一个 [element id](#element-ids) 并返回一个布尔值,表示当前指针位置是否在其边界框内。
```
// Reminder: Clay_SetPointerState must be called before functions that rely on pointer position otherwise it will have no effect
Clay_Vector2 mousePosition = { x, y };
Clay_SetPointerState(mousePosition);
// ...
// If profile picture was clicked
if (mouseButtonDown(0) && Clay_PointerOver(Clay_GetElementId("ProfilePicture"))) {
// Handle profile picture clicked
}
```
请注意,`Clay_PointerOver` 查询的边界框来自上一帧。除了在高速移动的动画情况下,这通常不会产生影响。
如果这对您来说是个问题,使用相同的数据每帧执行两次布局,第二次将为您提供正确的交互。
### 滚动元素
元素通过 `.clip` 配置配置为可滚动。Clipping 指示渲染器不要绘制剪切元素边界之外的任何像素,并通过指定 `.childOffset` 字段,可以移动剪切元素的内容以提供“滚动”行为。
您可以自己计算滚动并简单地在每帧中将当前偏移量提供给 `.childOffset`,或者,Clay 提供了一个内置机制来跟踪和更新滚动容器偏移量,详情如下。
要使滚动容器响应鼠标滚轮和滚动事件,需要在 `BeginLayout()` 之前调用两个函数:
```
Clay_Vector2 mousePosition = { x, y };
// Reminder: Clay_SetPointerState must be called before Clay_UpdateScrollContainers otherwise it will have no effect
Clay_SetPointerState(mousePosition);
// Clay_UpdateScrollContainers needs to be called before Clay_BeginLayout for the position to avoid a 1 frame delay
Clay_UpdateScrollContainers(
true, // Enable drag scrolling
scrollDelta, // Clay_Vector2 scrollwheel / trackpad scroll x and y delta this frame
float deltaTime, // Time since last frame in seconds as a float e.g. 8ms is 0.008f
);
// ...
// Clay internally tracks the scroll containers offset, and Clay_GetScrollOffset returns the x,y offset of the currently open element
CLAY(CLAY_ID("ScrollContainer"), { .clip = { .vertical = true, .childOffset = Clay_GetScrollOffset() } }) {
// Scrolling contents
}
// .childOffset can be provided directly if you would prefer to manage scrolling outside of clay
CLAY(CLAY_ID("ScrollContainer"), { .clip = { .vertical = true, .childOffset = myData.scrollContainer.offset } }) {
// Scrolling contents
}
```
更多具体细节可以在 [Clay_UpdateScrollContainers](#clay_updatescrollcontainers)、[Clay_SetPointerState](#clay_setpointerstate)、[Clay_ClipElementConfig](#clay_clipelementconfig) 和 [Clay_GetScrollOffset](#clay_getscrolloffset) 的文档中找到。
### Floating Elements(“绝对”定位)
Clay 中的所有标准元素都布局在其父元素的上方和_内部_,根据其父元素的布局规则定位,并影响兄弟元素的定位和大小。
**“Floating”** 通过 `CLAY_FLOATING()` 宏配置。浮动元素不会影响定义它们的父元素或其兄弟元素的位置。
它们还有一个 **z-index**,因此可以相交并渲染在其他元素的顶部。
浮动元素的一个经典用例是工具提示和模态框。
```
// The two text elements will be laid out top to bottom, and the floating container
// will be attached to "Outer"
CLAY(CLAY_ID("Outer"), { .layout = { .layoutDirection = TOP_TO_BOTTOM } }) {
CLAY_TEXT(text, &headerTextConfig);
CLAY(CLAY_ID("Tooltip"), { .floating = { .attachTo = CLAY_ATTACH_TO_PARENT } }) {}
CLAY_TEXT(text, &headerTextConfig);
}
```
更多具体细节可以在完整的 [Floating API](#clay_floatingelementconfig) 中找到。
### 布局您自己的自定义元素
Clay 仅支持一组简单的 UI 元素基元,例如矩形、文本和图像。Clay 提供了一个单一的 API 用于布局自定义元素:
```
#include "clay.h"
typedef enum {
CUSTOM_ELEMENT_TYPE_MODEL,
CUSTOM_ELEMENT_TYPE_VIDEO
} CustomElementType;
// A rough example of how you could handle laying out 3d models in your UI
typedef struct {
CustomElementType type;
union {
Model model;
Video video;
// ...
};
} CustomElementData;
Model myModel = Load3DModel(filePath);
CustomElement modelElement = (CustomElement) { .type = CUSTOM_ELEMENT_TYPE_MODEL, .model = myModel }
typedef struct {
void* memory;
uintptr_t offset;
} Arena;
// During init
Arena frameArena = (Arena) { .memory = malloc(1024) };
// Custom elements only take a single pointer, so we need to store the data somewhere
CustomElementData *modelData = (CustomElementData *)(frameArena.memory + frameArena.offset);
*modelData = (CustomElementData) { .type = CUSTOM_ELEMENT_TYPE_MODEL, .model = myModel };
frameArena.offset += sizeof(CustomElementData);
CLAY(CLAY_ID("3DModelViewer"), { .custom = { .customData = modelData } }) {}
// Later during your rendering
switch (renderCommand->commandType) {
// ...
case CLAY_RENDER_COMMAND_TYPE_CUSTOM: {
// Your extended struct is passed through
CustomElementData *customElement = renderCommand->config.customElementConfig->customData;
if (!customElement) continue;
switch (customElement->type) {
case CUSTOM_ELEMENT_TYPE_MODEL: {
// Render your 3d model here
break;
}
case CUSTOM_ELEMENT_TYPE_VIDEO: {
// Render your video here
break;
}
// ...
}
break;
}
}
```
更多具体细节可以在完整的 [Custom Element API](#clay_customelementconfig) 中找到。
### 保留模式渲染
Clay 最初是为 [Immediate Mode](https://www.youtube.com/watch?v=Z1qyvQsjK5Y) 渲染设计的——即每帧重绘整个 UI。这对于您的平台、渲染器设计或性能约束来说可能是不可能的。
有一些通用技术可用于将 clay 集成到 retained mode 渲染系统中:
- `Clay_RenderCommand` 包含用于声明元素的 `uint32_t id`。如果使用唯一 ID,这些可以跨多个帧/布局映射到持久图形对象。
- 渲染命令会自动剔除,仅保留当前可见的元素,并且 `Clay_RenderCommand` 是一个足够小的结构体,您可以简单地比较具有匹配 ID 的两个渲染命令的内存,以确定该元素是否“脏”并需要重新渲染或更新。
有关具体的示例,请参阅提供的 [HTML renderer](https://github.com/nicbarker/clay/blob/main/renderers/web/html/clay-html-renderer.html)。此渲染器将 clay 布局转换为持久的 HTML 文档,每帧更改最少。
### 可见性剔除
Clay 提供了一个内置的可见性剔除机制,**默认启用**。它只会为可见的元素输出渲染命令——也就是说,**它们的边界框中至少有一个像素位于视口内。**
可以通过使用 `#define CLAY_DISABLE_CULLING` 指令禁用此剔除机制。有关更多信息,请参阅 [Preprocessor Directives](#preprocessor-directives)。
### 预处理器指令
Clay 支持 C 预处理器指令,以便在编译时调节功能。这些可以在代码中使用 `#define CLAY_DISABLE_CULLING` 设置,或者在编译时使用适当的编译器特定参数在命令行上设置,例如 `clang -DCLAY_DISABLE_CULLING main.c ...`
支持的指令有:
- `CLAY_WASM` - 目标为 Web Assembly 时必需。
- `CLAY_DLL` - 创建 .Dll 文件时必需。
### 非 C 语言的 Bindings
Clay 可作为 `.h` 包含文件在 C99 和 C++20 中直接使用,并支持指定初始化器。
还有其他语言的支持绑定,包括:
- [Odin Bindings](https://github.com/nicbarker/clay/tree/main/bindings/odin)
- [Rust Bindings](https://github.com/clay-ui-rs/clay)
### 其他
Clay 也已在其他语言中实现:
- [`glay`](https://github.com/soypat/glay) - Go 逐行重写,以可读性为主要目标。
- [`totallygamerjet/clay`](https://github.com/totallygamerjet/clay) - 使用 `cxgo`(一个 C 到 Go 的转译器)移植。
- [`goclay`](https://github.com/igadmg/goclay) - Go 逐行重写,紧密匹配参考实现。
### 调试工具
Clay 包含内置的 UI 调试工具,类似于 Chrome 或 Firefox 等浏览器中的“检查器”。这些工具包含在 `clay.h` 中,通过将额外的渲染命令注入到输出 [Clay_RenderCommandArray](#clay_rendercommandarray) 中来工作。
只要您使用的渲染器工作正常,使用调试工具不需要额外的设置或配置。
要启用调试工具,请使用函数 `Clay_SetDebugModeEnabled(bool enabled)`。此布尔值是持久的,不需要每帧都设置。
调试工具默认将作为屏幕右侧的面板渲染,按其宽度压缩您的布局。默认宽度为 400,目前可以通过直接修改内部变量 `Clay__debugViewWidth` 进行配置,但这是一个内部 API,可能会发生变化。
_一个使用 clay 构建的 GUI 应用程序示例_
## 快速开始
下载或克隆 clay.h,并在一个文件中定义 `CLAY_IMPLEMENTATION` 后包含它。
```
// Must be defined in one file, _before_ #include "clay.h"
#define CLAY_IMPLEMENTATION
#include "../../clay.h"
const Clay_Color COLOR_LIGHT = (Clay_Color) {224, 215, 210, 255};
const Clay_Color COLOR_RED = (Clay_Color) {168, 66, 28, 255};
const Clay_Color COLOR_ORANGE = (Clay_Color) {225, 138, 50, 255};
void HandleClayErrors(Clay_ErrorData errorData) {
// See the Clay_ErrorData struct for more information
printf("%s", errorData.errorText.chars);
switch(errorData.errorType) {
// etc
}
}
// Example measure text function
static inline Clay_Dimensions MeasureText(Clay_StringSlice text, Clay_TextElementConfig *config, uintptr_t userData) {
// Clay_TextElementConfig contains members such as fontId, fontSize, letterSpacing etc
// Note: Clay_String->chars is not guaranteed to be null terminated
return (Clay_Dimensions) {
.width = text.length * config->fontSize, // <- this will only work for monospace fonts, see the renderers/ directory for more advanced text measurement
.height = config->fontSize
};
}
// Layout config is just a struct that can be declared statically, or inline
Clay_ElementDeclaration sidebarItemConfig = (Clay_ElementDeclaration) {
.layout = {
.sizing = { .width = CLAY_SIZING_GROW(0), .height = CLAY_SIZING_FIXED(50) }
},
.backgroundColor = COLOR_ORANGE
};
// Re-useable components are just normal functions
void SidebarItemComponent() {
CLAY(id, sidebarItemConfig) {
// children go here...
}
}
int main() {
// Note: malloc is only used here as an example, any allocator that provides
// a pointer to addressable memory of at least totalMemorySize will work
uint64_t totalMemorySize = Clay_MinMemorySize();
Clay_Arena arena = Clay_CreateArenaWithCapacityAndMemory(totalMemorySize, malloc(totalMemorySize));
// Note: screenWidth and screenHeight will need to come from your environment, Clay doesn't handle window related tasks
Clay_Initialize(arena, (Clay_Dimensions) { screenWidth, screenHeight }, (Clay_ErrorHandler) { HandleClayErrors });
while(renderLoop()) { // Will be different for each renderer / environment
// Optional: Update internal layout dimensions to support resizing
Clay_SetLayoutDimensions((Clay_Dimensions) { screenWidth, screenHeight });
// Optional: Update internal pointer position for handling mouseover / click / touch events - needed for scrolling & debug tools
Clay_SetPointerState((Clay_Vector2) { mousePositionX, mousePositionY }, isMouseDown);
// Optional: Update internal pointer position for handling mouseover / click / touch events - needed for scrolling and debug tools
Clay_UpdateScrollContainers(true, (Clay_Vector2) { mouseWheelX, mouseWheelY }, deltaTime);
// All clay layouts are declared between Clay_BeginLayout and Clay_EndLayout
Clay_BeginLayout();
// An example of laying out a UI with a fixed width sidebar and flexible width main content
CLAY(CLAY_ID("OuterContainer"), { .layout = { .sizing = {CLAY_SIZING_GROW(0), CLAY_SIZING_GROW(0)}, .padding = CLAY_PADDING_ALL(16), .childGap = 16 }, .backgroundColor = {250,250,255,255} }) {
CLAY(CLAY_ID("SideBar"), {
.layout = { .layoutDirection = CLAY_TOP_TO_BOTTOM, .sizing = { .width = CLAY_SIZING_FIXED(300), .height = CLAY_SIZING_GROW(0) }, .padding = CLAY_PADDING_ALL(16), .childGap = 16 },
.backgroundColor = COLOR_LIGHT
}) {
CLAY(CLAY_ID("ProfilePictureOuter"), { .layout = { .sizing = { .width = CLAY_SIZING_GROW(0) }, .padding = CLAY_PADDING_ALL(16), .childGap = 16, .childAlignment = { .y = CLAY_ALIGN_Y_CENTER } }, .backgroundColor = COLOR_RED }) {
CLAY(CLAY_ID("ProfilePicture"), {.layout = { .sizing = { .width = CLAY_SIZING_FIXED(60), .height = CLAY_SIZING_FIXED(60) }}, .image = { .imageData = &profilePicture } }) {}
CLAY_TEXT(CLAY_STRING("Clay - UI Library"), CLAY_TEXT_CONFIG({ .fontSize = 24, .textColor = {255, 255, 255, 255} }));
}
// Standard C code like loops etc work inside components
for (int i = 0; i < 5; i++) {
SidebarItemComponent();
}
CLAY(CLAY_ID("MainContent"), { .layout = { .sizing = { .width = CLAY_SIZING_GROW(0), .height = CLAY_SIZING_GROW(0) } }, .backgroundColor = COLOR_LIGHT }) {}
}
}
// All clay layouts are declared between Clay_BeginLayout and Clay_EndLayout
Clay_RenderCommandArray renderCommands = Clay_EndLayout();
// More comprehensive rendering examples can be found in the renderers/ directory
for (int i = 0; i < renderCommands.length; i++) {
Clay_RenderCommand *renderCommand = &renderCommands.internalArray[i];
switch (renderCommand->commandType) {
case CLAY_RENDER_COMMAND_TYPE_RECTANGLE: {
DrawRectangle( renderCommand->boundingBox, renderCommand->renderData.rectangle.backgroundColor);
}
// ... Implement handling of other command types
}
}
}
}
```
上面的示例如果正确渲染,将如下所示:

总之,一般的步骤顺序是:
1. [Clay_SetLayoutDimensions(dimensions)](#clay_setlayoutdimensions)
2. [Clay_SetPointerState(pointerPosition, isPointerDown)](#clay_setpointerstate)
3. [Clay_UpdateScrollContainers(enableDragScrolling, scrollDelta, deltaTime)](#clay_updatescrollcontainers)
4. [Clay_BeginLayout()](#clay_beginlayout)
5. 使用提供的 [Element Macros](#element-macros) 声明您的布局
6. [Clay_EndLayout()](#clay_endlayout)
7. 使用输出的 [Clay_RenderCommandArray](#clay_rendercommandarray) 渲染结果
如需入门帮助或讨论 clay,请考虑加入 [Discord 服务器](https://discord.gg/b4FTWkxdvT)。
## 概要
- [高级文档](#high-level-documentation)
- [构建 UI 层次结构](#building-ui-hierarchies)
- [配置布局和样式 UI 元素](#configuring-layout-and-styling-ui-elements)
- [Element IDs](#element-ids)
- [Mouse, Touch and Pointer Interactions](#mouse-touch-and-pointer-interactions)
- [Scrolling Elements](#scrolling-elements)
- [Floating Elements](#floating-elements-absolute-positioning)
- [Custom Elements](#laying-out-your-own-custom-elements)
- [Retained Mode Rendering](#retained-mode-rendering)
- [Visibility Culling](#visibility-culling)
- [Preprocessor Directives](#preprocessor-directives)
- [Bindings](#bindings-for-non-c)
- [Debug Tools](#debug-tools)
- [API](#api)
- [Naming Conventions](#naming-conventions)
- [Public Functions](#public-functions)
- [Lifecycle](#lifecycle-for-public-functions)
- [Clay_MinMemorySize](#clay_minmemorysize)
- [Clay_CreateArenaWithCapacityAndMemory](#clay_createarenawithcapacityandmemory)
- [Clay_SetMeasureTextFunction](#clay_setmeasuretextfunction)
- [Clay_ResetMeasureTextCache](#clay_resetmeasuretextcache)
- [Clay_SetMaxElementCount](#clay_setmaxelementcount)
- [Clay_SetMaxMeasureTextCacheWordCount](#clay_setmaxmeasuretextcachewordcount)
- [Clay_Initialize](#clay_initialize)
- [Clay_GetCurrentContext](#clay_getcurrentcontext)
- [Clay_SetCurrentContext](#clay_setcurrentcontext)
- [Clay_SetLayoutDimensions](#clay_setlayoutdimensions)
- [Clay_SetPointerState](#clay_setpointerstate)
- [Clay_UpdateScrollContainers](#clay_updatescrollcontainers)
- [Clay_BeginLayout](#clay_beginlayout)
- [Clay_EndLayout](#clay_endlayout)
- [Clay_Hovered](#clay_hovered)
- [Clay_OnHover](#clay_onhover)
- [Clay_PointerOver](#clay_pointerover)
- [Clay_GetScrollContainerData](#clay_getscrollcontainerdata)
- [Clay_GetElementData](#clay_getelementdata)
- [Clay_GetElementId](#clay_getelementid)
- [Element Macros](#element-macros)
- [CLAY](#clay)
- [CLAY_ID](#clay_id)
- [CLAY_IDI](#clay_idi)
- [Data Structures & Defs](#data-structures--definitions)
- [Clay_String](#clay_string)
- [Clay_ElementId](#clay_elementid)
- [Clay_RenderCommandArray](#clay_rendercommandarray)
- [Clay_RenderCommand](#clay_rendercommand)
- [Clay_ScrollContainerData](#clay_scrollcontainerdata)
- [Clay_ErrorHandler](#clay_errorhandler)
- [Clay_ErrorData](#clay_errordata)
## 高级文档
### 构建 UI 层次结构
Clay UI 使用 C 宏 `CLAY(id, { configuration })` 构建。该宏在 UI 层次结构中创建一个新的空元素,并支持模块化自定义布局、样式和功能。`CLAY()` 宏也可以_嵌套_,类似于 HTML 等其他声明式 UI 系统。
子元素通过在调用 `CLAY()` 宏后打开一个块:`{}`(就像您使用 `if` 语句或 `for` 循环一样),并在大括号内声明子组件来添加。
```
// Parent element with 8px of padding
CLAY(CLAY_ID("parent"), { .layout = { .padding = CLAY_PADDING_ALL(8) } }) {
// Child element 1
CLAY_TEXT(CLAY_STRING("Hello World"), CLAY_TEXT_CONFIG({ .fontSize = 16 }));
// Child element 2 with red background
CLAY((CLAY_ID("child"), { .backgroundColor = COLOR_RED }) {
// etc
}
}
```
然而,与 HTML 和其他声明式 DSL 不同,这个宏只是 C 代码。因此,您可以在布局声明代码中使用任意 C 代码,例如循环、函数和条件:
```
// Re-usable "components" are just functions that declare more UI
void ButtonComponent(Clay_String buttonText) {
// Red box button with 8px of padding
CLAY_AUTO_ID({ .layout = { .padding = CLAY_PADDING_ALL(8) }, .backgroundColor = COLOR_RED }) {
CLAY_TEXT(buttonText, textConfig);
}
}
// Parent element
CLAY(CLAY_ID("parent"), { .layout = { .layoutDirection = CLAY_TOP_TO_BOTTOM } }) {
// Render a bunch of text elements
for (int i = 0; i < textArray.length; i++) {
CLAY_TEXT(textArray.elements[i], textConfig);
}
// Only render this element if we're on a mobile screen
if (isMobileScreen) {
CLAY(0) {
// etc
}
}
// Re-usable components
ButtonComponent(CLAY_STRING("Click me!"));
ButtonComponent(CLAY_STRING("No, click me!"));
});
```
### 配置布局和样式 UI 元素
clay 元素的布局和样式通过传递给 `CLAY()` 宏的 [Clay_ElementDeclaration](#clay_elementdeclaration) 结构体进行配置。
```
CLAY(CLAY_ID("box"), { .layout = { .padding = { 8, 8, 8, 8 }, .layoutDirection = CLAY_TOP_TO_BOTTOM } }) {
// Children are 8px inset into parent, and laid out top to bottom
}
```
这个宏并不神奇——它所做的只是包装标准的指定初始化语法。例如 `(Clay_ElementDeclaration) { .layout = { .padding = { .left = 8, .right = 8 } ...`。
有关完整的选项列表,请参阅 [Clay_ElementDeclaration](#clay_elementdeclaration) API。
`Clay_ElementDeclaration` 结构体可以在文件作用域或其他地方定义并重用。
```
// Define a style in the global / file scope
Clay_ElementDeclaration reuseableStyle = (Clay_ElementDeclaration) {
.layout = { .padding = { .left = 12 } },
.backgroundColor = { 120, 120, 120, 255 },
.cornerRadius = { 12, 12, 12, 12 }
};
CLAY(CLAY_ID("box"), reuseableStyle) {
// ...
}
```
### Element ID
Clay 宏默认接受一个 ID 作为其第一个参数,该参数通常由便捷宏 [CLAY_ID()](#clay_id) 提供。也可以使用 [CLAY_AUTO_ID()](#clay-auto-id) 宏创建具有自动生成 ID 的元素。
```
// Will always produce the same ID from the same input string
CLAY(CLAY_ID("OuterContainer"), { ...configuration }) {}
// Generates a unique ID that may not be the same between two layout calls
CLAY_AUTO_ID({ ...configuration }) {}
```
Element IDs 有两个主要用例。首先,使用 ID 标记元素允许您稍后查询有关该元素的信息,例如其 [mouseover state](#clay_pointerover) 或尺寸。
其次,ID 在尝试阅读和修改 UI 代码时具有视觉上的实用性,以及在使用内置的 [debug tools](#debug-tools) 时也是如此。
为了避免在运行时构建动态字符串以区分循环中的 ID,clay 提供了 [CLAY_IDI(string, index)](#clay_idi) 宏,用于从单个输入字符串生成不同的 ID。将 IDI 视为 "**ID** + **I**ndex"。
```
// This is the equivalent of calling CLAY_ID("Item0"), CLAY_ID("Item1") etc
for (int index = 0; index < items.length; index++) {
CLAY(CLAY_IDI("Item", index), { ..configuration }) {}
}
```
此 ID 将被转发到最终的 `Clay_RenderCommandArray`,供 retained mode UIs 使用。使用重复的 ID 可能会导致某些功能行为异常(即,如果您尝试将浮动容器附加到具有重复 ID 的特定元素,它可能不会附加到您期望的那个元素上)。
### 鼠标、触摸和指针交互
Clay 提供了几个用于处理鼠标和指针交互的函数。
所有指针交互都依赖于函数 `void Clay_SetPointerState(Clay_Vector2 position, bool isPointerDown)`,该函数必须在每次鼠标位置更新后以及调用任何其他 clay 函数之前被调用。
**在 UI 声明期间**
函数 `bool Clay_Hovered()` 可以在元素构造期间或元素主体中调用,如果鼠标/指针位于当前打开的元素上,则返回 `true`。
```
// An orange button that turns blue when hovered
CLAY(CLAY_ID("Button"), { .backgroundColor = Clay_Hovered() ? COLOR_BLUE : COLOR_ORANGE }) {
bool buttonHovered = Clay_Hovered();
CLAY_TEXT(buttonHovered ? CLAY_STRING("Hovered") : CLAY_STRING("Hover me!"), headerTextConfig);
}
```
函数 `void Clay_OnHover()` 允许您将一个函数指针附加到当前打开的元素,如果鼠标/指针位于该元素上,则会调用该函数。
```
void HandleButtonInteraction(Clay_ElementId elementId, Clay_PointerData pointerInfo, void *userData) {
ButtonData *buttonData = (ButtonData *)userData;
// Pointer state allows you to detect mouse down / hold / release
if (pointerInfo.state == CLAY_POINTER_DATA_PRESSED_THIS_FRAME) {
// Do some click handling
NavigateTo(buttonData->link);
}
}
ButtonData linkButton = (ButtonData) { .link = "https://github.com/nicbarker/clay" };
// HandleButtonInteraction will be called for each frame the mouse / pointer / touch is inside the button boundaries
CLAY(CLAY_ID("Button"), { .layout = { .padding = CLAY_PADDING_ALL(8) } }) {
Clay_OnHover(HandleButtonInteraction, &linkButton);
CLAY_TEXT(CLAY_STRING("Button"), &headerTextConfig);
}
```
**在 UI 声明之前/之后**
如果您想在布局声明之外查询鼠标/指针重叠,可以使用函数 `bool Clay_PointerOver(Clay_ElementId id)`,它接受一个 [element id](#element-ids) 并返回一个布尔值,表示当前指针位置是否在其边界框内。
```
// Reminder: Clay_SetPointerState must be called before functions that rely on pointer position otherwise it will have no effect
Clay_Vector2 mousePosition = { x, y };
Clay_SetPointerState(mousePosition);
// ...
// If profile picture was clicked
if (mouseButtonDown(0) && Clay_PointerOver(Clay_GetElementId("ProfilePicture"))) {
// Handle profile picture clicked
}
```
请注意,`Clay_PointerOver` 查询的边界框来自上一帧。除了在高速移动的动画情况下,这通常不会产生影响。
如果这对您来说是个问题,使用相同的数据每帧执行两次布局,第二次将为您提供正确的交互。
### 滚动元素
元素通过 `.clip` 配置配置为可滚动。Clipping 指示渲染器不要绘制剪切元素边界之外的任何像素,并通过指定 `.childOffset` 字段,可以移动剪切元素的内容以提供“滚动”行为。
您可以自己计算滚动并简单地在每帧中将当前偏移量提供给 `.childOffset`,或者,Clay 提供了一个内置机制来跟踪和更新滚动容器偏移量,详情如下。
要使滚动容器响应鼠标滚轮和滚动事件,需要在 `BeginLayout()` 之前调用两个函数:
```
Clay_Vector2 mousePosition = { x, y };
// Reminder: Clay_SetPointerState must be called before Clay_UpdateScrollContainers otherwise it will have no effect
Clay_SetPointerState(mousePosition);
// Clay_UpdateScrollContainers needs to be called before Clay_BeginLayout for the position to avoid a 1 frame delay
Clay_UpdateScrollContainers(
true, // Enable drag scrolling
scrollDelta, // Clay_Vector2 scrollwheel / trackpad scroll x and y delta this frame
float deltaTime, // Time since last frame in seconds as a float e.g. 8ms is 0.008f
);
// ...
// Clay internally tracks the scroll containers offset, and Clay_GetScrollOffset returns the x,y offset of the currently open element
CLAY(CLAY_ID("ScrollContainer"), { .clip = { .vertical = true, .childOffset = Clay_GetScrollOffset() } }) {
// Scrolling contents
}
// .childOffset can be provided directly if you would prefer to manage scrolling outside of clay
CLAY(CLAY_ID("ScrollContainer"), { .clip = { .vertical = true, .childOffset = myData.scrollContainer.offset } }) {
// Scrolling contents
}
```
更多具体细节可以在 [Clay_UpdateScrollContainers](#clay_updatescrollcontainers)、[Clay_SetPointerState](#clay_setpointerstate)、[Clay_ClipElementConfig](#clay_clipelementconfig) 和 [Clay_GetScrollOffset](#clay_getscrolloffset) 的文档中找到。
### Floating Elements(“绝对”定位)
Clay 中的所有标准元素都布局在其父元素的上方和_内部_,根据其父元素的布局规则定位,并影响兄弟元素的定位和大小。
**“Floating”** 通过 `CLAY_FLOATING()` 宏配置。浮动元素不会影响定义它们的父元素或其兄弟元素的位置。
它们还有一个 **z-index**,因此可以相交并渲染在其他元素的顶部。
浮动元素的一个经典用例是工具提示和模态框。
```
// The two text elements will be laid out top to bottom, and the floating container
// will be attached to "Outer"
CLAY(CLAY_ID("Outer"), { .layout = { .layoutDirection = TOP_TO_BOTTOM } }) {
CLAY_TEXT(text, &headerTextConfig);
CLAY(CLAY_ID("Tooltip"), { .floating = { .attachTo = CLAY_ATTACH_TO_PARENT } }) {}
CLAY_TEXT(text, &headerTextConfig);
}
```
更多具体细节可以在完整的 [Floating API](#clay_floatingelementconfig) 中找到。
### 布局您自己的自定义元素
Clay 仅支持一组简单的 UI 元素基元,例如矩形、文本和图像。Clay 提供了一个单一的 API 用于布局自定义元素:
```
#include "clay.h"
typedef enum {
CUSTOM_ELEMENT_TYPE_MODEL,
CUSTOM_ELEMENT_TYPE_VIDEO
} CustomElementType;
// A rough example of how you could handle laying out 3d models in your UI
typedef struct {
CustomElementType type;
union {
Model model;
Video video;
// ...
};
} CustomElementData;
Model myModel = Load3DModel(filePath);
CustomElement modelElement = (CustomElement) { .type = CUSTOM_ELEMENT_TYPE_MODEL, .model = myModel }
typedef struct {
void* memory;
uintptr_t offset;
} Arena;
// During init
Arena frameArena = (Arena) { .memory = malloc(1024) };
// Custom elements only take a single pointer, so we need to store the data somewhere
CustomElementData *modelData = (CustomElementData *)(frameArena.memory + frameArena.offset);
*modelData = (CustomElementData) { .type = CUSTOM_ELEMENT_TYPE_MODEL, .model = myModel };
frameArena.offset += sizeof(CustomElementData);
CLAY(CLAY_ID("3DModelViewer"), { .custom = { .customData = modelData } }) {}
// Later during your rendering
switch (renderCommand->commandType) {
// ...
case CLAY_RENDER_COMMAND_TYPE_CUSTOM: {
// Your extended struct is passed through
CustomElementData *customElement = renderCommand->config.customElementConfig->customData;
if (!customElement) continue;
switch (customElement->type) {
case CUSTOM_ELEMENT_TYPE_MODEL: {
// Render your 3d model here
break;
}
case CUSTOM_ELEMENT_TYPE_VIDEO: {
// Render your video here
break;
}
// ...
}
break;
}
}
```
更多具体细节可以在完整的 [Custom Element API](#clay_customelementconfig) 中找到。
### 保留模式渲染
Clay 最初是为 [Immediate Mode](https://www.youtube.com/watch?v=Z1qyvQsjK5Y) 渲染设计的——即每帧重绘整个 UI。这对于您的平台、渲染器设计或性能约束来说可能是不可能的。
有一些通用技术可用于将 clay 集成到 retained mode 渲染系统中:
- `Clay_RenderCommand` 包含用于声明元素的 `uint32_t id`。如果使用唯一 ID,这些可以跨多个帧/布局映射到持久图形对象。
- 渲染命令会自动剔除,仅保留当前可见的元素,并且 `Clay_RenderCommand` 是一个足够小的结构体,您可以简单地比较具有匹配 ID 的两个渲染命令的内存,以确定该元素是否“脏”并需要重新渲染或更新。
有关具体的示例,请参阅提供的 [HTML renderer](https://github.com/nicbarker/clay/blob/main/renderers/web/html/clay-html-renderer.html)。此渲染器将 clay 布局转换为持久的 HTML 文档,每帧更改最少。
### 可见性剔除
Clay 提供了一个内置的可见性剔除机制,**默认启用**。它只会为可见的元素输出渲染命令——也就是说,**它们的边界框中至少有一个像素位于视口内。**
可以通过使用 `#define CLAY_DISABLE_CULLING` 指令禁用此剔除机制。有关更多信息,请参阅 [Preprocessor Directives](#preprocessor-directives)。
### 预处理器指令
Clay 支持 C 预处理器指令,以便在编译时调节功能。这些可以在代码中使用 `#define CLAY_DISABLE_CULLING` 设置,或者在编译时使用适当的编译器特定参数在命令行上设置,例如 `clang -DCLAY_DISABLE_CULLING main.c ...`
支持的指令有:
- `CLAY_WASM` - 目标为 Web Assembly 时必需。
- `CLAY_DLL` - 创建 .Dll 文件时必需。
### 非 C 语言的 Bindings
Clay 可作为 `.h` 包含文件在 C99 和 C++20 中直接使用,并支持指定初始化器。
还有其他语言的支持绑定,包括:
- [Odin Bindings](https://github.com/nicbarker/clay/tree/main/bindings/odin)
- [Rust Bindings](https://github.com/clay-ui-rs/clay)
### 其他
Clay 也已在其他语言中实现:
- [`glay`](https://github.com/soypat/glay) - Go 逐行重写,以可读性为主要目标。
- [`totallygamerjet/clay`](https://github.com/totallygamerjet/clay) - 使用 `cxgo`(一个 C 到 Go 的转译器)移植。
- [`goclay`](https://github.com/igadmg/goclay) - Go 逐行重写,紧密匹配参考实现。
### 调试工具
Clay 包含内置的 UI 调试工具,类似于 Chrome 或 Firefox 等浏览器中的“检查器”。这些工具包含在 `clay.h` 中,通过将额外的渲染命令注入到输出 [Clay_RenderCommandArray](#clay_rendercommandarray) 中来工作。
只要您使用的渲染器工作正常,使用调试工具不需要额外的设置或配置。
要启用调试工具,请使用函数 `Clay_SetDebugModeEnabled(bool enabled)`。此布尔值是持久的,不需要每帧都设置。
调试工具默认将作为屏幕右侧的面板渲染,按其宽度压缩您的布局。默认宽度为 400,目前可以通过直接修改内部变量 `Clay__debugViewWidth` 进行配置,但这是一个内部 API,可能会发生变化。
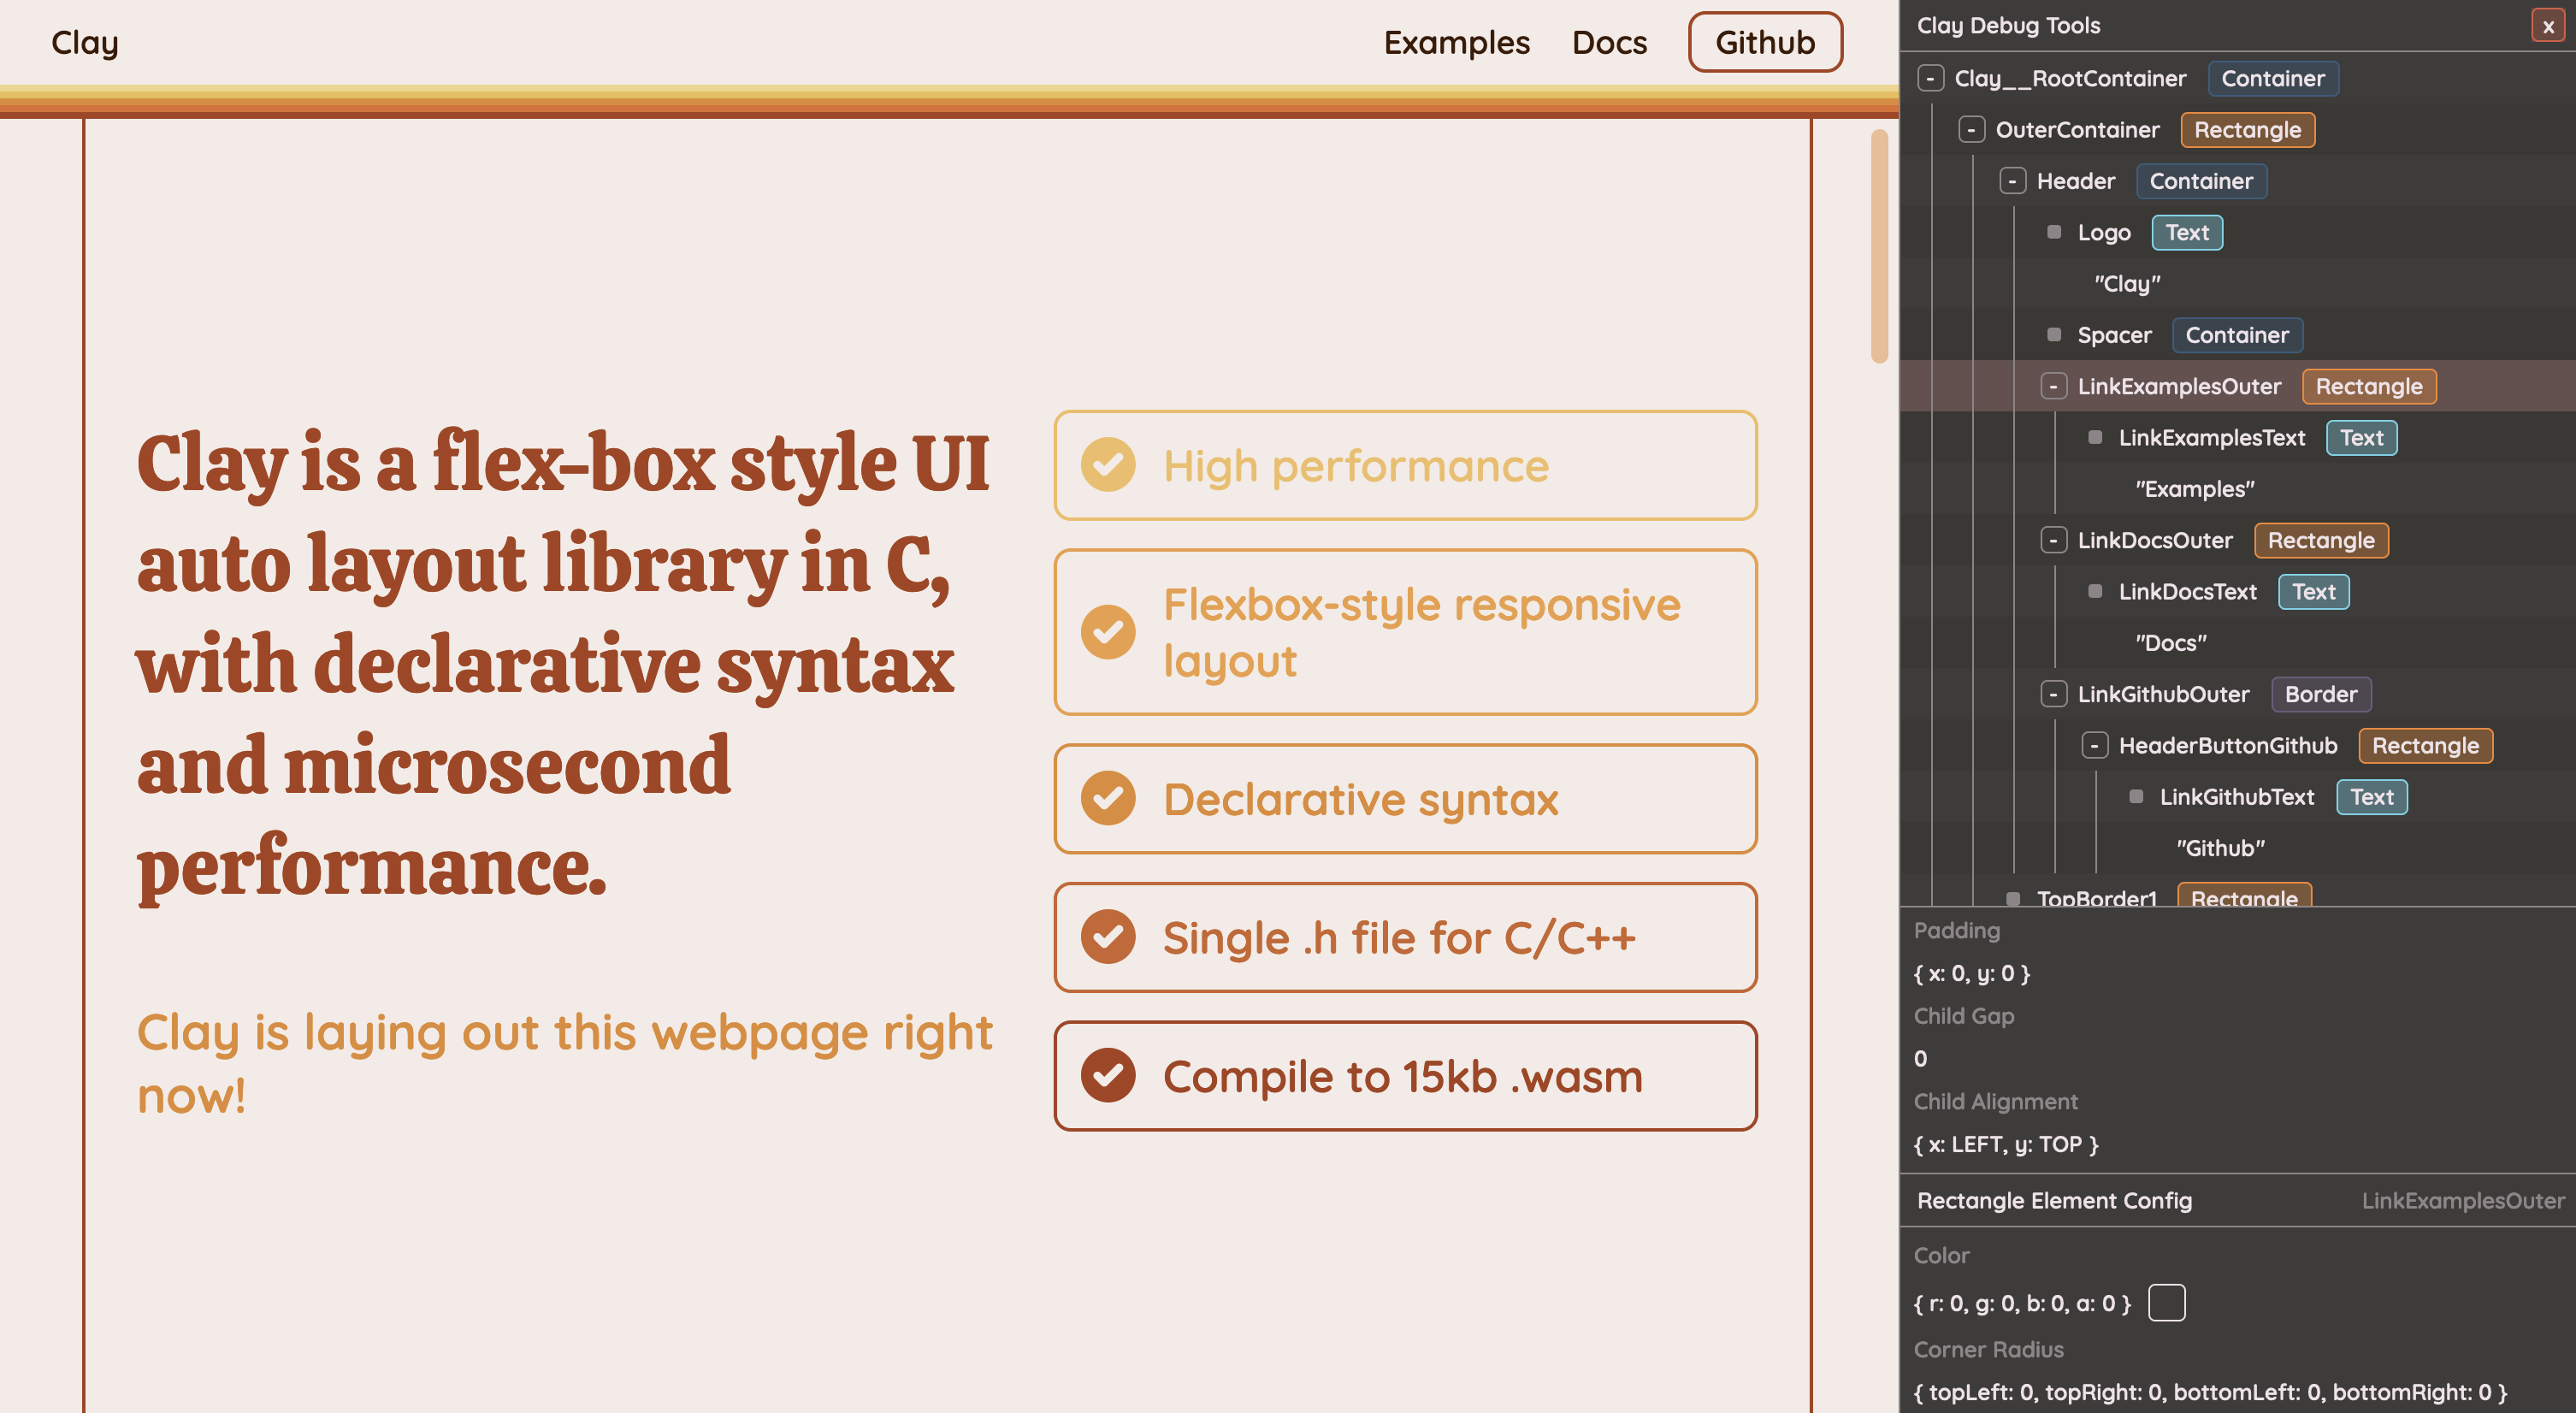 _带有可见调试工具的官方 Clay 网站_
### 运行多个 Clay 实例
Clay 允许您在一个程序中运行多个实例。为此,[Clay_Initialize](#clay_initialize) 返回一个 [Clay_Context*](#clay_context) 引用。您可以使用 [Clay_SetCurrentContext](#clay_setcurrentcontext) 激活特定实例。如果未调用 [Clay_SetCurrentContext](#clay_setcurrentcontext),Clay 将默认使用最近调用的 [Clay_Initialize](#clay_initialize) 中的上下文。
**⚠ 重要:不要跨不同线程同时渲染实例,因为 Clay 目前不支持真正的多线程。**
```
// Define separate arenas for the instances.
Clay_Arena arena1, arena2;
// ... allocate arenas
// Initialize both instances, storing the context for each one.
Clay_Context* instance1 = Clay_Initialize(arena1, layoutDimensions, errorHandler);
Clay_Context* instance2 = Clay_Initialize(arena2, layoutDimensions, errorHandler);
// In the program's render function, activate each instance before executing clay commands and macros.
Clay_SetCurrentContext(instance1);
Clay_BeginLayout();
// ... declare layout for instance1
Clay_RenderCommandArray renderCommands1 = Clay_EndLayout();
render(renderCommands1);
// Switch to the second instance
Clay_SetCurrentContext(instance2);
Clay_BeginLayout();
// ... declare layout for instance2
Clay_RenderCommandArray renderCommands2 = Clay_EndLayout();
render(renderCommands2);
```
# API
### 命名约定
- "**CAPITAL_LETTERS()**" 用于宏。
- "**Clay__**"("Clay" 后跟**双**下划线)用于内部函数,这些函数不打算供使用,并且可能会发生变化。
- "**Clay_**"("Clay" 后跟**单**下划线)用于可由用户调用的外部函数。
## 公共函数
### 公共函数的生命周期
**在启动/初始化时,运行一次**
`Clay_MinMemorySize` -> `Clay_CreateArenaWithCapacityAndMemory` -> `Clay_Initialize` -> `Clay_SetMeasureTextFunction`
**每一帧**
`Clay_SetLayoutDimensions` -> `Clay_SetPointerState` -> `Clay_UpdateScrollContainers` -> `Clay_BeginLayout` -> `CLAY() etc...` -> `Clay_EndLayout`
### Clay_MinMemorySize
`uint32_t Clay_MinMemorySize()`
返回 clay 为适应当前 [CLAY_MAX_ELEMENT_COUNT](#preprocessor-directives) 所需的最小内存量(**以字节为单位**)。
### Clay_CreateArenaWithCapacityAndMemory
`Clay_Arena Clay_CreateArenaWithCapacityAndMemory(uint32_t capacity, void *offset)`
使用给定的容量和基本内存指针创建一个 `Clay_Arena` 结构体,该结构体可以传递给 [Clay_Initialize](#clay_initialize)。
### Clay_SetMeasureTextFunction
`void Clay_SetMeasureTextFunction(Clay_Dimensions (*measureTextFunction)(Clay_StringSlice text, Clay_TextElementConfig *config, uintptr_t userData), uintptr_t userData)`
接受一个函数指针,该函数可用于测量字符串的 `width, height` 尺寸。由 clay 在布局期间用于确定 [CLAY_TEXT](#clay_text) 元素的尺寸和换行。
**注意 1:此字符串不保证以 null 结尾。** Clay 在换行时使用切片而不是克隆新的以 null 结尾的字符串,从而节省了大量的性能开销。如果您的渲染器不支持 **ptr, length** 样式的字符串(例如 Raylib),则需要在渲染之前将其克隆到新的 C 字符串中。
**注意 2:此函数必须尽可能快。** 对于文本繁重的用例,此函数会被调用多次,尽管 clay 会在内部缓存文本测量结果,但如果提供的函数很慢,它很容易成为主要的布局开销。**这是热点路径!**
### Clay_ResetMeasureTextCache
`void Clay_ResetMeasureTextCache(void)`
Clay 会缓存提供的 MeasureTextFunction 的测量结果,这对于大多数用例来说已经足够了。但是,如果测量结果可能取决于 clay 不知道的外部因素(例如 DPI 更改),那么缓存值可能不正确。当这些外部因素之一发生变化时,可以调用 Clay_ResetMeasureTextCache 以强制 clay 在下一帧重新计算所有字符串测量值。
### Clay_SetMaxElementCount
`void Clay_SetMaxElementCount(uint32_t maxElementCount)`
设置将在后续 [Clay_Initialize()](#clay_initialize) 和 [Clay_MinMemorySize()](#clay_minmemorysize) 调用中使用的内部最大元素计数,允许 clay 分配更大的 UI 层次结构。
**注意:在调用 [Clay_MinMemorySize()](#clay_minmemorysize) 计算更新的内存需求后,您需要重新初始化 clay。**
### Clay_SetMaxMeasureTextCacheWordCount
`void Clay_SetMaxMeasureTextCacheWordCount(uint32_t maxMeasureTextCacheWordCount)`
设置将在后续 [Clay_Initialize()](#clay_initialize) 和 [Clay_MinMemorySize()](#clay_minmemorysize) 调用中使用的内部文本测量缓存大小,允许 clay 分配更多文本。该值表示文本测量缓存中可以存储多少个单独的单词。
**注意:在调用 [Clay_MinMemorySize()](#clay_minmemorysize) 计算更新的内存需求后,您需要重新初始化 clay。**
### Clay_Initialize
`Clay_Context* Clay_Initialize(Clay_Arena arena, Clay_Dimensions layoutDimensions, Clay_ErrorHandler errorHandler)`
初始化内部内存映射,设置布局的内部尺寸,并绑定一个错误处理程序供 clay 在出现问题时使用。返回一个 [Clay_Context*](#clay_context),可以选择将其提供给 [Clay_SetCurrentContext](#clay_setcurrentcontext) 以允许在同一程序中运行多个 clay 实例,并将其设置为当前上下文。请参阅 [Running more than one Clay instance](#running-more-than-one-clay-instance)。
参考:[Clay_Arena](#clay_createarenawithcapacityandmemory)、[Clay_ErrorHandler](#clay_errorhandler)、[Clay_SetCurrentContext](#clay_setcurrentcontext)
### Clay_SetCurrentContext
`void Clay_SetCurrentContext(Clay_Context* context)`
设置后续 clay 命令将在其上运行的上下文。您可以从 [Clay_Initialize](#clay_initialize) 或 [Clay_GetCurrentContext](#clay_getcurrentcontext) 获取此引用。请参阅 [Running more than one Clay instance](#running-more-than-one-clay-instance)。
### Clay_GetCurrentContext
`Clay_Context* Clay_GetCurrentContext()`
返回 clay 命令当前正在其上运行的上下文,如果未设置上下文,则返回 null。请参阅 [Running more than one Clay instance](#running-more-than-one-clay-instance)。
### Clay_SetLayoutDimensions
`void Clay_SetLayoutDimensions(Clay_Dimensions dimensions)`
设置内部布局尺寸。此函数开销很低,可以每帧使用您的屏幕尺寸调用,以自动响应窗口大小调整等。
### Clay_SetPointerState
`void Clay_SetPointerState(Clay_Vector2 position, bool isPointerDown)`
设置内部指针位置和状态(即当前鼠标/触摸位置)并重新计算重叠信息,该信息用于鼠标悬停/点击计算(通过 [Clay_PointerOver](#clay_pointerover))以及使用 [Clay_UpdateScrollContainers](#clay_updatescrollcontainers) 更新滚动容器。**isPointerDown 应表示当前帧的当前状态,例如,在按住鼠标左键的整个持续时间内它应为 `true`。** Clay 具有用于检测点击/触摸开始和结束的内部处理。
### Clay_UpdateScrollContainers
`void Clay_UpdateScrollContainers(bool enableDragScrolling, Clay_Vector2 scrollDelta, float deltaTime)`
此函数处理容器的滚动。它响应 `scrollDelta`(表示本帧的鼠标滚轮或触控板滚动)以及移动设备上的“触摸滚动”或使用鼠标或类似设备的“拖动滚动”。
仅当 `enableDragScrolling` 参数为 `true`,**并且**本帧已调用 [Clay_SetPointerState](#clay_setpointerstate) 时,才会发生触摸/拖动滚动。因此,如果您想禁用触摸滚动,只需在第一个参数中传入 `false` 即可。
`deltaTime` 是自上一帧以来的时间(**以秒为单位**)(例如 0.016 是 **16 毫秒**),用于在不同刷新率之间规范化和平滑滚动。
### Clay_GetScrollOffset
`Clay_Vector2 Clay_GetScrollOffset()`
返回当前打开元素的内部存储滚动偏移量。
通常用于 [clip elements](#clay_clipelementconfig) 和 `.childOffset` 字段以创建滚动容器。
有关更多详细信息,请参阅 [Scrolling Elements](#scrolling-elements)。
```
// Create a horizontally scrolling container
CLAY(CLAY_ID("ScrollContainer"), {
.clip = { .horizontal = true, .childOffset = Clay_GetScrollOffset() }
})
```
### Clay_BeginLayout
`void Clay_BeginLayout()`
准备 clay 以计算新的布局。每帧/布局**在**任何 [Element Macros](#element-macros) **之前**调用。
### Clay_EndLayout
`Clay_RenderCommandArray Clay_EndLayout()`
结束元素宏的声明并计算当前布局的结果。返回一个包含布局计算结果的 [Clay_RenderCommandArray](#clay_rendercommandarray)。
### Clay_Hovered
`bool Clay_Hovered()`
在布局声明**期间**调用,如果先前使用 `Clay_SetPointerState` 设置的指针位置位于当前打开元素的边界框内,则返回 `true`。注意:这是基于元素在**上一**帧的位置。
### Clay_OnHover
`void Clay_OnHover(void (*onHoverFunction)(Clay_ElementId elementId, Clay_PointerData pointerData, void *userData), void *userData)`
在布局声明**期间**调用,此函数允许您将一个函数指针附加到当前打开的元素,如果先前使用 `Clay_SetPointerState` 设置的指针位置位于当前打开元素的边界框内,则每帧调用一次该函数。有关 `pointerData` 参数的更多信息,请参阅 [Clay_PointerData](#clay_pointerdata)。
```
void HandleButtonInteraction(Clay_ElementId elementId, Clay_PointerData pointerData, void *userData) {
ButtonData *buttonData = (ButtonData *)userData;
// Pointer state allows you to detect mouse down / hold / release
if (pointerData.state == CLAY_POINTER_DATA_PRESSED_THIS_FRAME) {
// Do some click handling
NavigateTo(buttonData->link);
}
}
ButtonData linkButton = (ButtonData) { .link = "https://github.com/nicbarker/clay" };
// HandleButtonInteraction will be called for each frame the mouse / pointer / touch is inside the button boundaries
CLAY(CLAY_ID("Button"), { .layout = { .padding = CLAY_PADDING_ALL(8) } }) {
Clay_OnHover(HandleButtonInteraction, &buttonData);
CLAY_TEXT(CLAY_STRING("Click me!"), &headerTextConfig);
}
```
### Clay_PointerOver
`bool Clay_PointerOver(Clay_ElementId id)`
如果先前使用 `Clay_SetPointerState` 设置的指针位置位于具有提供的 `id` 的布局元素的边界框内,则返回 `true`。注意:这是基于元素在**上一**帧的位置。如果需要帧精确的指针重叠检测(可能是在帧之间 UI 布局发生重大变化的情况下),您可以简单地在那一帧运行两次布局代码。第二次调用 `Clay_PointerOver` 将是帧精确的。
### Clay_GetScrollContainerData
`Clay_ScrollContainerData Clay_GetScrollContainerData(Clay_ElementId id)`
返回与提供的 ID 匹配的滚动容器的 [Clay_ScrollContainerData](#clay_scrollcontainerdata)。此函数允许命令式操作滚动位置,允许您构建诸如滚动条、在滚动容器中“跳转”到某处的按钮等内容。
### Clay_GetElementData
`Clay_ElementData Clay_GetElementData(Clay_ElementId id)`
返回与提供的 ID 匹配的元素的 [Clay_ElementData](#clay_elementdata)。
用于检索有关元素的信息,例如它们的最终计算边界框。
### Clay_GetElementId
`Clay_ElementId Clay_GetElementId(Clay_String idString)`
返回提供的 id 字符串的 [Clay_ElementId](#clay_elementid),用于查询元素信息,如鼠标悬停状态、滚动容器数据等。
## Element 宏
### CLAY()
**用法**
`CLAY(...configuration) { ...children }`
**生命周期**
`Clay_BeginLayout()` -> `CLAY()` -> `Clay_EndLayout()`
**注意事项**
**CLAY** 打开一个通用的空容器,该容器可配置并支持嵌套子项。
**CLAY** 需要一个参数,因此如果您想在没有任何配置的情况下创建元素,请使用 `CLAY(0)`。
**示例**
```
// Define an element with 16px of x and y padding
CLAY(CLAY_ID("Outer"), { .layout = { .padding = CLAY_PADDING_ALL(16) } }) {
// A nested child element
CLAY(CLAY_ID("SideBar"), { .layout = { .layoutDirection = CLAY_TOP_TO_BOTTOM, .childGap = 16 } }) {
// Children laid out top to bottom with a 16 px gap between them
}
// A vertical scrolling container with a colored background
CLAY(CLAY_ID("ScrollContainer"), {
.layout = { .layoutDirection = CLAY_TOP_TO_BOTTOM, .childGap = 16 },
.backgroundColor = { 200, 200, 100, 255 },
.cornerRadius = CLAY_CORNER_RADIUS(10),
.clip = { .vertical = true, .childOffset = Clay_GetScrollOffset() }
}) {
// child elements
}
}
```
### CLAY_AUTO_ID()
核心 [CLAY()](#clay) 元素创建宏的一个版本,它会自动生成 ID,而不是要求将其作为第一个参数。
请注意,在底层,此 ID 的生成方式与 [CLAY_ID_LOCAL()](#clay_id_local) 相同,即基于元素在层次结构中的位置,如果在定义元素之前从层次结构中添加/删除了元素,则布局调用之间的位置可能会发生变化。因此,为了使 transitions & retained mode 后端正常工作,应指定 ID。
```
// Note that CLAY_AUTO_ID only takes one argument: the configuration
CLAY_AUTO_ID({ .layout = { .padding = CLAY_PADDING_ALL(16) } }) {
// A nested child element
CLAY_AUTO_ID({ .layout = { .layoutDirection = CLAY_TOP_TO_BOTTOM, .childGap = 16 } }) {
// Children laid out top to bottom with a 16 px gap between them
}
// A vertical scrolling container with a colored background
CLAY_AUTO_ID({
.layout = { .layoutDirection = CLAY_TOP_TO_BOTTOM, .childGap = 16 },
.backgroundColor = { 200, 200, 100, 255 },
.cornerRadius = CLAY_CORNER_RADIUS(10),
.clip = { .vertical = true, .childOffset = Clay_GetScrollOffset() }
}) {
// child elements
}
}
```
### CLAY_TEXT()
**用法**
`CLAY_TEXT(Clay_String textContents, Clay_TextElementConfig *textConfig);`
**生命周期**
`Clay_BeginLayout()` -> `CLAY_TEXT()` -> `Clay_EndLayout()`
**注意事项**
**TEXT** 是一个经过测量的、自动换行的文本元素。它使用 `Clay_TextElementConfig` 来配置文本特定选项。
请注意,`Cl_TextElementConfig` 使用 `uint32_t fontId`。字体 ID 到字体资源的映射在用户代码中管理,并传递给渲染命令。
**Struct API (伪代码)**
```
// CLAY_TEXT(text, CLAY_TEXT_CONFIG({ .member = value })) supports these options
Clay_TextElementConfig {
Clay_Color textColor {
float r; float g; float b; float a;
};
uint16_t fontId;
uint16_t fontSize;
uint16_t letterSpacing;
uint16_t lineHeight;
Clay_TextElementConfigWrapMode wrapMode {
CLAY_TEXT_WRAP_WORDS (default),
CLAY_TEXT_WRAP_NEWLINES,
CLAY_TEXT_WRAP_NONE,
};
};
```
**字段**
**`.textColor`**
`CLAY_TEXT_CONFIG(.textColor = {120, 120, 120, 255})`
使用 [Clay_Color](#clay_color)。通常接受 0 到 255 之间的 `rgba` 浮点值,但解释留给渲染器,不影响布局。
**`.fontId`**
`CLAY_TEXT_CONFIG(.fontId = FONT_ID_LATO)`
由用户加载字体并创建从 `fontId` 到可以测量和渲染的字体的映射。
**`.fontSize`**
`CLAY_TEXT_CONFIG(.fontSize = 16)`
字体大小通常被认为是 `x 像素高`,但解释留给用户和渲染器。
**`.letterSpacing`**
`CLAY_TEXT_CONFIG(.letterSpacing = 1)`
`.letterSpacing` 导致各个渲染字符之间出现**水平**空白。
**`.lineHeight`**
`CLAY_TEXT_CONFIG(.lineHeight = 20)`
`.lineHeight` - 当非零时 - 强制将每行换行文本的 `height` 设置为 `.lineheight` 像素高。将影响父元素和兄弟元素的布局。值为 `0` 将使用字体的测量高度。
**`.wrapMode`**
`CLAY_TEXT_CONFIG(.wrapMode = CLAY_TEXT_WRAP_NONE)`
`.wrapMode` 指定在什么条件下文本应该 [wrap](https://en.wikipedia.org/wiki/Line_wrap_and_word_wrap)。
可用选项有:
- `CLAY_TEXT_WRAP_WORDS`(默认) - 当容器宽度缩小时,文本将在空白字符处换行,保留整个单词。
- `CLAY_TEXT_WRAP_NEWLINES` - 仅在遇到换行符时换行。
- `CLAY_TEXT_WRAP_NONE` - 即使容器被压缩到超出文本测量的宽度,文本也不会换行。
**示例**
```
// Define a font somewhere in your code
const uint32_t FONT_ID_LATO = 3;
// ..
CLAY_TEXT(CLAY_STRING("John Smith"), CLAY_TEXT_CONFIG({ .fontId = FONT_ID_LATO, .fontSize = 24, .textColor = {255, 0, 0, 255} }));
// Rendering example
Font fontToUse = LoadedFonts[renderCommand->renderData.text->fontId];
```
**渲染**
元素受 [culling](#visibility-culling) 约束。否则,可能会创建多个 `commandType = CLAY_RENDER_COMMAND_TYPE_TEXT` 的 `Clay_RenderCommand`,每行换行文本一个。
`Clay_RenderCommand.textContent` 将填充为传入的原始字符串的 `Clay_String` _切片_(即换行不会重新分配,它只返回一个指向新行开头且具有 `length` 的 `Clay_String`)
### CLAY_ID
`Clay_ElementId CLAY_ID(STRING_LITERAL idString)`
**CLAY_ID()** 用于在声明期间生成 [Clay_ElementId](#clay_elementid) 并将其附加到布局元素。
请注意,此宏仅适用于字符串字面量,如果与 `char*` 变量一起使用将无法编译。要将堆分配的 `char*` 字符串用作 ID,请使用 [CLAY_SID](#clay_sid)。
要在布局声明之外使用实用函数(如 [Clay_PointerOver](#clay_pointerover))重新生成相同的 ID,请使用 [Clay_GetElementId](#clay_getelementid) 函数。
**示例**
```
// Tag a button with the Id "Button"
CLAY(CLAY_ID("Button"), {
.layout = { .layoutDirection = CLAY_TOP_TO_BOTTOM, .sizing = { .width = CLAY_SIZING_GROW(0) }, .padding = CLAY_PADDING_ALL(16), .childGap = 16 }
}) {
// ...children
}
// Later on outside of layout code
bool buttonIsHovered = Clay_IsPointerOver(Clay_GetElementId("Button"));
if (buttonIsHovered && leftMouseButtonPressed) {
// ... do some click handling
}
```
### CLAY_SID()
`Clay_ElementId CLAY_SID(Clay_String idString)`
[CLAY_ID](#clay_id) 的一个版本,可与堆分配的 `char *` 数据一起使用。底层 `char` 数据不会在内部复制,并且应至少存活到下一帧。
### CLAY_IDI()
`Clay_ElementId CLAY_IDI(STRING_LITERAL idString, int32_t index)`
[CLAY_ID](#clay_id) 的偏移版本。从提供的 `char *label` 结合 `int index` 生成 [Clay_ElementId](#clay_elementid) 字符串 id。
用于为顺序元素(例如在 `for` 循环中)生成 id,而无需在运行时构造动态字符串。
请注意,此宏仅适用于字符串字面量,如果与 `char*` 变量一起使用将无法编译。要将堆分配的 `char*` 字符串用作 ID,请使用 [CLAY_SIDI](#clay_sidi)。
### CLAY_SIDI()
`Clay_ElementId CLAY_SIDI(Clay_String idString, int32_t index)`
[CLAY_IDI](#clay_idi) 的一个版本,可与堆分配的 `char *` 数据一起使用。底层 `char` 数据不会在内部复制,并且应至少存活到下一帧。
### CLAY_ID_LOCAL()
**用法**
`Clay_ElementId CLAY_ID_LOCAL(STRING_LITERAL idString)`
**生命周期**
`Clay_BeginLayout()` -> `CLAY(` -> `CLAY_ID_LOCAL()` -> `)` -> `Clay_EndLayout()`
**注意事项**
**CLAY_ID_LOCAL()** 用于在声明期间生成 [Clay_ElementId](#clay_elementid) 并将其附加到布局元素。
与需要全局唯一的 [CLAY_ID](#clay_id) 不同,local ID 基于其父元素的 ID,并且只需要在其兄弟元素中唯一。
因此,local id 适合在可重用组件和循环中使用。
请注意,此宏仅适用于字符串字面量,如果与 `char*` 变量一起使用将无法编译。要将堆分配的 `char*` 字符串用作 ID,请使用 [CLAY_SID_LOCAL](#clay_sid_local)。
**示例**
```
void RenderHeaderButton(ButtonData button) {
CLAY({
.id = CLAY_ID_LOCAL("HeaderButton"),
.layout = { .layoutDirection = CLAY_TOP_TO_BOTTOM, .sizing = { .width = CLAY_SIZING_GROW(0) }, .padding = CLAY_PADDING_ALL(16), .childGap = 16 }
}) {
// ...children
}
}
for (int i = 0; i < headerButtons.length; i++) {
RenderHeaderButton(headerButtons.items[i]);
}
```
### CLAY_SID_LOCAL()
`Clay_ElementId CLAY_SID_LOCAL(Clay_String idString)`
[CLAY_ID_LOCAL](#clay_id_local) 的一个版本,可与堆分配的 `char *` 数据一起使用。底层 `char` 数据不会在内部复制,并且应至少存活到下一帧。
### CLAY_IDI_LOCAL()
`Clay_ElementId CLAY_IDI_LOCAL(STRING_LITERAL idString, int32_t index)`
[CLAY_ID_LOCAL](#clay_local_id) 的偏移版本。从提供的 `char *label` 结合 `int index` 生成 [Clay_ElementId](#clay_elementid) 字符串 id。
用于为顺序元素(例如在 `for` 循环中)生成 id,而无需在运行时构造动态字符串。
请注意,此宏仅适用于字符串字面量,如果与 `char*` 变量一起使用将无法编译。要将堆分配的 `char*` 字符串用作 ID,请使用 [CLAY_SIDI_LOCAL](#clay_sidi_local)。
### CLAY_SIDI_LOCAL()
`Clay_ElementId CLAY_SIDI_LOCAL(Clay_String idString, int32_t index)`
[CLAY_IDI_LOCAL](#clay_idi_local) 的一个版本,可与堆分配的 `char *` 数据一起使用。底层 `char` 数据不会在内部复制,并且应至少存活到下一帧。
## 数据结构与定义
### Clay_ElementDeclaration
**Clay_ElementDeclaration** 结构体是 `CLAY()` 宏的唯一参数,并提供布局元素的配置选项。
```
typedef struct {
Clay_ElementId id;
Clay_LayoutConfig layout;
Clay_Color backgroundColor;
Clay_CornerRadius cornerRadius;
Clay_AspectRatioElementConfig aspectRatio;
Clay_ImageElementConfig image;
Clay_FloatingElementConfig floating;
Clay_CustomElementConfig custom;
Clay_ClipElementConfig clip;
Clay_BorderElementConfig border;
void *userData;
} Clay_ElementDeclaration;
```
**字段**
**`.layout`** - `Clay_LayoutConfig`
`CLAY(CLAY_ID("Element"), { .layout = { .padding = { 16, 16, 12, 12 }, .layoutDirection = CLAY_TOP_TO_BOTTOM } })`
使用 [Clay_LayoutConfig](#clay_layoutconfig)。控制与 _layout_ 相关的各种设置,可以将其视为“此元素及其子元素的尺寸和位置”。
**`.backgroundColor`** - `Clay_Color`
`CLAY(CLAY_ID("Element"), { .backgroundColor = {120, 120, 120, 255} } })`
使用 [Clay_Color](#clay_color)。通常接受 0 到 255 之间的 `rgba` 浮点值,但解释留给渲染器,不影响布局。
**`.cornerRadius`** - `float`
`CLAY(CLAY_ID("Element"), { .cornerRadius = { .topLeft = 16, .topRight = 16, .bottomLeft = 16, .bottomRight = 16 } })`
定义矩形拐角弧度的半径(以像素为单位)(`0` 为方形,`rectangle.width / 2` 为圆形)。
请注意,可以使用类似函数的宏 `CLAY_CORNER_RADIUS(radius)` 来简写将所有四个拐角半径设置为相同的值。例如 `CLAY_BORDER({ .cornerRadius = CLAY_CORNER_RADIUS(10) })`
**`.aspectRatio`** - `Clay_AspectRatioElementConfig`
`CLAY(CLAY_ID("Element"), { .aspectRatio = 1 })`
使用 [Clay_AspectRatioElementConfig](#clay_aspectratioelementconfig)。将元素配置为纵横比缩放元素。对于渲染图像特别有用,但也可用于强制执行其他元素的固定宽度/高度比。
**`.image`** - `Clay_ImageElementConfig`
`CLAY(CLAY_ID("Element"), { .image = { .imageData = &myImage } })`
使用 [Clay_ImageElementConfig](#clay_imageelementconfig)。将元素配置为图像元素。导致发出类型为 `IMAGE` 的渲染命令。
**`.floating`** - `Clay_FloatingElementConfig`
`CLAY(CLAY_ID("Element"), { .floating = { .attachTo = CLAY_ATTACH_TO_PARENT } })`
使用 [Clay_FloatingElementConfig](#clay_floatingelementconfig)。将元素配置为浮动元素,这允许它“堆叠在其他内容前面”并“位于其他元素之上”,而不影响兄弟元素或父元素的尺寸或位置。
**`.custom`** - `Clay_CustomElementConfig`
`CLAY(CLAY_ID("Element"), { .custom = { .customData = &my3DModel } })`
使用 [Clay_CustomElementConfig](#clay_customelementconfig)。将元素配置为自定义元素,这允许您将自定义数据传递给渲染器。导致发出类型为 `CUSTOM` 的渲染命令。
**`.clip`** - `Clay_ClipElementConfig`
`CLAY(CLAY_ID("Element"), { .clip = { .vertical = true, .childOffset = Clay_GetScrollOffset() } })`
使用 [Clay_ClipElementConfig](#clay_scrollelementconfig)。将元素配置为 clip 元素,如果子元素溢出,这会导致它们被剪切/遮罩,并与 [Scrolling Elements](#scrolling-elements) 中列出的函数一起启用子内容的滚动。
_带有可见调试工具的官方 Clay 网站_
### 运行多个 Clay 实例
Clay 允许您在一个程序中运行多个实例。为此,[Clay_Initialize](#clay_initialize) 返回一个 [Clay_Context*](#clay_context) 引用。您可以使用 [Clay_SetCurrentContext](#clay_setcurrentcontext) 激活特定实例。如果未调用 [Clay_SetCurrentContext](#clay_setcurrentcontext),Clay 将默认使用最近调用的 [Clay_Initialize](#clay_initialize) 中的上下文。
**⚠ 重要:不要跨不同线程同时渲染实例,因为 Clay 目前不支持真正的多线程。**
```
// Define separate arenas for the instances.
Clay_Arena arena1, arena2;
// ... allocate arenas
// Initialize both instances, storing the context for each one.
Clay_Context* instance1 = Clay_Initialize(arena1, layoutDimensions, errorHandler);
Clay_Context* instance2 = Clay_Initialize(arena2, layoutDimensions, errorHandler);
// In the program's render function, activate each instance before executing clay commands and macros.
Clay_SetCurrentContext(instance1);
Clay_BeginLayout();
// ... declare layout for instance1
Clay_RenderCommandArray renderCommands1 = Clay_EndLayout();
render(renderCommands1);
// Switch to the second instance
Clay_SetCurrentContext(instance2);
Clay_BeginLayout();
// ... declare layout for instance2
Clay_RenderCommandArray renderCommands2 = Clay_EndLayout();
render(renderCommands2);
```
# API
### 命名约定
- "**CAPITAL_LETTERS()**" 用于宏。
- "**Clay__**"("Clay" 后跟**双**下划线)用于内部函数,这些函数不打算供使用,并且可能会发生变化。
- "**Clay_**"("Clay" 后跟**单**下划线)用于可由用户调用的外部函数。
## 公共函数
### 公共函数的生命周期
**在启动/初始化时,运行一次**
`Clay_MinMemorySize` -> `Clay_CreateArenaWithCapacityAndMemory` -> `Clay_Initialize` -> `Clay_SetMeasureTextFunction`
**每一帧**
`Clay_SetLayoutDimensions` -> `Clay_SetPointerState` -> `Clay_UpdateScrollContainers` -> `Clay_BeginLayout` -> `CLAY() etc...` -> `Clay_EndLayout`
### Clay_MinMemorySize
`uint32_t Clay_MinMemorySize()`
返回 clay 为适应当前 [CLAY_MAX_ELEMENT_COUNT](#preprocessor-directives) 所需的最小内存量(**以字节为单位**)。
### Clay_CreateArenaWithCapacityAndMemory
`Clay_Arena Clay_CreateArenaWithCapacityAndMemory(uint32_t capacity, void *offset)`
使用给定的容量和基本内存指针创建一个 `Clay_Arena` 结构体,该结构体可以传递给 [Clay_Initialize](#clay_initialize)。
### Clay_SetMeasureTextFunction
`void Clay_SetMeasureTextFunction(Clay_Dimensions (*measureTextFunction)(Clay_StringSlice text, Clay_TextElementConfig *config, uintptr_t userData), uintptr_t userData)`
接受一个函数指针,该函数可用于测量字符串的 `width, height` 尺寸。由 clay 在布局期间用于确定 [CLAY_TEXT](#clay_text) 元素的尺寸和换行。
**注意 1:此字符串不保证以 null 结尾。** Clay 在换行时使用切片而不是克隆新的以 null 结尾的字符串,从而节省了大量的性能开销。如果您的渲染器不支持 **ptr, length** 样式的字符串(例如 Raylib),则需要在渲染之前将其克隆到新的 C 字符串中。
**注意 2:此函数必须尽可能快。** 对于文本繁重的用例,此函数会被调用多次,尽管 clay 会在内部缓存文本测量结果,但如果提供的函数很慢,它很容易成为主要的布局开销。**这是热点路径!**
### Clay_ResetMeasureTextCache
`void Clay_ResetMeasureTextCache(void)`
Clay 会缓存提供的 MeasureTextFunction 的测量结果,这对于大多数用例来说已经足够了。但是,如果测量结果可能取决于 clay 不知道的外部因素(例如 DPI 更改),那么缓存值可能不正确。当这些外部因素之一发生变化时,可以调用 Clay_ResetMeasureTextCache 以强制 clay 在下一帧重新计算所有字符串测量值。
### Clay_SetMaxElementCount
`void Clay_SetMaxElementCount(uint32_t maxElementCount)`
设置将在后续 [Clay_Initialize()](#clay_initialize) 和 [Clay_MinMemorySize()](#clay_minmemorysize) 调用中使用的内部最大元素计数,允许 clay 分配更大的 UI 层次结构。
**注意:在调用 [Clay_MinMemorySize()](#clay_minmemorysize) 计算更新的内存需求后,您需要重新初始化 clay。**
### Clay_SetMaxMeasureTextCacheWordCount
`void Clay_SetMaxMeasureTextCacheWordCount(uint32_t maxMeasureTextCacheWordCount)`
设置将在后续 [Clay_Initialize()](#clay_initialize) 和 [Clay_MinMemorySize()](#clay_minmemorysize) 调用中使用的内部文本测量缓存大小,允许 clay 分配更多文本。该值表示文本测量缓存中可以存储多少个单独的单词。
**注意:在调用 [Clay_MinMemorySize()](#clay_minmemorysize) 计算更新的内存需求后,您需要重新初始化 clay。**
### Clay_Initialize
`Clay_Context* Clay_Initialize(Clay_Arena arena, Clay_Dimensions layoutDimensions, Clay_ErrorHandler errorHandler)`
初始化内部内存映射,设置布局的内部尺寸,并绑定一个错误处理程序供 clay 在出现问题时使用。返回一个 [Clay_Context*](#clay_context),可以选择将其提供给 [Clay_SetCurrentContext](#clay_setcurrentcontext) 以允许在同一程序中运行多个 clay 实例,并将其设置为当前上下文。请参阅 [Running more than one Clay instance](#running-more-than-one-clay-instance)。
参考:[Clay_Arena](#clay_createarenawithcapacityandmemory)、[Clay_ErrorHandler](#clay_errorhandler)、[Clay_SetCurrentContext](#clay_setcurrentcontext)
### Clay_SetCurrentContext
`void Clay_SetCurrentContext(Clay_Context* context)`
设置后续 clay 命令将在其上运行的上下文。您可以从 [Clay_Initialize](#clay_initialize) 或 [Clay_GetCurrentContext](#clay_getcurrentcontext) 获取此引用。请参阅 [Running more than one Clay instance](#running-more-than-one-clay-instance)。
### Clay_GetCurrentContext
`Clay_Context* Clay_GetCurrentContext()`
返回 clay 命令当前正在其上运行的上下文,如果未设置上下文,则返回 null。请参阅 [Running more than one Clay instance](#running-more-than-one-clay-instance)。
### Clay_SetLayoutDimensions
`void Clay_SetLayoutDimensions(Clay_Dimensions dimensions)`
设置内部布局尺寸。此函数开销很低,可以每帧使用您的屏幕尺寸调用,以自动响应窗口大小调整等。
### Clay_SetPointerState
`void Clay_SetPointerState(Clay_Vector2 position, bool isPointerDown)`
设置内部指针位置和状态(即当前鼠标/触摸位置)并重新计算重叠信息,该信息用于鼠标悬停/点击计算(通过 [Clay_PointerOver](#clay_pointerover))以及使用 [Clay_UpdateScrollContainers](#clay_updatescrollcontainers) 更新滚动容器。**isPointerDown 应表示当前帧的当前状态,例如,在按住鼠标左键的整个持续时间内它应为 `true`。** Clay 具有用于检测点击/触摸开始和结束的内部处理。
### Clay_UpdateScrollContainers
`void Clay_UpdateScrollContainers(bool enableDragScrolling, Clay_Vector2 scrollDelta, float deltaTime)`
此函数处理容器的滚动。它响应 `scrollDelta`(表示本帧的鼠标滚轮或触控板滚动)以及移动设备上的“触摸滚动”或使用鼠标或类似设备的“拖动滚动”。
仅当 `enableDragScrolling` 参数为 `true`,**并且**本帧已调用 [Clay_SetPointerState](#clay_setpointerstate) 时,才会发生触摸/拖动滚动。因此,如果您想禁用触摸滚动,只需在第一个参数中传入 `false` 即可。
`deltaTime` 是自上一帧以来的时间(**以秒为单位**)(例如 0.016 是 **16 毫秒**),用于在不同刷新率之间规范化和平滑滚动。
### Clay_GetScrollOffset
`Clay_Vector2 Clay_GetScrollOffset()`
返回当前打开元素的内部存储滚动偏移量。
通常用于 [clip elements](#clay_clipelementconfig) 和 `.childOffset` 字段以创建滚动容器。
有关更多详细信息,请参阅 [Scrolling Elements](#scrolling-elements)。
```
// Create a horizontally scrolling container
CLAY(CLAY_ID("ScrollContainer"), {
.clip = { .horizontal = true, .childOffset = Clay_GetScrollOffset() }
})
```
### Clay_BeginLayout
`void Clay_BeginLayout()`
准备 clay 以计算新的布局。每帧/布局**在**任何 [Element Macros](#element-macros) **之前**调用。
### Clay_EndLayout
`Clay_RenderCommandArray Clay_EndLayout()`
结束元素宏的声明并计算当前布局的结果。返回一个包含布局计算结果的 [Clay_RenderCommandArray](#clay_rendercommandarray)。
### Clay_Hovered
`bool Clay_Hovered()`
在布局声明**期间**调用,如果先前使用 `Clay_SetPointerState` 设置的指针位置位于当前打开元素的边界框内,则返回 `true`。注意:这是基于元素在**上一**帧的位置。
### Clay_OnHover
`void Clay_OnHover(void (*onHoverFunction)(Clay_ElementId elementId, Clay_PointerData pointerData, void *userData), void *userData)`
在布局声明**期间**调用,此函数允许您将一个函数指针附加到当前打开的元素,如果先前使用 `Clay_SetPointerState` 设置的指针位置位于当前打开元素的边界框内,则每帧调用一次该函数。有关 `pointerData` 参数的更多信息,请参阅 [Clay_PointerData](#clay_pointerdata)。
```
void HandleButtonInteraction(Clay_ElementId elementId, Clay_PointerData pointerData, void *userData) {
ButtonData *buttonData = (ButtonData *)userData;
// Pointer state allows you to detect mouse down / hold / release
if (pointerData.state == CLAY_POINTER_DATA_PRESSED_THIS_FRAME) {
// Do some click handling
NavigateTo(buttonData->link);
}
}
ButtonData linkButton = (ButtonData) { .link = "https://github.com/nicbarker/clay" };
// HandleButtonInteraction will be called for each frame the mouse / pointer / touch is inside the button boundaries
CLAY(CLAY_ID("Button"), { .layout = { .padding = CLAY_PADDING_ALL(8) } }) {
Clay_OnHover(HandleButtonInteraction, &buttonData);
CLAY_TEXT(CLAY_STRING("Click me!"), &headerTextConfig);
}
```
### Clay_PointerOver
`bool Clay_PointerOver(Clay_ElementId id)`
如果先前使用 `Clay_SetPointerState` 设置的指针位置位于具有提供的 `id` 的布局元素的边界框内,则返回 `true`。注意:这是基于元素在**上一**帧的位置。如果需要帧精确的指针重叠检测(可能是在帧之间 UI 布局发生重大变化的情况下),您可以简单地在那一帧运行两次布局代码。第二次调用 `Clay_PointerOver` 将是帧精确的。
### Clay_GetScrollContainerData
`Clay_ScrollContainerData Clay_GetScrollContainerData(Clay_ElementId id)`
返回与提供的 ID 匹配的滚动容器的 [Clay_ScrollContainerData](#clay_scrollcontainerdata)。此函数允许命令式操作滚动位置,允许您构建诸如滚动条、在滚动容器中“跳转”到某处的按钮等内容。
### Clay_GetElementData
`Clay_ElementData Clay_GetElementData(Clay_ElementId id)`
返回与提供的 ID 匹配的元素的 [Clay_ElementData](#clay_elementdata)。
用于检索有关元素的信息,例如它们的最终计算边界框。
### Clay_GetElementId
`Clay_ElementId Clay_GetElementId(Clay_String idString)`
返回提供的 id 字符串的 [Clay_ElementId](#clay_elementid),用于查询元素信息,如鼠标悬停状态、滚动容器数据等。
## Element 宏
### CLAY()
**用法**
`CLAY(...configuration) { ...children }`
**生命周期**
`Clay_BeginLayout()` -> `CLAY()` -> `Clay_EndLayout()`
**注意事项**
**CLAY** 打开一个通用的空容器,该容器可配置并支持嵌套子项。
**CLAY** 需要一个参数,因此如果您想在没有任何配置的情况下创建元素,请使用 `CLAY(0)`。
**示例**
```
// Define an element with 16px of x and y padding
CLAY(CLAY_ID("Outer"), { .layout = { .padding = CLAY_PADDING_ALL(16) } }) {
// A nested child element
CLAY(CLAY_ID("SideBar"), { .layout = { .layoutDirection = CLAY_TOP_TO_BOTTOM, .childGap = 16 } }) {
// Children laid out top to bottom with a 16 px gap between them
}
// A vertical scrolling container with a colored background
CLAY(CLAY_ID("ScrollContainer"), {
.layout = { .layoutDirection = CLAY_TOP_TO_BOTTOM, .childGap = 16 },
.backgroundColor = { 200, 200, 100, 255 },
.cornerRadius = CLAY_CORNER_RADIUS(10),
.clip = { .vertical = true, .childOffset = Clay_GetScrollOffset() }
}) {
// child elements
}
}
```
### CLAY_AUTO_ID()
核心 [CLAY()](#clay) 元素创建宏的一个版本,它会自动生成 ID,而不是要求将其作为第一个参数。
请注意,在底层,此 ID 的生成方式与 [CLAY_ID_LOCAL()](#clay_id_local) 相同,即基于元素在层次结构中的位置,如果在定义元素之前从层次结构中添加/删除了元素,则布局调用之间的位置可能会发生变化。因此,为了使 transitions & retained mode 后端正常工作,应指定 ID。
```
// Note that CLAY_AUTO_ID only takes one argument: the configuration
CLAY_AUTO_ID({ .layout = { .padding = CLAY_PADDING_ALL(16) } }) {
// A nested child element
CLAY_AUTO_ID({ .layout = { .layoutDirection = CLAY_TOP_TO_BOTTOM, .childGap = 16 } }) {
// Children laid out top to bottom with a 16 px gap between them
}
// A vertical scrolling container with a colored background
CLAY_AUTO_ID({
.layout = { .layoutDirection = CLAY_TOP_TO_BOTTOM, .childGap = 16 },
.backgroundColor = { 200, 200, 100, 255 },
.cornerRadius = CLAY_CORNER_RADIUS(10),
.clip = { .vertical = true, .childOffset = Clay_GetScrollOffset() }
}) {
// child elements
}
}
```
### CLAY_TEXT()
**用法**
`CLAY_TEXT(Clay_String textContents, Clay_TextElementConfig *textConfig);`
**生命周期**
`Clay_BeginLayout()` -> `CLAY_TEXT()` -> `Clay_EndLayout()`
**注意事项**
**TEXT** 是一个经过测量的、自动换行的文本元素。它使用 `Clay_TextElementConfig` 来配置文本特定选项。
请注意,`Cl_TextElementConfig` 使用 `uint32_t fontId`。字体 ID 到字体资源的映射在用户代码中管理,并传递给渲染命令。
**Struct API (伪代码)**
```
// CLAY_TEXT(text, CLAY_TEXT_CONFIG({ .member = value })) supports these options
Clay_TextElementConfig {
Clay_Color textColor {
float r; float g; float b; float a;
};
uint16_t fontId;
uint16_t fontSize;
uint16_t letterSpacing;
uint16_t lineHeight;
Clay_TextElementConfigWrapMode wrapMode {
CLAY_TEXT_WRAP_WORDS (default),
CLAY_TEXT_WRAP_NEWLINES,
CLAY_TEXT_WRAP_NONE,
};
};
```
**字段**
**`.textColor`**
`CLAY_TEXT_CONFIG(.textColor = {120, 120, 120, 255})`
使用 [Clay_Color](#clay_color)。通常接受 0 到 255 之间的 `rgba` 浮点值,但解释留给渲染器,不影响布局。
**`.fontId`**
`CLAY_TEXT_CONFIG(.fontId = FONT_ID_LATO)`
由用户加载字体并创建从 `fontId` 到可以测量和渲染的字体的映射。
**`.fontSize`**
`CLAY_TEXT_CONFIG(.fontSize = 16)`
字体大小通常被认为是 `x 像素高`,但解释留给用户和渲染器。
**`.letterSpacing`**
`CLAY_TEXT_CONFIG(.letterSpacing = 1)`
`.letterSpacing` 导致各个渲染字符之间出现**水平**空白。
**`.lineHeight`**
`CLAY_TEXT_CONFIG(.lineHeight = 20)`
`.lineHeight` - 当非零时 - 强制将每行换行文本的 `height` 设置为 `.lineheight` 像素高。将影响父元素和兄弟元素的布局。值为 `0` 将使用字体的测量高度。
**`.wrapMode`**
`CLAY_TEXT_CONFIG(.wrapMode = CLAY_TEXT_WRAP_NONE)`
`.wrapMode` 指定在什么条件下文本应该 [wrap](https://en.wikipedia.org/wiki/Line_wrap_and_word_wrap)。
可用选项有:
- `CLAY_TEXT_WRAP_WORDS`(默认) - 当容器宽度缩小时,文本将在空白字符处换行,保留整个单词。
- `CLAY_TEXT_WRAP_NEWLINES` - 仅在遇到换行符时换行。
- `CLAY_TEXT_WRAP_NONE` - 即使容器被压缩到超出文本测量的宽度,文本也不会换行。
**示例**
```
// Define a font somewhere in your code
const uint32_t FONT_ID_LATO = 3;
// ..
CLAY_TEXT(CLAY_STRING("John Smith"), CLAY_TEXT_CONFIG({ .fontId = FONT_ID_LATO, .fontSize = 24, .textColor = {255, 0, 0, 255} }));
// Rendering example
Font fontToUse = LoadedFonts[renderCommand->renderData.text->fontId];
```
**渲染**
元素受 [culling](#visibility-culling) 约束。否则,可能会创建多个 `commandType = CLAY_RENDER_COMMAND_TYPE_TEXT` 的 `Clay_RenderCommand`,每行换行文本一个。
`Clay_RenderCommand.textContent` 将填充为传入的原始字符串的 `Clay_String` _切片_(即换行不会重新分配,它只返回一个指向新行开头且具有 `length` 的 `Clay_String`)
### CLAY_ID
`Clay_ElementId CLAY_ID(STRING_LITERAL idString)`
**CLAY_ID()** 用于在声明期间生成 [Clay_ElementId](#clay_elementid) 并将其附加到布局元素。
请注意,此宏仅适用于字符串字面量,如果与 `char*` 变量一起使用将无法编译。要将堆分配的 `char*` 字符串用作 ID,请使用 [CLAY_SID](#clay_sid)。
要在布局声明之外使用实用函数(如 [Clay_PointerOver](#clay_pointerover))重新生成相同的 ID,请使用 [Clay_GetElementId](#clay_getelementid) 函数。
**示例**
```
// Tag a button with the Id "Button"
CLAY(CLAY_ID("Button"), {
.layout = { .layoutDirection = CLAY_TOP_TO_BOTTOM, .sizing = { .width = CLAY_SIZING_GROW(0) }, .padding = CLAY_PADDING_ALL(16), .childGap = 16 }
}) {
// ...children
}
// Later on outside of layout code
bool buttonIsHovered = Clay_IsPointerOver(Clay_GetElementId("Button"));
if (buttonIsHovered && leftMouseButtonPressed) {
// ... do some click handling
}
```
### CLAY_SID()
`Clay_ElementId CLAY_SID(Clay_String idString)`
[CLAY_ID](#clay_id) 的一个版本,可与堆分配的 `char *` 数据一起使用。底层 `char` 数据不会在内部复制,并且应至少存活到下一帧。
### CLAY_IDI()
`Clay_ElementId CLAY_IDI(STRING_LITERAL idString, int32_t index)`
[CLAY_ID](#clay_id) 的偏移版本。从提供的 `char *label` 结合 `int index` 生成 [Clay_ElementId](#clay_elementid) 字符串 id。
用于为顺序元素(例如在 `for` 循环中)生成 id,而无需在运行时构造动态字符串。
请注意,此宏仅适用于字符串字面量,如果与 `char*` 变量一起使用将无法编译。要将堆分配的 `char*` 字符串用作 ID,请使用 [CLAY_SIDI](#clay_sidi)。
### CLAY_SIDI()
`Clay_ElementId CLAY_SIDI(Clay_String idString, int32_t index)`
[CLAY_IDI](#clay_idi) 的一个版本,可与堆分配的 `char *` 数据一起使用。底层 `char` 数据不会在内部复制,并且应至少存活到下一帧。
### CLAY_ID_LOCAL()
**用法**
`Clay_ElementId CLAY_ID_LOCAL(STRING_LITERAL idString)`
**生命周期**
`Clay_BeginLayout()` -> `CLAY(` -> `CLAY_ID_LOCAL()` -> `)` -> `Clay_EndLayout()`
**注意事项**
**CLAY_ID_LOCAL()** 用于在声明期间生成 [Clay_ElementId](#clay_elementid) 并将其附加到布局元素。
与需要全局唯一的 [CLAY_ID](#clay_id) 不同,local ID 基于其父元素的 ID,并且只需要在其兄弟元素中唯一。
因此,local id 适合在可重用组件和循环中使用。
请注意,此宏仅适用于字符串字面量,如果与 `char*` 变量一起使用将无法编译。要将堆分配的 `char*` 字符串用作 ID,请使用 [CLAY_SID_LOCAL](#clay_sid_local)。
**示例**
```
void RenderHeaderButton(ButtonData button) {
CLAY({
.id = CLAY_ID_LOCAL("HeaderButton"),
.layout = { .layoutDirection = CLAY_TOP_TO_BOTTOM, .sizing = { .width = CLAY_SIZING_GROW(0) }, .padding = CLAY_PADDING_ALL(16), .childGap = 16 }
}) {
// ...children
}
}
for (int i = 0; i < headerButtons.length; i++) {
RenderHeaderButton(headerButtons.items[i]);
}
```
### CLAY_SID_LOCAL()
`Clay_ElementId CLAY_SID_LOCAL(Clay_String idString)`
[CLAY_ID_LOCAL](#clay_id_local) 的一个版本,可与堆分配的 `char *` 数据一起使用。底层 `char` 数据不会在内部复制,并且应至少存活到下一帧。
### CLAY_IDI_LOCAL()
`Clay_ElementId CLAY_IDI_LOCAL(STRING_LITERAL idString, int32_t index)`
[CLAY_ID_LOCAL](#clay_local_id) 的偏移版本。从提供的 `char *label` 结合 `int index` 生成 [Clay_ElementId](#clay_elementid) 字符串 id。
用于为顺序元素(例如在 `for` 循环中)生成 id,而无需在运行时构造动态字符串。
请注意,此宏仅适用于字符串字面量,如果与 `char*` 变量一起使用将无法编译。要将堆分配的 `char*` 字符串用作 ID,请使用 [CLAY_SIDI_LOCAL](#clay_sidi_local)。
### CLAY_SIDI_LOCAL()
`Clay_ElementId CLAY_SIDI_LOCAL(Clay_String idString, int32_t index)`
[CLAY_IDI_LOCAL](#clay_idi_local) 的一个版本,可与堆分配的 `char *` 数据一起使用。底层 `char` 数据不会在内部复制,并且应至少存活到下一帧。
## 数据结构与定义
### Clay_ElementDeclaration
**Clay_ElementDeclaration** 结构体是 `CLAY()` 宏的唯一参数,并提供布局元素的配置选项。
```
typedef struct {
Clay_ElementId id;
Clay_LayoutConfig layout;
Clay_Color backgroundColor;
Clay_CornerRadius cornerRadius;
Clay_AspectRatioElementConfig aspectRatio;
Clay_ImageElementConfig image;
Clay_FloatingElementConfig floating;
Clay_CustomElementConfig custom;
Clay_ClipElementConfig clip;
Clay_BorderElementConfig border;
void *userData;
} Clay_ElementDeclaration;
```
**字段**
**`.layout`** - `Clay_LayoutConfig`
`CLAY(CLAY_ID("Element"), { .layout = { .padding = { 16, 16, 12, 12 }, .layoutDirection = CLAY_TOP_TO_BOTTOM } })`
使用 [Clay_LayoutConfig](#clay_layoutconfig)。控制与 _layout_ 相关的各种设置,可以将其视为“此元素及其子元素的尺寸和位置”。
**`.backgroundColor`** - `Clay_Color`
`CLAY(CLAY_ID("Element"), { .backgroundColor = {120, 120, 120, 255} } })`
使用 [Clay_Color](#clay_color)。通常接受 0 到 255 之间的 `rgba` 浮点值,但解释留给渲染器,不影响布局。
**`.cornerRadius`** - `float`
`CLAY(CLAY_ID("Element"), { .cornerRadius = { .topLeft = 16, .topRight = 16, .bottomLeft = 16, .bottomRight = 16 } })`
定义矩形拐角弧度的半径(以像素为单位)(`0` 为方形,`rectangle.width / 2` 为圆形)。
请注意,可以使用类似函数的宏 `CLAY_CORNER_RADIUS(radius)` 来简写将所有四个拐角半径设置为相同的值。例如 `CLAY_BORDER({ .cornerRadius = CLAY_CORNER_RADIUS(10) })`
**`.aspectRatio`** - `Clay_AspectRatioElementConfig`
`CLAY(CLAY_ID("Element"), { .aspectRatio = 1 })`
使用 [Clay_AspectRatioElementConfig](#clay_aspectratioelementconfig)。将元素配置为纵横比缩放元素。对于渲染图像特别有用,但也可用于强制执行其他元素的固定宽度/高度比。
**`.image`** - `Clay_ImageElementConfig`
`CLAY(CLAY_ID("Element"), { .image = { .imageData = &myImage } })`
使用 [Clay_ImageElementConfig](#clay_imageelementconfig)。将元素配置为图像元素。导致发出类型为 `IMAGE` 的渲染命令。
**`.floating`** - `Clay_FloatingElementConfig`
`CLAY(CLAY_ID("Element"), { .floating = { .attachTo = CLAY_ATTACH_TO_PARENT } })`
使用 [Clay_FloatingElementConfig](#clay_floatingelementconfig)。将元素配置为浮动元素,这允许它“堆叠在其他内容前面”并“位于其他元素之上”,而不影响兄弟元素或父元素的尺寸或位置。
**`.custom`** - `Clay_CustomElementConfig`
`CLAY(CLAY_ID("Element"), { .custom = { .customData = &my3DModel } })`
使用 [Clay_CustomElementConfig](#clay_customelementconfig)。将元素配置为自定义元素,这允许您将自定义数据传递给渲染器。导致发出类型为 `CUSTOM` 的渲染命令。
**`.clip`** - `Clay_ClipElementConfig`
`CLAY(CLAY_ID("Element"), { .clip = { .vertical = true, .childOffset = Clay_GetScrollOffset() } })`
使用 [Clay_ClipElementConfig](#clay_scrollelementconfig)。将元素配置为 clip 元素,如果子元素溢出,这会导致它们被剪切/遮罩,并与 [Scrolling Elements](#scrolling-elements) 中列出的函数一起启用子内容的滚动。
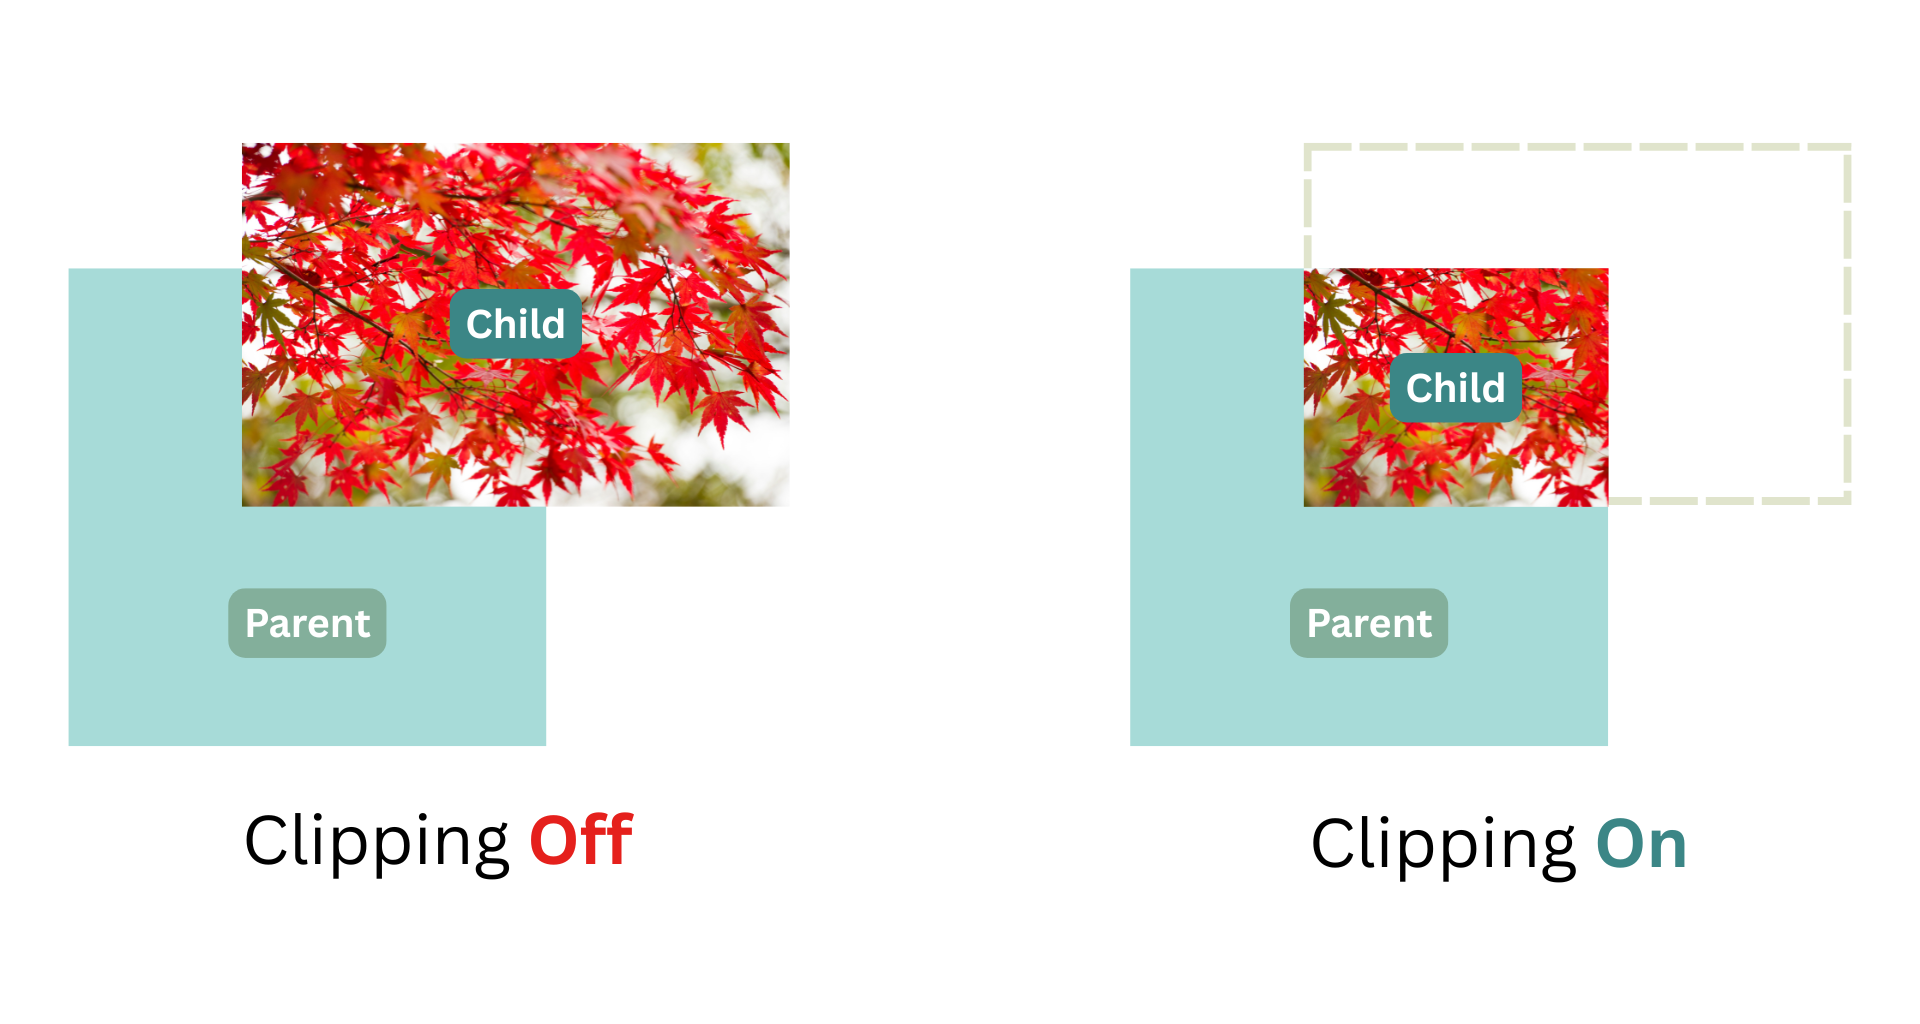 **`.border`** - `Clay_BorderElementConfig`
`CLAY(CLAY_ID("Element"), { .border = { .width = { .left = 5 }, .color = COLOR_BLUE } })`
使用 [Clay_BorderElementConfig](#clay_borderelementconfig)。将元素配置为边框元素,这指示渲染器沿此元素边界框的指定边缘绘制彩色边框线。导致发出类型为 `BORDER` 的渲染命令。
**`.userData`** - `void *`
`CLAY(CLAY_ID("Element"), { .userData = &extraData })`
透明地将指针传递给由此元素生成的相应 [Clay_RenderCommands](#clay_rendercommand)s。
**示例**
```
// Declare a reusable rectangle config, with a purple color and 10px rounded corners
Clay_RectangleElementConfig rectangleConfig = (Clay_RectangleElementConfig) { .color = { 200, 200, 100, 255 }, .cornerRadius = CLAY_CORNER_RADIUS(10) };
// Declare a rectangle element using a reusable config
CLAY(CLAY_ID("Box"), rectangleConfig) {}
// Declare a retangle element using an inline config
CLAY(CLAY_ID("BoxInline"), { .color = { 200, 200, 100, 255 }, .cornerRadius = CLAY_CORNER_RADIUS(10) })) {
// child elements
}
// Declare a scrolling container with a colored background
CLAY(CLAY_ID("ScrollingContainer"), {
.backgroundColor = { 200, 200, 100, 255 },
.cornerRadius = CLAY_CORNER_RADIUS(10)
.clip = { .vertical = true, .childOffset = Clay_GetScrollOffset() }
) {
// child elements
}
```
元素受 [culling](#visibility-culling) 约束。否则,将创建一个 `commandType = CLAY_RENDER_COMMAND_TYPE_RECTANGLE` 的 `Clay_RenderCommand`,其中 `renderCommand->elementConfig.rectangleElementConfig` 包含指向元素的 Clay_RectangleElementConfig 的指针。
### Clay_LayoutConfig
**Clay_LayoutConfig** 用于配置 _layout_ 选项(即影响元素及其父元素、兄弟元素和子元素的最终位置和大小的选项)
**Struct API (伪代码)**
```
// CLAY({ .layout = { ...fields } }) supports these options
Clay_LayoutConfig {
Clay_LayoutDirection layoutDirection = CLAY_LEFT_TO_RIGHT (default) | CLAY_TOP_TO_BOTTOM;
Clay_Padding padding {
u16 left; u16 right; u16 top; u16 bottom;
};
uint16_t childGap;
Clay_ChildAlignment childAlignment {
.x = CLAY_ALIGN_X_LEFT (default) | CLAY_ALIGN_X_CENTER | CLAY_ALIGN_X_RIGHT;
.y = CLAY_ALIGN_Y_TOP (default) | CLAY_ALIGN_Y_CENTER | CLAY_ALIGN_Y_BOTTOM;
};
Clay_Sizing sizing { // Recommended to use the provided macros here - see #sizing for more in depth explanation
.width = CLAY_SIZING_FIT(float min, float max) (default) | CLAY_SIZING_GROW(float min, float max) | CLAY_SIZING_FIXED(float width) | CLAY_SIZING_PERCENT(float percent)
.height = CLAY_SIZING_FIT(float min, float max) (default) | CLAY_SIZING_GROW(float min, float max) | CLAY_SIZING_FIXED(float height) | CLAY_SIZING_PERCENT(float percent)
}; // See CLAY_SIZING_GROW() etc for more details
};
```
**字段**
**`.layoutDirection`** - `Clay_LayoutDirection`
`CLAY(CLAY_ID("Element"), { .layout = { .layoutDirection = CLAY_TOP_TO_BOTTOM } })`
控制子元素布局的轴/方向。可用选项有 `CLAY_LEFT_TO_RIGHT`(默认)和 `CLAY_TOP_TO_BOTTOM`。
_您知道吗,“left to right”和“top to bottom”都有 13 个字母?_
**`.border`** - `Clay_BorderElementConfig`
`CLAY(CLAY_ID("Element"), { .border = { .width = { .left = 5 }, .color = COLOR_BLUE } })`
使用 [Clay_BorderElementConfig](#clay_borderelementconfig)。将元素配置为边框元素,这指示渲染器沿此元素边界框的指定边缘绘制彩色边框线。导致发出类型为 `BORDER` 的渲染命令。
**`.userData`** - `void *`
`CLAY(CLAY_ID("Element"), { .userData = &extraData })`
透明地将指针传递给由此元素生成的相应 [Clay_RenderCommands](#clay_rendercommand)s。
**示例**
```
// Declare a reusable rectangle config, with a purple color and 10px rounded corners
Clay_RectangleElementConfig rectangleConfig = (Clay_RectangleElementConfig) { .color = { 200, 200, 100, 255 }, .cornerRadius = CLAY_CORNER_RADIUS(10) };
// Declare a rectangle element using a reusable config
CLAY(CLAY_ID("Box"), rectangleConfig) {}
// Declare a retangle element using an inline config
CLAY(CLAY_ID("BoxInline"), { .color = { 200, 200, 100, 255 }, .cornerRadius = CLAY_CORNER_RADIUS(10) })) {
// child elements
}
// Declare a scrolling container with a colored background
CLAY(CLAY_ID("ScrollingContainer"), {
.backgroundColor = { 200, 200, 100, 255 },
.cornerRadius = CLAY_CORNER_RADIUS(10)
.clip = { .vertical = true, .childOffset = Clay_GetScrollOffset() }
) {
// child elements
}
```
元素受 [culling](#visibility-culling) 约束。否则,将创建一个 `commandType = CLAY_RENDER_COMMAND_TYPE_RECTANGLE` 的 `Clay_RenderCommand`,其中 `renderCommand->elementConfig.rectangleElementConfig` 包含指向元素的 Clay_RectangleElementConfig 的指针。
### Clay_LayoutConfig
**Clay_LayoutConfig** 用于配置 _layout_ 选项(即影响元素及其父元素、兄弟元素和子元素的最终位置和大小的选项)
**Struct API (伪代码)**
```
// CLAY({ .layout = { ...fields } }) supports these options
Clay_LayoutConfig {
Clay_LayoutDirection layoutDirection = CLAY_LEFT_TO_RIGHT (default) | CLAY_TOP_TO_BOTTOM;
Clay_Padding padding {
u16 left; u16 right; u16 top; u16 bottom;
};
uint16_t childGap;
Clay_ChildAlignment childAlignment {
.x = CLAY_ALIGN_X_LEFT (default) | CLAY_ALIGN_X_CENTER | CLAY_ALIGN_X_RIGHT;
.y = CLAY_ALIGN_Y_TOP (default) | CLAY_ALIGN_Y_CENTER | CLAY_ALIGN_Y_BOTTOM;
};
Clay_Sizing sizing { // Recommended to use the provided macros here - see #sizing for more in depth explanation
.width = CLAY_SIZING_FIT(float min, float max) (default) | CLAY_SIZING_GROW(float min, float max) | CLAY_SIZING_FIXED(float width) | CLAY_SIZING_PERCENT(float percent)
.height = CLAY_SIZING_FIT(float min, float max) (default) | CLAY_SIZING_GROW(float min, float max) | CLAY_SIZING_FIXED(float height) | CLAY_SIZING_PERCENT(float percent)
}; // See CLAY_SIZING_GROW() etc for more details
};
```
**字段**
**`.layoutDirection`** - `Clay_LayoutDirection`
`CLAY(CLAY_ID("Element"), { .layout = { .layoutDirection = CLAY_TOP_TO_BOTTOM } })`
控制子元素布局的轴/方向。可用选项有 `CLAY_LEFT_TO_RIGHT`(默认)和 `CLAY_TOP_TO_BOTTOM`。
_您知道吗,“left to right”和“top to bottom”都有 13 个字母?_
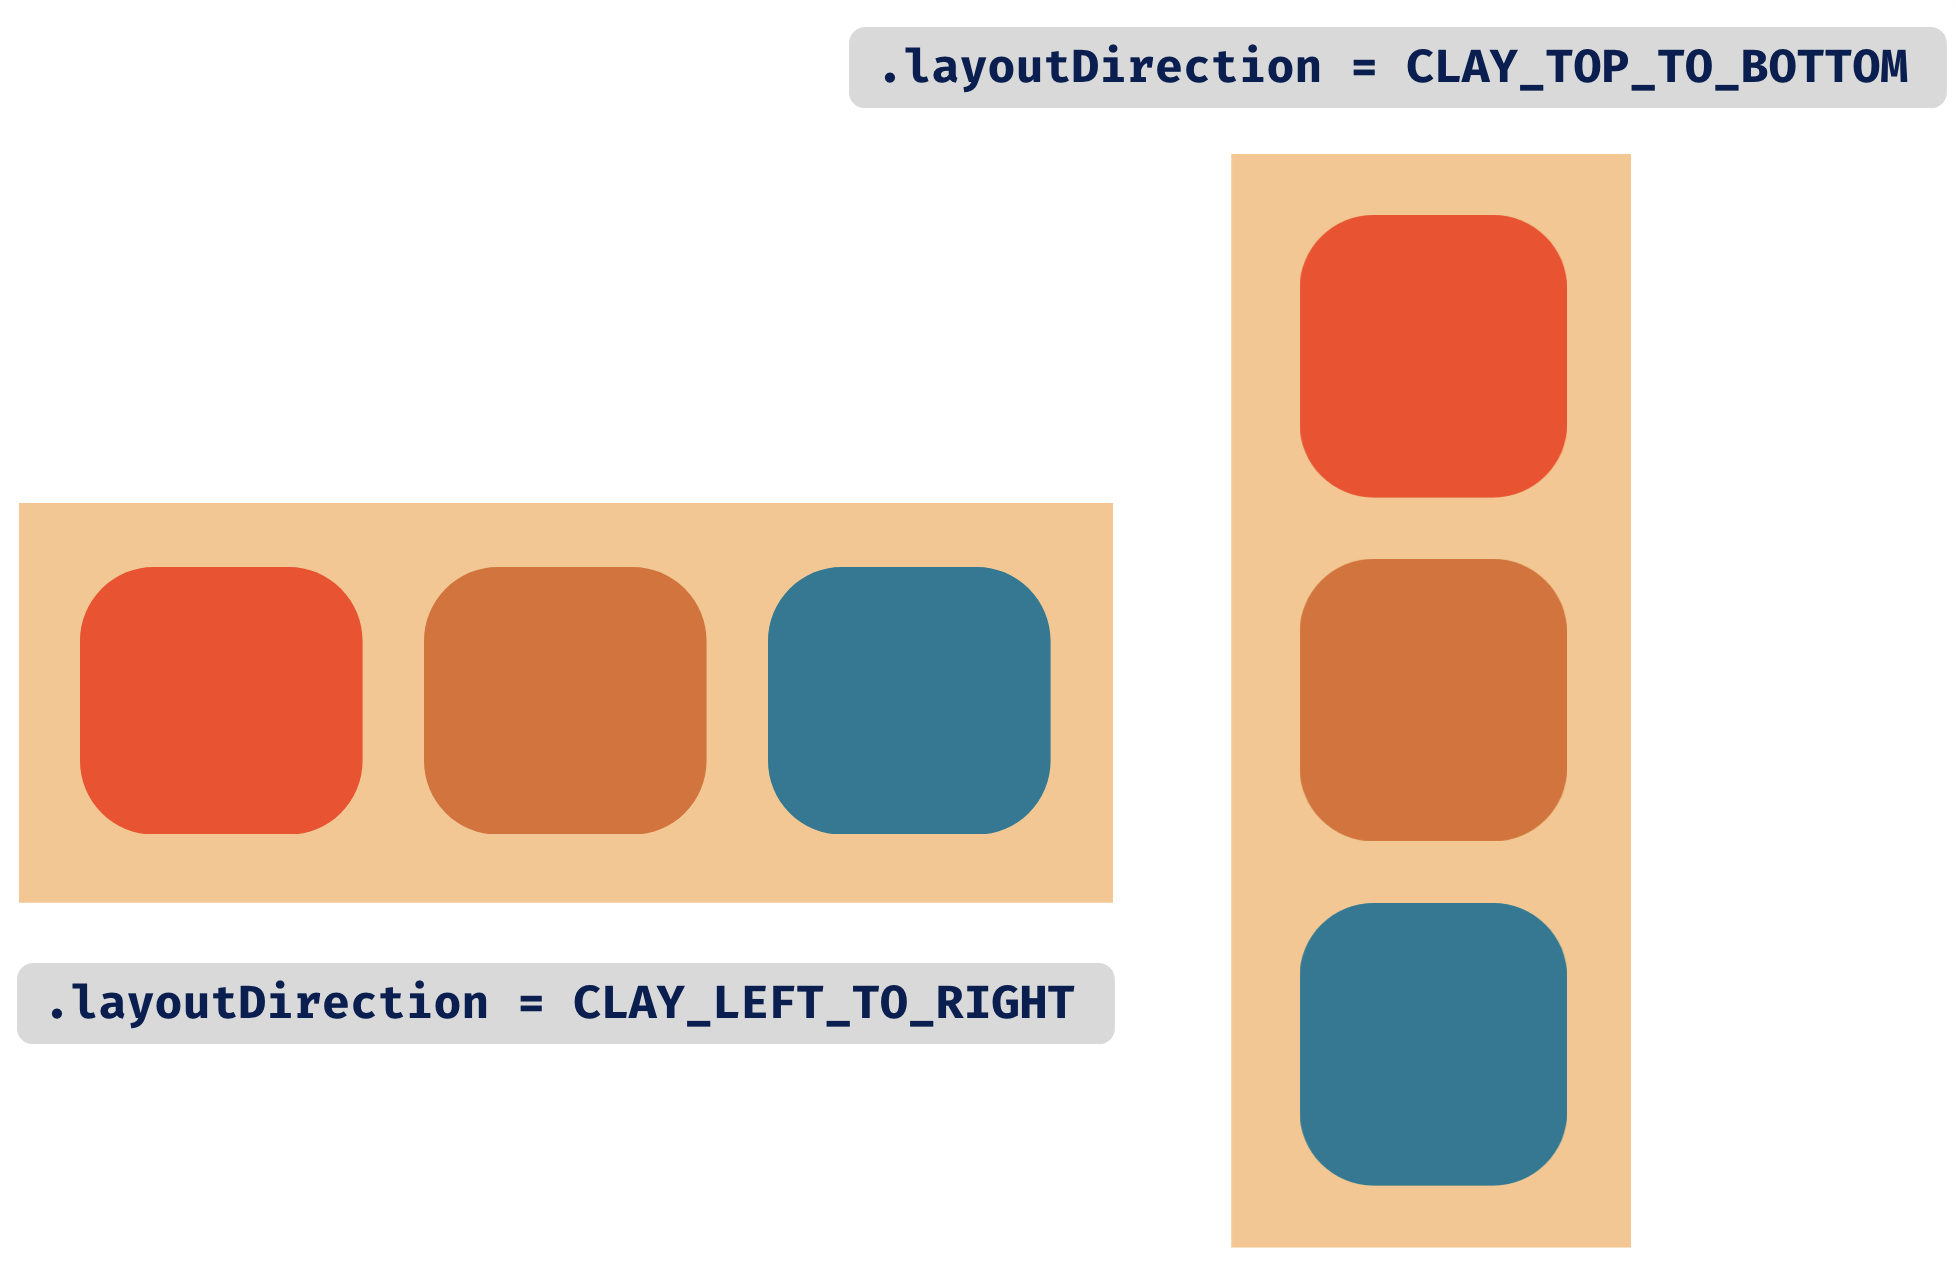 **`.padding`** - `Clay_Padding`
`CLAY(CLAY_ID("Element"), { .layout = { .padding = { .left = 16, .right = 16, .top = 8, .bottom = 8 } } })`
控制子元素**外部**周围的空白“padding”。
**`.padding`** - `Clay_Padding`
`CLAY(CLAY_ID("Element"), { .layout = { .padding = { .left = 16, .right = 16, .top = 8, .bottom = 8 } } })`
控制子元素**外部**周围的空白“padding”。
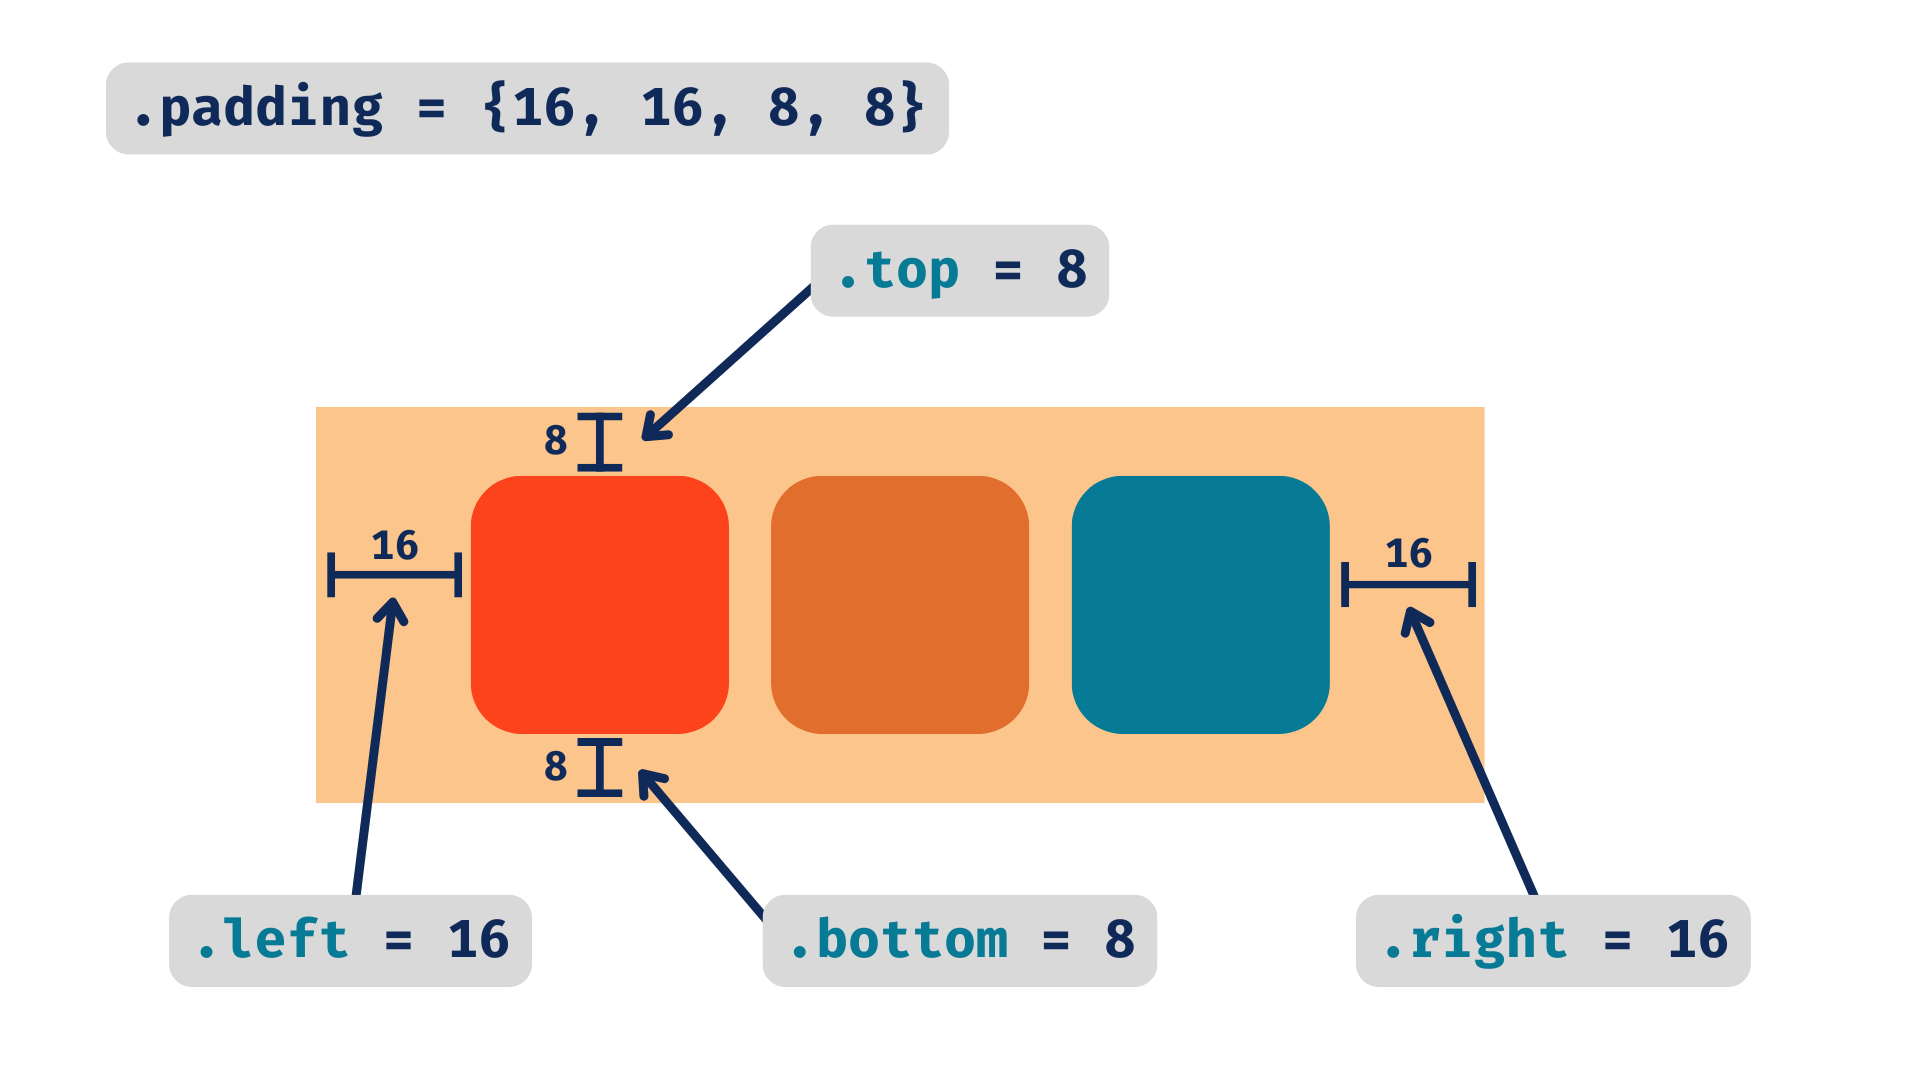 **`.childGap`** - `uint16_t`
`CLAY(CLAY_ID("Element"), { .layout = { .childGap = 16 } })`
控制子元素在布局时的**之间**的空白。当 `.layoutDirection` 为 `CLAY_LEFT_TO_RIGHT`(默认)时,这将是水平空间,而对于 `CLAY_TOP_TO_BOTTOM`,这将是垂直空间。
**`.childGap`** - `uint16_t`
`CLAY(CLAY_ID("Element"), { .layout = { .childGap = 16 } })`
控制子元素在布局时的**之间**的空白。当 `.layoutDirection` 为 `CLAY_LEFT_TO_RIGHT`(默认)时,这将是水平空间,而对于 `CLAY_TOP_TO_BOTTOM`,这将是垂直空间。
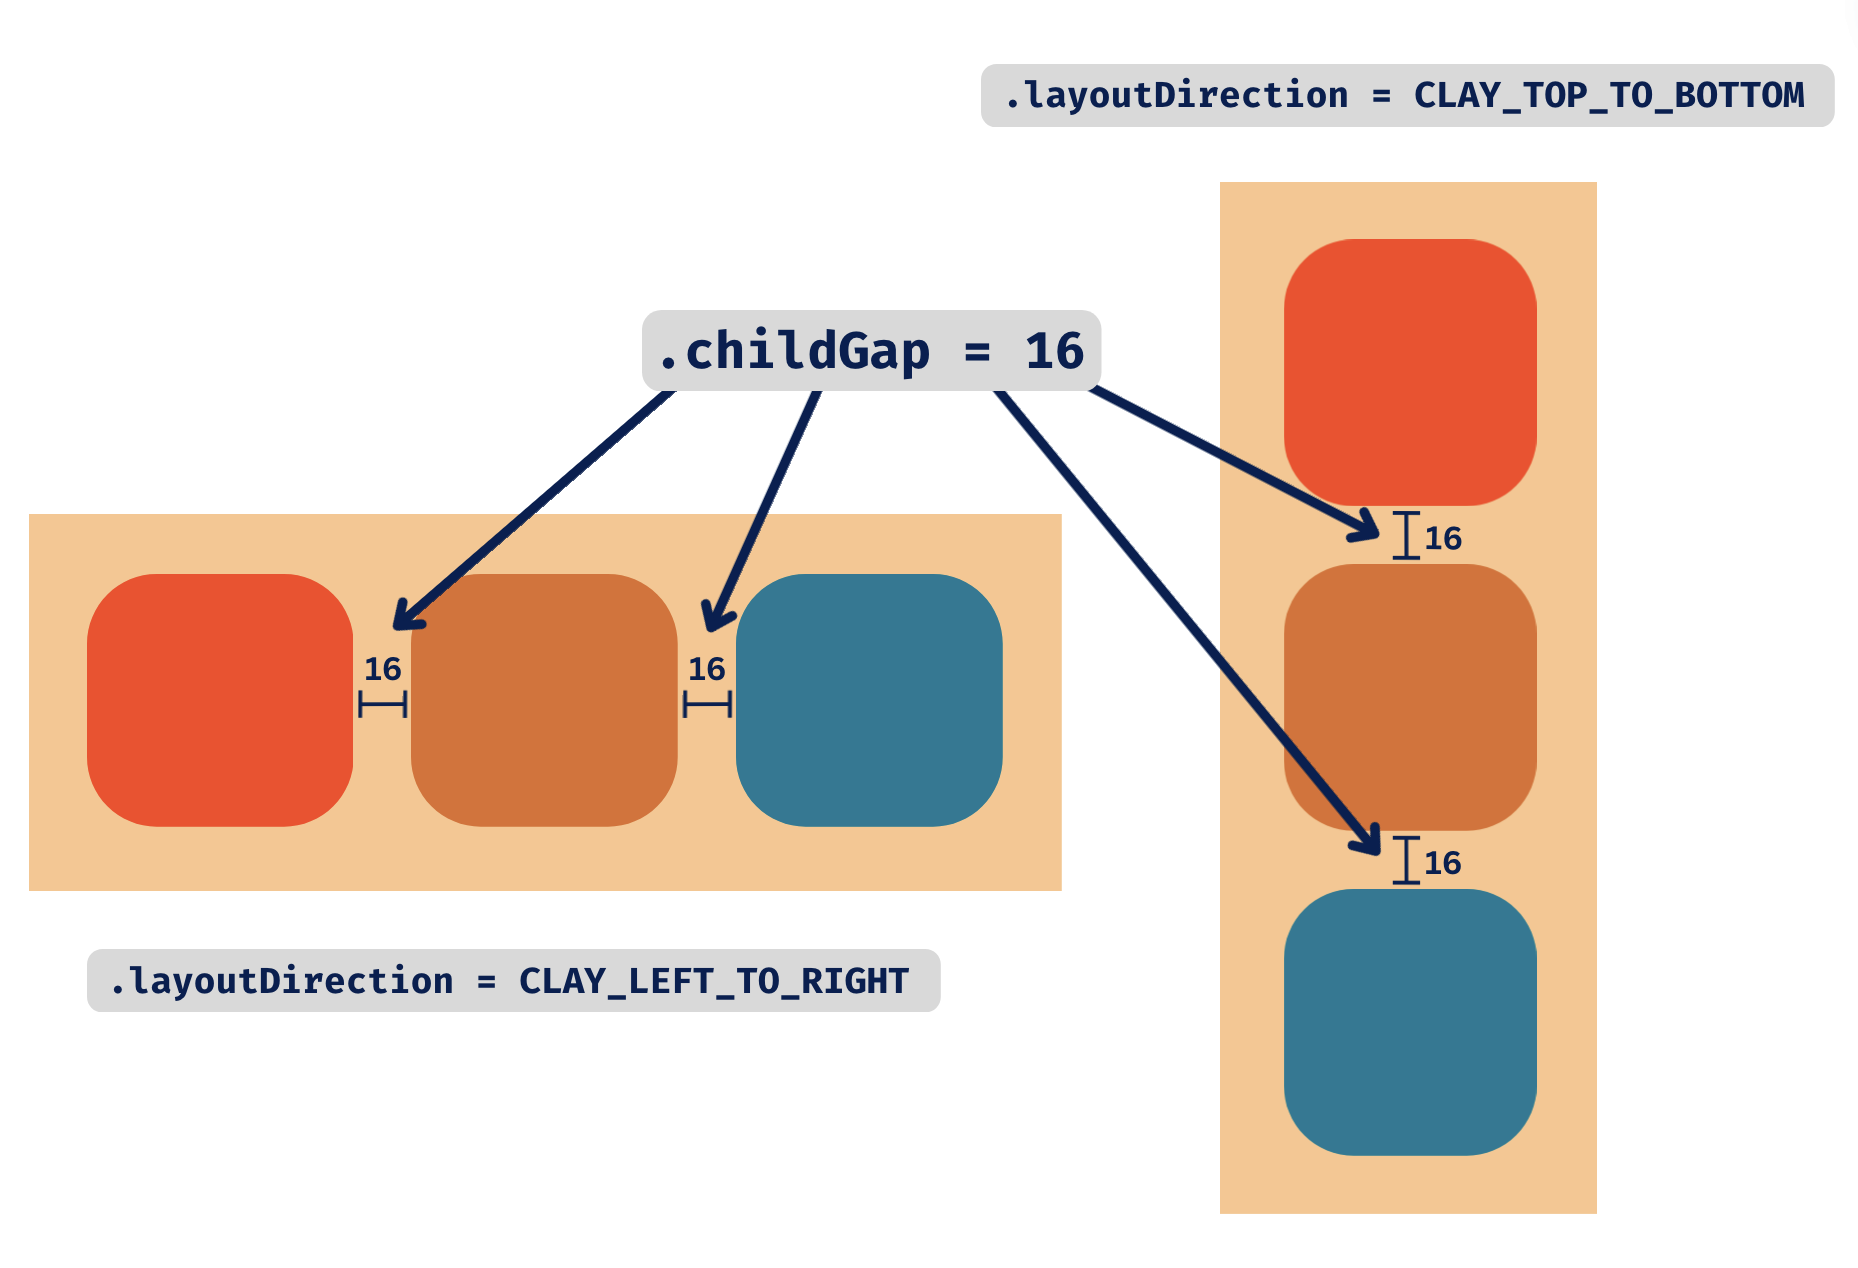 **`.childAlignment`** - `Clay_ChildAlignment`
`CLAY(CLAY_ID("Element"), { .layout = { .childAlignment = { .x = CLAY_ALIGN_X_LEFT, .y = CLAY_ALIGN_Y_CENTER } } })`
控制子元素相对于父容器高度和宽度的对齐方式。可用选项有:
```
.x = CLAY_ALIGN_X_LEFT (default) | CLAY_ALIGN_X_CENTER | CLAY_ALIGN_X_RIGHT;
.y = CLAY_ALIGN_Y_TOP (default) | CLAY_ALIGN_Y_CENTER | CLAY_ALIGN_Y_BOTTOM;
```
**`.childAlignment`** - `Clay_ChildAlignment`
`CLAY(CLAY_ID("Element"), { .layout = { .childAlignment = { .x = CLAY_ALIGN_X_LEFT, .y = CLAY_ALIGN_Y_CENTER } } })`
控制子元素相对于父容器高度和宽度的对齐方式。可用选项有:
```
.x = CLAY_ALIGN_X_LEFT (default) | CLAY_ALIGN_X_CENTER | CLAY_ALIGN_X_RIGHT;
.y = CLAY_ALIGN_Y_TOP (default) | CLAY_ALIGN_Y_CENTER | CLAY_ALIGN_Y_BOTTOM;
```
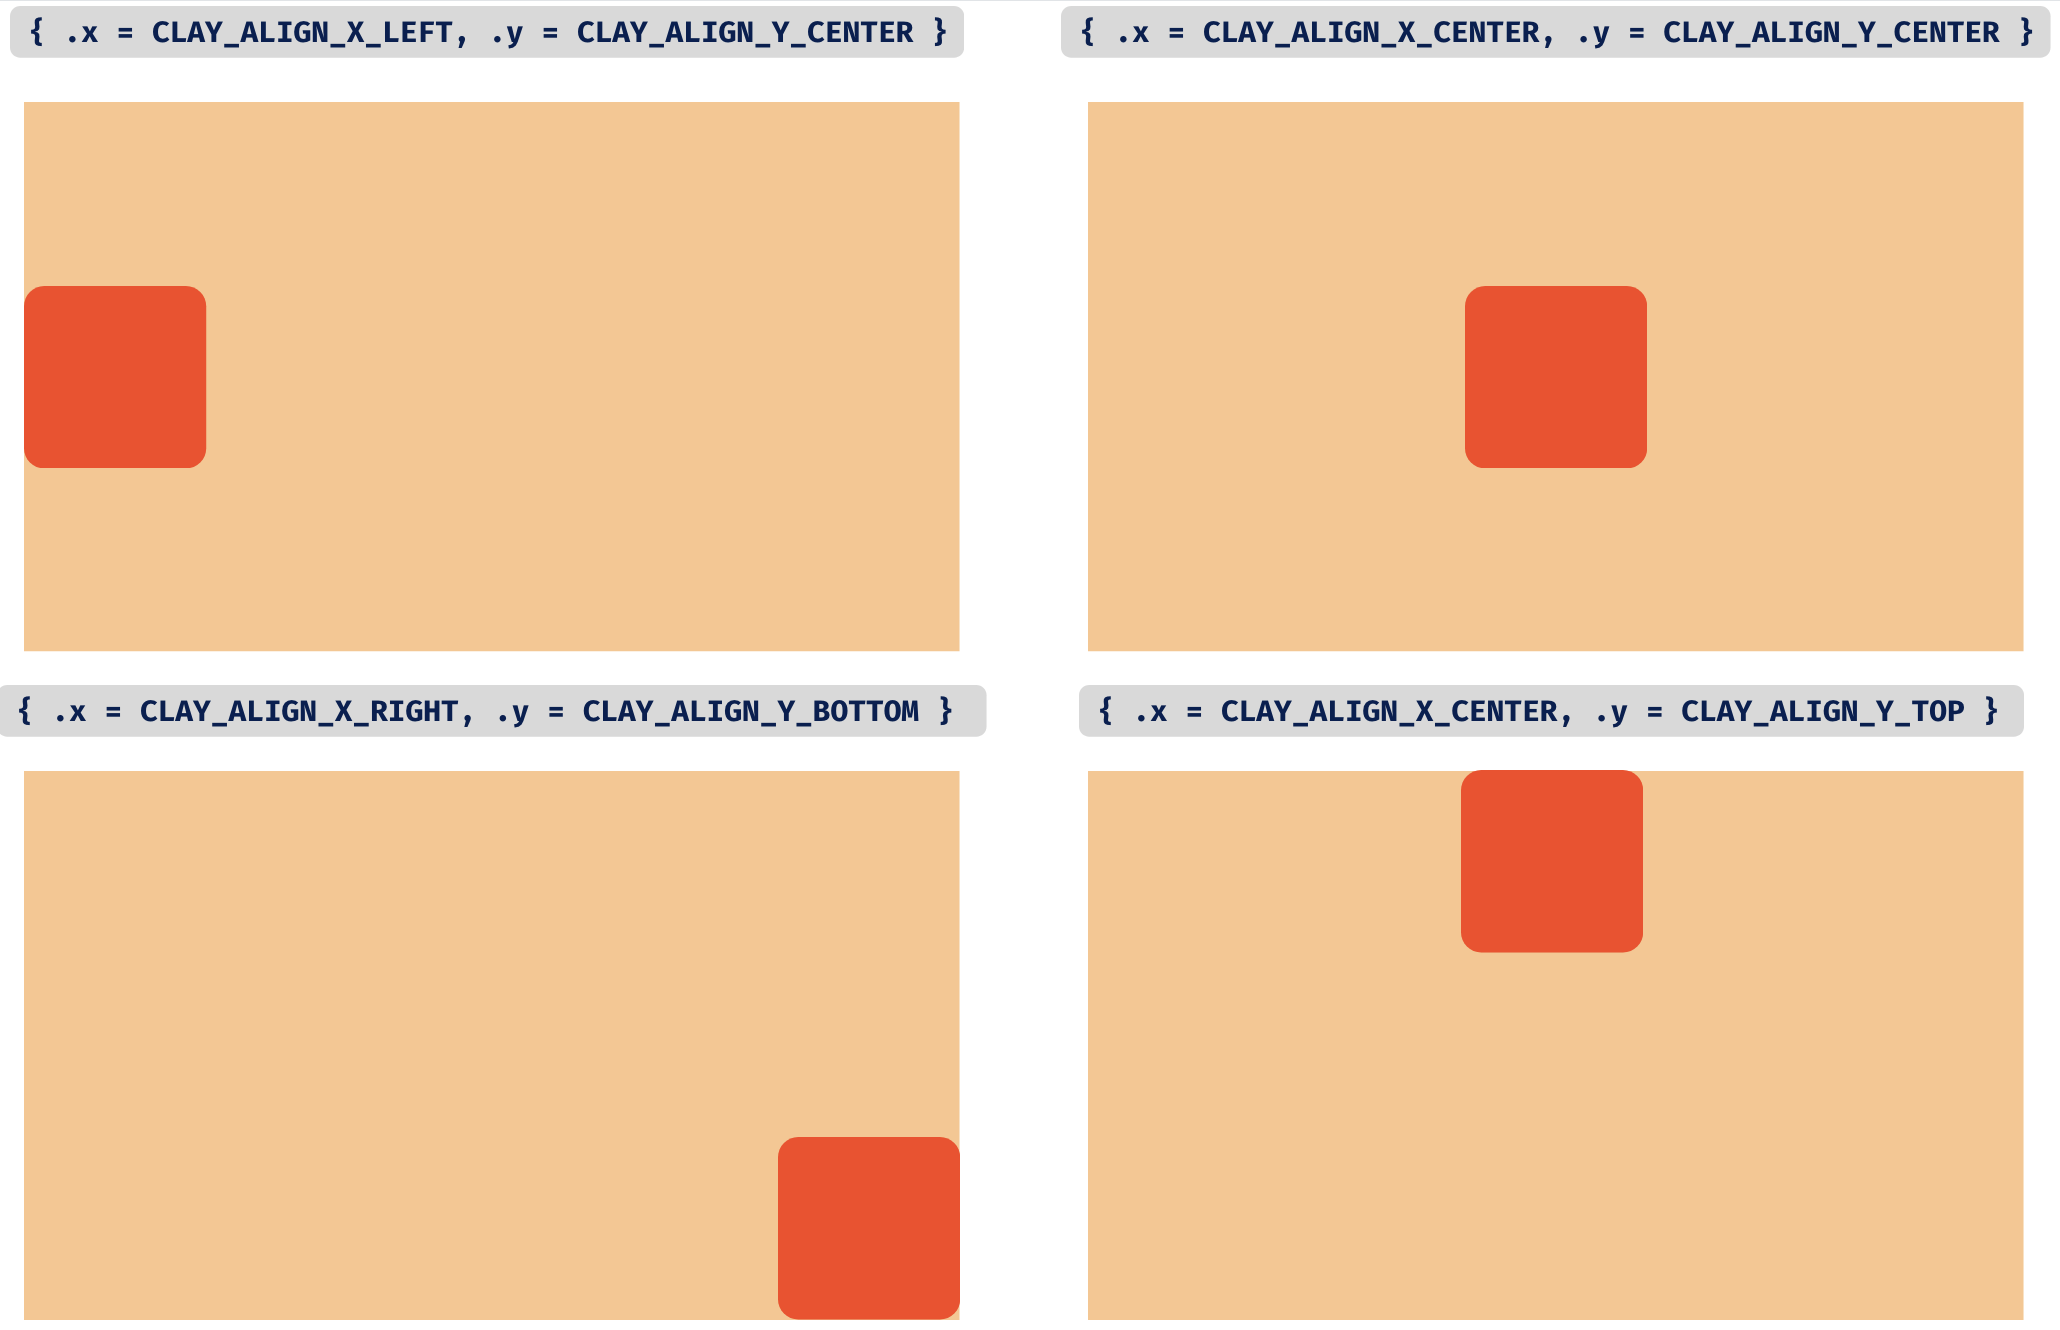 **`.sizing`** - `Clayizing`
`CLAY(CLAY_ID("Element"), { .layout = { .sizing = { .width = CLAY_SIZING_FIXED(300), .height = CLAY_SIZING_PERCENT(0.5) } } })`
控制如何计算元素的最终宽度和高度。`.width` 和 `.height` 轴都有相同的配置可用。有几个选项:
- `CLAY_SIZING_FIT(float min, float max) (默认)` - 元素将被调整为适合其子元素(加上 padding 和间隙),最高可达 `max`。如果未指定 `max`,它将默认为 `FLOAT_MAX`。当元素被压缩以适应较小的父元素时,此元素不会收缩到 `min` 以下。
- `CLAY_SIZING_GROW(float min, float max)` - 元素将增长以填充其父元素中的可用空间,最高可达 `max`。如果未指定 `max`,它将默认为 `FLOAT_MAX`。当元素被压缩以适应较小的父元素时,此元素不会收缩到 `min` 以下。
- `CLAY_SIZING_FIXED(float fixed)` - 最终大小将始终正好是提供的 `fixed` 值。`CLAY_SIZING_FIT(fixed, fixed)` 的简写
- `CLAY_SIZING_PERCENT(float percent)` - 最终大小将是父元素大小的百分比,减去 padding 和子间隙。`percent` 假定为 `0` 到 `1` 之间的浮点数。
**`.sizing`** - `Clayizing`
`CLAY(CLAY_ID("Element"), { .layout = { .sizing = { .width = CLAY_SIZING_FIXED(300), .height = CLAY_SIZING_PERCENT(0.5) } } })`
控制如何计算元素的最终宽度和高度。`.width` 和 `.height` 轴都有相同的配置可用。有几个选项:
- `CLAY_SIZING_FIT(float min, float max) (默认)` - 元素将被调整为适合其子元素(加上 padding 和间隙),最高可达 `max`。如果未指定 `max`,它将默认为 `FLOAT_MAX`。当元素被压缩以适应较小的父元素时,此元素不会收缩到 `min` 以下。
- `CLAY_SIZING_GROW(float min, float max)` - 元素将增长以填充其父元素中的可用空间,最高可达 `max`。如果未指定 `max`,它将默认为 `FLOAT_MAX`。当元素被压缩以适应较小的父元素时,此元素不会收缩到 `min` 以下。
- `CLAY_SIZING_FIXED(float fixed)` - 最终大小将始终正好是提供的 `fixed` 值。`CLAY_SIZING_FIT(fixed, fixed)` 的简写
- `CLAY_SIZING_PERCENT(float percent)` - 最终大小将是父元素大小的百分比,减去 padding 和子间隙。`percent` 假定为 `0` 到 `1` 之间的浮点数。
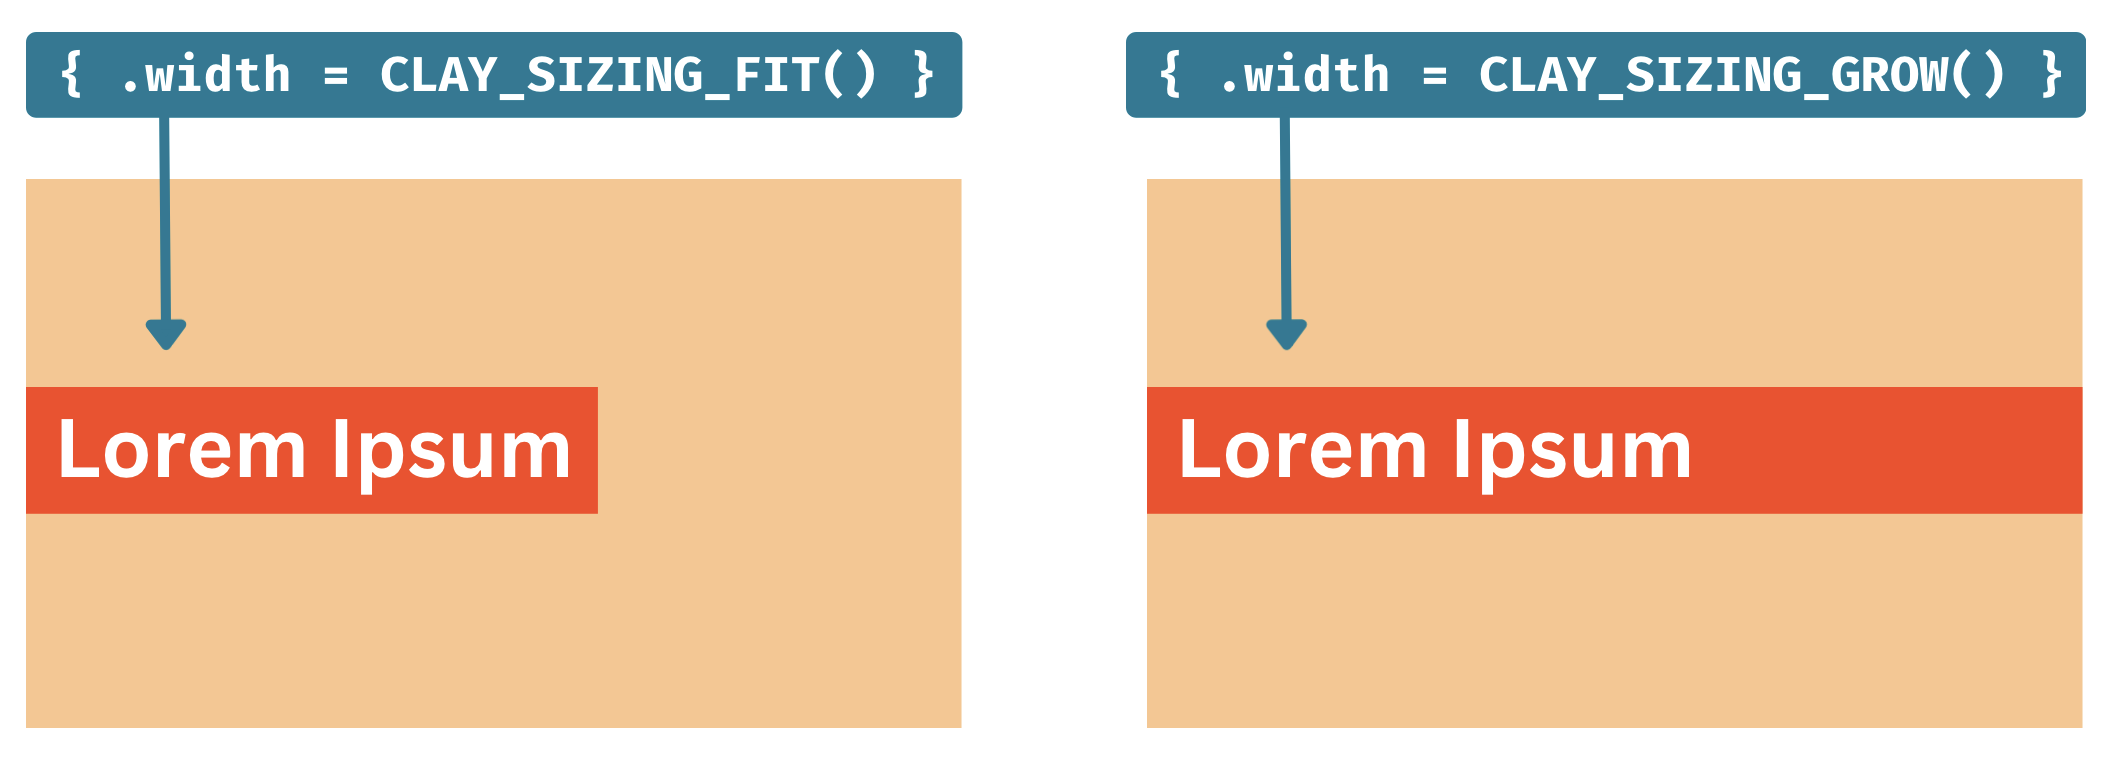
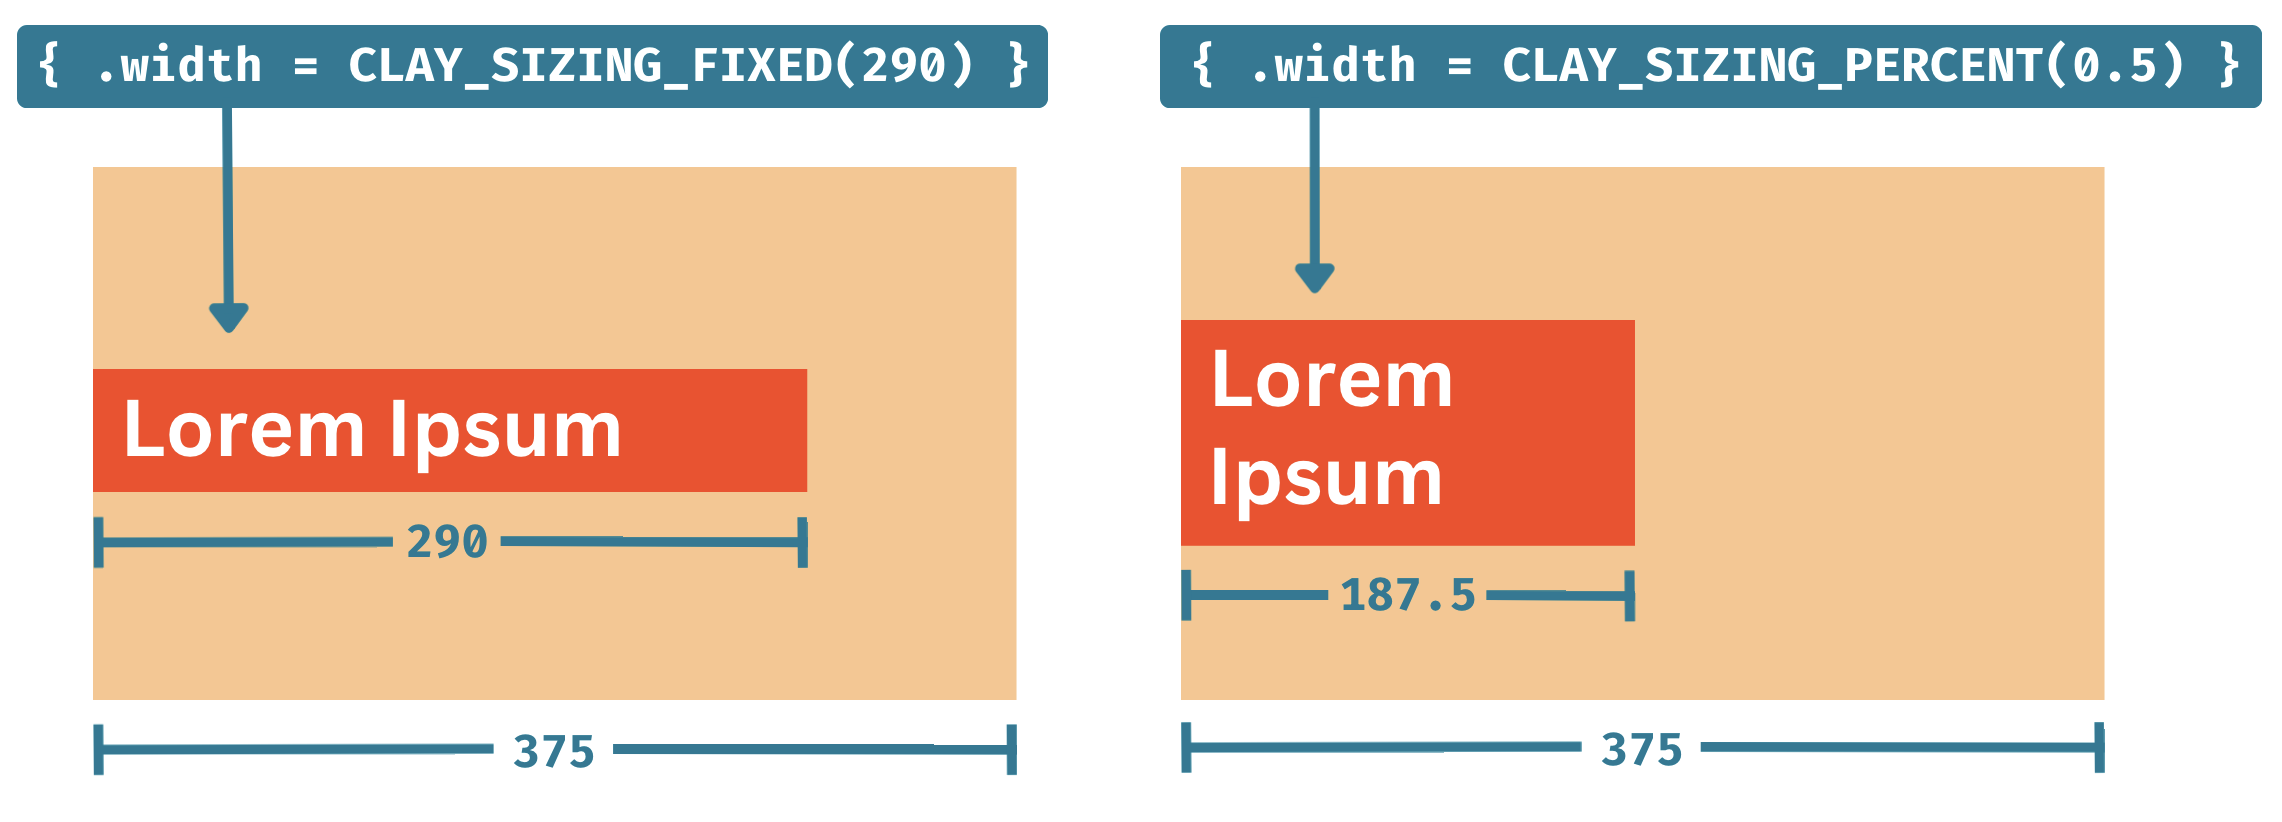 **用法示例**
```
CLAY(CLAY_ID("Button"), { .layout = { .layoutDirection = CLAY_TOP_TO_BOTTOM, .sizing = { .width = CLAY_SIZING_GROW(0) }, .padding = CLAY_PADDING_ALL(16, .childGap = 16) } }) {
// Children will be laid out vertically with 16px of padding around and between
}
```
### Clay_ImageElementConfig
**用法**
`CLAY(CLAY_ID("Element"), { .image = { ...image config } }) {}`
**Clay_ImageElementConfig** 将 clay 元素配置为渲染图像作为其背景。
**Struct API (伪代码)**
```
Clay_ImageElementConfig {
void * imageData;
};
```
**字段**
**`.imageData`** - `void *`
`CLAY(CLAY_ID("Image"), { .image = { .imageData = &myImage } }) {}`
`.imageData` 是一个通用的 void 指针,可用于将图像数据传递给渲染器。
```
// Load an image somewhere in your code
YourImage profilePicture = LoadYourImage("profilePicture.png");
// Note that when rendering, .imageData will be void* type.
CLAY(CLAY_ID("Image"), { .image = { .imageData = &profilePicture } }) {}
```
**示例**
```
// Load an image somewhere in your code
YourImage profilePicture = LoadYourImage("profilePicture.png");
// Declare a reusable image config
Clay_ImageElementConfig imageConfig = (Clay_ImageElementConfig) { .imageData = &profilePicture };
// Declare an image element using a reusable config
CLAY(CLAY_ID("Image"), { .image = imageConfig }) {}
// Declare an image element using an inline config
CLAY(CLAY_ID("ImageInline"), { .image = { .imageData = &profilePicture }, .aspectRatio = 16.0 / 9.0 }) {}
// Rendering example
YourImage *imageToRender = renderCommand->elementConfig.imageElementConfig->imageData;
```
**渲染**
元素受 [culling](#visibility-culling) 约束。否则,将创建一个 `commandType = CLAY_RENDER_COMMAND_TYPE_IMAGE` 的 `Clay_RenderCommand`。用户需要访问 `renderCommand->renderData.image->imageData` 以检索布局创建期间引用的图像数据。如何/是否将 `renderCommand->renderData.image->backgroundColor` 与图像混合也由用户决定。
### Clay_AspectRatioElementConfig
**用法**
`CLAY(CLAY_ID("Aspect"), { .aspectRatio = 16.0 / 9.0 }) {}`
**Clay_AspectRatioElementConfig** 将 clay 元素配置为其最终尺寸中强制执行固定的宽度/高度比。主要用于图像元素,但也可用于非图像元素。
**Struct API (伪代码)**
```
Clay_AspectRatioElementConfig {
float aspectRatio;
};
```
**字段**
**`.aspectRatio`** - `float`
`CLAY(CLAY_ID("Aspect"), { .aspectRatio = { .aspectRatio = 16.0 / 9.0 } }) {}`
或者,由于 C 会自动将值传递给第一个嵌套结构字段:
`CLAY(CLAY_ID("Aspect"), { .aspectRatio = 16.0 / 9.0 }) {}`
**示例**
```
// Load an image somewhere in your code
YourImage profilePicture = LoadYourImage("profilePicture.png");
// Declare an image element that will grow along the X axis while maintaining its original aspect ratio
CLAY(CLAY_ID("ProfilePicture"), {
.layout = { .width = CLAY_SIZING_GROW() },
.aspectRatio = profilePicture.width / profilePicture.height,
.image = { .imageData = &profilePicture },
}) {}
```
### Clay_ImageElementConfig
**用法**
`CLAY(CLAY_ID("Image"), { .image = { ...image config } }) {}`
**Clay_ImageElementConfig** 将 clay 元素配置为渲染图像作为其背景。
**Struct API (伪代码)**
```
Clay_ImageElementConfig {
void * imageData;
};
```
**字段**
**`.imageData`** - `void *`
`CLAY(CLAY_ID("Image"), { .image = { .imageData = &myImage } }) {}`
`.imageData` 是一个通用的 void 指针,可用于将图像数据传递给渲染器。
```
// Load an image somewhere in your code
YourImage profilePicture = LoadYourImage("profilePicture.png");
// Note that when rendering, .imageData will be void* type.
CLAY(CLAY_ID("Image"), { .image = { .imageData = &profilePicture } }) {}
```
注意:为了在使用动态缩放时保持图像的原始纵横比,必须使用 [.aspectRatio](#clay_aspectratioelementconfig) 配置选项。
**示例**
```
// Load an image somewhere in your code
YourImage profilePicture = LoadYourImage("profilePicture.png");
// Declare a reusable image config
Clay_ImageElementConfig imageConfig = (Clay_ImageElementConfig) { .imageData = &profilePicture };
// Declare an image element using a reusable config
CLAY(CLAY_ID("Image"), { .image = imageConfig }) {}
// Declare an image element using an inline config
CLAY(CLAY_ID("ImageInline"), { .image = { .imageData = &profilePicture }, .aspectRatio = 16.0 / 9.0 }) {}
// Rendering example
YourImage *imageToRender = renderCommand->elementConfig.imageElementConfig->imageData;
```
**渲染**
元素受 [culling](#visibility-culling) 约束。否则,将创建一个 `commandType = CLAY_RENDER_COMMAND_TYPE_IMAGE` 的 `Clay_RenderCommand`。用户需要访问 `renderCommand->renderData.image->imageData` 以检索布局创建期间引用的图像数据。如何/是否将 `renderCommand->renderData.image->backgroundColor` 与图像混合也由用户决定。
### Clay_ClipElementConfig
**用法**
`CLAY(CLAY_ID("ScrollBox"), { .clip = { ...clip config } }) {}`
**注意事项**
`Clay_ClipElementConfig` 将元素配置为剪切容器,从而能够屏蔽超出其边界的子元素。
注意:为了处理基于指针位置和鼠标滚轮或触摸交互的滚动,您必须在调用 `BeginLayout` _之前_ 调用 `Clay_SetPointerState()` 和 `Clay_UpdateScrollContainers()`。
**Struct Definition (伪代码)**
```
Clay_ClipElementConfig {
bool horizontal;
bool vertical;
};
```
**字段**
**`.horizontal`** - `bool`
`CLAY(CLAY_ID("HorizontalScroll"), { .clip = { .horizontal = true } })`
为此容器元素启用或禁用水平剪切。
**`.vertical`** - `bool`
`CLAY(LAY_ID("VerticalScroll"), { .clip = { .vertical = true } })`
为此容器元素启用或禁用垂直剪切。
**渲染**
为元素启用 clip 将导致两个额外的渲染命令:
- `commandType = CLAY_RENDER_COMMAND_TYPE_SCISSOR_START`,应使用其 `boundingBox` 创建矩形蒙版,并且**不**受 [culling](#visibility-culling) 约束
- `commandType = CLAY_RENDER_COMMAND_TYPE_SCISSOR_END`,禁用先前的矩形蒙版,并且**不**受 [culling](#visibility-culling) 约束
**示例**
```
CLAY(CLAY_ID("ScrollOuter"), { .clip = { .vertical = true } }) {
// Create child content with a fixed height of 5000
CLAY(CLAY_ID("ScrollInner"), { .layout = { .sizing = { .height = CLAY_SIZING_FIXED(5000) } } }) {}
}
```
### Clay_BorderElementConfig
**用法**
`CLAY(CLAY_ID("Border"), { .border = { ...border config } }) {}`
**注意事项**
`Clay_BorderElementConfig` 向元素的边缘或子元素之间添加边框。它使用 Clay_BorderElementConfig 来配置边框特定选项。
**Struct Definition (伪代码)**
```
typedef struct Clay_BorderElementConfig
{
Clay_Color color {
float r; float g; float b; float a;
};
Clay_BorderWidth width {
uint16_t left;
uint16_t right;
uint16_t top;
uint16_t bottom;
uint16_t betweenChildren;
};
} Clay_BorderElementConfig;
```
**字段**
**`.color`** - `Clay_Color`
`CLAY(CLAY_ID("Border"), { .border = { .color = { 255, 0, 0, 255 } } })`
使用 [Clay_Color](#clay_color)。指定此元素配置的所有边框的共享颜色。通常接受 0 到 255 之间的 `rgba` 浮点值,但解释留给渲染器,不影响布局。
**`.width`** - `Clay_BorderWidth`
`CLAY(CLAY_ID("Border"), { .border = { .width = { .left = 2, .right = 10 } } })`
向渲染器指示应在边界框的指定边缘绘制 `.color` 的边框,**嵌入并与框内容重叠 `.width`**。
这意味着边框配置不影响布局,因为边框的宽度不会影响总容器宽度或布局位置。具有零 padding 的边框容器将绘制在子元素的顶部。
注意:
**`.width.betweenChildren`**
`CLAY(CLAY_ID("Border"), { .border = { .width = { .betweenChildren = 2 } }, .color = COLOR_RED })`
配置要在子元素之间绘制的边框的宽度和颜色。如果父元素使用 `.layoutDirection = CLAY_LEFT_TO_RIGHT`,这些边框将是垂直线,如果父元素使用 `CLAY_TOP_TO_BOTTOM`,则是水平线。与 `.left, .top` 等不同,此选项**将生成表示子元素之间边框的额外矩形渲染命令。** 因此,渲染器不需要专门实现这些边框元素的渲染。
**示例**
```
// 300x300 container with a 1px red border around all the edges
CLAY(CLAY_ID("OuterBorder"), {
.layout = { .sizing = { .width = CLAY_SIZING_FIXED(300), .height = CLAY_SIZING_FIXED(300) } },
.border = { .width = { 1, 1, 1, 1, 0 }, .color = COLOR_RED }
}) {
// ...
}
// Container with a 3px yellow bottom border
CLAY(CLAY_ID("OuterBorder"), {
.border = { .width = { .bottom = 3 }, .color = COLOR_YELLOW }
}) {
// ...
}
// Container with a 5px curved border around the edges, and a 5px blue border between all children laid out top to bottom
CLAY(CLAY_ID("OuterBorder"), {
.layout = { .layoutDirection = CLAY_TOP_TO_BOTTOM },
.border = { .width = { 5, 5, 5, 5, 5 }, .color = COLOR_BLUE }
}) {
// Child
// -- 5px blue border will be here --
// Child
// -- 5px blue border will be here --
// Child
}
```
**渲染**
元素受 [culling](#visibility-culling) 约束。否则,将创建一个表示容器的 `commandType = CLAY_RENDER_COMMAND_TYPE_BORDER` 的 `Clay_RenderCommand`。
边框和圆角的渲染留给用户。请参阅提供的 [Raylib Renderer](https://github.com/nicbarker/clay/tree/main/renderers/raylib) 以获取有关如何使用线条和曲线基元绘制边框的示例。
### Clay_FloatingElementConfig
**用法**
`CLAY(CLAY_ID("Floating"), { .floating = { ...floating config } }) {}`
**注意事项**
**Floating Elements** 定义了一个“浮动”在其他内容之上的元素。典型用例包括工具提示和模态框。
浮动容器:
- 使用默认配置,附加到其“父元素”的左上角
- 不影响其父元素的宽度和高度
- 不影响兄弟元素的定位
- 根据其 z-index,可以出现在其他元素的上方或下方,部分或完全遮挡它们
- 除了定位之外,其功能与标准元素完全一样——包括扩展以适应其子元素等。
思考浮动容器时最简单的心理模型是,它们是一个完全独立的 UI 层次结构,附加到其“父元素”上的特定 x,y 点。
浮动元素使用 `Clay_FloatingElementConfig` 来配置特定选项。
**Struct Definition (伪代码)**
```
Clay_FloatingElementConfig {
Clay_Vector2 offset {
float x, float y
};
Clay_Dimensions expand {
float width, float height
};
uint32_t parentId;
int16_t zIndex;
Clay_FloatingAttachPoints attachPoint {
.element = CLAY_ATTACH_POINT_LEFT_TOP (default) | CLAY_ATTACH_POINT_LEFT_CENTER | CLAY_ATTACH_POINT_LEFT_BOTTOM | CLAY_ATTACH_POINT_CENTER_TOP | CLAY_ATTACH_POINT_CENTER_CENTER | CLAY_ATTACH_POINT_CENTER_BOTTOM | CLAY_ATTACH_POINT_RIGHT_TOP | CLAY_ATTACH_POINT_RIGHT_CENTER | CLAY_ATTACH_POINT_RIGHT_BOTTOM
.parent = CLAY_ATTACH_POINT_LEFT_TOP (default) | CLAY_ATTACH_POINT_LEFT_CENTER | CLAY_ATTACH_POINT_LEFT_BOTTOM | CLAY_ATTACH_POINT_CENTER_TOP | CLAY_ATTACH_POINT_CENTER_CENTER | CLAY_ATTACH_POINT_CENTER_BOTTOM | CLAY_ATTACH_POINT_RIGHT_TOP | CLAY_ATTACH_POINT_RIGHT_CENTER | CLAY_ATTACH_POINT_RIGHT_BOTTOM
};
Clay_FloatingAttachToElement attachTo {
CLAY_POINTER_CAPTURE_MODE_CAPTURE (default),
CLAY_POINTER_CAPTURE_MODE_PASSTHROUGH
};
Clay_FloatingAttachToElement attachTo {
CLAY_ATTACH_TO_NONE (default),
CLAY_ATTACH_TO_PARENT,
CLAY_ATTACH_TO_ELEMENT_WITH_ID,
CLAY_ATTACH_TO_ROOT,
};
};
```
**字段**
**`.offset`** - `Clay_Vector2`
`CLAY(CLAY_ID("Floating"), { .floating = { .offset = { -24, -24 } } })`
用于在计算完所有其他布局_之后_将位置偏移应用于浮动容器。
**`.expand`** - `Clay_Dimensions`
`CLAY(CLAY_ID("Floating"), { .floating = { .expand = { 16, 16 } } })`
用于在布局子元素_之前_扩展浮动容器的宽度和高度。
**`.zIndex`** - `float`
`CLAY(CLAY_ID("Floating"), { .floating = { .zIndex = 1 } })`
所有浮动元素(及其整个子层次结构)将在转换为渲染命令之前按 `.zIndex` 顺序排序。如果按顺序绘制渲染命令,具有较高 `.zIndex` 值的元素将绘制在顶部。
**`.parentId`** - `uint32_t`
`CLAY(CLAY_ID("Floating"), { .floating = { .parentId = Clay_GetElementId("HeaderButton").id } })`
默认情况下,浮动容器将“附加”到声明它们的父元素。但是,在某些情况下,此限制可能会导致严重的性能或人机工程学问题。`.parentId` 允许您指定一个 `CLAY_ID().id` 来附加浮动容器。具有匹配 ID 的父元素可以在层次结构中的任何位置声明,不需要特别在浮动容器之前或之后声明。
考虑以下情况:
```
// Load an image somewhere in your code
CLAY(CLAY_IDI("SidebarButton", 1), { }) {
// .. some button contents
if (tooltip.attachedButtonIndex == 1) {
CLAY(CLAY_ID("OptionTooltip"), { /* floating config... */ })
}
}
CLAY(CLAY_IDI("SidebarButton", 2), { }) {
// .. some button contents
if (tooltip.attachedButtonIndex == 2) {
CLAY(CLAY_ID("OptionTooltip"), { /* floating config... */ })
}
}
CLAY(CLAY_IDI("SidebarButton", 3), { }) {
// .. some button contents
if (tooltip.attachedButtonIndex == 3) {
CLAY(CLAY_ID("OptionTooltip"), { /* floating config... */ })
}
}
CLAY(CLAY_IDI("SidebarButton", 4), { }) {
// .. some button contents
if (tooltip.attachedButtonIndex == 4) {
CLAY(CLAY_ID("OptionTooltip"), { /* floating config... */ })
}
}
CLAY(CLAY_IDI("SidebarButton", 5), { }) {
// .. some button contents
if (tooltip.attachedButtonIndex == 5) {
CLAY(CLAY_ID("OptionTooltip"), { /* floating config... */ })
}
}
```
上述 UI 的定义因需要有条件地将浮动工具提示渲染为许多可能元素的子元素而受到严重污染。使用 `parentId` 的替代方法如下所示:
```
// Load an image somewhere in your code
CLAY(CLAY_IDI("SidebarButton", 1), { }) {
// .. some button contents
}
CLAY(CLAY_IDI("SidebarButton", 2), { }) {
// .. some button contents
}
CLAY(CLAY_IDI("SidebarButton", 3), { }) {
// .. some button contents
}
CLAY(CLAY_IDI("SidebarButton", 4), { }) {
// .. some button contents
}
CLAY(CLAY_IDI("SidebarButton", 5), { }) {
// .. some button contents
}
// Any other point in the hierarchy
CLAY(CLAY_ID("OptionTooltip"), { .floating = { .attachTo = CLAY_ATTACH_TO_ELEMENT_ID, .parentId = CLAY_IDI("SidebarButton", tooltip.attachedButtonIndex).id }) {
// Tooltip contents...
}
```
**`.attachment`** - `Clay_FloatingAttachPoints`
`CLAY(CLAY_ID("Floating"), { .floating = { .attachment = { .element = CLAY_ATTACH_POINT_LEFT_CENTER, .parent = CLAY_ATTACH_POINT_RIGHT_TOP } } }) {}`
在定位浮动容器方面,`.attachment` 指定
- 浮动容器上的点(`.element`)
- 它“附加”到的父元素上的点(`.parent`)

您可以在心理上将其可视化为在浮动容器上找到一个点,然后在父元素上找到一个点,并将它们重叠排列。
例如:
“将浮动容器的 LEFT_CENTER 附加到父元素的 RIGHT_TOP”
`CLAY(CLAY_ID("Floating"), { .floating = { .attachment = { .element = CLAY_ATTACH_POINT_LEFT_CENTER, .parent = CLAY_ATTACH_POINT_RIGHT_TOP } } });`
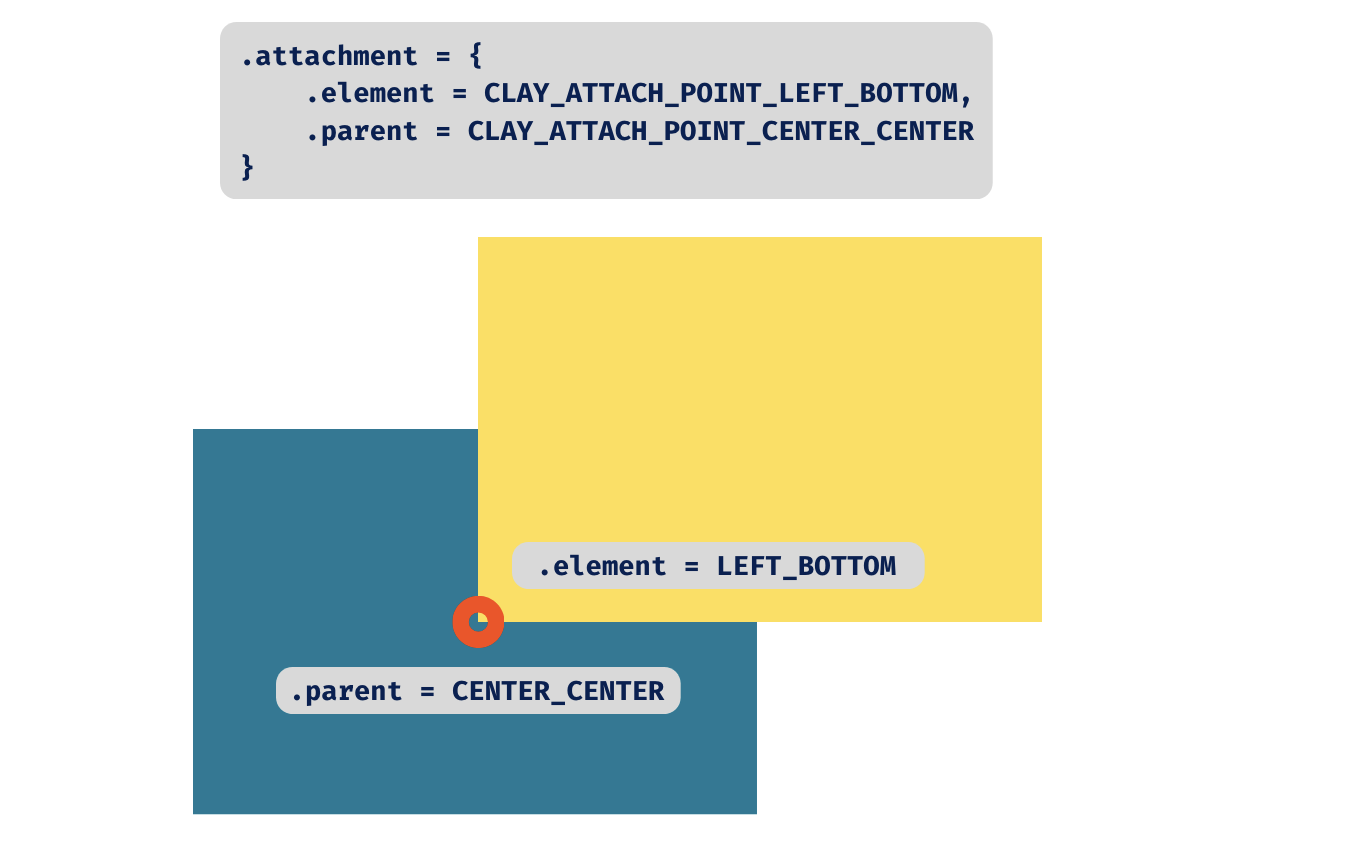
**`.pointerCaptureMode`** - `Clay_PointerCaptureMode`
`CLAY({ .floating = { .pointerCaptureMode = CLAY_POINTER_CAPTURE_MODE_CAPTURE } })`
控制悬停和点击等指针事件是否应穿透到此浮动元素下方的内容,或者指针是否应被此浮动元素“捕获”。默认为 `CLAY_POINTER_CAPTURE_MODE_CAPTURE`。
**示例**
```
// Horizontal container with three option buttons
CLAY(CLAY_ID("OptionsList"), { .layout = { childGap = 16 } }) {
CLAY(CLAY_IDI("Option", 1), { .layout = { padding = CLAY_PADDING_ALL(16)), .backgroundColor = COLOR_BLUE } }) {
CLAY_TEXT(CLAY_STRING("Option 1"), CLAY_TEXT_CONFIG());
}
CLAY(CLAY_IDI("Option", 2), { .layout = { padding = CLAY_PADDING_ALL(16)), .backgroundColor = COLOR_BLUE } }) {
CLAY_TEXT(CLAY_STRING("Option 2"), CLAY_TEXT_CONFIG());
// Floating tooltip will attach above the "Option 2" container and not affect widths or positions of other elements
CLAY(CLAY_ID("OptionTooltip"), { .floating = { .zIndex = 1, .attachment = { .element = CLAY_ATTACH_POINT_CENTER_BOTTOM, .parent = CLAY_ATTACH_POINT_CENTER_TOP } } }) {
CLAY_TEXT(CLAY_STRING("Most popular!"), CLAY_TEXT_CONFIG());
}
}
CLAY(CLAY_IDI("Option", 3), { .layout = { padding = CLAY_PADDING_ALL(16)), .backgroundColor = COLOR_BLUE } }) {
CLAY_TEXT(CLAY_STRING("Option 3"), CLAY_TEXT_CONFIG());
}
}
// Floating containers can also be declared elsewhere in a layout, to avoid branching or polluting other UI
for (int i = 0; i < 1000; i++) {
CLAY(CLAY_IDI("Option", i + 1), { }) {
// ...
}
}
// Note the use of "parentId".
// Floating tooltip will attach above the "Option 2" container and not affect widths or positions of other elements
CLAY(CLAY_ID("OptionTooltip"), { .floating = { .parentId = CLAY_IDI("Option", 2).id, .zIndex = 1, .attachment = { .element = CLAY_ATTACH_POINT_CENTER_BOTTOM, .parent = CLAY_ATTACH_POINT_TOP_CENTER } } }) {
CLAY_TEXT(CLAY_STRING("Most popular!"), CLAY_TEXT_CONFIG());
}
```
使用 `.parentId` 时,浮动容器可以在 `BeginLayout` 之后和 `EndLayout` 之前的任何位置声明。使用 `Clay_FloatingElementConfig` 时,与 `.parentId` 匹配的目标元素不需要存在。
**渲染**
`Clay_FloatingElementConfig` 不会生成任何特定的渲染命令。
### Clay_CustomElementConfig
**用法**
`CLAY(CLAY_ID("Custom"), { .custom = { .customData = &something } }) {}`
**注意事项**
**Clay_CustomElementConfig** 允许用户将自定义数据传递给渲染器。
**Struct Definition (伪代码)**
```
typedef struct
{
void * customData;
} Clay_CustomElementConfig;
```
**字段**
`.customData` - ` *`
`CLAY({ .custom = { .customData = &myCustomData } })`
`.customData` 是一个通用的 void 指针,可用于将自定义数据传递给渲染器。
**示例**
```
#include "clay.h"
typedef enum {
CUSTOM_ELEMENT_TYPE_MODEL,
CUSTOM_ELEMENT_TYPE_VIDEO
} CustomElementType;
// A rough example of how you could handle laying out 3d models in your UI
typedef struct {
CustomElementType type;
union {
Model model;
Video video;
// ...
};
} CustomElementData;
Model myModel = Load3DModel(filePath);
CustomElement modelElement = (CustomElement) { .type = CUSTOM_ELEMENT_TYPE_MODEL, .model = myModel }
typedef struct {
void* memory;
uintptr_t offset;
} Arena;
// During init
Arena frameArena = (Arena) { .memory = malloc(1024) };
// ...
CLAY(0) {
// Custom elements only take a single pointer, so we need to store the data somewhere
CustomElementData *modelData = (CustomElementData *)(frameArena.memory + frameArena.offset);
*modelData = (CustomElementData) { .type = CUSTOM_ELEMENT_TYPE_MODEL, .model = myModel };
frameArena.offset += sizeof(CustomElementData);
CLAY(CLAY_ID("3DModelViewer"), { .custom = { .customData = modelData } }) {}
}
// Later during your rendering
switch (renderCommand->commandType) {
// ...
case CLAY_RENDER_COMMAND_TYPE_CUSTOM: {
// Your extended struct is passed through
CustomElementData *customElement = renderCommand->config.customElementConfig->customData;
if (!customElement) continue;
switch (customElement->type) {
case CUSTOM_ELEMENT_TYPE_MODEL: {
// Render your 3d model here
break;
}
case CUSTOM_ELEMENT_TYPE_VIDEO: {
// Render your video here
break;
}
// ...
}
break;
}
}
```
**渲染**
元素受 [culling](#visibility-culling) 约束。否则,将创建一个 `commandType = CLAY_RENDER_COMMAND_TYPE_CUSTOM` 的 `Clay_RenderCommand`。
### Clay_Color
```
typedef struct {
float r, g, b, a;
} Clay_Color;
```
`Clay_Color` 是 Clay 声明和渲染中使用的 RGBA 颜色结构体。按照惯例,通道表示为 0-255,但这留给渲染器决定。
注意:使用调试工具时,其内部颜色表示为 0-255。
### Clay_String
```
typedef struct {
bool isStaticallyAllocated;
int32_t length;
const char *chars;
} Clay_String;
```
`Clay_String` 是 clay 在内部用来表示所有字符串的字符串容器。
**字段**
**`.isStaticallyAllocated`** - `bool`
字符串是否是静态分配的,或者换句话说,它是否存在于程序的整个生命周期中。
**`.length`** - `int32_t`
字符串中的字符数,_不包括可选的 null 终止符。_
**`.chars`** - `const char *`
指向字符串内容的指针。此数据不保证以 null 结尾,因此如果您将其传递给期望标准 null 结尾 C 字符串的代码,则需要复制数据并附加 null 终止符。
### Clay_ElementId
```
typedef struct {
uint32_t id;
uint32_t offset;
uint32_t baseId;
Clay_String stringId;
} Clay_ElementId;
```
由 [CLAY_ID](#clay_id) 和 [CLAY_IDI](#clay_idi) 返回,此结构体包含哈希 ID 以及用于生成它的源字符串。
**字段**
**`.id`** - `uint32_t`
从传递给 [CLAY_ID](#clay_id) 或 [CLAY_IDI](#clay_idi) 的字符串派生的唯一 ID。
**`.offset`** - `uint32_t`
如果此 ID 是使用 [CLAY_IDI](#clay_idi) 生成的,`.offset` 是作为第二个参数传递的值。对于 [CLAY_ID](#clay_id),此值始终为 `0`。
**`.baseId`** - `uint32_t`
如果此 ID 是使用 [CLAY_IDI](#clay_idi) 生成的,`.baseId` 是传递的基本字符串的哈希,**在与 `.offset` 进行额外哈希之前**。对于 [CLAY_ID](#clay_id),此值始终与 `.id` 相同。
**`.stringId`** - `Clay_String`
存储调用 [CLAY_ID](#clay_id) 或 [CLAY_IDI](#clay_idi) 时传入的原始字符串。
### Clay_RenderCommandArray
```
typedef struct
{
uint32_t capacity;
uint32_t length;
Clay_RenderCommand *internalArray;
} Clay_RenderCommandArray;
```
由 [Clay_EndLayout](#clay_endlayout) 返回,此数组包含表示计算布局的 [Clay_RenderCommand](#clay_rendercommand)s。
**字段**
**`.capacity`** - `uint32_t`
表示 `.internalArray` 中已分配内存的总容量。
**`.length`** - `uint32_t`
表示存储在地址 `.internalArray` 的 `Clay_RenderCommand` 元素的总数。
**`.internalArray`** - `Clay_RenderCommand`
一个表示计算布局的 [Clay_RenderCommand](#clay_rendercommand)s 数组。如果至少有一个渲染命令,此数组将包含从 `.internalArray[0]` 到 `.internalArray[.length - 1]` 的元素。
### Clay_RenderCommand
```
typedef struct {
Clay_BoundingBox boundingBox;
Clay_RenderData renderData;
uintptr_t userData;
uint32_t id;
int16_t zIndex;
Clay_RenderCommandType commandType;
} Clay_RenderCommand;
```
**字段**
**`.commandType`** - `Clay_RenderCommandType`
一个枚举,指示应如何处理此渲染命令。可能的值包括:
- `CLAY_RENDER_COMMAND_TYPE_NONE` - 应被渲染器忽略,并且在正常情况下 clay 永远不会发出。
- `CLAY_RENDER_COMMAND_TYPE_RECTANGLE` - 应绘制一个矩形,使用 `.config.rectangleElementConfig` 配置
- `CLAY_RENDER_COMMAND_TYPE_BORDER` - 应绘制一个边框,使用 `.config.borderElementConfig` 配置
- `CLAY_RENDER_COMMAND_TYPE_TEXT` - 应绘制文本,使用 `.config.textElementConfig` 配置
- `CLAY_RENDER_COMMAND_TYPE_IMAGE` - 应绘制一个图像,使用 `.config.imageElementConfig` 配置
- `CLAY_RENDER_COMMAND_TYPE_SCISSOR_START` - 以 [glScissor](https://registry.khronos.org/OpenGL-Refpages/gl4/html/glScissor.xhtml) 命名,这表示渲染器应开始剔除绘制在此渲染命令 `.boundingBox` 之外的任何后续像素。
- `CLAY_RENDER_COMMAND_TYPE_SCISSOR_END` - 仅在匹配的 `CLAY_RENDER_COMMAND_TYPE_SCISSOR_START` 命令之后出现,并表示剪切已结束。
- `CLAY_RENDER_COMMAND_TYPE_CUSTOM` - 由用户控制的自定义渲染命令,使用 `.config.customElementConfig` 配置
**`.boundingBox`** - `Clay_BoundingBox`
```
typedef struct {
float x, y, width, height;
} Clay_BoundingBox;
```
一个表示此渲染命令边界框的矩形,其中 `.x` 和 `.y` 表示元素的左上角。
**`.id`** - `uint32_t`
最初用于创建此渲染命令的元素宏的 ID。有关详细信息,请参阅 [CLAY_ID](#clay_id)。
**`.zIndex`** - `int16_t`
元素的 z index,基于传递给此元素所属的根浮动配置。
较高的 z indexes 应渲染在较低的 z indexes _之上_。
**`.renderData`** - `Clay_RenderData`
```
typedef union {
Clay_RectangleRenderData rectangle;
Clay_TextRenderData text;
Clay_ImageRenderData image;
Clay_CustomRenderData custom;
Clay_BorderRenderData border;
} Clay_RenderData;
```
一个包含各种结构体的 C 联合体,类型取决于 `.commandType`。可能的值包括:
- `config.rectangle` - 当 `.commandType == CLAY_RENDER_COMMAND_TYPE_RECTANGLE` 时使用。
- `config.text` - 当 `.commandType == CLAY_RENDER_COMMAND_TYPE_TEXT` 时使用。有关详细信息,请参阅 [Clay_Text](#clay_text)。
- `config.image` - 当 `.commandType == CLAY_RENDER_COMMAND_TYPE_IMAGE` 时使用。有关详细信息,请参阅 [Clay_Image](#clay_imageelementconfig)。
- `config.border` - 当 `.commandType == CLAY_RENDER_COMMAND_TYPE_BORDER` 时使用。有关详细信息,请参阅 [Clay_Border](#clay_borderelementconfig)。
- `config.custom` - 当 `.commandType == CLAY_RENDER_COMMAND_TYPE_CUSTOM` 时使用。有关详细信息,请参阅 [Clay_Custom](#clay_customelementconfig)。
**Union Structs**
```
typedef struct {
Clay_StringSlice stringContents;
Clay_Color textColor;
uint16_t fontId;
uint16_t fontSize;
uint16_t letterSpacing;
uint16_t lineHeight;
} Clay_TextRenderData;
```
```
typedef struct {
Clay_Color backgroundColor;
Clay_CornerRadius cornerRadius;
} Clay_RectangleRenderData;
```
```
typedef struct {
Clay_Color backgroundColor;
Clay_CornerRadius cornerRadius;
void* imageData;
} Clay_ImageRenderData;
```
```
typedef struct {
Clay_Color backgroundColor;
Clay_CornerRadius cornerRadius;
void* customData;
} Clay_CustomRenderData;
```
```
typedef struct {
Clay_Color color;
Clay_CornerRadius cornerRadius;
Clay_BorderWidth width;
} Clay_BorderRenderData;
```
```
typedef union {
Clay_RectangleRenderData rectangle;
Clay_TextRenderData text;
Clay_ImageRenderData image;
Clay_CustomRenderData custom;
Clay_BorderRenderData border;
} Clay_RenderData;
```
### Clay_ScrollContainerData
```
// Data representing the current internal state of a scrolling element.
typedef struct {
// Note: This is a pointer to the real internal scroll position, mutating it may cause a change in final layout.
// Intended for use with external functionality that modifies scroll position, such as scroll bars or auto scrolling.
Clay_Vector2 *scrollPosition;
// The bounding box of the scroll element.
Clay_Dimensions scrollContainerDimensions;
// The outer dimensions of the inner scroll container content, including the padding of the parent scroll container.
Clay_Dimensions contentDimensions;
// The config that was originally passed to the scroll element.
Clay_ClipElementConfig config;
// Indicates whether an actual scroll container matched the provided ID or if the default struct was returned.
bool found;
} Clay_ScrollContainerData;
```
**字段**
**`.scrollPosition`** - `Clay_Vector2 *`
指向此滚动容器内部滚动位置的指针。对其进行变更将导致滚动容器内的元素向上/向下(`.y`)或向左/向右(`.x`)移动。
**`.scrollContainerDimensions`** - `Clay_Dimensions`
```
typedef struct {
float width, height;
} Clay_Dimensions;
```
表示滚动容器本身的外部宽度和高度的尺寸。
**`.contentDimensions`** - `Clay_Dimensions`
```
typedef struct {
float width, height;
} Clay_Dimensions;
```
表示滚动容器_内部_内容的内部宽度和高度的尺寸。只有当 `contentDimensions` 在至少一个维度上大于 `scrollContainerDimensions` 时,滚动才可能。
**`.config`** - `Clay_ClipElementConfig`
匹配的滚动容器元素的 [Clay_ClipElementConfig](#clay_scroll)。
### Clay_ElementData
```
// Bounding box and other data for a specific UI element.
typedef struct {
// The rectangle that encloses this UI element, with the position relative to the root of the layout.
Clay_BoundingBox boundingBox;
// Indicates whether an actual Element matched the provided ID or if the default struct was returned.
bool found;
} Clay_ElementData;
```
**字段**
**`.boundingBox`** - `Clay_BoundingBox`
```
typedef struct {
float x, y, width, height;
} Clay_BoundingBox;
```
一个表示此渲染命令边界框的矩形,其中 `.x` 和 `.y` 表示元素的左上角。
**`.found`** - `bool`
一个布尔值,表示传递给 [Clay_GetElementData](#clay_getelementdata) 的 ID 是否匹配有效元素。如果 `.found` 为 `false`,`.boundingBox` 将是默认值(归零)。
### Clay_PointerData
```
typedef struct
{
Clay_Vector2 position;
Clay_PointerDataInteractionState state;
} Clay_PointerData;
```
**字段**
**`.position`** - `Clay_Vector2`
一个 Vector2,包含鼠标指针的当前 x,y 坐标,这些坐标最初传递到 [Clay_SetPointerState()](#clay_setpointerstate) 中。
**`.state`** - `Clay_PointerDataInteractionState`
```
typedef enum
{
CLAY_POINTER_DATA_PRESSED_THIS_FRAME,
CLAY_POINTER_DATA_PRESSED,
CLAY_POINTER_DATA_RELEASED_THIS_FRAME,
CLAY_POINTER_DATA_RELEASED,
} Clay_PointerDataInteractionState;
```
一个表示指针交互当前“状态”的枚举值。举个例子,考虑一个用户在台式计算机上,将鼠标指针移动到按钮上,单击并按住鼠标左键一小段时间,然后释放它的情况:
- 当鼠标指针在(“悬停”)按钮上,但尚未按下任何鼠标按钮时:`CLAY_POINTER_DATA_RELEASED`
- 用户按下鼠标左键的第一帧:`CLAY_POINTER_DATA_PRESSED_THIS_FRAME`
- 用户仍在按住鼠标左键的所有后续帧:`CLAY_POINTER_DATA_PRESSED`
- 鼠标左键从按下变为释放的单帧:`CLAY_POINTER_DATA_RELEASED_THIS_FRAME`
- 鼠标指针仍在按钮上的所有后续帧:`CLAY_POINTER_DATA_RELEASED`
### Clay_ErrorHandler
```
typedef struct
{
void (*errorHandlerFunction)(Clay_ErrorData errorText);
uintptr_t userData;
} Clay_ErrorHandler;
```
**字段**
**`.errorHandlerFunction`** - `void (Clay_ErrorData errorText) {}`
指向错误处理函数的函数指针,该函数接受 `Clay_ErrorData` 作为参数。当 Clay 遇到内部错误时将调用此函数。
**`.userData`** - `uintptr_t`
指向额外用户数据的通用指针,从 `Clay_Initialize` 透明传递到 Clay 的错误处理回调。默认为 NULL。
### Clay_ErrorData
```
typedef struct
{
Clay_ErrorType errorType;
Clay_String errorText;
uintptr_t userData;
} Clay_ErrorData;
```
**字段**
**`.errorType`** - `Clay_ErrorType`
```
typedef enum {
CLAY_ERROR_TYPE_TEXT_MEASUREMENT_FUNCTION_NOT_PROVIDED,
CLAY_ERROR_TYPE_ARENA_CAPACITY_EXCEEDED,
CLAY_ERROR_TYPE_ELEMENTS_CAPACITY_EXCEEDED,
CLAY_ERROR_TYPE_TEXT_MEASUREMENT_CAPACITY_EXCEEDED,
CLAY_ERROR_TYPE_DUPLICATE_ID,
CLAY_ERROR_TYPE_FLOATING_CONTAINER_PARENT_NOT_FOUND,
CLAY_ERROR_TYPE_INTERNAL_ERROR,
} Clay_ErrorType;
```
一个表示 Clay 遇到的错误类型的枚举。具体情况由用户处理,但作为一般指导:
- `CLAY_ERROR_TYPE_TEXT_MEASUREMENT_FUNCTION_NOT_PROVIDED` - 用户尝试使用 `CLAY_TEXT` 并且要么忘记调用 [Clay_SetMeasureTextFunction](#clay_setmeasuretextfunction),要么意外传递了空函数指针。
- `CLAY_ERROR_TYPE_ARENA_CAPACITY_EXCEEDED` - Clay 初始化时使用的 Arena 对于配置的 [Clay_SetMaxElementCount](#clay_setmaxelementcount) 来说太小了。尝试使用 [Clay_MinMemorySize()](#clay_minmemorysize) 获取当前配置所需的确切字节数。
- `CLAY_ERROR_TYPE_ELEMENTS_CAPACITY_EXCEEDED` - 声明的 UI 层次结构对于配置的最大元素计数来说有太多元素。使用 [Clay_SetMaxElementCount](#clay_setmaxelementcount) 增加最大值,然后再次调用 [Clay_MinMemorySize()](#clay_minmemorysize) 并使用所需的大小重新初始化 clay 的内存。
- `CLAY_ERROR_TYPE_ELEMENTS_CAPACITY_EXCEEDED` - 声明的 UI 层次结构对于配置的文本测量缓存大小来说有太多文本。使用 [Clay_SetMaxMeasureTextCacheWordCount](#clay_setmeasuretextcachesize) 增加最大值,然后再次调用 [Clay_MinMemorySize()](#clay_minmemorysize) 并使用所需的大小重新初始化 clay 的内存。
- `CLAY_ERROR_TYPE_DUPLICATE_ID` - Clays UI Hierarchy 中的两个元素已使用完全相同的 ID 声明。在错误处理函数中设置断点以获取堆栈跟踪,以准确找到发生这种情况的位置。
- `CLAY_ERROR_TYPE_FLOATING_CONTAINER_PARENT_NOT_FOUND` - 声明了一个带有 `.parentId` 属性的 `CLAY_FLOATING` 元素,但未找到具有该 ID 的元素。在错误处理函数中设置断点以获取堆栈跟踪,以准确找到发生这种情况的位置。
- `CLAY_ERROR_TYPE_INTERNAL_ERROR` - Clay 遇到了内部逻辑或内存错误。请将此作为错误报告并提供堆栈跟踪,以帮助我们修复这些问题!
**`.errorText`** - `Clay_String`
一个 [Clay_String](#clay_string),提供错误的可读描述。将来可能会更改,不应依赖它来检测错误类型。
**`.userData`** - `uintptr_t`
指向额外用户数据的通用指针,从 `Clay_Initialize` 透明传递到 Clay 的错误处理回调。默认为 NULL。
**用法示例**
```
CLAY(CLAY_ID("Button"), { .layout = { .layoutDirection = CLAY_TOP_TO_BOTTOM, .sizing = { .width = CLAY_SIZING_GROW(0) }, .padding = CLAY_PADDING_ALL(16, .childGap = 16) } }) {
// Children will be laid out vertically with 16px of padding around and between
}
```
### Clay_ImageElementConfig
**用法**
`CLAY(CLAY_ID("Element"), { .image = { ...image config } }) {}`
**Clay_ImageElementConfig** 将 clay 元素配置为渲染图像作为其背景。
**Struct API (伪代码)**
```
Clay_ImageElementConfig {
void * imageData;
};
```
**字段**
**`.imageData`** - `void *`
`CLAY(CLAY_ID("Image"), { .image = { .imageData = &myImage } }) {}`
`.imageData` 是一个通用的 void 指针,可用于将图像数据传递给渲染器。
```
// Load an image somewhere in your code
YourImage profilePicture = LoadYourImage("profilePicture.png");
// Note that when rendering, .imageData will be void* type.
CLAY(CLAY_ID("Image"), { .image = { .imageData = &profilePicture } }) {}
```
**示例**
```
// Load an image somewhere in your code
YourImage profilePicture = LoadYourImage("profilePicture.png");
// Declare a reusable image config
Clay_ImageElementConfig imageConfig = (Clay_ImageElementConfig) { .imageData = &profilePicture };
// Declare an image element using a reusable config
CLAY(CLAY_ID("Image"), { .image = imageConfig }) {}
// Declare an image element using an inline config
CLAY(CLAY_ID("ImageInline"), { .image = { .imageData = &profilePicture }, .aspectRatio = 16.0 / 9.0 }) {}
// Rendering example
YourImage *imageToRender = renderCommand->elementConfig.imageElementConfig->imageData;
```
**渲染**
元素受 [culling](#visibility-culling) 约束。否则,将创建一个 `commandType = CLAY_RENDER_COMMAND_TYPE_IMAGE` 的 `Clay_RenderCommand`。用户需要访问 `renderCommand->renderData.image->imageData` 以检索布局创建期间引用的图像数据。如何/是否将 `renderCommand->renderData.image->backgroundColor` 与图像混合也由用户决定。
### Clay_AspectRatioElementConfig
**用法**
`CLAY(CLAY_ID("Aspect"), { .aspectRatio = 16.0 / 9.0 }) {}`
**Clay_AspectRatioElementConfig** 将 clay 元素配置为其最终尺寸中强制执行固定的宽度/高度比。主要用于图像元素,但也可用于非图像元素。
**Struct API (伪代码)**
```
Clay_AspectRatioElementConfig {
float aspectRatio;
};
```
**字段**
**`.aspectRatio`** - `float`
`CLAY(CLAY_ID("Aspect"), { .aspectRatio = { .aspectRatio = 16.0 / 9.0 } }) {}`
或者,由于 C 会自动将值传递给第一个嵌套结构字段:
`CLAY(CLAY_ID("Aspect"), { .aspectRatio = 16.0 / 9.0 }) {}`
**示例**
```
// Load an image somewhere in your code
YourImage profilePicture = LoadYourImage("profilePicture.png");
// Declare an image element that will grow along the X axis while maintaining its original aspect ratio
CLAY(CLAY_ID("ProfilePicture"), {
.layout = { .width = CLAY_SIZING_GROW() },
.aspectRatio = profilePicture.width / profilePicture.height,
.image = { .imageData = &profilePicture },
}) {}
```
### Clay_ImageElementConfig
**用法**
`CLAY(CLAY_ID("Image"), { .image = { ...image config } }) {}`
**Clay_ImageElementConfig** 将 clay 元素配置为渲染图像作为其背景。
**Struct API (伪代码)**
```
Clay_ImageElementConfig {
void * imageData;
};
```
**字段**
**`.imageData`** - `void *`
`CLAY(CLAY_ID("Image"), { .image = { .imageData = &myImage } }) {}`
`.imageData` 是一个通用的 void 指针,可用于将图像数据传递给渲染器。
```
// Load an image somewhere in your code
YourImage profilePicture = LoadYourImage("profilePicture.png");
// Note that when rendering, .imageData will be void* type.
CLAY(CLAY_ID("Image"), { .image = { .imageData = &profilePicture } }) {}
```
注意:为了在使用动态缩放时保持图像的原始纵横比,必须使用 [.aspectRatio](#clay_aspectratioelementconfig) 配置选项。
**示例**
```
// Load an image somewhere in your code
YourImage profilePicture = LoadYourImage("profilePicture.png");
// Declare a reusable image config
Clay_ImageElementConfig imageConfig = (Clay_ImageElementConfig) { .imageData = &profilePicture };
// Declare an image element using a reusable config
CLAY(CLAY_ID("Image"), { .image = imageConfig }) {}
// Declare an image element using an inline config
CLAY(CLAY_ID("ImageInline"), { .image = { .imageData = &profilePicture }, .aspectRatio = 16.0 / 9.0 }) {}
// Rendering example
YourImage *imageToRender = renderCommand->elementConfig.imageElementConfig->imageData;
```
**渲染**
元素受 [culling](#visibility-culling) 约束。否则,将创建一个 `commandType = CLAY_RENDER_COMMAND_TYPE_IMAGE` 的 `Clay_RenderCommand`。用户需要访问 `renderCommand->renderData.image->imageData` 以检索布局创建期间引用的图像数据。如何/是否将 `renderCommand->renderData.image->backgroundColor` 与图像混合也由用户决定。
### Clay_ClipElementConfig
**用法**
`CLAY(CLAY_ID("ScrollBox"), { .clip = { ...clip config } }) {}`
**注意事项**
`Clay_ClipElementConfig` 将元素配置为剪切容器,从而能够屏蔽超出其边界的子元素。
注意:为了处理基于指针位置和鼠标滚轮或触摸交互的滚动,您必须在调用 `BeginLayout` _之前_ 调用 `Clay_SetPointerState()` 和 `Clay_UpdateScrollContainers()`。
**Struct Definition (伪代码)**
```
Clay_ClipElementConfig {
bool horizontal;
bool vertical;
};
```
**字段**
**`.horizontal`** - `bool`
`CLAY(CLAY_ID("HorizontalScroll"), { .clip = { .horizontal = true } })`
为此容器元素启用或禁用水平剪切。
**`.vertical`** - `bool`
`CLAY(LAY_ID("VerticalScroll"), { .clip = { .vertical = true } })`
为此容器元素启用或禁用垂直剪切。
**渲染**
为元素启用 clip 将导致两个额外的渲染命令:
- `commandType = CLAY_RENDER_COMMAND_TYPE_SCISSOR_START`,应使用其 `boundingBox` 创建矩形蒙版,并且**不**受 [culling](#visibility-culling) 约束
- `commandType = CLAY_RENDER_COMMAND_TYPE_SCISSOR_END`,禁用先前的矩形蒙版,并且**不**受 [culling](#visibility-culling) 约束
**示例**
```
CLAY(CLAY_ID("ScrollOuter"), { .clip = { .vertical = true } }) {
// Create child content with a fixed height of 5000
CLAY(CLAY_ID("ScrollInner"), { .layout = { .sizing = { .height = CLAY_SIZING_FIXED(5000) } } }) {}
}
```
### Clay_BorderElementConfig
**用法**
`CLAY(CLAY_ID("Border"), { .border = { ...border config } }) {}`
**注意事项**
`Clay_BorderElementConfig` 向元素的边缘或子元素之间添加边框。它使用 Clay_BorderElementConfig 来配置边框特定选项。
**Struct Definition (伪代码)**
```
typedef struct Clay_BorderElementConfig
{
Clay_Color color {
float r; float g; float b; float a;
};
Clay_BorderWidth width {
uint16_t left;
uint16_t right;
uint16_t top;
uint16_t bottom;
uint16_t betweenChildren;
};
} Clay_BorderElementConfig;
```
**字段**
**`.color`** - `Clay_Color`
`CLAY(CLAY_ID("Border"), { .border = { .color = { 255, 0, 0, 255 } } })`
使用 [Clay_Color](#clay_color)。指定此元素配置的所有边框的共享颜色。通常接受 0 到 255 之间的 `rgba` 浮点值,但解释留给渲染器,不影响布局。
**`.width`** - `Clay_BorderWidth`
`CLAY(CLAY_ID("Border"), { .border = { .width = { .left = 2, .right = 10 } } })`
向渲染器指示应在边界框的指定边缘绘制 `.color` 的边框,**嵌入并与框内容重叠 `.width`**。
这意味着边框配置不影响布局,因为边框的宽度不会影响总容器宽度或布局位置。具有零 padding 的边框容器将绘制在子元素的顶部。
注意:
**`.width.betweenChildren`**
`CLAY(CLAY_ID("Border"), { .border = { .width = { .betweenChildren = 2 } }, .color = COLOR_RED })`
配置要在子元素之间绘制的边框的宽度和颜色。如果父元素使用 `.layoutDirection = CLAY_LEFT_TO_RIGHT`,这些边框将是垂直线,如果父元素使用 `CLAY_TOP_TO_BOTTOM`,则是水平线。与 `.left, .top` 等不同,此选项**将生成表示子元素之间边框的额外矩形渲染命令。** 因此,渲染器不需要专门实现这些边框元素的渲染。
**示例**
```
// 300x300 container with a 1px red border around all the edges
CLAY(CLAY_ID("OuterBorder"), {
.layout = { .sizing = { .width = CLAY_SIZING_FIXED(300), .height = CLAY_SIZING_FIXED(300) } },
.border = { .width = { 1, 1, 1, 1, 0 }, .color = COLOR_RED }
}) {
// ...
}
// Container with a 3px yellow bottom border
CLAY(CLAY_ID("OuterBorder"), {
.border = { .width = { .bottom = 3 }, .color = COLOR_YELLOW }
}) {
// ...
}
// Container with a 5px curved border around the edges, and a 5px blue border between all children laid out top to bottom
CLAY(CLAY_ID("OuterBorder"), {
.layout = { .layoutDirection = CLAY_TOP_TO_BOTTOM },
.border = { .width = { 5, 5, 5, 5, 5 }, .color = COLOR_BLUE }
}) {
// Child
// -- 5px blue border will be here --
// Child
// -- 5px blue border will be here --
// Child
}
```
**渲染**
元素受 [culling](#visibility-culling) 约束。否则,将创建一个表示容器的 `commandType = CLAY_RENDER_COMMAND_TYPE_BORDER` 的 `Clay_RenderCommand`。
边框和圆角的渲染留给用户。请参阅提供的 [Raylib Renderer](https://github.com/nicbarker/clay/tree/main/renderers/raylib) 以获取有关如何使用线条和曲线基元绘制边框的示例。
### Clay_FloatingElementConfig
**用法**
`CLAY(CLAY_ID("Floating"), { .floating = { ...floating config } }) {}`
**注意事项**
**Floating Elements** 定义了一个“浮动”在其他内容之上的元素。典型用例包括工具提示和模态框。
浮动容器:
- 使用默认配置,附加到其“父元素”的左上角
- 不影响其父元素的宽度和高度
- 不影响兄弟元素的定位
- 根据其 z-index,可以出现在其他元素的上方或下方,部分或完全遮挡它们
- 除了定位之外,其功能与标准元素完全一样——包括扩展以适应其子元素等。
思考浮动容器时最简单的心理模型是,它们是一个完全独立的 UI 层次结构,附加到其“父元素”上的特定 x,y 点。
浮动元素使用 `Clay_FloatingElementConfig` 来配置特定选项。
**Struct Definition (伪代码)**
```
Clay_FloatingElementConfig {
Clay_Vector2 offset {
float x, float y
};
Clay_Dimensions expand {
float width, float height
};
uint32_t parentId;
int16_t zIndex;
Clay_FloatingAttachPoints attachPoint {
.element = CLAY_ATTACH_POINT_LEFT_TOP (default) | CLAY_ATTACH_POINT_LEFT_CENTER | CLAY_ATTACH_POINT_LEFT_BOTTOM | CLAY_ATTACH_POINT_CENTER_TOP | CLAY_ATTACH_POINT_CENTER_CENTER | CLAY_ATTACH_POINT_CENTER_BOTTOM | CLAY_ATTACH_POINT_RIGHT_TOP | CLAY_ATTACH_POINT_RIGHT_CENTER | CLAY_ATTACH_POINT_RIGHT_BOTTOM
.parent = CLAY_ATTACH_POINT_LEFT_TOP (default) | CLAY_ATTACH_POINT_LEFT_CENTER | CLAY_ATTACH_POINT_LEFT_BOTTOM | CLAY_ATTACH_POINT_CENTER_TOP | CLAY_ATTACH_POINT_CENTER_CENTER | CLAY_ATTACH_POINT_CENTER_BOTTOM | CLAY_ATTACH_POINT_RIGHT_TOP | CLAY_ATTACH_POINT_RIGHT_CENTER | CLAY_ATTACH_POINT_RIGHT_BOTTOM
};
Clay_FloatingAttachToElement attachTo {
CLAY_POINTER_CAPTURE_MODE_CAPTURE (default),
CLAY_POINTER_CAPTURE_MODE_PASSTHROUGH
};
Clay_FloatingAttachToElement attachTo {
CLAY_ATTACH_TO_NONE (default),
CLAY_ATTACH_TO_PARENT,
CLAY_ATTACH_TO_ELEMENT_WITH_ID,
CLAY_ATTACH_TO_ROOT,
};
};
```
**字段**
**`.offset`** - `Clay_Vector2`
`CLAY(CLAY_ID("Floating"), { .floating = { .offset = { -24, -24 } } })`
用于在计算完所有其他布局_之后_将位置偏移应用于浮动容器。
**`.expand`** - `Clay_Dimensions`
`CLAY(CLAY_ID("Floating"), { .floating = { .expand = { 16, 16 } } })`
用于在布局子元素_之前_扩展浮动容器的宽度和高度。
**`.zIndex`** - `float`
`CLAY(CLAY_ID("Floating"), { .floating = { .zIndex = 1 } })`
所有浮动元素(及其整个子层次结构)将在转换为渲染命令之前按 `.zIndex` 顺序排序。如果按顺序绘制渲染命令,具有较高 `.zIndex` 值的元素将绘制在顶部。
**`.parentId`** - `uint32_t`
`CLAY(CLAY_ID("Floating"), { .floating = { .parentId = Clay_GetElementId("HeaderButton").id } })`
默认情况下,浮动容器将“附加”到声明它们的父元素。但是,在某些情况下,此限制可能会导致严重的性能或人机工程学问题。`.parentId` 允许您指定一个 `CLAY_ID().id` 来附加浮动容器。具有匹配 ID 的父元素可以在层次结构中的任何位置声明,不需要特别在浮动容器之前或之后声明。
考虑以下情况:
```
// Load an image somewhere in your code
CLAY(CLAY_IDI("SidebarButton", 1), { }) {
// .. some button contents
if (tooltip.attachedButtonIndex == 1) {
CLAY(CLAY_ID("OptionTooltip"), { /* floating config... */ })
}
}
CLAY(CLAY_IDI("SidebarButton", 2), { }) {
// .. some button contents
if (tooltip.attachedButtonIndex == 2) {
CLAY(CLAY_ID("OptionTooltip"), { /* floating config... */ })
}
}
CLAY(CLAY_IDI("SidebarButton", 3), { }) {
// .. some button contents
if (tooltip.attachedButtonIndex == 3) {
CLAY(CLAY_ID("OptionTooltip"), { /* floating config... */ })
}
}
CLAY(CLAY_IDI("SidebarButton", 4), { }) {
// .. some button contents
if (tooltip.attachedButtonIndex == 4) {
CLAY(CLAY_ID("OptionTooltip"), { /* floating config... */ })
}
}
CLAY(CLAY_IDI("SidebarButton", 5), { }) {
// .. some button contents
if (tooltip.attachedButtonIndex == 5) {
CLAY(CLAY_ID("OptionTooltip"), { /* floating config... */ })
}
}
```
上述 UI 的定义因需要有条件地将浮动工具提示渲染为许多可能元素的子元素而受到严重污染。使用 `parentId` 的替代方法如下所示:
```
// Load an image somewhere in your code
CLAY(CLAY_IDI("SidebarButton", 1), { }) {
// .. some button contents
}
CLAY(CLAY_IDI("SidebarButton", 2), { }) {
// .. some button contents
}
CLAY(CLAY_IDI("SidebarButton", 3), { }) {
// .. some button contents
}
CLAY(CLAY_IDI("SidebarButton", 4), { }) {
// .. some button contents
}
CLAY(CLAY_IDI("SidebarButton", 5), { }) {
// .. some button contents
}
// Any other point in the hierarchy
CLAY(CLAY_ID("OptionTooltip"), { .floating = { .attachTo = CLAY_ATTACH_TO_ELEMENT_ID, .parentId = CLAY_IDI("SidebarButton", tooltip.attachedButtonIndex).id }) {
// Tooltip contents...
}
```
**`.attachment`** - `Clay_FloatingAttachPoints`
`CLAY(CLAY_ID("Floating"), { .floating = { .attachment = { .element = CLAY_ATTACH_POINT_LEFT_CENTER, .parent = CLAY_ATTACH_POINT_RIGHT_TOP } } }) {}`
在定位浮动容器方面,`.attachment` 指定
- 浮动容器上的点(`.element`)
- 它“附加”到的父元素上的点(`.parent`)

您可以在心理上将其可视化为在浮动容器上找到一个点,然后在父元素上找到一个点,并将它们重叠排列。
例如:
“将浮动容器的 LEFT_CENTER 附加到父元素的 RIGHT_TOP”
`CLAY(CLAY_ID("Floating"), { .floating = { .attachment = { .element = CLAY_ATTACH_POINT_LEFT_CENTER, .parent = CLAY_ATTACH_POINT_RIGHT_TOP } } });`

**`.pointerCaptureMode`** - `Clay_PointerCaptureMode`
`CLAY({ .floating = { .pointerCaptureMode = CLAY_POINTER_CAPTURE_MODE_CAPTURE } })`
控制悬停和点击等指针事件是否应穿透到此浮动元素下方的内容,或者指针是否应被此浮动元素“捕获”。默认为 `CLAY_POINTER_CAPTURE_MODE_CAPTURE`。
**示例**
```
// Horizontal container with three option buttons
CLAY(CLAY_ID("OptionsList"), { .layout = { childGap = 16 } }) {
CLAY(CLAY_IDI("Option", 1), { .layout = { padding = CLAY_PADDING_ALL(16)), .backgroundColor = COLOR_BLUE } }) {
CLAY_TEXT(CLAY_STRING("Option 1"), CLAY_TEXT_CONFIG());
}
CLAY(CLAY_IDI("Option", 2), { .layout = { padding = CLAY_PADDING_ALL(16)), .backgroundColor = COLOR_BLUE } }) {
CLAY_TEXT(CLAY_STRING("Option 2"), CLAY_TEXT_CONFIG());
// Floating tooltip will attach above the "Option 2" container and not affect widths or positions of other elements
CLAY(CLAY_ID("OptionTooltip"), { .floating = { .zIndex = 1, .attachment = { .element = CLAY_ATTACH_POINT_CENTER_BOTTOM, .parent = CLAY_ATTACH_POINT_CENTER_TOP } } }) {
CLAY_TEXT(CLAY_STRING("Most popular!"), CLAY_TEXT_CONFIG());
}
}
CLAY(CLAY_IDI("Option", 3), { .layout = { padding = CLAY_PADDING_ALL(16)), .backgroundColor = COLOR_BLUE } }) {
CLAY_TEXT(CLAY_STRING("Option 3"), CLAY_TEXT_CONFIG());
}
}
// Floating containers can also be declared elsewhere in a layout, to avoid branching or polluting other UI
for (int i = 0; i < 1000; i++) {
CLAY(CLAY_IDI("Option", i + 1), { }) {
// ...
}
}
// Note the use of "parentId".
// Floating tooltip will attach above the "Option 2" container and not affect widths or positions of other elements
CLAY(CLAY_ID("OptionTooltip"), { .floating = { .parentId = CLAY_IDI("Option", 2).id, .zIndex = 1, .attachment = { .element = CLAY_ATTACH_POINT_CENTER_BOTTOM, .parent = CLAY_ATTACH_POINT_TOP_CENTER } } }) {
CLAY_TEXT(CLAY_STRING("Most popular!"), CLAY_TEXT_CONFIG());
}
```
使用 `.parentId` 时,浮动容器可以在 `BeginLayout` 之后和 `EndLayout` 之前的任何位置声明。使用 `Clay_FloatingElementConfig` 时,与 `.parentId` 匹配的目标元素不需要存在。
**渲染**
`Clay_FloatingElementConfig` 不会生成任何特定的渲染命令。
### Clay_CustomElementConfig
**用法**
`CLAY(CLAY_ID("Custom"), { .custom = { .customData = &something } }) {}`
**注意事项**
**Clay_CustomElementConfig** 允许用户将自定义数据传递给渲染器。
**Struct Definition (伪代码)**
```
typedef struct
{
void * customData;
} Clay_CustomElementConfig;
```
**字段**
`.customData` - ` *`
`CLAY({ .custom = { .customData = &myCustomData } })`
`.customData` 是一个通用的 void 指针,可用于将自定义数据传递给渲染器。
**示例**
```
#include "clay.h"
typedef enum {
CUSTOM_ELEMENT_TYPE_MODEL,
CUSTOM_ELEMENT_TYPE_VIDEO
} CustomElementType;
// A rough example of how you could handle laying out 3d models in your UI
typedef struct {
CustomElementType type;
union {
Model model;
Video video;
// ...
};
} CustomElementData;
Model myModel = Load3DModel(filePath);
CustomElement modelElement = (CustomElement) { .type = CUSTOM_ELEMENT_TYPE_MODEL, .model = myModel }
typedef struct {
void* memory;
uintptr_t offset;
} Arena;
// During init
Arena frameArena = (Arena) { .memory = malloc(1024) };
// ...
CLAY(0) {
// Custom elements only take a single pointer, so we need to store the data somewhere
CustomElementData *modelData = (CustomElementData *)(frameArena.memory + frameArena.offset);
*modelData = (CustomElementData) { .type = CUSTOM_ELEMENT_TYPE_MODEL, .model = myModel };
frameArena.offset += sizeof(CustomElementData);
CLAY(CLAY_ID("3DModelViewer"), { .custom = { .customData = modelData } }) {}
}
// Later during your rendering
switch (renderCommand->commandType) {
// ...
case CLAY_RENDER_COMMAND_TYPE_CUSTOM: {
// Your extended struct is passed through
CustomElementData *customElement = renderCommand->config.customElementConfig->customData;
if (!customElement) continue;
switch (customElement->type) {
case CUSTOM_ELEMENT_TYPE_MODEL: {
// Render your 3d model here
break;
}
case CUSTOM_ELEMENT_TYPE_VIDEO: {
// Render your video here
break;
}
// ...
}
break;
}
}
```
**渲染**
元素受 [culling](#visibility-culling) 约束。否则,将创建一个 `commandType = CLAY_RENDER_COMMAND_TYPE_CUSTOM` 的 `Clay_RenderCommand`。
### Clay_Color
```
typedef struct {
float r, g, b, a;
} Clay_Color;
```
`Clay_Color` 是 Clay 声明和渲染中使用的 RGBA 颜色结构体。按照惯例,通道表示为 0-255,但这留给渲染器决定。
注意:使用调试工具时,其内部颜色表示为 0-255。
### Clay_String
```
typedef struct {
bool isStaticallyAllocated;
int32_t length;
const char *chars;
} Clay_String;
```
`Clay_String` 是 clay 在内部用来表示所有字符串的字符串容器。
**字段**
**`.isStaticallyAllocated`** - `bool`
字符串是否是静态分配的,或者换句话说,它是否存在于程序的整个生命周期中。
**`.length`** - `int32_t`
字符串中的字符数,_不包括可选的 null 终止符。_
**`.chars`** - `const char *`
指向字符串内容的指针。此数据不保证以 null 结尾,因此如果您将其传递给期望标准 null 结尾 C 字符串的代码,则需要复制数据并附加 null 终止符。
### Clay_ElementId
```
typedef struct {
uint32_t id;
uint32_t offset;
uint32_t baseId;
Clay_String stringId;
} Clay_ElementId;
```
由 [CLAY_ID](#clay_id) 和 [CLAY_IDI](#clay_idi) 返回,此结构体包含哈希 ID 以及用于生成它的源字符串。
**字段**
**`.id`** - `uint32_t`
从传递给 [CLAY_ID](#clay_id) 或 [CLAY_IDI](#clay_idi) 的字符串派生的唯一 ID。
**`.offset`** - `uint32_t`
如果此 ID 是使用 [CLAY_IDI](#clay_idi) 生成的,`.offset` 是作为第二个参数传递的值。对于 [CLAY_ID](#clay_id),此值始终为 `0`。
**`.baseId`** - `uint32_t`
如果此 ID 是使用 [CLAY_IDI](#clay_idi) 生成的,`.baseId` 是传递的基本字符串的哈希,**在与 `.offset` 进行额外哈希之前**。对于 [CLAY_ID](#clay_id),此值始终与 `.id` 相同。
**`.stringId`** - `Clay_String`
存储调用 [CLAY_ID](#clay_id) 或 [CLAY_IDI](#clay_idi) 时传入的原始字符串。
### Clay_RenderCommandArray
```
typedef struct
{
uint32_t capacity;
uint32_t length;
Clay_RenderCommand *internalArray;
} Clay_RenderCommandArray;
```
由 [Clay_EndLayout](#clay_endlayout) 返回,此数组包含表示计算布局的 [Clay_RenderCommand](#clay_rendercommand)s。
**字段**
**`.capacity`** - `uint32_t`
表示 `.internalArray` 中已分配内存的总容量。
**`.length`** - `uint32_t`
表示存储在地址 `.internalArray` 的 `Clay_RenderCommand` 元素的总数。
**`.internalArray`** - `Clay_RenderCommand`
一个表示计算布局的 [Clay_RenderCommand](#clay_rendercommand)s 数组。如果至少有一个渲染命令,此数组将包含从 `.internalArray[0]` 到 `.internalArray[.length - 1]` 的元素。
### Clay_RenderCommand
```
typedef struct {
Clay_BoundingBox boundingBox;
Clay_RenderData renderData;
uintptr_t userData;
uint32_t id;
int16_t zIndex;
Clay_RenderCommandType commandType;
} Clay_RenderCommand;
```
**字段**
**`.commandType`** - `Clay_RenderCommandType`
一个枚举,指示应如何处理此渲染命令。可能的值包括:
- `CLAY_RENDER_COMMAND_TYPE_NONE` - 应被渲染器忽略,并且在正常情况下 clay 永远不会发出。
- `CLAY_RENDER_COMMAND_TYPE_RECTANGLE` - 应绘制一个矩形,使用 `.config.rectangleElementConfig` 配置
- `CLAY_RENDER_COMMAND_TYPE_BORDER` - 应绘制一个边框,使用 `.config.borderElementConfig` 配置
- `CLAY_RENDER_COMMAND_TYPE_TEXT` - 应绘制文本,使用 `.config.textElementConfig` 配置
- `CLAY_RENDER_COMMAND_TYPE_IMAGE` - 应绘制一个图像,使用 `.config.imageElementConfig` 配置
- `CLAY_RENDER_COMMAND_TYPE_SCISSOR_START` - 以 [glScissor](https://registry.khronos.org/OpenGL-Refpages/gl4/html/glScissor.xhtml) 命名,这表示渲染器应开始剔除绘制在此渲染命令 `.boundingBox` 之外的任何后续像素。
- `CLAY_RENDER_COMMAND_TYPE_SCISSOR_END` - 仅在匹配的 `CLAY_RENDER_COMMAND_TYPE_SCISSOR_START` 命令之后出现,并表示剪切已结束。
- `CLAY_RENDER_COMMAND_TYPE_CUSTOM` - 由用户控制的自定义渲染命令,使用 `.config.customElementConfig` 配置
**`.boundingBox`** - `Clay_BoundingBox`
```
typedef struct {
float x, y, width, height;
} Clay_BoundingBox;
```
一个表示此渲染命令边界框的矩形,其中 `.x` 和 `.y` 表示元素的左上角。
**`.id`** - `uint32_t`
最初用于创建此渲染命令的元素宏的 ID。有关详细信息,请参阅 [CLAY_ID](#clay_id)。
**`.zIndex`** - `int16_t`
元素的 z index,基于传递给此元素所属的根浮动配置。
较高的 z indexes 应渲染在较低的 z indexes _之上_。
**`.renderData`** - `Clay_RenderData`
```
typedef union {
Clay_RectangleRenderData rectangle;
Clay_TextRenderData text;
Clay_ImageRenderData image;
Clay_CustomRenderData custom;
Clay_BorderRenderData border;
} Clay_RenderData;
```
一个包含各种结构体的 C 联合体,类型取决于 `.commandType`。可能的值包括:
- `config.rectangle` - 当 `.commandType == CLAY_RENDER_COMMAND_TYPE_RECTANGLE` 时使用。
- `config.text` - 当 `.commandType == CLAY_RENDER_COMMAND_TYPE_TEXT` 时使用。有关详细信息,请参阅 [Clay_Text](#clay_text)。
- `config.image` - 当 `.commandType == CLAY_RENDER_COMMAND_TYPE_IMAGE` 时使用。有关详细信息,请参阅 [Clay_Image](#clay_imageelementconfig)。
- `config.border` - 当 `.commandType == CLAY_RENDER_COMMAND_TYPE_BORDER` 时使用。有关详细信息,请参阅 [Clay_Border](#clay_borderelementconfig)。
- `config.custom` - 当 `.commandType == CLAY_RENDER_COMMAND_TYPE_CUSTOM` 时使用。有关详细信息,请参阅 [Clay_Custom](#clay_customelementconfig)。
**Union Structs**
```
typedef struct {
Clay_StringSlice stringContents;
Clay_Color textColor;
uint16_t fontId;
uint16_t fontSize;
uint16_t letterSpacing;
uint16_t lineHeight;
} Clay_TextRenderData;
```
```
typedef struct {
Clay_Color backgroundColor;
Clay_CornerRadius cornerRadius;
} Clay_RectangleRenderData;
```
```
typedef struct {
Clay_Color backgroundColor;
Clay_CornerRadius cornerRadius;
void* imageData;
} Clay_ImageRenderData;
```
```
typedef struct {
Clay_Color backgroundColor;
Clay_CornerRadius cornerRadius;
void* customData;
} Clay_CustomRenderData;
```
```
typedef struct {
Clay_Color color;
Clay_CornerRadius cornerRadius;
Clay_BorderWidth width;
} Clay_BorderRenderData;
```
```
typedef union {
Clay_RectangleRenderData rectangle;
Clay_TextRenderData text;
Clay_ImageRenderData image;
Clay_CustomRenderData custom;
Clay_BorderRenderData border;
} Clay_RenderData;
```
### Clay_ScrollContainerData
```
// Data representing the current internal state of a scrolling element.
typedef struct {
// Note: This is a pointer to the real internal scroll position, mutating it may cause a change in final layout.
// Intended for use with external functionality that modifies scroll position, such as scroll bars or auto scrolling.
Clay_Vector2 *scrollPosition;
// The bounding box of the scroll element.
Clay_Dimensions scrollContainerDimensions;
// The outer dimensions of the inner scroll container content, including the padding of the parent scroll container.
Clay_Dimensions contentDimensions;
// The config that was originally passed to the scroll element.
Clay_ClipElementConfig config;
// Indicates whether an actual scroll container matched the provided ID or if the default struct was returned.
bool found;
} Clay_ScrollContainerData;
```
**字段**
**`.scrollPosition`** - `Clay_Vector2 *`
指向此滚动容器内部滚动位置的指针。对其进行变更将导致滚动容器内的元素向上/向下(`.y`)或向左/向右(`.x`)移动。
**`.scrollContainerDimensions`** - `Clay_Dimensions`
```
typedef struct {
float width, height;
} Clay_Dimensions;
```
表示滚动容器本身的外部宽度和高度的尺寸。
**`.contentDimensions`** - `Clay_Dimensions`
```
typedef struct {
float width, height;
} Clay_Dimensions;
```
表示滚动容器_内部_内容的内部宽度和高度的尺寸。只有当 `contentDimensions` 在至少一个维度上大于 `scrollContainerDimensions` 时,滚动才可能。
**`.config`** - `Clay_ClipElementConfig`
匹配的滚动容器元素的 [Clay_ClipElementConfig](#clay_scroll)。
### Clay_ElementData
```
// Bounding box and other data for a specific UI element.
typedef struct {
// The rectangle that encloses this UI element, with the position relative to the root of the layout.
Clay_BoundingBox boundingBox;
// Indicates whether an actual Element matched the provided ID or if the default struct was returned.
bool found;
} Clay_ElementData;
```
**字段**
**`.boundingBox`** - `Clay_BoundingBox`
```
typedef struct {
float x, y, width, height;
} Clay_BoundingBox;
```
一个表示此渲染命令边界框的矩形,其中 `.x` 和 `.y` 表示元素的左上角。
**`.found`** - `bool`
一个布尔值,表示传递给 [Clay_GetElementData](#clay_getelementdata) 的 ID 是否匹配有效元素。如果 `.found` 为 `false`,`.boundingBox` 将是默认值(归零)。
### Clay_PointerData
```
typedef struct
{
Clay_Vector2 position;
Clay_PointerDataInteractionState state;
} Clay_PointerData;
```
**字段**
**`.position`** - `Clay_Vector2`
一个 Vector2,包含鼠标指针的当前 x,y 坐标,这些坐标最初传递到 [Clay_SetPointerState()](#clay_setpointerstate) 中。
**`.state`** - `Clay_PointerDataInteractionState`
```
typedef enum
{
CLAY_POINTER_DATA_PRESSED_THIS_FRAME,
CLAY_POINTER_DATA_PRESSED,
CLAY_POINTER_DATA_RELEASED_THIS_FRAME,
CLAY_POINTER_DATA_RELEASED,
} Clay_PointerDataInteractionState;
```
一个表示指针交互当前“状态”的枚举值。举个例子,考虑一个用户在台式计算机上,将鼠标指针移动到按钮上,单击并按住鼠标左键一小段时间,然后释放它的情况:
- 当鼠标指针在(“悬停”)按钮上,但尚未按下任何鼠标按钮时:`CLAY_POINTER_DATA_RELEASED`
- 用户按下鼠标左键的第一帧:`CLAY_POINTER_DATA_PRESSED_THIS_FRAME`
- 用户仍在按住鼠标左键的所有后续帧:`CLAY_POINTER_DATA_PRESSED`
- 鼠标左键从按下变为释放的单帧:`CLAY_POINTER_DATA_RELEASED_THIS_FRAME`
- 鼠标指针仍在按钮上的所有后续帧:`CLAY_POINTER_DATA_RELEASED`
### Clay_ErrorHandler
```
typedef struct
{
void (*errorHandlerFunction)(Clay_ErrorData errorText);
uintptr_t userData;
} Clay_ErrorHandler;
```
**字段**
**`.errorHandlerFunction`** - `void (Clay_ErrorData errorText) {}`
指向错误处理函数的函数指针,该函数接受 `Clay_ErrorData` 作为参数。当 Clay 遇到内部错误时将调用此函数。
**`.userData`** - `uintptr_t`
指向额外用户数据的通用指针,从 `Clay_Initialize` 透明传递到 Clay 的错误处理回调。默认为 NULL。
### Clay_ErrorData
```
typedef struct
{
Clay_ErrorType errorType;
Clay_String errorText;
uintptr_t userData;
} Clay_ErrorData;
```
**字段**
**`.errorType`** - `Clay_ErrorType`
```
typedef enum {
CLAY_ERROR_TYPE_TEXT_MEASUREMENT_FUNCTION_NOT_PROVIDED,
CLAY_ERROR_TYPE_ARENA_CAPACITY_EXCEEDED,
CLAY_ERROR_TYPE_ELEMENTS_CAPACITY_EXCEEDED,
CLAY_ERROR_TYPE_TEXT_MEASUREMENT_CAPACITY_EXCEEDED,
CLAY_ERROR_TYPE_DUPLICATE_ID,
CLAY_ERROR_TYPE_FLOATING_CONTAINER_PARENT_NOT_FOUND,
CLAY_ERROR_TYPE_INTERNAL_ERROR,
} Clay_ErrorType;
```
一个表示 Clay 遇到的错误类型的枚举。具体情况由用户处理,但作为一般指导:
- `CLAY_ERROR_TYPE_TEXT_MEASUREMENT_FUNCTION_NOT_PROVIDED` - 用户尝试使用 `CLAY_TEXT` 并且要么忘记调用 [Clay_SetMeasureTextFunction](#clay_setmeasuretextfunction),要么意外传递了空函数指针。
- `CLAY_ERROR_TYPE_ARENA_CAPACITY_EXCEEDED` - Clay 初始化时使用的 Arena 对于配置的 [Clay_SetMaxElementCount](#clay_setmaxelementcount) 来说太小了。尝试使用 [Clay_MinMemorySize()](#clay_minmemorysize) 获取当前配置所需的确切字节数。
- `CLAY_ERROR_TYPE_ELEMENTS_CAPACITY_EXCEEDED` - 声明的 UI 层次结构对于配置的最大元素计数来说有太多元素。使用 [Clay_SetMaxElementCount](#clay_setmaxelementcount) 增加最大值,然后再次调用 [Clay_MinMemorySize()](#clay_minmemorysize) 并使用所需的大小重新初始化 clay 的内存。
- `CLAY_ERROR_TYPE_ELEMENTS_CAPACITY_EXCEEDED` - 声明的 UI 层次结构对于配置的文本测量缓存大小来说有太多文本。使用 [Clay_SetMaxMeasureTextCacheWordCount](#clay_setmeasuretextcachesize) 增加最大值,然后再次调用 [Clay_MinMemorySize()](#clay_minmemorysize) 并使用所需的大小重新初始化 clay 的内存。
- `CLAY_ERROR_TYPE_DUPLICATE_ID` - Clays UI Hierarchy 中的两个元素已使用完全相同的 ID 声明。在错误处理函数中设置断点以获取堆栈跟踪,以准确找到发生这种情况的位置。
- `CLAY_ERROR_TYPE_FLOATING_CONTAINER_PARENT_NOT_FOUND` - 声明了一个带有 `.parentId` 属性的 `CLAY_FLOATING` 元素,但未找到具有该 ID 的元素。在错误处理函数中设置断点以获取堆栈跟踪,以准确找到发生这种情况的位置。
- `CLAY_ERROR_TYPE_INTERNAL_ERROR` - Clay 遇到了内部逻辑或内存错误。请将此作为错误报告并提供堆栈跟踪,以帮助我们修复这些问题!
**`.errorText`** - `Clay_String`
一个 [Clay_String](#clay_string),提供错误的可读描述。将来可能会更改,不应依赖它来检测错误类型。
**`.userData`** - `uintptr_t`
指向额外用户数据的通用指针,从 `Clay_Initialize` 透明传递到 Clay 的错误处理回调。默认为 NULL。
_一个使用 clay 构建的 GUI 应用程序示例_
## 快速开始
下载或克隆 clay.h,并在一个文件中定义 `CLAY_IMPLEMENTATION` 后包含它。
```
// Must be defined in one file, _before_ #include "clay.h"
#define CLAY_IMPLEMENTATION
#include "../../clay.h"
const Clay_Color COLOR_LIGHT = (Clay_Color) {224, 215, 210, 255};
const Clay_Color COLOR_RED = (Clay_Color) {168, 66, 28, 255};
const Clay_Color COLOR_ORANGE = (Clay_Color) {225, 138, 50, 255};
void HandleClayErrors(Clay_ErrorData errorData) {
// See the Clay_ErrorData struct for more information
printf("%s", errorData.errorText.chars);
switch(errorData.errorType) {
// etc
}
}
// Example measure text function
static inline Clay_Dimensions MeasureText(Clay_StringSlice text, Clay_TextElementConfig *config, uintptr_t userData) {
// Clay_TextElementConfig contains members such as fontId, fontSize, letterSpacing etc
// Note: Clay_String->chars is not guaranteed to be null terminated
return (Clay_Dimensions) {
.width = text.length * config->fontSize, // <- this will only work for monospace fonts, see the renderers/ directory for more advanced text measurement
.height = config->fontSize
};
}
// Layout config is just a struct that can be declared statically, or inline
Clay_ElementDeclaration sidebarItemConfig = (Clay_ElementDeclaration) {
.layout = {
.sizing = { .width = CLAY_SIZING_GROW(0), .height = CLAY_SIZING_FIXED(50) }
},
.backgroundColor = COLOR_ORANGE
};
// Re-useable components are just normal functions
void SidebarItemComponent() {
CLAY(id, sidebarItemConfig) {
// children go here...
}
}
int main() {
// Note: malloc is only used here as an example, any allocator that provides
// a pointer to addressable memory of at least totalMemorySize will work
uint64_t totalMemorySize = Clay_MinMemorySize();
Clay_Arena arena = Clay_CreateArenaWithCapacityAndMemory(totalMemorySize, malloc(totalMemorySize));
// Note: screenWidth and screenHeight will need to come from your environment, Clay doesn't handle window related tasks
Clay_Initialize(arena, (Clay_Dimensions) { screenWidth, screenHeight }, (Clay_ErrorHandler) { HandleClayErrors });
while(renderLoop()) { // Will be different for each renderer / environment
// Optional: Update internal layout dimensions to support resizing
Clay_SetLayoutDimensions((Clay_Dimensions) { screenWidth, screenHeight });
// Optional: Update internal pointer position for handling mouseover / click / touch events - needed for scrolling & debug tools
Clay_SetPointerState((Clay_Vector2) { mousePositionX, mousePositionY }, isMouseDown);
// Optional: Update internal pointer position for handling mouseover / click / touch events - needed for scrolling and debug tools
Clay_UpdateScrollContainers(true, (Clay_Vector2) { mouseWheelX, mouseWheelY }, deltaTime);
// All clay layouts are declared between Clay_BeginLayout and Clay_EndLayout
Clay_BeginLayout();
// An example of laying out a UI with a fixed width sidebar and flexible width main content
CLAY(CLAY_ID("OuterContainer"), { .layout = { .sizing = {CLAY_SIZING_GROW(0), CLAY_SIZING_GROW(0)}, .padding = CLAY_PADDING_ALL(16), .childGap = 16 }, .backgroundColor = {250,250,255,255} }) {
CLAY(CLAY_ID("SideBar"), {
.layout = { .layoutDirection = CLAY_TOP_TO_BOTTOM, .sizing = { .width = CLAY_SIZING_FIXED(300), .height = CLAY_SIZING_GROW(0) }, .padding = CLAY_PADDING_ALL(16), .childGap = 16 },
.backgroundColor = COLOR_LIGHT
}) {
CLAY(CLAY_ID("ProfilePictureOuter"), { .layout = { .sizing = { .width = CLAY_SIZING_GROW(0) }, .padding = CLAY_PADDING_ALL(16), .childGap = 16, .childAlignment = { .y = CLAY_ALIGN_Y_CENTER } }, .backgroundColor = COLOR_RED }) {
CLAY(CLAY_ID("ProfilePicture"), {.layout = { .sizing = { .width = CLAY_SIZING_FIXED(60), .height = CLAY_SIZING_FIXED(60) }}, .image = { .imageData = &profilePicture } }) {}
CLAY_TEXT(CLAY_STRING("Clay - UI Library"), CLAY_TEXT_CONFIG({ .fontSize = 24, .textColor = {255, 255, 255, 255} }));
}
// Standard C code like loops etc work inside components
for (int i = 0; i < 5; i++) {
SidebarItemComponent();
}
CLAY(CLAY_ID("MainContent"), { .layout = { .sizing = { .width = CLAY_SIZING_GROW(0), .height = CLAY_SIZING_GROW(0) } }, .backgroundColor = COLOR_LIGHT }) {}
}
}
// All clay layouts are declared between Clay_BeginLayout and Clay_EndLayout
Clay_RenderCommandArray renderCommands = Clay_EndLayout();
// More comprehensive rendering examples can be found in the renderers/ directory
for (int i = 0; i < renderCommands.length; i++) {
Clay_RenderCommand *renderCommand = &renderCommands.internalArray[i];
switch (renderCommand->commandType) {
case CLAY_RENDER_COMMAND_TYPE_RECTANGLE: {
DrawRectangle( renderCommand->boundingBox, renderCommand->renderData.rectangle.backgroundColor);
}
// ... Implement handling of other command types
}
}
}
}
```
上面的示例如果正确渲染,将如下所示:

总之,一般的步骤顺序是:
1. [Clay_SetLayoutDimensions(dimensions)](#clay_setlayoutdimensions)
2. [Clay_SetPointerState(pointerPosition, isPointerDown)](#clay_setpointerstate)
3. [Clay_UpdateScrollContainers(enableDragScrolling, scrollDelta, deltaTime)](#clay_updatescrollcontainers)
4. [Clay_BeginLayout()](#clay_beginlayout)
5. 使用提供的 [Element Macros](#element-macros) 声明您的布局
6. [Clay_EndLayout()](#clay_endlayout)
7. 使用输出的 [Clay_RenderCommandArray](#clay_rendercommandarray) 渲染结果
如需入门帮助或讨论 clay,请考虑加入 [Discord 服务器](https://discord.gg/b4FTWkxdvT)。
## 概要
- [高级文档](#high-level-documentation)
- [构建 UI 层次结构](#building-ui-hierarchies)
- [配置布局和样式 UI 元素](#configuring-layout-and-styling-ui-elements)
- [Element IDs](#element-ids)
- [Mouse, Touch and Pointer Interactions](#mouse-touch-and-pointer-interactions)
- [Scrolling Elements](#scrolling-elements)
- [Floating Elements](#floating-elements-absolute-positioning)
- [Custom Elements](#laying-out-your-own-custom-elements)
- [Retained Mode Rendering](#retained-mode-rendering)
- [Visibility Culling](#visibility-culling)
- [Preprocessor Directives](#preprocessor-directives)
- [Bindings](#bindings-for-non-c)
- [Debug Tools](#debug-tools)
- [API](#api)
- [Naming Conventions](#naming-conventions)
- [Public Functions](#public-functions)
- [Lifecycle](#lifecycle-for-public-functions)
- [Clay_MinMemorySize](#clay_minmemorysize)
- [Clay_CreateArenaWithCapacityAndMemory](#clay_createarenawithcapacityandmemory)
- [Clay_SetMeasureTextFunction](#clay_setmeasuretextfunction)
- [Clay_ResetMeasureTextCache](#clay_resetmeasuretextcache)
- [Clay_SetMaxElementCount](#clay_setmaxelementcount)
- [Clay_SetMaxMeasureTextCacheWordCount](#clay_setmaxmeasuretextcachewordcount)
- [Clay_Initialize](#clay_initialize)
- [Clay_GetCurrentContext](#clay_getcurrentcontext)
- [Clay_SetCurrentContext](#clay_setcurrentcontext)
- [Clay_SetLayoutDimensions](#clay_setlayoutdimensions)
- [Clay_SetPointerState](#clay_setpointerstate)
- [Clay_UpdateScrollContainers](#clay_updatescrollcontainers)
- [Clay_BeginLayout](#clay_beginlayout)
- [Clay_EndLayout](#clay_endlayout)
- [Clay_Hovered](#clay_hovered)
- [Clay_OnHover](#clay_onhover)
- [Clay_PointerOver](#clay_pointerover)
- [Clay_GetScrollContainerData](#clay_getscrollcontainerdata)
- [Clay_GetElementData](#clay_getelementdata)
- [Clay_GetElementId](#clay_getelementid)
- [Element Macros](#element-macros)
- [CLAY](#clay)
- [CLAY_ID](#clay_id)
- [CLAY_IDI](#clay_idi)
- [Data Structures & Defs](#data-structures--definitions)
- [Clay_String](#clay_string)
- [Clay_ElementId](#clay_elementid)
- [Clay_RenderCommandArray](#clay_rendercommandarray)
- [Clay_RenderCommand](#clay_rendercommand)
- [Clay_ScrollContainerData](#clay_scrollcontainerdata)
- [Clay_ErrorHandler](#clay_errorhandler)
- [Clay_ErrorData](#clay_errordata)
## 高级文档
### 构建 UI 层次结构
Clay UI 使用 C 宏 `CLAY(id, { configuration })` 构建。该宏在 UI 层次结构中创建一个新的空元素,并支持模块化自定义布局、样式和功能。`CLAY()` 宏也可以_嵌套_,类似于 HTML 等其他声明式 UI 系统。
子元素通过在调用 `CLAY()` 宏后打开一个块:`{}`(就像您使用 `if` 语句或 `for` 循环一样),并在大括号内声明子组件来添加。
```
// Parent element with 8px of padding
CLAY(CLAY_ID("parent"), { .layout = { .padding = CLAY_PADDING_ALL(8) } }) {
// Child element 1
CLAY_TEXT(CLAY_STRING("Hello World"), CLAY_TEXT_CONFIG({ .fontSize = 16 }));
// Child element 2 with red background
CLAY((CLAY_ID("child"), { .backgroundColor = COLOR_RED }) {
// etc
}
}
```
然而,与 HTML 和其他声明式 DSL 不同,这个宏只是 C 代码。因此,您可以在布局声明代码中使用任意 C 代码,例如循环、函数和条件:
```
// Re-usable "components" are just functions that declare more UI
void ButtonComponent(Clay_String buttonText) {
// Red box button with 8px of padding
CLAY_AUTO_ID({ .layout = { .padding = CLAY_PADDING_ALL(8) }, .backgroundColor = COLOR_RED }) {
CLAY_TEXT(buttonText, textConfig);
}
}
// Parent element
CLAY(CLAY_ID("parent"), { .layout = { .layoutDirection = CLAY_TOP_TO_BOTTOM } }) {
// Render a bunch of text elements
for (int i = 0; i < textArray.length; i++) {
CLAY_TEXT(textArray.elements[i], textConfig);
}
// Only render this element if we're on a mobile screen
if (isMobileScreen) {
CLAY(0) {
// etc
}
}
// Re-usable components
ButtonComponent(CLAY_STRING("Click me!"));
ButtonComponent(CLAY_STRING("No, click me!"));
});
```
### 配置布局和样式 UI 元素
clay 元素的布局和样式通过传递给 `CLAY()` 宏的 [Clay_ElementDeclaration](#clay_elementdeclaration) 结构体进行配置。
```
CLAY(CLAY_ID("box"), { .layout = { .padding = { 8, 8, 8, 8 }, .layoutDirection = CLAY_TOP_TO_BOTTOM } }) {
// Children are 8px inset into parent, and laid out top to bottom
}
```
这个宏并不神奇——它所做的只是包装标准的指定初始化语法。例如 `(Clay_ElementDeclaration) { .layout = { .padding = { .left = 8, .right = 8 } ...`。
有关完整的选项列表,请参阅 [Clay_ElementDeclaration](#clay_elementdeclaration) API。
`Clay_ElementDeclaration` 结构体可以在文件作用域或其他地方定义并重用。
```
// Define a style in the global / file scope
Clay_ElementDeclaration reuseableStyle = (Clay_ElementDeclaration) {
.layout = { .padding = { .left = 12 } },
.backgroundColor = { 120, 120, 120, 255 },
.cornerRadius = { 12, 12, 12, 12 }
};
CLAY(CLAY_ID("box"), reuseableStyle) {
// ...
}
```
### Element ID
Clay 宏默认接受一个 ID 作为其第一个参数,该参数通常由便捷宏 [CLAY_ID()](#clay_id) 提供。也可以使用 [CLAY_AUTO_ID()](#clay-auto-id) 宏创建具有自动生成 ID 的元素。
```
// Will always produce the same ID from the same input string
CLAY(CLAY_ID("OuterContainer"), { ...configuration }) {}
// Generates a unique ID that may not be the same between two layout calls
CLAY_AUTO_ID({ ...configuration }) {}
```
Element IDs 有两个主要用例。首先,使用 ID 标记元素允许您稍后查询有关该元素的信息,例如其 [mouseover state](#clay_pointerover) 或尺寸。
其次,ID 在尝试阅读和修改 UI 代码时具有视觉上的实用性,以及在使用内置的 [debug tools](#debug-tools) 时也是如此。
为了避免在运行时构建动态字符串以区分循环中的 ID,clay 提供了 [CLAY_IDI(string, index)](#clay_idi) 宏,用于从单个输入字符串生成不同的 ID。将 IDI 视为 "**ID** + **I**ndex"。
```
// This is the equivalent of calling CLAY_ID("Item0"), CLAY_ID("Item1") etc
for (int index = 0; index < items.length; index++) {
CLAY(CLAY_IDI("Item", index), { ..configuration }) {}
}
```
此 ID 将被转发到最终的 `Clay_RenderCommandArray`,供 retained mode UIs 使用。使用重复的 ID 可能会导致某些功能行为异常(即,如果您尝试将浮动容器附加到具有重复 ID 的特定元素,它可能不会附加到您期望的那个元素上)。
### 鼠标、触摸和指针交互
Clay 提供了几个用于处理鼠标和指针交互的函数。
所有指针交互都依赖于函数 `void Clay_SetPointerState(Clay_Vector2 position, bool isPointerDown)`,该函数必须在每次鼠标位置更新后以及调用任何其他 clay 函数之前被调用。
**在 UI 声明期间**
函数 `bool Clay_Hovered()` 可以在元素构造期间或元素主体中调用,如果鼠标/指针位于当前打开的元素上,则返回 `true`。
```
// An orange button that turns blue when hovered
CLAY(CLAY_ID("Button"), { .backgroundColor = Clay_Hovered() ? COLOR_BLUE : COLOR_ORANGE }) {
bool buttonHovered = Clay_Hovered();
CLAY_TEXT(buttonHovered ? CLAY_STRING("Hovered") : CLAY_STRING("Hover me!"), headerTextConfig);
}
```
函数 `void Clay_OnHover()` 允许您将一个函数指针附加到当前打开的元素,如果鼠标/指针位于该元素上,则会调用该函数。
```
void HandleButtonInteraction(Clay_ElementId elementId, Clay_PointerData pointerInfo, void *userData) {
ButtonData *buttonData = (ButtonData *)userData;
// Pointer state allows you to detect mouse down / hold / release
if (pointerInfo.state == CLAY_POINTER_DATA_PRESSED_THIS_FRAME) {
// Do some click handling
NavigateTo(buttonData->link);
}
}
ButtonData linkButton = (ButtonData) { .link = "https://github.com/nicbarker/clay" };
// HandleButtonInteraction will be called for each frame the mouse / pointer / touch is inside the button boundaries
CLAY(CLAY_ID("Button"), { .layout = { .padding = CLAY_PADDING_ALL(8) } }) {
Clay_OnHover(HandleButtonInteraction, &linkButton);
CLAY_TEXT(CLAY_STRING("Button"), &headerTextConfig);
}
```
**在 UI 声明之前/之后**
如果您想在布局声明之外查询鼠标/指针重叠,可以使用函数 `bool Clay_PointerOver(Clay_ElementId id)`,它接受一个 [element id](#element-ids) 并返回一个布尔值,表示当前指针位置是否在其边界框内。
```
// Reminder: Clay_SetPointerState must be called before functions that rely on pointer position otherwise it will have no effect
Clay_Vector2 mousePosition = { x, y };
Clay_SetPointerState(mousePosition);
// ...
// If profile picture was clicked
if (mouseButtonDown(0) && Clay_PointerOver(Clay_GetElementId("ProfilePicture"))) {
// Handle profile picture clicked
}
```
请注意,`Clay_PointerOver` 查询的边界框来自上一帧。除了在高速移动的动画情况下,这通常不会产生影响。
如果这对您来说是个问题,使用相同的数据每帧执行两次布局,第二次将为您提供正确的交互。
### 滚动元素
元素通过 `.clip` 配置配置为可滚动。Clipping 指示渲染器不要绘制剪切元素边界之外的任何像素,并通过指定 `.childOffset` 字段,可以移动剪切元素的内容以提供“滚动”行为。
您可以自己计算滚动并简单地在每帧中将当前偏移量提供给 `.childOffset`,或者,Clay 提供了一个内置机制来跟踪和更新滚动容器偏移量,详情如下。
要使滚动容器响应鼠标滚轮和滚动事件,需要在 `BeginLayout()` 之前调用两个函数:
```
Clay_Vector2 mousePosition = { x, y };
// Reminder: Clay_SetPointerState must be called before Clay_UpdateScrollContainers otherwise it will have no effect
Clay_SetPointerState(mousePosition);
// Clay_UpdateScrollContainers needs to be called before Clay_BeginLayout for the position to avoid a 1 frame delay
Clay_UpdateScrollContainers(
true, // Enable drag scrolling
scrollDelta, // Clay_Vector2 scrollwheel / trackpad scroll x and y delta this frame
float deltaTime, // Time since last frame in seconds as a float e.g. 8ms is 0.008f
);
// ...
// Clay internally tracks the scroll containers offset, and Clay_GetScrollOffset returns the x,y offset of the currently open element
CLAY(CLAY_ID("ScrollContainer"), { .clip = { .vertical = true, .childOffset = Clay_GetScrollOffset() } }) {
// Scrolling contents
}
// .childOffset can be provided directly if you would prefer to manage scrolling outside of clay
CLAY(CLAY_ID("ScrollContainer"), { .clip = { .vertical = true, .childOffset = myData.scrollContainer.offset } }) {
// Scrolling contents
}
```
更多具体细节可以在 [Clay_UpdateScrollContainers](#clay_updatescrollcontainers)、[Clay_SetPointerState](#clay_setpointerstate)、[Clay_ClipElementConfig](#clay_clipelementconfig) 和 [Clay_GetScrollOffset](#clay_getscrolloffset) 的文档中找到。
### Floating Elements(“绝对”定位)
Clay 中的所有标准元素都布局在其父元素的上方和_内部_,根据其父元素的布局规则定位,并影响兄弟元素的定位和大小。
**“Floating”** 通过 `CLAY_FLOATING()` 宏配置。浮动元素不会影响定义它们的父元素或其兄弟元素的位置。
它们还有一个 **z-index**,因此可以相交并渲染在其他元素的顶部。
浮动元素的一个经典用例是工具提示和模态框。
```
// The two text elements will be laid out top to bottom, and the floating container
// will be attached to "Outer"
CLAY(CLAY_ID("Outer"), { .layout = { .layoutDirection = TOP_TO_BOTTOM } }) {
CLAY_TEXT(text, &headerTextConfig);
CLAY(CLAY_ID("Tooltip"), { .floating = { .attachTo = CLAY_ATTACH_TO_PARENT } }) {}
CLAY_TEXT(text, &headerTextConfig);
}
```
更多具体细节可以在完整的 [Floating API](#clay_floatingelementconfig) 中找到。
### 布局您自己的自定义元素
Clay 仅支持一组简单的 UI 元素基元,例如矩形、文本和图像。Clay 提供了一个单一的 API 用于布局自定义元素:
```
#include "clay.h"
typedef enum {
CUSTOM_ELEMENT_TYPE_MODEL,
CUSTOM_ELEMENT_TYPE_VIDEO
} CustomElementType;
// A rough example of how you could handle laying out 3d models in your UI
typedef struct {
CustomElementType type;
union {
Model model;
Video video;
// ...
};
} CustomElementData;
Model myModel = Load3DModel(filePath);
CustomElement modelElement = (CustomElement) { .type = CUSTOM_ELEMENT_TYPE_MODEL, .model = myModel }
typedef struct {
void* memory;
uintptr_t offset;
} Arena;
// During init
Arena frameArena = (Arena) { .memory = malloc(1024) };
// Custom elements only take a single pointer, so we need to store the data somewhere
CustomElementData *modelData = (CustomElementData *)(frameArena.memory + frameArena.offset);
*modelData = (CustomElementData) { .type = CUSTOM_ELEMENT_TYPE_MODEL, .model = myModel };
frameArena.offset += sizeof(CustomElementData);
CLAY(CLAY_ID("3DModelViewer"), { .custom = { .customData = modelData } }) {}
// Later during your rendering
switch (renderCommand->commandType) {
// ...
case CLAY_RENDER_COMMAND_TYPE_CUSTOM: {
// Your extended struct is passed through
CustomElementData *customElement = renderCommand->config.customElementConfig->customData;
if (!customElement) continue;
switch (customElement->type) {
case CUSTOM_ELEMENT_TYPE_MODEL: {
// Render your 3d model here
break;
}
case CUSTOM_ELEMENT_TYPE_VIDEO: {
// Render your video here
break;
}
// ...
}
break;
}
}
```
更多具体细节可以在完整的 [Custom Element API](#clay_customelementconfig) 中找到。
### 保留模式渲染
Clay 最初是为 [Immediate Mode](https://www.youtube.com/watch?v=Z1qyvQsjK5Y) 渲染设计的——即每帧重绘整个 UI。这对于您的平台、渲染器设计或性能约束来说可能是不可能的。
有一些通用技术可用于将 clay 集成到 retained mode 渲染系统中:
- `Clay_RenderCommand` 包含用于声明元素的 `uint32_t id`。如果使用唯一 ID,这些可以跨多个帧/布局映射到持久图形对象。
- 渲染命令会自动剔除,仅保留当前可见的元素,并且 `Clay_RenderCommand` 是一个足够小的结构体,您可以简单地比较具有匹配 ID 的两个渲染命令的内存,以确定该元素是否“脏”并需要重新渲染或更新。
有关具体的示例,请参阅提供的 [HTML renderer](https://github.com/nicbarker/clay/blob/main/renderers/web/html/clay-html-renderer.html)。此渲染器将 clay 布局转换为持久的 HTML 文档,每帧更改最少。
### 可见性剔除
Clay 提供了一个内置的可见性剔除机制,**默认启用**。它只会为可见的元素输出渲染命令——也就是说,**它们的边界框中至少有一个像素位于视口内。**
可以通过使用 `#define CLAY_DISABLE_CULLING` 指令禁用此剔除机制。有关更多信息,请参阅 [Preprocessor Directives](#preprocessor-directives)。
### 预处理器指令
Clay 支持 C 预处理器指令,以便在编译时调节功能。这些可以在代码中使用 `#define CLAY_DISABLE_CULLING` 设置,或者在编译时使用适当的编译器特定参数在命令行上设置,例如 `clang -DCLAY_DISABLE_CULLING main.c ...`
支持的指令有:
- `CLAY_WASM` - 目标为 Web Assembly 时必需。
- `CLAY_DLL` - 创建 .Dll 文件时必需。
### 非 C 语言的 Bindings
Clay 可作为 `.h` 包含文件在 C99 和 C++20 中直接使用,并支持指定初始化器。
还有其他语言的支持绑定,包括:
- [Odin Bindings](https://github.com/nicbarker/clay/tree/main/bindings/odin)
- [Rust Bindings](https://github.com/clay-ui-rs/clay)
### 其他
Clay 也已在其他语言中实现:
- [`glay`](https://github.com/soypat/glay) - Go 逐行重写,以可读性为主要目标。
- [`totallygamerjet/clay`](https://github.com/totallygamerjet/clay) - 使用 `cxgo`(一个 C 到 Go 的转译器)移植。
- [`goclay`](https://github.com/igadmg/goclay) - Go 逐行重写,紧密匹配参考实现。
### 调试工具
Clay 包含内置的 UI 调试工具,类似于 Chrome 或 Firefox 等浏览器中的“检查器”。这些工具包含在 `clay.h` 中,通过将额外的渲染命令注入到输出 [Clay_RenderCommandArray](#clay_rendercommandarray) 中来工作。
只要您使用的渲染器工作正常,使用调试工具不需要额外的设置或配置。
要启用调试工具,请使用函数 `Clay_SetDebugModeEnabled(bool enabled)`。此布尔值是持久的,不需要每帧都设置。
调试工具默认将作为屏幕右侧的面板渲染,按其宽度压缩您的布局。默认宽度为 400,目前可以通过直接修改内部变量 `Clay__debugViewWidth` 进行配置,但这是一个内部 API,可能会发生变化。
_带有可见调试工具的官方 Clay 网站_
### 运行多个 Clay 实例
Clay 允许您在一个程序中运行多个实例。为此,[Clay_Initialize](#clay_initialize) 返回一个 [Clay_Context*](#clay_context) 引用。您可以使用 [Clay_SetCurrentContext](#clay_setcurrentcontext) 激活特定实例。如果未调用 [Clay_SetCurrentContext](#clay_setcurrentcontext),Clay 将默认使用最近调用的 [Clay_Initialize](#clay_initialize) 中的上下文。
**⚠ 重要:不要跨不同线程同时渲染实例,因为 Clay 目前不支持真正的多线程。**
```
// Define separate arenas for the instances.
Clay_Arena arena1, arena2;
// ... allocate arenas
// Initialize both instances, storing the context for each one.
Clay_Context* instance1 = Clay_Initialize(arena1, layoutDimensions, errorHandler);
Clay_Context* instance2 = Clay_Initialize(arena2, layoutDimensions, errorHandler);
// In the program's render function, activate each instance before executing clay commands and macros.
Clay_SetCurrentContext(instance1);
Clay_BeginLayout();
// ... declare layout for instance1
Clay_RenderCommandArray renderCommands1 = Clay_EndLayout();
render(renderCommands1);
// Switch to the second instance
Clay_SetCurrentContext(instance2);
Clay_BeginLayout();
// ... declare layout for instance2
Clay_RenderCommandArray renderCommands2 = Clay_EndLayout();
render(renderCommands2);
```
# API
### 命名约定
- "**CAPITAL_LETTERS()**" 用于宏。
- "**Clay__**"("Clay" 后跟**双**下划线)用于内部函数,这些函数不打算供使用,并且可能会发生变化。
- "**Clay_**"("Clay" 后跟**单**下划线)用于可由用户调用的外部函数。
## 公共函数
### 公共函数的生命周期
**在启动/初始化时,运行一次**
`Clay_MinMemorySize` -> `Clay_CreateArenaWithCapacityAndMemory` -> `Clay_Initialize` -> `Clay_SetMeasureTextFunction`
**每一帧**
`Clay_SetLayoutDimensions` -> `Clay_SetPointerState` -> `Clay_UpdateScrollContainers` -> `Clay_BeginLayout` -> `CLAY() etc...` -> `Clay_EndLayout`
### Clay_MinMemorySize
`uint32_t Clay_MinMemorySize()`
返回 clay 为适应当前 [CLAY_MAX_ELEMENT_COUNT](#preprocessor-directives) 所需的最小内存量(**以字节为单位**)。
### Clay_CreateArenaWithCapacityAndMemory
`Clay_Arena Clay_CreateArenaWithCapacityAndMemory(uint32_t capacity, void *offset)`
使用给定的容量和基本内存指针创建一个 `Clay_Arena` 结构体,该结构体可以传递给 [Clay_Initialize](#clay_initialize)。
### Clay_SetMeasureTextFunction
`void Clay_SetMeasureTextFunction(Clay_Dimensions (*measureTextFunction)(Clay_StringSlice text, Clay_TextElementConfig *config, uintptr_t userData), uintptr_t userData)`
接受一个函数指针,该函数可用于测量字符串的 `width, height` 尺寸。由 clay 在布局期间用于确定 [CLAY_TEXT](#clay_text) 元素的尺寸和换行。
**注意 1:此字符串不保证以 null 结尾。** Clay 在换行时使用切片而不是克隆新的以 null 结尾的字符串,从而节省了大量的性能开销。如果您的渲染器不支持 **ptr, length** 样式的字符串(例如 Raylib),则需要在渲染之前将其克隆到新的 C 字符串中。
**注意 2:此函数必须尽可能快。** 对于文本繁重的用例,此函数会被调用多次,尽管 clay 会在内部缓存文本测量结果,但如果提供的函数很慢,它很容易成为主要的布局开销。**这是热点路径!**
### Clay_ResetMeasureTextCache
`void Clay_ResetMeasureTextCache(void)`
Clay 会缓存提供的 MeasureTextFunction 的测量结果,这对于大多数用例来说已经足够了。但是,如果测量结果可能取决于 clay 不知道的外部因素(例如 DPI 更改),那么缓存值可能不正确。当这些外部因素之一发生变化时,可以调用 Clay_ResetMeasureTextCache 以强制 clay 在下一帧重新计算所有字符串测量值。
### Clay_SetMaxElementCount
`void Clay_SetMaxElementCount(uint32_t maxElementCount)`
设置将在后续 [Clay_Initialize()](#clay_initialize) 和 [Clay_MinMemorySize()](#clay_minmemorysize) 调用中使用的内部最大元素计数,允许 clay 分配更大的 UI 层次结构。
**注意:在调用 [Clay_MinMemorySize()](#clay_minmemorysize) 计算更新的内存需求后,您需要重新初始化 clay。**
### Clay_SetMaxMeasureTextCacheWordCount
`void Clay_SetMaxMeasureTextCacheWordCount(uint32_t maxMeasureTextCacheWordCount)`
设置将在后续 [Clay_Initialize()](#clay_initialize) 和 [Clay_MinMemorySize()](#clay_minmemorysize) 调用中使用的内部文本测量缓存大小,允许 clay 分配更多文本。该值表示文本测量缓存中可以存储多少个单独的单词。
**注意:在调用 [Clay_MinMemorySize()](#clay_minmemorysize) 计算更新的内存需求后,您需要重新初始化 clay。**
### Clay_Initialize
`Clay_Context* Clay_Initialize(Clay_Arena arena, Clay_Dimensions layoutDimensions, Clay_ErrorHandler errorHandler)`
初始化内部内存映射,设置布局的内部尺寸,并绑定一个错误处理程序供 clay 在出现问题时使用。返回一个 [Clay_Context*](#clay_context),可以选择将其提供给 [Clay_SetCurrentContext](#clay_setcurrentcontext) 以允许在同一程序中运行多个 clay 实例,并将其设置为当前上下文。请参阅 [Running more than one Clay instance](#running-more-than-one-clay-instance)。
参考:[Clay_Arena](#clay_createarenawithcapacityandmemory)、[Clay_ErrorHandler](#clay_errorhandler)、[Clay_SetCurrentContext](#clay_setcurrentcontext)
### Clay_SetCurrentContext
`void Clay_SetCurrentContext(Clay_Context* context)`
设置后续 clay 命令将在其上运行的上下文。您可以从 [Clay_Initialize](#clay_initialize) 或 [Clay_GetCurrentContext](#clay_getcurrentcontext) 获取此引用。请参阅 [Running more than one Clay instance](#running-more-than-one-clay-instance)。
### Clay_GetCurrentContext
`Clay_Context* Clay_GetCurrentContext()`
返回 clay 命令当前正在其上运行的上下文,如果未设置上下文,则返回 null。请参阅 [Running more than one Clay instance](#running-more-than-one-clay-instance)。
### Clay_SetLayoutDimensions
`void Clay_SetLayoutDimensions(Clay_Dimensions dimensions)`
设置内部布局尺寸。此函数开销很低,可以每帧使用您的屏幕尺寸调用,以自动响应窗口大小调整等。
### Clay_SetPointerState
`void Clay_SetPointerState(Clay_Vector2 position, bool isPointerDown)`
设置内部指针位置和状态(即当前鼠标/触摸位置)并重新计算重叠信息,该信息用于鼠标悬停/点击计算(通过 [Clay_PointerOver](#clay_pointerover))以及使用 [Clay_UpdateScrollContainers](#clay_updatescrollcontainers) 更新滚动容器。**isPointerDown 应表示当前帧的当前状态,例如,在按住鼠标左键的整个持续时间内它应为 `true`。** Clay 具有用于检测点击/触摸开始和结束的内部处理。
### Clay_UpdateScrollContainers
`void Clay_UpdateScrollContainers(bool enableDragScrolling, Clay_Vector2 scrollDelta, float deltaTime)`
此函数处理容器的滚动。它响应 `scrollDelta`(表示本帧的鼠标滚轮或触控板滚动)以及移动设备上的“触摸滚动”或使用鼠标或类似设备的“拖动滚动”。
仅当 `enableDragScrolling` 参数为 `true`,**并且**本帧已调用 [Clay_SetPointerState](#clay_setpointerstate) 时,才会发生触摸/拖动滚动。因此,如果您想禁用触摸滚动,只需在第一个参数中传入 `false` 即可。
`deltaTime` 是自上一帧以来的时间(**以秒为单位**)(例如 0.016 是 **16 毫秒**),用于在不同刷新率之间规范化和平滑滚动。
### Clay_GetScrollOffset
`Clay_Vector2 Clay_GetScrollOffset()`
返回当前打开元素的内部存储滚动偏移量。
通常用于 [clip elements](#clay_clipelementconfig) 和 `.childOffset` 字段以创建滚动容器。
有关更多详细信息,请参阅 [Scrolling Elements](#scrolling-elements)。
```
// Create a horizontally scrolling container
CLAY(CLAY_ID("ScrollContainer"), {
.clip = { .horizontal = true, .childOffset = Clay_GetScrollOffset() }
})
```
### Clay_BeginLayout
`void Clay_BeginLayout()`
准备 clay 以计算新的布局。每帧/布局**在**任何 [Element Macros](#element-macros) **之前**调用。
### Clay_EndLayout
`Clay_RenderCommandArray Clay_EndLayout()`
结束元素宏的声明并计算当前布局的结果。返回一个包含布局计算结果的 [Clay_RenderCommandArray](#clay_rendercommandarray)。
### Clay_Hovered
`bool Clay_Hovered()`
在布局声明**期间**调用,如果先前使用 `Clay_SetPointerState` 设置的指针位置位于当前打开元素的边界框内,则返回 `true`。注意:这是基于元素在**上一**帧的位置。
### Clay_OnHover
`void Clay_OnHover(void (*onHoverFunction)(Clay_ElementId elementId, Clay_PointerData pointerData, void *userData), void *userData)`
在布局声明**期间**调用,此函数允许您将一个函数指针附加到当前打开的元素,如果先前使用 `Clay_SetPointerState` 设置的指针位置位于当前打开元素的边界框内,则每帧调用一次该函数。有关 `pointerData` 参数的更多信息,请参阅 [Clay_PointerData](#clay_pointerdata)。
```
void HandleButtonInteraction(Clay_ElementId elementId, Clay_PointerData pointerData, void *userData) {
ButtonData *buttonData = (ButtonData *)userData;
// Pointer state allows you to detect mouse down / hold / release
if (pointerData.state == CLAY_POINTER_DATA_PRESSED_THIS_FRAME) {
// Do some click handling
NavigateTo(buttonData->link);
}
}
ButtonData linkButton = (ButtonData) { .link = "https://github.com/nicbarker/clay" };
// HandleButtonInteraction will be called for each frame the mouse / pointer / touch is inside the button boundaries
CLAY(CLAY_ID("Button"), { .layout = { .padding = CLAY_PADDING_ALL(8) } }) {
Clay_OnHover(HandleButtonInteraction, &buttonData);
CLAY_TEXT(CLAY_STRING("Click me!"), &headerTextConfig);
}
```
### Clay_PointerOver
`bool Clay_PointerOver(Clay_ElementId id)`
如果先前使用 `Clay_SetPointerState` 设置的指针位置位于具有提供的 `id` 的布局元素的边界框内,则返回 `true`。注意:这是基于元素在**上一**帧的位置。如果需要帧精确的指针重叠检测(可能是在帧之间 UI 布局发生重大变化的情况下),您可以简单地在那一帧运行两次布局代码。第二次调用 `Clay_PointerOver` 将是帧精确的。
### Clay_GetScrollContainerData
`Clay_ScrollContainerData Clay_GetScrollContainerData(Clay_ElementId id)`
返回与提供的 ID 匹配的滚动容器的 [Clay_ScrollContainerData](#clay_scrollcontainerdata)。此函数允许命令式操作滚动位置,允许您构建诸如滚动条、在滚动容器中“跳转”到某处的按钮等内容。
### Clay_GetElementData
`Clay_ElementData Clay_GetElementData(Clay_ElementId id)`
返回与提供的 ID 匹配的元素的 [Clay_ElementData](#clay_elementdata)。
用于检索有关元素的信息,例如它们的最终计算边界框。
### Clay_GetElementId
`Clay_ElementId Clay_GetElementId(Clay_String idString)`
返回提供的 id 字符串的 [Clay_ElementId](#clay_elementid),用于查询元素信息,如鼠标悬停状态、滚动容器数据等。
## Element 宏
### CLAY()
**用法**
`CLAY(...configuration) { ...children }`
**生命周期**
`Clay_BeginLayout()` -> `CLAY()` -> `Clay_EndLayout()`
**注意事项**
**CLAY** 打开一个通用的空容器,该容器可配置并支持嵌套子项。
**CLAY** 需要一个参数,因此如果您想在没有任何配置的情况下创建元素,请使用 `CLAY(0)`。
**示例**
```
// Define an element with 16px of x and y padding
CLAY(CLAY_ID("Outer"), { .layout = { .padding = CLAY_PADDING_ALL(16) } }) {
// A nested child element
CLAY(CLAY_ID("SideBar"), { .layout = { .layoutDirection = CLAY_TOP_TO_BOTTOM, .childGap = 16 } }) {
// Children laid out top to bottom with a 16 px gap between them
}
// A vertical scrolling container with a colored background
CLAY(CLAY_ID("ScrollContainer"), {
.layout = { .layoutDirection = CLAY_TOP_TO_BOTTOM, .childGap = 16 },
.backgroundColor = { 200, 200, 100, 255 },
.cornerRadius = CLAY_CORNER_RADIUS(10),
.clip = { .vertical = true, .childOffset = Clay_GetScrollOffset() }
}) {
// child elements
}
}
```
### CLAY_AUTO_ID()
核心 [CLAY()](#clay) 元素创建宏的一个版本,它会自动生成 ID,而不是要求将其作为第一个参数。
请注意,在底层,此 ID 的生成方式与 [CLAY_ID_LOCAL()](#clay_id_local) 相同,即基于元素在层次结构中的位置,如果在定义元素之前从层次结构中添加/删除了元素,则布局调用之间的位置可能会发生变化。因此,为了使 transitions & retained mode 后端正常工作,应指定 ID。
```
// Note that CLAY_AUTO_ID only takes one argument: the configuration
CLAY_AUTO_ID({ .layout = { .padding = CLAY_PADDING_ALL(16) } }) {
// A nested child element
CLAY_AUTO_ID({ .layout = { .layoutDirection = CLAY_TOP_TO_BOTTOM, .childGap = 16 } }) {
// Children laid out top to bottom with a 16 px gap between them
}
// A vertical scrolling container with a colored background
CLAY_AUTO_ID({
.layout = { .layoutDirection = CLAY_TOP_TO_BOTTOM, .childGap = 16 },
.backgroundColor = { 200, 200, 100, 255 },
.cornerRadius = CLAY_CORNER_RADIUS(10),
.clip = { .vertical = true, .childOffset = Clay_GetScrollOffset() }
}) {
// child elements
}
}
```
### CLAY_TEXT()
**用法**
`CLAY_TEXT(Clay_String textContents, Clay_TextElementConfig *textConfig);`
**生命周期**
`Clay_BeginLayout()` -> `CLAY_TEXT()` -> `Clay_EndLayout()`
**注意事项**
**TEXT** 是一个经过测量的、自动换行的文本元素。它使用 `Clay_TextElementConfig` 来配置文本特定选项。
请注意,`Cl_TextElementConfig` 使用 `uint32_t fontId`。字体 ID 到字体资源的映射在用户代码中管理,并传递给渲染命令。
**Struct API (伪代码)**
```
// CLAY_TEXT(text, CLAY_TEXT_CONFIG({ .member = value })) supports these options
Clay_TextElementConfig {
Clay_Color textColor {
float r; float g; float b; float a;
};
uint16_t fontId;
uint16_t fontSize;
uint16_t letterSpacing;
uint16_t lineHeight;
Clay_TextElementConfigWrapMode wrapMode {
CLAY_TEXT_WRAP_WORDS (default),
CLAY_TEXT_WRAP_NEWLINES,
CLAY_TEXT_WRAP_NONE,
};
};
```
**字段**
**`.textColor`**
`CLAY_TEXT_CONFIG(.textColor = {120, 120, 120, 255})`
使用 [Clay_Color](#clay_color)。通常接受 0 到 255 之间的 `rgba` 浮点值,但解释留给渲染器,不影响布局。
**`.fontId`**
`CLAY_TEXT_CONFIG(.fontId = FONT_ID_LATO)`
由用户加载字体并创建从 `fontId` 到可以测量和渲染的字体的映射。
**`.fontSize`**
`CLAY_TEXT_CONFIG(.fontSize = 16)`
字体大小通常被认为是 `x 像素高`,但解释留给用户和渲染器。
**`.letterSpacing`**
`CLAY_TEXT_CONFIG(.letterSpacing = 1)`
`.letterSpacing` 导致各个渲染字符之间出现**水平**空白。
**`.lineHeight`**
`CLAY_TEXT_CONFIG(.lineHeight = 20)`
`.lineHeight` - 当非零时 - 强制将每行换行文本的 `height` 设置为 `.lineheight` 像素高。将影响父元素和兄弟元素的布局。值为 `0` 将使用字体的测量高度。
**`.wrapMode`**
`CLAY_TEXT_CONFIG(.wrapMode = CLAY_TEXT_WRAP_NONE)`
`.wrapMode` 指定在什么条件下文本应该 [wrap](https://en.wikipedia.org/wiki/Line_wrap_and_word_wrap)。
可用选项有:
- `CLAY_TEXT_WRAP_WORDS`(默认) - 当容器宽度缩小时,文本将在空白字符处换行,保留整个单词。
- `CLAY_TEXT_WRAP_NEWLINES` - 仅在遇到换行符时换行。
- `CLAY_TEXT_WRAP_NONE` - 即使容器被压缩到超出文本测量的宽度,文本也不会换行。
**示例**
```
// Define a font somewhere in your code
const uint32_t FONT_ID_LATO = 3;
// ..
CLAY_TEXT(CLAY_STRING("John Smith"), CLAY_TEXT_CONFIG({ .fontId = FONT_ID_LATO, .fontSize = 24, .textColor = {255, 0, 0, 255} }));
// Rendering example
Font fontToUse = LoadedFonts[renderCommand->renderData.text->fontId];
```
**渲染**
元素受 [culling](#visibility-culling) 约束。否则,可能会创建多个 `commandType = CLAY_RENDER_COMMAND_TYPE_TEXT` 的 `Clay_RenderCommand`,每行换行文本一个。
`Clay_RenderCommand.textContent` 将填充为传入的原始字符串的 `Clay_String` _切片_(即换行不会重新分配,它只返回一个指向新行开头且具有 `length` 的 `Clay_String`)
### CLAY_ID
`Clay_ElementId CLAY_ID(STRING_LITERAL idString)`
**CLAY_ID()** 用于在声明期间生成 [Clay_ElementId](#clay_elementid) 并将其附加到布局元素。
请注意,此宏仅适用于字符串字面量,如果与 `char*` 变量一起使用将无法编译。要将堆分配的 `char*` 字符串用作 ID,请使用 [CLAY_SID](#clay_sid)。
要在布局声明之外使用实用函数(如 [Clay_PointerOver](#clay_pointerover))重新生成相同的 ID,请使用 [Clay_GetElementId](#clay_getelementid) 函数。
**示例**
```
// Tag a button with the Id "Button"
CLAY(CLAY_ID("Button"), {
.layout = { .layoutDirection = CLAY_TOP_TO_BOTTOM, .sizing = { .width = CLAY_SIZING_GROW(0) }, .padding = CLAY_PADDING_ALL(16), .childGap = 16 }
}) {
// ...children
}
// Later on outside of layout code
bool buttonIsHovered = Clay_IsPointerOver(Clay_GetElementId("Button"));
if (buttonIsHovered && leftMouseButtonPressed) {
// ... do some click handling
}
```
### CLAY_SID()
`Clay_ElementId CLAY_SID(Clay_String idString)`
[CLAY_ID](#clay_id) 的一个版本,可与堆分配的 `char *` 数据一起使用。底层 `char` 数据不会在内部复制,并且应至少存活到下一帧。
### CLAY_IDI()
`Clay_ElementId CLAY_IDI(STRING_LITERAL idString, int32_t index)`
[CLAY_ID](#clay_id) 的偏移版本。从提供的 `char *label` 结合 `int index` 生成 [Clay_ElementId](#clay_elementid) 字符串 id。
用于为顺序元素(例如在 `for` 循环中)生成 id,而无需在运行时构造动态字符串。
请注意,此宏仅适用于字符串字面量,如果与 `char*` 变量一起使用将无法编译。要将堆分配的 `char*` 字符串用作 ID,请使用 [CLAY_SIDI](#clay_sidi)。
### CLAY_SIDI()
`Clay_ElementId CLAY_SIDI(Clay_String idString, int32_t index)`
[CLAY_IDI](#clay_idi) 的一个版本,可与堆分配的 `char *` 数据一起使用。底层 `char` 数据不会在内部复制,并且应至少存活到下一帧。
### CLAY_ID_LOCAL()
**用法**
`Clay_ElementId CLAY_ID_LOCAL(STRING_LITERAL idString)`
**生命周期**
`Clay_BeginLayout()` -> `CLAY(` -> `CLAY_ID_LOCAL()` -> `)` -> `Clay_EndLayout()`
**注意事项**
**CLAY_ID_LOCAL()** 用于在声明期间生成 [Clay_ElementId](#clay_elementid) 并将其附加到布局元素。
与需要全局唯一的 [CLAY_ID](#clay_id) 不同,local ID 基于其父元素的 ID,并且只需要在其兄弟元素中唯一。
因此,local id 适合在可重用组件和循环中使用。
请注意,此宏仅适用于字符串字面量,如果与 `char*` 变量一起使用将无法编译。要将堆分配的 `char*` 字符串用作 ID,请使用 [CLAY_SID_LOCAL](#clay_sid_local)。
**示例**
```
void RenderHeaderButton(ButtonData button) {
CLAY({
.id = CLAY_ID_LOCAL("HeaderButton"),
.layout = { .layoutDirection = CLAY_TOP_TO_BOTTOM, .sizing = { .width = CLAY_SIZING_GROW(0) }, .padding = CLAY_PADDING_ALL(16), .childGap = 16 }
}) {
// ...children
}
}
for (int i = 0; i < headerButtons.length; i++) {
RenderHeaderButton(headerButtons.items[i]);
}
```
### CLAY_SID_LOCAL()
`Clay_ElementId CLAY_SID_LOCAL(Clay_String idString)`
[CLAY_ID_LOCAL](#clay_id_local) 的一个版本,可与堆分配的 `char *` 数据一起使用。底层 `char` 数据不会在内部复制,并且应至少存活到下一帧。
### CLAY_IDI_LOCAL()
`Clay_ElementId CLAY_IDI_LOCAL(STRING_LITERAL idString, int32_t index)`
[CLAY_ID_LOCAL](#clay_local_id) 的偏移版本。从提供的 `char *label` 结合 `int index` 生成 [Clay_ElementId](#clay_elementid) 字符串 id。
用于为顺序元素(例如在 `for` 循环中)生成 id,而无需在运行时构造动态字符串。
请注意,此宏仅适用于字符串字面量,如果与 `char*` 变量一起使用将无法编译。要将堆分配的 `char*` 字符串用作 ID,请使用 [CLAY_SIDI_LOCAL](#clay_sidi_local)。
### CLAY_SIDI_LOCAL()
`Clay_ElementId CLAY_SIDI_LOCAL(Clay_String idString, int32_t index)`
[CLAY_IDI_LOCAL](#clay_idi_local) 的一个版本,可与堆分配的 `char *` 数据一起使用。底层 `char` 数据不会在内部复制,并且应至少存活到下一帧。
## 数据结构与定义
### Clay_ElementDeclaration
**Clay_ElementDeclaration** 结构体是 `CLAY()` 宏的唯一参数,并提供布局元素的配置选项。
```
typedef struct {
Clay_ElementId id;
Clay_LayoutConfig layout;
Clay_Color backgroundColor;
Clay_CornerRadius cornerRadius;
Clay_AspectRatioElementConfig aspectRatio;
Clay_ImageElementConfig image;
Clay_FloatingElementConfig floating;
Clay_CustomElementConfig custom;
Clay_ClipElementConfig clip;
Clay_BorderElementConfig border;
void *userData;
} Clay_ElementDeclaration;
```
**字段**
**`.layout`** - `Clay_LayoutConfig`
`CLAY(CLAY_ID("Element"), { .layout = { .padding = { 16, 16, 12, 12 }, .layoutDirection = CLAY_TOP_TO_BOTTOM } })`
使用 [Clay_LayoutConfig](#clay_layoutconfig)。控制与 _layout_ 相关的各种设置,可以将其视为“此元素及其子元素的尺寸和位置”。
**`.backgroundColor`** - `Clay_Color`
`CLAY(CLAY_ID("Element"), { .backgroundColor = {120, 120, 120, 255} } })`
使用 [Clay_Color](#clay_color)。通常接受 0 到 255 之间的 `rgba` 浮点值,但解释留给渲染器,不影响布局。
**`.cornerRadius`** - `float`
`CLAY(CLAY_ID("Element"), { .cornerRadius = { .topLeft = 16, .topRight = 16, .bottomLeft = 16, .bottomRight = 16 } })`
定义矩形拐角弧度的半径(以像素为单位)(`0` 为方形,`rectangle.width / 2` 为圆形)。
请注意,可以使用类似函数的宏 `CLAY_CORNER_RADIUS(radius)` 来简写将所有四个拐角半径设置为相同的值。例如 `CLAY_BORDER({ .cornerRadius = CLAY_CORNER_RADIUS(10) })`
**`.aspectRatio`** - `Clay_AspectRatioElementConfig`
`CLAY(CLAY_ID("Element"), { .aspectRatio = 1 })`
使用 [Clay_AspectRatioElementConfig](#clay_aspectratioelementconfig)。将元素配置为纵横比缩放元素。对于渲染图像特别有用,但也可用于强制执行其他元素的固定宽度/高度比。
**`.image`** - `Clay_ImageElementConfig`
`CLAY(CLAY_ID("Element"), { .image = { .imageData = &myImage } })`
使用 [Clay_ImageElementConfig](#clay_imageelementconfig)。将元素配置为图像元素。导致发出类型为 `IMAGE` 的渲染命令。
**`.floating`** - `Clay_FloatingElementConfig`
`CLAY(CLAY_ID("Element"), { .floating = { .attachTo = CLAY_ATTACH_TO_PARENT } })`
使用 [Clay_FloatingElementConfig](#clay_floatingelementconfig)。将元素配置为浮动元素,这允许它“堆叠在其他内容前面”并“位于其他元素之上”,而不影响兄弟元素或父元素的尺寸或位置。
**`.custom`** - `Clay_CustomElementConfig`
`CLAY(CLAY_ID("Element"), { .custom = { .customData = &my3DModel } })`
使用 [Clay_CustomElementConfig](#clay_customelementconfig)。将元素配置为自定义元素,这允许您将自定义数据传递给渲染器。导致发出类型为 `CUSTOM` 的渲染命令。
**`.clip`** - `Clay_ClipElementConfig`
`CLAY(CLAY_ID("Element"), { .clip = { .vertical = true, .childOffset = Clay_GetScrollOffset() } })`
使用 [Clay_ClipElementConfig](#clay_scrollelementconfig)。将元素配置为 clip 元素,如果子元素溢出,这会导致它们被剪切/遮罩,并与 [Scrolling Elements](#scrolling-elements) 中列出的函数一起启用子内容的滚动。
**`.border`** - `Clay_BorderElementConfig`
`CLAY(CLAY_ID("Element"), { .border = { .width = { .left = 5 }, .color = COLOR_BLUE } })`
使用 [Clay_BorderElementConfig](#clay_borderelementconfig)。将元素配置为边框元素,这指示渲染器沿此元素边界框的指定边缘绘制彩色边框线。导致发出类型为 `BORDER` 的渲染命令。
**`.userData`** - `void *`
`CLAY(CLAY_ID("Element"), { .userData = &extraData })`
透明地将指针传递给由此元素生成的相应 [Clay_RenderCommands](#clay_rendercommand)s。
**示例**
```
// Declare a reusable rectangle config, with a purple color and 10px rounded corners
Clay_RectangleElementConfig rectangleConfig = (Clay_RectangleElementConfig) { .color = { 200, 200, 100, 255 }, .cornerRadius = CLAY_CORNER_RADIUS(10) };
// Declare a rectangle element using a reusable config
CLAY(CLAY_ID("Box"), rectangleConfig) {}
// Declare a retangle element using an inline config
CLAY(CLAY_ID("BoxInline"), { .color = { 200, 200, 100, 255 }, .cornerRadius = CLAY_CORNER_RADIUS(10) })) {
// child elements
}
// Declare a scrolling container with a colored background
CLAY(CLAY_ID("ScrollingContainer"), {
.backgroundColor = { 200, 200, 100, 255 },
.cornerRadius = CLAY_CORNER_RADIUS(10)
.clip = { .vertical = true, .childOffset = Clay_GetScrollOffset() }
) {
// child elements
}
```
元素受 [culling](#visibility-culling) 约束。否则,将创建一个 `commandType = CLAY_RENDER_COMMAND_TYPE_RECTANGLE` 的 `Clay_RenderCommand`,其中 `renderCommand->elementConfig.rectangleElementConfig` 包含指向元素的 Clay_RectangleElementConfig 的指针。
### Clay_LayoutConfig
**Clay_LayoutConfig** 用于配置 _layout_ 选项(即影响元素及其父元素、兄弟元素和子元素的最终位置和大小的选项)
**Struct API (伪代码)**
```
// CLAY({ .layout = { ...fields } }) supports these options
Clay_LayoutConfig {
Clay_LayoutDirection layoutDirection = CLAY_LEFT_TO_RIGHT (default) | CLAY_TOP_TO_BOTTOM;
Clay_Padding padding {
u16 left; u16 right; u16 top; u16 bottom;
};
uint16_t childGap;
Clay_ChildAlignment childAlignment {
.x = CLAY_ALIGN_X_LEFT (default) | CLAY_ALIGN_X_CENTER | CLAY_ALIGN_X_RIGHT;
.y = CLAY_ALIGN_Y_TOP (default) | CLAY_ALIGN_Y_CENTER | CLAY_ALIGN_Y_BOTTOM;
};
Clay_Sizing sizing { // Recommended to use the provided macros here - see #sizing for more in depth explanation
.width = CLAY_SIZING_FIT(float min, float max) (default) | CLAY_SIZING_GROW(float min, float max) | CLAY_SIZING_FIXED(float width) | CLAY_SIZING_PERCENT(float percent)
.height = CLAY_SIZING_FIT(float min, float max) (default) | CLAY_SIZING_GROW(float min, float max) | CLAY_SIZING_FIXED(float height) | CLAY_SIZING_PERCENT(float percent)
}; // See CLAY_SIZING_GROW() etc for more details
};
```
**字段**
**`.layoutDirection`** - `Clay_LayoutDirection`
`CLAY(CLAY_ID("Element"), { .layout = { .layoutDirection = CLAY_TOP_TO_BOTTOM } })`
控制子元素布局的轴/方向。可用选项有 `CLAY_LEFT_TO_RIGHT`(默认)和 `CLAY_TOP_TO_BOTTOM`。
_您知道吗,“left to right”和“top to bottom”都有 13 个字母?_
**`.padding`** - `Clay_Padding`
`CLAY(CLAY_ID("Element"), { .layout = { .padding = { .left = 16, .right = 16, .top = 8, .bottom = 8 } } })`
控制子元素**外部**周围的空白“padding”。
**`.childGap`** - `uint16_t`
`CLAY(CLAY_ID("Element"), { .layout = { .childGap = 16 } })`
控制子元素在布局时的**之间**的空白。当 `.layoutDirection` 为 `CLAY_LEFT_TO_RIGHT`(默认)时,这将是水平空间,而对于 `CLAY_TOP_TO_BOTTOM`,这将是垂直空间。
**`.childAlignment`** - `Clay_ChildAlignment`
`CLAY(CLAY_ID("Element"), { .layout = { .childAlignment = { .x = CLAY_ALIGN_X_LEFT, .y = CLAY_ALIGN_Y_CENTER } } })`
控制子元素相对于父容器高度和宽度的对齐方式。可用选项有:
```
.x = CLAY_ALIGN_X_LEFT (default) | CLAY_ALIGN_X_CENTER | CLAY_ALIGN_X_RIGHT;
.y = CLAY_ALIGN_Y_TOP (default) | CLAY_ALIGN_Y_CENTER | CLAY_ALIGN_Y_BOTTOM;
```
**`.sizing`** - `Clayizing`
`CLAY(CLAY_ID("Element"), { .layout = { .sizing = { .width = CLAY_SIZING_FIXED(300), .height = CLAY_SIZING_PERCENT(0.5) } } })`
控制如何计算元素的最终宽度和高度。`.width` 和 `.height` 轴都有相同的配置可用。有几个选项:
- `CLAY_SIZING_FIT(float min, float max) (默认)` - 元素将被调整为适合其子元素(加上 padding 和间隙),最高可达 `max`。如果未指定 `max`,它将默认为 `FLOAT_MAX`。当元素被压缩以适应较小的父元素时,此元素不会收缩到 `min` 以下。
- `CLAY_SIZING_GROW(float min, float max)` - 元素将增长以填充其父元素中的可用空间,最高可达 `max`。如果未指定 `max`,它将默认为 `FLOAT_MAX`。当元素被压缩以适应较小的父元素时,此元素不会收缩到 `min` 以下。
- `CLAY_SIZING_FIXED(float fixed)` - 最终大小将始终正好是提供的 `fixed` 值。`CLAY_SIZING_FIT(fixed, fixed)` 的简写
- `CLAY_SIZING_PERCENT(float percent)` - 最终大小将是父元素大小的百分比,减去 padding 和子间隙。`percent` 假定为 `0` 到 `1` 之间的浮点数。
**用法示例**
```
CLAY(CLAY_ID("Button"), { .layout = { .layoutDirection = CLAY_TOP_TO_BOTTOM, .sizing = { .width = CLAY_SIZING_GROW(0) }, .padding = CLAY_PADDING_ALL(16, .childGap = 16) } }) {
// Children will be laid out vertically with 16px of padding around and between
}
```
### Clay_ImageElementConfig
**用法**
`CLAY(CLAY_ID("Element"), { .image = { ...image config } }) {}`
**Clay_ImageElementConfig** 将 clay 元素配置为渲染图像作为其背景。
**Struct API (伪代码)**
```
Clay_ImageElementConfig {
void * imageData;
};
```
**字段**
**`.imageData`** - `void *`
`CLAY(CLAY_ID("Image"), { .image = { .imageData = &myImage } }) {}`
`.imageData` 是一个通用的 void 指针,可用于将图像数据传递给渲染器。
```
// Load an image somewhere in your code
YourImage profilePicture = LoadYourImage("profilePicture.png");
// Note that when rendering, .imageData will be void* type.
CLAY(CLAY_ID("Image"), { .image = { .imageData = &profilePicture } }) {}
```
**示例**
```
// Load an image somewhere in your code
YourImage profilePicture = LoadYourImage("profilePicture.png");
// Declare a reusable image config
Clay_ImageElementConfig imageConfig = (Clay_ImageElementConfig) { .imageData = &profilePicture };
// Declare an image element using a reusable config
CLAY(CLAY_ID("Image"), { .image = imageConfig }) {}
// Declare an image element using an inline config
CLAY(CLAY_ID("ImageInline"), { .image = { .imageData = &profilePicture }, .aspectRatio = 16.0 / 9.0 }) {}
// Rendering example
YourImage *imageToRender = renderCommand->elementConfig.imageElementConfig->imageData;
```
**渲染**
元素受 [culling](#visibility-culling) 约束。否则,将创建一个 `commandType = CLAY_RENDER_COMMAND_TYPE_IMAGE` 的 `Clay_RenderCommand`。用户需要访问 `renderCommand->renderData.image->imageData` 以检索布局创建期间引用的图像数据。如何/是否将 `renderCommand->renderData.image->backgroundColor` 与图像混合也由用户决定。
### Clay_AspectRatioElementConfig
**用法**
`CLAY(CLAY_ID("Aspect"), { .aspectRatio = 16.0 / 9.0 }) {}`
**Clay_AspectRatioElementConfig** 将 clay 元素配置为其最终尺寸中强制执行固定的宽度/高度比。主要用于图像元素,但也可用于非图像元素。
**Struct API (伪代码)**
```
Clay_AspectRatioElementConfig {
float aspectRatio;
};
```
**字段**
**`.aspectRatio`** - `float`
`CLAY(CLAY_ID("Aspect"), { .aspectRatio = { .aspectRatio = 16.0 / 9.0 } }) {}`
或者,由于 C 会自动将值传递给第一个嵌套结构字段:
`CLAY(CLAY_ID("Aspect"), { .aspectRatio = 16.0 / 9.0 }) {}`
**示例**
```
// Load an image somewhere in your code
YourImage profilePicture = LoadYourImage("profilePicture.png");
// Declare an image element that will grow along the X axis while maintaining its original aspect ratio
CLAY(CLAY_ID("ProfilePicture"), {
.layout = { .width = CLAY_SIZING_GROW() },
.aspectRatio = profilePicture.width / profilePicture.height,
.image = { .imageData = &profilePicture },
}) {}
```
### Clay_ImageElementConfig
**用法**
`CLAY(CLAY_ID("Image"), { .image = { ...image config } }) {}`
**Clay_ImageElementConfig** 将 clay 元素配置为渲染图像作为其背景。
**Struct API (伪代码)**
```
Clay_ImageElementConfig {
void * imageData;
};
```
**字段**
**`.imageData`** - `void *`
`CLAY(CLAY_ID("Image"), { .image = { .imageData = &myImage } }) {}`
`.imageData` 是一个通用的 void 指针,可用于将图像数据传递给渲染器。
```
// Load an image somewhere in your code
YourImage profilePicture = LoadYourImage("profilePicture.png");
// Note that when rendering, .imageData will be void* type.
CLAY(CLAY_ID("Image"), { .image = { .imageData = &profilePicture } }) {}
```
注意:为了在使用动态缩放时保持图像的原始纵横比,必须使用 [.aspectRatio](#clay_aspectratioelementconfig) 配置选项。
**示例**
```
// Load an image somewhere in your code
YourImage profilePicture = LoadYourImage("profilePicture.png");
// Declare a reusable image config
Clay_ImageElementConfig imageConfig = (Clay_ImageElementConfig) { .imageData = &profilePicture };
// Declare an image element using a reusable config
CLAY(CLAY_ID("Image"), { .image = imageConfig }) {}
// Declare an image element using an inline config
CLAY(CLAY_ID("ImageInline"), { .image = { .imageData = &profilePicture }, .aspectRatio = 16.0 / 9.0 }) {}
// Rendering example
YourImage *imageToRender = renderCommand->elementConfig.imageElementConfig->imageData;
```
**渲染**
元素受 [culling](#visibility-culling) 约束。否则,将创建一个 `commandType = CLAY_RENDER_COMMAND_TYPE_IMAGE` 的 `Clay_RenderCommand`。用户需要访问 `renderCommand->renderData.image->imageData` 以检索布局创建期间引用的图像数据。如何/是否将 `renderCommand->renderData.image->backgroundColor` 与图像混合也由用户决定。
### Clay_ClipElementConfig
**用法**
`CLAY(CLAY_ID("ScrollBox"), { .clip = { ...clip config } }) {}`
**注意事项**
`Clay_ClipElementConfig` 将元素配置为剪切容器,从而能够屏蔽超出其边界的子元素。
注意:为了处理基于指针位置和鼠标滚轮或触摸交互的滚动,您必须在调用 `BeginLayout` _之前_ 调用 `Clay_SetPointerState()` 和 `Clay_UpdateScrollContainers()`。
**Struct Definition (伪代码)**
```
Clay_ClipElementConfig {
bool horizontal;
bool vertical;
};
```
**字段**
**`.horizontal`** - `bool`
`CLAY(CLAY_ID("HorizontalScroll"), { .clip = { .horizontal = true } })`
为此容器元素启用或禁用水平剪切。
**`.vertical`** - `bool`
`CLAY(LAY_ID("VerticalScroll"), { .clip = { .vertical = true } })`
为此容器元素启用或禁用垂直剪切。
**渲染**
为元素启用 clip 将导致两个额外的渲染命令:
- `commandType = CLAY_RENDER_COMMAND_TYPE_SCISSOR_START`,应使用其 `boundingBox` 创建矩形蒙版,并且**不**受 [culling](#visibility-culling) 约束
- `commandType = CLAY_RENDER_COMMAND_TYPE_SCISSOR_END`,禁用先前的矩形蒙版,并且**不**受 [culling](#visibility-culling) 约束
**示例**
```
CLAY(CLAY_ID("ScrollOuter"), { .clip = { .vertical = true } }) {
// Create child content with a fixed height of 5000
CLAY(CLAY_ID("ScrollInner"), { .layout = { .sizing = { .height = CLAY_SIZING_FIXED(5000) } } }) {}
}
```
### Clay_BorderElementConfig
**用法**
`CLAY(CLAY_ID("Border"), { .border = { ...border config } }) {}`
**注意事项**
`Clay_BorderElementConfig` 向元素的边缘或子元素之间添加边框。它使用 Clay_BorderElementConfig 来配置边框特定选项。
**Struct Definition (伪代码)**
```
typedef struct Clay_BorderElementConfig
{
Clay_Color color {
float r; float g; float b; float a;
};
Clay_BorderWidth width {
uint16_t left;
uint16_t right;
uint16_t top;
uint16_t bottom;
uint16_t betweenChildren;
};
} Clay_BorderElementConfig;
```
**字段**
**`.color`** - `Clay_Color`
`CLAY(CLAY_ID("Border"), { .border = { .color = { 255, 0, 0, 255 } } })`
使用 [Clay_Color](#clay_color)。指定此元素配置的所有边框的共享颜色。通常接受 0 到 255 之间的 `rgba` 浮点值,但解释留给渲染器,不影响布局。
**`.width`** - `Clay_BorderWidth`
`CLAY(CLAY_ID("Border"), { .border = { .width = { .left = 2, .right = 10 } } })`
向渲染器指示应在边界框的指定边缘绘制 `.color` 的边框,**嵌入并与框内容重叠 `.width`**。
这意味着边框配置不影响布局,因为边框的宽度不会影响总容器宽度或布局位置。具有零 padding 的边框容器将绘制在子元素的顶部。
注意:
**`.width.betweenChildren`**
`CLAY(CLAY_ID("Border"), { .border = { .width = { .betweenChildren = 2 } }, .color = COLOR_RED })`
配置要在子元素之间绘制的边框的宽度和颜色。如果父元素使用 `.layoutDirection = CLAY_LEFT_TO_RIGHT`,这些边框将是垂直线,如果父元素使用 `CLAY_TOP_TO_BOTTOM`,则是水平线。与 `.left, .top` 等不同,此选项**将生成表示子元素之间边框的额外矩形渲染命令。** 因此,渲染器不需要专门实现这些边框元素的渲染。
**示例**
```
// 300x300 container with a 1px red border around all the edges
CLAY(CLAY_ID("OuterBorder"), {
.layout = { .sizing = { .width = CLAY_SIZING_FIXED(300), .height = CLAY_SIZING_FIXED(300) } },
.border = { .width = { 1, 1, 1, 1, 0 }, .color = COLOR_RED }
}) {
// ...
}
// Container with a 3px yellow bottom border
CLAY(CLAY_ID("OuterBorder"), {
.border = { .width = { .bottom = 3 }, .color = COLOR_YELLOW }
}) {
// ...
}
// Container with a 5px curved border around the edges, and a 5px blue border between all children laid out top to bottom
CLAY(CLAY_ID("OuterBorder"), {
.layout = { .layoutDirection = CLAY_TOP_TO_BOTTOM },
.border = { .width = { 5, 5, 5, 5, 5 }, .color = COLOR_BLUE }
}) {
// Child
// -- 5px blue border will be here --
// Child
// -- 5px blue border will be here --
// Child
}
```
**渲染**
元素受 [culling](#visibility-culling) 约束。否则,将创建一个表示容器的 `commandType = CLAY_RENDER_COMMAND_TYPE_BORDER` 的 `Clay_RenderCommand`。
边框和圆角的渲染留给用户。请参阅提供的 [Raylib Renderer](https://github.com/nicbarker/clay/tree/main/renderers/raylib) 以获取有关如何使用线条和曲线基元绘制边框的示例。
### Clay_FloatingElementConfig
**用法**
`CLAY(CLAY_ID("Floating"), { .floating = { ...floating config } }) {}`
**注意事项**
**Floating Elements** 定义了一个“浮动”在其他内容之上的元素。典型用例包括工具提示和模态框。
浮动容器:
- 使用默认配置,附加到其“父元素”的左上角
- 不影响其父元素的宽度和高度
- 不影响兄弟元素的定位
- 根据其 z-index,可以出现在其他元素的上方或下方,部分或完全遮挡它们
- 除了定位之外,其功能与标准元素完全一样——包括扩展以适应其子元素等。
思考浮动容器时最简单的心理模型是,它们是一个完全独立的 UI 层次结构,附加到其“父元素”上的特定 x,y 点。
浮动元素使用 `Clay_FloatingElementConfig` 来配置特定选项。
**Struct Definition (伪代码)**
```
Clay_FloatingElementConfig {
Clay_Vector2 offset {
float x, float y
};
Clay_Dimensions expand {
float width, float height
};
uint32_t parentId;
int16_t zIndex;
Clay_FloatingAttachPoints attachPoint {
.element = CLAY_ATTACH_POINT_LEFT_TOP (default) | CLAY_ATTACH_POINT_LEFT_CENTER | CLAY_ATTACH_POINT_LEFT_BOTTOM | CLAY_ATTACH_POINT_CENTER_TOP | CLAY_ATTACH_POINT_CENTER_CENTER | CLAY_ATTACH_POINT_CENTER_BOTTOM | CLAY_ATTACH_POINT_RIGHT_TOP | CLAY_ATTACH_POINT_RIGHT_CENTER | CLAY_ATTACH_POINT_RIGHT_BOTTOM
.parent = CLAY_ATTACH_POINT_LEFT_TOP (default) | CLAY_ATTACH_POINT_LEFT_CENTER | CLAY_ATTACH_POINT_LEFT_BOTTOM | CLAY_ATTACH_POINT_CENTER_TOP | CLAY_ATTACH_POINT_CENTER_CENTER | CLAY_ATTACH_POINT_CENTER_BOTTOM | CLAY_ATTACH_POINT_RIGHT_TOP | CLAY_ATTACH_POINT_RIGHT_CENTER | CLAY_ATTACH_POINT_RIGHT_BOTTOM
};
Clay_FloatingAttachToElement attachTo {
CLAY_POINTER_CAPTURE_MODE_CAPTURE (default),
CLAY_POINTER_CAPTURE_MODE_PASSTHROUGH
};
Clay_FloatingAttachToElement attachTo {
CLAY_ATTACH_TO_NONE (default),
CLAY_ATTACH_TO_PARENT,
CLAY_ATTACH_TO_ELEMENT_WITH_ID,
CLAY_ATTACH_TO_ROOT,
};
};
```
**字段**
**`.offset`** - `Clay_Vector2`
`CLAY(CLAY_ID("Floating"), { .floating = { .offset = { -24, -24 } } })`
用于在计算完所有其他布局_之后_将位置偏移应用于浮动容器。
**`.expand`** - `Clay_Dimensions`
`CLAY(CLAY_ID("Floating"), { .floating = { .expand = { 16, 16 } } })`
用于在布局子元素_之前_扩展浮动容器的宽度和高度。
**`.zIndex`** - `float`
`CLAY(CLAY_ID("Floating"), { .floating = { .zIndex = 1 } })`
所有浮动元素(及其整个子层次结构)将在转换为渲染命令之前按 `.zIndex` 顺序排序。如果按顺序绘制渲染命令,具有较高 `.zIndex` 值的元素将绘制在顶部。
**`.parentId`** - `uint32_t`
`CLAY(CLAY_ID("Floating"), { .floating = { .parentId = Clay_GetElementId("HeaderButton").id } })`
默认情况下,浮动容器将“附加”到声明它们的父元素。但是,在某些情况下,此限制可能会导致严重的性能或人机工程学问题。`.parentId` 允许您指定一个 `CLAY_ID().id` 来附加浮动容器。具有匹配 ID 的父元素可以在层次结构中的任何位置声明,不需要特别在浮动容器之前或之后声明。
考虑以下情况:
```
// Load an image somewhere in your code
CLAY(CLAY_IDI("SidebarButton", 1), { }) {
// .. some button contents
if (tooltip.attachedButtonIndex == 1) {
CLAY(CLAY_ID("OptionTooltip"), { /* floating config... */ })
}
}
CLAY(CLAY_IDI("SidebarButton", 2), { }) {
// .. some button contents
if (tooltip.attachedButtonIndex == 2) {
CLAY(CLAY_ID("OptionTooltip"), { /* floating config... */ })
}
}
CLAY(CLAY_IDI("SidebarButton", 3), { }) {
// .. some button contents
if (tooltip.attachedButtonIndex == 3) {
CLAY(CLAY_ID("OptionTooltip"), { /* floating config... */ })
}
}
CLAY(CLAY_IDI("SidebarButton", 4), { }) {
// .. some button contents
if (tooltip.attachedButtonIndex == 4) {
CLAY(CLAY_ID("OptionTooltip"), { /* floating config... */ })
}
}
CLAY(CLAY_IDI("SidebarButton", 5), { }) {
// .. some button contents
if (tooltip.attachedButtonIndex == 5) {
CLAY(CLAY_ID("OptionTooltip"), { /* floating config... */ })
}
}
```
上述 UI 的定义因需要有条件地将浮动工具提示渲染为许多可能元素的子元素而受到严重污染。使用 `parentId` 的替代方法如下所示:
```
// Load an image somewhere in your code
CLAY(CLAY_IDI("SidebarButton", 1), { }) {
// .. some button contents
}
CLAY(CLAY_IDI("SidebarButton", 2), { }) {
// .. some button contents
}
CLAY(CLAY_IDI("SidebarButton", 3), { }) {
// .. some button contents
}
CLAY(CLAY_IDI("SidebarButton", 4), { }) {
// .. some button contents
}
CLAY(CLAY_IDI("SidebarButton", 5), { }) {
// .. some button contents
}
// Any other point in the hierarchy
CLAY(CLAY_ID("OptionTooltip"), { .floating = { .attachTo = CLAY_ATTACH_TO_ELEMENT_ID, .parentId = CLAY_IDI("SidebarButton", tooltip.attachedButtonIndex).id }) {
// Tooltip contents...
}
```
**`.attachment`** - `Clay_FloatingAttachPoints`
`CLAY(CLAY_ID("Floating"), { .floating = { .attachment = { .element = CLAY_ATTACH_POINT_LEFT_CENTER, .parent = CLAY_ATTACH_POINT_RIGHT_TOP } } }) {}`
在定位浮动容器方面,`.attachment` 指定
- 浮动容器上的点(`.element`)
- 它“附加”到的父元素上的点(`.parent`)

您可以在心理上将其可视化为在浮动容器上找到一个点,然后在父元素上找到一个点,并将它们重叠排列。
例如:
“将浮动容器的 LEFT_CENTER 附加到父元素的 RIGHT_TOP”
`CLAY(CLAY_ID("Floating"), { .floating = { .attachment = { .element = CLAY_ATTACH_POINT_LEFT_CENTER, .parent = CLAY_ATTACH_POINT_RIGHT_TOP } } });`

**`.pointerCaptureMode`** - `Clay_PointerCaptureMode`
`CLAY({ .floating = { .pointerCaptureMode = CLAY_POINTER_CAPTURE_MODE_CAPTURE } })`
控制悬停和点击等指针事件是否应穿透到此浮动元素下方的内容,或者指针是否应被此浮动元素“捕获”。默认为 `CLAY_POINTER_CAPTURE_MODE_CAPTURE`。
**示例**
```
// Horizontal container with three option buttons
CLAY(CLAY_ID("OptionsList"), { .layout = { childGap = 16 } }) {
CLAY(CLAY_IDI("Option", 1), { .layout = { padding = CLAY_PADDING_ALL(16)), .backgroundColor = COLOR_BLUE } }) {
CLAY_TEXT(CLAY_STRING("Option 1"), CLAY_TEXT_CONFIG());
}
CLAY(CLAY_IDI("Option", 2), { .layout = { padding = CLAY_PADDING_ALL(16)), .backgroundColor = COLOR_BLUE } }) {
CLAY_TEXT(CLAY_STRING("Option 2"), CLAY_TEXT_CONFIG());
// Floating tooltip will attach above the "Option 2" container and not affect widths or positions of other elements
CLAY(CLAY_ID("OptionTooltip"), { .floating = { .zIndex = 1, .attachment = { .element = CLAY_ATTACH_POINT_CENTER_BOTTOM, .parent = CLAY_ATTACH_POINT_CENTER_TOP } } }) {
CLAY_TEXT(CLAY_STRING("Most popular!"), CLAY_TEXT_CONFIG());
}
}
CLAY(CLAY_IDI("Option", 3), { .layout = { padding = CLAY_PADDING_ALL(16)), .backgroundColor = COLOR_BLUE } }) {
CLAY_TEXT(CLAY_STRING("Option 3"), CLAY_TEXT_CONFIG());
}
}
// Floating containers can also be declared elsewhere in a layout, to avoid branching or polluting other UI
for (int i = 0; i < 1000; i++) {
CLAY(CLAY_IDI("Option", i + 1), { }) {
// ...
}
}
// Note the use of "parentId".
// Floating tooltip will attach above the "Option 2" container and not affect widths or positions of other elements
CLAY(CLAY_ID("OptionTooltip"), { .floating = { .parentId = CLAY_IDI("Option", 2).id, .zIndex = 1, .attachment = { .element = CLAY_ATTACH_POINT_CENTER_BOTTOM, .parent = CLAY_ATTACH_POINT_TOP_CENTER } } }) {
CLAY_TEXT(CLAY_STRING("Most popular!"), CLAY_TEXT_CONFIG());
}
```
使用 `.parentId` 时,浮动容器可以在 `BeginLayout` 之后和 `EndLayout` 之前的任何位置声明。使用 `Clay_FloatingElementConfig` 时,与 `.parentId` 匹配的目标元素不需要存在。
**渲染**
`Clay_FloatingElementConfig` 不会生成任何特定的渲染命令。
### Clay_CustomElementConfig
**用法**
`CLAY(CLAY_ID("Custom"), { .custom = { .customData = &something } }) {}`
**注意事项**
**Clay_CustomElementConfig** 允许用户将自定义数据传递给渲染器。
**Struct Definition (伪代码)**
```
typedef struct
{
void * customData;
} Clay_CustomElementConfig;
```
**字段**
`.customData` - ` *`
`CLAY({ .custom = { .customData = &myCustomData } })`
`.customData` 是一个通用的 void 指针,可用于将自定义数据传递给渲染器。
**示例**
```
#include "clay.h"
typedef enum {
CUSTOM_ELEMENT_TYPE_MODEL,
CUSTOM_ELEMENT_TYPE_VIDEO
} CustomElementType;
// A rough example of how you could handle laying out 3d models in your UI
typedef struct {
CustomElementType type;
union {
Model model;
Video video;
// ...
};
} CustomElementData;
Model myModel = Load3DModel(filePath);
CustomElement modelElement = (CustomElement) { .type = CUSTOM_ELEMENT_TYPE_MODEL, .model = myModel }
typedef struct {
void* memory;
uintptr_t offset;
} Arena;
// During init
Arena frameArena = (Arena) { .memory = malloc(1024) };
// ...
CLAY(0) {
// Custom elements only take a single pointer, so we need to store the data somewhere
CustomElementData *modelData = (CustomElementData *)(frameArena.memory + frameArena.offset);
*modelData = (CustomElementData) { .type = CUSTOM_ELEMENT_TYPE_MODEL, .model = myModel };
frameArena.offset += sizeof(CustomElementData);
CLAY(CLAY_ID("3DModelViewer"), { .custom = { .customData = modelData } }) {}
}
// Later during your rendering
switch (renderCommand->commandType) {
// ...
case CLAY_RENDER_COMMAND_TYPE_CUSTOM: {
// Your extended struct is passed through
CustomElementData *customElement = renderCommand->config.customElementConfig->customData;
if (!customElement) continue;
switch (customElement->type) {
case CUSTOM_ELEMENT_TYPE_MODEL: {
// Render your 3d model here
break;
}
case CUSTOM_ELEMENT_TYPE_VIDEO: {
// Render your video here
break;
}
// ...
}
break;
}
}
```
**渲染**
元素受 [culling](#visibility-culling) 约束。否则,将创建一个 `commandType = CLAY_RENDER_COMMAND_TYPE_CUSTOM` 的 `Clay_RenderCommand`。
### Clay_Color
```
typedef struct {
float r, g, b, a;
} Clay_Color;
```
`Clay_Color` 是 Clay 声明和渲染中使用的 RGBA 颜色结构体。按照惯例,通道表示为 0-255,但这留给渲染器决定。
注意:使用调试工具时,其内部颜色表示为 0-255。
### Clay_String
```
typedef struct {
bool isStaticallyAllocated;
int32_t length;
const char *chars;
} Clay_String;
```
`Clay_String` 是 clay 在内部用来表示所有字符串的字符串容器。
**字段**
**`.isStaticallyAllocated`** - `bool`
字符串是否是静态分配的,或者换句话说,它是否存在于程序的整个生命周期中。
**`.length`** - `int32_t`
字符串中的字符数,_不包括可选的 null 终止符。_
**`.chars`** - `const char *`
指向字符串内容的指针。此数据不保证以 null 结尾,因此如果您将其传递给期望标准 null 结尾 C 字符串的代码,则需要复制数据并附加 null 终止符。
### Clay_ElementId
```
typedef struct {
uint32_t id;
uint32_t offset;
uint32_t baseId;
Clay_String stringId;
} Clay_ElementId;
```
由 [CLAY_ID](#clay_id) 和 [CLAY_IDI](#clay_idi) 返回,此结构体包含哈希 ID 以及用于生成它的源字符串。
**字段**
**`.id`** - `uint32_t`
从传递给 [CLAY_ID](#clay_id) 或 [CLAY_IDI](#clay_idi) 的字符串派生的唯一 ID。
**`.offset`** - `uint32_t`
如果此 ID 是使用 [CLAY_IDI](#clay_idi) 生成的,`.offset` 是作为第二个参数传递的值。对于 [CLAY_ID](#clay_id),此值始终为 `0`。
**`.baseId`** - `uint32_t`
如果此 ID 是使用 [CLAY_IDI](#clay_idi) 生成的,`.baseId` 是传递的基本字符串的哈希,**在与 `.offset` 进行额外哈希之前**。对于 [CLAY_ID](#clay_id),此值始终与 `.id` 相同。
**`.stringId`** - `Clay_String`
存储调用 [CLAY_ID](#clay_id) 或 [CLAY_IDI](#clay_idi) 时传入的原始字符串。
### Clay_RenderCommandArray
```
typedef struct
{
uint32_t capacity;
uint32_t length;
Clay_RenderCommand *internalArray;
} Clay_RenderCommandArray;
```
由 [Clay_EndLayout](#clay_endlayout) 返回,此数组包含表示计算布局的 [Clay_RenderCommand](#clay_rendercommand)s。
**字段**
**`.capacity`** - `uint32_t`
表示 `.internalArray` 中已分配内存的总容量。
**`.length`** - `uint32_t`
表示存储在地址 `.internalArray` 的 `Clay_RenderCommand` 元素的总数。
**`.internalArray`** - `Clay_RenderCommand`
一个表示计算布局的 [Clay_RenderCommand](#clay_rendercommand)s 数组。如果至少有一个渲染命令,此数组将包含从 `.internalArray[0]` 到 `.internalArray[.length - 1]` 的元素。
### Clay_RenderCommand
```
typedef struct {
Clay_BoundingBox boundingBox;
Clay_RenderData renderData;
uintptr_t userData;
uint32_t id;
int16_t zIndex;
Clay_RenderCommandType commandType;
} Clay_RenderCommand;
```
**字段**
**`.commandType`** - `Clay_RenderCommandType`
一个枚举,指示应如何处理此渲染命令。可能的值包括:
- `CLAY_RENDER_COMMAND_TYPE_NONE` - 应被渲染器忽略,并且在正常情况下 clay 永远不会发出。
- `CLAY_RENDER_COMMAND_TYPE_RECTANGLE` - 应绘制一个矩形,使用 `.config.rectangleElementConfig` 配置
- `CLAY_RENDER_COMMAND_TYPE_BORDER` - 应绘制一个边框,使用 `.config.borderElementConfig` 配置
- `CLAY_RENDER_COMMAND_TYPE_TEXT` - 应绘制文本,使用 `.config.textElementConfig` 配置
- `CLAY_RENDER_COMMAND_TYPE_IMAGE` - 应绘制一个图像,使用 `.config.imageElementConfig` 配置
- `CLAY_RENDER_COMMAND_TYPE_SCISSOR_START` - 以 [glScissor](https://registry.khronos.org/OpenGL-Refpages/gl4/html/glScissor.xhtml) 命名,这表示渲染器应开始剔除绘制在此渲染命令 `.boundingBox` 之外的任何后续像素。
- `CLAY_RENDER_COMMAND_TYPE_SCISSOR_END` - 仅在匹配的 `CLAY_RENDER_COMMAND_TYPE_SCISSOR_START` 命令之后出现,并表示剪切已结束。
- `CLAY_RENDER_COMMAND_TYPE_CUSTOM` - 由用户控制的自定义渲染命令,使用 `.config.customElementConfig` 配置
**`.boundingBox`** - `Clay_BoundingBox`
```
typedef struct {
float x, y, width, height;
} Clay_BoundingBox;
```
一个表示此渲染命令边界框的矩形,其中 `.x` 和 `.y` 表示元素的左上角。
**`.id`** - `uint32_t`
最初用于创建此渲染命令的元素宏的 ID。有关详细信息,请参阅 [CLAY_ID](#clay_id)。
**`.zIndex`** - `int16_t`
元素的 z index,基于传递给此元素所属的根浮动配置。
较高的 z indexes 应渲染在较低的 z indexes _之上_。
**`.renderData`** - `Clay_RenderData`
```
typedef union {
Clay_RectangleRenderData rectangle;
Clay_TextRenderData text;
Clay_ImageRenderData image;
Clay_CustomRenderData custom;
Clay_BorderRenderData border;
} Clay_RenderData;
```
一个包含各种结构体的 C 联合体,类型取决于 `.commandType`。可能的值包括:
- `config.rectangle` - 当 `.commandType == CLAY_RENDER_COMMAND_TYPE_RECTANGLE` 时使用。
- `config.text` - 当 `.commandType == CLAY_RENDER_COMMAND_TYPE_TEXT` 时使用。有关详细信息,请参阅 [Clay_Text](#clay_text)。
- `config.image` - 当 `.commandType == CLAY_RENDER_COMMAND_TYPE_IMAGE` 时使用。有关详细信息,请参阅 [Clay_Image](#clay_imageelementconfig)。
- `config.border` - 当 `.commandType == CLAY_RENDER_COMMAND_TYPE_BORDER` 时使用。有关详细信息,请参阅 [Clay_Border](#clay_borderelementconfig)。
- `config.custom` - 当 `.commandType == CLAY_RENDER_COMMAND_TYPE_CUSTOM` 时使用。有关详细信息,请参阅 [Clay_Custom](#clay_customelementconfig)。
**Union Structs**
```
typedef struct {
Clay_StringSlice stringContents;
Clay_Color textColor;
uint16_t fontId;
uint16_t fontSize;
uint16_t letterSpacing;
uint16_t lineHeight;
} Clay_TextRenderData;
```
```
typedef struct {
Clay_Color backgroundColor;
Clay_CornerRadius cornerRadius;
} Clay_RectangleRenderData;
```
```
typedef struct {
Clay_Color backgroundColor;
Clay_CornerRadius cornerRadius;
void* imageData;
} Clay_ImageRenderData;
```
```
typedef struct {
Clay_Color backgroundColor;
Clay_CornerRadius cornerRadius;
void* customData;
} Clay_CustomRenderData;
```
```
typedef struct {
Clay_Color color;
Clay_CornerRadius cornerRadius;
Clay_BorderWidth width;
} Clay_BorderRenderData;
```
```
typedef union {
Clay_RectangleRenderData rectangle;
Clay_TextRenderData text;
Clay_ImageRenderData image;
Clay_CustomRenderData custom;
Clay_BorderRenderData border;
} Clay_RenderData;
```
### Clay_ScrollContainerData
```
// Data representing the current internal state of a scrolling element.
typedef struct {
// Note: This is a pointer to the real internal scroll position, mutating it may cause a change in final layout.
// Intended for use with external functionality that modifies scroll position, such as scroll bars or auto scrolling.
Clay_Vector2 *scrollPosition;
// The bounding box of the scroll element.
Clay_Dimensions scrollContainerDimensions;
// The outer dimensions of the inner scroll container content, including the padding of the parent scroll container.
Clay_Dimensions contentDimensions;
// The config that was originally passed to the scroll element.
Clay_ClipElementConfig config;
// Indicates whether an actual scroll container matched the provided ID or if the default struct was returned.
bool found;
} Clay_ScrollContainerData;
```
**字段**
**`.scrollPosition`** - `Clay_Vector2 *`
指向此滚动容器内部滚动位置的指针。对其进行变更将导致滚动容器内的元素向上/向下(`.y`)或向左/向右(`.x`)移动。
**`.scrollContainerDimensions`** - `Clay_Dimensions`
```
typedef struct {
float width, height;
} Clay_Dimensions;
```
表示滚动容器本身的外部宽度和高度的尺寸。
**`.contentDimensions`** - `Clay_Dimensions`
```
typedef struct {
float width, height;
} Clay_Dimensions;
```
表示滚动容器_内部_内容的内部宽度和高度的尺寸。只有当 `contentDimensions` 在至少一个维度上大于 `scrollContainerDimensions` 时,滚动才可能。
**`.config`** - `Clay_ClipElementConfig`
匹配的滚动容器元素的 [Clay_ClipElementConfig](#clay_scroll)。
### Clay_ElementData
```
// Bounding box and other data for a specific UI element.
typedef struct {
// The rectangle that encloses this UI element, with the position relative to the root of the layout.
Clay_BoundingBox boundingBox;
// Indicates whether an actual Element matched the provided ID or if the default struct was returned.
bool found;
} Clay_ElementData;
```
**字段**
**`.boundingBox`** - `Clay_BoundingBox`
```
typedef struct {
float x, y, width, height;
} Clay_BoundingBox;
```
一个表示此渲染命令边界框的矩形,其中 `.x` 和 `.y` 表示元素的左上角。
**`.found`** - `bool`
一个布尔值,表示传递给 [Clay_GetElementData](#clay_getelementdata) 的 ID 是否匹配有效元素。如果 `.found` 为 `false`,`.boundingBox` 将是默认值(归零)。
### Clay_PointerData
```
typedef struct
{
Clay_Vector2 position;
Clay_PointerDataInteractionState state;
} Clay_PointerData;
```
**字段**
**`.position`** - `Clay_Vector2`
一个 Vector2,包含鼠标指针的当前 x,y 坐标,这些坐标最初传递到 [Clay_SetPointerState()](#clay_setpointerstate) 中。
**`.state`** - `Clay_PointerDataInteractionState`
```
typedef enum
{
CLAY_POINTER_DATA_PRESSED_THIS_FRAME,
CLAY_POINTER_DATA_PRESSED,
CLAY_POINTER_DATA_RELEASED_THIS_FRAME,
CLAY_POINTER_DATA_RELEASED,
} Clay_PointerDataInteractionState;
```
一个表示指针交互当前“状态”的枚举值。举个例子,考虑一个用户在台式计算机上,将鼠标指针移动到按钮上,单击并按住鼠标左键一小段时间,然后释放它的情况:
- 当鼠标指针在(“悬停”)按钮上,但尚未按下任何鼠标按钮时:`CLAY_POINTER_DATA_RELEASED`
- 用户按下鼠标左键的第一帧:`CLAY_POINTER_DATA_PRESSED_THIS_FRAME`
- 用户仍在按住鼠标左键的所有后续帧:`CLAY_POINTER_DATA_PRESSED`
- 鼠标左键从按下变为释放的单帧:`CLAY_POINTER_DATA_RELEASED_THIS_FRAME`
- 鼠标指针仍在按钮上的所有后续帧:`CLAY_POINTER_DATA_RELEASED`
### Clay_ErrorHandler
```
typedef struct
{
void (*errorHandlerFunction)(Clay_ErrorData errorText);
uintptr_t userData;
} Clay_ErrorHandler;
```
**字段**
**`.errorHandlerFunction`** - `void (Clay_ErrorData errorText) {}`
指向错误处理函数的函数指针,该函数接受 `Clay_ErrorData` 作为参数。当 Clay 遇到内部错误时将调用此函数。
**`.userData`** - `uintptr_t`
指向额外用户数据的通用指针,从 `Clay_Initialize` 透明传递到 Clay 的错误处理回调。默认为 NULL。
### Clay_ErrorData
```
typedef struct
{
Clay_ErrorType errorType;
Clay_String errorText;
uintptr_t userData;
} Clay_ErrorData;
```
**字段**
**`.errorType`** - `Clay_ErrorType`
```
typedef enum {
CLAY_ERROR_TYPE_TEXT_MEASUREMENT_FUNCTION_NOT_PROVIDED,
CLAY_ERROR_TYPE_ARENA_CAPACITY_EXCEEDED,
CLAY_ERROR_TYPE_ELEMENTS_CAPACITY_EXCEEDED,
CLAY_ERROR_TYPE_TEXT_MEASUREMENT_CAPACITY_EXCEEDED,
CLAY_ERROR_TYPE_DUPLICATE_ID,
CLAY_ERROR_TYPE_FLOATING_CONTAINER_PARENT_NOT_FOUND,
CLAY_ERROR_TYPE_INTERNAL_ERROR,
} Clay_ErrorType;
```
一个表示 Clay 遇到的错误类型的枚举。具体情况由用户处理,但作为一般指导:
- `CLAY_ERROR_TYPE_TEXT_MEASUREMENT_FUNCTION_NOT_PROVIDED` - 用户尝试使用 `CLAY_TEXT` 并且要么忘记调用 [Clay_SetMeasureTextFunction](#clay_setmeasuretextfunction),要么意外传递了空函数指针。
- `CLAY_ERROR_TYPE_ARENA_CAPACITY_EXCEEDED` - Clay 初始化时使用的 Arena 对于配置的 [Clay_SetMaxElementCount](#clay_setmaxelementcount) 来说太小了。尝试使用 [Clay_MinMemorySize()](#clay_minmemorysize) 获取当前配置所需的确切字节数。
- `CLAY_ERROR_TYPE_ELEMENTS_CAPACITY_EXCEEDED` - 声明的 UI 层次结构对于配置的最大元素计数来说有太多元素。使用 [Clay_SetMaxElementCount](#clay_setmaxelementcount) 增加最大值,然后再次调用 [Clay_MinMemorySize()](#clay_minmemorysize) 并使用所需的大小重新初始化 clay 的内存。
- `CLAY_ERROR_TYPE_ELEMENTS_CAPACITY_EXCEEDED` - 声明的 UI 层次结构对于配置的文本测量缓存大小来说有太多文本。使用 [Clay_SetMaxMeasureTextCacheWordCount](#clay_setmeasuretextcachesize) 增加最大值,然后再次调用 [Clay_MinMemorySize()](#clay_minmemorysize) 并使用所需的大小重新初始化 clay 的内存。
- `CLAY_ERROR_TYPE_DUPLICATE_ID` - Clays UI Hierarchy 中的两个元素已使用完全相同的 ID 声明。在错误处理函数中设置断点以获取堆栈跟踪,以准确找到发生这种情况的位置。
- `CLAY_ERROR_TYPE_FLOATING_CONTAINER_PARENT_NOT_FOUND` - 声明了一个带有 `.parentId` 属性的 `CLAY_FLOATING` 元素,但未找到具有该 ID 的元素。在错误处理函数中设置断点以获取堆栈跟踪,以准确找到发生这种情况的位置。
- `CLAY_ERROR_TYPE_INTERNAL_ERROR` - Clay 遇到了内部逻辑或内存错误。请将此作为错误报告并提供堆栈跟踪,以帮助我们修复这些问题!
**`.errorText`** - `Clay_String`
一个 [Clay_String](#clay_string),提供错误的可读描述。将来可能会更改,不应依赖它来检测错误类型。
**`.userData`** - `uintptr_t`
指向额外用户数据的通用指针,从 `Clay_Initialize` 透明传递到 Clay 的错误处理回调。默认为 NULL。标签:AI工具, Clay, Flexbox布局, UI布局库, Wasm, WebAssembly, 单头文件, 即时模式GUI, 响应式布局, 声明式UI, 客户端加密, 客户端加密, 嵌入式GUI, 微秒级性能, 渲染器无关, 游戏引擎UI, 零依赖, 静态内存管理