NetSPI/gcpwn
GitHub: NetSPI/gcpwn
一款面向 GCP 的渗透测试框架,集凭证管理、资源枚举与 BloodHound 图谱分析于一体,用于发现云环境中的权限提升路径。
Stars: 305 | Forks: 28

[](https://pypi.org/project/gcpwn/)
[](https://www.python.org/)
[](./LICENSE)
[](https://github.com/NetSPI/gcpwn/stargazers)
[](https://github.com/NetSPI/gcpwn/network)
[](https://github.com/NetSPI/gcpwn/issues)
# GCPwn
## 目录
- [概述](#overview)
- [文档](#documentation)
- [安装简述](#installation-tldr)
- [首次运行简述](#first-run-tldr)
- [未认证运行简述](#unauthenticated-run-tldr)
- [OpenGraph 简述](#opengraph-tldr)
- [模块/数据输出简述](#moduledata-output-tldr)
- [Scripts 文件夹简述](#scripts-folder-tldr)
- [依赖清单](#dependency-inventory)
- [仓库布局](#repository-layout)
- [适用人群](#who-is-this-for)
- [作者、贡献者与许可](#author-contributors-and-license)
- [资源](#resources)
- [致谢](#credits)
## 概述
GCPwn (gee-see-pwn) 是一个 Google Cloud 攻击性安全评估框架,专为基于工作空间的凭证处理、服务枚举、制品收集和基于图的攻击路径分析而构建。
它被设计为以下三种主要工作流的“一站式”解决方案:
- **侦察与枚举:** 利用后台追踪的成功/失败 API 行为、显式的 `testIamPermissions` 调用以及 IAM 绑定分析,来理解从白盒(可能是配置审计)到黑盒场景(在渗透测试期间查找凭证)的有效权限。以 JSON/CSV/Excel 格式导出数据,在发现制品时(例如 Artifact Registry Python 包)下载它们,并通过 `enum_all` 执行广泛的发现,同时在整个过程中使用 `--download` 标志下载数据。
- **漏洞利用:** 执行预打包的漏洞利用工作流,用于蓝队验证和专业的渗透测试演练。
- **图谱与 OpenGraph:** 将收集的数据转换为 OpenGraph 输出,以进行 BloodHound 风格的分析(见下文)。默认情况下,图谱功能侧重于选定的权限提升边,并可以通过更详细的输出、继承评估和多权限边逻辑进行扩展。
`。
3. 从广泛枚举开始,最好是使用**以下选项之一**:
```
# 最小初次扫描:仅枚举发现的资源(不执行 testIamPermissions 或下载调用)。
modules run enum_all
# 常规初次扫描:对受支持的资源执行 testIamPermissions 检查。
# 同时针对 org/folder/project 资源运行精简版的权限列表。
modules run enum_all --iam
# 常规初次扫描 + 下载:执行 testIamPermissions 并在受支持的地方尝试下载内容。
modules run enum_all --iam --download
# 深度扫描:--all-permissions 包含大型 org/folder/project 权限集(10,000+ 权限,分批执行)。可能需要一些时间。
# 查看完整列表或进行自定义,请见:gcpwn/modules/resourcemanager/utilities/data/all_*_permissions.txt。
modules run enum_all --iam --all-permissions
# 深度扫描 + 下载:在受支持的地方启用 artifact/内容下载。
# 使用 `modules run enum_all -h` 查看 token 选项。
# token 示例:cloudrun_revision_env
modules run enum_all --iam --all-permissions --download
```
4. 检查收集到的内容:
```
# 下载的 artifact 默认写入 gcpwn_output/ 目录下。
# 导出收集的数据。
# CSV/JSON 在基础安装中即可使用;Excel 需要从安装部分获取可选的 Excel 依赖。
data export csv
data export json
data export excel
# 查看通过 testIamPermissions 发现的当前凭证权限。
# 使用 --csv 导出完整的行级权限数据(以避免在终端输出中被截断)。
creds info
creds info --csv
# 处理枚举的 IAM bindings 并构建 IAM 摘要。
modules run process_iam_bindings
# 构建兼容 BloodHound 的 graph JSON。
# 将 output.json 导入 BloodHound CE:
# https://bloodhound.specterops.io/get-started/quickstart/community-edition-quickstart
modules run process_og_gcpwn_data --expand-inherited --reset --out output.json
# 可选:将 BloodHound custom node styling 作为单独的实用程序步骤推送。
modules run process_og_node_color_images \
--push-custom-node-attributes-url http://127.0.0.1:8080/api/v2/custom-nodes \
--push-custom-node-attributes-token
```
## 未认证运行简述
有时您可能希望运行未认证或快速模块,而不启动完整的交互式会话。您可以直接运行未认证模块,而无需进入交互式工作空间 shell。这会隐式创建一个名为 `PASSTHROUGH` 的工作空间。
示例:
```
# 通过已安装的 console script 运行
gcpwn --module unauth_apikey_enum_all_scopes --api-key AIza...
# 通过 python module entrypoint 的相同流程
python -m gcpwn --module unauth_apikey_gemini_exploit --api-key AIza...
```
## OpenGraph 简述
默认情况下,OpenGraph 仅对与权限提升路径相关的边及相关资源边进行绘图。默认的 OpenGraph 提升规则白名单位于 `gcpwn/mappings/og_privilege_escalation_paths.json` 中。请查阅 wiki 以了解可用标志的说明,但最佳选项通常是以下命令:
```
modules run process_og_gcpwn_data --expand-inherited --reset --out Bloodhound_Output.json
```
### 图谱策略
OpenGraph 模块结构说明:
- 用户可调用的 OpenGraph 入口模块位于 `gcpwn/modules/opengraph/enumeration/` 下。
- OpenGraph 处理实现位于 `gcpwn/modules/opengraph/processing/` 下。
- `process_og_gcpwn_data` 是主要的图生成/导出模块。
- `process_og_node_color_images` 是用于将自定义节点颜色/图标元数据推送到 BloodHound 的专用工具模块。
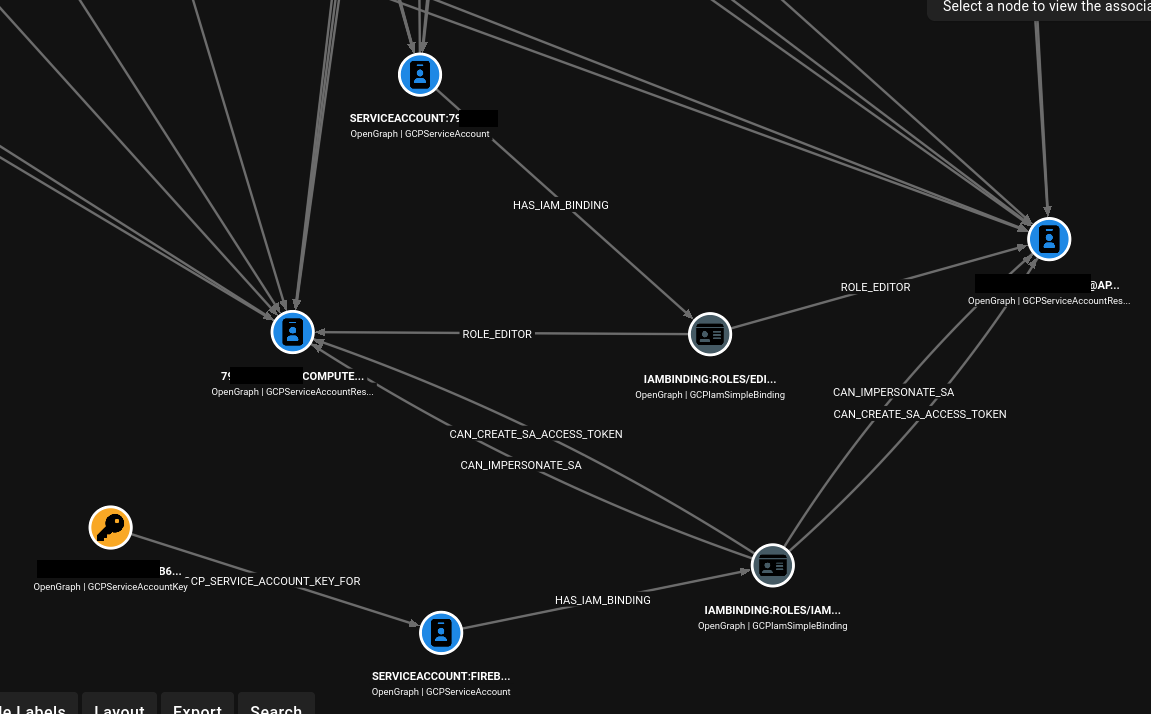
您可能会注意到边指向了 `role@location` 而不是直接指向项目。这是为了在图中保留授权的精确性。如果用户 A 在项目 A 上拥有 `compute.admin` 权限,而用户 B 在项目 A 上拥有 `storage.admin` 权限,将两个用户都直接连接到项目 A,然后再从项目 A 连接到所有资源,就会错误地暗示两个用户都能访问相同的资源,而实际上用户 A 只能访问计算资源,用户 B 只能访问存储资源。正确的模型是通过每个用户在该位置的特定角色绑定节点来路由,然后再扩展到该角色实际能影响的资源。
错误方法(过于宽泛的可达性):
```
User A --> Project A --> Compute & Storage
User B --> Project A --> Compute & Storage
```
正确方法(绑定范围的可达性):
```
User A --> compute_admin@project:A --> Compute Resources in Project A
User B --> storage_admin@project:A --> Storage Resources in Project A
```
生成 OpenGraph JSON:
```
modules run process_og_gcpwn_data --out opengraph_output.json --reset [--include-all] [--expand-inherited] [--cond-eval]
# 示例
(:ABC)> modules run process_og_gcpwn_data --expand-inherited --reset --out my_output.json
[*] Step 1: users_groups (Users/Groups graph)
[*] Completed users_groups: +92 nodes, +0 edges
[*] Step 2: iam_bindings (IAM bindings graph)
[*] Completed iam_bindings: +109 nodes, +201 edges
[*] Step 3: inferred_permissions (Inferred permissions graph)
[*] Completed inferred_permissions: +2 nodes, +2 edges
[*] Step 4: resource_expansion (Resource expansion graph)
[*] Completed resource_expansion: +63 nodes, +62 edges
[*] Pruned isolated service-account IAM-binding islands (pairs=17, key_islands=5, nodes=50, edges=28).
[*] Pruned orphan implied-IAM-binding nodes (implied_bindings=2, nodes=2, edges=2).
[*] Pruned isolated service-account nodes (service_accounts=43, nodes=43, edges=0).
[*] OpenGraph generation complete. Nodes: 171 | Edges: 235
[*] Saved graph JSON to my_output.json
# 将输出的 JSON 传递到你本地安装的 BloodHound
> head TEST.json -n 20
{
"metadata": {
"source_kind": "GCPBase"
},
"graph": {
"nodes": [
{
"id": "allUsers",
"kinds": [
"GCPAllUsers",
"GCPPrincipal"
],
"properties": {
"display_name": "allUsers",
"source": "iam_members"
}
},
{
"id": "combo_iambinding:RESET_COMPUTE_STARTUP_SA@project:#06e0003fe1",
"kinds": [
[TRUNCATED]
```
关于在 BloodHound 中自定义节点颜色/图标,请参阅下文的 [OpenGraph 节点自定义简述](#opengraph-node-customize-tldr)。
可选标志:
- `--include-all`:包含更广泛的关系输出,这些输出可能不是直接的权限提升路径(例如,存在一个绑定,但并不是提升权限的直接途径)。
- `--expand-inherited`:展开继承的 IAM 范围关系。
- `--cond-eval`:目前保留条件工作流的底层结构(占位行为)。
- `--reset`:在生成之前清除之前的 OpenGraph DB 状态。
然后将 JSON 导入到 [BloodHound CE](https://bloodhound.specterops.io/get-started/quickstart/community-edition-quickstart) 中。
### 添加自定义边简述
如果您想添加自己的权限提升边(或任何边)以便默认调用,请编辑 `og_privilege_escalation_paths.json` 并添加您的规则。您需要知道要标记哪些权限。我们在下面介绍了如何添加单权限边,wiki 中涵盖了多权限边规则。
#### 添加单权限边
假设我们要标记 `cloudkms.cryptoKeys.update` 并将其添加到默认的单权限规则中。
1. 添加到 权限 --> 角色 字典
- 如果您的目标权限(即 `cloudkms.cryptoKeys.update`)尚未包含在内,请在 `scripts/build_predfined_perm_to_role_input.txt` 的新行中添加该权限
- 在您自己的私有 GCP 环境中使用您自己的 GCP 凭证(例如免费的 GCP 账户),作为经过身份验证的用户运行 `./scripts/build_predefined_perm_to_roles.sh scripts/build_predfined_perm_to_role_input.txt > perm_to_role_mappings.json`。此脚本会获取 GCP 环境中所有预定义角色的所有权限,以显示哪些角色映射到您的目标权限。您也可以使用 https://docs.cloud.google.com/iam/docs/roles-permissions 手动将映射添加到 `gcpwn/mappings/og_permission_to_roles_map.json` 中
- 您应该会在 `perm_to_role_mappings.json` 中看到 权限 --> 角色 的映射。用 `perm_to_role_mappings.json` 的内容替换 `gcpwn/mappings/og_permission_to_roles_map.json`
2. 将规则定义添加到 `og_privilege_escalation_paths.json` 中(注意:wiki 中涵盖了多权限规则)。在我们的例子中,它可能如下面的条目所示。注意 `resource_scopes_possible` 是可能会看到具有这些权限的绑定的地方,而 `resource_types` 是您将要绘制边指向的实际资源节点。例如,您可能会看到附加到项目 IAM 绑定或直接附加到密钥 IAM 绑定的 `cloudkms.cryptoKeys.update`,但根据上述推理,在这两种情况下,最终节点都是密钥节点,而不是项目节点。如果 `cloudkms.cryptoKeys.update` 附加到项目 IAM 绑定,gcpwn 会将边扩展到在该项目中发现的密钥节点,而不是结束于项目节点。
```
"single_permission_rules": {
"CAN_DISABLE_KMS_KEY": {
"permission": "cloudkms.cryptoKeys.update",
"description": "Can update KMS crypto key settings including disabling or changing key behavior.",
"resource_scopes_possible": ["project", "kmscryptokey"],
"target_selector": {
"mode": "resource_types",
"resource_types": ["kmscryptokey"]
}
}
}
```
3. 当在 BloodHound 中被导入时,最终的 OpenGraph 边可能如下所示
```
user:alice@example.com
-[HAS_IAM_BINDING]->
iambinding:roles/cloudkms.admin@project:my-project
-[CAN_DISABLE_KMS_KEY]->
resource:projects/my-project/locations/us-central1/keyRings/prod/cryptoKeys/app-key
```
### OpenGraph 节点自定义简述
如果您需要 OpenGraph 节点颜色/图标,请在将图 JSON 导入 BloodHound 后使用此功能。
直接标志:
```
modules run process_og_node_color_images \
--push-custom-node-attributes-url http://127.0.0.1:8080/api/v2/custom-nodes \
--custom-node-auth-mode signature \
--push-custom-node-attributes-token-id \
--push-custom-node-attributes-token-key
```
交互式:
```
(None:None)> modules run process_og_node_color_images
[*] No arguments supplied. Launching BloodHound custom-node sync setup.
[*] BloodHound custom-node URL (press Enter to use default: http://127.0.0.1:8080/api/v2/custom-nodes):
> Custom-node sync: choose auth mode
>> [1] Bearer JWT
>> [2] API key signature
> [3] Exit
> Choose an option: 2
> Choose a saved BloodHound API token or enter a new one:
>> [1] Saved Token ID: (http://127.0.0.1:8080/api/v2/custom-nodes)
>> [2] Enter a new API token ID/key
> [3] Exit
> Choose an option: 1
[*] custom-nodes sync complete: unchanged=46, updated=0, created=0
```
### OpenGraph Cypher 简述
这些示例假设您的 OpenGraph JSON 已经被导入到 Neo4j/BloodHound 兼容的工具中。根据需要删除/修改 `LIMIT` 行。
1. 查看所有节点和边
```
MATCH (n)-[r]->(m)
RETURN n, r, m
LIMIT 1000
```
2. 查看所有节点和边,但不包含服务代理关联的数据
```
MATCH (n)-[r]->(m)
WHERE coalesce(n.is_service_agent, false) = false
AND coalesce(m.is_service_agent, false) = false
AND coalesce(n.service_agent_role, false) = false
AND coalesce(m.service_agent_role, false) = false
RETURN n, r, m
LIMIT 1000
```
3. 查看所有节点和边,仅限推断的 IAM 边
```
MATCH (p)-[:HAS_IMPLIED_PERMISSIONS]->(g)-[r]->(t)
WHERE type(r) STARTS WITH "INFERRED_"
RETURN p, g, r, t
LIMIT 1000
```
4. 查看所有节点和边,仅限基于绑定的 IAM 边
```
MATCH (p)-[seed:HAS_IAM_BINDING|HAS_COMBO_BINDING]->(g)
OPTIONAL MATCH (g)-[r]->(t)
WHERE r IS NULL OR NOT type(r) STARTS WITH "INFERRED_"
RETURN p, seed, g, r, t
LIMIT 1000
```
5. 查找到 `roles/owner` 或任何自定义角色的路径(替换 `ABC_Name`)
```
MATCH p=(principal)-[:HAS_IAM_BINDING]->(binding:GCPIamSimpleBinding)
WHERE binding.role_name IN ["roles/owner", "ABC_Name"]
OPTIONAL MATCH (binding)-[r]->(target)
RETURN principal, binding, r, target, p
LIMIT 1000
```
6. 识别一个服务账号导致另一个服务账号的路径
```
MATCH p=(sa1:GCPServiceAccount)-[*1..6]->(sa2)
WHERE (sa2:GCPServiceAccount OR sa2:GCPServiceAccountResource)
AND sa1 <> sa2
RETURN p
LIMIT 500
```
## 模块/数据输出简述
### 模块输出格式
默认输出为 `text`。您可以通过以下方式切换工作空间输出格式:
```
configs list
configs set std_output_format text
configs set std_output_format table
```
`table` 模式需要上述安装部分中介绍的可选依赖 `prettytable`。
### 数据输出和导出
```
# 将所有收集到的 service 数据导出为一个 CSV blob
data export csv
# 将所有收集到的 service 数据导出为一个 JSON blob
data export json
# 将所有收集到的 service 数据导出为一个 Excel workbook
data export excel
# 将所有收集到的 service 数据导出到指定的 Excel 文件路径
data export excel --out-file ./gcpwn_export.xlsx
# 导出层级结构图像 (SVG)
data export treeimage
# 针对 SQLite 运行直接 SQL(默认为 service DB)
data sql --db service "SELECT * FROM iam_allow_policies LIMIT 25"
# 清除当前 workspace 的 service DB 行(破坏性操作)
data wipe-service --yes
```
## Scripts 文件夹简述
此 GitHub 仓库中包含的 `scripts/` 下的脚本用于支持设置、自定义和开发工作流。
正常使用工具时并不需要它们,并且它们也不是已安装包的标准运行时路径的一部分。
当您想要修改行为、重新生成映射数据或遵循高级项目工作流时,请使用它们。
如需了解背景,请查阅 wiki 和本 README 中关于添加边的 OpenGraph 说明。
## 依赖清单
直接运行时依赖源自 `requirements.txt`(并通过 `pyproject.toml` 加载)### 核心实用工具
- `boto3>=1.43.6,<2`(传递包含 `botocore`)
- `pandas==3.0.2`
- `requests==2.33.1`
### Google API 和认证库
- `google-api-core==2.30.3`
- `google-api-python-client==2.196.0`
- `google-auth-httplib2==0.4.0`
- `google-auth-oauthlib==1.4.0`
### Google Cloud 客户端库
- `google-cloud-*` 包固定在 `requirements.txt` 中(例如:`google-cloud-compute`、`google-cloud-storage`、`google-cloud-resource-manager`、`google-cloud-container` 等)。
### Vertex/GenAI 支持
- `google-genai==1.74.0`
### 可选附加功能
- `prettytable==3.17.0`,通过 `pip install "gcpwn[table]"` 安装
- `xlsxwriter==3.2.9`,通过 `pip install "gcpwn[excel]"` 安装
### 仅限开发用的附加功能
- `pytest>=9.0`,通过 `pip install "gcpwn[dev]"` 安装
### 仅用于发布构建的依赖
- `pyinstaller==6.20.0` 被 `.github/workflows/build_release.yml` 用于打包发布制品的独立可执行文件。
- GCPwn 的正常运行时使用不需要它。
提示:如果您想从 GitHub 获取 SBOM,请打开此仓库并转到 `Insights` -> `Dependency graph`,然后使用 `Export SBOM`。
## 仓库布局
- `gcpwn/`:主包根目录。
- `gcpwn/__main__.py`:`python -m gcpwn` 入口点。
- `gcpwn/cli/`:命令处理器和工作空间命令处理程序。
- `gcpwn/core/`:会话/配置/DB/运行时/导出原语。
- `gcpwn/modules/`:服务模块(`everything`、`opengraph`、特定服务模块)。
- `gcpwn/mappings/`:跨模块使用的静态映射/配置数据。
- `tests/`:单元/集成/模块测试。
- `databases/`:用于工作空间、会话和服务数据的 SQLite 存储。
## 适用人群?
- **渗透测试人员:** 自动化 GCP 侦察和漏洞利用路径发现的大部分工作。
- **云安全学习者:** 快速映射 API/资源和权限行为。
- **安全研究人员:** 批量执行模块 + 集中的数据/操作收集,以便进行更深入的分析/代理。
## 作者、贡献者和许可
- 作者:Scott (@WebbinRoot) via NetSPI
- 许可证:BSD-3-Clause (`LICENSE`)
- 贡献者:欢迎提交 PR 和 issue
## 资源
该工具在几个方面发生了变化,新视频即将推出。目前,以下内容应该能提供很好的参考:
- fwd:cloudsec 2024:https://www.youtube.com/watch?v=opvv9h3Qe0s
- DEF CON 32 Cloud Village:https://www.youtube.com/watch?v=rxXyYo1n9cw
- 介绍博客:https://www.netspi.com/blog/technical-blog/cloud-pentesting/introduction-to-gcpwn-part-1/
## 致谢
站在巨人的肩膀上构建;灵感、代码和/或支持性研究来源于:
- GMap API Scanner:https://github.com/ozguralp/gmapsapiscanner
- Rhino Security:https://rhinosecuritylabs.com/gcp/privilege-escalation-google-cloud-platform-part-1/
- GCPBucketBrute:https://github.com/RhinoSecurityLabs/GCPBucketBrute
- Google Cloud Python 文档:https://cloud.google.com/python/docs/reference
免责声明: 仅在您拥有或获得明确授权评估的系统、项目和环境中使用此工具。未经授权的使用可能会违反法律、政策或服务条款。
## 文档 文档维护在 GitHub Wiki 中: - https://github.com/NetSPI/gcpwn/wiki Wiki 快速链接: - 入门指南:https://github.com/NetSPI/gcpwn/wiki/Getting-Started - 认证参考:https://github.com/NetSPI/gcpwn/wiki/Authentication-Reference - 工作空间说明:https://github.com/NetSPI/gcpwn/wiki/Workspace-Instructions - CLI 模块参考:https://github.com/NetSPI/gcpwn/wiki/CLI-Module-Reference - 常见用例:https://github.com/NetSPI/gcpwn/wiki/Common-Use-Cases - OpenGraph 概述与用法:https://github.com/NetSPI/gcpwn/wiki/OpenGraph-Overview-and-Usage - OpenGraph 添加自定义内容:https://github.com/NetSPI/gcpwn/wiki/OpenGraph-Add-Your-Own-Content 其他项目文档: - 贡献:`CONTRIBUTING.md` - 路线图:`ROADMAP.md` - 许可证:`LICENSE` ## 安装简述 安装策略是将非 Google 依赖保持在最低限度,希望这能让您在需要时更容易获得工具的审批。`xlsxwriter` 和 `prettytable` 是可选的,仅当您想要这些额外功能时才安装,如下所示。 ### 选项 1:本地 Git Clone 安装 ``` git clone https://github.com/NetSPI/gcpwn.git cd gcpwn python3 -m venv .venv source .venv/bin/activate pip install --upgrade pip ``` 基础安装(无可选的表格/Excel 依赖): ``` pip install -r requirements.txt ``` 安装可选的表格输出支持: ``` pip install prettytable==3.17.0 ``` 安装可选的 Excel 导出支持: ``` pip install xlsxwriter==3.2.9 ``` 运行工具: ``` python -m gcpwn ``` ### 选项 2:Pip 安装 (PyPI) ``` pip3 install gcpwn ``` 如果您需要可选的表格渲染(配置中的 table 标准输出选项)和/或 Excel 导出支持(`data export excel` 选项): ``` pip3 install "gcpwn[table]" pip3 install "gcpwn[excel]" # both extras pip3 install "gcpwn[table,excel]" ``` 运行工具: ``` gcpwn ``` 如果您的 shell 找不到 `gcpwn`,请运行: ``` python -m gcpwn ``` ### 选项 3:发布版本下载 从 GitHub Releases 下载发布二进制文件: - https://github.com/NetSPI/gcpwn/releases 使用与您的操作系统和 CPU 架构相匹配的二进制文件(例如 Linux/macOS/Windows 以及 `amd64` 或 `arm64`)。 示例(Linux/macOS): ``` chmod +x ./gcpwn ./gcpwn ``` ### 选项 4:Docker ``` docker build -t gcpwn . docker run --rm -it gcpwn ``` 使用可选的额外功能构建(如果您希望在容器中使用表格渲染和/或 Excel 导出功能): ``` # prettytable extra docker build --build-arg GCPWN_EXTRAS=table -t gcpwn . # xlsxwriter extra docker build --build-arg GCPWN_EXTRAS=excel -t gcpwn . # both extras docker build --build-arg GCPWN_EXTRAS=table,excel -t gcpwn . ``` 如果您希望在运行之间保持 DB/输出的本地持久化,请挂载数据卷: ``` docker run --rm -it \ -v "$(pwd)/databases:/opt/gcpwn/databases" \ -v "$(pwd)/gcpwn_output:/opt/gcpwn/gcpwn_output" \ gcpwn ``` ## 首次运行简述 1. 通过使用上述安装部分中的某个命令启动程序,来创建/选择一个工作空间。 2. 加载凭证(用户/服务/OAuth token)。如果您使用的是 `gcloud`,在加载 ADC 风格的凭证时,您可能需要运行 `gcloud config set project标签:GCP, Python, StruQ, 代码分析, 凭证管理, 攻击路径分析, 无后门, 渗透测试框架, 请求拦截, 足迹分析, 逆向工具, 防御