memN0ps/illusion-rs
GitHub: memN0ps/illusion-rs
基于 Rust 的 Windows UEFI Type-1 蓝色药片 Hypervisor,支持 Intel VT-x EPT 隐藏 Hook 与检测绕过,适用于虚拟化安全研究与攻防实验。
Stars: 400 | Forks: 52
# Windows UEFI Blue Pill Type-1 Hypervisor in Rust (代号:Illusion)


一个轻量级、内存安全且极速的基于 Rust 的 Type-1 研究 Hypervisor,支持 Intel VT-x Hook,专注于研究虚拟化的核心概念。
**注意:** [**Illusion** Hypervisor](https://github.com/memN0ps/illusion-rs)(Windows UEFI Blue Pill Type-1 Hypervisor in Rust)更稳定,支持更多功能,整体设计也更好。[**Matrix** Hypervisor](https://github.com/memN0ps/matrix-rs)(Windows Kernel Blue Pill Type-2 Hypervisor in Rust)是一个较旧的实验版本,不适用于生产环境。这两个项目都旨在作为模板,帮助人们开始使用 Rust 进行 Hypervisor 开发。
## 描述
**分页:将 x64 虚拟地址转换为物理地址**
此图说明了在传统分页系统中将 x64 虚拟地址转换为物理地址的机制。在 x64 架构中,此转换涉及四级页表:PML4、PDPT、PDT 和 PT(Page Map Level 4、Page Directory Pointer Table、Page Directory Table 和 Page Table)。每一级使用虚拟地址的 9 位来索引下一级,最终指向 RAM 中的特定物理地址。此过程由操作系统和内存管理单元 (MMU) 管理,MMU 将软件使用的虚拟地址转换为硬件使用的物理地址。
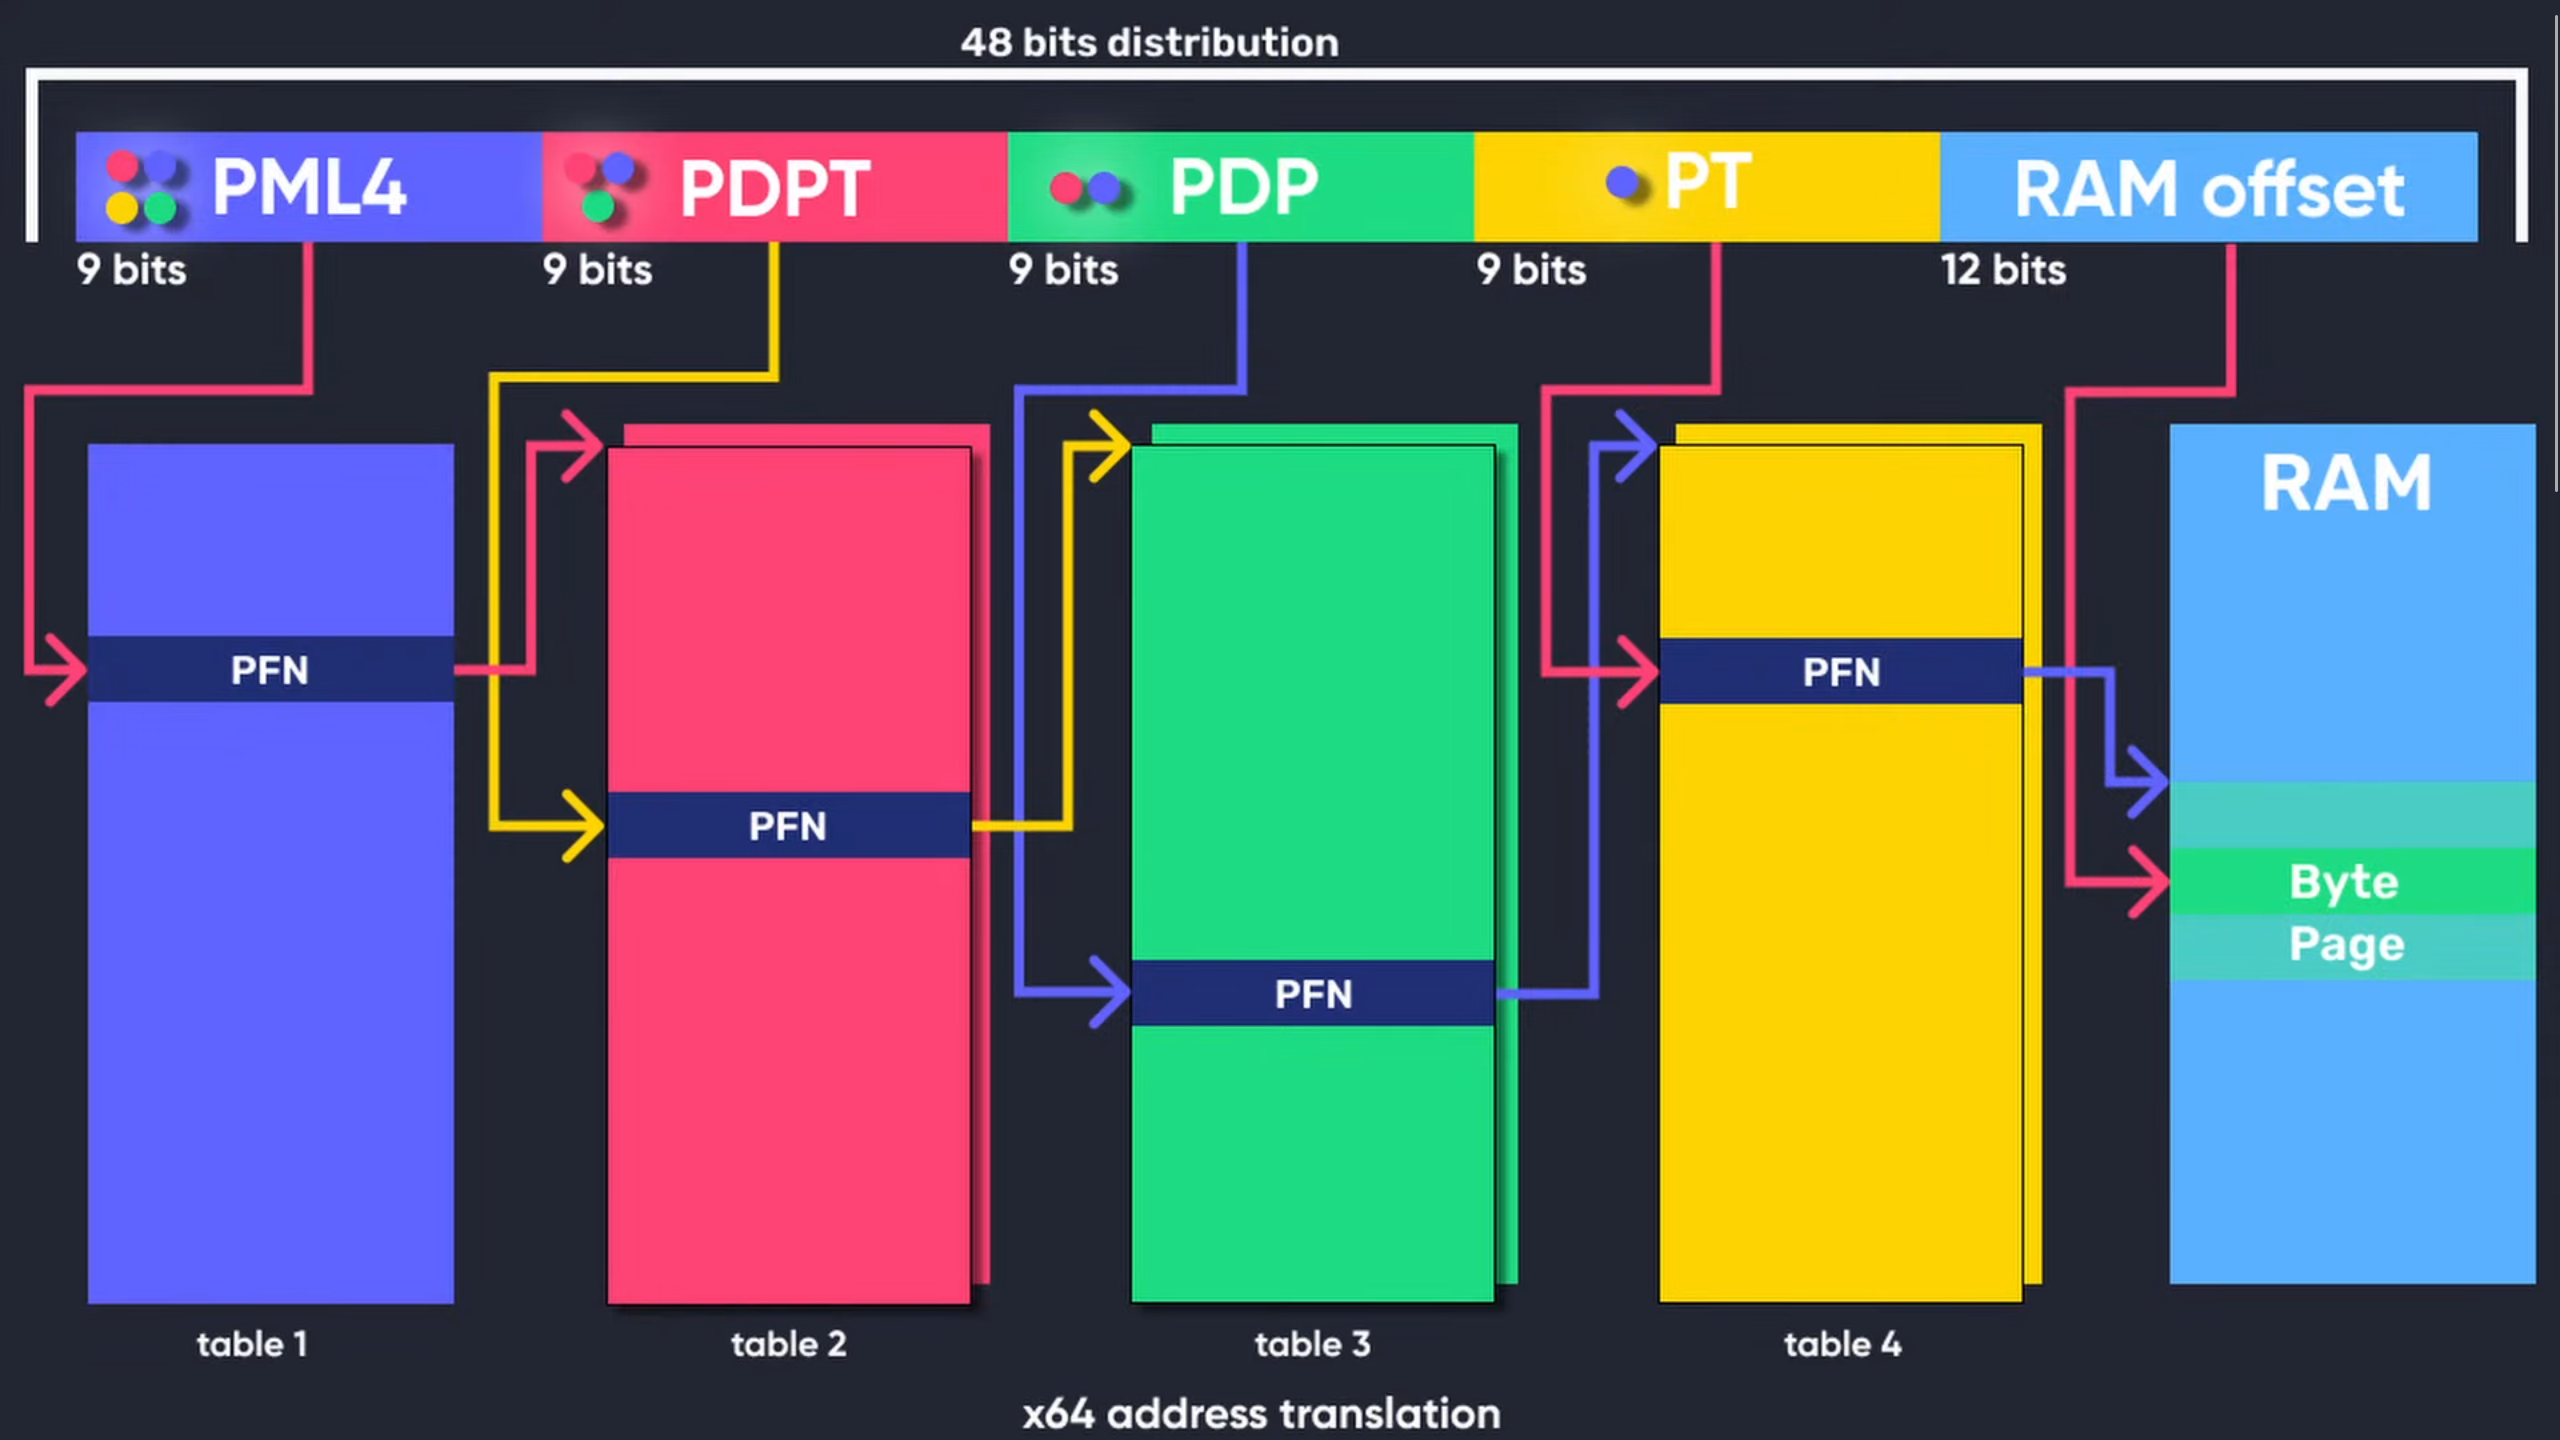
**图 1:[x64 虚拟地址转换](https://www.youtube.com/watch?v=W3o5jYHMh8s)(完全归功于:[Guided Hacking](https://guidedhacking.com/threads/x64-virtual-address-translation.20416/))**
**扩展页表 (EPT):二级地址转换 (SLAT)**
扩展页表 (EPT) 是硬件辅助虚拟化技术(如 Intel VT-x 和 AMD-V 的嵌套页表 (NPT))的一项功能。EPT 实现了二级地址转换 (SLAT),专为虚拟化环境设计。传统分页在 Guest OS 内部将虚拟地址转换为物理地址,而 EPT 通过将 Guest 物理地址(由 Guest OS 使用)转换为主机物理地址(由 Hypervisor 使用)增加了一个额外的层。这第二层转换由 Hypervisor 管理,允许 Guest 操作系统独立管理其自身的页表。SLAT 通过最大限度地减少内存操作期间对 VM Exit 的需求来提高性能,从而减少开销并提高虚拟化效率。
下图演示了如何在用 Rust 编写的 Windows UEFI Blue Pill Type-1 Hypervisor(代号:Illusion)中实现隐藏的 EPT Hook。

**图 2:扩展页表 (EPT) Hook (Illusion)**
## 功能特性
### 兼容 PatchGuard 的功能
- :white_check_mark: 通过系统服务描述符表 (SSDT) 实现的隐藏系统调用 Hook。
- :white_check_mark: 隐藏的内核内联 Hook。
- :white_check_mark: 隐藏的特定模型寄存器 Hook。
### 处理器特定功能
- :white_check_mark: 扩展页表 (EPT)。
- :white_check_mark: 内存类型范围寄存器。
- :x: Intel 处理器追踪 (PT)。
### 兼容 Microsoft Hyper-V 的功能
- :x: 支持在启用基于虚拟化的安全性 (VBS) 的情况下,作为嵌套 Hypervisor 在 Microsoft Hyper-V (Type-2) 下运行。
- :x: 支持在启用基于虚拟化的安全性 (VBS) 的情况下,作为主 Hypervisor 在 Microsoft Hyper-V (Type-1) 之上运行。
### VM Exit 处理
- :white_check_mark: VM Exit 处理:`ExceptionOrNmi (#GP, #PF, #BP, #UD)` (0)、`InitSignal` (3)、`StartupIpi` (4)、`Cpuid` (10)、`Getsec` (11)、`Hlt` (12)、`Invd` (13)、`Vmcall` (18)、`Vmclear` (19)、`Vmlaunch` (20)、`Vmptrld` (21)、`Vmptrst` (22)、`Vmresume` (24)、`Vmxon` (27)、`Vmxoff` (26)、`ControlRegisterAccesses` (28)、`Rdmsr` (31)、`Wrmsr` (32)、`MonitorTrapFlag` (37)、`Rdtsc` (49)、`EptViolation` (48)、`EptMisconfiguration` (50)、`Invept` (53)、`Invvpid` (55)、`Xsetbv` (55)。
### Hypervisor 检测
- :white_check_mark: 使用 EPT 从 Guest 隐藏 Hypervisor 内存(将指向主机内存的 Guest 内存重定向到填充有 0xFF 的虚拟页)。
- :white_check_mark: 基于自定义页表的 Hypervisor 检测绕过(提供来自 Guest 的隔离和安全性,包括 CR3 Trashing)。
- :white_check_mark: 基于自定义 GDT 和 IDT 的 Hypervisor 检测绕过(确保来自 Guest 的隔离和安全性)。
- :white_check_mark: 基于 CPUID 的 Hypervisor 检测绕过(取消设置 HypervisorPresent 并移除功能信息和 Hypervisor 供应商的供应商 ID 签名)。
- :white_check_mark: 基于 MSR 的 Hypervisor 检测绕过(对无效、不支持和保留的 Hyper-V MSR vmexit 注入 #GP)。
- :white_check_mark: 基于 CR 的 Hypervisor 检测绕过(隐藏特定于 Hypervisor 位的 Shadow CR0 和 CR4)。
- :white_check_mark: 基于 XSETBV 的 Hypervisor 检测绕过(对无效或不支持的 XSETBV vmexit 注入 #GP)。
- :white_check_mark: 基于 VMCALL 的 Hypervisor 检测绕过(对无效或不支持的 VMCALL vmexit 注入 #GP)。
- :white_check_mark: 基于 ExceptionOrNMI 的 Hypervisor 检测绕过(对特定的异常 vmexit 注入 #GP、#PF、#BP、#UD)。
- :white_check_mark: 无条件 vmexit(对无条件 vmexit 注入 #UD,但对于 Vmxon,如果不包含 VMXE 则注入 #UD;否则,如果包含 VMXE 则注入 #GP)。
- :x: 基于 EPT 的 Hypervisor 检测绕过(写入检查、计时检查和线程检查)。
- :x: 基于 RDTSC 的 Hypervisor 检测绕过。
- :white_check_mark: 从 UEFI 内存映射/表中移除 Hypervisor 内存(识别 Hypervisor 占用的内存区域,并修改 UEFI 内存映射以将这些区域标记为 `UNUSABLE`)。
### 隔离与安全
- :white_check_mark: 全局描述符表 (GDT)、中断描述符表 (IDT) 和页表的自定义实现,以增强 Hypervisor 的安全性和隔离性。
## 支持的硬件
- :white_check_mark: 支持 VT-x 和扩展页表 (EPT) 的 Intel 处理器。
- :x: 支持 AMD-V (SVM) 和嵌套页表 (NPT) 的 AMD 处理器。
## 支持的平台
- :white_check_mark: Windows 10 - Windows 11,仅限 x64。
## 安装
- 从[此处](https://www.rust-lang.org/tools/install)安装 Rust。
- 安装 cargo-make:`cargo install cargo-make`。
## 构建项目
- Debug:`cargo make build-debug`。
- Release:`cargo make build-release`。
## 运行项目
- Debug:`cargo make run-debug`。
- Release:`cargo make run-release`。
## 调试
- 串口日志:使用串口记录器从 Hypervisor 捕获日志。
#### 启用调试模式
- 测试模式:使用 `bcdedit.exe /set testsigning on` 激活测试签名。
- Windows 调试:遵循此 [Microsoft 指南](https://learn.microsoft.com/en-us/windows-hardware/drivers/devtest/bcdedit--bootdebug)中的步骤。
```
bcdedit.exe /bootdebug {bootmgr} on
bcdedit.exe /bootdebug on
bcdedit.exe /debug on
```
#### 使用 Windbg 进行网络调试
- 设置:`bcdedit.exe /dbgsettings net hostip:w.x.y.z port:n`。
## 用法
UEFI Blue-Pill Hypervisor 在以下条件下运行:
- **禁用安全启动**:无需漏洞(**本项目支持**)。
- **禁用基于虚拟化的安全性 (VBS)**:确保兼容性。
- **利用已知的 UEFI 漏洞**:使用过时或不支持的固件,包括自带易受攻击二进制文件 (BYOVB) 技术,来绕过安全启动。
- **利用未指明的 UEFI 漏洞**:使用零日漏洞来禁用安全启动。
### 配置说明
设置此 UEFI Hypervisor 时,根据系统的逻辑处理器/核心/线程数量配置文件非常重要。请在 [global_const.rs](https://github.com/memN0ps/illusion-rs/blob/main/hypervisor/src/global_const.rs) 中编辑相关代码。
全局堆分配器在所有处理器/核心/线程之间共享,是一个预分配的内存池。堆栈大小是按处理器/核心/线程分配的。这种设计使得跟踪内存分配变得更容易,特别是对于设置 Hook 等需要预分配缓冲区的任务。通过调整此文件中的设置,您可以确保分配足够的内存来容纳所有处理器,同时保持最佳的性能和资源管理。
## 用法 1:在 VMware Workstation 上通过 UEFI Shell 运行 UEFI Blue-Pill Hypervisor(已支持)
0. **创建用于启动的虚拟 USB 驱动器**
以管理员身份运行以下 PowerShell 脚本,在 USB 驱动器上创建新分区并将其格式化为 FAT32。此脚本将现有分区缩小 512 MB,并在 USB 驱动器上创建一个标签为 "Hypervisor" 的新分区。请务必根据您的环境修改驱动器号。或者,您也可以使用物理 USB 驱动器。
# 定义要缩小的大小(以 MB 为单位)
$sizeToShrinkMB = 512
# 定义要缩小的现有分区的驱动器号
$existingDriveLetter = "C"
# 定义新分区的驱动器号和标签
$newDriveLetter = "D"
$newFileSystemLabel = "Hypervisor"
# 缩小现有分区
$volume = Get-Volume -DriveLetter $existingDriveLetter
$partition = $volume | Get-Partition
Resize-Partition -DriveLetter $partition.DriveLetter -Size ($partition.Size - ($sizeToShrinkMB * 1MB))
# 在未分配的空间中创建新分区
$disk = Get-Disk -Number $partition.DiskNumber
$newPartition = New-Partition -DiskNumber $disk.Number -UseMaximumSize -DriveLetter $newDriveLetter
# 格式化新分区
Format-Volume -DriveLetter $newDriveLetter -FileSystem FAT32 -NewFileSystemLabel $newFileSystemLabel
Write-Output "Partition created and formatted successfully."
1. **VMware Workstation 设置**
- **构建项目**:按照前面章节提供的构建说明编译项目。
2. **设置 VMware Workstation**
将 VMware Workstation 配置为在下次启动时进入固件设置,并使用物理 USB 驱动器作为启动设备:
- **添加硬盘:**
- 物理 USB:转到 `VM -> Settings -> Hardware -> Add -> Hard Disk -> Next -> SCSI or NVMe (Recommended) -> Next -> Use a physical disk (for advanced users) -> Next -> Device: PhysicalDrive1 and Usage: Use entire disk -> Next -> Finish.`
- 虚拟 USB:转到 `VM -> Settings -> Hardware -> Add -> Hard Disk -> Next -> SCSI or NVMe (Recommended) -> Next -> Use a physical disk (for advanced users) -> Next -> Device: PhysicalDrive0 and Usage: Use individual partitions -> Select Partition -> Next -> Finish.`
- **添加串口:**
- 转到 `VM -> Settings -> Add -> Serial Port -> Finish`。
- 选择 `Use output file: C:\Users\memN0ps\Documents\GitHub\illusion-rs\logs.txt` 以将来自 COM1 的串口输出定向到 `logs.txt` 文件。(您可以选择任何位置,但建议在项目目录内)。
- **启动选项:**
- 如果您没有使用自动化的 PowerShell 脚本,请通过点击 `Power On to Firmware` 启动 VM。
- 选择 `Internal Shell (Unsupported option)` 或 `EFI VMware Virtual SCSI Hard Drive (1.0)`。
3. **运行 PowerShell 脚本**
执行以下 PowerShell 脚本以自动化设置过程。请务必根据您的环境修改路径。
### 根据您的环境更改路径 ###
# 将构建类型设置为 'debug' 或 'release'
$buildType = "debug" # 此行用于 debug 构建
# $buildType = "release" # 取消注释此行并注释上行以进行 release 构建
# 根据构建类型定义要复制所有 EFI 文件的文件路径
$efiFilePaths = ".\target\x86_64-unknownuefi\$buildType\*.efi"
# 定义 USB 驱动器 D:\ 上的目标路径
$usbFilePath = "D:\"
# 定义 VMX 文件的路径
$vmxPath = "C:\Users\memN0ps\Documents\Virtual Machines\Class_Windows\Class_Windows.vmx"
# 定义 vmrun.exe 文件的路径
$vmrunPath = "C:\Program Files (x86)\VMware\VMware Workstation\vmrun.exe"
# 定义日志文件的路径
$logFilePath = ".\logs.txt"
# 将所有 EFI 应用程序复制到 D:\ 驱动器
Copy-Item -Path $efiFilePaths -Destination $usbFilePath
# 打印 D:\ 驱动器的内容以验证复制操作
Get-ChildItem -Path D:\ -Recurse
# 将配置附加到 VMX 文件,以便在下次启动时进入固件设置
Add-Content -Path $vmxPath -Value "bios.forceSetupOnce = `"TRUE`""
# 检查日志文件是否存在,如果存在则删除
if (Test-Path $logFilePath) {
Remove-Item $logFilePath -Force
Write-Host "Log file $logFilePath deleted."
}
# 启动 VMware VM 并打开 GUI。尝试启动到固件(如果支持)。
& "$vmrunPath" -T ws start "$vmxPath" gui
# 等待日志文件创建(例如,由另一个进程创建),然后再继续跟踪它
while (-not (Test-Path $logFilePath)) {
Start-Sleep -Seconds 1
Write-Host "Waiting for log file to be created..."
}
# 从头开始跟踪日志文件以显示实时更新
Write-Host "Monitoring log file from the start for updates..."
Get-Content -Path $logFilePath -Wait
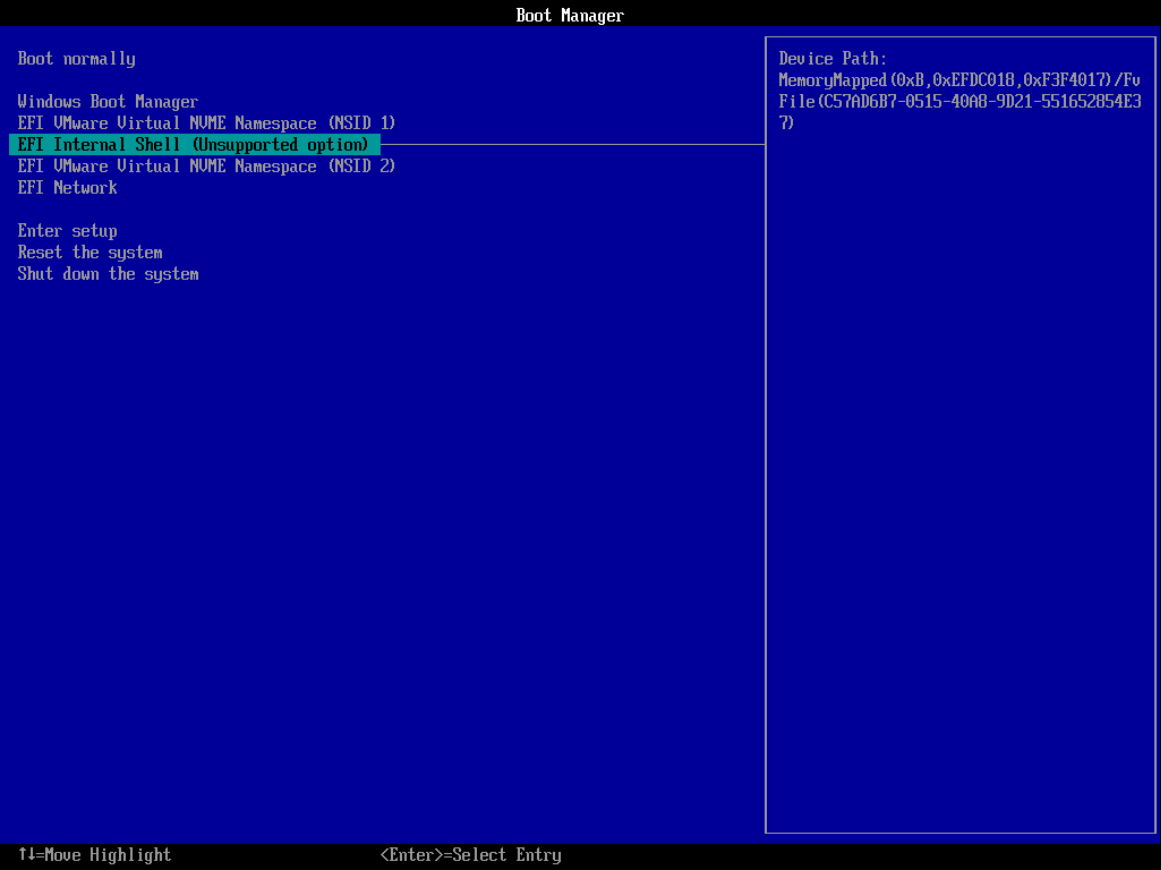
**图 3:VMware Workstation 启动选项**
4. **导航到 USB 驱动器并启动 Hypervisor**
在 UEFI Shell 中,导航到 USB 驱动器并运行加载器 (`loader.efi`)。Hypervisor 将启动,随后是 Windows 启动管理器 (`bootmgfw.efi`) 以启动进入 Windows。
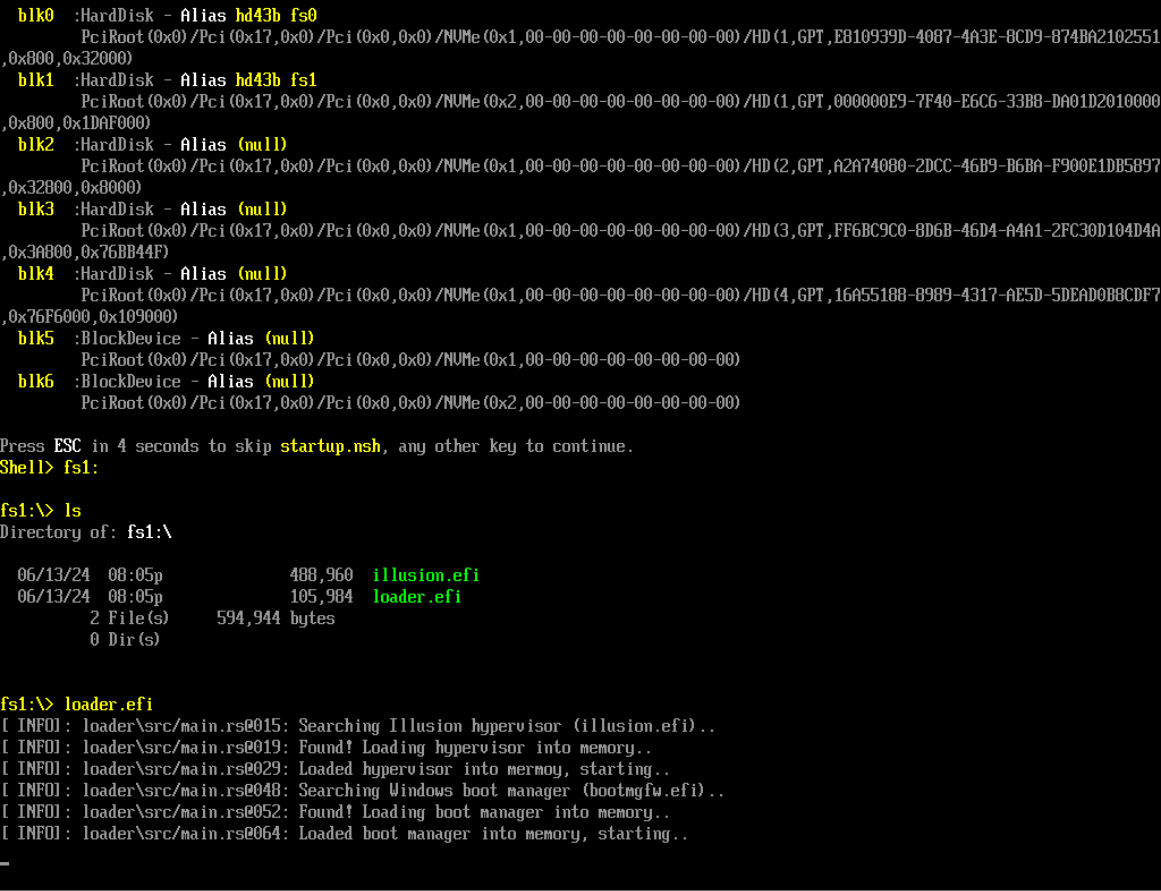
**图 4:VMware Workstation UEFI Shell**
5. **与 Hypervisor 交互**
Windows 启动后,使用 `client.exe` 与 Hypervisor 交互并执行各种操作,包括检查 Hypervisor 的存在或设置隐藏的 EPT Hook。
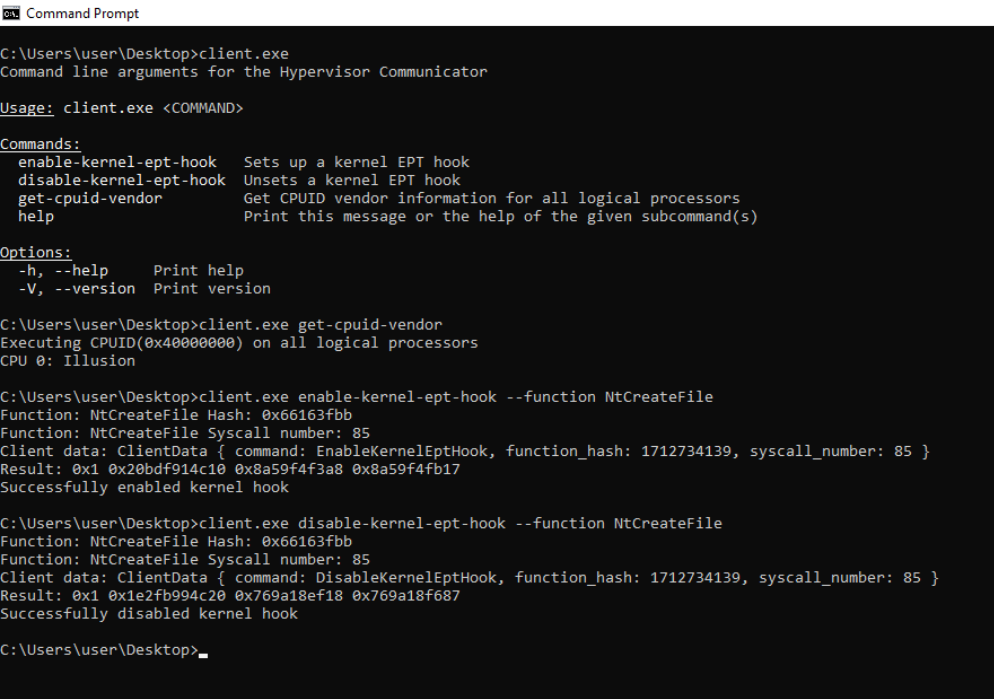
**图 5:Hypervisor 客户端**
### PoC
通过检查 Hypervisor 的日志(通过 COM 端口的串口记录器)和 Windbg 来验证 EPT Hook 概念验证 的执行。下面提供了 PoC 屏幕截图。
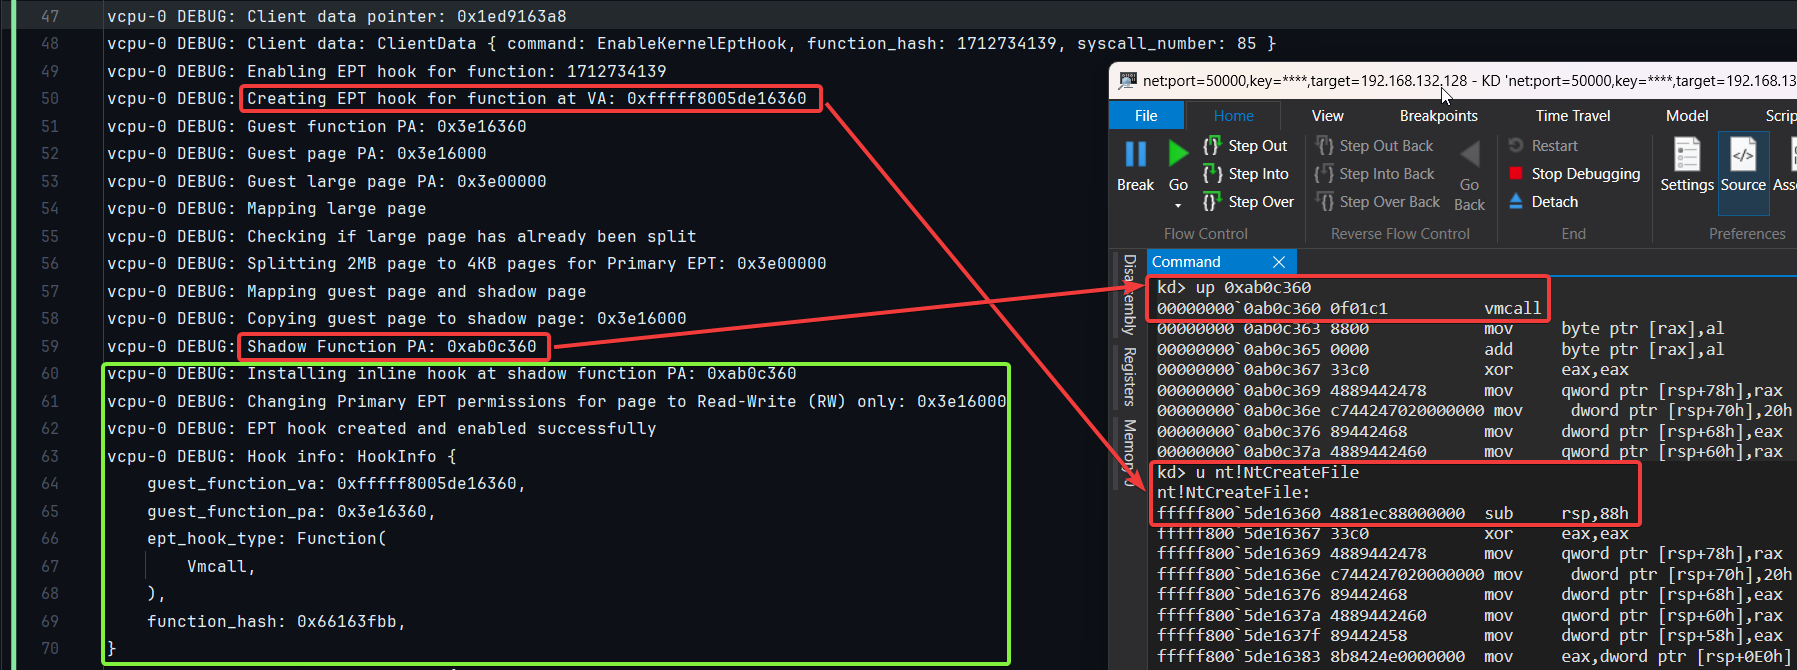
**图 6:日志和 Windbg PoC**
## 用法 2:在裸机上通过 UEFI Shell 运行 UEFI Blue-Pill Hypervisor(已支持)
以下概述了使用 UEFI Shell 执行 UEFI Blue-Pill Hypervisor 的支持方法。通过利用 EDK2 EFI Shell 或 UEFI-Shell,用户可以设置 USB 驱动器以启动到 UEFI Shell 环境。从那里,可以直接加载并执行 Hypervisor。
1. **构建项目**
按照前面章节提供的构建说明编译项目。
2. **下载 EDK2 EFI Shell 或 UEFI-Shell**
- [EDK2 EFI Shell](https://github.com/tianocore/edk2/releases)
- [UEFI-Shell](https://github.com/pbatard/UEFI-Shell/releases)
3. **准备 USB 驱动器**
a. 解压下载的 EFI Shell 并将文件 `Shell.efi`(位于 `UefiShell/X64` 文件夹中)重命名为 `bootx64.efi`。
b. 将 USB 驱动器格式化为 FAT32。
c. 在 USB 驱动器上创建以下文件夹结构:
USB:.
│ loader.efi
│ illusion.efi
│
└───EFI
└───Boot
bootx64.efi
## 用法 3:感染磁盘上的 Windows 启动管理器 (bootmgfw.efi)(不支持)
UEFI Blue-Pill Hypervisor 可以针对 EFI 分区中 `\EFI\Microsoft\Boot\bootmgfw.efi`(也在 `C:\Windows\Boot\EFI\bootmgfw.efi`)找到的 Windows 启动管理器 (`bootmgfw.efi`)。该过程包括:
1. 将 Hypervisor 转换为位置无关代码 (PIC) 或 Shellcode。
2. 在 EFI 分区中找到 `bootmgfw.efi`。
3. 向 `bootmgfw.efi` 添加新的 `.efi` 节。
4. 将 Hypervisor Shellcode 注入新的 `.efi` 节。
5. 修改入口点以指向 Shellcode。
6. 重启系统。
更多信息:[Bootkitting Windows Sandbox](https://secret.club/2022/08/29/bootkitting-windows-sandbox.html)
## 致谢、参考和动机
非常感谢塑造了这个项目的出色的人们和资源。特别向下面列出的每个人大声致谢。虽然我在工作中没有使用所有这些资源,但它们一直是信息的金矿,对于任何深入研究 Hypervisor 开发(包括我)的人来说都非常有帮助。
- **[Daax (@daaximus)](https://github.com/daaximus)**:感谢他出色的免费 Hypervisor 开发系列,这是目前最好的资源之一,以其详尽的研究和清晰的解释极大地影响了我的工作。他的支持和对我问题的回答对于我开始 Hypervisor 开发非常宝贵:
- [7 Days to Virtualization](https://revers.engineering/7-days-to-virtualization-a-series-on-hypervisor-development/)。
- [MMU Virtualization via Intel EPT](https://revers.engineering/mmu-virtualization-via-intel-ept-index/)。
- **[Satoshi Tanda (@tandasat)](https://github.com/tandasat)**:Satoshi Tanda 的指导、项目和结构化培训计划非常有帮助。他在 GitHub 上的详细解释和贡献显著增强了我的理解,使他成为我整个旅程中的伟大导师:
- [Hypervisor Development for Security Researchers](https://tandasat.github.io/Hypervisor_Development_for_Security_Researchers.html)。
- [Hypervisor 101 in Rust](https://github.com/tandasat/Hypervisor-101-in-Rust)。
- 其他项目:[Hello-VT-rp](https://github.com/tandasat/Hello-VT-rp)、[DdiMon](https://github.com/tandasat/DdiMon)、[HyperPlatform](https://github.com/tandasat/HyperPlatform)、[MiniVisorPkg](https://github.com/tandasat/MiniVisorPkg)。
- **[Sina Karvandi (@Intel80x86)](https://github.com/SinaKarvandi)**:感谢他详细的免费 Hypervisor From Scratch 系列:
- [Tutorial Series](https://rayanfam.com/tutorials/)。
- [GitHub Repository](https://github.com/SinaKarvandi/Hypervisor-From-Scratch/)。
- **[Jess (@jessiep_)](https://github.com/Intege-rs)**:感谢他在本项目多个领域提供的宝贵支持和协作,提供了重要的见解和专业知识,并迅速回答了我的问题。
- **[Feli (@vmctx)](https://github.com/vmctx/)**:感谢他们在本项目多个领域提供的宝贵支持和协作,提供了重要的见解和专业知识,并迅速回答了我的问题。
- **[Wcscpy (@Azvanzed)](https://github.com/Azvanzed/)**:感谢他在本项目多个领域提供的宝贵支持和协作,提供了重要的见解和专业知识,并迅速回答了我的问题。
- **[Drew (@drew)](https://github.com/drew-gpf)**:感谢他在本项目多个领域提供的宝贵支持和协作,提供了重要的见解和专业知识,并迅速回答了我的问题。
- **[Matthias (@not-matthias)](https://github.com/not-matthias)**:感谢他在 [amd_hypervisor](https://github.com/not-matthias/amd_hypervisor) 项目上的影响力工作,该工作极大地启发并影响了这项研究。
- **[Nick Peterson (@everdox)](https://github.com/everdox)** 和 **[Aidan Khoury (@ajkhoury)](https://github.com/ajkhoury)**:感谢他们对 Hypervisor 自省和系统调用 Hook 的深刻探索:
- [Patchguard: Hypervisor Based Introspection [P1]](https://revers.engineering/patchguard-detection-of-hypervisor-based-instrospection-p1/)。
- [Patchguard: Hypervisor Based Introspection [P2]](https://revers.engineering/patchguard-detection-of-hypervisor-based-instrospection-p2/).
- [Syscall Hooking Via Extended Feature Enable Register (EFER)](https://revers.engineering/syscall-hooking-via-extended-feature-enable-register-efer/)。
#### 社区和技术资源
- **[Secret Club](https://github.com/thesecretclub)**:对抗作弊系统和 Hypervisor 检测的见解,这也启发了本项目:
- [System emulation detection](https://secret.club/2020/04/13/how-anti-cheats-detect-system-emulation.html) 作者:[@Daax](https://github.com/daaximus)、[@iPower](https://github.com/iPower)、[@ajkhoury](https://github.com/ajkhoury)、[@drew](https://github.com/drew-gpf)。
- [BattlEye hypervisor detection](https://secret.club/2020/01/12/battleye-hypervisor-detection.html) 作者:[@vmcall](https://github.com/vmcall)、[@Daax](https://github.com/daaximus)。
- **其他重要资源**:
- [Intel's Software Developer's Manual](https://www.intel.com/)。
- [Maurice Heumann's (@momo5502)](https://github.com/momo5502/) [Detecting Hypervisor-Assisted Hooking](https://momo5502.com/posts/2022-05-02-detecting-hypervisor-assisted-hooking/)。
- [Guided Hacking's](https://guidedhacking.com/) YouTube 上的 [x64 Virtual Address Translation](https://www.youtube.com/watch?v=W3o5jYHMh8s)。
- [UnKnoWnCheaTs](https://unknowncheats.me/) [@namazso](https://github.com/namazso) 的 [论坛帖子](https://www.unknowncheats.me/forum/2779560-post4.html)。
- [RVM1.5](https://github.com/rcore-os/RVM1.5)、[Barbervisor](https://github.com/Cisco-Talos/Barbervisor)、[rustyvisor](https://github.com/iankronquist/rustyvisor)、[orange_slice](https://github.com/gamozolabs/orange_slice)、[mythril](https://github.com/mythril-hypervisor/mythril)、[uhyve](https://github.com/hermit-os/uhyve)、[maystorm](https://github.com/neri/maystorm)。
- [AMD-V Hypervisor Development by Back Engineering](https://blog.back.engineering/04/08/2022)、[@_xeroxz](https://git.back.engineering/_xeroxz/bluepill) 的 [bluepill](https://git.back.engineering/_xeroxz/bluepill)。
- [@wbenny](https://github.com/wbenny/hvpp) 的 [hvpp](https://github.com/wbenny/hvpp)。
- [@Air14](https://github.com/Air14/HyperHide) 的 [HyperHide](https://github.com/Air14/HyperHide)。
- [How AetherVisor works under the hood by M3ll0wN1ght](https://mellownight.github.io/AetherVisor)。
- [Rust library to use x86 (amd64) specific functionality and registers (x86 crate for Rust)](https://github.com/gz/rust-x86)。
- [DarthTon's HyperBone](https://github.com/DarthTon/HyperBone)(基于传奇的 [Alex Ionescu's](https://github.com/ionescu007/SimpleVisor) 版本)在 [UnknownCheats](https://www.unknowncheats.me/forum/c-and-c-/173560-hyperbone-windows-hypervisor.html) 上。
- [Joanna Rutkowska: Pioneering the Blue Pill Hypervisor Concept, one of the earliest proofs of concept](https://blog.invisiblethings.org/2006/06/22/introducing-blue-pill.html)。
#### 帮助者和合作者
特别感谢:
- [Daax](https://revers.engineering/)。
- [Satoshi Tanda (@tandasat)](https://github.com/tandasat)。
- [Drew (@drew)](https://github.com/drew-gpf)。
- [iPower (@iPower)](https://github.com/iPower)。
- [Namazso (@namazso)](https://github.com/namazso)。
- [Jess (@jessiep_)](https://github.com/Intege-rs)。
- [Matthias @not-matthias](https://github.com/not-matthias/)。
- [@felix-rs / @joshuа](https://github.com/felix-rs)。
- [Wcscpy (@Azvanzed)](https://github.com/Azvanzed/)。
- [Ryan McCrystal / @rmccrystal](https://github.com/rmccrystal)。
- [Jim Colerick (@vmprotect)](https://github.com/thug-shaker)。
- [Xitan (@xitan)](https://github.com/x1tan)。
## 许可证
本项目根据 MIT 许可证授权。有关更多信息,请参阅 [MIT 许可证详细信息](./LICENSE)。
标签:0day挖掘, Blue Pill, EDK2, Hypervisor, Intel VT-x, MMU, Rootkit, Rust, Type-1 裸机虚拟机, UEFI, Zeek, 中高交互蜜罐, 内存安全, 内核安全, 分页机制, 可视化界面, 地址转换, 底层开发, 恶意软件开发, 系统编程, 网络流量审计, 蓝药丸, 虚拟化, 计算机科学研究, 通知系统, 钩子技术