使用 Lookahead Decoding 打破 LLM 推理的顺序依赖
| 论文 | 博客 | 路线图 |
*新闻* 🔥
- [2024/2] Lookahead Decoding 论文现已在 [arXiv](https://arxiv.org/abs/2402.02057) 上发布。现已支持 [Sampling](#use-lookahead-decoding-in-your-own-code) 和 [FlashAttention](#flashAttention-support)。用于优化 token 预测的高级功能已更新。
## 简介
我们引入了 lookahead decoding:
- 一种用于加速 LLM 推理的并行解码算法。
- 无需 draft model 或数据存储。
- 相对于每个解码步骤使用的 log(FLOPs),线性减少解码步骤数。
下面是一个 lookahead decoding 加速 LLaMa-2-Chat 7B 生成的演示:

Demo of speedups by lookahead decoding on LLaMA-2-Chat 7B generation. Blue fonts are tokens generated in parallel in a decoding step.
### 背景:使用 Jacobi 迭代的并行 LLM 解码
Lookahead decoding 受到 [Jacobi decoding](https://arxiv.org/pdf/2305.10427.pdf) 的启发,后者将自回归解码视为求解非线性方程组,并使用不动点迭代法同时解码所有未来的 token。下面是一个 Jacobi decoding 的示例。
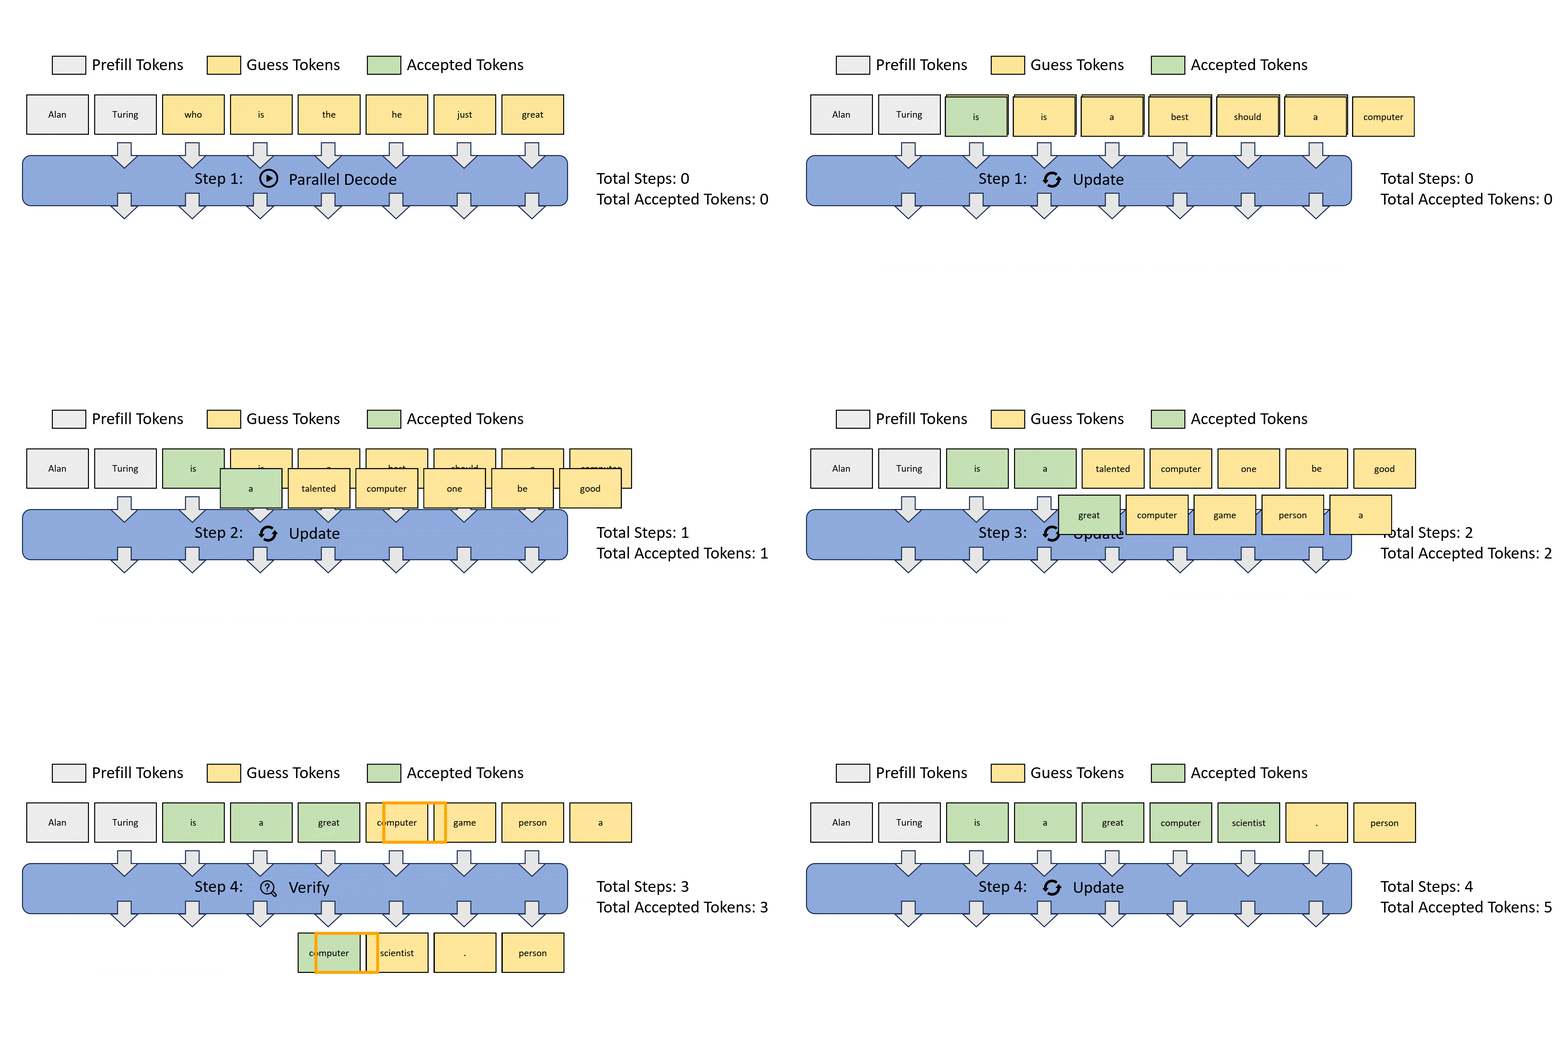
Illustration of applying Jacobi iteration method for parallel LLM decoding.
然而,在实际的 LLM 应用中,Jacobi decoding 几乎无法实现挂钟时间(wall-clock)的加速。
### Lookahead Decoding:让 Jacobi Decoding 变得可行
Lookahead decoding 利用了 Jacobi decoding 的能力,通过收集并缓存从 Jacobi 迭代轨迹生成的 n-gram。
下面的 gif 展示了通过 Jacobi decoding 收集 2-gram 并对其进行验证以加速解码的过程。
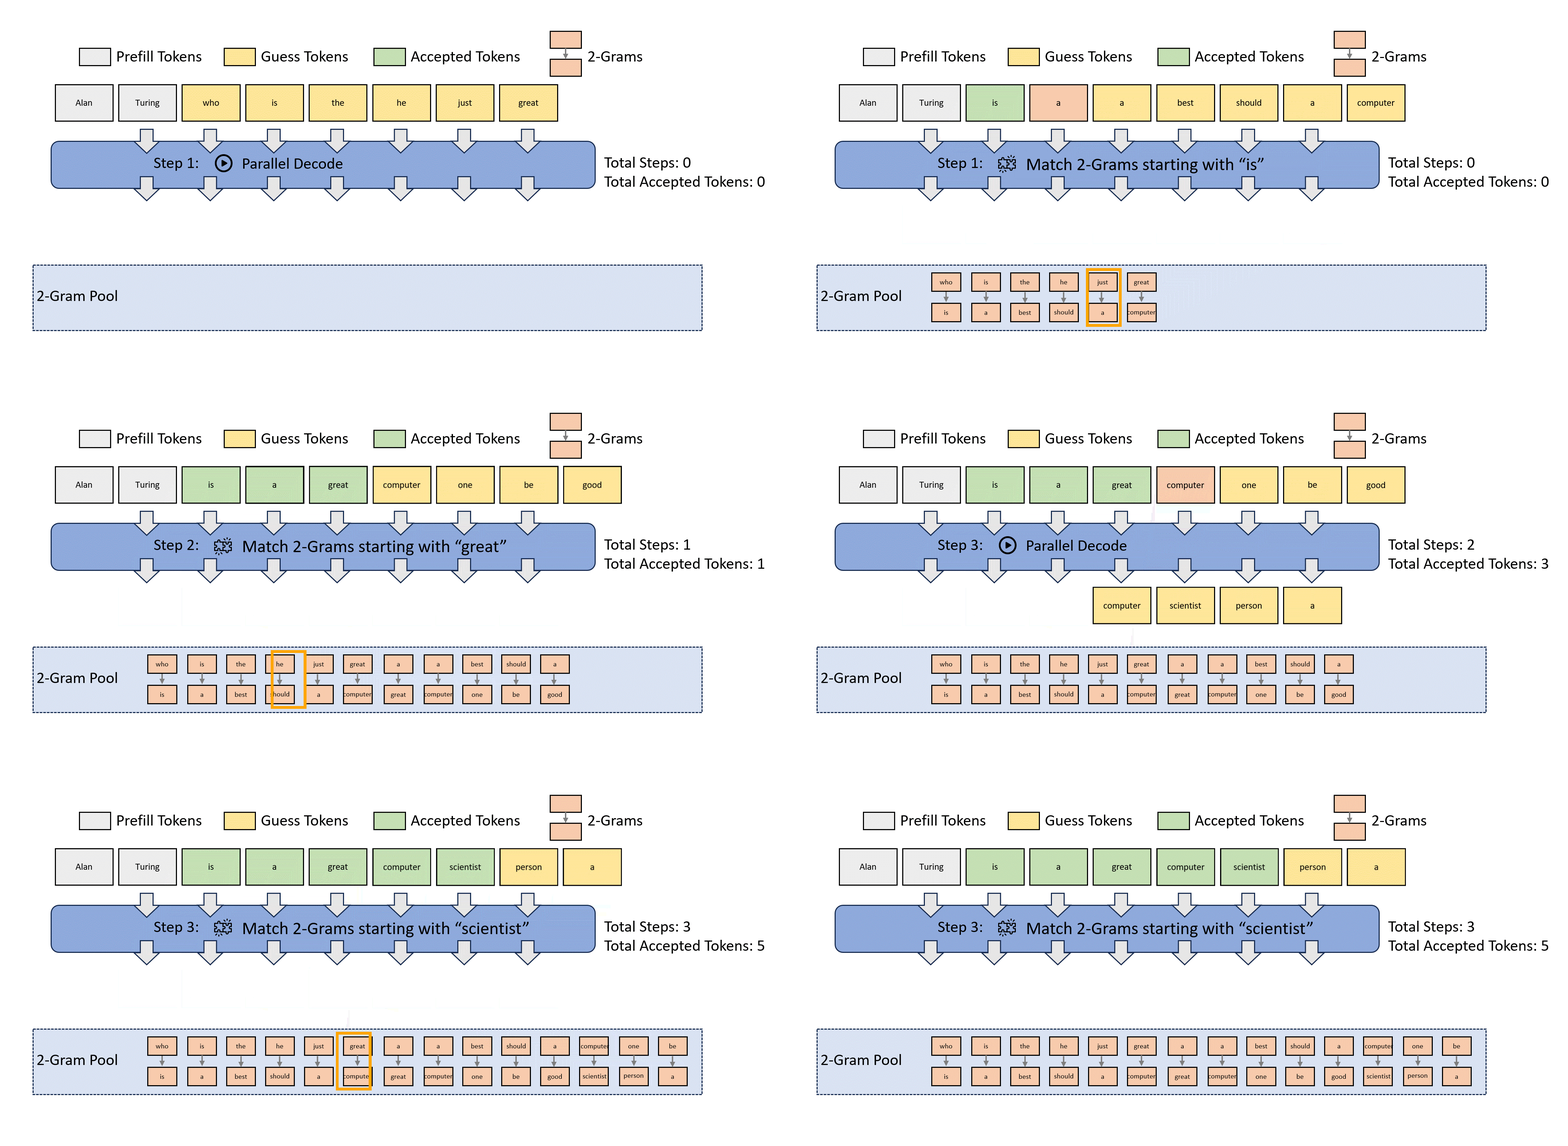
Illustration of lookahead decoding with 2-grams.
为了提高此过程的效率,每个 lookahead decoding 步骤被分为两个并行分支:lookahead 分支和验证分支。lookahead 分支维护一个固定大小的 2D 窗口,用于从 Jacobi 迭代轨迹中生成 n-gram。同时,验证分支选择并验证有潜力的 n-gram 候选。
### Lookahead 分支和验证分支
lookahead 分支旨在生成新的 N-gram。该分支通过由两个参数定义的二维窗口进行操作:
- 窗口大小 W:我们在未来 token 位置向前查看多远以进行并行解码。
- N-gram 大小 N:我们回溯过去 Jacobi 迭代轨迹多少步以检索 n-gram。
在验证分支中,我们识别出第一个 token 与最后一个输入 token 匹配的 n-gram。这是通过简单的字符串匹配来确定的。一旦识别出,这些 n-gram 就会被附加到当前输入中,并通过 LLM 对它们进行 forward pass 来验证。
我们将这些分支实现在一个 attention mask 中,以进一步利用 GPU 的并行计算能力。
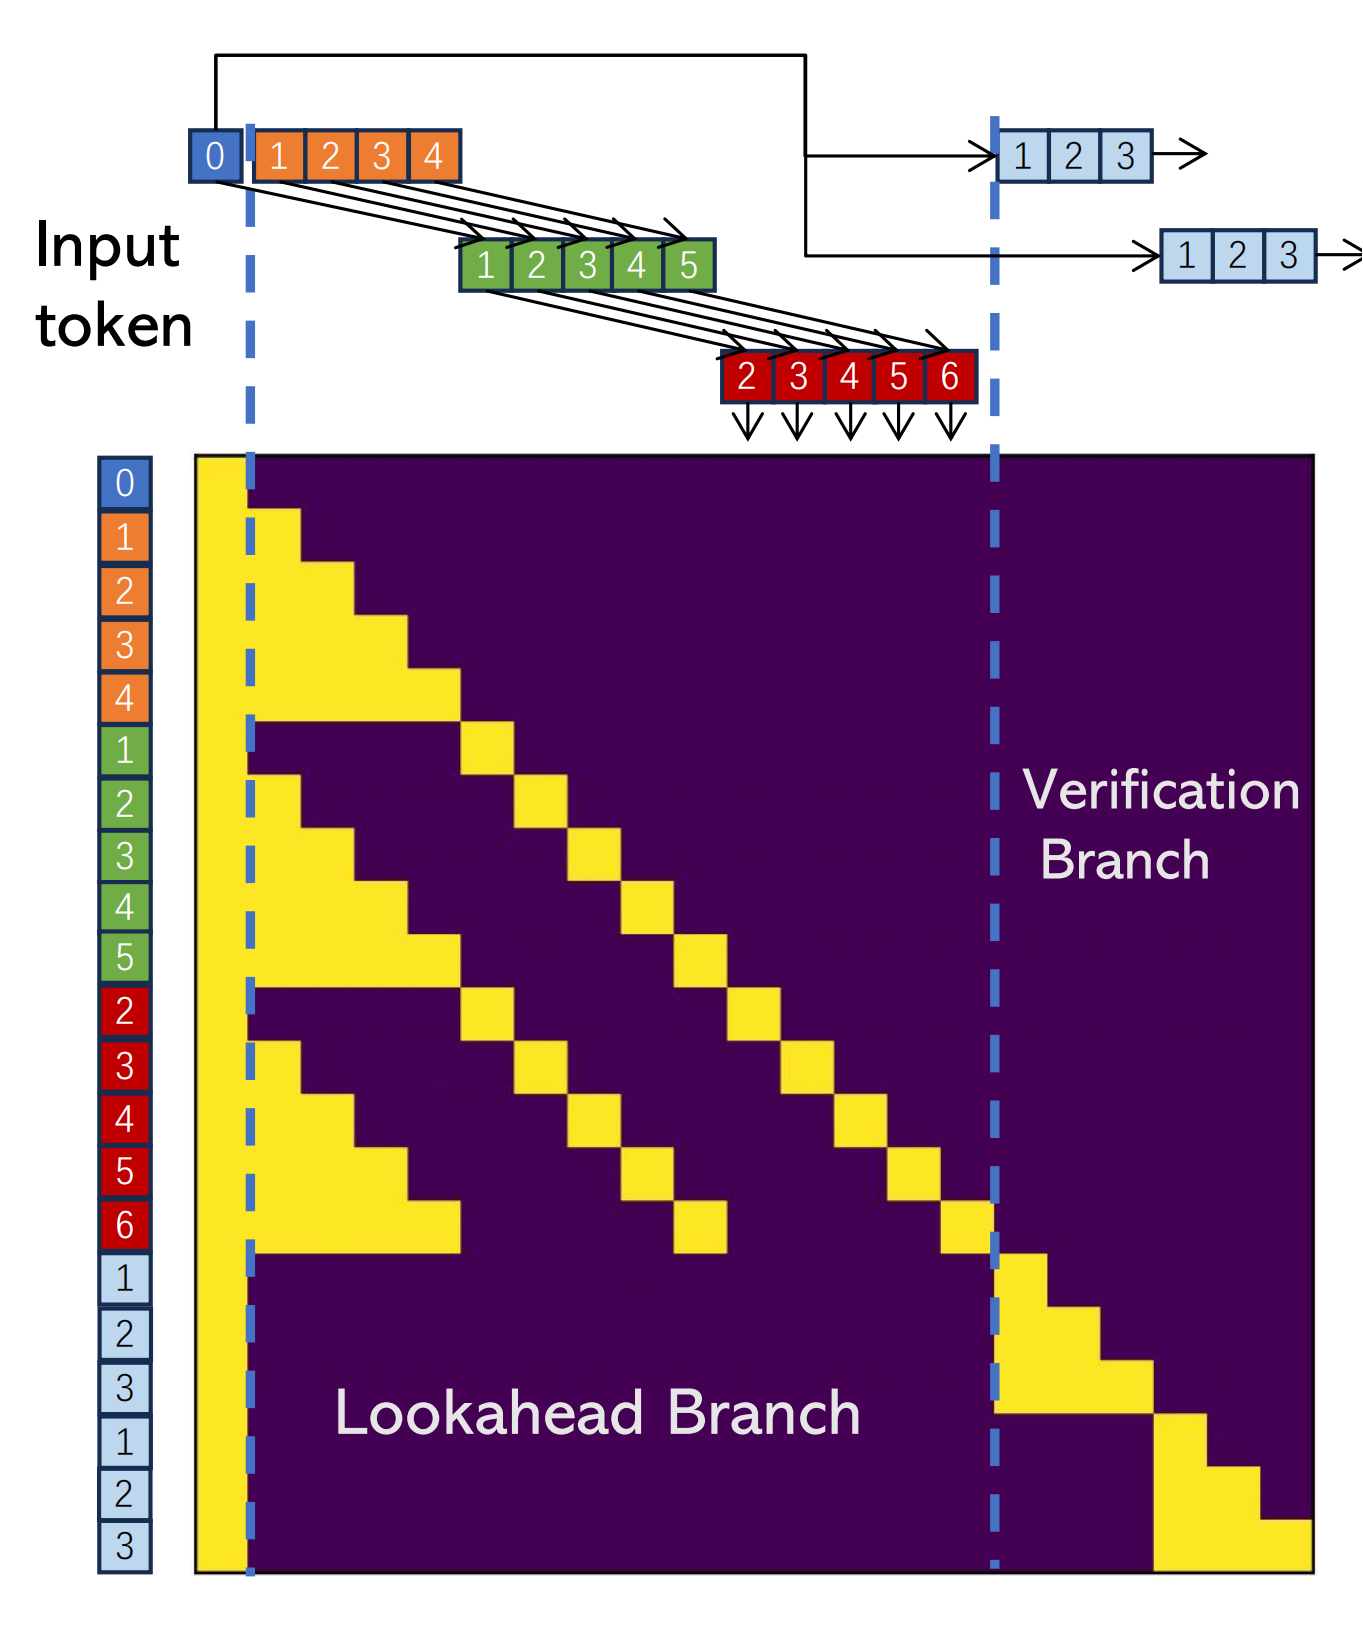
Attention mask for lookahead decoding with 4-grams and window size 5. In this mask, two 4-gram candidates (bottom right) are verified concurrently with parallel decoding.
### 实验结果
我们的研究表明,lookahead decoding 显著降低了延迟,在单 GPU 的不同数据集上达到了 1.5 倍到 2.3 倍的提升。请参见下图。
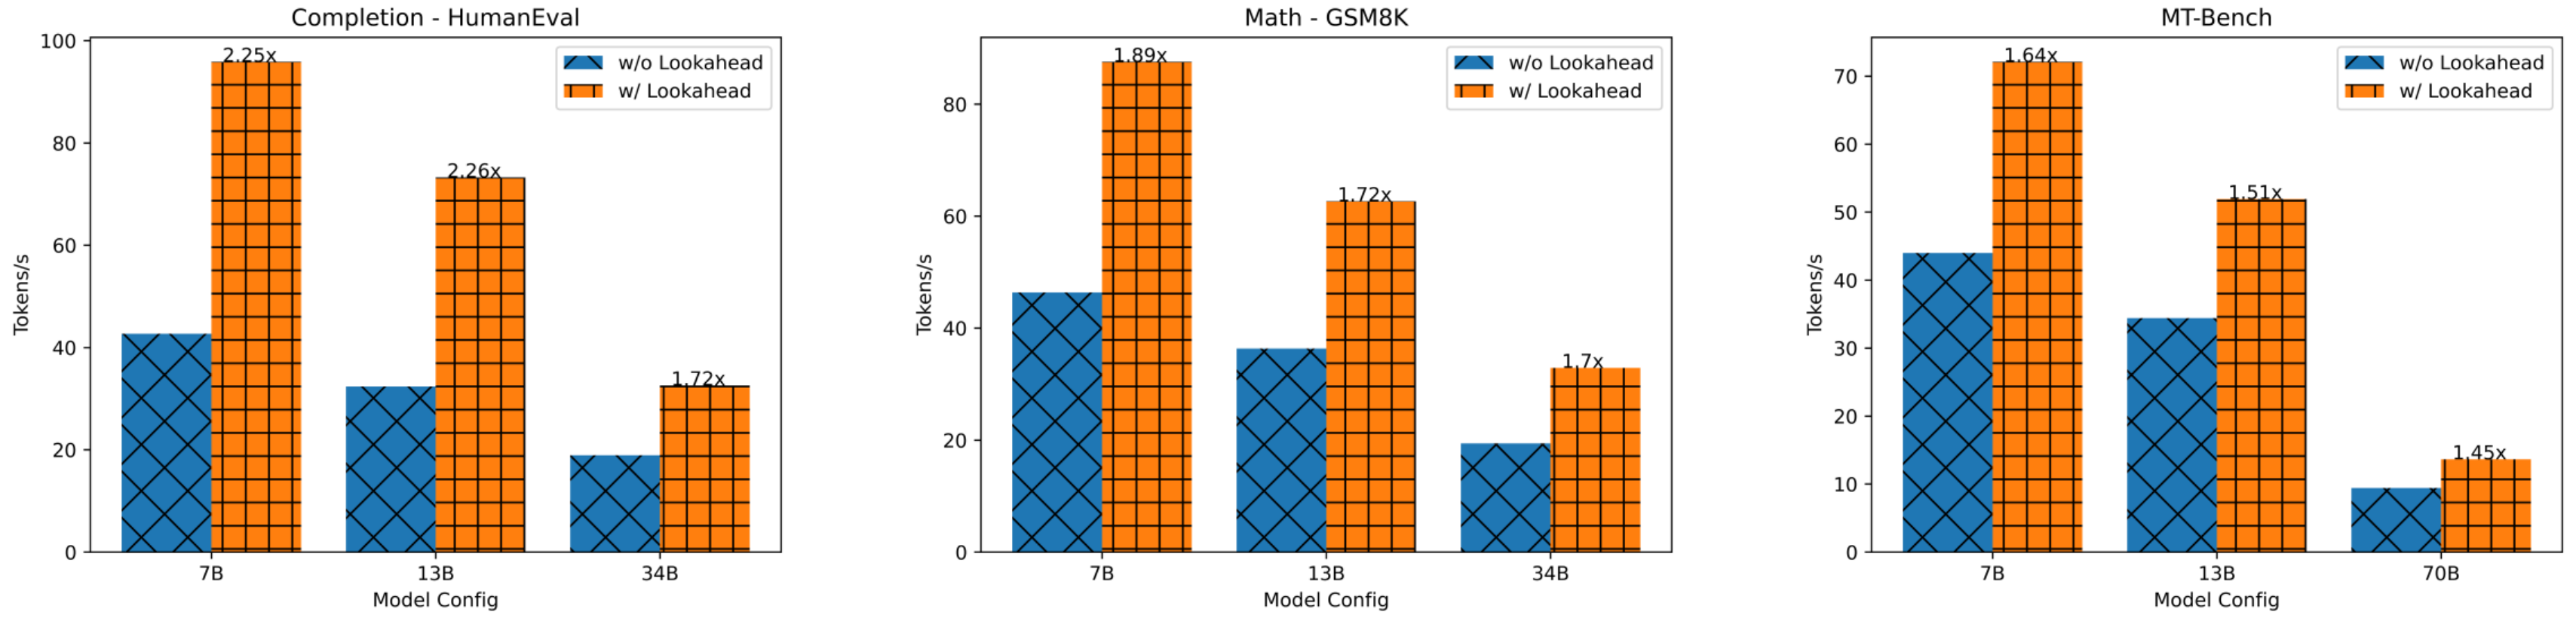
Speedup of lookahead decoding on different models and datasets.
## 目录
- [简介](#introduction)
- [目录](#contents)
- [安装](#installation)
- [通过 Pip 安装](#install-with-pip)
- [通过源码安装](#install-from-the-source)
- [推理](#inference-with-lookahead-decoding)
- [在你的代码中使用](#use-lookahead-decoding-in-your-own-code)
- [引用](#citation)
- [指引](#guidance)
## 安装
### 通过 pip 安装
```
pip install lade
```
### 通过源码安装
```
git clone https://github.com/hao-ai-lab/LookaheadDecoding.git
cd LookaheadDecoding
pip install -r requirements.txt
pip install -e .
```
### 使用 Lookahead decoding 进行推理
你可以运行这个最简示例来查看 Lookahead decoding 带来的加速效果。
```
python minimal.py #no Lookahead decoding
USE_LADE=1 LOAD_LADE=1 python minimal.py #use Lookahead decoding, 1.6x speedup
```
你也可以在使用 Lookahead decoding 的同时与你自己的 chatbot 进行聊天。
```
USE_LADE=1 python applications/chatbot.py --model_path meta-llama/Llama-2-7b-chat-hf --debug --chat #chat, with lookahead
USE_LADE=0 python applications/chatbot.py --model_path meta-llama/Llama-2-7b-chat-hf --debug --chat #chat, without lookahead
USE_LADE=1 python applications/chatbot.py --model_path meta-llama/Llama-2-7b-chat-hf --debug #no chat, with lookahead
USE_LADE=0 python applications/chatbot.py --model_path meta-llama/Llama-2-7b-chat-hf --debug #no chat, without lookahead
```
### 在你自己的代码中使用 Lookahead decoding
你可以通过三行代码(LoC)在你自己的代码中导入并使用 Lookahead decoding。你还需要在命令行中设置 ```USE_LADE=1```,或者在 Python 脚本中设置 ```os.environ["USE_LADE"]="1"```。请注意,Lookahead decoding 目前仅支持 LLaMA。
```
import lade
lade.augment_all()
lade.config_lade(LEVEL=5, WINDOW_SIZE=7, GUESS_SET_SIZE=7, DEBUG=0)
#LEVEL, WINDOW_SIZE and GUESS_SET_SIZE are three important configurations (N,W,G) in lookahead decoding, please refer to our blog!
#You can obtain a better performance by tuning LEVEL/WINDOW_SIZE/GUESS_SET_SIZE on your own device.
```
然后你就可以加速解码过程了。以下是使用贪心搜索(greedy search)的示例:
```
tokenizer = AutoTokenizer.from_pretrained(model_name)
model = AutoModelForCausalLM.from_pretrained(model_name, torch_dtype=torch.float16, device_map=torch_device)
model_inputs = tokenizer(input_text, return_tensors='pt').to(torch_device)
greedy_output = model.generate(**model_inputs, max_new_tokens=1024) #speedup obtained
```
以下是使用 sampling 的示例:
```
tokenizer = AutoTokenizer.from_pretrained(model_name)
model = AutoModelForCausalLM.from_pretrained(model_name, torch_dtype=torch.float16, device_map=torch_device)
model_inputs = tokenizer(input_text, return_tensors='pt').to(torch_device)
sample_output = model.generate(**model_inputs, max_new_tokens=1024, temperature=0.7) #speedup obtained
```
### FlashAttention 支持
安装原版 FlashAttention
```
pip install flash-attn==2.3.3 #original FlashAttention
```
有两种方式可以安装专为 Lookahead Decoding 优化的 FlashAttention
1. 从 https://github.com/Viol2000/flash-attention-lookahead/releases/tag/v2.3.3 下载预构建包并安装(快速,推荐)。
例如,我有 cuda==11.8、python==3.9 和 torch==2.1,我应该执行以下操作:
```
wget https://github.com/Viol2000/flash-attention-lookahead/releases/download/v2.3.3/flash_attn_lade-2.3.3+cu118torch2.1cxx11abiFALSE-cp39-cp39-linux_x86_64.whl
pip install flash_attn_lade-2.3.3+cu118torch2.1cxx11abiFALSE-cp39-cp39-linux_x86_64.whl
```
2. 通过源码安装(缓慢,不推荐)
```
git clone https://github.com/Viol2000/flash-attention-lookahead.git
cd flash-attention-lookahead && python setup.py install
```
以下是运行带有 FlashAttention 的模型的示例脚本:
```
python minimal-flash.py #no Lookahead decoding, w/ FlashAttention
USE_LADE=1 LOAD_LADE=1 python minimal-flash.py #use Lookahead decoding, w/ FlashAttention, 20% speedup than w/o FlashAttention
```
在你自己的代码中,你需要在调用 ```config_lade``` 时设置 ```USE_FLASH=True```,并在调用 ```AutoModelForCausalLM.from_pretrained``` 时设置 ```attn_implementation="flash_attention_2"```。
```
import lade
lade.augment_all()
lade.config_lade(LEVEL=5, WINDOW_SIZE=7, GUESS_SET_SIZE=7, USE_FLASH=True, DEBUG=0)
tokenizer = AutoTokenizer.from_pretrained(model_name)
model = AutoModelForCausalLM.from_pretrained(model_name, torch_dtype=torch.float16, device_map=torch_device, attn_implementation="flash_attention_2")
model_inputs = tokenizer(input_text, return_tensors='pt').to(torch_device)
greedy_output = model.generate(**model_inputs, max_new_tokens=1024) #speedup obtained
```
我们将直接把 FlashAttention 集成到此仓库中,以便于安装和使用。
## 引用
```
@article{fu2024break,
title={Break the sequential dependency of llm inference using lookahead decoding},
author={Fu, Yichao and Bailis, Peter and Stoica, Ion and Zhang, Hao},
journal={arXiv preprint arXiv:2402.02057},
year={2024}
}
```
## 指引
核心实现位于 decoding.py 中。Lookahead decoding 需要针对每个特定模型进行适配。相关示例位于 models/llama.py 中。