AD Miner 是一款 Active Directory 安全审计工具,通过分析 BloodHound 图数据库数据自动生成包含风险评级与缓解路径的 Web 报告。
### AD Miner 是一款 Active Directory(本地部署和 Entra ID)审计工具,它的功能包括:
- 利用 **Cypher 查询** 来分析来自 [BloodHound](https://github.com/SpecterOps/BloodHound) 图数据库(Neo4j)的数据。
- 通过静态的、基于网页的报告,提供对现有弱点的全面概述。
基于网页报告的功能:
- 已识别弱点的**详细列表**
- 用于可视化分析的**动态图表**
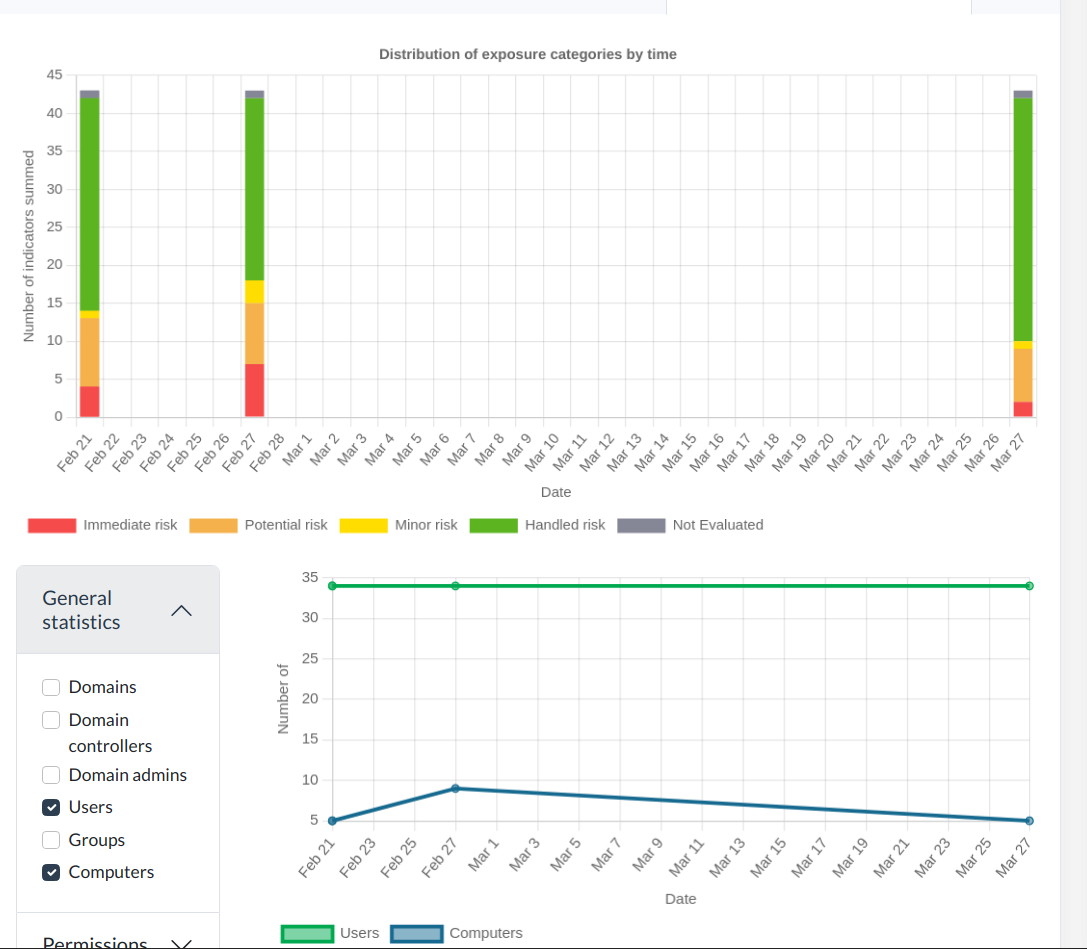
- 用于跟踪随时间变化的**历史关键指标**
- 用于对威胁和行动进行优先级排序的**风险评级**
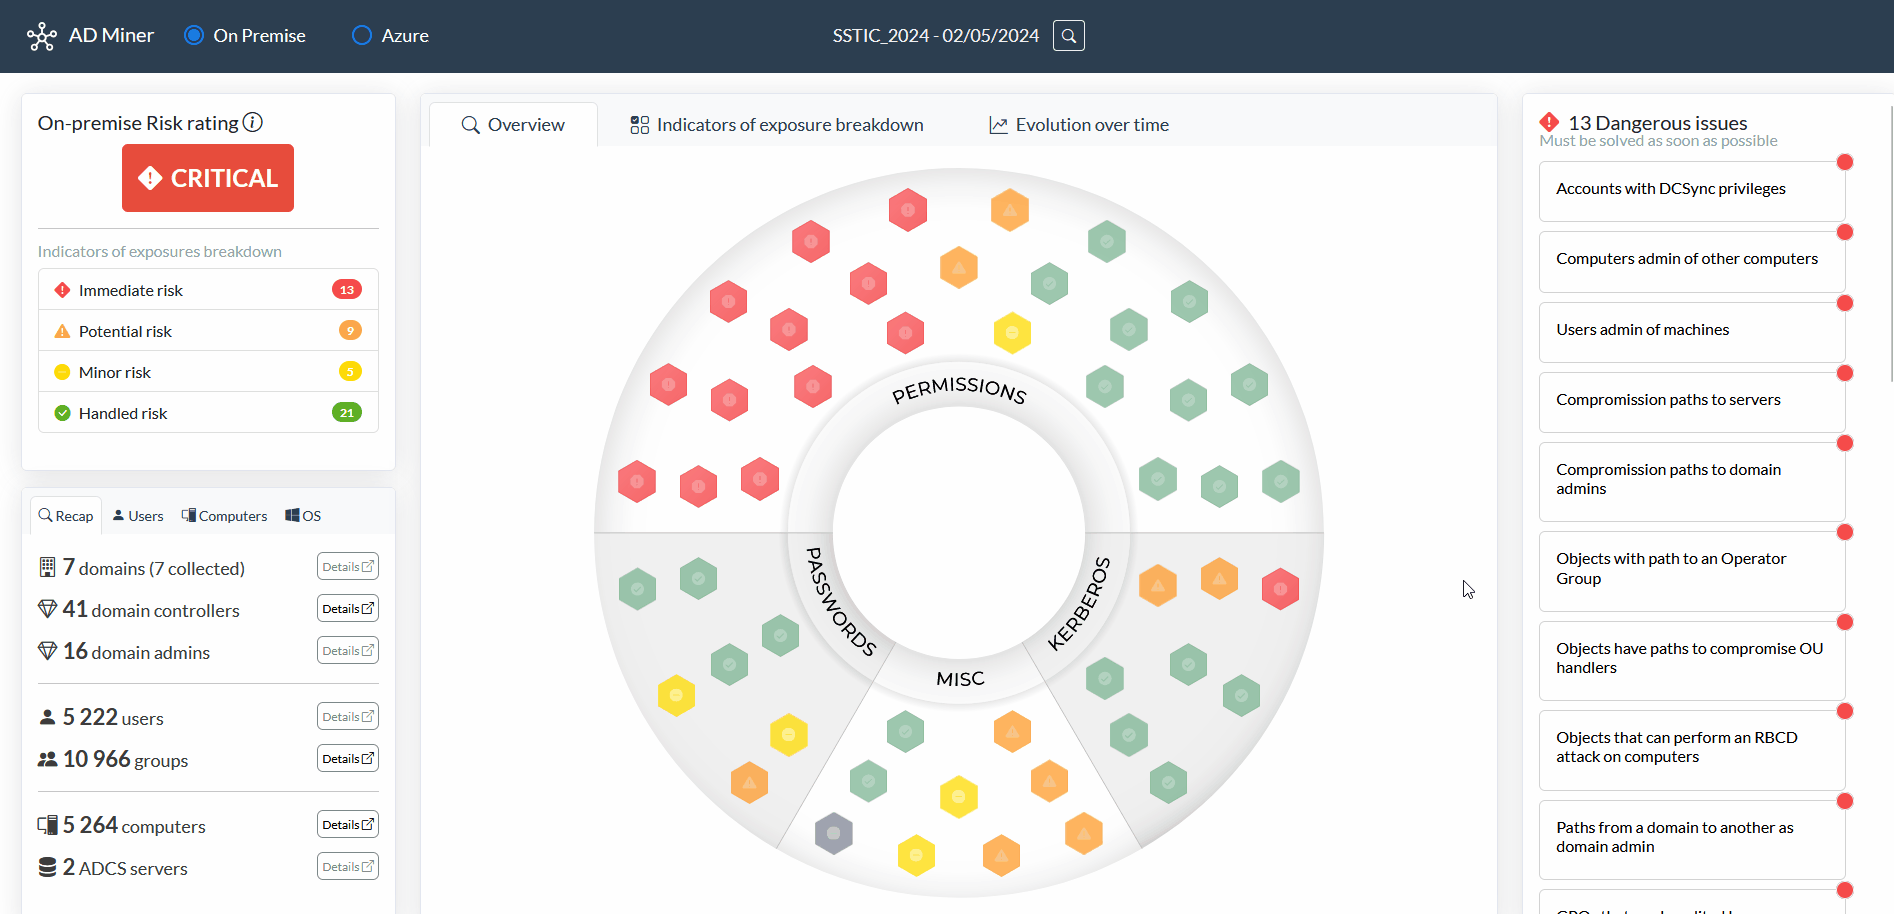
## 报告快速概览
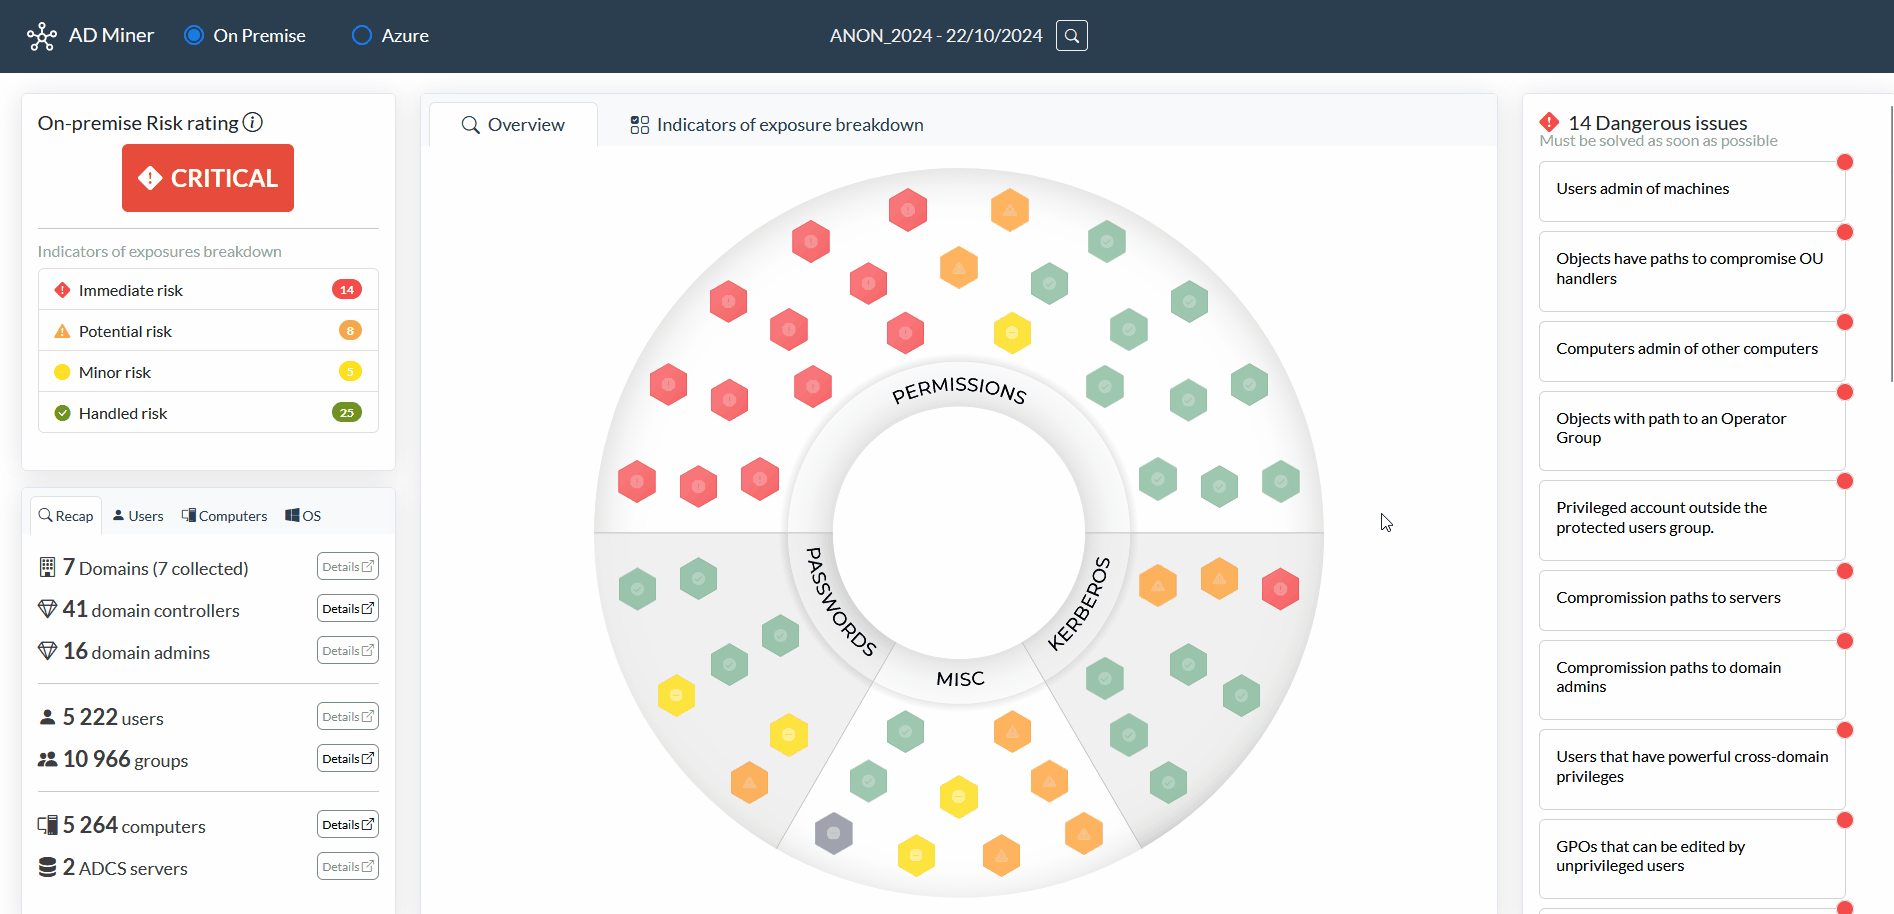
### Active Directory 风险的综合缓解路径
基于风险评级的 Active Directory 弱点评估,以及综合缓解路径。
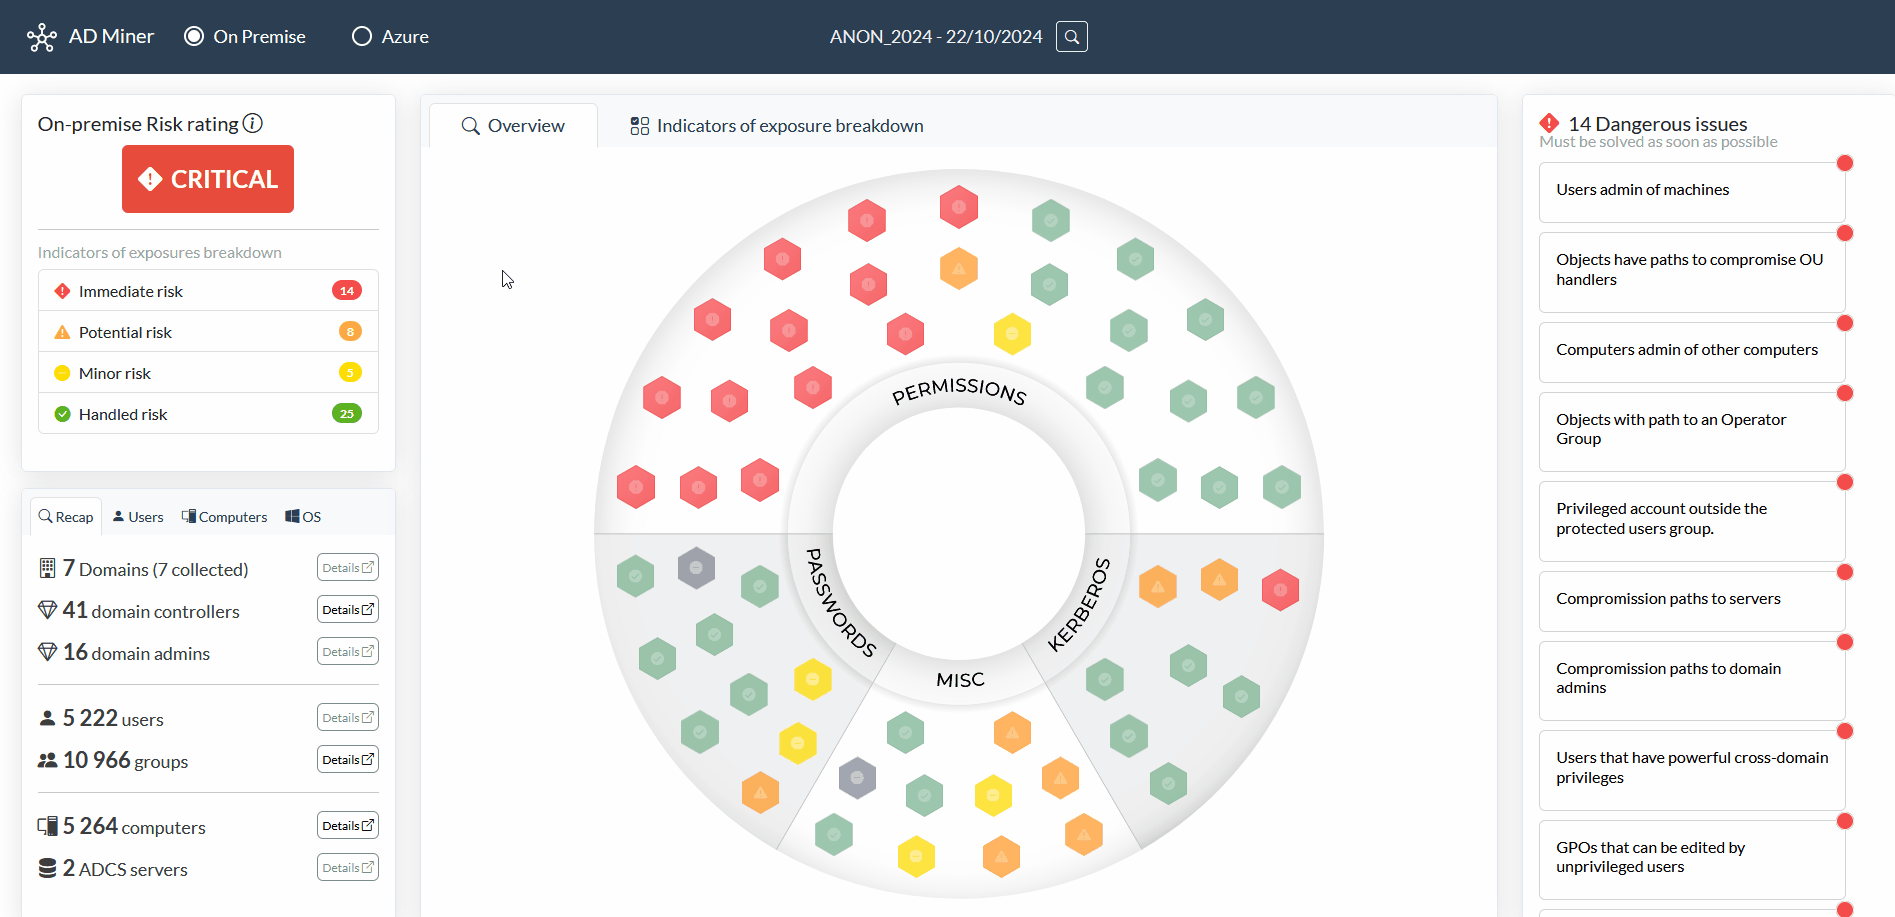
### 动态 Web 界面
经过精心调整的搜索栏和控制项,可帮助识别风险最高的错误配置。
### 通过不断演进的界面进行进度监控
您还可以观察随时间变化的指标,以帮助衡量缓解措施的效率。
AD Miner 最初由 Forvis Mazars 创建,目前由 Grant Thornton 网络安全审计与咨询团队负责维护。
## 前置条件
要运行 AD Miner,您首先需要一个包含 Active Directory 对象的 neo4j 数据库:
1. 要从域中提取数据,您可以使用 [SharpHound](https://github.com/BloodHoundAD/SharpHound)、[RustHound-CE](https://github.com/g0h4n/RustHound-CE) 或 [BloodHound.py](https://github.com/dirkjanm/BloodHound.py) 等工具;如果是 EntraID 环境,则可使用 [AzureHound](https://github.com/BloodHoundAD/AzureHound)。
2. 要搭建您的 BloodHound 环境(包括 GUI 和 Neo4j 数据库),**强烈推荐**使用 [BloodHound Automation](https://github.com/Tanguy-Boisset/bloodhound-automation),**因为它能与 Graph Data Science 插件无缝集成**。虽然使用默认的 [BloodHound CE](https://github.com/SpecterOps/BloodHound) 安装也完全没问题,但请注意,您将错失 GDS 带来的优势(例如:更智能的寻路、提升的执行速度等)。
3. 默认情况下,BloodHound 创建的 neo4j 数据库可以通过 7687 端口访问。
## 安装和设置
最简单的方法是使用 `pipx` 执行以下命令:
```
pipx install 'git+https://github.com/AD-Security/AD_Miner.git'
```
ADMiner 也可在某些 Linux 发行版上使用:
[](https://repology.org/project/ad-miner/versions)
- BlackArch: `pacman -S ad-miner`
- NixOS: `nix-env -iA nixos.ad-miner`
我们提供了一个可用于构建的 Docker 镜像。使用以下命令构建镜像:
```
docker build -t ad-miner .
```
要在 Windows 上使用 BloodHound Community Edition 数据运行此镜像,请使用以下命令:
```
docker run -v ${PWD}:/tmp ad-miner AD-miner -b bolt://host.docker.internal:7687 -u neo4j -p mypassword -cf YOUR_PREFIX
```
要在 Linux 上使用 BloodHound Community Edition 数据运行此镜像,请使用以下命令:
```
docker run -v ${PWD}:/tmp --network host ad-miner AD-miner -b bolt://localhost:7687 -u neo4j -p mypassword -cf YOUR_PREFIX
```
请注意,使用 `-v` 挂载数据卷对于获取数据输出至关重要。此处假设 BHCE 服务器正在以默认设置运行在 Docker 宿主机上。
## 用法
运行该工具:
```
AD-miner [-h] [-b BOLT] [-u USERNAME] [-p PASSWORD] [-e EXTRACT_DATE] [-r RENEWAL_PASSWORD] [-a] [-c] [-l LEVEL] -cf CACHE_PREFIX [-ch NB_CHUNKS] [-co NB_CORES] [--rdp] [--evolution EVOLUTION] [--cluster CLUSTER]
```
示例:
```
AD-miner -cf My_Report -u neo4j -p mypassword
```
每次 Neo4j 请求完成时都会生成缓存文件。此功能允许您在处理过程中的任何时刻暂停或停止 AD Miner,而不会丢失之前已计算的结果。要利用缓存,请使用 `-c` 参数。缓存文件存储在您当前代码库的 cache_neo4j 文件夹中。要使用缓存,报告名称必须与缓存文件的名称前缀相匹配:
```
AD-miner -c -cf My_Report -u neo4j -p mypassword
```
为了更好地处理大型数据集,可以启用多线程,并使用由多个 neo4j 数据库组成的集群,如下例所示(其中 server1 处理 32 个线程,server2 处理 16 个):
```
AD-miner -c -cf My_Report -b bolt://server1:7687 -u neo4j -p mypassword --cluster server1:7687:32,server2:7687:16
```
如果已知晓密码续期策略,您可以使用 `-r` 参数进行指定,以确保密码续期检查符合您环境的设置(默认为 90 天)。例如,如果密码策略设置为 180 天,您可以使用以下命令:
```
AD-miner -c -cf My_Report -b bolt://server:7687 -u neo4j -p mypassword -r 180
```
选项:
```
-h, --help show this help message and exit
-b BOLT, --bolt BOLT Neo4j bolt connection (default: bolt://127.0.0.1:7687)
-u USERNAME, --username USERNAME
Neo4j username (default : neo4j)
-p PASSWORD, --password PASSWORD
Neo4j password (default : bloodhoundcommunityedition)
-e EXTRACT_DATE, --extract_date EXTRACT_DATE
Extract date (e.g., 20220131). Default: last logon date
-r RENEWAL_PASSWORD, --renewal_password RENEWAL_PASSWORD
Password renewal policy in days. Default: 90
-c, --cache Use local file for neo4j data
-l LEVEL, --level LEVEL
Recursive level for path queries
-cf CACHE_PREFIX, --cache_prefix CACHE_PREFIX
Cache file to use (in case of multiple company cache files)
--gpo_low Perform a faster but incomplete query for GPO (faster than the regular query)
-ch NB_CHUNKS, --nb_chunks NB_CHUNKS
Number of chunks for parallel neo4j requests. Default : 20 * number of CPU
-co NB_CORES, --nb_cores NB_CORES
Number of cores for parallel neo4j requests. Default : number of CPU
--rdp Include the CanRDP edge in graphs
--evolution EVOLUTION
Evolution over time : location of json data files. ex : '../../tests/'
--cluster CLUSTER Nodes of the cluster to run parallel neo4j queries. ex : host1:port1:nCore1,host2:port2:nCore2,...
```
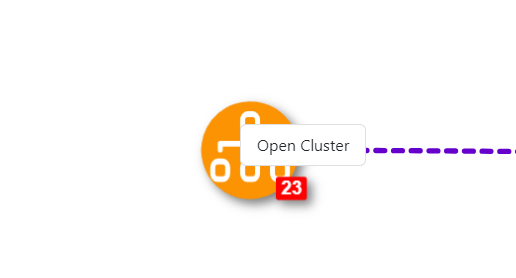
在图表页面中,您可以右键单击图表节点对其进行聚类或打开聚类。