RevEngAI/plugin-ghidra
GitHub: RevEngAI/plugin-ghidra
RevEng.AI 官方推出的 Ghidra 插件,利用云端 AI 与代码相似度技术辅助逆向工程师分析二进制并自动恢复函数名。
Stars: 180 | Forks: 18
# RevEng.AI Ghidra 插件
[Discord](https://discord.com/invite/ZwQTvzfSbA)
### AI 辅助的二进制分析
由 RevEng.ai 作为开源项目发布 - https://reveng.ai
## 描述
RevEng.AI Ghidra 插件允许您在 Ghidra 中与我们的 API 进行交互。
这允许您上传当前打开的二进制文件进行分析,
并将其用于二进制代码相似性对比,以帮助您逆向工程被 strip 的二进制文件。
## 目录
- [核心功能](#key-features)
- [安装说明](#installation)
- [加载插件](#loading-the-plugin)
- [启用插件](#enabling-the-plugin)
- [使用说明](#usage)
- [配置说明](#configuration)
- [分析功能](#analysis)
- [自动 Unstrip](#auto-unstrip)
- [函数匹配](#function-matching)
- [单个函数匹配与重命名](#individual-function-matching-and-renaming)
- [批量函数匹配与重命名](#batch-function-matching-and-renaming)
- [AI 反编译](#ai-decompilation)
- [贡献指南](#contributing)
- [从源码构建](#building-from-source)
- [报告 Bug](#reporting-bugs)
- [已知问题](#known-issues)
## 核心功能
* 上传当前二进制文件以进行分析
* 自动重命名所有置信度高于阈值的函数
* 针对单个选定的函数显示相似函数及其名称
## 安装说明
适用于常见 Ghidra 版本的 RevEng.AI Ghidra 插件最新稳定版本的构建包,可以从 [Releases](https://github.com/revengai/plugin-ghidra/releases/latest) 页面下载。
### 支持的 Ghidra 版本
我们支持所有基于 Java 21 且兼容 Ghidra 11.4+ 的版本。
#### 构建您自己的插件(适用于自定义 Ghidra 分支和版本)
如果您使用的是自定义版本的 Ghidra(例如 nightly builds),则需要针对它构建您自己的插件版本,
否则在尝试安装插件时,Ghidra 会报错提示版本不匹配。
您可以通过 `./gradlew -PGHIDRA_INSTALL_DIR=/opt/ghidra buildExtension` 来执行此操作,然后使用 `dist/` 文件夹中的 zip 文件。
### 加载插件
1. 启动 Ghidra。
2. 导航到 `Install Extensions` 窗口。
* `File` -> `Install Extensions...`
3. 点击右上角的绿色“+”图标。
4. 选择下载的 ZIP 文件以将插件加载到 Ghidra 中。
5. 点击“OK”按钮退出 `Install Extensions` 窗口。
6. 出现提示时,重启 Ghidra。
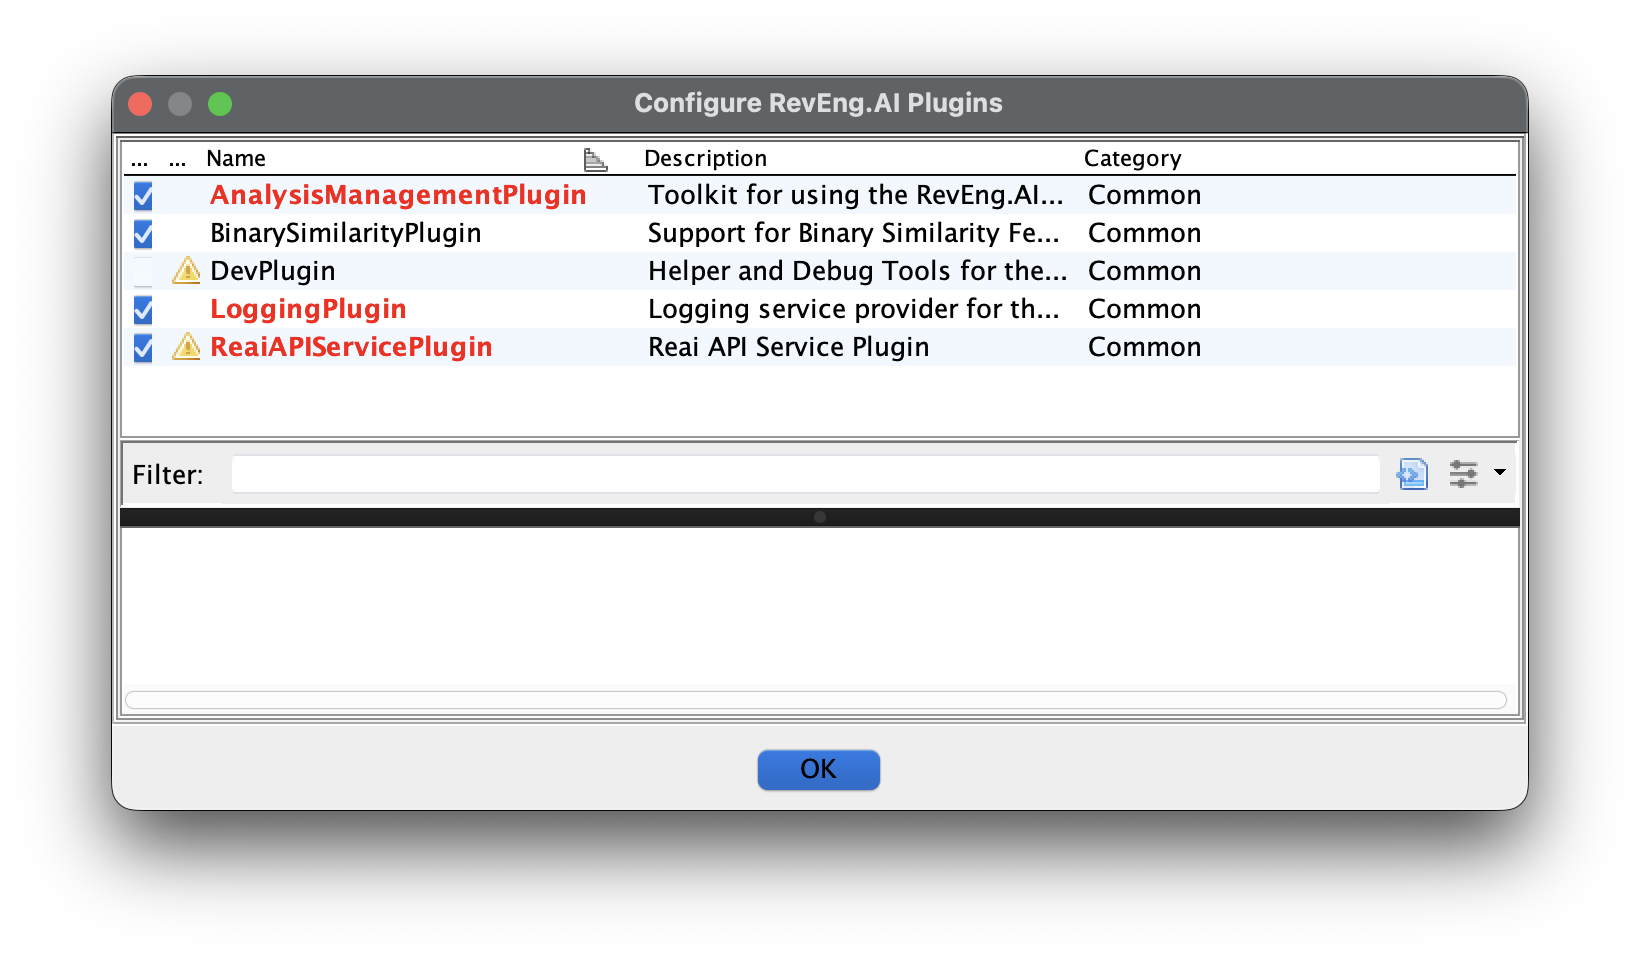
### 启用插件
安装完成后,您可以通过 `Configure` 工具启用该插件。
1. 导航到 Ghidra 的 Configure 工具
- `File` -> `Configure`
2. 点击 `RevEng.AI` 插件组下的 `Configure`
3. 勾选除 `DevPlugin` 之外的每个插件旁边的复选框(除非您正在对该插件本身进行开发)
## 使用说明
在本节中,我们将为您提供一个使用 `src/test/resources` 中的测试二进制文件的插件示例工作流。
插件加载完成后,工具栏的 `RevEng.AI` 下会新增相关的菜单项。
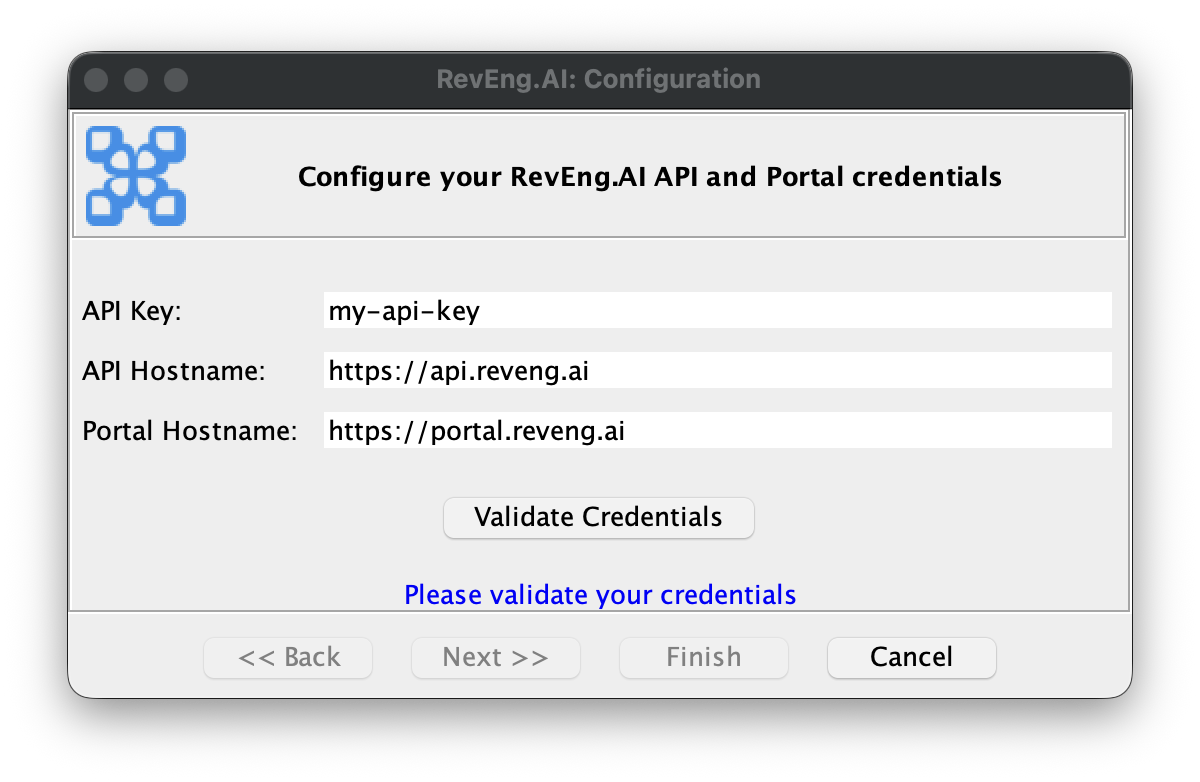
### 配置说明
我们需要做的第一件事是配置插件的 API key 以及要使用的主机。
当您首次加载插件,或选择 `RevEng.AI -> Configure` 时,系统将引导您完成配置过程。
### 分析功能
您现在已经准备好分析二进制文件了。
将 `src/test/resources/fdupes` 导入 Ghidra,然后通过转到 `RevEng.AI -> Analysis -> Create New` 创建新的 RevEng 分析。
通常使用默认选项就足够了,但如果需要,您也可以指定特定的平台或架构。
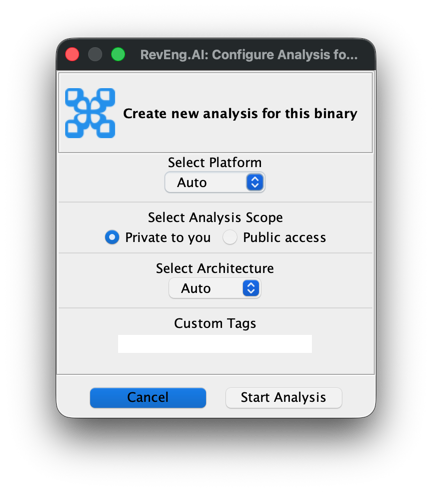
您可以从同一菜单中选择 `RevEng.AI -> Analysis -> Check status` 来检查请求的状态。
启动分析还会触发一个后台 Ghidra 线程,它会定期检查状态,
并在分析完成时弹出通知。
### 自动 Unstrip
`Auto Unstrip` 工具允许您基于我们的调试符号数据库自动恢复函数名称。这是一个自动化的过程,将从当前附加的二进制文件中恢复所有函数名称。
您可以通过从菜单中选择 `RevEng.AI -> Auto Unstrip` 来访问它。
### 函数匹配
函数匹配工具允许您基于与我们数据库中函数的相似度来重命名二进制文件中的函数。
这是一个手动过程,可以针对单个函数执行,也可以针对整个二进制文件进行批量处理。它允许您更好地控制重命名哪些函数以及重命名的时间,并且能够在应用建议的名称之前对其进行审查。
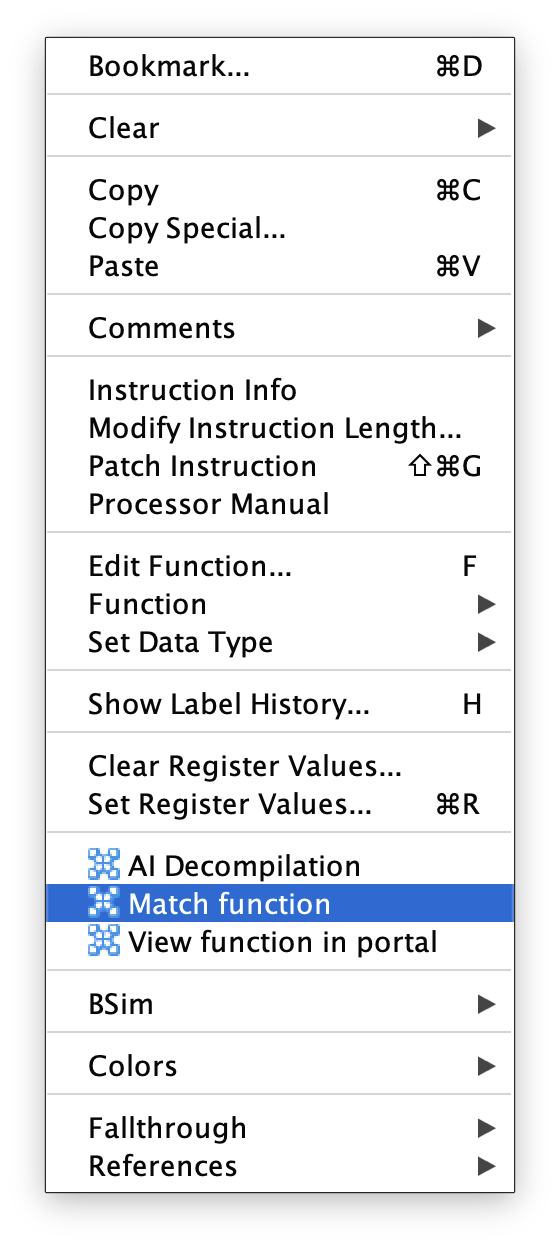
#### 单个函数匹配与重命名
我们现在已经将 `fdupes` 上传到我们的数据集中,这意味着我们可以将其用于我们的二进制相似度任务。让我们看看这在 `fdupes` 的 strip 版本上是如何运作的。
使用与之前相同的步骤导入 `src/test/resourcesfdupes.stripped`。完成此操作后,您就可以继续下一步了。
在 Ghidra 中打开 `fdupes.stripped`,在 Ghidra 的列表或反编译视图中选中一个函数,然后 `Right-Click -> Match function`。
这将打开函数匹配与重命名窗口。
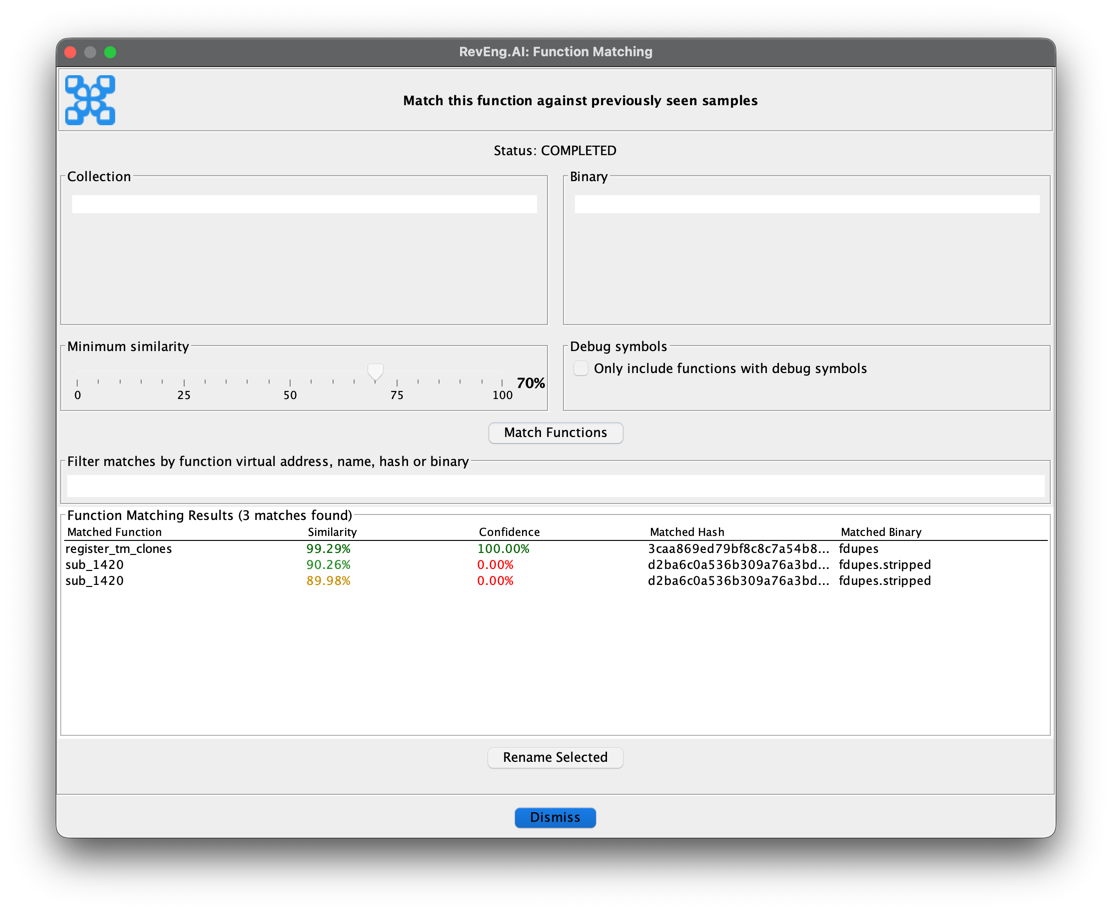
根据需要调整过滤器,准备好后点击 `Match Functions`。这将返回最多 10 个与所选函数匹配的函数。然后您可以通过点击 `Rename Selected`,决定将该函数重命名为其中一个建议的名称。
您随时可以更新过滤器并再次点击 `Match Functions`,以便根据更新的过滤器刷新返回的函数。
#### 批量函数匹配与重命名
您还可以使用 `Function Matching` 工具对二进制文件进行批量分析以重命名函数。您可以通过从菜单中选择 `RevEng.AI -> Function Matching` 来访问它。
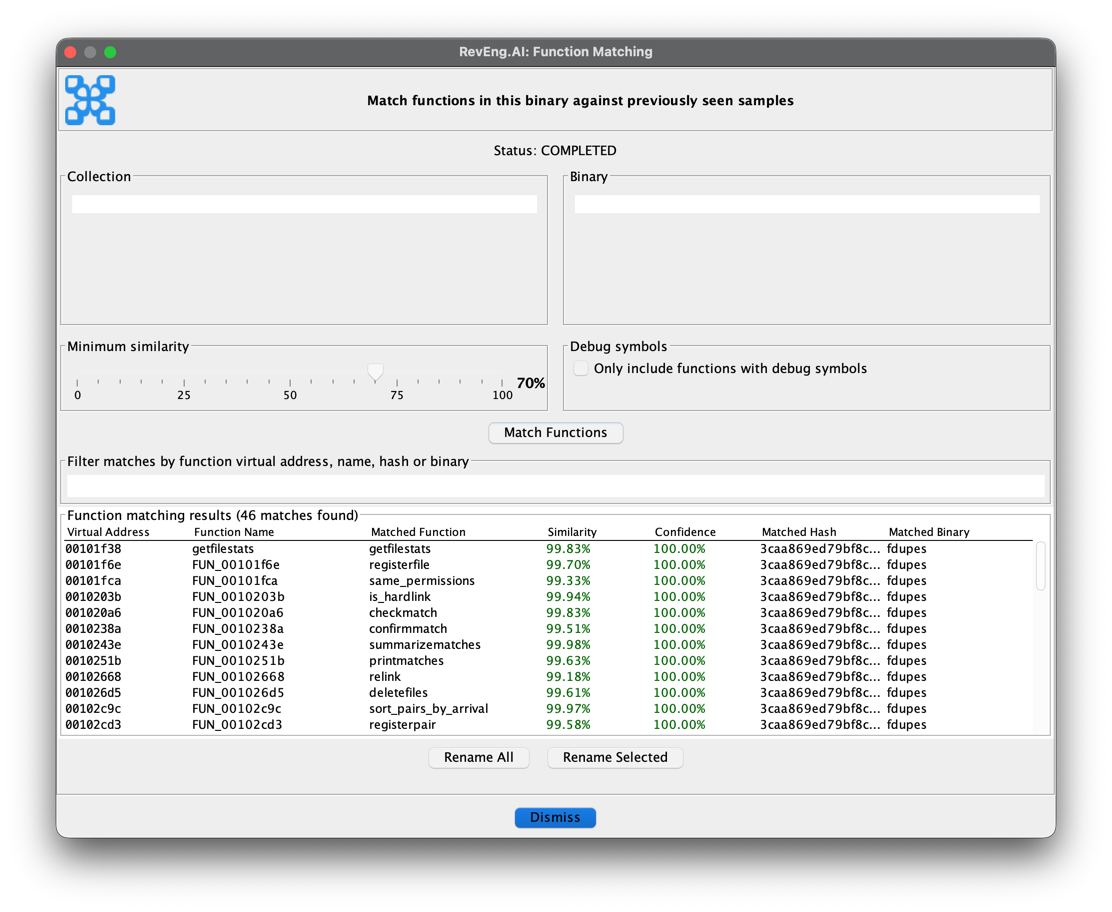
与单个函数匹配窗口类似,您可以根据需要调整过滤器。
准备好后,点击 `Match Functions` 开始匹配过程。获取结果后,您可以重命名所有函数,也可以选择特定的函数进行重命名。
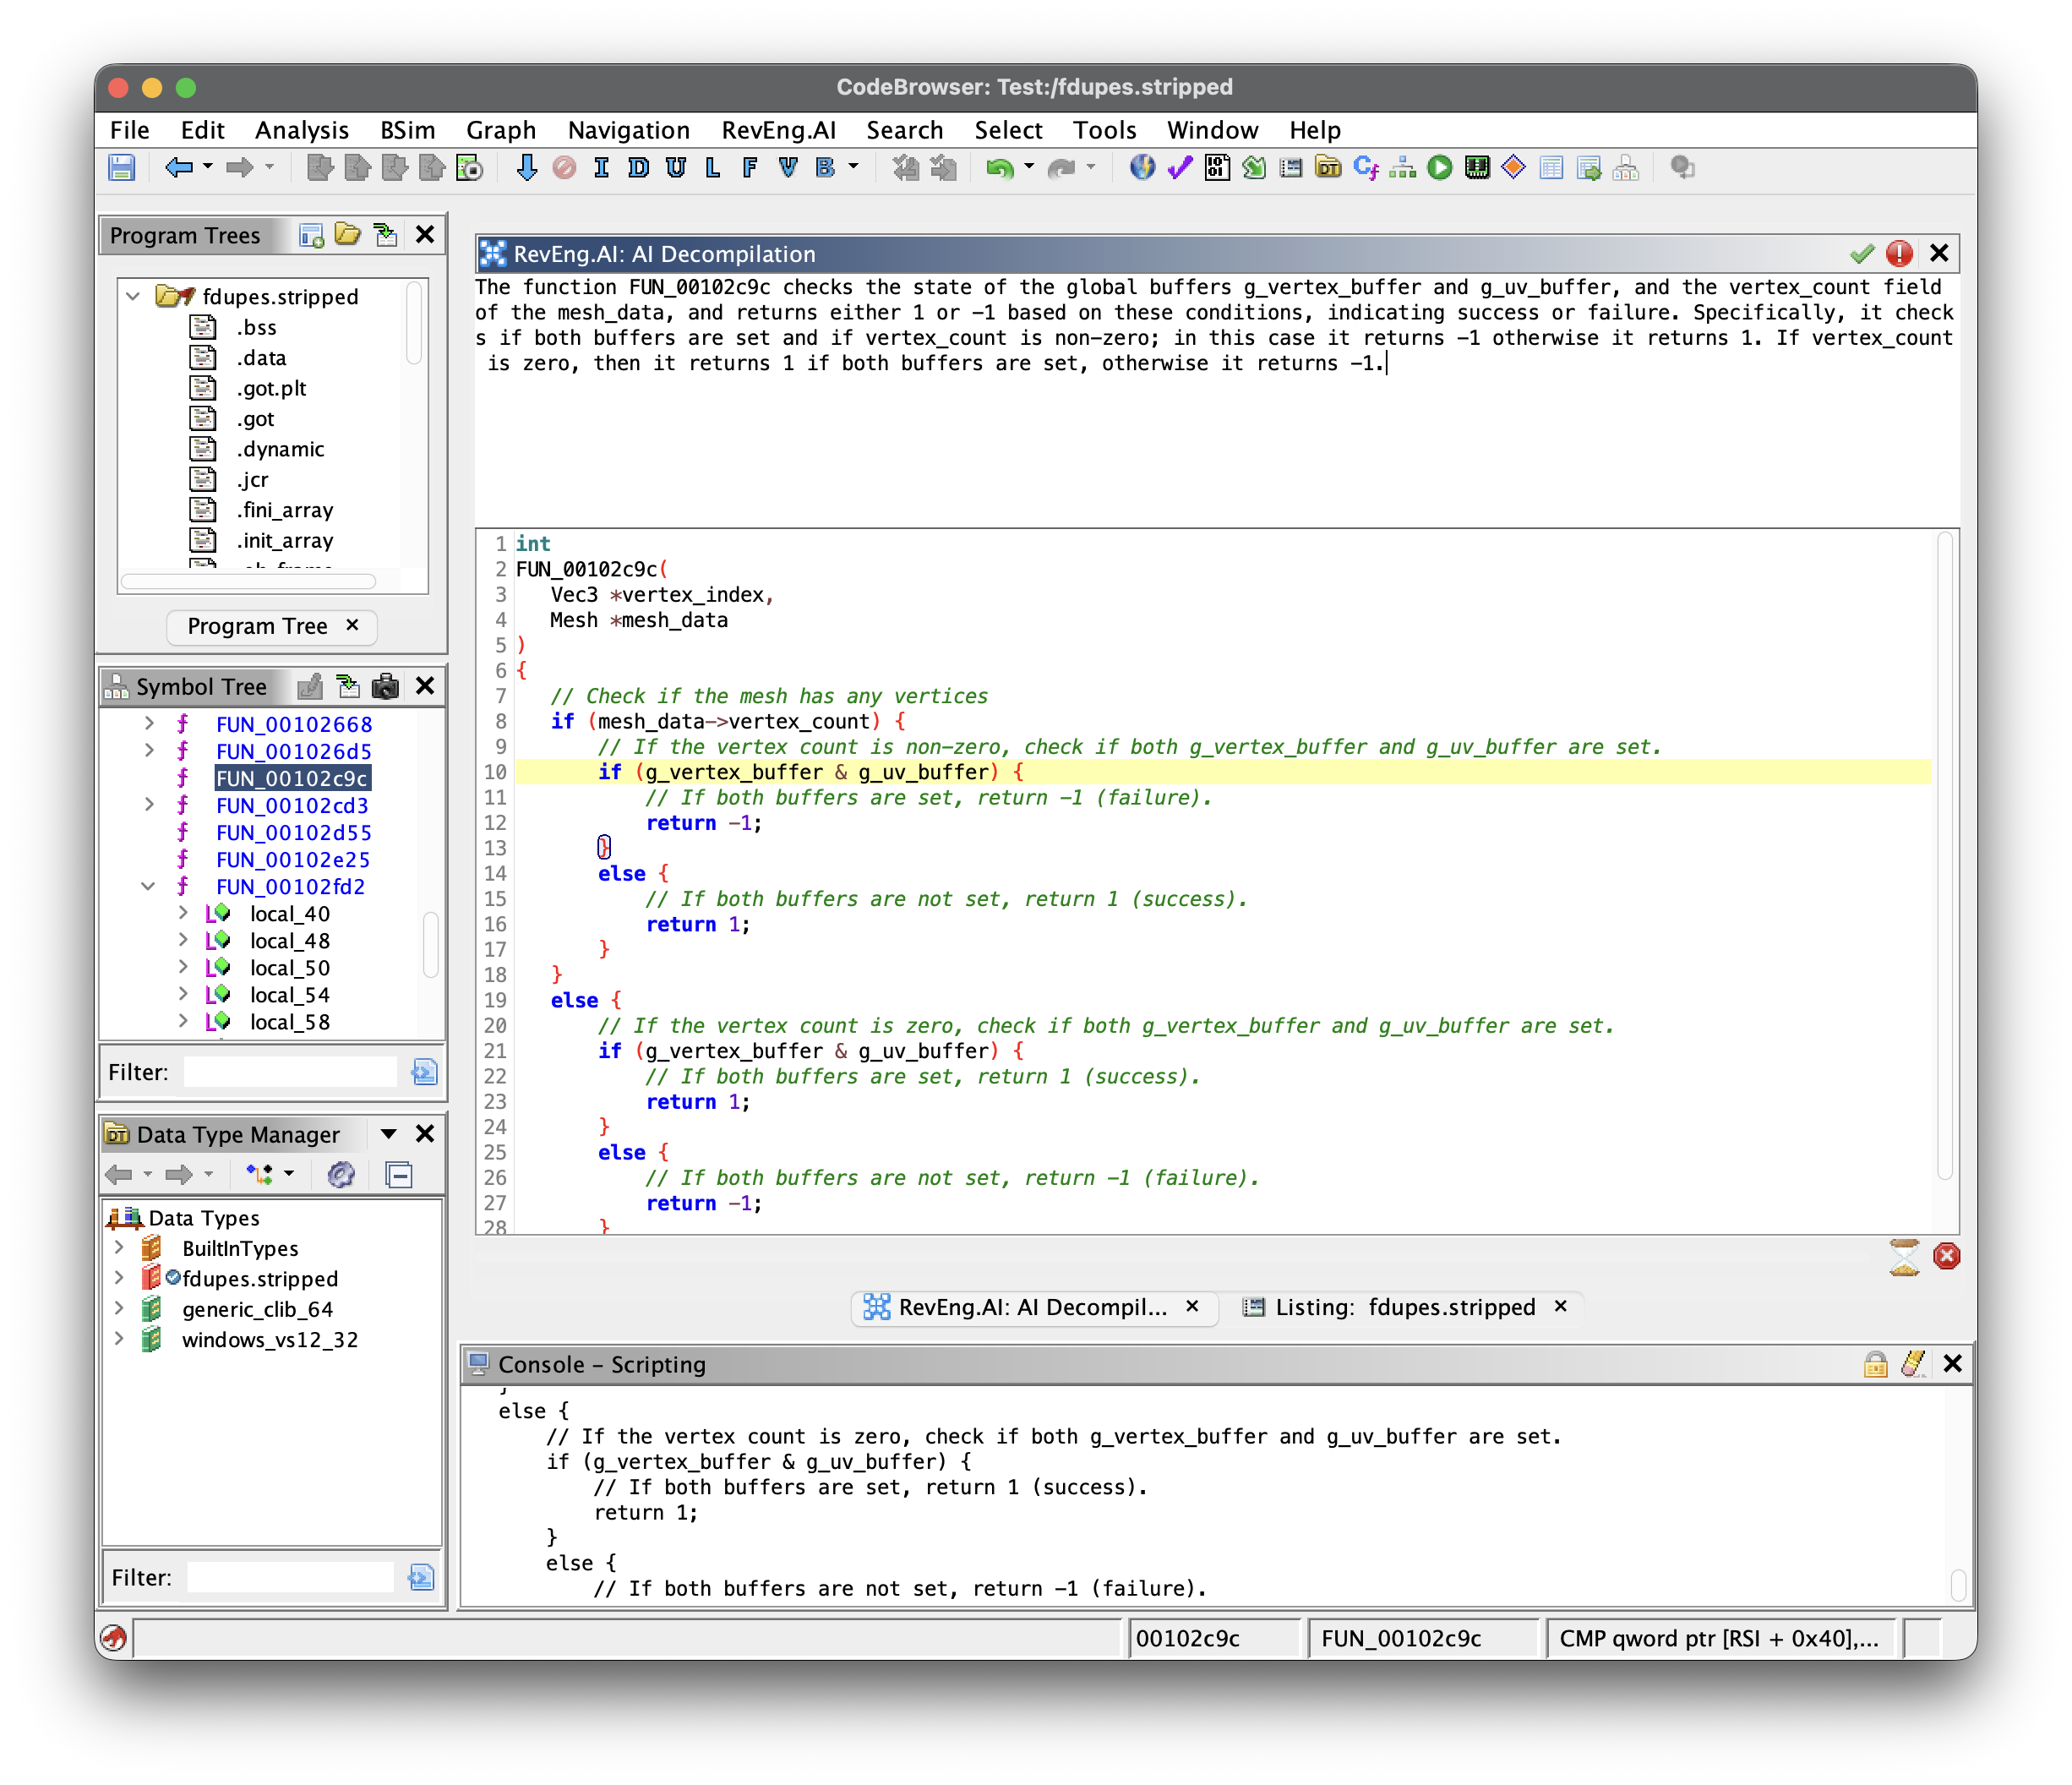
### AI 反编译
`AI Decompilation` 工具允许您获取所选函数的 AI 生成反编译结果。您可以通过在 Ghidra 的列表或反编译视图中右键点击函数并选择 `AI Decompilation` 来访问它。
该窗口将向您展示所选函数的 AI 生成反编译结果,以及关于该函数功能的自然语言描述。
通过拖动蓝色的顶部栏可以固定该窗口,并且当您在 Ghidra 中选择不同的函数时,它会自动更新。
### 代码概览
我们尝试将插件分解为一系列依赖于 **CorePlugin** 的独立插件。
**CorePlugin** 提供了在整个工具包各部分共享的服务,即配置和 API 服务。
因此,您应该将相关的功能组合到一个功能插件中,然后根据需要从 CorePlugin 获取服务。这使得用户能够根据其使用场景和/或偏好来启用/禁用相关功能。
### 从源码构建
可以使用 Gradle 从其源代码构建该插件。
#### 无需 Eclipse
1. 克隆 GitHub 仓库。
git clone https://github.com/RevEngAI/plugin-ghidra.git
2. 进入仓库目录并使用 gradle 构建。
cd plugin-ghidra
gradle -PGHIDRA_INSTALL_DIR=
* 将 `` 替换为您本地的 Ghidra 安装路径。
3. 构建完成后,插件 ZIP 文件将位于 `dist/` 文件夹中。
#### 使用 Eclipse
在 Eclipse 中开发是首选方法,但这确实需要开发人员进行一些设置,以下是您需要执行的操作的(非详尽的)摘要。
1. 将项目导入 Eclipse
2. 在 **Preferences -> Gradle** 下
- 添加一个程序参数:`-PGHIDRA_INSTALL_DIR=PATH2GHIDRA`
3. 使用 GhidraDev 将您的项目与 Ghidra 链接
4. 更新您的 classpath 以指向 `lib/` 中的 `jar` 包
- 同样,这可以在您项目的 `preferences` 中找到
### 报告 Bug
如果您在插件中发现了 bug,请通过 [GitHub](https://github.com/RevEngAi/plugin-ghidra/issues/new/choose) 提交 issue,或者在我们的 [Discord](https://discord.com/invite/ZwQTvzfSbA) 上发布帖子。
#### 已知问题
_安装后未出现插件配置:_
请检查下载的文件夹名称是否为 `plugin-ghidra`,而不是由于多次下载同一文件夹导致的 `plugin-ghidra-2`。
标签:AI辅助, Ghidra插件, JS文件枚举, URL提取, 二进制分析, 云安全运维, 云资产清单, 代码相似性, 反编译, 后台面板检测, 域名枚举, 逆向工程