chamodanethra/biometric_signature
GitHub: chamodanethra/biometric_signature
该插件为 Flutter 提供硬件级生物识别密码学签名与解密能力,使后端能以数学方式验证用户真实身份。
Stars: 17 | Forks: 23
# biometric_signature
**别只停留在解锁 UI,开始证明身份吧。**
标准的生物识别集成通常只返回一个布尔值来指示验证是否成功。
`biometric_signature` 提供了一个完整的生物识别解决方案:
1. **密码学证明(核心功能):** 使用存储在硬件(Secure Enclave / StrongBox)中的私钥生成**可验证的密码学签名**。这允许您的后端以数学方式验证用户身份,防止重放攻击和 API 钩子。
2. **简单的身份验证:** 支持标准的生物识别提示(返回成功/失败),用于本地 UI 门控或快速重新认证,并完全支持 Android 生物识别强度级别和设备凭据。
即使攻击者绕过或钩住生物识别 API,您的后端仍然会拒绝该请求,因为**攻击者无法在没有私钥的情况下伪造硬件支持的签名**。
## 功能
- **身份的密码学证明:** 您的后端可以独立验证的硬件支持 RSA (Android) 或 ECDSA(所有平台)签名。
- **解密支持:**
- **RSA**: RSA/ECB/PKCS1Padding(Android 原生,iOS/macOS 通过封装的软件密钥)
- **EC**: ECIES (`eciesEncryptionStandardX963SHA256AESGCM`)
- **硬件安全:** 使用 Secure Enclave (iOS/macOS) 和 Keystore/StrongBox (Android)。
- **混合架构:**
- **Android 混合 EC:** 硬件 EC 签名 + 软件 ECIES 解密。软件 EC 私钥使用 Keystore/StrongBox AES-256 主密钥进行 AES 封装,每次解封装都需要生物识别认证。
- **iOS/macOS 混合 RSA:** 软件 RSA 密钥**同时用于签名和解密**,通过 ECIES 使用 Secure Enclave EC 公钥进行封装。硬件 EC 仅用于封装/解封装。
- **命名密钥别名:** 通过可选的 `keyAlias` 参数,为每个应用管理多个独立的密钥对(例如,一个用于认证,一个用于支付签名)。
- **密钥覆盖保护:** 使用 `failIfExists` 选项防止意外替换密钥。
- **密钥失效:** 密钥可以绑定到生物识别注册状态(指纹/Face ID 更改)。
- **设备凭据:** 在 Android 上支持可选的 PIN/图案/密码回退。
- **简单提示(无加密):** 无需密钥操作即可验证用户是否存在。支持设备凭据回退和 Android 生物识别强度选择。
## 安全架构
### 密钥模式
该插件根据平台支持不同的操作模式:
#### Android
Android 支持三种密钥模式:
1. **RSA 模式** (`SignatureType.rsa`):
- 硬件支持的 RSA-2048 签名(Keystore/StrongBox)
- 可选的 RSA 解密(PKCS#1 填充)
- 私钥永不离开安全硬件
2. **仅 EC 签名** (`SignatureType.ecdsa`, `enableDecryption: false`):
- Keystore/StrongBox 中硬件支持的 P-256 密钥
- 仅 ECDSA 签名
- 不支持解密
3. **混合 EC 模式** (`SignatureType.ecdsa`, `enableDecryption: true`):
- 硬件 EC 密钥用于签名
- 软件 EC 密钥用于 ECIES 解密
- 软件 EC 私钥使用 AES-256 GCM 主密钥(Keystore/StrongBox)加密
- 解密时需要针对每次操作进行生物识别认证
#### iOS / macOS
Apple 平台支持两种密钥模式(Secure Enclave 原生仅支持 EC 密钥):
1. **EC 模式** (`SignatureType.ecdsa`):
- Secure Enclave 中硬件支持的 P-256 密钥
- ECDSA 签名
- 原生 ECIES 解密 (`eciesEncryptionStandardX963SHA256AESGCM`)
- 单个密钥用于两种操作
2. **RSA 模式** (`SignatureType.rsa`) - 混合架构:
- 软件 RSA-2048 密钥**同时用于签名和解密**
- RSA 私钥通过 ECIES 使用 Secure Enclave EC 公钥封装
- 硬件 EC 密钥**仅**用于封装/解封装 RSA 密钥
- 封装的 RSA 密钥作为 `kSecClassGenericPassword` 存储在 Keychain 中
- 解封装 RSA 密钥需要针对每次操作进行生物识别认证
### 工作流程概述
1. **注册**
用户进行身份验证 → 硬件生成签名密钥。
混合模式还会生成软件解密密钥,然后使用安全硬件对其进行加密。
2. **签名**
显示生物识别提示
硬件解锁签名密钥,并生成可验证的签名。
3. **解密**
再次显示生物识别提示。
混合模式使用受硬件保护的 AES-GCM 解封装软件私钥,然后解密 payload。
4. **后端验证**
后端使用已注册的公钥验证签名。
**不得**在客户端进行验证。
## 后端验证
请在服务器上执行验证。以下是参考实现。
### Node.js
```
const crypto = require('crypto');
function verifySignature(publicKeyPem, payload, signatureBase64) {
const verify = crypto.createVerify('SHA256');
verify.update(payload); // The original string you sent to the plugin
verify.end();
// Returns true if valid
return verify.verify(publicKeyPem, Buffer.from(signatureBase64, 'base64'));
}
```
### Python
```
from cryptography.hazmat.primitives import hashes
from cryptography.hazmat.primitives.asymmetric import padding
from cryptography.hazmat.primitives import serialization
import base64
def verify_signature(public_key_pem_str, payload_str, signature_base64_str):
public_key = serialization.load_pem_public_key(public_key_pem_str.encode())
signature = base64.b64decode(signature_base64_str)
try:
# Assuming RSA (For EC, use ec.ECDSA(hashes.SHA256()))
public_key.verify(
signature,
payload_str.encode(),
padding.PKCS1v15(),
hashes.SHA256()
)
return True
except Exception:
return False
```
### Go
```
import (
"crypto"
"crypto/rsa"
"crypto/sha256"
"crypto/x509"
"encoding/base64"
"encoding/pem"
"fmt"
)
func verify(pubPemStr, payload, sigBase64 string) error {
block, _ := pem.Decode([]byte(pubPemStr))
pub, _ := x509.ParsePKIXPublicKey(block.Bytes)
rsaPub := pub.(*rsa.PublicKey)
hashed := sha256.Sum256([]byte(payload))
sig, _ := base64.StdEncoding.DecodeString(sigBase64)
return rsa.VerifyPKCS1v15(rsaPub, crypto.SHA256, hashed[:], sig)
}
```
## 开始使用
要开始使用 Biometric Signature,请按照以下步骤操作:
1. 将该包添加到您的项目中,将其包含在您的 `pubspec.yaml` 文件中:
```
dependencies:
biometric_signature: ^12.1.0
```
| | Android | iOS | macOS | Windows |
|-------------|---------|-------|--------|--------|
| **支持** | SDK 23+ | 13.0+ | 10.15+ | 10+ |
最低 Flutter SDK:`3.24.5` (Dart `3.5.0`)。
#### 所需的 Android 构建配置
此插件间接依赖于 `androidx.biometric:1.4.0-alpha05`,其 AAR
元数据强制要求 `minCompileSdk = 35`。Flutter 3.24.5 默认附带
`flutter.compileSdkVersion = 34` 和 `flutter.ndkVersion = "23.1.7779620"`,
低于此插件(以及其他现代 AndroidX 库)
所需的值。因此,您的应用的 `android/app/build.gradle.kts` 需要显式
覆盖这些值:
```
android {
// androidx.biometric:1.4.0-alpha05 requires compileSdk >= 35.
compileSdk = 35
// Many recent plugins (shared_preferences_android, etc.) require NDK 27.
ndkVersion = "27.0.12077973"
defaultConfig {
// Floor for androidx.biometric BiometricPrompt.
minSdk = 23
// ...
}
}
```
如果您跳过这些配置,Gradle 将失败并报错:
插件本身针对 `compileSdk = 35` 进行编译,并附带固定为
AGP `8.6.0` 的构建脚本。AGP `8.6.0` 略高于 Flutter 3.24.5 的
`maxKnownAndSupportedAgpVersion` (`8.4.0`),这会产生仅包含详细信息的跟踪
日志——在默认的 Flutter 3.24.5 工具链上构建会正常成功。
### iOS 集成
此插件支持 Touch ID **或** Face ID。要在可用设备上使用 Face ID,
您需要添加:
```
NSFaceIDUsageDescription
This app is using FaceID for authentication
```
到您的 Info.plist 文件中。
### Android 集成
#### Activity 更改
此插件需要使用 `FragmentActivity` 而不是 `Activity`。更新您的 `MainActivity.kt` 以继承 `FlutterFragmentActivity`:
```
import io.flutter.embedding.android.FlutterFragmentActivity
class MainActivity : FlutterFragmentActivity() {
}
```
#### 权限
更新您项目的 `AndroidManifest.xml` 文件以包含
`USE_BIOMETRIC` 权限。
```
```
### macOS 集成
此插件在受支持的 Mac 上使用 Touch ID。要使用 Touch ID,您需要:
1. 为您的 macOS 应用添加所需的 entitlements。
打开您 macOS 项目的 entitlements 文件(通常位于 `macos/Runner/DebugProfile.entitlements` 和 `macos/Runner/Release.entitlements`)并确保其包含:
```
com.apple.security.device.usb
com.apple.security.device.bluetooth
keychain-access-groups
$(AppIdentifierPrefix)com.yourdomain.yourapp
```
将 `com.yourdomain.yourapp` 替换为您实际的 bundle identifier。
2. 确保您的 `macos/Podfile` 中正确配置了 CocoaPods。此插件需要 macOS 10.15 或更高版本:
```
platform :osx, '10.15'
```
### Windows 集成
### Windows 集成
此插件在 Windows 10 及更高版本上使用 **Windows Hello** (`Windows.Security.Credentials.KeyCredentialManager`) 进行生物识别认证。密钥通常由设备的 **TPM(受信任的平台模块)** 支持,以实现硬件级的安全性。
**平台限制:**
- **密钥类型**:Windows Hello 仅支持 **RSA-2048** 密钥(ECDSA 请求会自动提升为 RSA)。
- **身份验证**:Windows Hello 在创建密钥时**始终进行身份验证**(`enforceBiometric` 实际上始终为 `true`)。
- **配置**:在此平台上,`setInvalidatedByBiometricEnrollment` 和 `useDeviceCredentials` 参数将被忽略。
- **解密**:**不支持**。Windows Hello API 主要为身份验证(签名)而设计,不公开这些密钥的通用解密功能。
无需额外配置。当 Windows Hello 可用时,插件将自动使用它。
### 通用设置
1. 在您的 Dart 代码中导入该包:
```
import 'package:biometric_signature/biometric_signature.dart';
```
2. 初始化 Biometric Signature 实例:
```
final biometricSignature = BiometricSignature();
```
## 用法
此包简化了使用生物识别进行服务器身份验证的过程。以下来自 Android Developers Blog 的图像说明了基本用例:
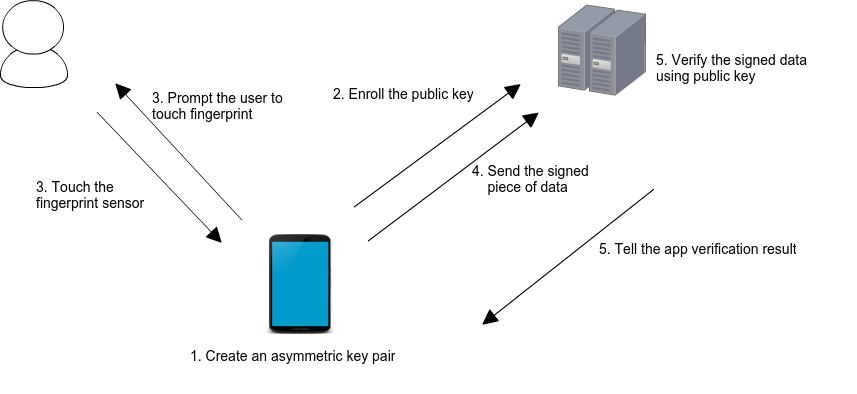
当用户注册生物识别时,会生成一个密钥对。私钥安全地存储在设备上,而公钥则发送到服务器进行注册。要进行身份验证,系统会提示用户使用其生物识别,从而解锁私钥。然后生成密码学签名并发送到服务器进行验证。如果服务器成功验证了签名,它将返回适当的响应,对用户进行授权。
### 生物识别解密
该插件还支持安全解密,确保从服务器传输的敏感数据只能由特定设备上经过身份验证的用户访问。
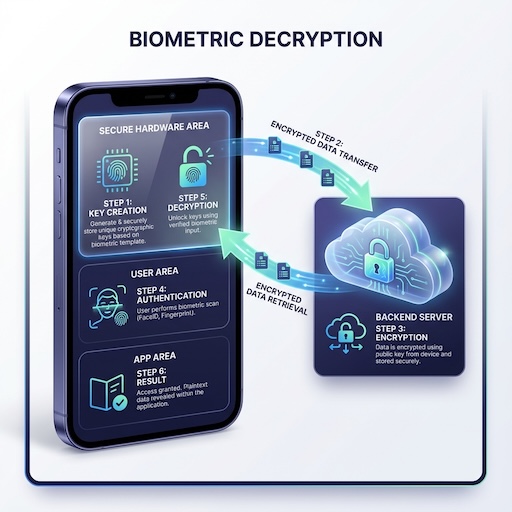
1. **密钥创建**:设备在安全硬件中生成密钥对(EC 或 RSA)。
2. **注册**:公钥被发送到后端服务器。
3. **加密**:服务器使用公钥对敏感 payload 进行加密。
4. **身份验证**:加密的 payload 被发送到设备。用户必须进行生物识别认证才能继续。
5. **解密**:一旦认证通过,安全硬件将使用私钥解密 payload,向应用显示明文数据。
## 类:BiometricSignaturePlugin
此类提供管理和利用生物识别身份验证以进行安全服务器交互的方法。它支持 Android 和 iOS 平台。
### `createKeys({ keyAlias, config, keyFormat, promptMessage })`
为生物识别认证生成新的密钥对(RSA 2048 或 EC)。私钥安全地存储在设备上。
- **参数**:
- `keyAlias`:此密钥对的可选名称。不同的别名会创建独立的密钥对。当为 `null` 时,使用默认别名。
- `config`:带有平台选项的 `CreateKeysConfig`(见下文)
- `keyFormat`:输出格式(`KeyFormat.base64`、`pem`、`hex`)
- `promptMessage`:自定义身份验证提示消息
- **返回**:`Future`。
- `publicKey`:格式化的公钥字符串(Base64 或 PEM)。
- `code`:`BiometricError` 代码(例如,`success`、`userCanceled`、`keyAlreadyExists`)。
- `error`:描述性的错误消息。
#### CreateKeysConfig 选项
| 选项 | 平台 | 描述 |
|--------|-----------|-------------|
| `signatureType` | Android/iOS/macOS | `SignatureType.rsa` 或 `SignatureType.ecdsa` |
| `enforceBiometric` | Android/iOS/macOS | 在创建密钥时要求生物识别 |
| `setInvalidatedByBiometricEnrollment` | Android/iOS/macOS | 在生物识别更改时使密钥失效 |
| `useDeviceCredentials` | Android/iOS/macOS | 允许 PIN/密码回退 |
| `enableDecryption` | Android | 启用解密功能 |
| `failIfExists` | 所有 | 如果密钥已存在,则返回 `keyAlreadyExists` 失败 |
| `promptSubtitle` | Android | 生物识别提示的副标题 |
| `promptDescription` | Android | 生物识别提示的描述 |
| `cancelButtonText` | Android | 取消按钮文本 |
```
final result = await biometricSignature.createKeys(
keyAlias: 'payment_key', // Optional: named alias
keyFormat: KeyFormat.pem,
promptMessage: 'Authenticate to create keys',
config: CreateKeysConfig(
signatureType: SignatureType.rsa,
enforceBiometric: true,
setInvalidatedByBiometricEnrollment: true,
useDeviceCredentials: false,
enableDecryption: true, // Android only
failIfExists: true, // Prevent overwriting existing key
),
);
if (result.code == BiometricError.success) {
print('Public Key: ${result.publicKey}');
} else if (result.code == BiometricError.keyAlreadyExists) {
print('Key already exists for this alias');
}
```
### `createSignature({ payload, keyAlias, config, signatureFormat, keyFormat, promptMessage })`
提示用户进行生物识别认证并生成密码学签名。
- **参数**:
- `payload`:要签名的数据
- `keyAlias`:用于签名的密钥。默认为默认别名。
- `config`:带有平台选项的 `CreateSignatureConfig`
- `signatureFormat`:签名的输出格式
- `keyFormat`:公钥的输出格式
- `promptMessage`自定义身份验证提示
#### CreateSignatureConfig 选项
| 选项 | 平台 | 描述 |
|--------|-----------|-------------|
| `allowDeviceCredentials` | Android | 允许 PIN/图案回退 |
| `promptSubtitle` | Android | 生物识别提示的副标题 |
| `promptDescription` | Android | 生物识别提示的描述 |
| `cancelButtonText` | Android | 取消按钮文本 |
- **返回**:`Future`。
- `signature`:已签名的 payload。
- `publicKey`:公钥。
- `code`:`BiometricError` 代码。
```
final result = await biometricSignature.createSignature(
payload: 'Data to sign',
keyAlias: 'payment_key', // Optional: use named key
promptMessage: 'Please authenticate',
signatureFormat: SignatureFormat.base64,
keyFormat: KeyFormat.base64,
config: CreateSignatureConfig(
allowDeviceCredentials: false,
),
);
```
### `createSignatureFromBytes({ payload, keyAlias, config, signatureFormat, keyFormat, promptMessage })`
提示用户进行生物识别认证,并对原始二进制数据生成密码学签名。这非常适合将随机 nonce 作为原始字节生成的挑战-响应身份验证流程。
- **参数**:
- `payload`:要签名的原始字节数据 (`Uint8List`)
- `keyAlias`:用于签名的密钥。默认为默认别名。
- `config`:带有平台选项的 `CreateSignatureConfig`
- `signatureFormat`:签名的输出格式
- `keyFormat`:公钥的输出格式
- `promptMessage`:自定义身份验证提示
#### CreateSignatureConfig 选项
| 选项 | 平台 | 描述 |
|--------|-----------|-------------|
| `allowDeviceCredentials` | Android | 允许 PIN/图案回退 |
| `promptSubtitle` | Android | 生物识别提示的副标题 |
| `promptDescription` | Android | 生物识别提示的描述 |
| `cancelButtonText` | Android | 取消按钮文本 |
- **返回**:`Future`。
- `signature`:已签名的 payload。
- `signatureBytes`:原始签名字节。
- `publicKey`:公钥。
- `code`:`BiometricError` 代码。
```
final random = Random.secure();
final nonceBytes = Uint8List.fromList(
List.generate(32, (_) => random.nextInt(256)),
);
final result = await biometricSignature.createSignatureFromBytes(
payload: nonceBytes,
keyAlias: 'payment_key', // Optional: use named key
promptMessage: 'Please authenticate',
signatureFormat: SignatureFormat.base64,
keyFormat: KeyFormat.base64,
config: CreateSignatureConfig(
allowDeviceCredentials: false,
),
);
```
### `decrypt({ payload, payloadFormat, keyAlias, config, promptMessage })`
使用私钥和生物识别解密给定的 payload。
- **参数**:
- `payload`:加密的数据
- `payloadFormat`:加密数据的格式(`PayloadFormat.base64`、`hex`)
- `keyAlias`:用于解密的密钥。默认为默认别名。
- `config`:带有平台选项的 `DecryptConfig`
- `promptMessage`:自定义身份验证提示
#### DecryptConfig 选项
| 选项 | 平台 | 描述 |
|--------|-----------|-------------|
| `allowDeviceCredentials` | Android | 允许 PIN/图案回退 |
| `promptSubtitle` | Android | 生物识别提示的副标题 |
| `promptDescription` | Android | 生物识别提示的描述 |
| `cancelButtonText` | Android | 取消按钮文本 |
- **返回**:`Future`。
- `decryptedData`:明文字符串。
- `code`:`BiometricError` 代码。
```
final result = await biometricSignature.decrypt(
payload: encryptedBase64,
payloadFormat: PayloadFormat.base64,
keyAlias: 'payment_key', // Optional: use named key
promptMessage: 'Authenticate to decrypt',
config: DecryptConfig(
allowDeviceCredentials: false,
),
);
```
### `deleteKeys({ keyAlias })`
从设备的安全存储中删除特定别名的生物识别密钥材料。
- **参数**:
- `keyAlias`:要删除的密钥。当为 `null` 时,仅删除默认别名。其他别名不受影响。
- **返回**:`Future`。
- `true`:密钥已成功删除,或者不存在任何密钥(幂等)。
- `false`:由于系统错误导致删除失败。
```
// Delete a specific named key
final deleted = await biometricSignature.deleteKeys(keyAlias: 'payment_key');
// Delete the default key
final defaultDeleted = await biometricSignature.deleteKeys();
```
### `deleteAllKeys()`
删除所有别名下的所有生物识别密钥材料。这是一个破坏性操作——请使用带有特定别名的 `deleteKeys()` 进行针对性删除。
- **返回**:`Future`。
- `true`:所有密钥已成功删除。
- `false`:由于系统错误导致删除失败。
```
final deleted = await biometricSignature.deleteAllKeys();
if (deleted) {
print('All biometric keys removed across all aliases');
}
```
### `biometricAuthAvailable()`
检查设备上是否可以使用生物识别认证,并返回结构化的响应。
- **返回**:`Future`。
- `canAuthenticate`:`bool`,指示是否可以进行认证。
- `hasEnrolledBiometrics`:`bool`,指示用户是否已注册生物识别。
- `availableBiometrics`:`List`(例如,`fingerprint`、`face`)。
- `reason`:如果不可用,则提供字符串说明。
```
final availability = await biometricSignature.biometricAuthAvailable();
if (availability.canAuthenticate) {
print('Biometrics available: ${availability.availableBiometrics}');
} else {
print('Not available: ${availability.reason}');
}
```
### `getKeyInfo({ keyAlias, checkValidity, keyFormat })`
检索有关现有生物识别密钥的详细信息,而不提示进行身份验证。
- **参数**:
- `keyAlias`:要查询的密钥。默认为默认别名。
- `checkValidity`:是否验证密钥未因生物识别更改而失效。默认为 `false`。
- `keyFormat`:公钥的输出格式(`KeyFormat.base64`、`pem`、`hex`)。默认为 `base64`。
- **返回**:`Future`。
- `exists`:是否存在任何生物识别密钥。
- `isValid`:密钥有效性状态(仅在 `checkValidity: true` 时填充)。
- `algorithm`:`"RSA"` 或 `"EC"`。
- `keySize`:以位为单位的密钥大小(例如,2048、256)。
- `isHybridMode`:是否使用混合签名/解密密钥。
- `publicKey`:签名公钥。
- `decryptingPublicKey`:解密密钥(仅在混合模式下)。
```
final info = await biometricSignature.getKeyInfo(
keyAlias: 'payment_key', // Optional: query named key
checkValidity: true,
keyFormat: KeyFormat.pem,
);
if (info.exists && (info.isValid ?? true)) {
print('Algorithm: ${info.algorithm}, Size: ${info.keySize}');
print('Hybrid Mode: ${info.isHybridMode}');
}
```
### `biometricKeyExists({ keyAlias, checkValidity })`
封装了 `getKeyInfo()` 并返回简单布尔值的便捷方法。
- **参数**:
- `keyAlias`:要检查的密钥。默认为默认别名。
- `checkValidity`:是否检查密钥有效性。默认为 `false`。
- **返回**:`Future` - 如果密钥存在且有效,则为 `true`。
```
final exists = await biometricSignature.biometricKeyExists(
keyAlias: 'payment_key',
checkValidity: true,
);
```
### `simplePrompt({ promptMessage, config })`
执行生物识别认证而不执行任何密码学操作。适用于快速重新认证或对敏感 UI 进行门控。
#### SimplePromptConfig 选项
| 选项 | 平台 | 描述 |
|--------|-----------|-------------|
| `subtitle` | Android | 生物识别提示的副标题 |
| `description` | Android | 生物识别提示的描述 |
| `cancelButtonText` | Android | 取消按钮文本 |
| `allowDeviceCredentials` | Android/iOS/macOS | 允许 PIN/图案/密码回退 |
| `biometricStrength` | Android | `BiometricStrength.strong` 或 `BiometricStrength.weak` |
```
final result = await biometricSignature.simplePrompt(
promptMessage: 'Verify your identity',
config: SimplePromptConfig(
subtitle: 'Access secure features',
allowDeviceCredentials: true,
biometricStrength: BiometricStrength.strong,
),
);
if (result.success == true) {
// Authenticated
} else {
print('Failed: ${result.code} - ${result.error}');
}
```
## 迁移指南
本部分涵盖了在主要版本之间升级时的破坏性变更和迁移步骤。它假定您已熟悉该插件的核心概念(密钥创建、签名、生物识别可用性)。
### 从 v5/v6 迁移至 v7
**v7.0.0** 使用类型化的 `SignatureOptions` 替换了传统的基于 Map 的 `createSignature()` API。
#### `createSignature()` API 变更
**之前 (v5/v6):**
```
final signature = await biometricSignature.createSignature(
options: {
'payload': 'data to sign',
'promptMessage': 'Authenticate',
'cancelButtonText': 'Cancel', // Android
'allowDeviceCredentials': 'false', // Android
'shouldMigrate': 'true', // iOS
},
);
```
**之后 (v7):**
```
final signature = await biometricSignature.createSignature(
SignatureOptions(
payload: 'data to sign',
promptMessage: 'Authenticate',
androidOptions: AndroidSignatureOptions(
cancelButtonText: 'Cancel',
allowDeviceCredentials: false,
),
iosOptions: IosSignatureOptions(
shouldMigrate: true,
),
),
);
```
### 从 v7 迁移至 v8
**v8.0.0** 引入了结构化的返回类型和可配置的密钥/签名格式。
#### 返回类型变更
**之前 (v7):** 方法返回 `String?` 或 `bool?`。
**之后 (v8):** 方法返回带有元数据的结构化结果对象。
| 方法 | v7 返回类型 | v8 返回类型 |
|--------|---------------|----------------|
| `createKeys()` | `String?` | `KeyCreationResult?` |
| `createSignature()` | `String?` | `SignatureResult?` |
#### `createKeys()` 变更
**之前 (v7):**
```
final publicKey = await biometricSignature.createKeys(
androidConfig: AndroidConfig(useDeviceCredentials: false),
iosConfig: IosConfig(useDeviceCredentials: false),
);
// publicKey is a String?
```
**之后 (v8):**
```
final result = await biometricSignature.createKeys(
androidConfig: AndroidConfig(useDeviceCredentials: false),
iosConfig: IosConfig(useDeviceCredentials: false),
keyFormat: KeyFormat.pem, // NEW: choose output format
);
// result.publicKey, result.algorithm, result.keySize available
```
#### `createSignature()` 变更
**之前 (v7):**
```
final signature = await biometricSignature.createSignature(options);
// signature is a String?
```
**之后 (v8):**
```
final result = await biometricSignature.createSignature(
SignatureOptions(
payload: 'data',
promptMessage: 'Sign',
keyFormat: KeyFormat.base64, // NEW: output format
),
);
// result.signature, result.publicKey available
```
#### v8 中的新功能
- **密钥格式:** `KeyFormat.base64`、`KeyFormat.pem`、`KeyFormat.hex`、`KeyFormat.raw`
- **enforceBiometric:** 在创建密钥时要求进行生物识别认证
- **setInvalidatedByBiometricEnrollment:** 将密钥绑定到生物识别注册状态
- **解密支持 (v8.4+):** 通过 `decrypt()` 进行 RSA 和 ECIES 解密
- **macOS 支持 (v8.5):** 通过 `MacosConfig` 在 Mac 上支持 Touch ID
### 从 v8 迁移至 v9
**v9.0.0** 是一次重大重构,统一了平台配置,并迁移到 Pigeon 以实现类型安全的平台通信。
#### 关键架构变更
1. **Pigeon 迁移:** 所有平台通信现在都使用强类型的 Pigeon 接口
2. **统一的配置对象:** 将特定于平台的配置(`AndroidConfig`、`IosConfig`、`MacosConfig`)合并为单一的配置类
3. **标准化的错误处理:** 所有方法都返回带有 `BiometricError` 枚举代码的结果对象
4. **新方法:** `getKeyInfo()` 用于详细的密钥检查,`deleteKeys()` 返回 `Future`
#### `createKeys()` 变更
**之前 (v8):**
```
final result = await biometricSignature.createKeys(
androidConfig: AndroidConfig(
useDeviceCredentials: false,
signatureType: AndroidSignatureType.RSA,
enforceBiometric: true,
setInvalidatedByBiometricEnrollment: true,
enableDecryption: true,
),
iosConfig: IosConfig(
useDeviceCredentials: false,
signatureType: IOSSignatureType.RSA,
enforceBiometric: true,
setInvalidatedByBiometricEnrollment: true,
),
macosConfig: MacosConfig(
useDeviceCredentials: false,
signatureType: MacosSignatureType.RSA,
),
keyFormat: KeyFormat.pem,
);
```
**之后 (v9):**
```
final result = await biometricSignature.createKeys(
keyFormat: KeyFormat.pem,
promptMessage: 'Authenticate to create keys', // NEW: top-level
config: CreateKeysConfig(
signatureType: SignatureType.rsa, // Unified enum
enforceBiometric: true,
setInvalidatedByBiometricEnrollment: true,
useDeviceCredentials: false,
enableDecryption: true, // Android only
promptSubtitle: 'Subtitle', // Android only
promptDescription: 'Description', // Android only
cancelButtonText: 'Cancel', // Android only
),
);
if (result.code == BiometricError.success) {
print('Public Key: ${result.publicKey}');
} else {
print('Error: ${result.code} - ${result.error}');
}
```
#### `createSignature()` 变更
**之前 (v8):**
```
final result = await biometricSignature.createSignature(
SignatureOptions(
payload: 'data to sign',
promptMessage: 'Authenticate',
keyFormat: KeyFormat.base64,
androidOptions: AndroidSignatureOptions(
cancelButtonText: 'Cancel',
allowDeviceCredentials: false,
),
iosOptions: IosSignatureOptions(
shouldMigrate: true,
),
),
);
```
**之后 (v9):**
```
final result = await biometricSignature.createSignature(
payload: 'data to sign', // Top-level parameter
promptMessage: 'Authenticate', // Top-level parameter
signatureFormat: SignatureFormat.base64, // NEW: separate format
keyFormat: KeyFormat.base64, // Public key format
config: CreateSignatureConfig(
allowDeviceCredentials: false, // Android
promptSubtitle: 'Subtitle', // Android
promptDescription: 'Description', // Android
cancelButtonText: 'Cancel', // Android
shouldMigrate: true, // iOS
),
);
if (result.code == BiometricError.success) {
print('Signature: ${result.signature}');
}
```
#### `biometricAuthAvailable()` 变更
**之前 (v8):**
```
final availability = await biometricSignature.biometricAuthAvailable();
// Returns String? like "fingerprint", "face", "none", etc.
```
**之后 (v9):**
```
final availability = await biometricSignature.biometricAuthAvailable();
// Returns BiometricAvailability object
if (availability.canAuthenticate ?? false) {
print('Biometrics available: ${availability.availableBiometrics}');
// availableBiometrics is List
} else {
print('Not available: ${availability.reason}');
}
```
#### `decrypt()` 变更 (v8.4+ → v9)
**之前 (v8):**
```
final result = await biometricSignature.decrypt(
DecryptionOptions(
payload: encryptedBase64,
promptMessage: 'Decrypt',
androidOptions: AndroidDecryptionOptions(
allowDeviceCredentials: false,
),
iosOptions: IosDecryptionOptions(
shouldMigrate: true,
),
),
);
```
**之后 (v9):**
```
final result = await biometricSignature.decrypt(
payload: encryptedBase64,
payloadFormat: PayloadFormat.base64, // NEW: explicit format
promptMessage: 'Decrypt',
config: DecryptConfig(
allowDeviceCredentials: false, // Android
shouldMigrate: true, // iOS
),
);
if (result.code == BiometricError.success) {
print('Decrypted: ${result.decryptedData}');
}
```
#### 新的 `getKeyInfo()` 方法
v9 引入了 `getKeyInfo()`,用于在无需身份验证的情况下检查现有密钥:
```
final info = await biometricSignature.getKeyInfo(
checkValidity: true, // Check if key was invalidated
keyFormat: KeyFormat.pem,
);
if (info.exists ?? false) {
print('Algorithm: ${info.algorithm}'); // "RSA" or "EC"
print('Key Size: ${info.keySize}'); // 2048, 256, etc.
print('Hybrid Mode: ${info.isHybridMode}'); // Separate decrypt key?
print('Valid: ${info.isValid}'); // Not invalidated?
}
```
#### v9 破坏性变更摘要
| 变更 | v8 | v9 |
|--------|----|----|
| 平台配置 | `AndroidConfig`、`IosConfig`、`MacosConfig` | `CreateKeysConfig`、`CreateSignatureConfig`、`DecryptConfig` |
| 签名类型枚举 | `AndroidSignatureType.RSA` | `SignatureType.rsa` |
| 错误处理 | 检查是否为 `null` | 检查 `result.code == BiometricError.success` |
| biometricAuthAvailable | 返回 `String?` | 返回 `BiometricAvailability` |
| 平台通信 | 带有 Map 的 MethodChannel | 带有类型化类的 Pigeon |
| Windows 支持 | ❌ | ✅ (v9.0.0+) |
#### 导入变更
**之前 (v8):**
```
import 'package:biometric_signature/biometric_signature.dart';
import 'package:biometric_signature/android_config.dart';
import 'package:biometric_signature/ios_config.dart';
import 'package:biometric_signature/signature_options.dart';
```
**之后 (v9):**
```
import 'package:biometric_signature/biometric_signature.dart';
// All types exported from single import
```
### 从 v9 迁移至 v10
**v10.0.0** 改进了错误处理,并引入了非密码学身份验证。
#### 破坏性变更:`BiometricError` 变更
**新增的值**:添加了新的错误代码以涵盖更多的边缘情况:
- `BiometricError.securityUpdateRequired`
- `BiometricError.notSupported`
- `BiometricError.systemCanceled`
- `BiometricError.promptError`
- **影响**:如果您使用了穷举式的 switch 语句(例如在 Dart 3.0+ 中),您必须为这些新值添加相应的 case。
#### 新功能:`simplePrompt()`
v10 添加了 `simplePrompt()`,适用于您只需要验证用户存在而不需要密码学操作的场景。有关详细信息,请参阅[用法](#usage)部分。
### 从 v10 迁移至 v11
**v11.0.0** 添加了命名密钥别名、密钥覆盖保护以及内部架构改进。(自定义回退选项也是在 v11 中引入的,但在 v12 中被移除了——请参阅下面的“从 v11 迁移至 v12”)。
#### 新增:命名密钥别名
所有密钥操作现在都接受一个可选的 `keyAlias` 参数:
```
// Before (v10.2) — single default key
final result = await biometricSignature.createKeys(...);
// After (v11.0) — multiple named keys
final authKey = await biometricSignature.createKeys(keyAlias: 'auth', ...);
final paymentKey = await biometricSignature.createKeys(keyAlias: 'payment', ...);
```
已更新的方法:`createKeys`、`createSignature`、`decrypt`、`deleteKeys`、`getKeyInfo`、`biometricKeyExists`。
#### 新增:密钥覆盖保护
```
final result = await biometricSignature.createKeys(
keyAlias: 'payment',
config: CreateKeysConfig(failIfExists: true),
);
if (result.code == BiometricError.keyAlreadyExists) {
// Key already exists — handle accordingly
}
```
#### 新增:`deleteAllKeys()`
```
// Delete all keys across all aliases
await biometricSignature.deleteAllKeys();
```
#### 新增破坏性变更:`BiometricError` 值
- `BiometricError.keyAlreadyExists` — 当 `failIfExists: true` 且密钥已存在时返回。
- **影响**:如果您使用了穷举式的 switch 语句(例如在 Dart 3.0+ 中),您必须为这个新值添加相应的 case。
### 从 v11 迁移至 v12
**v12..0** 将最低 Flutter 版本降至 **3.24.5**,以便该插件能够在更广泛的宿主项目上开箱即用地构建。为了实现这一点,v11 中添加的仅限 Android 使用的**自定义回退选项**功能已被移除(它需要通过 `androidx.biometric:1.4.0-alpha06` 使用 `compileSdk = 36` / AGP `8.9.1`)。
移除的符号:
- `BiometricFallbackOption` 类
- `BiometricError.fallbackSelected`
- `CreateKeysConfig`、`CreateSignatureConfig`、`DecryptConfig`、`SimplePromptConfig` 中的 `fallbackOptions` 字段
- `SignatureResult`、`DecryptResult`、`SimplePromptResult` 中的 `selectedFallbackIndex` / `selectedFallbackText`
- `CreateSignatureConfig` 和 `DecryptConfig` 上的 **`shouldMigrate` 字段** —— 现在会自动检测 iOS Secure Enclave 迁移(问题 [#65](https://github.com/chamodanethra/biometric_signature/issues/65))。
如果您之前通过 `fallbackOptions` 渲染 Android 15+ 的自定义回退按钮,您可以在 Flutter 中复制这种 UX:捕获取消/`userCanceled` 结果,并显示您自己的底部弹出页(bottom-sheet)列出可选操作。标准的 `cancelButtonText` 和 `allowDeviceCredentials` 流程将继续像以前一样在所有地方正常工作。
#### `shouldMigrate` 移除 —— 改变了什么以及为什么
在 v11.x 及更早版本中,调用者必须通过在 `CreateSignatureConfig` / `DecryptConfig` 上传递 `shouldMigrate: true` 来选择加入传统的 v2.x → Secure Enclave RSA 迁移。这存在两个问题:
1. **它会对 v10+ 的 EC 密钥误判。** 当应用已经拥有一个 EC 密钥(通过 `signatureType: SignatureType.ecdsa` 创建)且调用者仍然传递 `shouldMigrate: true` 时,iOS 代码会搜索不存在的传统 RSA 密钥并报错 `RSA private key not found in Keychain` 失败。已作为问题 #65 报告。
2. **这很容易弄巧成拙。** 应用无法可靠地从 Dart 端获知是否存在传统密钥,因此它们要么总是设置为 `true`(冒着出现 #1 的风险),要么从不设置它(导致传统密钥成为孤儿)。
v12 移除了该标志。iOS 插件现在会自行检查 Keychain:只有在 *(a)* `keyAlias == nil`,*(b)* 不存在现代 EC 密钥,并且 *(c)* 确实存在传统的未封装 RSA 私钥时,才会执行迁移。如果其中任何一个条件不成立,调用将直接路由到 EC 路径(或者,如果已存在封装的 RSA 密钥,则路由到混合 RSA 路径)。应用不再需要知道或关心这一点。
如果您之前传递的是 `shouldMigrate: false`,删除该行是一个空操作。如果您之前传递的是 `shouldMigrate: true`,删除该行也是安全的——自动检测将在与 v11.x 下完全相同的场景中成功运行迁移,并在 v11.x 下本会报错的场景中干净地跳过它。
标签:Flutter, MITM代理, 密码学, 手动系统调用, 日志审计, 生物识别, 硬件安全, 移动开发, 逆向工具