v-y-archive/Jailbreak-detection-The-modern-way
GitHub: v-y-archive/Jailbreak-detection-The-modern-way
Stars: 137 | Forks: 10
# 越狱检测:现代方式
 下载 PDF: [2022_C00C00R00CON_jailbreak.pdf](2022_C00C00R00CON_jailbreak.pdf)
 # 介绍
- iOS
- 封闭式操作系统
- 越狱 (JailBreaks) 通过绕过 iOS 安全机制以获取(几乎)完整的访问权限
- 越狱检测
- 被银行应用和游戏所使用
- 为了确保环境是“安全”的……
- ……或者是为了阻止作弊/破解
- 安全研究人员需要
- 评估/逆向受保护的应用程序
# 介绍
- iOS
- 封闭式操作系统
- 越狱 (JailBreaks) 通过绕过 iOS 安全机制以获取(几乎)完整的访问权限
- 越狱检测
- 被银行应用和游戏所使用
- 为了确保环境是“安全”的……
- ……或者是为了阻止作弊/破解
- 安全研究人员需要
- 评估/逆向受保护的应用程序
# 越狱检测 ### 调试 iOS 应用 - 没有越狱 - 使用 ptrace (lldb / frida) → 应用需要 get-task-allow 权限 - 通过注入 frida 代码 → 应用需要重新打包 - 在这两种情况下,你都需要对应用进行重签名 但这有很多副作用: 不同的 Team ID 文件被修改 - 有越狱 - 不需要任何权限 - Frida 能够附加到任何进程
### 越狱检测规避 越狱检测机制被添加到逆向工程防御中,以增加在越狱设备上运行应用的难度。这阻碍了逆向工程师喜欢使用的一些工具和技术。像大多数其他类型的防御一样,越狱检测本身并不是很有效,但在应用源代码中分散检查可以提高整体防篡改方案的有效性。 越狱带来的企业安全风险在面对可以帮助用户轻松规避常见越狱检测方法的工具时会更加复杂。用户可以直接从第三方应用商店 Cydia 下载任何应用修改版,如 Spotify++。许多应用程序提供越狱检测,许多媒体和金融服务应用也是如此,它们分别希望限制内容盗版和账户被盗。不幸的是,这些越狱检测依赖于相对简单且可规避的测试组合,例如: - 检查越狱设备上常见的文件或目录,例如 Cydia - 检查提升的目录权限(即更多具有“写入”权限的目录) - 检查应用是否可以成功在其沙盒之外写入文件 - 检查 cydia:// 协议处理程序 这些以及类似检测测试的根本局限性在于,作为客户端测试,它们可以被攻击者访问、逆向工程和规避。此外,执行这些越狱检测测试的应用(例如 MDM 应用)必须经过 Apple 的应用审查流程,这限制了它们可以收集以分析设备越狱状态的数据范围。让我们快速看一下它们:
### 基于文件的检查 检查通常与越狱相关的文件和目录,例如: ``` //suspicious system and app paths to check private static var suspicousAppandSystemPaths: [String] { return [ "/usr/sbin/frida-server", "/etc/apt/sources.list.d/electra.list", "/etc/apt/sources.list.d/sileo.sources", "/.bootstrapped_electra", "/usr/lib/libjailbreak.dylib", "/jb/lzma", "/.cydia_no_stash", "/.installed_unc0ver", "/jb/offsets.plist", "/usr/share/jailbreak/injectme.plist", "/etc/apt/undecimus/undecimus.list", "/var/lib/dpkg/info/mobilesubstrate.md5sums", "/Library/MobileSubstrate/MobileSubstrate.dylib", "/jb/jailbreakd.plist", "/jb/amfid_payload.dylib", "/jb/libjailbreak.dylib", "/usr/libexec/cydia/firmware.sh", "/var/lib/cydia", "/etc/apt", "/private/var/lib/apt", "/private/var/Users/", "/var/log/apt", "/Applications/Cydia.app", "/private/var/stash", "/private/var/lib/apt/", "/private/var/lib/cydia", "/private/var/cache/apt/", "/private/var/log/syslog", "/private/var/tmp/cydia.log", "/Applications/Icy.app", "/Applications/MxTube.app", "/Applications/RockApp.app", "/Applications/blackra1n.app", "/Applications/SBSettings.app", "/Applications/FakeCarrier.app", "/Applications/WinterBoard.app", "/Applications/IntelliScreen.app", "/private/var/mobile/Library/SBSettings/Themes", "/Library/MobileSubstrate/CydiaSubstrate.dylib", "/System/Library/LaunchDaemons/com.ikey.bbot.plist", "/Library/MobileSubstrate/DynamicLibraries/Veency.plist", "/Library/MobileSubstrate/DynamicLibraries/LiveClock.plist", "/System/Library/LaunchDaemons/com.saurik.Cydia.Startup.plist", "/Applications/Cydia.app", "/Applications/blackra1n.app", "/Applications/FakeCarrier.app", "/Applications/Icy.app", "/Applications/IntelliScreen.app", "/Applications/MxTube.app", "/Applications/RockApp.app", "/Applications/SBSettings.app", "/Applications/WinterBoard.app" ] #### }
### File based checks Most often, these are checked using the `-(BOOL)fileExistsAtPath:(NSString*)` path method in NSFileManager or `FileManager.default.fileExists(atPath: path)`. However, there are also applications that use lower-level C functions like fopen(), stat(), or access().
### Checking File Permissions Another way to check for jailbreaking mechanisms is to try to write to a location that's outside the application's sandbox. You can do this by having the application attempt to create a file in, for example, the `/private` directory. If the file is created successfully, the device has been jailbroken. This method consists of checking the permissions of specific files and directories on the system. More directories have write access on a jailbroken device than on a non compromised one. One example of this is the root partition, which originally has only read permission. If it is found it has read and write permissions it means the device is jailbroken. There are different ways of performing these checks such as using NSFileManager and C functions like statfs(). **Swift:** ```swift do { let pathToFileInRestrictedDirectory = "/private/jailbreak.txt" try "This is a test.".write(toFile: pathToFileInRestrictedDirectory, atomically: true, encoding: String.Encoding.utf8) try FileManager.default.removeItem(atPath: pathToFileInRestrictedDirectory) // Device is jailbroken } catch { // Device is not jailbroken #### } **Objective-C:** ```objc NSError *error; NSString *stringToBeWritten = @"This is a test."; [stringToBeWritten writeToFile:@"/private/jailbreak.txt" atomically:YES encoding:NSUTF8StringEncoding error:&error]; if (error == nil) { // Device is jailbroken return YES; } else { // Device is not jailbroken [[NSFileManager defaultManager] removeItemAtPath:@"/private/jailbreak.txt" error:nil]; #### }
### Checking File Permissions There are different ways of performing these checks such as using NSFileManager and C functions like statfs(), open(), utimes(), stat(), pathconf(), stat64(), fopen().
### Checking Protocol Handlers You can check protocol handlers by attempting to open a Cydia URL. The Cydia app store, which practically every jailbreaking tool installs by default, installs the cydia:// protocol handler. **Swift:** ```swift if let url = URL(string: "cydia://package/com.example.package"), UIApplication.shared.canOpenURL(url) { // Device is jailbroken #### } **Objective-C:** ```objc if([[UIApplication sharedApplication] canOpenURL:[NSURL URLWithString:@"cydia://package/com.example.package"]]){ // Device is jailbroken #### }
### Why it's not enough This simple checks can be accessed, reverse-engineered, and evaded by attackers.
# Better ways of Jailbreak detection
### Try to block/detect debuggers 1. PT_DENY_ATTACH ```c #### ptrace(PT_DENY_ATTACH); 2. Try to “kill” its own pid with the 0-signal 3. Check if PTRACE is flagged ```cpp void try_kill() { const int pid = getpid(); int ret = kill(pid, 0); #### } According to the man page of kill (`man 2 kill`), the signal `0` is used to check that the `pid` given in the first parameter really exists. > […] A value of 0, however, will cause error checking to be performed (with no signal being sent). This can be used to check the validity of pid. This *kill* operation is followed by `PTRACE` check: ```cpp inline bool ptrace_detect() { int32_t opt[4] = { CTL_KERN, KERN_PROC, KERN_PROC_PID, getpid(), }; kinfo_proc info; sysctl(opt, 4, &info, sizeof(kinfo_proc), nullptr, 0); return info.kp_proc.p_flag & P_TRACED; #### }
### Check if the parent pid is launchd ``` #### getppid() == 1
### 尝试检测 rootfs 是否可写 ``` #### getfsstat64(), statvfs()
### Try to load an invalid signature ``` #### fcntl(F_ADDSIGS)
### 检查签名状态 ``` #### csops(CS_OPS_MARKKILL)
### Check signature directly We can check the integrity of the signature of our binary. This check starts by opening the main app binary from the disk, seek till kSecCodeMagicEmbeddedSignature sequence `0xfade0cc0`, read the entitlements and calculate the checksum. The code signing segment contains a superblob structure, which itself contains other blobs of different types. The structure of both is defined in some more [open-source Apple code](https://opensource.apple.com/source/Security/Security-55179.1/libsecurity_codesigning/lib/cscdefs.h): ```Cpp /* * Structure of an embedded-signature SuperBlob */ typedef struct __BlobIndex { uint32_t type; /* type of entry */ uint32_t offset; /* offset of entry */ } CS_BlobIndex; typedef struct __SuperBlob { uint32_t magic; /* magic number */ uint32_t length; /* total length of SuperBlob */ uint32_t count; /* number of index entries following */ CS_BlobIndex index[]; /* (count) entries */ /* followed by Blobs in no particular order as indicated by offsets in index */ #### } CS_SuperBlob; The super blob just contains some magic, the length of the whole code signing section, a count of the blobs, and an array of indices to those blobs. The different identifying blob magics are defined in [this file](https://opensource.apple.com/source/libsecurity_codesigning/libsecurity_codesigning-55032/lib/CSCommonPriv.h): ```Cpp /* * Magic numbers used by Code Signing */ enum { kSecCodeMagicRequirement = 0xfade0c00, /* single requirement */ kSecCodeMagicRequirementSet = 0xfade0c01, /* requirement set */ kSecCodeMagicCodeDirectory = 0xfade0c02, /* CodeDirectory */ kSecCodeMagicEmbeddedSignature = 0xfade0cc0, /* single-architecture embedded signature */ kSecCodeMagicDetachedSignature = 0xfade0cc1, /* detached multi-architecture signature */ kSecCodeMagicEntitlement = 0xfade7171, /* entitlement blob */ #### }; For example, the iOS `ps` binary has four blobs of content following the initial superblob: 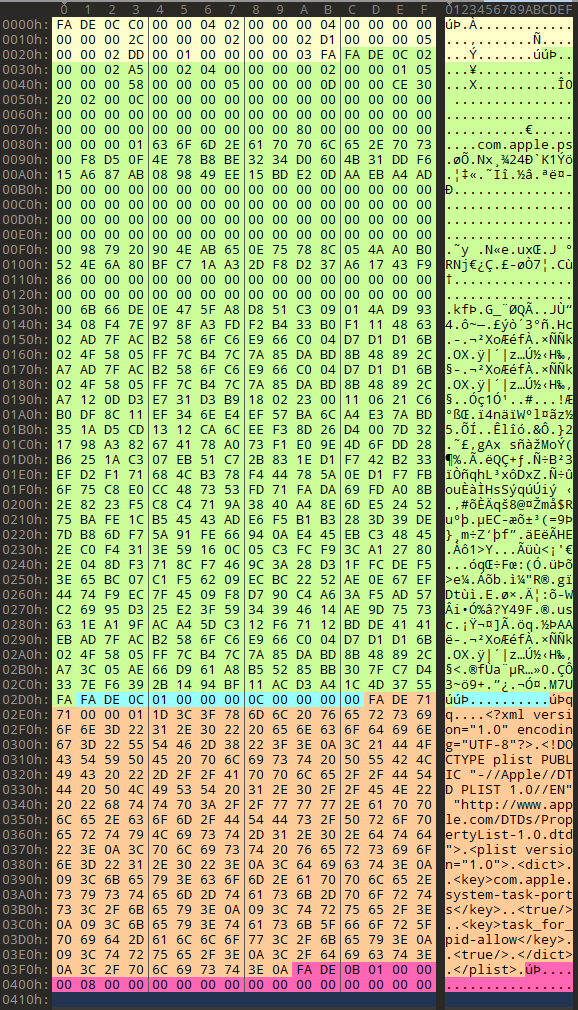 These are, respectively: 1. The code directory blob (magic `0xfade0c02`), which you can spot as it has the qualified binary name `com.apple.ps` in it. 2. An empty and short requirement set (magic `0xfade0c01`). 3. The entitlements blob, which contains the xml plist (magic `0xfade7171`). 4. A blob wrapper, (magic `0xfade0b01`).
### Complicate the backtracing Try to halt the app after a big timeout and do not exit directly from the jailbreak detection place.
### API-based Detection ``` #### fork() #### 进程分叉。在越狱设备上,Sandboxd 不会拒绝应用程序使用 fork()、popen() 或任何其他 C 函数创建子进程的能力。然而,Sandboxd 在非越狱设备上明确拒绝进程分叉。因此,通过检查 fork() 返回的 pid,应用程序可以判断设备是否已受损。如果分叉成功,应用可以推断出它正在越狱设备上运行。 #### system() 在非越狱设备上使用 NULL 参数调用 system() 函数将返回 0。在越狱设备上执行相同操作将返回 1。这是因为该函数会检查 /bin/sh 是否存在,而它只存在于越狱设备上。
### OpenSSH 服务检测 SSH 环回连接。由于很大一部分越狱设备安装了 OpenSSH,某些应用程序尝试连接到 127.0.0.1 的 22 端口。如果连接成功,则表示 OpenSSH 已安装并正在运行,这证明设备已越狱。 检查环回接口上的 22 (OpenSSH) 和 44 (checkra1n) 开放端口。
### 检查你的进程中是否加载了某些越狱库 这种检测方法首先调用 `_dyld_image_count()` 和 `_dyld_get_image_name()` 等函数来查看当前加载了哪些 dylib。这种方法很难动态修补,因为修补程序本身也是 dylib 的一部分。 例如 `/usr/lib/substitute-inserter.dylib` 可以使用 dlopen / 内存扫描 / dyld 内部结构等。 ``` private static func checkDYLD() -> Bool { let suspiciousLibraries = [ "FridaGadget", "frida", "cynject", "libcycript" ] for libraryIndex in 0..<_dyld_image_count() { guard let loadedLibrary = String(validatingUTF8: _dyld_get_image_name(libraryIndex)) else { continue } for suspiciousLibrary in suspiciousLibraries { if loadedLibrary.lowercased().contains(suspiciousLibrary.lowercased()) { return true } } } return false #### }
### Check if your process is instrumented - Check code integrity - CRC, derive constants from the code, check API entries, etc. - Try to detect frida ```swift private static func isFridaRunning() -> Bool { func swapBytesIfNeeded(port: in_port_t) -> in_port_t { let littleEndian = Int(OSHostByteOrder()) == OSLittleEndian return littleEndian ? _OSSwapInt16(port) : port } var serverAddress = sockaddr_in() serverAddress.sin_family = sa_family_t(AF_INET) serverAddress.sin_addr.s_addr = inet_addr("127.0.0.1") serverAddress.sin_port = swapBytesIfNeeded(port: in_port_t(27042)) let sock = socket(AF_INET, SOCK_STREAM, 0) let result = withUnsafePointer(to: &serverAddress) { $0.withMemoryRebound(to: sockaddr.self, capacity: 1) { connect(sock, $0, socklen_t(MemoryLayout.stride))
}
}
if result != -1 {
return true
}
return false
#### }
# Summary In general, the more complicated the jailbreak detection is, the more difficult it is to detect and bypass. The most common mistake when implementing jailbreak detection often lies in the implementation itself.
We often come across apps that have great jailbreak detection, but the implementation is in one function that returns true or false depending on whether the device is jailbroken. In these cases, we bypass jailbreak detection by using Cycript or a similar tool to invert the return value from the detection function.
In practice, the best jailbreak detection combining multiple techniques and integrating them into other functions so that they cannot easily be bypassed.
# References https://github.com/mehrankmlf/SecurityKit https://www.synacktiv.com/sites/default/files/2021-10/2021_sthack_jailbreak.pdf https://www.romainthomas.fr/post/21-07-pokemongo-anti-frida-jailbreak-bypass/ https://aeonlucid.com/Snapchat-detection-on-iOS/ https://github.com/AeonLucid/SnapHide https://redmaple.tech/blogs/macho-files/ ```
Nov 20 2022 by Vadim Yegorov <vadim.a.yegorov@pm.me>, Security Researcher, Software Engineer.

Licensed under a Creative Commons Attribution-ShareAlike 4.0 International License. Author should be mentioned when copying or redistributing this work.
Licensed under a Creative Commons Attribution-ShareAlike 4.0 International License. Author should be mentioned when copying or redistributing this work.
# 越狱检测 ### 调试 iOS 应用 - 没有越狱 - 使用 ptrace (lldb / frida) → 应用需要 get-task-allow 权限 - 通过注入 frida 代码 → 应用需要重新打包 - 在这两种情况下,你都需要对应用进行重签名 但这有很多副作用: 不同的 Team ID 文件被修改 - 有越狱 - 不需要任何权限 - Frida 能够附加到任何进程
### 越狱检测规避 越狱检测机制被添加到逆向工程防御中,以增加在越狱设备上运行应用的难度。这阻碍了逆向工程师喜欢使用的一些工具和技术。像大多数其他类型的防御一样,越狱检测本身并不是很有效,但在应用源代码中分散检查可以提高整体防篡改方案的有效性。 越狱带来的企业安全风险在面对可以帮助用户轻松规避常见越狱检测方法的工具时会更加复杂。用户可以直接从第三方应用商店 Cydia 下载任何应用修改版,如 Spotify++。许多应用程序提供越狱检测,许多媒体和金融服务应用也是如此,它们分别希望限制内容盗版和账户被盗。不幸的是,这些越狱检测依赖于相对简单且可规避的测试组合,例如: - 检查越狱设备上常见的文件或目录,例如 Cydia - 检查提升的目录权限(即更多具有“写入”权限的目录) - 检查应用是否可以成功在其沙盒之外写入文件 - 检查 cydia:// 协议处理程序 这些以及类似检测测试的根本局限性在于,作为客户端测试,它们可以被攻击者访问、逆向工程和规避。此外,执行这些越狱检测测试的应用(例如 MDM 应用)必须经过 Apple 的应用审查流程,这限制了它们可以收集以分析设备越狱状态的数据范围。让我们快速看一下它们:
### 基于文件的检查 检查通常与越狱相关的文件和目录,例如: ``` //suspicious system and app paths to check private static var suspicousAppandSystemPaths: [String] { return [ "/usr/sbin/frida-server", "/etc/apt/sources.list.d/electra.list", "/etc/apt/sources.list.d/sileo.sources", "/.bootstrapped_electra", "/usr/lib/libjailbreak.dylib", "/jb/lzma", "/.cydia_no_stash", "/.installed_unc0ver", "/jb/offsets.plist", "/usr/share/jailbreak/injectme.plist", "/etc/apt/undecimus/undecimus.list", "/var/lib/dpkg/info/mobilesubstrate.md5sums", "/Library/MobileSubstrate/MobileSubstrate.dylib", "/jb/jailbreakd.plist", "/jb/amfid_payload.dylib", "/jb/libjailbreak.dylib", "/usr/libexec/cydia/firmware.sh", "/var/lib/cydia", "/etc/apt", "/private/var/lib/apt", "/private/var/Users/", "/var/log/apt", "/Applications/Cydia.app", "/private/var/stash", "/private/var/lib/apt/", "/private/var/lib/cydia", "/private/var/cache/apt/", "/private/var/log/syslog", "/private/var/tmp/cydia.log", "/Applications/Icy.app", "/Applications/MxTube.app", "/Applications/RockApp.app", "/Applications/blackra1n.app", "/Applications/SBSettings.app", "/Applications/FakeCarrier.app", "/Applications/WinterBoard.app", "/Applications/IntelliScreen.app", "/private/var/mobile/Library/SBSettings/Themes", "/Library/MobileSubstrate/CydiaSubstrate.dylib", "/System/Library/LaunchDaemons/com.ikey.bbot.plist", "/Library/MobileSubstrate/DynamicLibraries/Veency.plist", "/Library/MobileSubstrate/DynamicLibraries/LiveClock.plist", "/System/Library/LaunchDaemons/com.saurik.Cydia.Startup.plist", "/Applications/Cydia.app", "/Applications/blackra1n.app", "/Applications/FakeCarrier.app", "/Applications/Icy.app", "/Applications/IntelliScreen.app", "/Applications/MxTube.app", "/Applications/RockApp.app", "/Applications/SBSettings.app", "/Applications/WinterBoard.app" ] #### }
### File based checks Most often, these are checked using the `-(BOOL)fileExistsAtPath:(NSString*)` path method in NSFileManager or `FileManager.default.fileExists(atPath: path)`. However, there are also applications that use lower-level C functions like fopen(), stat(), or access().
### Checking File Permissions Another way to check for jailbreaking mechanisms is to try to write to a location that's outside the application's sandbox. You can do this by having the application attempt to create a file in, for example, the `/private` directory. If the file is created successfully, the device has been jailbroken. This method consists of checking the permissions of specific files and directories on the system. More directories have write access on a jailbroken device than on a non compromised one. One example of this is the root partition, which originally has only read permission. If it is found it has read and write permissions it means the device is jailbroken. There are different ways of performing these checks such as using NSFileManager and C functions like statfs(). **Swift:** ```swift do { let pathToFileInRestrictedDirectory = "/private/jailbreak.txt" try "This is a test.".write(toFile: pathToFileInRestrictedDirectory, atomically: true, encoding: String.Encoding.utf8) try FileManager.default.removeItem(atPath: pathToFileInRestrictedDirectory) // Device is jailbroken } catch { // Device is not jailbroken #### } **Objective-C:** ```objc NSError *error; NSString *stringToBeWritten = @"This is a test."; [stringToBeWritten writeToFile:@"/private/jailbreak.txt" atomically:YES encoding:NSUTF8StringEncoding error:&error]; if (error == nil) { // Device is jailbroken return YES; } else { // Device is not jailbroken [[NSFileManager defaultManager] removeItemAtPath:@"/private/jailbreak.txt" error:nil]; #### }
### Checking File Permissions There are different ways of performing these checks such as using NSFileManager and C functions like statfs(), open(), utimes(), stat(), pathconf(), stat64(), fopen().
### Checking Protocol Handlers You can check protocol handlers by attempting to open a Cydia URL. The Cydia app store, which practically every jailbreaking tool installs by default, installs the cydia:// protocol handler. **Swift:** ```swift if let url = URL(string: "cydia://package/com.example.package"), UIApplication.shared.canOpenURL(url) { // Device is jailbroken #### } **Objective-C:** ```objc if([[UIApplication sharedApplication] canOpenURL:[NSURL URLWithString:@"cydia://package/com.example.package"]]){ // Device is jailbroken #### }
### Why it's not enough This simple checks can be accessed, reverse-engineered, and evaded by attackers.
# Better ways of Jailbreak detection
### Try to block/detect debuggers 1. PT_DENY_ATTACH ```c #### ptrace(PT_DENY_ATTACH); 2. Try to “kill” its own pid with the 0-signal 3. Check if PTRACE is flagged ```cpp void try_kill() { const int pid = getpid(); int ret = kill(pid, 0); #### } According to the man page of kill (`man 2 kill`), the signal `0` is used to check that the `pid` given in the first parameter really exists. > […] A value of 0, however, will cause error checking to be performed (with no signal being sent). This can be used to check the validity of pid. This *kill* operation is followed by `PTRACE` check: ```cpp inline bool ptrace_detect() { int32_t opt[4] = { CTL_KERN, KERN_PROC, KERN_PROC_PID, getpid(), }; kinfo_proc info; sysctl(opt, 4, &info, sizeof(kinfo_proc), nullptr, 0); return info.kp_proc.p_flag & P_TRACED; #### }
### Check if the parent pid is launchd ``` #### getppid() == 1
### 尝试检测 rootfs 是否可写 ``` #### getfsstat64(), statvfs()
### Try to load an invalid signature ``` #### fcntl(F_ADDSIGS)
### 检查签名状态 ``` #### csops(CS_OPS_MARKKILL)
### Check signature directly We can check the integrity of the signature of our binary. This check starts by opening the main app binary from the disk, seek till kSecCodeMagicEmbeddedSignature sequence `0xfade0cc0`, read the entitlements and calculate the checksum. The code signing segment contains a superblob structure, which itself contains other blobs of different types. The structure of both is defined in some more [open-source Apple code](https://opensource.apple.com/source/Security/Security-55179.1/libsecurity_codesigning/lib/cscdefs.h): ```Cpp /* * Structure of an embedded-signature SuperBlob */ typedef struct __BlobIndex { uint32_t type; /* type of entry */ uint32_t offset; /* offset of entry */ } CS_BlobIndex; typedef struct __SuperBlob { uint32_t magic; /* magic number */ uint32_t length; /* total length of SuperBlob */ uint32_t count; /* number of index entries following */ CS_BlobIndex index[]; /* (count) entries */ /* followed by Blobs in no particular order as indicated by offsets in index */ #### } CS_SuperBlob; The super blob just contains some magic, the length of the whole code signing section, a count of the blobs, and an array of indices to those blobs. The different identifying blob magics are defined in [this file](https://opensource.apple.com/source/libsecurity_codesigning/libsecurity_codesigning-55032/lib/CSCommonPriv.h): ```Cpp /* * Magic numbers used by Code Signing */ enum { kSecCodeMagicRequirement = 0xfade0c00, /* single requirement */ kSecCodeMagicRequirementSet = 0xfade0c01, /* requirement set */ kSecCodeMagicCodeDirectory = 0xfade0c02, /* CodeDirectory */ kSecCodeMagicEmbeddedSignature = 0xfade0cc0, /* single-architecture embedded signature */ kSecCodeMagicDetachedSignature = 0xfade0cc1, /* detached multi-architecture signature */ kSecCodeMagicEntitlement = 0xfade7171, /* entitlement blob */ #### }; For example, the iOS `ps` binary has four blobs of content following the initial superblob:  These are, respectively: 1. The code directory blob (magic `0xfade0c02`), which you can spot as it has the qualified binary name `com.apple.ps` in it. 2. An empty and short requirement set (magic `0xfade0c01`). 3. The entitlements blob, which contains the xml plist (magic `0xfade7171`). 4. A blob wrapper, (magic `0xfade0b01`).
### Complicate the backtracing Try to halt the app after a big timeout and do not exit directly from the jailbreak detection place.
### API-based Detection ``` #### fork() #### 进程分叉。在越狱设备上,Sandboxd 不会拒绝应用程序使用 fork()、popen() 或任何其他 C 函数创建子进程的能力。然而,Sandboxd 在非越狱设备上明确拒绝进程分叉。因此,通过检查 fork() 返回的 pid,应用程序可以判断设备是否已受损。如果分叉成功,应用可以推断出它正在越狱设备上运行。 #### system() 在非越狱设备上使用 NULL 参数调用 system() 函数将返回 0。在越狱设备上执行相同操作将返回 1。这是因为该函数会检查 /bin/sh 是否存在,而它只存在于越狱设备上。
### OpenSSH 服务检测 SSH 环回连接。由于很大一部分越狱设备安装了 OpenSSH,某些应用程序尝试连接到 127.0.0.1 的 22 端口。如果连接成功,则表示 OpenSSH 已安装并正在运行,这证明设备已越狱。 检查环回接口上的 22 (OpenSSH) 和 44 (checkra1n) 开放端口。
### 检查你的进程中是否加载了某些越狱库 这种检测方法首先调用 `_dyld_image_count()` 和 `_dyld_get_image_name()` 等函数来查看当前加载了哪些 dylib。这种方法很难动态修补,因为修补程序本身也是 dylib 的一部分。 例如 `/usr/lib/substitute-inserter.dylib` 可以使用 dlopen / 内存扫描 / dyld 内部结构等。 ``` private static func checkDYLD() -> Bool { let suspiciousLibraries = [ "FridaGadget", "frida", "cynject", "libcycript" ] for libraryIndex in 0..<_dyld_image_count() { guard let loadedLibrary = String(validatingUTF8: _dyld_get_image_name(libraryIndex)) else { continue } for suspiciousLibrary in suspiciousLibraries { if loadedLibrary.lowercased().contains(suspiciousLibrary.lowercased()) { return true } } } return false #### }
### Check if your process is instrumented - Check code integrity - CRC, derive constants from the code, check API entries, etc. - Try to detect frida ```swift private static func isFridaRunning() -> Bool { func swapBytesIfNeeded(port: in_port_t) -> in_port_t { let littleEndian = Int(OSHostByteOrder()) == OSLittleEndian return littleEndian ? _OSSwapInt16(port) : port } var serverAddress = sockaddr_in() serverAddress.sin_family = sa_family_t(AF_INET) serverAddress.sin_addr.s_addr = inet_addr("127.0.0.1") serverAddress.sin_port = swapBytesIfNeeded(port: in_port_t(27042)) let sock = socket(AF_INET, SOCK_STREAM, 0) let result = withUnsafePointer(to: &serverAddress) { $0.withMemoryRebound(to: sockaddr.self, capacity: 1) { connect(sock, $0, socklen_t(MemoryLayout
# Summary In general, the more complicated the jailbreak detection is, the more difficult it is to detect and bypass. The most common mistake when implementing jailbreak detection often lies in the implementation itself.
We often come across apps that have great jailbreak detection, but the implementation is in one function that returns true or false depending on whether the device is jailbroken. In these cases, we bypass jailbreak detection by using Cycript or a similar tool to invert the return value from the detection function.
In practice, the best jailbreak detection combining multiple techniques and integrating them into other functions so that they cannot easily be bypassed.
# References https://github.com/mehrankmlf/SecurityKit https://www.synacktiv.com/sites/default/files/2021-10/2021_sthack_jailbreak.pdf https://www.romainthomas.fr/post/21-07-pokemongo-anti-frida-jailbreak-bypass/ https://aeonlucid.com/Snapchat-detection-on-iOS/ https://github.com/AeonLucid/SnapHide https://redmaple.tech/blogs/macho-files/ ```
标签:CVE监控, Docker支持, DOM解析, Frida, iOS安全, iOS开发, Mitre ATT&CK, ObjC, Pokemon GO, Snapchat, Swift, UML, 云资产清单, 反调试, 目录枚举, 私有化部署, 移动安全, 越狱, 越狱检测, 逆向工程, 防御规避