rodrigsmor/tastyhub-api
GitHub: rodrigsmor/tastyhub-api
一个基于 Spring Boot 的食谱分享平台 REST API,专注展示模块化单体与整洁架构的最佳实践。
Stars: 1 | Forks: 0

Tastyhub — Recipe Sharing Platform
TastyHub 是一个后端应用程序,其开发过程重点关注**软件架构最佳实践**、**系统设计**和**Web 安全**。
该项目模拟了一个用于食谱分享的社交平台,并被构想为一个**实践学习项目**,优先考虑架构的清晰性、理性的技术决策以及可持续的代码。
主要目标不仅是交付功能,还要**探索现实世界中的权衡**、记录决策,并为未来的演进构建坚实的基础。
## 📚 目录
- [📚 目录](#-table-of-contents)
- [🎯 项目目标](#-project-goals)
- [📐 架构](#-architecture)
- [⚙️ 技术栈](#️-technologies)
- [🗄️ 数据库结构](#️-database-structure)
- [🏗️ 系统设计](#️-system-design)
- [📦 包结构](#-package-structure)
- [🚀 运行项目](#-running-the-project)
- [🐳 使用 Docker Compose](#-using-docker-compose)
- [🐋 使用独立 Docker](#-using-standalone-docker)
- [🔩 动手实践](#-hands-on)
- [👨🏽💻 作者](#-author)
## 🎯 项目目标
* 应用 **SOLID**、**DRY**、**KISS** 和 **Clean Architecture** 原则
* 实现设计模式以构建健壮且标准化的解决方案
* 使用 **JAVA** 和 **Spring Boot** 开发健壮的 REST API
* 正确建模身份验证和引导流程
* 在模块化单体中探索 **系统设计** 概念
## 📐 架构
* **架构风格:** Modular Monolith (模块化单体)
* **方法:** Clean Architecture (整洁架构,受 Hexagonal / Ports & Adapters 启发)
* **层级:**
* **Application (应用层):** 编排用例并协调领域逻辑。处理 DTO 和应用工作流。
* **Domain (领域层):** 包含核心业务规则、实体、值对象和仓储契约。不依赖框架。
* **Infrastructure (基础设施层):** 提供技术实现,如数据库持久化、安全、消息传递和缓存。
* **Interfaces (交付层):** 系统的入口点,例如 REST 控制器、WebSocket 端点和事件监听器。
### ⚙️ 技术栈
* **语言:** Java 17
* **框架:** Spring Boot
* **持久化:** PostgreSQL + JPA (Hibernate)
* **迁移:** Flyway
* **认证:** JWT (无状态)
* **缓存:** Redis (🔜)
* **消息传递:** Kafka (🔜)
* **实时通信:** WebSocket (🔜)
* **文档:** Swagger / OpenAPI
* **测试:** JUnit 5, Mockito
* **基础设施:** Docker
### 🗄️ 数据库结构
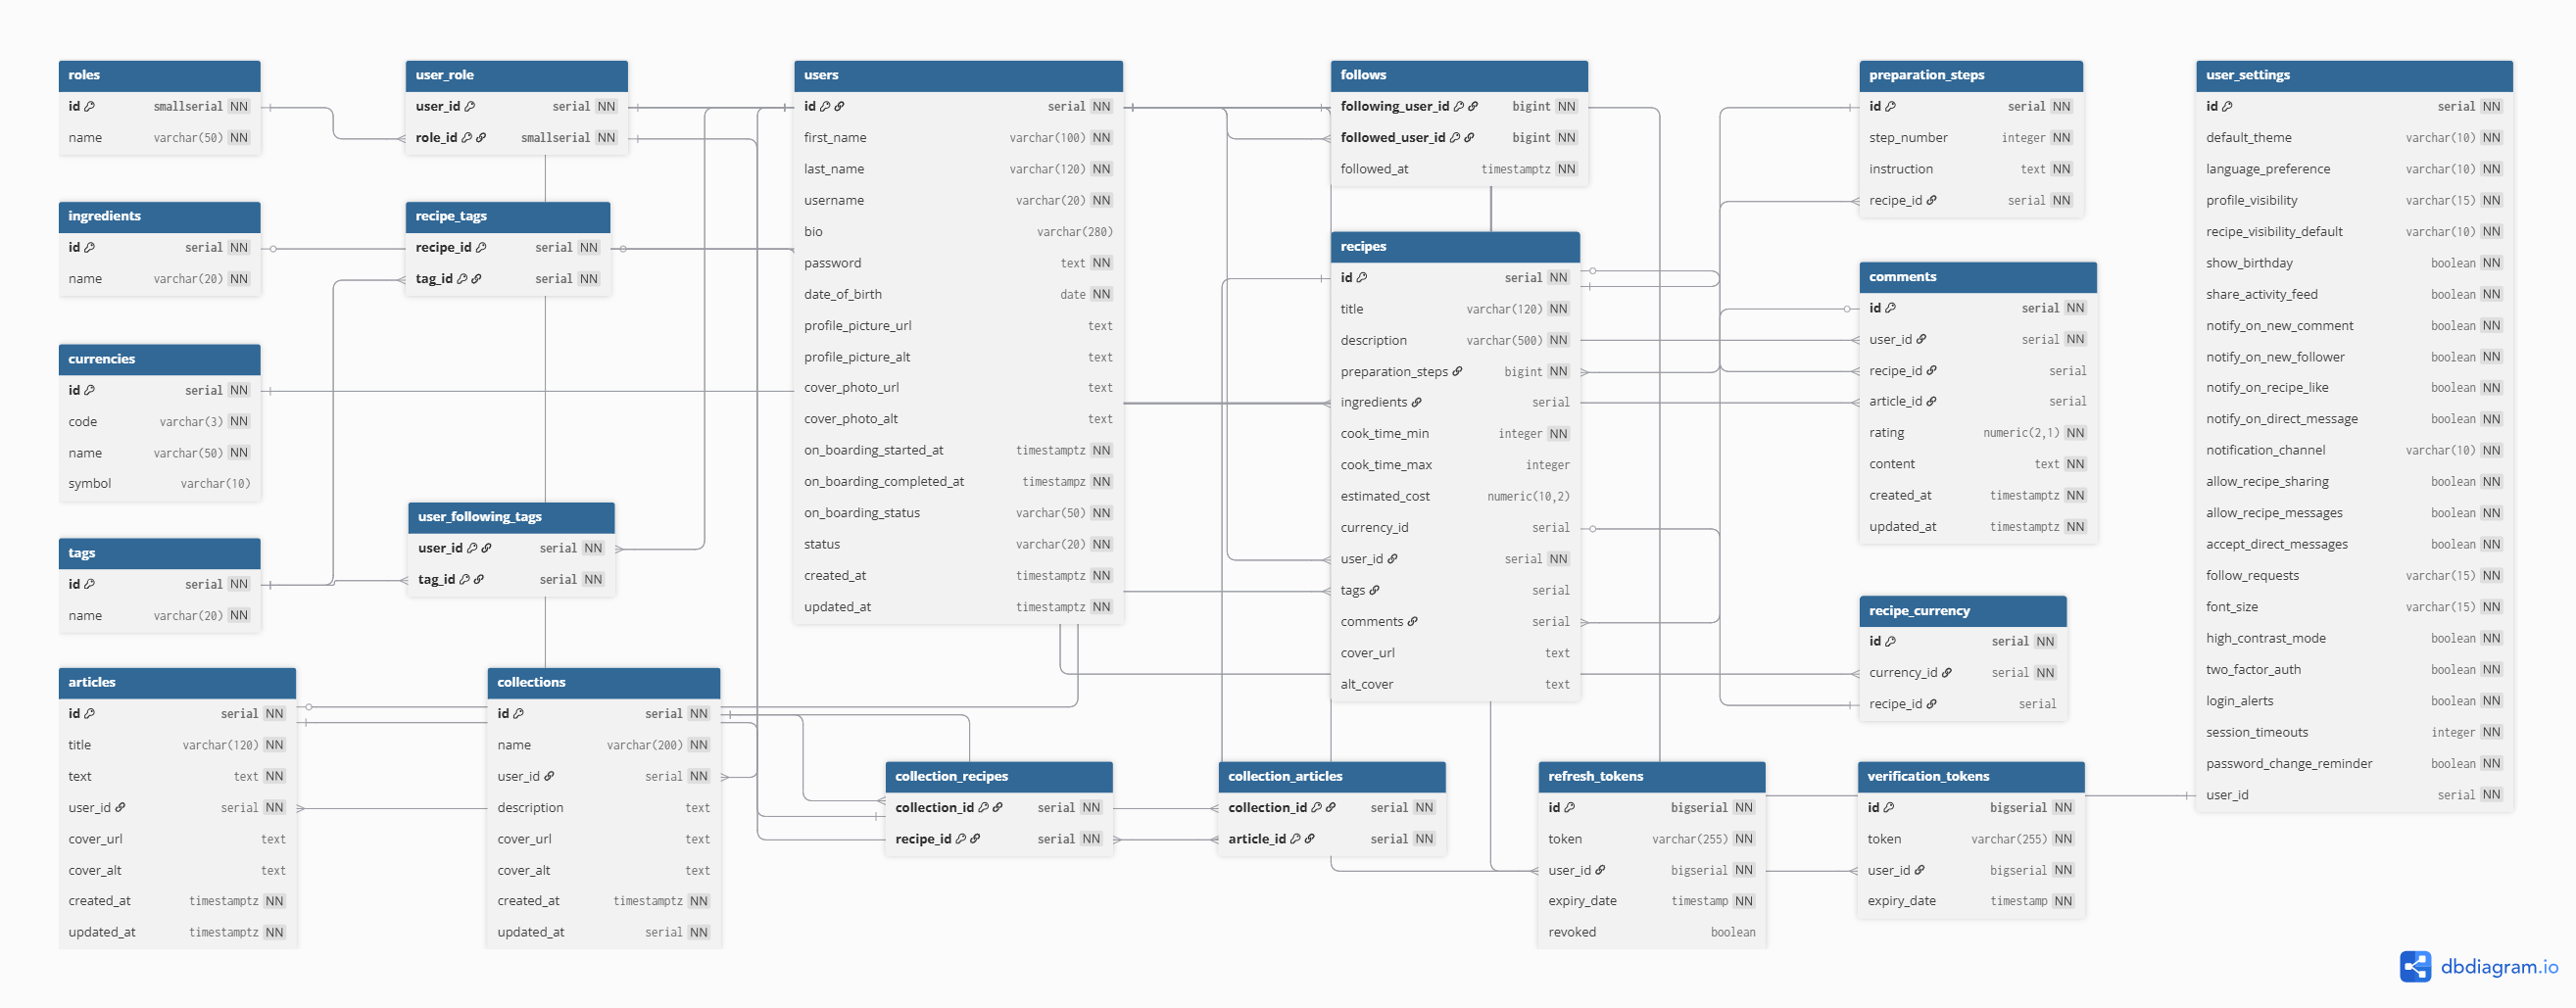
### 🏗️ 系统设计
[img]
### 📦 包结构
```
com.tastyhub
├── modules # Business modules organized by bounded context (modular monolith approach)
│ ├── auth
│ │ ├── application # Application layer: orchestrates use cases and coordinates domain logic
│ │ │ ├── usecase # Application use cases (command/query handlers implementing business flows)
│ │ │ ├── dto # Data Transfer Objects used for input/output boundaries
│ │ │ └── mapper # Mapping logic between Domain models and DTOs
│ │ │
│ │ ├── domain # Core business logic and domain rules (framework-independent)
│ │ │ ├── annotations # Custom domain-level annotations (e.g., business constraints)
│ │ │ ├── event # Domain events representing significant business occurrences
│ │ │ ├── model # Aggregates, Entities, Value Objects, and Enums
│ │ │ ├── repository # Repository contracts (interfaces) defining persistence operations
│ │ │ ├── service # Domain services containing complex business logic
│ │ │ └── policy # Business policies and rule objects encapsulating decision logic
│ │ │
│ │ ├── infrastructure # Technical implementations of external concerns
│ │ │ ├── aspect # Cross-cutting concerns (AOP: logging, auditing, transactions)
│ │ │ ├── persistence # Repository implementations, JPA mappings, database adapters
│ │ │ ├── security # Security configurations and authentication providers
│ │ │ ├── messaging # Kafka/RabbitMQ producers, consumers, and integration adapters
│ │ │ └── cache # Redis integrations and caching strategies
│ │ │
│ │ └── interfaces # Entry points into the application (delivery layer)
│ │ ├── controller # REST controllers exposing HTTP endpoints
│ │ ├── websocket # WebSocket endpoints for real-time communication
│ │ └── listener # Event listeners (application or messaging-driven)
│ │
│ ├── user
│ ├── recipes
│ ├── articles
│ │ ...other modules
│ └── comments
│
└── shared
├── exception # Global exception handling and base domain exception classes
├── dto # Shared DTOs used across modules (avoid overusing)
├── kernel # Core abstractions and base classes shared across the system
└── config # Global technical configurations (Spring, security, serialization, etc.)
```
## 🚀 运行项目
首先,确保您的机器上已正确安装 **Git CLI**。
如果尚未安装,请按照官方 Git 文档 [(Git - 安装)](https://git-scm.com/install/) 进行安装和配置,或者直接从 GitHub 下载项目的 `.zip` 文件。
安装并配置好 Git CLI 后,在终端中运行以下命令以克隆仓库:
```
git clone git@github.com:rodrigsmor/tastyhub-api.git
```
然后,导航到新创建的目录:
```
cd tastyhub-api
```
⚠️ **重要提示**:配置环境变量以进行正确的设置。
在项目根目录下创建一个 `.env` 文件并添加以下变量(示例):
```
SPRING_PROFILES_ACTIVE= # Active profile (prod or dev)
# 图像查看
API_UPLOAD_BASE_URL= # Base Url of Images
# Database 配置
DB_URL= # Database connection URL (e.g., jdbc:postgresql://localhost:5432/tastyhub)
DB_USERNAME= # Database user credentials
DB_PASSWORD= # Database password
# Spring Security
SPRING_SECURITY_USERNAME= # (Optional) Basic Auth username
SPRING_SECURITY_PASSWORD= # (Optional) Basic Auth password
# Postgres (Docker/本地设置)
POSTGRES_DB= # Name of the PostgreSQL database
POSTGRES_USER= # PostgreSQL administrative user
POSTGRES_PASSWORD= # PostgreSQL administrative password
# JWT 配置
JWT_SECRET= # Secret key for signing tokens
JWT_EXPIRATION= # Token expiration time (e.g., in milliseconds)
JWT_SECRET_KEY= # Additional secret key or encoded string if required
JWT_ISSUER= # Registered claim identifying the token provider (e.g., tastyhub-api)
```
👉 不要忘记根据您的具体情况(用户名、密码、数据库名称等)替换这些值。
从现在开始,主要有三种方式运行项目:
1. [🐳 使用 Docker Compose](#-using-docker-compose) (**强烈推荐**) 运行所有容器。
2. [🐋 使用独立 Docker](#-using-standalone-docker) 仅运行 Spring 项目。
3. [🔩 动手实践](#-hands-on) 仅运行 Spring Boot 项目(通过 IntelliJ 或终端)。
### 🐳 使用 Docker Compose
**Docker Compose** 是最推荐的方法,因为它允许您使用单个命令启动所有必需的服务(Spring Boot、数据库、缓存等)。
1. 确保已安装 **Docker** 和 **Docker Compose**。
* [安装 Docker](https://docs.docker.com/get-docker/)
* [安装 Docker Compose](https://docs.docker.com/compose/install/)
2. 在项目根目录下运行:
```
docker-compose up -d
```
3. 这将启动 `docker-compose.yml` 文件中定义的所有容器。
* Spring Boot 服务将在 `http://localhost:8080` 上可用。
* 数据库(例如 PostgreSQL)将在配置的端口(例如 `5432`)上可用。
4. 停止容器:
```
docker-compose down
```
### 🐋 使用独立 Docker
如果您只想运行 **Spring Boot 容器**,而不需要辅助服务,可以直接使用 Docker。
1. 确保已安装 **Docker**。
* [安装 Docker](https://docs.docker.com/get-docker/)
2. 构建项目 JAR:
```
./gradlew build
```
3. 构建 Docker 镜像:
```
# 构建 production 镜像
docker build -t tastyhub-api .
# 构建 development 镜像
docker build -t tastyhub-api-dev -f Dockerfile.dev .
```
4. 运行容器:
```
docker run -p 8080:8080 tastyhub-api
```
5. 应用程序将在 `http://localhost:8080` 上可用。
文档界面将在 `http://localhost:8080/swagger-ui/index.html` 上可用。
### 🔩 动手实践
如果您更喜欢仅运行 Spring Boot 项目,而不使用 Docker,可以直接在 **IntelliJ IDEA** 中或通过终端执行。
1. **使用 IntelliJ IDEA**
* 在 IntelliJ 中打开项目。
* 找到带有 `@SpringBootApplication` 注解的主类。
* 点击 **Run**。
2. **使用终端**
* 运行:
```
./gradlew bootRun
```
* 或者,如果您更喜欢构建 JAR:
```
./gradlew build
java -jar build/libs/your-project-0.0.1-SNAPSHOT.jar
```
3. 应用程序将在 `http://localhost:8080` 上可用。
## 👨🏽💻 作者

Rodrigo Moreira 🌠
🌐👨🏽💼 Developed with ♥️ by Rodrigo Moreira da Silva
[](https://twitter.com/psrodrigs)
[](https://www.linkedin.com/in/psrodrigomoreira/)
Copyright © 2023 – 2026. Rodrigo Moreira da Silva

标签:Clean Architecture, DNS解析, Docker, Docker Compose, JWT, Modular Monolith, NIDS, Ports and Adapters, REST API, SOLID原则, Spring Boot, Spring Framework, SQL, Syscall, Web安全, Web开发, 代码示例, 六边形架构, 后端开发, 学习项目, 安全防御评估, 容器化, 开源项目, 授权, 数据分析, 数据库设计, 整洁架构, 模块化单体, 测试用例, 社交平台, 系统审计, 系统设计, 美食分享, 菜谱平台, 蓝队分析, 设计模式, 请求拦截