GamehunterKaan/AutoPWN-Suite
GitHub: GamehunterKaan/AutoPWN-Suite
一个自动化漏洞扫描与利用框架,集成 nmap 与 NIST 漏洞库,提供 CLI、Web UI 与 API 的一站式解决方案。
Stars: 1094 | Forks: 136
# AutoPWN Suite
AutoPWN Suite 是一个用于自动扫描漏洞和利用系统的项目。


[](https://github.com/GamehunterKaan/AutoPWN-Suite/actions/workflows/tests.yml)


## 功能
### CLI
- 完全[自动](#usage)扫描与利用
- 无需用户输入即可检测网络 IP 范围
- 基于服务版本进行漏洞检测
- Web 应用漏洞测试(LFI、XSS、SQLI)
- Web 应用目录爆破
- 从终端直接获取漏洞信息
- 自动下载相关漏洞的利用程序
- 噪声模式,用于在网络中产生流量
- 规避模式,实现隐蔽扫描
- 根据权限级别自动选择扫描类型
- 丰富的格式化输出,易于阅读
- 可通过配置文件指定参数
- 通过 Webhook 或邮件发送扫描结果
- 支持 Windows、macOS 和 Linux
- 可作为[模块](#module-usage)使用
- 可作为[守护进程](#install-daemon)定期扫描网络
### Web UI
AutoPWN Suite 包含一个内置的 Web 仪表板,用于通过浏览器管理扫描。
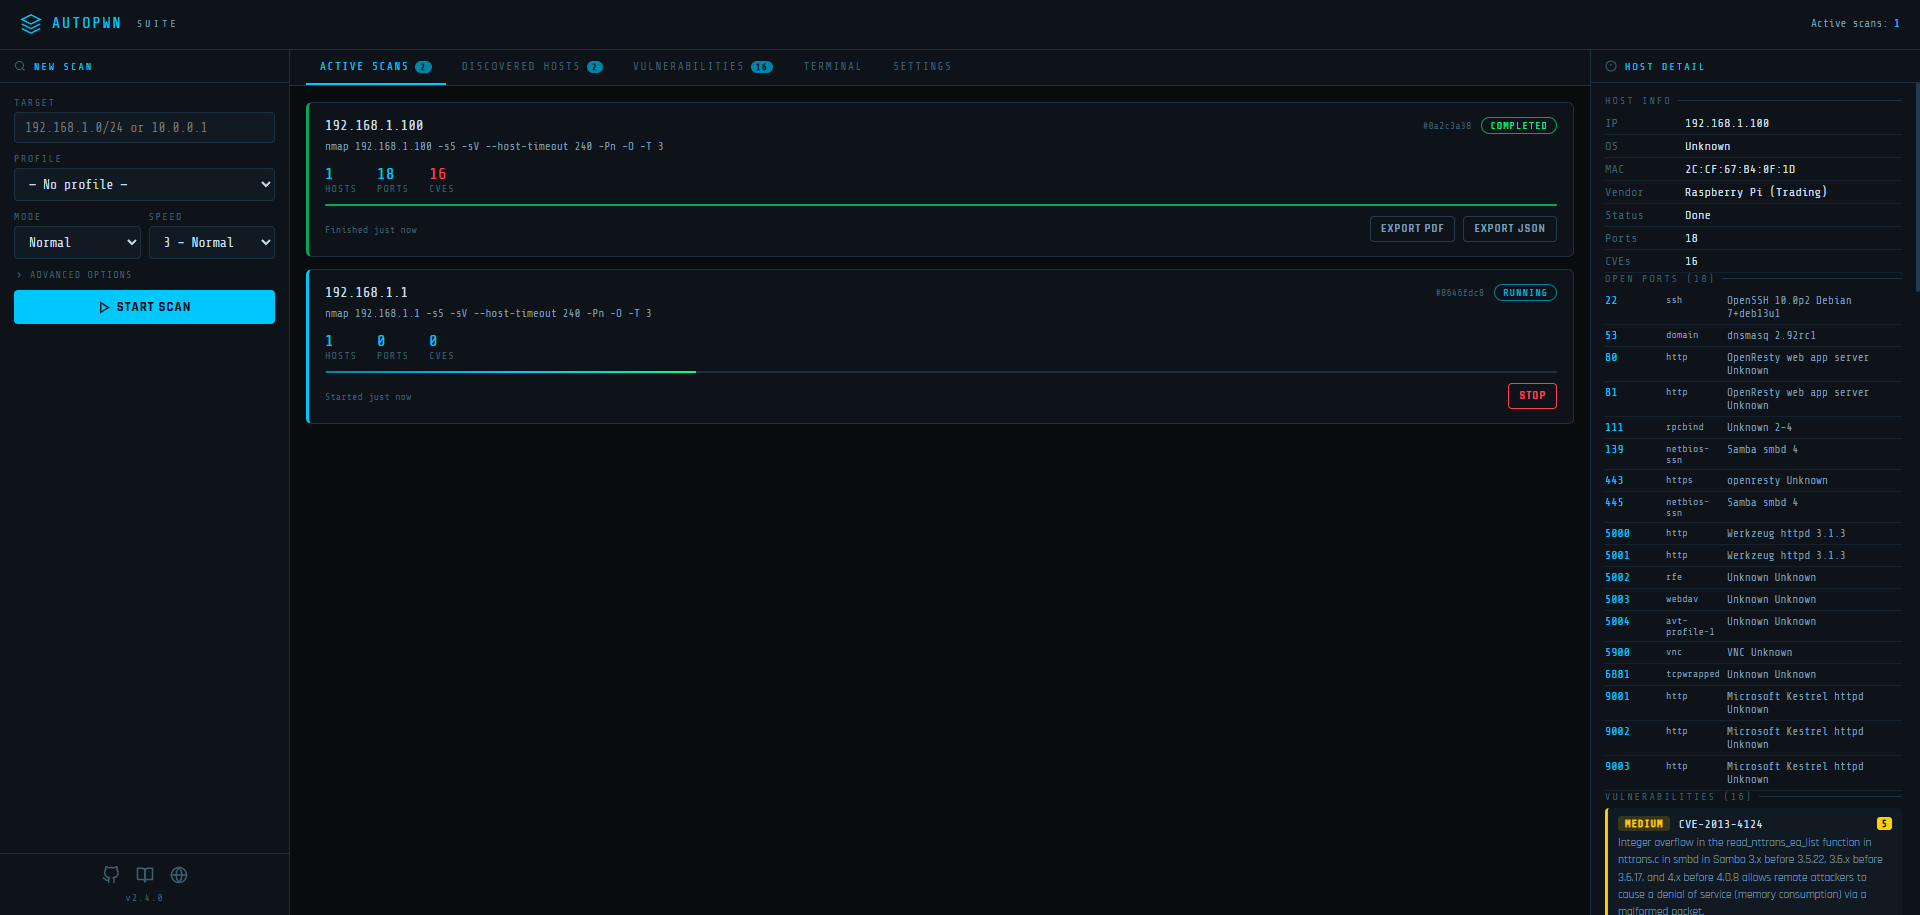
- **多并发扫描** - 同时启动并监控多个扫描任务
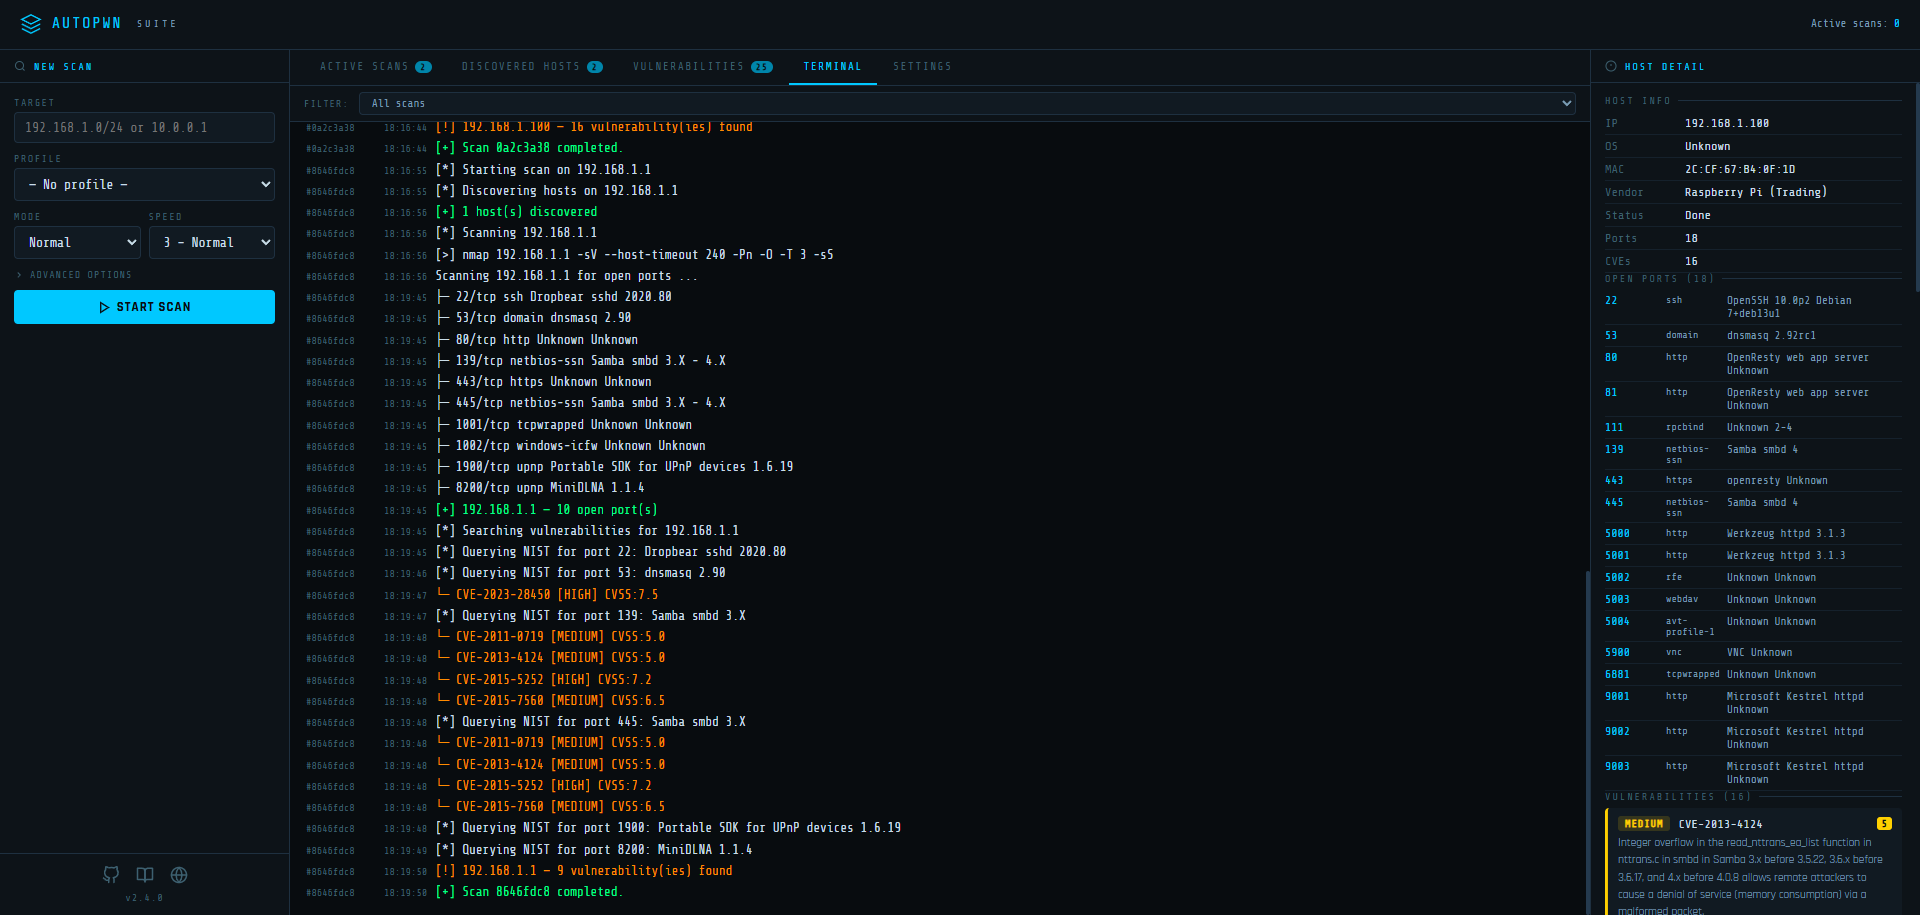
- **实时终端输出** - 通过 SSE 实时查看 nmap 命令与结果
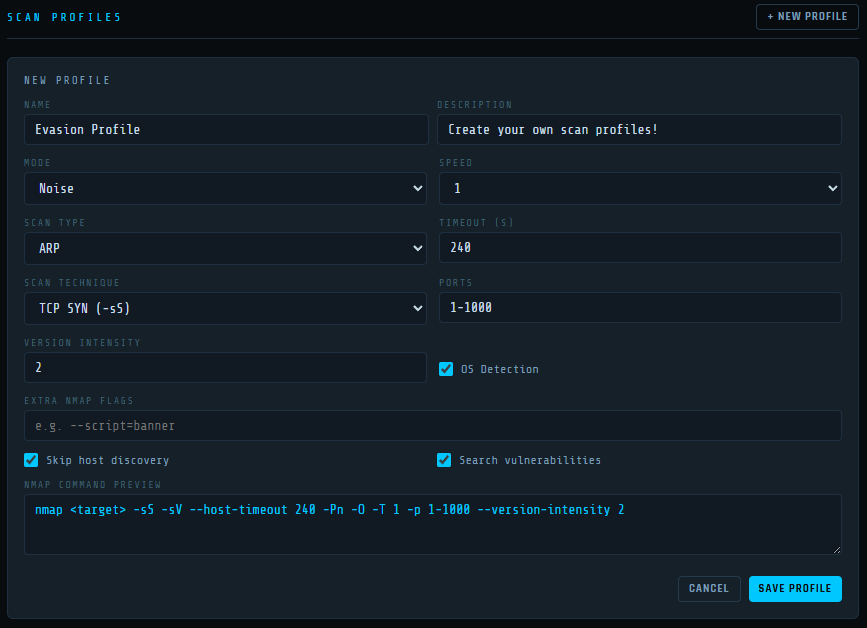
- **扫描配置** - 保存并复用扫描配置(技术、速度、超时、端口、规避、自定义标志)
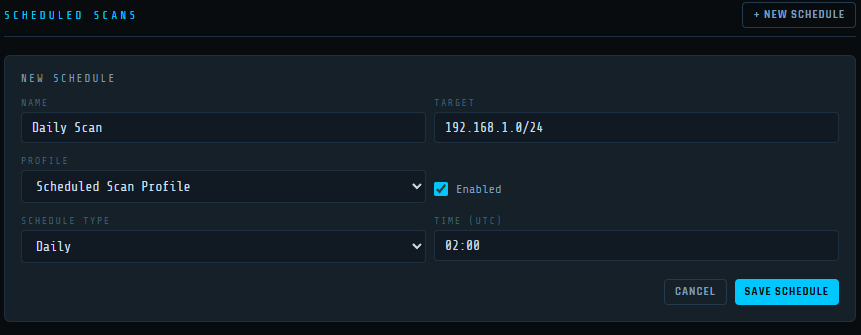
- **定时扫描** - 设置周期性扫描任务,自动加载配置
- **扫描技术** - 在 TCP SYN、TCP Connect、UDP、Window、ACK、FIN、Xmas、Null、Maimon 和 SCTP 扫描之间选择
- **规避模式** - 分片数据包、伪造源端口与填充数据长度
- **邮件通知** - 扫描完成时接收通知及内联结果摘要
- **Webhook 通知** - 将扫描结果发布到任意 Webhook 端点
- **持久化设置** - 所有配置、配置文件与调度记录均保存至磁盘
- **可通过环境变量配置** - 无需修改代码即可设置主机、端口与数据目录
## 工作原理
AutoPWN Suite 使用 nmap TCP-SYN 扫描来枚举主机并检测其上运行的软件版本。收集足够的主机信息后,AutoPWN Suite 会自动生成关键词列表,用于搜索 [NIST 漏洞数据库](https://www.nist.gov/)。
## 演示
AutoPWN Suite 提供非常友好且易于阅读的输出。
[](https://asciinema.org/a/509345)
## 安装
### Windows
```
git clone https://github.com/GamehunterKaan/AutoPWN-Suite.git
cd AutoPWN-Suite
pip install -r requirements.txt
```
### Linux
在 Linux 上进行系统级安装(需要 root 权限),请使用提供的安装脚本。(推荐)
```
# Install as root
sudo bash install.sh
# Uninstall
sudo bash uninstall.sh
```
你也可以克隆仓库并创建虚拟环境。此安装方法适用于在 Linux 上进行非 root 安装。
```
git clone https://github.com/GamehunterKaan/AutoPWN-Suite.git
cd AutoPWN-Suite
python3 -m venv .venv
source .venv/bin/activate
pip install -r requirements.txt
```
### Docker
最快启动 Web UI 的方式。下载 [docker-compose.yml](https://raw.githubusercontent.com/GamehunterKaan/AutoPWN-Suite/main/docker-compose.yml) 文件并运行:
```
docker compose up -d
```
Web UI 将可在 `http://localhost:8080` 访问。
#### 配置
编辑 `docker-compose.yml` 以更改主机、端口或数据目录:
```
environment:
- AUTOPWN_DATA_DIR=/data # Where settings/profiles/schedules are stored
- AUTOPWN_WEB_HOST=0.0.0.0 # Listen address
- AUTOPWN_WEB_PORT=8080 # Listen port
```
你也可以通过 Docker 运行 CLI:
```
docker run -it --net=host gamehunterkaan/autopwn-suite -t 192.168.1.0/24 -y
```
### 云端
你可以使用 Google Cloud Shell。
[](https://shell.cloud.google.com/cloudshell/editor?cloudshell_git_repo=https://github.com/GamehunterKaan/AutoPWN-Suite.git)
## 使用方法
建议始终以 root 权限(sudo)运行。
### CLI
#### 自动模式
```
autopwn-suite -y
```
#### 扫描指定目标
```
autopwn-suite -t
```
#### 更改扫描速度
```
autopwn-suite -s <1, 2, 3, 4, 5>
```
#### 更改扫描模式
```
autopwn-suite -m
```
如需了解详细用法和参数,请使用 `-h` 标志。
#### 安装守护进程
```
autopwn-suite --daemon-install
```
### Web UI
启动 Web 仪表板:
```
autopwn-suite --web
```
使用自定义主机和端口:
```
autopwn-suite --web --web-host 0.0.0.0 --web-port 3000
```
### REST API
Web UI 提供了完整的 REST API:
| 方法 | 端点 | 描述 |
|------|------|------|
| `GET` | `/api/scans` | 列出所有扫描任务 |
| `POST` | `/api/scan/start` | 启动新扫描 |
| `POST` | `/api/scan/stop` | 停止正在运行的扫描 |
| `GET` | `/api/hosts` | 所有已发现的主机(合并) |
| `GET` | `/api/log` | 日志历史记录 |
| `GET` | `/api/events` | SSE 事件流 |
| `GET` | `/api/settings` | 获取所有设置 |
| `PUT` | `/api/settings` | 更新设置 |
| `GET` | `/api/profiles` | 列出扫描配置 |
| `POST` | `/api/profiles` | 创建配置 |
| `PUT` | `/api/profiles/` | 更新配置 |
| `DELETE` | `/api/profiles/` | 删除配置 |
| `GET` | `/api/schedules` | 列出定时扫描 |
| `POST` | `/api/schedules` | 创建定时任务 |
| `PUT` | `/api/schedules/` | 更新定时任务 |
| `DELETE` | `/api/schedules/` | 删除定时任务 |
## 模块使用
```
from autopwn_suite.api import AutoScanner
scanner = AutoScanner()
json_results = scanner.scan("192.168.0.1")
scanner.save_to_file("autopwn.json")
```
## 开发与测试
你可以使用 poetry 来安装依赖并运行测试。
#### 安装依赖
```
poetry install
```
#### 运行测试
```
# Run all tests with coverage
poetry run test
# Run tests without coverage
poetry run test --no-cov
# Run only unit tests
poetry run test -m unit
# Run only integration tests
poetry run test -m integration
# Run tests excluding slow tests
poetry run test -m "not slow"
```
#### 使用 Docker 运行(开发)
```
docker compose up --build
```
## 法律声明
你不得出租、租赁、分发、修改、出售或转让该软件给第三方。AutoPWN Suite 可自由分发与修改,条件是为创作者提供署名且不得用于商业用途。你不得将该软件用于非法或恶意目的。在适用法律允许的最大范围内,不对任何后果性损害承担责任。
## 支持或联系
使用此工具遇到问题?你可以[创建问题](https://github.com/GamehunterKaan/AutoPWN-Suite/issues/new/choose)或[创建讨论!](https://github.com/GamehunterKaan/AutoPWN-Suite/discussions)
标签:IP范围检测, LFI, Webhook通知, Web仪表盘, Web漏洞测试, XSS, 云存储安全, 命令行界面, 噪声模式, 守护进程, 富格式输出, 并发扫描, 开源安全工具, 文档结构分析, 服务版本探测, 模块集成, 渗透测试框架, 漏洞信息查询, 漏洞情报, 特权等级检测, 目录爆破, 网络扫描, 网络流量生成, 自动下载Exploit, 自动化攻击, 自动化渗透测试, 规避模式, 请求拦截, 逆向工具, 逆向工程平台, 邮件通知, 配置文件参数, 防御