raaymax/quack
GitHub: raaymax/quack
Quack 是一款免费开源、支持端到端加密的自托管私人聊天应用,灵感来自 Slack,让用户在掌控数据的同时享受丰富的通讯功能。
Stars: 47 | Forks: 3

[](https://github.com/raaymax/chat/actions/workflows/tests.yml)
[](https://shields.io/github/v/release/raaymax/chat?display_name=tag)
[](code_of_conduct.md)
[](https://opensource.org/licenses/MIT)
欢迎使用 Quack - 私人聊天应用程序。
欢迎使用 Quack,这是一款专为私人使用而设计的免费开源聊天应用程序。Quack 提供了易于使用的界面并无缝集成到 Web 浏览器中,使其成为一款 Progressive Web Application,可以通过任何带有 Web 浏览器的平台(例如 Chrome)进行访问。
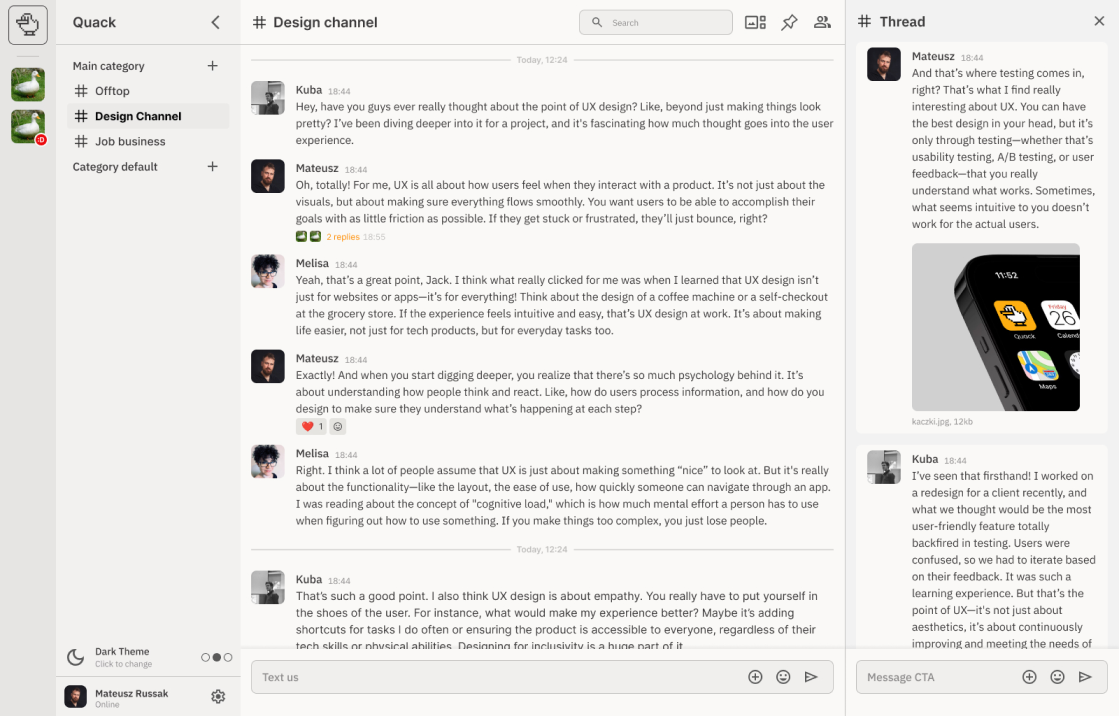
Quack 的灵感来自 Slack,但在私人使用上更具性价比。它汇集了其他通信工具的最佳功能,同时将隐私和安全放在首位。用户可以自行托管应用程序,从而确保对数据的完全控制。
# 功能
- 支持 E2EE 以提供更好的隐私保护
- Progressive Web Application (PWA)
- 带有后台通知的 Android 原生应用
- 为隐私和安全设计的自托管方案
- 多频道支持
- 私信
- 置顶消息
- 消息搜索
- 文件分享
- Emoji 回应
- 自定义 Emoji
- 消息串
- 用户提及
- 链接预览
- 用于扩展的插件系统
# 快速开始
## 使用 Docker Hub
[https://registry.hub.docker.com/r/codecat/quack](https://registry.hub.docker.com/r/codecat/quack)
## 使用 GitHub 仓库
最快的上手方式是在检出代码后使用 Docker compose。使用以下命令将立即以默认设置启动应用程序。
```
docker compose up -d
```
导航至 [http://localhost:8080](http://localhost:8080) 并使用默认凭据登录 `admin / 123`。
# 配置
要覆盖默认设置,可以在项目根目录中创建 `chat.config.ts` 文件。您可以将 `chat.config.example.ts` 用作模板。
该文件应导出以下对象:
```
type Config = {
port?: number // default `PORT` env otherwise `8080`
sessionSecret?: string // auto generated on first run to `secrets.json` but can be overwritten here
trustProxy?: bool | string | number // default `uniquelocal` ref: https://expressjs.com/en/guide/behind-proxies.html
vapid?: { // auto generated on first run to `secrets.json` but can be overwritten here
publicKey: string
secretKey: string
},
databaseUrl?: string // default `DATABASE_URL` env
cors?: string[] // by default [ 'https?://localhost(:[0-9]{,4})' ],
storage?: { // Where uploaded files should be stored
type: 'memory' | 'gcs' | 'fs' // default `fs` / `memory` in tests
directory: string // where to save files when type `fs`
bucket: string // bucket name for `gcs`
}
apiUrl?: string // default 'http://localhost:8080' url of api
appUrl?: string // default 'http://localhost:8081' url for frontend app
};
```
## port
应用程序启动的端口
## sessionSecret
此值将覆盖 `secrets.json` 中的值
## trustProxy
是否信任 proxy。
## databaseUrl
连接到 mongodb 实例的连接字符串。默认情况下,此值取自环境变量 `DATABASE_URL`。
示例:
```
mongodb://chat:chat@localhost:27017/chat?authSource=admin
```
## cors
这允许在不同域名上托管前端和后端
对于开发环境,此选项设置为:
```
cors: [ 'https?://localhost(:[0-9]{,4})' ]
```
以允许在单独的进程中同时运行 vite 和 deno,从而在代码更改时实现完全的自动重载
## storage
用于文件上传的存储选项。
```
storage: {
type: 'memory' | 'fs' | 'gcs'
}
```
### memory
用于测试,无需持久化存储文件
### FS
将文件存储在文件系统中
您可以使用 `storage.directory` 字段来配置存储文件的文件夹。
### GCS
将文件保存在 Google Cloud Storage 中,这是用于生产环境的不错选择。
在这种情况下,您需要指定 `storage.bucket` 字段,并且需要定义环境变量
`GOOGLE_APPLICATION_CREDENTIALS` [字符串],包含 google 应用程序凭据的路径
### S3
尚未实现,如果有兴趣,我将会实现它。
请为此创建 issue。
## apiUrl
如果与 appUrl 不同,则指向 api 的 URL
## appUrl
用于生成链接的应用程序 URL
# 运行项目
## 前置条件
- 安装 [Deno](https://deno.land/)
- Node.js 和 npm(用于管理前端依赖和运行 React)
- MongoDB
## 后端
启动服务器:
```
cd ./deno/server
deno task dev
```
## 前端
安装依赖并启动 React 应用程序:
```
cd ./app
npm install
npm run dev
```
## Storybook
启动 Storybook:
```
cd ./app
npm install
npm run storybook
```
## 移动应用程序
构建带有后台推送通知的 Android 原生应用:
```
cd ./mobile
npm install
export QUACK_SERVER_URL="https://your-quack-server.com"
npm run cap:sync
npm run cap:open # Opens Android Studio
```
有关详细的设置说明,请参阅[移动应用程序文档](docs/mobile-app.md)。
# 文档
- [系统架构](docs/ARCHITECTURE.md) — 后端层、前端模式、数据流、加密
- [编码规范](docs/CONVENTIONS.md) — 文件命名、组件模式、导入顺序、git 工作流
- [架构决策记录](docs/adr/README.md) — 12 个 ADR,涵盖 runtime、状态管理、加密等
- [移动应用程序](docs/mobile-app.md) — Capacitor Android 构建设置
# 插件
Chat 拥有插件系统。示例插件可以在 `plugins/example` 中找到。
如何使用插件及插件 hook 点尚待补充。
# 默认凭据
```
admin / 123
```
可以使用 `/invite` 命令邀请新用户,这将生成一个用于用户注册的一次性链接。
# 贡献
欢迎各种贡献。对于重大更改,请先开一个 issue 以讨论您希望更改的内容。请确保适当地更新测试。
# 许可证
MIT 许可证
版权所有 (c) 2023 CodeCat
标签:Android, DSL, MITM代理, 即时通讯, 端到端加密, 聊天应用, 自动化攻击, 自托管, 请求拦截

