unitreerobotics/unitree_mujoco
GitHub: unitreerobotics/unitree_mujoco
基于 MuJoCo 和 Unitree SDK2 的机器人仿真平台,帮助开发者在仿真环境中验证底层控制算法并无缝迁移至真实机器人硬件。
Stars: 1105 | Forks: 377
# 简介
## Unitree mujoco
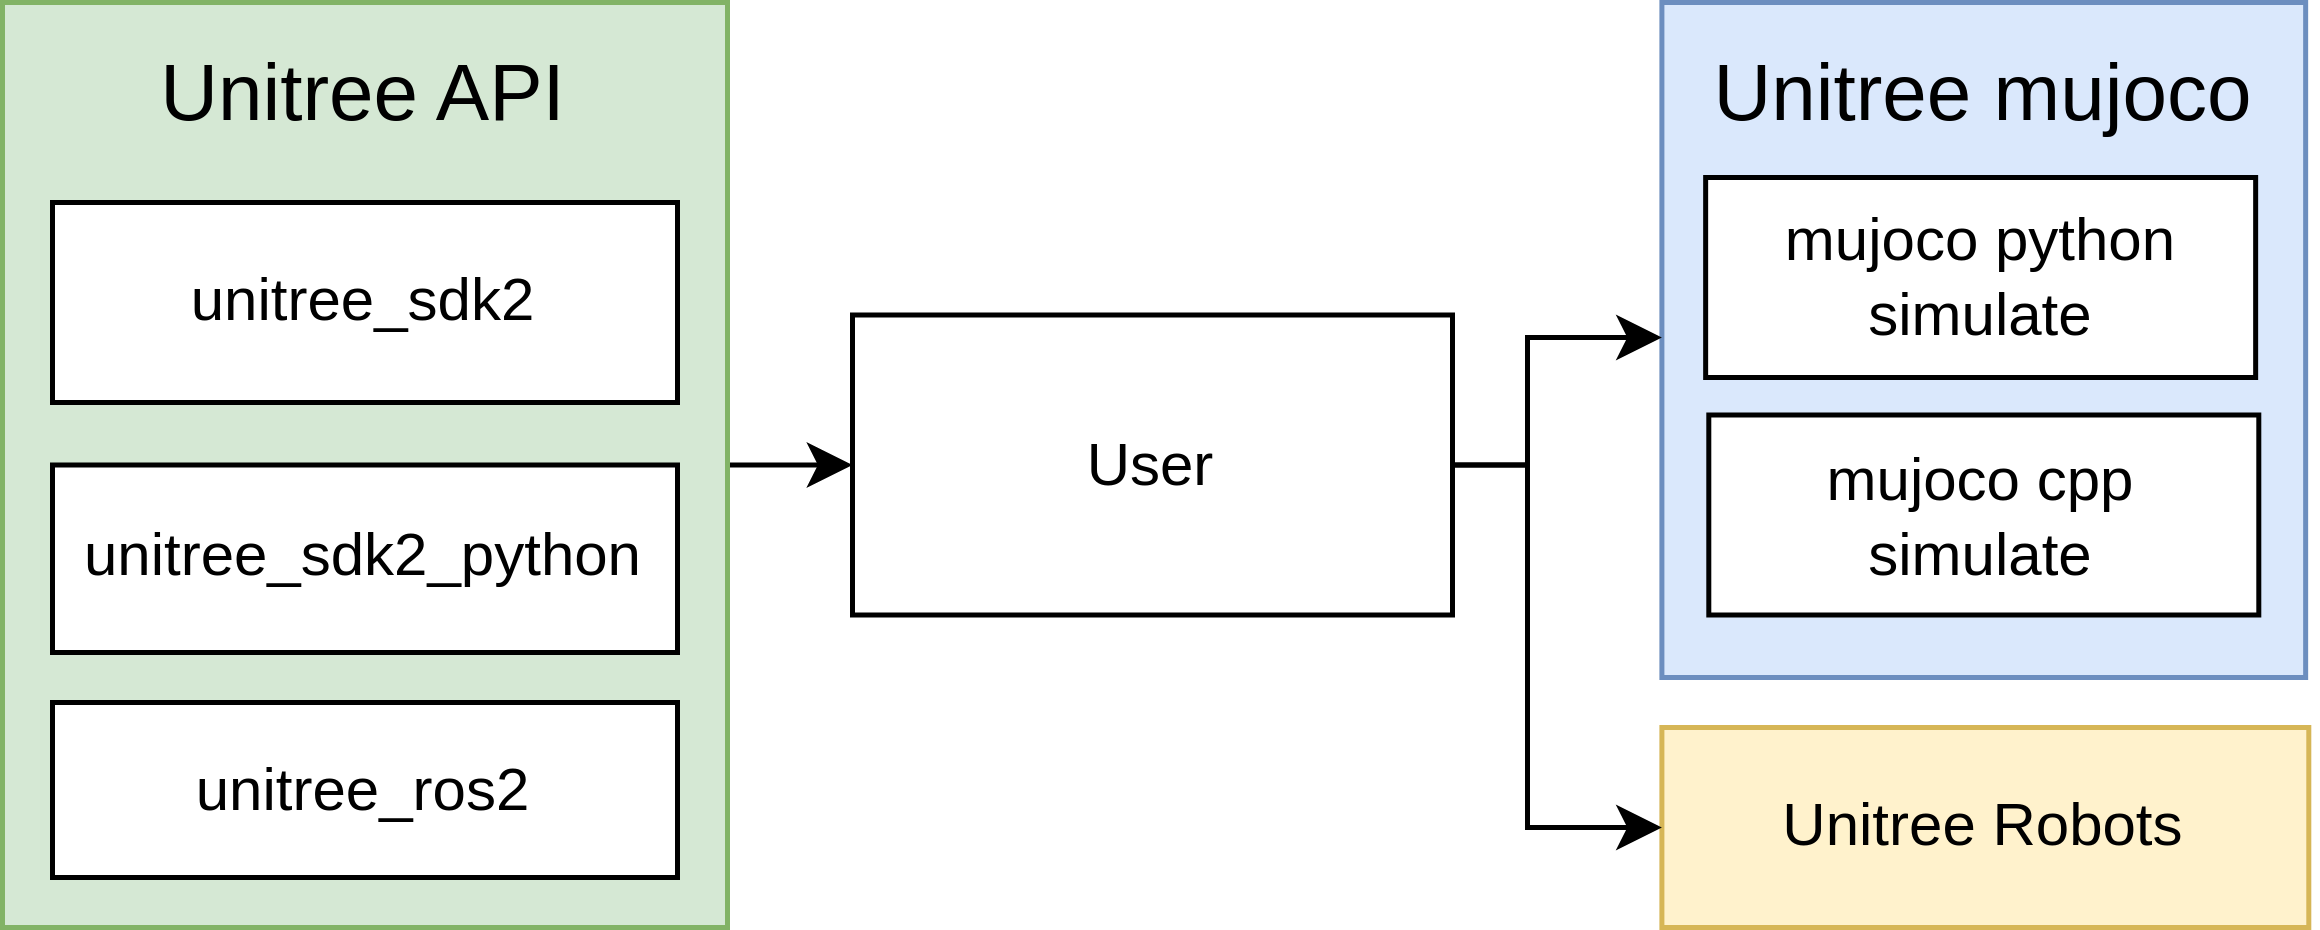
`unitree_mujoco` 是一个基于 `Unitree sdk2` 和 `mujoco` 开发的仿真器。用户可以轻松地将使用 `Unitree_sdk2`、`unitree_ros2` 和 `unitree_sdk2_python` 开发的控制程序集成到该仿真器中,实现从仿真到物理开发的无缝过渡。本仓库包含用 C++ 和 Python 实现的两个版本的仿真器,结构如下:
## 目录结构
- `simulate`:基于 unitree_sdk2 和 mujoco 实现的仿真器 (C++,推荐)
- `simulate_python`:基于 unitree_sdk2_python 和 mujoco 实现的仿真器 (Python)
- `unitree_robots`:unitree_sdk2 支持的机器人的 MJCF 描述文件
- `terrain_tool`:用于在仿真场景中生成地形的工具
- `example`:示例程序
## 支持的 Unitree sdk2 消息:
**当前版本仅支持底层开发,主要用于控制器的 Sim to Real 验证**
- `LowCmd`:电机控制命令
- `LowState`:电机状态信息
- `SportModeState`:机器人位置和速度数据
- `IMUState`:`rt/secondary_imu` 话题下的躯干 IMU 状态(仅限 G1)
注意:
1. 电机的编号与实际的机器人硬件相对应。具体细节可在 [Unitree 文档](https://support.unitree.com/home/zh/developer) 中找到。
2. 在实际的机器人硬件中,内置运动控制服务关闭后无法读取 `SportModeState` 消息。但是,仿真器保留了此消息,以便用户利用位置和速度信息来分析所开发的控制程序。
## 相关链接
- [unitree_sdk2](https://github.com/unitreerobotics/unitree_sdk2)
- [unitree_sdk2_python](https://github.com/unitreerobotics/unitree_sdk2_python)
- [unitree_ros2](https://github.com/unitreerobotics/unitree_ros2)
- [Unitree 文档](https://support.unitree.com/home/zh/developer)
- [Mujoco 文档](https://mujoco.readthedocs.io/en/stable/overview.html)
## 消息 (DDS idl) 类型说明
- Unitree Go2、B2、H1、B2w、Go2w 机器人使用 unitree_go idl 进行底层通信。
- Unitree G1、H1-2 机器人使用 unitree_hg idl 进行底层通信。
# 安装
## C++ 仿真器 (simulate)
### 1. 依赖项
```
sudo apt install libyaml-cpp-dev libspdlog-dev libboost-all-dev libglfw3-dev
```
#### unitree_sdk2
建议将 `unitree_sdk2` 安装在 `/opt/unitree_robotics` 路径下。
```
git clone https://github.com/unitreerobotics/unitree_sdk2.git
cd unitree_sdk2/
mkdir build
cd build
cmake .. -DCMAKE_INSTALL_PREFIX=/opt/unitree_robotics
sudo make install
```
更多详情请参见:https://github.com/unitreerobotics/unitree_sdk2
#### mujoco
下载 mujoco [发行版](https://github.com/google-deepmind/mujoco/releases),并将其解压到 `~/.mujoco` 目录下;
```
cd unitree_mujoco/simulate/
ln -s ~/.mujoco/mujoco-3.3.6 mujoco
```
### 2. 编译 unitree_mujoco
```
cd unitree_mujoco/simulate
mkdir build && cd build
cmake ..
make -j4
```
### 3. 测试:
运行:
```
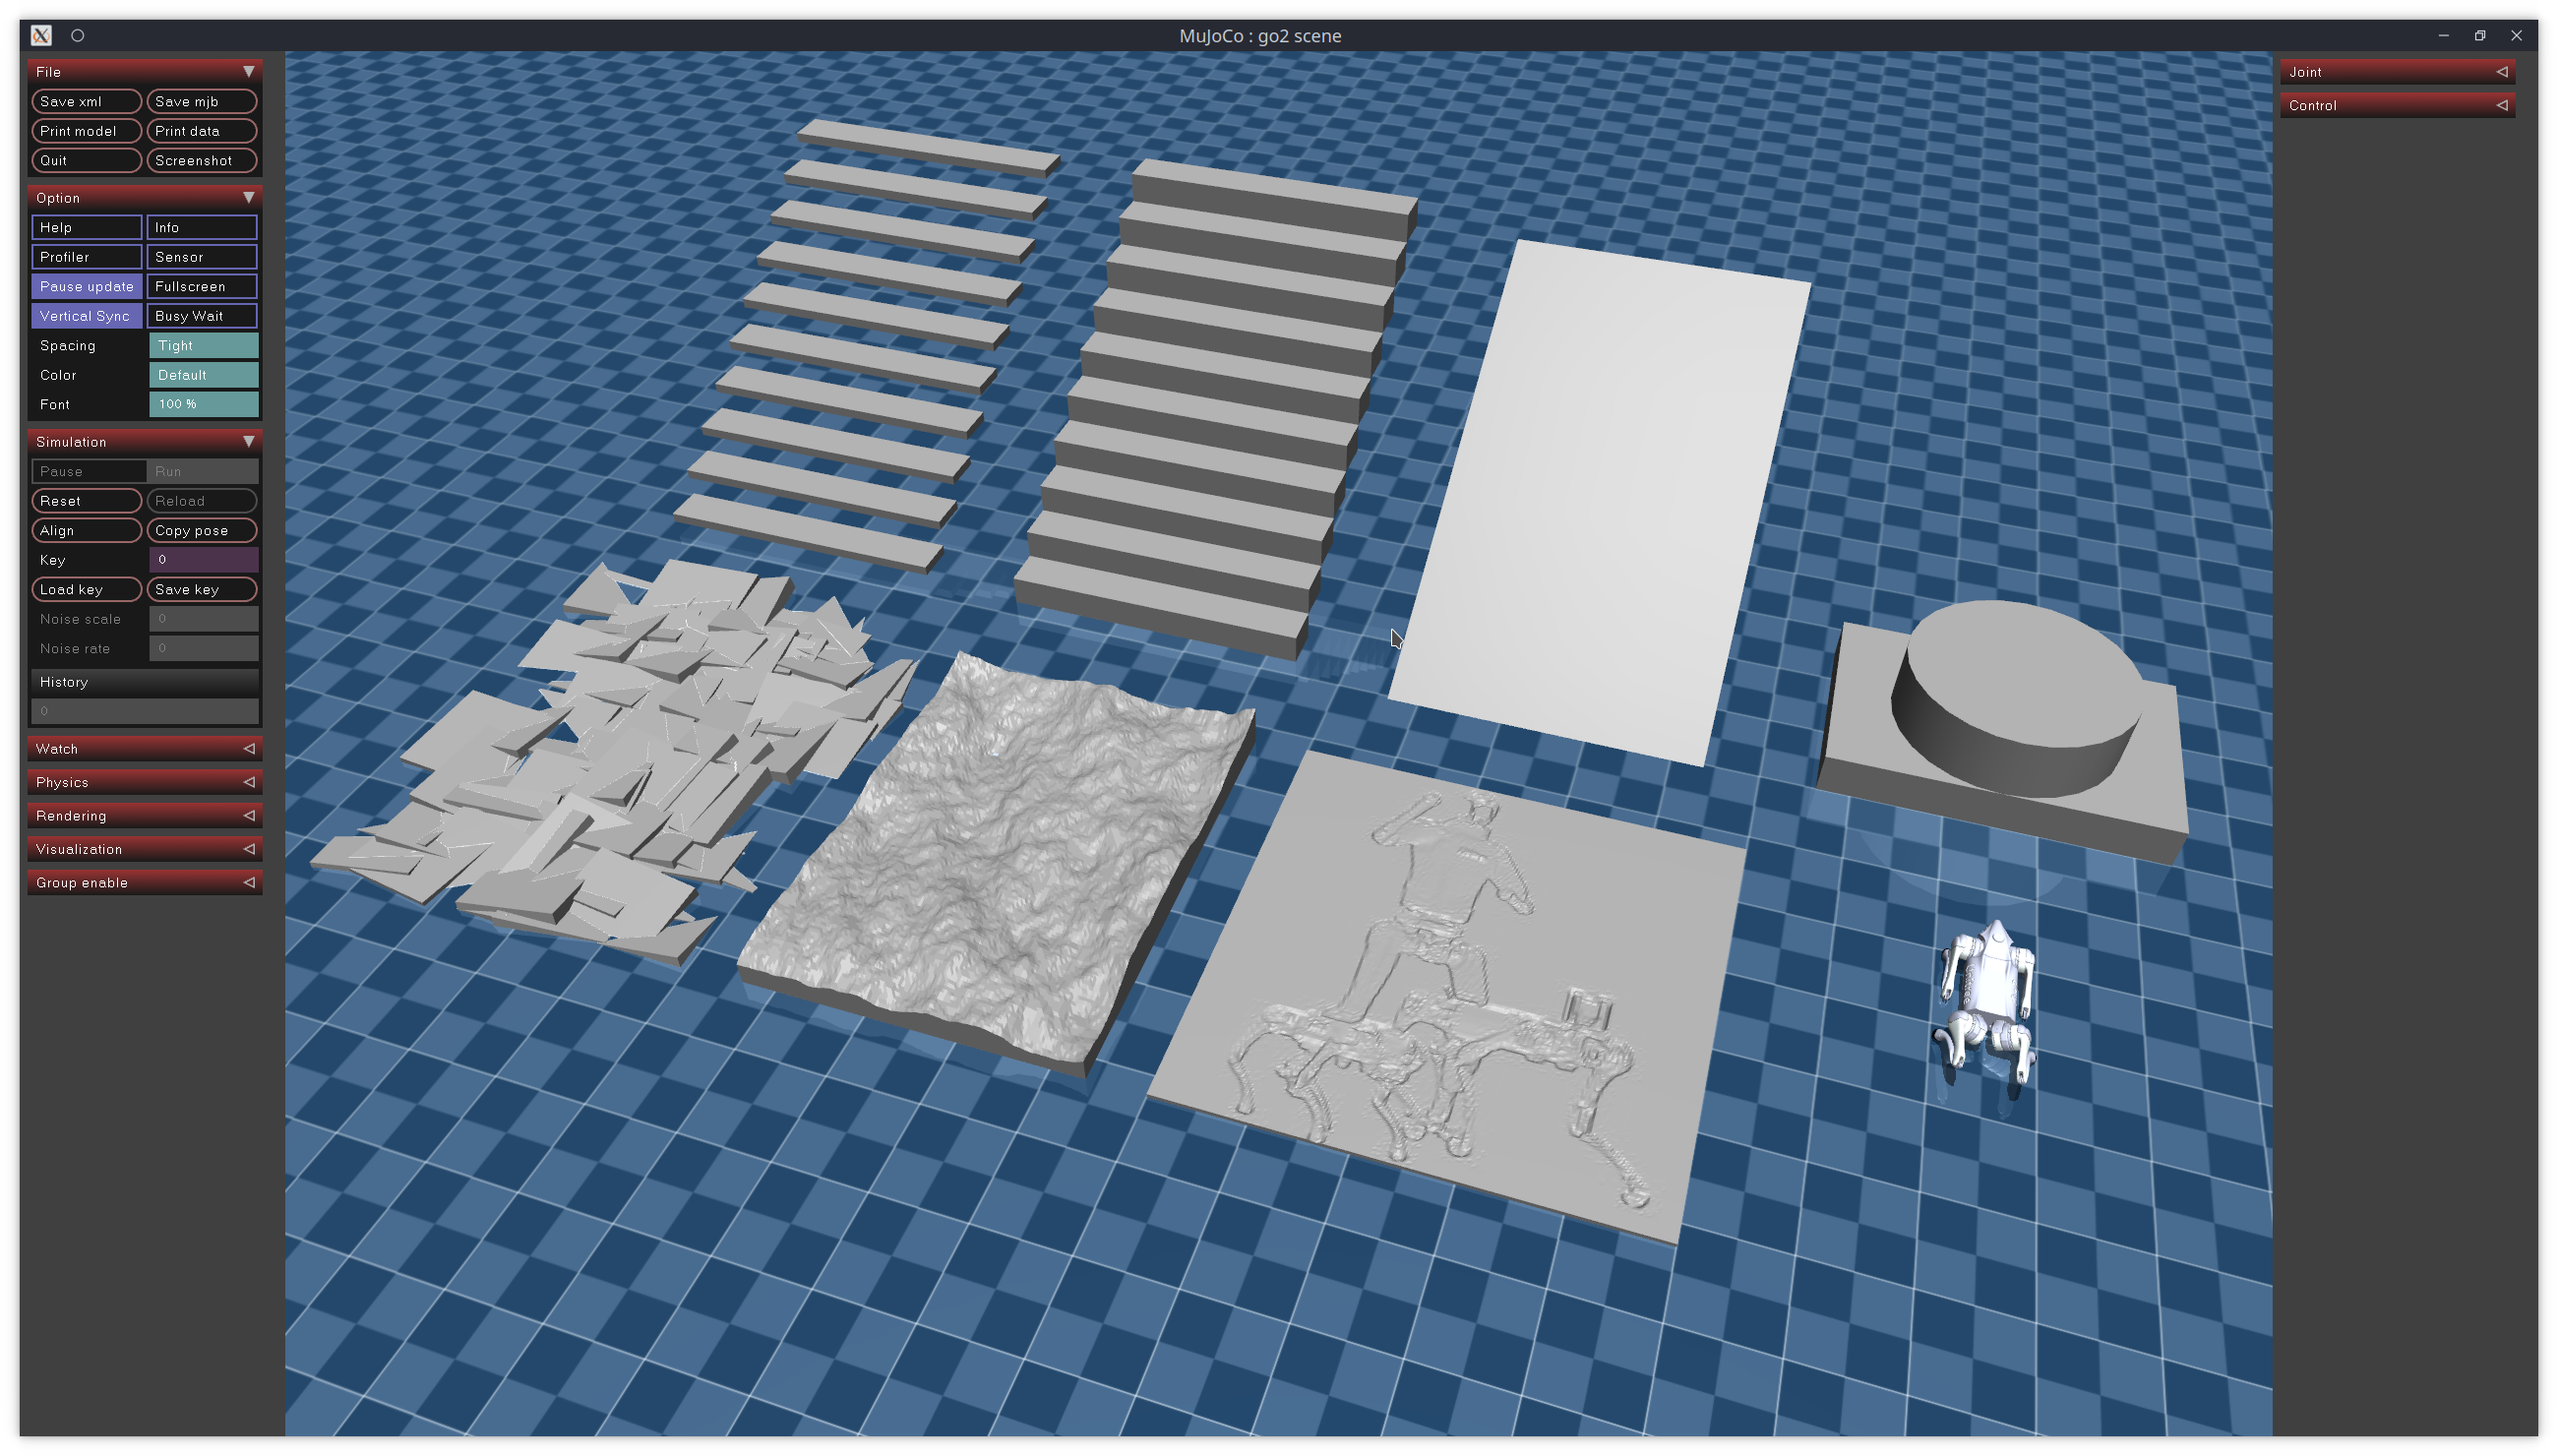
./unitree_mujoco -r go2 -s scene_terrain.xml
```
你应该能看到加载了 Go2 机器人的 mujoco 仿真器。
在一个新终端中运行:
```
./test
```
程序将输出机器人在仿真器中的姿态和位置信息,并且机器人的每个电机将持续输出 1Nm 的扭矩。
**注意:** 测试程序发送的是 unitree_go 消息。如果你想测试 G1 机器人,则需要修改程序以使用 unitree_hg 消息。
## Python 仿真器 (simulate_python)
### 1. 依赖项
#### unitree_sdk2_python
```
cd ~
sudo apt install python3-pip
git clone https://github.com/unitreerobotics/unitree_sdk2_python.git
cd unitree_sdk2_python
pip3 install -e .
```
如果在安装过程中遇到错误:
```
Could not locate cyclonedds. Try to set CYCLONEDDS_HOME or CMAKE_PREFIX_PATH
```
请参考:https://github.com/unitreerobotics/unitree_sdk2_python
#### mujoco-python
```
pip3 install mujoco
```
#### joystick
```
pip3 install pygame
```
### 2. 测试
```
cd ./simulate_python
python3 ./unitree_mujoco.py
```
你应该能看到加载了 Go2 机器人的 mujoco 仿真器。
在一个新终端中运行:
```
python3 ./test/test_unitree_sdk2.py
```
程序将输出机器人在仿真器中的姿态和位置信息,并且机器人的每个电机将持续输出 1Nm 的扭矩。
**注意:** 测试程序发送的是 unitree_go 消息。如果你想测试 G1 机器人,则需要修改程序以使用 unitree_hg 消息。
# 使用
## 1. 仿真配置
### C++ 仿真器
C++ 仿真器的配置文件位于 `/simulate/config.yaml`:
```
# 模拟器加载的机器人名称
# "go2", "b2", "b2w", "h1"
robot: "go2"
# 机器人仿真场景文件
# 例如,对于 go2,它指的是 /unitree_robots/go2/ 文件夹中的 scene.xml 文件
robot_scene: "scene.xml"
# DDS domain id,建议与真实机器人区分开(真实机器人上默认为 0)
domain_id: 1
use_joystick: 1 # Simulate Unitree WirelessController using a gamepad
joystick_type: "xbox" # support "xbox" and "switch" gamepad layout
joystick_device: "/dev/input/js0" # Device path
joystick_bits: 16 # Some game controllers may only have 8-bit accuracy
# 网络接口名称,对于仿真,建议使用本地环回 "lo"
interface: "lo"
# 是否输出机器人 link、joint、sensor 信息,1 为输出
print_scene_information: 1
# 是否使用 virtual tape,1 为启用
# 主要用于模拟 H1 机器人初始化的悬挂过程
enable_elastic_band: 0 # For H1
```
### Python 仿真器
Python 仿真器的配置文件位于 `/simulate_python/config.py`:
```
# 模拟器加载的机器人名称
# "go2", "b2", "b2w", "h1"
ROBOT = "go2"
# 机器人仿真场景文件
ROBOT_SCENE = "../unitree_robots/" + ROBOT + "/scene.xml" # Robot scene
# DDS domain id,建议与真实机器人区分开(真实机器人上默认为 0)
DOMAIN_ID = 1 # Domain id
# 网络接口名称,对于仿真,建议使用本地环回 "lo"
INTERFACE = "lo" # Interface
# 是否输出机器人 link、joint、sensor 信息,True 为输出
PRINT_SCENE_INFORMATION = True
USE_JOYSTICK = 1 # Simulate Unitree WirelessController using a gamepad
JOYSTICK_TYPE = "xbox" # support "xbox" and "switch" gamepad layout
JOYSTICK_DEVICE = 0 # Joystick number
# 是否使用 virtual tape,1 为启用
# 主要用于模拟 H1 机器人初始化的悬挂过程
ENABLE_ELASTIC_BAND = False
# 仿真时间步长(单位:s)
# 为了保证仿真的可靠性,它需要大于 viewer.sync() 渲染一次所需的时间
SIMULATE_DT = 0.003
# 可视化界面运行时间步长,0.02 对应于 50fps/s
VIEWER_DT = 0.02
```
### Joystick
仿真器将使用 Xbox 或 Switch 游戏手柄来模拟机器人的无线控制器。无线控制器的按键和摇杆信息将通过 "rt/wireless_controller" 话题发布。当没有游戏手柄时,需要将 `config.yaml/config.py` 中的 `use_joystick/USE_JOYSTICK` 设置为 0。如果你的游戏手柄不是 Xbox 或 Switch 布局,你可以在源代码中修改它(按键和摇杆 ID 可以使用 `jstest` 确定):
在 `simulate/src/unitree_sdk2_bridge/unitree_sdk2_bridge.cc` 中:
```
if (js_type == "xbox")
{
js_id_.axis["LX"] = 0; // Left stick axis x
js_id_.axis["LY"] = 1; // Left stick axis y
js_id_.axis["RX"] = 3; // Right stick axis x
js_id_.axis["RY"] = 4; // Right stick axis y
js_id_.axis["LT"] = 2; // Left trigger
js_id_.axis["RT"] = 5; // Right trigger
js_id_.axis["DX"] = 6; // Directional pad x
js_id_.axis["DY"] = 7; // Directional pad y
js_id_.button["X"] = 2;
js_id_.button["Y"] = 3;
js_id_.button["B"] = 1;
js_id_.button["A"] = 0;
js_id_.button["LB"] = 4;
js_id_.button["RB"] = 5;
js_id_.button["SELECT"] = 6;
js_id_.button["START"] = 7;
}
```
在 `simulate_python/unitree_sdk2_bridge.py` 中:
```
if js_type == "xbox":
self.axis_id = {
"LX": 0, # Left stick axis x
"LY": 1, # Left stick axis y
"RX": 3, # Right stick axis x
"RY": 4, # Right stick axis y
"LT": 2, # Left trigger
"RT": 5, # Right trigger
"DX": 6, # Directional pad x
"DY": 7, # Directional pad y
}
self.button_id = {
"X": 2,
"Y": 3,
"B": 1,
"A": 0,
"LB": 4,
"RB": 5,
"SELECT": 6,
"START": 7,
}
```
### 人形机器人弹性带
考虑到人形机器人不适合在地面上启动,我们设计了虚拟弹性带来模拟人形机器人的升降。设置 `enable_elastic_mand/ENABLE_ELSTIC_BAND=1` 可以启用虚拟弹性带。加载机器人后,按 '9' 激活或释放绑带,按 '7' 降低机器人,按 '8' 升起机器人。
## 2. 地形生成工具
我们提供了一个用于在 mujoco 仿真器中参数化创建简单地形的工具,包括楼梯、粗糙地面和高度图。该程序位于 `terrain_tool` 文件夹中。具体的使用说明请参考 `terrain_tool` 文件夹中的 README 文件。
## 3. Sim to Real
`example` 文件夹包含使用不同接口使 Go2 机器人先站立然后躺下的简单示例。这些示例演示了如何使用 Unitree 提供的接口实现从仿真到现实的过渡。以下是每个文件夹名称的说明:
- `cpp`:基于 C++,使用 `unitree_sdk2` 接口
- `python`:基于 Python,使用 `unitree_sdk2_python` 接口
- `ros2`:基于 ROS2,使用 `unitree_ros2` 接口
### unitree_sdk2
1. 编译
```
cd example/cpp
mkdir build && cd build
cmake ..
make -j4
```
2. 运行:
```
./stand_go2 # Control the robot in the simulation (make sure the Go2 simulation scene has been loaded)
./stand_go2 enp3s0 # Control the physical robot, where enp3s0 is the name of the network card connected to the robot
```
3. Sim to Real
```
if (argc < 2)
{
// If no network card is input, use the simulated domain id and the local network card
ChannelFactory::Instance()->Init(1, "lo");
}
else
{
// Otherwise, use the specified network card
ChannelFactory::Instance()->Init(0, argv[1]);
}
```
### unitree_sdk2_python
1. 运行
```
python3 ./stand_go2.py # Control the robot in the simulation (make sure the Go2 simulation scene has been loaded)
python3 ./stand_go2.py enp3s0 # Control the physical robot, where enp3s0 is the name of the network card connected to the robot
```
2. Sim to Real
```
if len(sys.argv) < 2:
// If no network card is input, use the simulated domain id and the local network card
ChannelFactoryInitialize(1, "lo")
else:
// Otherwise, use the specified network card
ChannelFactoryInitialize(0, sys.argv[1])
```
### unitree_ros2
1. 编译
首先,请确保 unitree_ros2 环境已正确配置,详见 [unitree_ros2](https://github.com/unitreerobotics/unitree_ros2)。
```
source ~/unitree_ros2/setup.sh
cd example/ros2
colcon build
```
2. 运行仿真
```
source ~/unitree_ros2/setup_local.sh # Use the local network card
export ROS_DOMAIN_ID=1 # Modify the domain id to match the simulation
./install/stand_go2/bin/stand_go2 # Run
```
3. 运行真实机器人
```
source ~/unitree_ros2/setup.sh # Use the network card connected to the robot
export ROS_DOMAIN_ID=0 # Use the default domain id
./install/stand_go2/bin/stand_go2 # Run
```
标签:C++, IMU状态, MJCF, MuJoCo, Python, ROS2, Sim-to-Real, Unitree, Unitree SDK2, 人形机器人, 低层控制, 四足机器人, 地形生成工具, 宇树科技, 强化学习, 数据擦除, 无后门, 机器人仿真, 机器人开发框架, 机器人控制, 物理仿真, 电机控制, 虚实迁移, 运动控制, 逆向工具