MetaMask/metamask-extension
GitHub: MetaMask/metamask-extension
一款浏览器扩展形式的以太坊加密钱包,让用户安全地管理区块链资产并无缝交互各类去中心化应用。
Stars: 13180 | Forks: 5561
# MetaMask 浏览器扩展
您可以在[我们的官方网站](https://metamask.io/)上找到最新版本的 MetaMask。如需使用 MetaMask 的帮助,请访问我们的[用户支持网站](https://support.metamask.io/)。
如需[一般问题解答](https://community.metamask.io/c/learn/26)、[功能请求](https://community.metamask.io/c/feature-requests-ideas/13)或[开发者疑问](https://community.metamask.io/c/developer-questions/11),请访问我们的[社区论坛](https://community.metamask.io/)。
MetaMask 支持 Firefox、Google Chrome 和基于 Chromium 的浏览器。我们建议使用最新可用的浏览器版本。
要了解如何开发兼容 MetaMask 的应用程序,请访问我们的[开发者文档](https://docs.metamask.io/)。
要了解如何为 MetaMask 代码库做贡献,请访问我们的[贡献者文档](https://github.com/MetaMask/contributor-docs)。
要了解如何为 MetaMask 扩展项目本身做贡献,请访问我们的[扩展文档](https://github.com/MetaMask/metamask-extension/tree/main/docs)。
## GitHub Codespaces 快速入门
作为在本地计算机上构建的替代方案,现在有一个新选项,可以使用 GitHub Codespaces 在 5 分钟内启动并运行开发环境。请注意,这里有一个[有限的每月免费额度](https://docs.github.com/en/billing/managing-billing-for-github-codespaces/about-billing-for-github-codespaces),超过该额度后 GitHub 将开始向您收费。
_注意:您的运行时间消耗和存储空间使用都会产生费用_
[](https://codespaces.new/MetaMask/metamask-extension?quickstart=1)
1. 首先点击上方的按钮
2. 将打开一个新的浏览器选项卡,其中包含 Visual Studio Code 的远程版本(加载需要几分钟时间)
3. 一个带有 noVNC 的“Simple Browser”将在浏览器内打开——点击 Connect
- 可选步骤:
- 点击 Simple Browser 选项卡右上角的按钮,以在自己的选项卡中打开 noVNC 窗口
- 打开左侧的 noVNC 侧边栏,点击齿轮图标,将 Scaling Mode 更改为 Remote Resizing
4. 首次启动时请多等待约 20 秒,以便脚本执行完成
5. 右键点击 noVNC 桌面,以启动已预装 MetaMask 的 Chrome 或 Firefox
6. 修改一些代码,然后运行 `yarn start` 以在开发模式下进行构建
7. 一两分钟后,构建将完成,您可以在 noVNC 桌面中看到您的更改
### 降低 Codespaces 使用量的小提示
- 您的运行时间消耗和存储空间使用都会产生费用
- Codespaces 在不活动 30 分钟后会暂停,并在不活动 30 天后自动删除
- 您可以在此处管理您的 Codespaces:https://github.com/codespaces
- 您可能希望在 30 分钟超时之前手动暂停它们
- 如果您有几个闲置的 Codespaces 挂起了几天,您的存储配额可能会很快耗尽。您应该删除那些不再计划使用的 Codespaces,从长远来看,最好只保留 1 到 2 个。您也可以重复使用旧的 Codespaces 并切换分支,而不是创建新的并删除旧的。
### 在 Fork 上使用 Codespaces
如果您不是 MetaMask 内部开发者,或者正在 fork 上进行开发,默认的 Infura key 将处于免费计划中,并且每秒的请求量非常有限。如果您想使用自己的 Infura key,请按照[在本地计算机上构建](#building-on-your-local-machine)部分中的 `.metamaskrc` 和 `INFURA_PROJECT_ID` 说明进行操作。
## 在本地计算机上构建
- 安装 [Node.js](https://nodejs.org) 版本 24
- 如果您正在使用 [nvm](https://github.com/nvm-sh/nvm#installing-and-updating)(推荐),运行 `nvm use` 会自动为您选择正确的 node 版本。
- 在 metamask-extension 项目中执行 `corepack enable` 命令以启用 Corepack。Corepack 是 Node.js 默认内置的一个实用程序。它使用项目 package.json 文件中 `packageManager` 属性指定的版本,在基于每个项目的基础上管理 Yarn。请注意,最新发布的 [Yarn](https://yarnpkg.com/getting-started/install) 并不打算全局安装或通过 npm 安装。
- 运行 `cp .metamaskrc{.dist,}`,在根目录中复制 `.metamaskrc.dist` 并将其重命名为 `.metamaskrc`。
- 将 `INFURA_PROJECT_ID` 的值替换为您自己的个人 [Infura API Key](https://docs.infura.io/networks/ethereum/how-to/secure-a-project/project-id)。
- 如果您没有 Infura 账户,可以在 [Infura 网站](https://app.infura.io/register)上免费创建一个。
- 如果要调试 MetaMetrics,您需要为 `SEGMENT_WRITE_KEY` 添加一个值,即 [Segment write key](https://segment.com/docs/connections/find-writekey/),请参阅[在 MetaMask 上开发 - Segment](./development/README.md#segment)。
- 如果要调试未处理的异常,您需要为 `SENTRY_DSN` 添加一个值,即 [Sentry Dsn](https://docs.sentry.io/product/sentry-basics/dsn-explainer/),请参阅[在 MetaMask 上开发 - Sentry](./development/README.md#sentry)。
- (可选)将 `PASSWORD` 的值替换为您的开发钱包密码,以避免每次打开应用时都要输入。
- 如果在开发时使用了远程 feature flag,并且您想在构建过程中覆盖这些 flag,您可以在项目的根目录添加一个 `.manifest-overrides.json` 文件,并在 `.metamaskrc` 中将 `MANIFEST_OVERRIDES=.manifest-overrides.json` 设置为该文件的路径。
此文件用于为扩展的 `manifest.json` 构建文件添加 flag。您也可以在构建后修改 `dist/browser` 文件夹中已构建版本的 `manifest.json` 里的 `_flags.remoteFeatureFlags` 来调整 flag(当您再次构建时,这些更改将被覆盖)。
覆盖远程 feature flag 的示例可以是:
{
"_flags": {
"remoteFeatureFlags": { "testBooleanFlag": false }
}
}
- 运行 `yarn install` 以安装依赖项。
- 使用 `yarn dist`(适用于基于 Chromium 的浏览器)或 `yarn dist:mv2`(适用于 Firefox)将项目构建到 `./dist/` 文件夹中
- 或者,要创建开发构建,您可以改为运行 `yarn start`(适用于基于 Chromium 的浏览器)或 `yarn start:mv2`(适用于 Firefox)
- 未压缩的构建可以在 `/dist` 中找到,压缩后的构建一旦完成便可在 `/builds` 中找到。
- 有关构建系统的使用信息,请参阅[构建系统 readme](./development/build/README.md)。
- 按照以下说明验证您的本地构建是否正常运行:
- [如何将自定义构建添加到 Chrome](./docs/add-to-chrome.md)
- [如何将自定义构建添加到 Firefox](./docs/add-to-firefox.md)
## AI Agent 技能 (`yarn skills`)
AI 编码 agent(Cursor、Claude Code、Codex)会从 [MetaMask/skills](https://github.com/MetaMask/skills) 仓库中获取共享技能,还可以选择从 [Consensys/skills](https://github.com/Consensys/skills) 获取可选的私有覆盖层。根据 [ADR #57](https://github.com/MetaMask/decisions/pull/162),此内容**不在此处提交** —— `yarn skills` 会按需将其同步到 `.cursor/`、`.claude/` 和 `.agents/` 下的本地独有路径中。
零配置设置:
```
yarn install # refreshes the MetaMask/skills cache via the shared `@metamask/skills` CLI
yarn skills # syncs all default skills through the `metamask-skills sync` command
```
可选的本地配置:
```
cp .skills.local.example .skills.local
# 编辑 .skills.local 以设置 SKILLS_DOMAINS 或覆盖 skills 源路径
yarn skills --select # interactively pick domains
SKILLS_DOMAINS=perps,testing yarn skills # one-off domain override
```
使用 `.skills.local` 进行持久的技能配置。支持使用具有相同名称的 Shell 环境变量进行一次性或 CI 覆盖,且环境变量具有优先权。
跳过 `yarn skills` 也没问题——它只会影响 agent 工具,不会影响应用的构建。该仓库使用共享的 `@metamask/skills` 包,因此同步/缓存行为在各个 MetaMask 包中保持一致。若想在安装/设置期间选择加入尽力而为的重新生成,请在您的 shell 或 `.skills.local` 中设置 `SKILLS_AUTO_UPDATE=1`。
## Git Hooks
为了在提交代码之前从我们的共享代码质量适应度函数中获得快速反馈,您可以使用 Husky 安装我们的 git hooks。
`$ yarn githooks:install`
您可以在我们的[测试文档](./docs/testing.md#fitness-functions-measuring-progress-in-code-quality-and-preventing-regressions-using-custom-git-hooks)中了解更多信息。
如果您使用的是 VS Code,并且由于“command not found”错误而无法从源代码管理侧边栏进行提交,请尝试 [Husky 文档](https://typicode.github.io/husky/troubleshooting.html#command-not-found)中的这些步骤。
### 开发构建
要启动开发构建(例如带有日志记录和文件监视功能),请运行 `yarn start`。
#### 带有钱包状态的开发构建
您可以通过将 `TEST_SSRP='<在此处插入 SRP>'` 和 `PASSWORD='<在此处插入钱包密码>'` 添加到 `.metamaskrc` 文件中,来启动带有预加载钱包状态的开发构建。然后您有以下选项:
1. 通过运行 `yarn start:with-state`,使用默认的 fixture flag 启动钱包。
2. 通过运行 `yarn start:with-state --help` 查看可用的 fixture flag 列表。
3. 通过运行 `yarn start:with-state --FIXTURE_NAME=VALUE`,使用自定义 fixture flag 启动钱包,例如 `yarn start:with-state --withAccounts=100`。您可以传递任意数量的 flag。其余的 fixture 将采用默认值。
#### 高级 Webpack 构建
`yarn start` 由 Webpack 提供支持。您也可以直接调用 `yarn webpack` 进行高级构建系统调试;有关更多信息,请参阅 [Webpack README](./development/webpack/README.md)。
目前不支持 `yarn start:lavamoat`,因为 Webpack 的 watch 模式不支持 LavaMoat。要进行类似生产环境的 LavaMoat 验证,请使用 `yarn webpack:lavamoat:build` 或 `yarn build:test:webpack`。
#### React 和 Redux DevTools
要使用 React 或 Redux DevTools,您首先需要在 `.metamaskrc` 中将 `METAMASK_REACT_REDUX_DEVTOOLS` 设置为 `true`。
要启动 [React DevTools](https://github.com/facebook/react-devtools),请在浏览器中安装开发构建后运行 `yarn devtools:react`。这将在单独的窗口中打开;无需浏览器扩展。
要启动 [Redux DevTools Extension](https://github.com/reduxjs/redux-devtools/tree/main/extension):
- 全局安装 `remotedev-server` 包(例如 `yarn global add remotedev-server`)
- 安装 Redux Devtools 扩展。
- 打开 Redux DevTools 扩展,并在 Remote DevTools Settings 中勾选“Use custom (local) server”复选框,使用默认的服务器配置(host 为 `localhost`,port 为 `8000`,不勾选安全连接复选框)。
然后在浏览器中安装开发构建后运行命令 `yarn devtools:redux`。这将使您能够使用 Redux DevTools 扩展来检查 MetaMask。
要创建开发构建并同时运行这两个工具,请运行 `yarn start:dev`。
#### 测试 Dapp
[此测试站点](https://metamask.github.io/test-dapp/)可用于执行不同的用户流程。
### 运行单元测试和 Lint
使用 `yarn test` 运行单元测试和 linter。如果仅运行单元测试,请运行 `yarn test:unit`。
您可以仅使用 `yarn lint` 运行 linter,并且可以使用 `yarn lint:fix` 自动修复某些 lint 问题。您还可以仅对本地更改运行这两个命令以节省时间,分别是 `yarn lint:changed` 和 `yarn lint:changed:fix`。
有关使用 Node.js 进行 Jest 调试的指南,请参阅 [docs/tests/jest.md](docs/tests/jest.md)。
### 运行 E2E 测试
我们的 e2e 测试套件可以在 Firefox 或 Chrome 上运行。以下是开始 e2e 测试的方法:
#### 准备测试构建
在运行 e2e 测试之前,确保您已运行 `yarn install` 以下载依赖项。接下来,您需要一个测试构建。您有 3 个选项:
1. 使用 `yarn download-builds --build-type test` 快速下载 Chrome 和 Firefox 的测试构建并将其解压到 `./dist/` 文件夹中。此方法快速且便捷,适用于标准测试。
2. 创建自定义的类生产环境 Webpack 测试构建。此命令允许您生成各种类型的测试构建,包括:
- `yarn build:test:webpack` 用于 main 构建
- `yarn build:test:flask:webpack` 用于 flask 构建
- `yarn build:test:webpack:mv2` 用于 mv2 构建
3. 启动带有实时更改的 Webpack 测试构建:`yarn start:test` 对于开发特别有用。它启动一个测试构建,该构建会在发生更改时自动重新编译应用程序代码。此选项非常适合迭代测试和开发。此命令还允许您生成各种类型的测试构建,包括:
- `yarn start:test` 用于 main 构建
- `yarn start:test:flask` 用于 flask 构建
- `yarn start:test:mv2` 用于 mv2 构建
注意:为了加快迭代速度,`yarn start:test` 命令已禁用 LavaMoat 和 Snow。若要进行类似生产环境的 LavaMoat 验证,请使用 `yarn build:test:webpack`。
运行测试
准备好测试构建后,选择用于 e2e 测试的浏览器:
- 对于 Firefox,运行 `yarn test:e2e:firefox`。
- 注意:如果您在 Linux 上将 Firefox 作为 snap 包运行,请确保启用相应的环境变量:`FIREFOX_SNAP=true yarn test:e2e:firefox`
- 对于 Chrome,运行 `yarn test:e2e:chrome`。
这些脚本支持用于调试的附加选项。使用 `--help` 查看所有可用选项。
#### 运行单个 e2e 测试
单个 e2e 测试可以通过 `yarn test:e2e:single test/e2e/tests/TEST_NAME.spec.js` 以及下方的选项来运行。
```
--browser Set the browser to be used; specify 'chrome', 'firefox', 'all'
or leave unset to run on 'all' by default.
[string] [default: 'all']
--debug Run tests in debug mode, logging each driver interaction
[boolean] [default: true]
--retries Set how many times the test should be retried upon failure.
[number] [default: 0]
--leave-running Leaves the browser running after a test fails, along with
anything else that the test used (the local node, the
test dapp, etc.) [boolean] [default: false]
--update-snapshot Update E2E test snapshots
[alias: -u] [boolean] [default: false]
```
例如,要使用 Chrome 运行 `account-details` 测试,带有调试日志并且在失败时保持浏览器打开,您可以使用:
`yarn test:e2e:single test/e2e/tests/account-menu/account-details.spec.js --browser=chrome --leave-running`
#### 使用 feature flag 运行 E2E 测试
测试中使用的 feature flag 分为两类:remote flag(从 client-config 获取的运行时值)和 build-time flag(在构建期间设置的编译时值)。请使用与 flag 类型匹配的工作流程。
##### Remote feature flag(运行时)
Remote flag 在运行时提供,通常应遵循 [Feature Flag Registry](./test/e2e/feature-flags/feature-flag-registry.ts) 中的生产默认值。您不需要为了更改测试的 remote flag 值而创建自定义构建。
使用以下测试时覆盖之一:
- **`withFixtures` 中的 `manifestFlags`** —— 最适合不依赖于其他 fixture 状态的、简单的、全测试范围的 flag 覆盖。
- **`FixtureBuilder.withRemoteFeatureFlags()`** —— 最适合当您需要 flag 更改与其他 fixture 状态进行交互时。注意:此方法仅在旧版 `FixtureBuilder` 上可用;即使对于新测试,也可以在需要时使用此构建器。
有关代码示例和详细指南,请参阅 contributor-docs 中的 [E2E 测试中的 Feature flag](https://github.com/MetaMask/contributor-docs/blob/main/docs/testing/e2e-testing.md#feature-flags-in-e2e-tests)。
##### Build-time feature flag(编译时)
Build-time flag 在运行测试之前设置,需要创建一个启用了该 flag 的测试构建。请在您本地的 `.metamaskrc` 文件中或作为环境变量前缀(例如 `MULTICHAIN=1 yarn build:test:webpack`)设置 flag,然后按照[准备测试构建](#preparing-a-test-build)中的步骤创建并运行构建。
#### Feature Flag Registry
[Feature Flag Registry](./test/e2e/feature-flags/feature-flag-registry.ts) 是 MetaMask Extension E2E 测试中使用的所有 remote feature flag 的唯一事实来源。每次提交 PR 时都会运行一个 [CI check](./.github/workflows/check-feature-flag-registry.yml),以验证更改文件中每个 remote flag 引用是否存在于注册表中。有关 remote feature flag 在 MetaMask 中工作原理的背景信息,请参阅 [Remote Feature Flags](https://github.com/MetaMask/contributor-docs/blob/main/docs/remote-feature-flags.md) 贡献者文档。
##### 注册表条目格式
`test/e2e/feature-flags/feature-flag-registry.ts` 中的每个条目都具有以下结构:
```
myNewFlag: {
name: 'myNewFlag',
type: FeatureFlagType.Remote,
inProd: true,
productionDefault: false,
status: FeatureFlagStatus.Active,
},
```
| 字段 | 描述 |
| ------------------- | --------------------------------------------------------------------------------------- |
| `name` | 必须与对象键完全匹配 |
| `type` | `FeatureFlagType.Remote`(在运行时获取)或 `FeatureFlagType.Build`(编译时) |
| `inProd` | 该 flag 当前是否存在于生产环境的 client-config API 中 |
| `productionDefault` | 任何有效的 JSON 值(`Json` 类型 —— 布尔值、数字、字符串、null、对象或数组) |
| `status` | `FeatureFlagStatus.Active` 或 `FeatureFlagStatus.Deprecated` |
##### 将 flag 添加到注册表
有关创建 remote feature flag 的完整流程(LaunchDarkly 设置、代码集成),请参阅 [Remote Feature Flags](https://github.com/MetaMask/contributor-docs/blob/main/docs/remote-feature-flags.md) 贡献者文档。一旦 flag 存在,将其注册以进行 E2E 测试:
1. 从 [client-config API](https://client-config.api.cx.metamask.io/v1/flags?client=extension&distribution=main&environment=prod) 中查找该 flag 当前的生产值。如果该 flag 尚未投入生产,请设置 `inProd: false` 并将 `productionDefault` 设置为预期的默认值。
2. 按字母顺序将条目添加到 `test/e2e/feature-flags/feature-flag-registry.ts`。
3. 如果您通过常量访问该 flag(例如 `remoteFeatureFlags[MY_CONSTANT]`),还需将常量映射添加到 [`.github/scripts/known-feature-flag-constants.mts`](./.github/scripts/known-feature-flag-constants.mts),以便 CI check 能够解析它。
##### 在 E2E 测试中覆盖 flag
要测试与生产默认值不同的 flag 行为,请参阅上面的 [Remote feature flag(运行时)](#remote-feature-flags-runtime) 中的覆盖示例。
注册表模块还导出了可用于测试和工具的辅助函数(例如 `getProductionRemoteFlagApiResponse()`、`getProductionRemoteFlagDefaults()`)。有关详细信息,请参阅 [feature-flag-registry.ts](./test/e2e/feature-flags/feature-flag-registry.ts) 中的 JSDoc。
##### 移除 flag
当 remote feature flag 完全推出或不再需要时:
1. 从应用程序代码(`app/`、`ui/`、`shared/`)中删除对该 flag 的所有引用。
2. 从注册表中删除该条目,或者如果您想暂时跟踪它,请将其 `status` 更改为 `FeatureFlagStatus.Deprecated`。
3. CI check 会在删除了已注册 flag 的最后一个代码库引用的 PR 上发布警告,提醒您清理注册表。
#### 运行 E2E 性能基准测试
E2E 性能基准测试用于衡量流程时间(新手引导、发送、兑换、资产详情等),并且可以在本地或 CI 中运行。使用 `yarn test:e2e:benchmark` 以及 `--preset ` 或文件路径。有关预设和选项,请参阅 [test/e2e/benchmarks/flows/README.md](test/e2e/benchmarks/flows/README.md)。
#### 运行特定构建类型的 e2e 测试
不同的构建类型有不同的 e2e 测试集。要运行它们,请查看 `package.json` 文件。您会发现:
```
"test:e2e:chrome:snaps": "SELENIUM_BROWSER=chrome node test/e2e/run-all.js --snaps",
"test:e2e:firefox": "SELENIUM_BROWSER=firefox node test/e2e/run-all.js",
```
### 在 GitHub Actions 上更快地测试和迭代
在 GitHub Actions 上运行完整的工作流可能需要 30 分钟或更长时间,但是有一些方法可以加快速度以实现更快的迭代
- **自动构建重用** —— 当 PR 中影响构建的源文件与之前的运行(在同一分支或基础分支上)相比没有发生更改时,CI 会自动检测到。当找到匹配项时,它会重用现有的构建产物而不是重新构建,从而为 browserify 构建节省约 12 分钟,为 webpack 构建节省约 4 分钟。这会透明地发生,无需您采取任何行动。
- 最后一次提交消息中的 `[force-builds]`,或 PR 上的 `force-builds` 标签 —— 即使 CI 本会重用之前的产物,也强制进行全新的构建。当您在仅修改了非代码文件(CI 配置、文档等)之后需要验证构建是否正常工作时,或者如果自动系统出错,这会非常有用。
- 最后一次提交消息中的 `[skip-builds]`,或 PR 上的 `skip-builds` 标签 —— 重用最近一次运行的构建,**不**验证源哈希。这是迭代测试或非构建更改的最快选项,但它**会阻止合并** —— 您必须移除标签/标签并再次推送,PR 才能进入合并队列。
- **自动跳过 E2E** —— 当 PR 的更改不需要 E2E 测试时(例如,仅文档、仅 CI 或使用重用构建的仅测试更改),CI 会自动跳过 E2E 测试。您可以在两个方向上覆盖此行为:
- 最后一次提交消息中的 `[skip-e2e]`,或 PR 上的 `skip-e2e` 标签 —— 无论更改了什么文件,都强制跳过 E2E 测试。
- 最后一次提交消息中的 `[force-e2e]`,或 PR 上的 `force-e2e` 标签 —— 即使 CI 本会跳过,也强制运行 E2E 测试。对于修改了 E2E 工作流文件的仅 CI 的 PR 非常有用。
- 最后一次提交消息中的 `[skip-unit]` _(命令暂不可用,即将推出)_ - 跳过单元测试套件
- 作为分支名称的 `trigger-ci-*` - 这允许您在不将 CI 工作流附加到 PR 的情况下运行它。如果您需要测试一些您知道永远不会被合并的东西,这很有用。完成后请自行清理并删除该分支。
### 更改依赖项
每当您更改依赖项(在 `package.json` 或 `yarn.lock` 中添加、删除或更新)时,都必须保持各种文件处于最新状态。
- `yarn.lock`:
- 在更改后再次运行 `yarn`,以确保 `yarn.lock` 已正确更新。
- 运行 `yarn lint:lockfile:dedupe:fix` 从 lockfile 中删除重复的依赖项。
- `package.json` 中的 `allow-scripts` 配置
- 运行 `yarn allow-scripts auto` 以自动更新 `allow-scripts` 配置。此配置确定是否允许运行包的 install/postinstall 脚本。审查每个新包以确定是否需要运行 install 脚本,并在必要时进行测试。
- 不幸的是,`yarn allow-scripts auto` 在不同平台上的表现会不一致。macOS 和 Windows 用户可能会看到与可选依赖项无关的多余更改。
- LavaMoat 策略文件
- 如果您是 MetaMask 团队成员并且您的 PR 位于仓库分支上,您可以使用 bot 命令 `@metamaskbot update-policies` 来要求 MetaMask bot 自动为您更新策略。
- 如果您的 PR 来自 fork,您可以请求 MetaMask 团队成员帮助更新策略文件。
- 手动更新说明:_简而言之_ 就是运行 `yarn lavamoat:auto` 来更新这些文件,但细节中可能隐藏着麻烦:
- 有两套 LavaMoat 策略文件:
- 生产环境 LavaMoat 策略文件(`lavamoat/browserify/*/policy.json`),使用 `yarn lavamoat:webapp:auto` 重新生成。添加 `--help` 查看用法。
- 每当 webapp 的生产环境依赖项发生更改时,都应重新生成这些文件。
- 构建系统 LavaMoat 策略文件(`lavamoat/build-system/policy.json`),使用 `yarn lavamoat:build:auto` 重新生成。
- 每当构建系统本身使用的依赖项发生更改时,都应重新生成此文件。
- 每当您重新生成策略文件时,请审查更改以确定授予每个包的访问权限是否合适。
- 不幸的是,`yarn lavamoat:auto` 在不同平台上的表现会不一致。
macOS 和 Windows 用户可能会看到与可选依赖项无关的多余更改。
- 如果您在重新生成策略文件后仍然遇到策略失败问题,请尝试在全新安装后重新生成策略:
- `rm -rf node_modules/ && yarn && yarn lavamoat:auto`
- 请记住,任何类型的动态导入或动态使用全局变量都可能逃脱 LavaMoat 的静态分析。
如果您遇到任何问题,请参阅 LavaMoat 文档或寻求帮助。
- Attributions 文件
- 如果您是 MetaMask 团队成员并且您的 PR 位于仓库分支上,您可以使用 bot 命令 `@metamaskbot update-attributions` 来要求 MetaMask bot 自动为您更新 attributions 文件。
- 手动更新:运行 `yarn attributions:generate`。
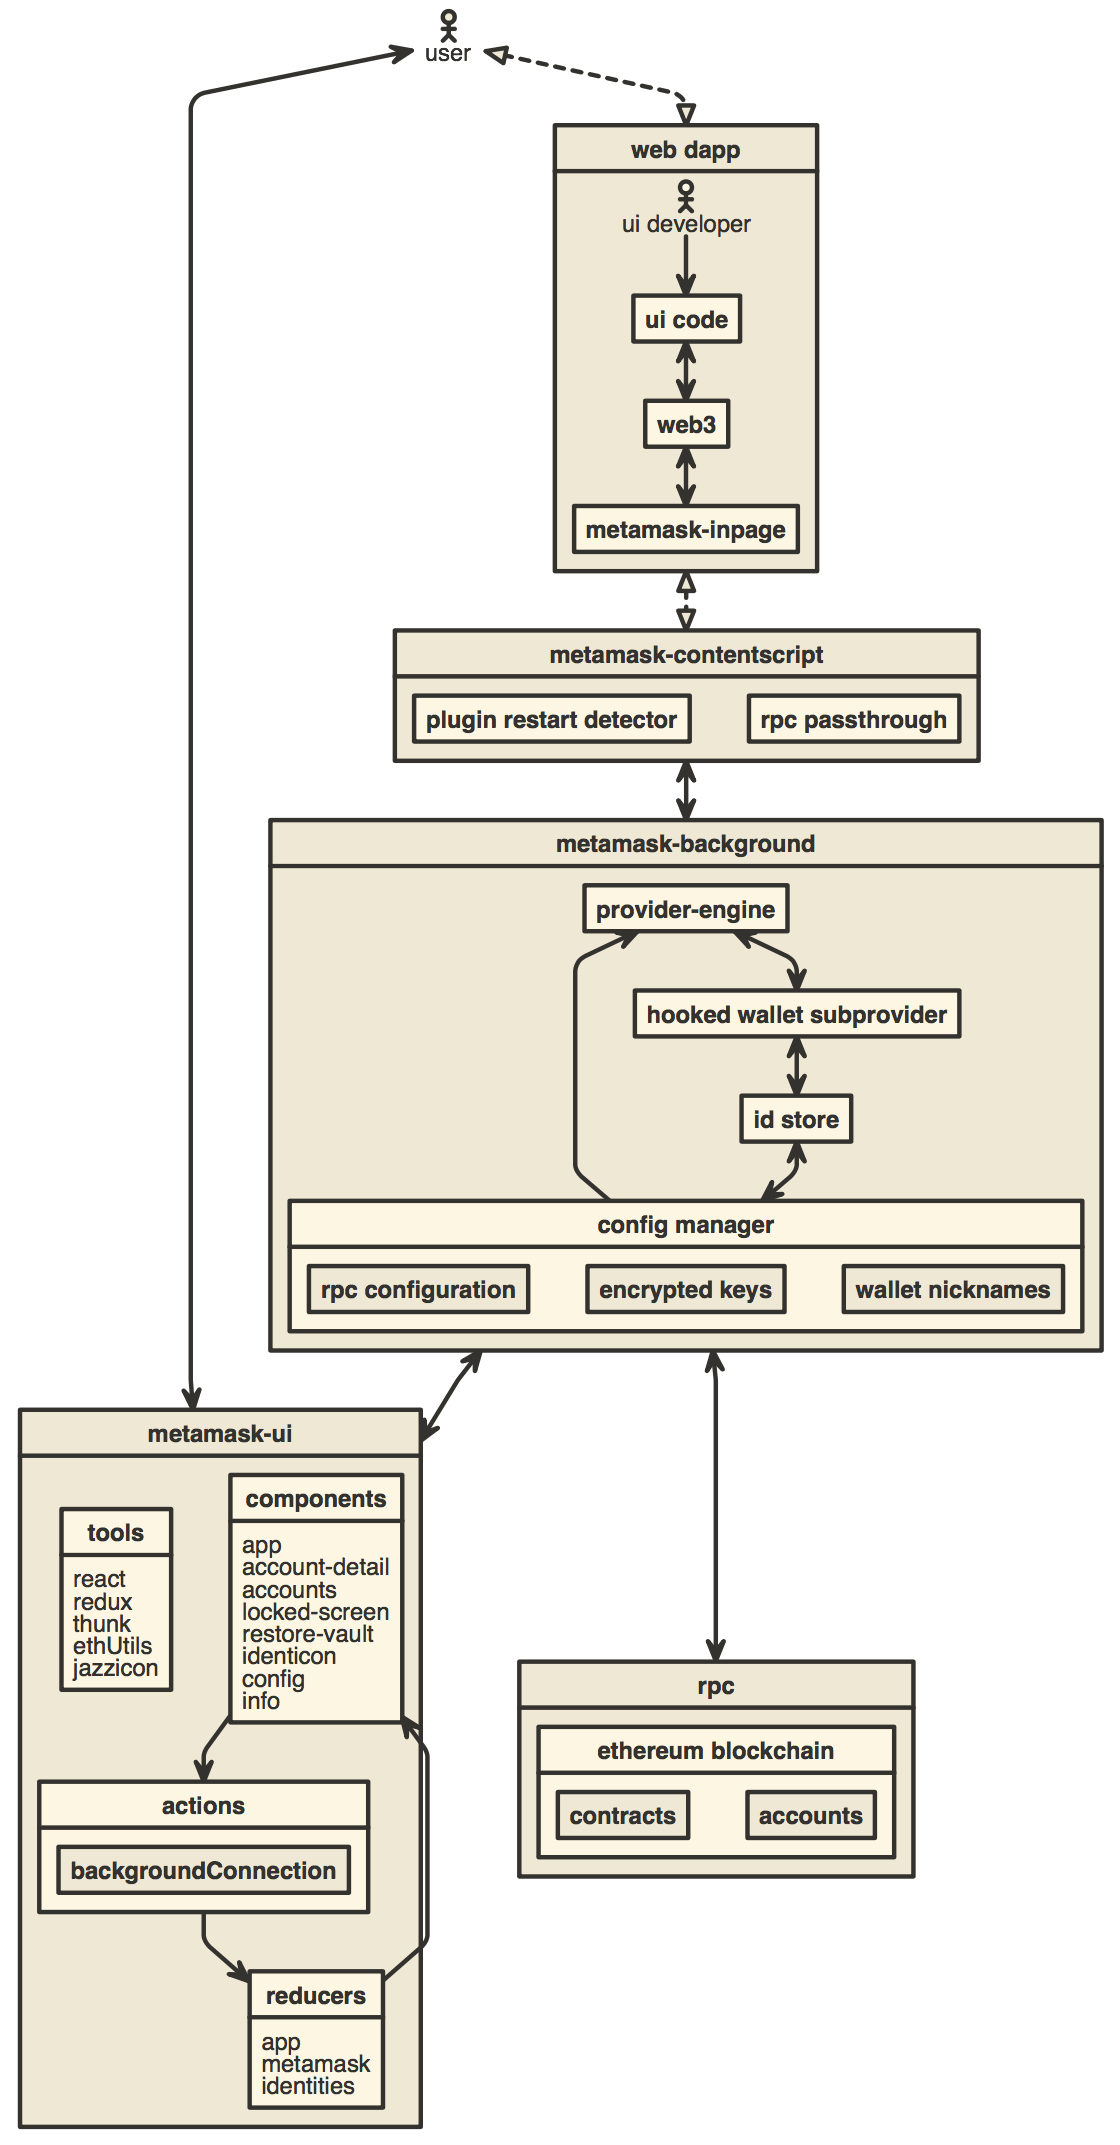
## 架构
- [截至 2022 年夏季的 controller 层级和依赖项可视化图表。](https://gist.github.com/rekmarks/8dba6306695dcd44967cce4b6a94ae33)
- [整个代码库的可视化图表。](https://mango-dune-07a8b7110.1.azurestaticapps.net/?repo=metamask%2Fmetamask-extension)
[][1]
## 其他文档
- [如何为 MetaMask 添加新的翻译](./docs/translating-guide.md)
- [发布指南](./docs/publishing.md)
- [如何使用 TREZOR 模拟器](./docs/trezor-emulator.md)
- [在 MetaMask 上开发](./development/README.md)
- [如何生成本仓库开发历史的可视化图表](./development/gource-viz.sh)
- [如何添加新的确认](./docs/confirmations.md)
- [浏览器支持指南](./docs/browser-support.md)
## Dapp 开发者资源
- [使用 MetaMask Snaps 扩展 MetaMask 的功能。](https://docs.metamask.io/snaps/)
- [提示您的用户添加并切换到新的网络。](https://docs.metamask.io/wallet/how-to/add-network/)
- [更改您的 dapp 连接到 MetaMask 时显示的徽标。](https://docs.metamask.io/wallet/how-to/display/icon/)
标签:MITM代理, Web3, 以太坊, 内核驱动漏洞利用, 区块链, 去中心化应用, 响应拦截, 数字钱包, 数据可视化, 浏览器扩展, 自动化攻击