aristocratos/btop
GitHub: aristocratos/btop
一款使用 C++ 编写的高效跨平台系统资源监控器,旨在通过华丽的 TUI 界面提供包括 CPU、内存、磁盘、网络及 GPU 在内的实时性能统计。
Stars: 32863 | Forks: 1054
# 


[](https://paypal.me/aristocratos)
[](https://github.com/sponsors/aristocratos)
[](https://ko-fi.com/aristocratos)
[](https://snapcraft.io/btop)
[](https://github.com/aristocratos/btop/actions/workflows/continuous-build-linux.yml)
[](https://github.com/aristocratos/btop/actions/workflows/continuous-build-macos.yml)
[](https://github.com/aristocratos/btop/actions/workflows/continuous-build-freebsd.yml)
[](https://github.com/aristocratos/btop/actions/workflows/continuous-build-netbsd.yml)
[](https://github.com/aristocratos/btop/actions/workflows/continuous-build-openbsd.yml)
## 目录
* [新闻](#news)
* [文档](#documents)
* [描述](#description)
* [功能](#features)
* [主题](#themes)
* [支持与资助](#support-and-funding)
* [前置条件](#prerequisites)(遇到问题请先阅读此节!)
* [截图](#screenshots)
* [快捷键](#help-menu)
* [安装 Linux/macOS](#installation)
* [编译 Linux](#compilation-linux)
* [编译 macOS](#compilation-macos-osx)
* [编译 FreeBSD](#compilation-freebsd)
* [编译 NetBSD](#compilation-netbsd)
* [编译 OpenBSD](#compilation-openbsd)
* [测试](#testing)
* [GPU 兼容性](#gpu-compatibility)
* [安装 snap](#installing-the-snap)
* [配置](#configurability)
* [许可证](#license)
## 新闻
##### 2025年12月4日
由于 AI 生成/辅助的 PR 数量日益增加,CONTRIBUTING.md 中已添加以下准则:
* 绝大部分代码由 AI 生成的提交必须标记为 [AI generated]。
* 作者似乎不理解所生成代码的“氛围编程(Vibe coded)”类 PR 将被驳回。
##### 2024年9月22日
Btop 发布 v1.4.0
新增 Intel GPU 支持,请注意仅能监控 GPU 利用率、功耗和时钟频率。感谢 [@bjia56](https://github.com/bjia56) 的贡献。
新增 NetBSD 支持。感谢 [@fraggerfox](https://github.com/fraggerfox) 的贡献。
关于新功能、错误修复和新主题的详细列表,请参阅 [CHANGELOG.md](CHANGELOG.md) 和最新的 [发布说明](https://github.com/aristocratos/btop/releases/latest)。
##### 2024年1月7日
Btop 发布 v1.3.0
这是一次重大更新,为 Linux 添加了 GPU 支持,并增加了对 OpenBSD 平台的支持。非常感谢 [@romner-set](https://github.com/romner-set)(GPU 支持)和 [@joske](https://github.com/joske)(OpenBSD 支持)的贡献。
此外还有大量的错误修复和小改动,详细的列表和致谢请参阅 [CHANGELOG.md](CHANGELOG.md) 和最新的 [发布说明](https://github.com/aristocratos/btop/releases/latest)。
关于 GPU 支持的更多信息,请参阅下面的新闻条目。
##### 2023年11月25日
Linux 平台新增 GPU 监控功能!
从 git main 分支编译以试用此功能。
使用按键 `5`、`6`、`7` 和 `0` 来显示/隐藏 gpu 监控框。`5` = GPU 1,`6` = GPU 2,以此类推。
GPU 统计数据/图表也可以显示在“CPU 框”中(信息不如专用框详细),请参阅 CPU 选项菜单获取信息和配置。
请注意,发布页面提供的二进制文件(发布时)以及持续构建版本默认不会启用 GPU 支持。
因为 GPU 支持依赖于动态 GPU 库的加载,所以在静态链接时 GPU 支持将无法工作。
关于如何编译带有 GPU 监控支持的版本,请参阅 [编译 Linux](#compilation-linux)。
非常感谢 [@romner-set](https://github.com/romner-set),他编写了绝大部分 GPU 支持的实现代码。
版本号升级至 1.3 的重大更新即将推出。
##### 2022年8月28日
[](https://github.com/aristocratos/btop4win)
btop4win 的首个版本已在 https://github.com/aristocratos/btop4win 发布
## 文档
**[CHANGELOG.md](CHANGELOG.md)**
**[CONTRIBUTING.md](CONTRIBUTING.md)**
**[CODE_OF_CONDUCT.md](CODE_OF_CONDUCT.md)**
## 描述
资源监控器,显示处理器、内存、磁盘、网络和进程的使用情况和统计数据。
这是 [bashtop](https://github.com/aristocratos/bashtop) 和 [bpytop](https://github.com/aristocratos/bpytop) 的 C++ 版本和延续。
## 功能
* 易于使用,采用受游戏启发的菜单系统。
* 完整的鼠标支持:所有带有高亮按键的按钮都可点击,鼠标滚动在进程列表和菜单框中均有效。
* 快速响应的 UI,支持 UP、DOWN 键选择进程。
* 显示所选进程详细统计数据的功能。
* 过滤进程的能力。
* 轻松切换排序选项。
* 进程树视图。
* 向选定的进程发送任何信号。
* 暂停进程列表。
* 用于更改所有配置文件选项的 UI 菜单。
* 网络使用率的自动缩放图表。
* 显示磁盘的 IO 活动和速度。
* 电池电量计
* 图表的可选符号。
* 自定义预设
* 以及更多...
## 主题
Btop++ 使用与 bpytop 和 bashtop 相同的主题文件(bashtop 主题中缺少某些颜色值)。
可用主题请参阅 [themes](https://github.com/aristocratos/btop/tree/main/themes) 文件夹。
Btop 按以下顺序搜索系统主题目录:
* `../share/btop/themes`(此路径相对于 btop 可执行文件)
* `/usr/local/share/btop/themes`
* `/usr/share/btop/themes`
第一个存在且非空的目录将被用作系统主题目录。
用户主题目录取决于设置了哪些环境变量:
* 如果设置了 `$XDG_CONFIG_HOME`,用户主题目录为 `$XDG_CONFIG_HOME/btop/themes`
* 否则,如果设置了 `$HOME`,用户主题目录为 `$HOME/.config/btop/themes`
* 否则,用户主题目录为 `~/.config/btop/themes`
`make install` 命令会将默认主题放置在 `[$PREFIX or /usr/local]/share/btop/themes` 中。
用户创建的主题应放置在用户主题目录中。
使用 `--themes-dir` 命令行选项指定自定义主题目录。
指定后,此目录优先于默认搜索路径。
如果你想贡献新主题,请告诉我。
新的进程列表暂停和进程跟踪功能引入了一些新的主题属性。
这些属性仍需添加到所有现有主题中(默认主题除外)。
进程列表横幅属性:
* proc_pause_bg:列表暂停时横幅的背景色。
* proc_follow_bg:进程跟踪功能激活时横幅的背景色。
* proc_banner_bg:进程跟踪功能激活**且**列表暂停时横幅的背景色。
* proc_banner_fg:横幅的前景(文本)颜色
进程跟踪属性:
* followed_bg:列表中被跟踪进程的背景色。
* followed_fg:列表中被跟踪进程的前景色。
## 前置条件
为了获得最佳体验,请在支持以下功能的终端中运行:
* 24位真彩色([查看支持真彩色的终端列表](https://github.com/termstandard/colors))
* 当在选项中将 "truecolor" 设置为 False 或使用 "-lc/--low-color" 参数时,支持通过 24 位到 256 色的转换来使用 256 色终端。
* 如果检测到真实的 tty 设备,将激活 16 色 TTY 模式。可以使用 "-t/--tty" 参数强制开启。
* 宽字符(在基于 Web 的终端中有时会有问题)
此外还需要 UTF8 区域设置以及包含以下内容的字体:
* Unicode Block “Braille Patterns” U+2800 - U+28FF(TTY 模式下或将图表设置为类型:block 或 tty 时不需要。)
* Unicode Block “Geometric Shapes” U+25A0 - U+25FF
* Unicode Block "Box Drawing" and "Block Elements" U+2500 - U+259F
### **可选依赖项(GPU 监控所需)(仅限 Linux)**
GPU 监控还需要使用 GPU 支持(`GPU_SUPPORT=true` 标志)构建的 btop 二进制文件。
有关编译 GPU 支持的更多信息,请参阅 [GPU 兼容性](#gpu-compatibility) 部分。
* **NVIDIA**
如果你有 NVIDIA GPU,必须使用官方 NVIDIA 驱动程序,闭源和开源驱动均已验证可用。
此外,你还必须安装 nvidia-ml 动态库,该库通常包含在你发行版的驱动程序包中。
* **AMD**
如果你有 AMD GPU,则需要 `rocm_smi_lib`,该库可能没有在你的发行版中打包。
* **INTEL**
如果从源代码编译,需要一个可工作的 C 编译器。
还需要用户有从 SYSFS 读取的权限。
可以通过 `make setcap`(推荐)或 `make setuid` 设置,或者使用 `sudo` 或等效命令运行 btop。
###注意(文本渲染问题)**
* 如果你在图表中的字符看起来不像截图中那样,这可能是你系统配置的后备字体不支持盲文字符的问题。
* 参见 [Terminess Powerline](https://github.com/ryanoasis/nerd-fonts/blob/master/patched-fonts/Terminus/TerminessNerdFontMono-Regular.ttf) 作为包含盲文符号的字体的示例。
* 参见 issue #100 中 @sgleizes [链接](https://github.com/aristocratos/bpytop/issues/100#issuecomment-684036827) 和 @XenHat [链接](https://github.com/aristocratos/bpytop/issues/100#issuecomment-691585587) 的评论以获取可能的解决方案。
* 如果文本未对齐且你使用的是 Konsole 或 Yakuake,关闭“双向文本渲染”是一个可能的修复方法。
* 字符相互重叠或文本/边框未对齐不是 btop 造成的错误,很可能是 fontconfig 或终端的问题,即构成图表的盲文字符未正确渲染。
* 如果上述修复方法对你无效,请向你使用的终端模拟器的创建者寻求解决这些问题的方法。
## 截图
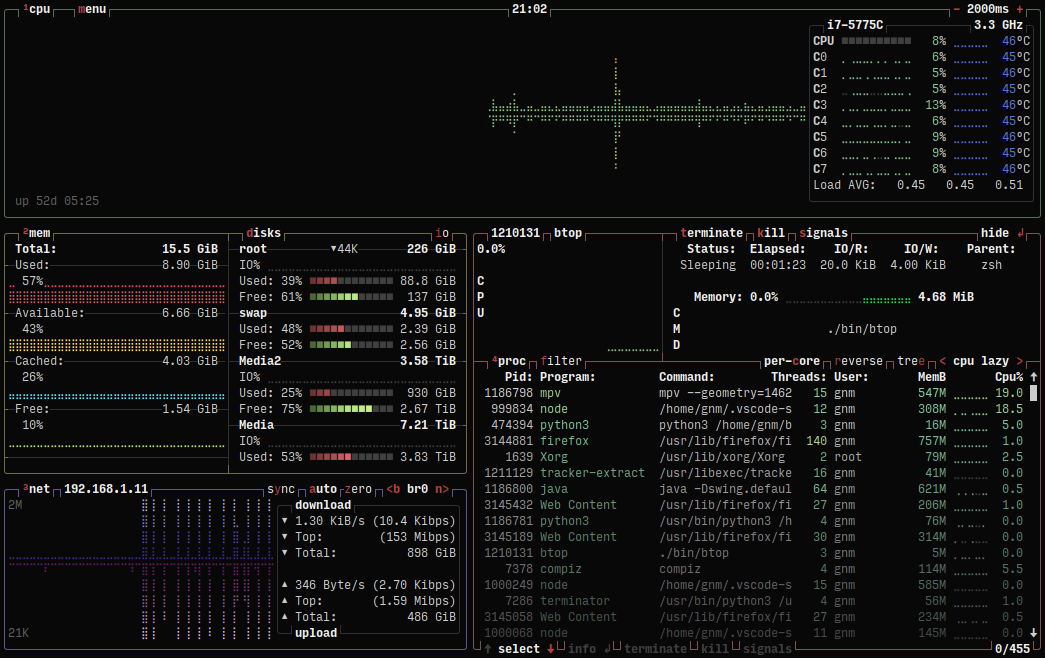
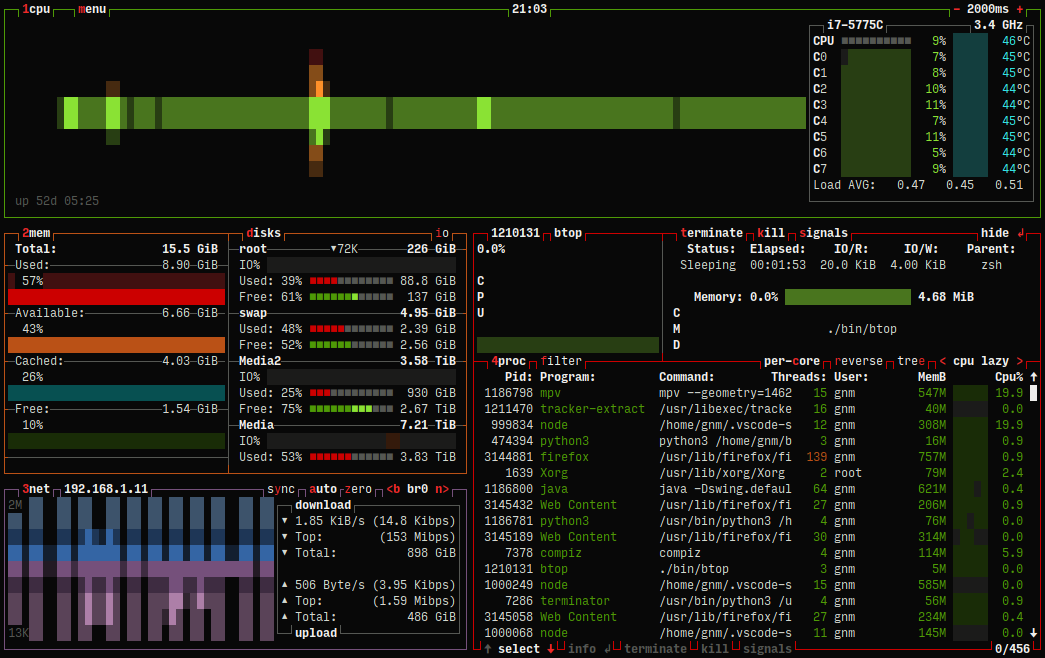
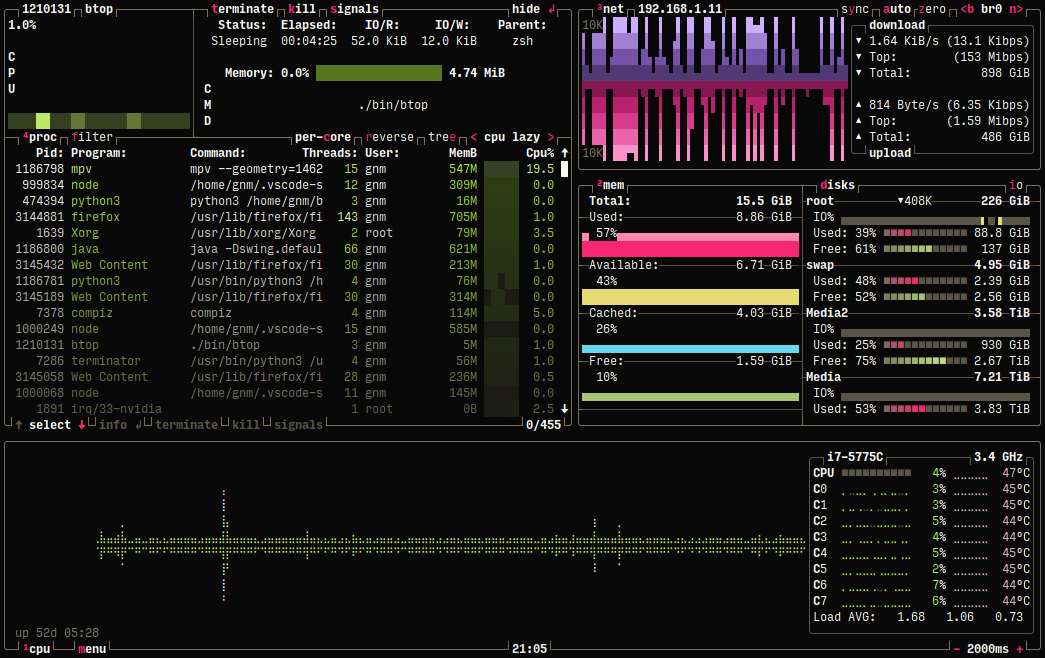
#### 主界面,显示所选进程的详细信息
#### TTY 模式下的主界面
#### 带有自定义选项的主界面
#### 主菜单
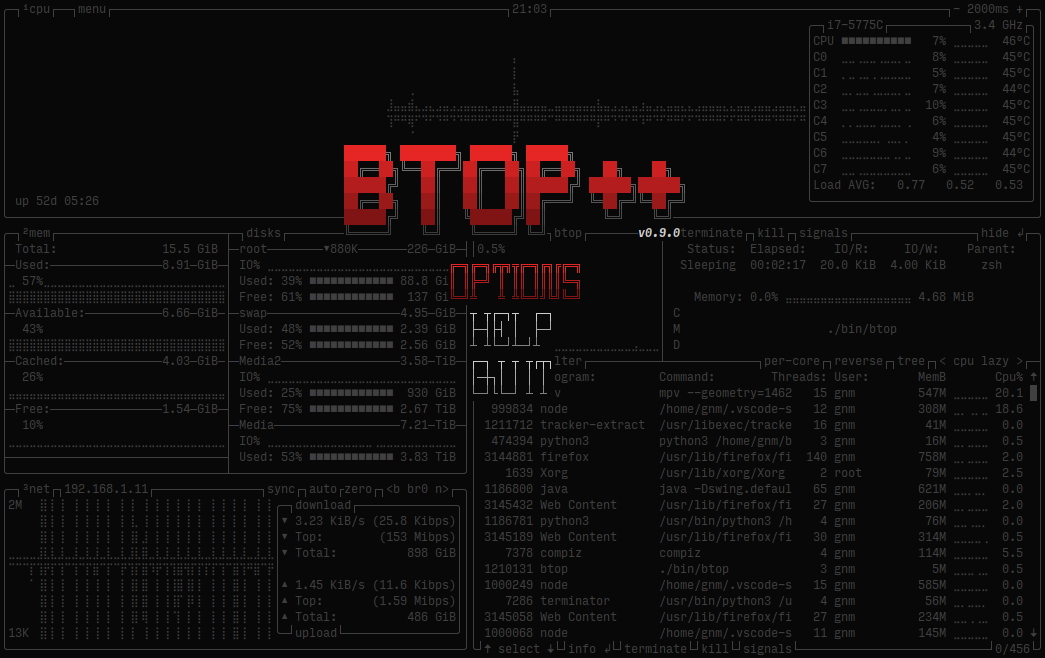
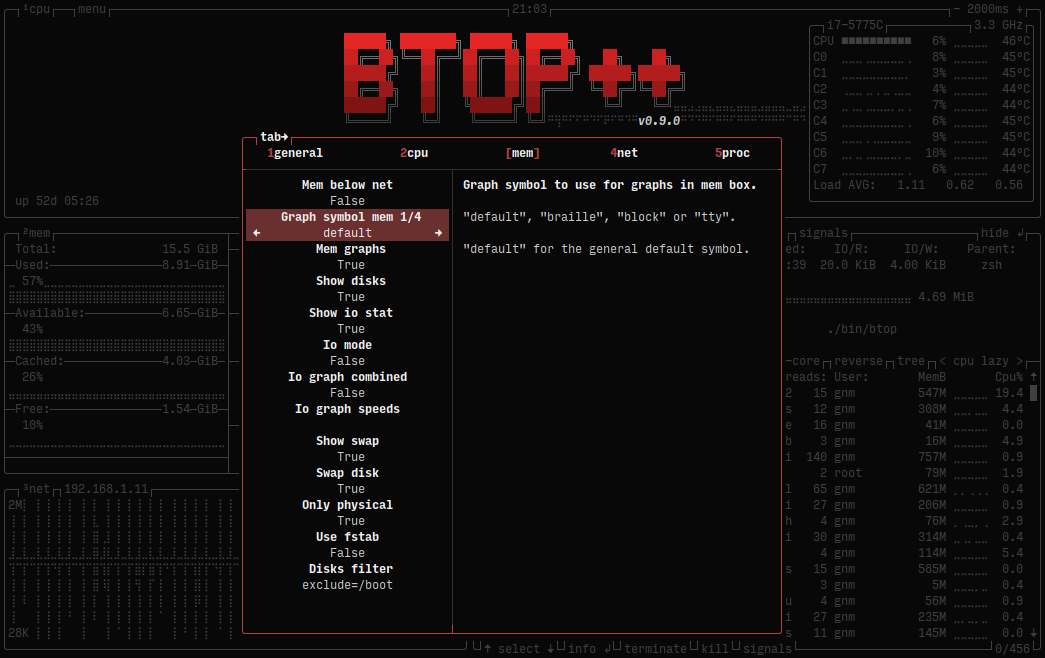
#### 选项菜单
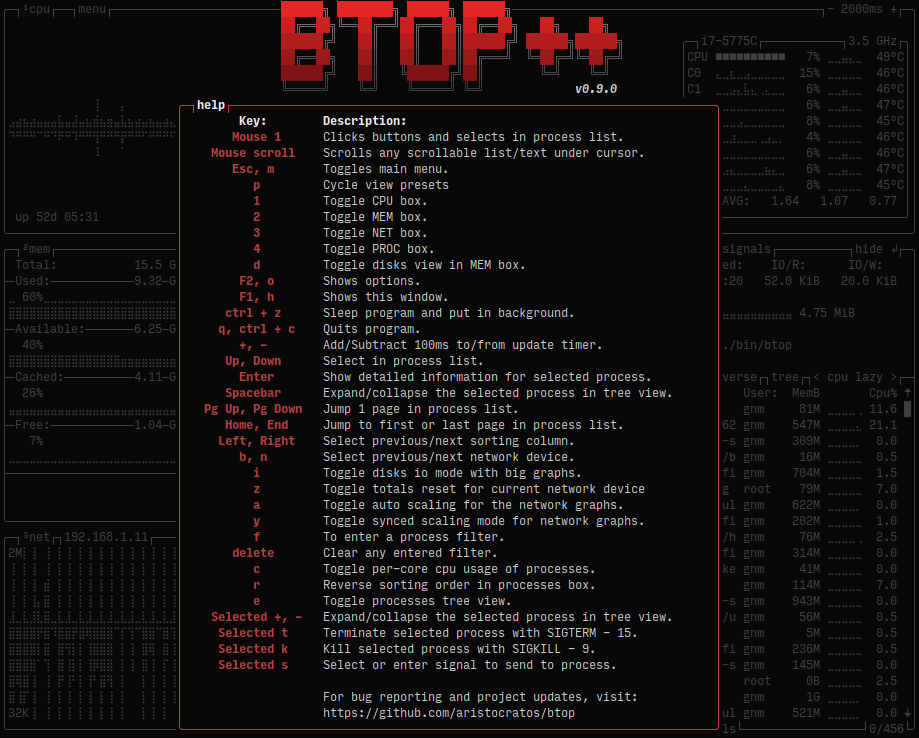
#### 帮助菜单
## 安装
**Linux 二进制文件使用 musl 静态编译,适用于内核版本 2.6.39 及更高版本**
1. **从 [最新版本](https://github.com/aristocratos/btop/releases/latest) 下载 btop-(VERSION)-(ARCH)-(PLATFORM).tbz 并解压到一个新文件夹**
**注意!64位 x86 系统请使用 x86_64,i486 和 i686 是32位的!**
2. **安装(从创建的文件夹中)**
* **运行:**
# 使用 "make install PREFIX=/target/dir" 设置目标目录,默认:/usr/local
# 仅在安装到非用户拥有的目录时使用 "sudo"
sudo make install
3. **(可选/Intel GPU 和 CPU 功耗监测所需)为 btop 设置扩展功能或 suid 位**
允许向任何进程发送信号而无需使用 `sudo` 启动,并可防止某些系统上的 /proc 读取权限问题。
Intel GPU 支持和 CPU 功耗监测需要此步骤。
* **运行:**
# 在 make install 之后运行,如果安装时使用了 PREFIX,此处也需使用相同的 PREFIX
sudo make setcap
* **或者**
# 在 make install 之后运行,如果安装时使用了 PREFIX,此处也需使用相同的 PREFIX
# 设置 SU_USER 和 SU_GROUP 以选择用户和组,默认为 root:root
sudo make setuid
* **卸载**
* **运行:**
sudo make uninstall
* **显示帮助**
make help
**二进制发布版(来自原生系统仓库)**
* **openSUSE**
* **Tumbleweed:**
sudo zypper in btop
* 对于所有其他版本,请参阅 [openSUSE Software: btop](https://software.opensuse.org/package/btop)
* **Fedora**
sudo dnf install btop
* **RHEL/Rocky/AlmaLinux 8+**
sudo dnf install epel-release
sudo dnf install btop
* **FreeBSD**
pkg install btop
* **NetBSD**
pkg_add btop
**Homebrew 上的二进制发布版(macOS (x86_64 & ARM64) / Linux (x86_64))**
* **[Homebrew](https://formulae.brew.sh/formula/btop)**
brew install btop
## 编译 Linux
至少需要 GCC 14 或 Clang 19。
Makefile 还需要 GNU `coreutils` 和 `sed`(任何现代发行版应该都已安装)。
### GPU 兼容性
只要你拥有正确的驱动程序和库,Btop++ 在 Linux x86_64 上开箱即支持 Nvidia、AMD GPU 和 Intel IGPUs。
Nvidia 或 AMD 的 GPU 支持在静态链接 glibc(或 musl 等)时将无法工作!
对于 x86_64 Linux,标志 `GPU_SUPPORT` 会自动设置为 `true`,要手动禁用 GPU 支持,请将该标志设置为 false,例如:
`make GPU_SUPPORT=false`(或使用 CMake 时 `cmake -DBTOP_GPU=false`)
* **NVIDIA**
必须使用官方 NVIDIA 驱动程序,闭源和[开源](https://github.com/NVIDIA/open-gpu-kernel-modules)驱动均已验证可用。
此外,你还必须安装 `nvidia-ml` 动态库,该库通常包含在你发行版的驱动程序包中。
* **AMD**
AMDGPU 数据使用 [ROCm SMI](https://github.com/rocm/rocm_smi_lib) 库查询,该库可能没有在你的发行版中打包。如果你的发行版没有提供该包,可以使用 `RSMI_STATIC=true` make 标志将 btop++ 静态链接到 ROCm SMI。
此标志期望 ROCm SMI 源代码位于 `lib/rocm_smi_lib`,如果不存在编译将失败。最新测试版本为 5.6.x,可通过以下命令获取:
git clone https://github.com/rocm/rocm_smi_lib.git --depth 1 -b rocm-5.6.x lib/rocm_smi_lib


[](https://paypal.me/aristocratos)
[](https://github.com/sponsors/aristocratos)
[](https://ko-fi.com/aristocratos)
[](https://snapcraft.io/btop)
[](https://github.com/aristocratos/btop/actions/workflows/continuous-build-linux.yml)
[](https://github.com/aristocratos/btop/actions/workflows/continuous-build-macos.yml)
[](https://github.com/aristocratos/btop/actions/workflows/continuous-build-freebsd.yml)
[](https://github.com/aristocratos/btop/actions/workflows/continuous-build-netbsd.yml)
[](https://github.com/aristocratos/btop/actions/workflows/continuous-build-openbsd.yml)
## 目录
* [新闻](#news)
* [文档](#documents)
* [描述](#description)
* [功能](#features)
* [主题](#themes)
* [支持与资助](#support-and-funding)
* [前置条件](#prerequisites)(遇到问题请先阅读此节!)
* [截图](#screenshots)
* [快捷键](#help-menu)
* [安装 Linux/macOS](#installation)
* [编译 Linux](#compilation-linux)
* [编译 macOS](#compilation-macos-osx)
* [编译 FreeBSD](#compilation-freebsd)
* [编译 NetBSD](#compilation-netbsd)
* [编译 OpenBSD](#compilation-openbsd)
* [测试](#testing)
* [GPU 兼容性](#gpu-compatibility)
* [安装 snap](#installing-the-snap)
* [配置](#configurability)
* [许可证](#license)
## 新闻
##### 2025年12月4日
由于 AI 生成/辅助的 PR 数量日益增加,CONTRIBUTING.md 中已添加以下准则:
* 绝大部分代码由 AI 生成的提交必须标记为 [AI generated]。
* 作者似乎不理解所生成代码的“氛围编程(Vibe coded)”类 PR 将被驳回。
##### 2024年9月22日
Btop 发布 v1.4.0
新增 Intel GPU 支持,请注意仅能监控 GPU 利用率、功耗和时钟频率。感谢 [@bjia56](https://github.com/bjia56) 的贡献。
新增 NetBSD 支持。感谢 [@fraggerfox](https://github.com/fraggerfox) 的贡献。
关于新功能、错误修复和新主题的详细列表,请参阅 [CHANGELOG.md](CHANGELOG.md) 和最新的 [发布说明](https://github.com/aristocratos/btop/releases/latest)。
##### 2024年1月7日
Btop 发布 v1.3.0
这是一次重大更新,为 Linux 添加了 GPU 支持,并增加了对 OpenBSD 平台的支持。非常感谢 [@romner-set](https://github.com/romner-set)(GPU 支持)和 [@joske](https://github.com/joske)(OpenBSD 支持)的贡献。
此外还有大量的错误修复和小改动,详细的列表和致谢请参阅 [CHANGELOG.md](CHANGELOG.md) 和最新的 [发布说明](https://github.com/aristocratos/btop/releases/latest)。
关于 GPU 支持的更多信息,请参阅下面的新闻条目。
##### 2023年11月25日
Linux 平台新增 GPU 监控功能!
从 git main 分支编译以试用此功能。
使用按键 `5`、`6`、`7` 和 `0` 来显示/隐藏 gpu 监控框。`5` = GPU 1,`6` = GPU 2,以此类推。
GPU 统计数据/图表也可以显示在“CPU 框”中(信息不如专用框详细),请参阅 CPU 选项菜单获取信息和配置。
请注意,发布页面提供的二进制文件(发布时)以及持续构建版本默认不会启用 GPU 支持。
因为 GPU 支持依赖于动态 GPU 库的加载,所以在静态链接时 GPU 支持将无法工作。
关于如何编译带有 GPU 监控支持的版本,请参阅 [编译 Linux](#compilation-linux)。
非常感谢 [@romner-set](https://github.com/romner-set),他编写了绝大部分 GPU 支持的实现代码。
版本号升级至 1.3 的重大更新即将推出。
##### 2022年8月28日
[](https://github.com/aristocratos/btop4win)
btop4win 的首个版本已在 https://github.com/aristocratos/btop4win 发布
## 文档
**[CHANGELOG.md](CHANGELOG.md)**
**[CONTRIBUTING.md](CONTRIBUTING.md)**
**[CODE_OF_CONDUCT.md](CODE_OF_CONDUCT.md)**
## 描述
资源监控器,显示处理器、内存、磁盘、网络和进程的使用情况和统计数据。
这是 [bashtop](https://github.com/aristocratos/bashtop) 和 [bpytop](https://github.com/aristocratos/bpytop) 的 C++ 版本和延续。
## 功能
* 易于使用,采用受游戏启发的菜单系统。
* 完整的鼠标支持:所有带有高亮按键的按钮都可点击,鼠标滚动在进程列表和菜单框中均有效。
* 快速响应的 UI,支持 UP、DOWN 键选择进程。
* 显示所选进程详细统计数据的功能。
* 过滤进程的能力。
* 轻松切换排序选项。
* 进程树视图。
* 向选定的进程发送任何信号。
* 暂停进程列表。
* 用于更改所有配置文件选项的 UI 菜单。
* 网络使用率的自动缩放图表。
* 显示磁盘的 IO 活动和速度。
* 电池电量计
* 图表的可选符号。
* 自定义预设
* 以及更多...
## 主题
Btop++ 使用与 bpytop 和 bashtop 相同的主题文件(bashtop 主题中缺少某些颜色值)。
可用主题请参阅 [themes](https://github.com/aristocratos/btop/tree/main/themes) 文件夹。
Btop 按以下顺序搜索系统主题目录:
* `../share/btop/themes`(此路径相对于 btop 可执行文件)
* `/usr/local/share/btop/themes`
* `/usr/share/btop/themes`
第一个存在且非空的目录将被用作系统主题目录。
用户主题目录取决于设置了哪些环境变量:
* 如果设置了 `$XDG_CONFIG_HOME`,用户主题目录为 `$XDG_CONFIG_HOME/btop/themes`
* 否则,如果设置了 `$HOME`,用户主题目录为 `$HOME/.config/btop/themes`
* 否则,用户主题目录为 `~/.config/btop/themes`
`make install` 命令会将默认主题放置在 `[$PREFIX or /usr/local]/share/btop/themes` 中。
用户创建的主题应放置在用户主题目录中。
使用 `--themes-dir` 命令行选项指定自定义主题目录。
指定后,此目录优先于默认搜索路径。
如果你想贡献新主题,请告诉我。
新的进程列表暂停和进程跟踪功能引入了一些新的主题属性。
这些属性仍需添加到所有现有主题中(默认主题除外)。
进程列表横幅属性:
* proc_pause_bg:列表暂停时横幅的背景色。
* proc_follow_bg:进程跟踪功能激活时横幅的背景色。
* proc_banner_bg:进程跟踪功能激活**且**列表暂停时横幅的背景色。
* proc_banner_fg:横幅的前景(文本)颜色
进程跟踪属性:
* followed_bg:列表中被跟踪进程的背景色。
* followed_fg:列表中被跟踪进程的前景色。
## 前置条件
为了获得最佳体验,请在支持以下功能的终端中运行:
* 24位真彩色([查看支持真彩色的终端列表](https://github.com/termstandard/colors))
* 当在选项中将 "truecolor" 设置为 False 或使用 "-lc/--low-color" 参数时,支持通过 24 位到 256 色的转换来使用 256 色终端。
* 如果检测到真实的 tty 设备,将激活 16 色 TTY 模式。可以使用 "-t/--tty" 参数强制开启。
* 宽字符(在基于 Web 的终端中有时会有问题)
此外还需要 UTF8 区域设置以及包含以下内容的字体:
* Unicode Block “Braille Patterns” U+2800 - U+28FF(TTY 模式下或将图表设置为类型:block 或 tty 时不需要。)
* Unicode Block “Geometric Shapes” U+25A0 - U+25FF
* Unicode Block "Box Drawing" and "Block Elements" U+2500 - U+259F
### **可选依赖项(GPU 监控所需)(仅限 Linux)**
GPU 监控还需要使用 GPU 支持(`GPU_SUPPORT=true` 标志)构建的 btop 二进制文件。
有关编译 GPU 支持的更多信息,请参阅 [GPU 兼容性](#gpu-compatibility) 部分。
* **NVIDIA**
如果你有 NVIDIA GPU,必须使用官方 NVIDIA 驱动程序,闭源和开源驱动均已验证可用。
此外,你还必须安装 nvidia-ml 动态库,该库通常包含在你发行版的驱动程序包中。
* **AMD**
如果你有 AMD GPU,则需要 `rocm_smi_lib`,该库可能没有在你的发行版中打包。
* **INTEL**
如果从源代码编译,需要一个可工作的 C 编译器。
还需要用户有从 SYSFS 读取的权限。
可以通过 `make setcap`(推荐)或 `make setuid` 设置,或者使用 `sudo` 或等效命令运行 btop。
###注意(文本渲染问题)**
* 如果你在图表中的字符看起来不像截图中那样,这可能是你系统配置的后备字体不支持盲文字符的问题。
* 参见 [Terminess Powerline](https://github.com/ryanoasis/nerd-fonts/blob/master/patched-fonts/Terminus/TerminessNerdFontMono-Regular.ttf) 作为包含盲文符号的字体的示例。
* 参见 issue #100 中 @sgleizes [链接](https://github.com/aristocratos/bpytop/issues/100#issuecomment-684036827) 和 @XenHat [链接](https://github.com/aristocratos/bpytop/issues/100#issuecomment-691585587) 的评论以获取可能的解决方案。
* 如果文本未对齐且你使用的是 Konsole 或 Yakuake,关闭“双向文本渲染”是一个可能的修复方法。
* 字符相互重叠或文本/边框未对齐不是 btop 造成的错误,很可能是 fontconfig 或终端的问题,即构成图表的盲文字符未正确渲染。
* 如果上述修复方法对你无效,请向你使用的终端模拟器的创建者寻求解决这些问题的方法。
## 截图
#### 主界面,显示所选进程的详细信息

#### TTY 模式下的主界面

#### 带有自定义选项的主界面

#### 主菜单

#### 选项菜单

#### 帮助菜单

## 安装
**Linux 二进制文件使用 musl 静态编译,适用于内核版本 2.6.39 及更高版本**
1. **从 [最新版本](https://github.com/aristocratos/btop/releases/latest) 下载 btop-(VERSION)-(ARCH)-(PLATFORM).tbz 并解压到一个新文件夹**
**注意!64位 x86 系统请使用 x86_64,i486 和 i686 是32位的!**
2. **安装(从创建的文件夹中)**
* **运行:**
# 使用 "make install PREFIX=/target/dir" 设置目标目录,默认:/usr/local
# 仅在安装到非用户拥有的目录时使用 "sudo"
sudo make install
3. **(可选/Intel GPU 和 CPU 功耗监测所需)为 btop 设置扩展功能或 suid 位**
允许向任何进程发送信号而无需使用 `sudo` 启动,并可防止某些系统上的 /proc 读取权限问题。
Intel GPU 支持和 CPU 功耗监测需要此步骤。
* **运行:**
# 在 make install 之后运行,如果安装时使用了 PREFIX,此处也需使用相同的 PREFIX
sudo make setcap
* **或者**
# 在 make install 之后运行,如果安装时使用了 PREFIX,此处也需使用相同的 PREFIX
# 设置 SU_USER 和 SU_GROUP 以选择用户和组,默认为 root:root
sudo make setuid
* **卸载**
* **运行:**
sudo make uninstall
* **显示帮助**
make help
**二进制发布版(来自原生系统仓库)**
* **openSUSE**
* **Tumbleweed:**
sudo zypper in btop
* 对于所有其他版本,请参阅 [openSUSE Software: btop](https://software.opensuse.org/package/btop)
* **Fedora**
sudo dnf install btop
* **RHEL/Rocky/AlmaLinux 8+**
sudo dnf install epel-release
sudo dnf install btop
* **FreeBSD**
pkg install btop
* **NetBSD**
pkg_add btop
**Homebrew 上的二进制发布版(macOS (x86_64 & ARM64) / Linux (x86_64))**
* **[Homebrew](https://formulae.brew.sh/formula/btop)**
brew install btop
## 编译 Linux
至少需要 GCC 14 或 Clang 19。
Makefile 还需要 GNU `coreutils` 和 `sed`(任何现代发行版应该都已安装)。
### GPU 兼容性
只要你拥有正确的驱动程序和库,Btop++ 在 Linux x86_64 上开箱即支持 Nvidia、AMD GPU 和 Intel IGPUs。
Nvidia 或 AMD 的 GPU 支持在静态链接 glibc(或 musl 等)时将无法工作!
对于 x86_64 Linux,标志 `GPU_SUPPORT` 会自动设置为 `true`,要手动禁用 GPU 支持,请将该标志设置为 false,例如:
`make GPU_SUPPORT=false`(或使用 CMake 时 `cmake -DBTOP_GPU=false`)
* **NVIDIA**
必须使用官方 NVIDIA 驱动程序,闭源和[开源](https://github.com/NVIDIA/open-gpu-kernel-modules)驱动均已验证可用。
此外,你还必须安装 `nvidia-ml` 动态库,该库通常包含在你发行版的驱动程序包中。
* **AMD**
AMDGPU 数据使用 [ROCm SMI](https://github.com/rocm/rocm_smi_lib) 库查询,该库可能没有在你的发行版中打包。如果你的发行版没有提供该包,可以使用 `RSMI_STATIC=true` make 标志将 btop++ 静态链接到 ROCm SMI。
此标志期望 ROCm SMI 源代码位于 `lib/rocm_smi_lib`,如果不存在编译将失败。最新测试版本为 5.6.x,可通过以下命令获取:
git clone https://github.com/rocm/rocm_smi_lib.git --depth 1 -b rocm-5.6.x lib/rocm_smi_lib
` | 手动设置目标架构 |
| `GPU_SUPPORT=` | 启用/禁用 GPU 支持(X86_64 Linux 上默认启用) |
| `RSMI_STATIC=true` | 静态链接用于查询 AMDGPU 的 ROCm SMI 库 |
| `ADDFLAGS=` | 向编译器和链接器追加标志 |
| `CXX=` | 手动设置要使用的编译器 |
示例:如果仅为自己的系统编译,`make ADDFLAGS=-march=native` 可能会带来性能提升。
注意!如果使用 LDAP 认证,使用 glibc 静态编译时,LDAP 用户名将显示为 UID 号。
4. **安装**
sudo make install
追加 `PREFIX=/target/dir` 设置目标目录,默认:`/usr/local`
注意!仅在安装到非用户拥有的目录时使用 "sudo"。
5. **(可选/Intel GPU 支持和 CPU 功耗所需)为 btop 设置扩展功能或 suid 位**
无需 `sudo` 即可向任何进程发送信号,并防止某些系统上的 /proc 读取权限问题。
Intel GPU 监控和 CPU 功耗监测也需要此步骤。
在 make install 后运行,如果安装时使用了 PREFIX,此处也需使用相同的 PREFIX。
sudo make setcap
或者
设置 `SU_USER` 和 `SU_GROUP` 以选择用户和组,默认为 `root` 和 `root`
sudo make setuid
* **卸载**
sudo make uninstall
* **删除源目录中的任何目标文件**
make clean
* **删除源目录中的所有目标文件、二进制文件和创建的目录**
make distclean
* **显示帮助**
make help
` | 启用静态链接(默认为 OFF) |
| `-DBTOP_LTO=` | 启用链接时优化(默认为 ON) |
| `-DBTOP_GPU=` | 启用 GPU 支持(默认为 ON) |
| `-DBTOP_RSMI_STATIC=` | 静态构建并链接 ROCm SMI 库(默认为 OFF) |
| `-DCMAKE_INSTALL_PREFIX=` | 安装前缀(默认为 '/usr/local') |
要强制使用任何其他编译器,运行 `CXX= cmake -B build -G Ninja`
4. **安装**
cmake --install build
可能需要 root 权限
5. **卸载**
CMake 默认不生成卸载目标。要删除已安装的文件,运行
cat build/install_manifest.txt | xargs rm -irv
6. **清理构建目录**
cmake --build build -t clean
## 编译 macOS OSX
至少需要 GCC 14 或 Clang 19。
Makefile 还需要 GNU coreutils 和 `sed`。
安装并使用 Homebrew 或 MacPorts 包管理器可以轻松安装依赖项
` | 手动设置目标架构 |
| `ADDFLAGS=` | 向编译器和链接器追加标志 |
| `CXX=` | 手动设置要使用的编译器 |
示例:如果仅为自己的系统编译,`gmake ADDFLAGS=-march=native` 可能会带来性能提升。
4. **安装**
sudo gmake install
追加 `PREFIX=/target/dir` 设置目标目录,默认:`/usr/local`
注意!仅在安装到非用户拥有的目录时使用 "sudo"。
5. **(推荐)设置 suid 位以使 btop 始终以 root(或其他用户)运行**
sudo gmake setuid
无需 `sudo` 即可查看非用户拥有进程的信息,并向任何进程发送信号。
在 make install 后运行,如果安装时使用了 PREFIX,此处也需使用相同的 PREFIX。
设置 `SU_USER` 和 `SU_GROUP` 以选择用户和组,默认为 `root` 和 `wheel`
* **卸载**
sudo gmake uninstall
* **删除源目录中的任何目标文件**
gmake clean
* **删除源目录中的所有目标文件、二进制文件和创建的目录**
gmake distclean
* **显示帮助**
gmake help
` | 启用链接时优化(默认为 ON) |
| `-DCMAKE_INSTALL_PREFIX=` | 安装前缀(默认为 '/usr/local') |
要强制使用任何特定编译器,运行 `CXX= cmake -B build -G Ninja`
4. **安装**
cmakeinstall build
可能需要 root 权限
5. **卸载**
CMake 默认不生成卸载目标。要删除已安装的文件,运行
cat build/install_manifest.txt | xargs rm -irv
6. **清理构建目录**
cmake --build build -t clean
## 编译 FreeBSD
至少需要 Clang 19(默认)或 GCC 14。
请注意,在 FreeBSD 上编译需要 GNU make (`gmake`)。
` | 手动设置目标架构 |
| `ADDFLAGS=` | 向编译器和链接器追加标志 |
| `CXX=` | 手动设置要使用的编译器 |
示例:如果仅为自己的系统编译,`gmake ADDFLAGS=-march=native` 可能会带来性能提升。
4. **安装**
sudo gmake install
追加 `PREFIX=/target/dir` 设置目标目录,默认:`/usr/local`
注意!仅在安装到非用户拥有的目录时使用 "sudo"。
5. **(推荐)设置 suid 位以使 btop 始终以 root(或其他用户)运行**
sudo gmake setuid
无需 `sudo` 即可查看非用户拥有进程的信息,并向任何进程发送信号。
在 make install 后运行,如果安装时使用了 PREFIX,此处也需使用相同的 PREFIX。
设置 `SU_USER` 和 `SU_GROUP` 以选择用户和组,默认为 `root` 和 `wheel`
* **卸载**
sudo gmake uninstall
* **删除源目录中的任何目标文件**
gmake clean
* **删除源目录中的所有目标文件、二进制文件和创建的目录**
gmake distclean
* **显示帮助**
gmake help
` | 启用静态链接(默认为 OFF) |
| `-DBTOP_LTO=` | 启用链接时优化(默认为 ON) |
| `-DCMAKE_INSTALL_PREFIX=` | 安装前缀(默认为 '/usr/local') |
_**注意:** 静态链接不适用于 GCC。_
要强制使用任何其他编译器,运行 `CXX= cmake -B build -G Ninja`
4. **安装**
cmake --install build
可能需要 root 权限
5. **卸载**
CMake 默认不生成卸载目标。要删除已安装的文件,运行
cat build/install_manifest.txt | xargs rm -irv
6. **清理构建目录**
cmake --build build -t clean
## 编译 NetBSD
至少需要 GCC 14。
请注意,在 NetBSD 上编译需要 GNU make (`gmake`)。
` | 手动设置目标架构 |
| `ADDFLAGS=` | 向编译器和链接器追加标志 |
| `CXX=` | 手动设置要使用的编译器 |
示例:如果仅为自己的系统编译,`gmake ADDFLAGS=-march=native` 可能会带来性能提升。
4. **安装**
sudo gmake install
追加 `PREFIX=/target/dir` 设置目标目录,默认:`/usr/local`
注意!仅在安装到非用户拥有的目录时使用 "sudo"。
5. **(推荐)设置 suid 位以使 btop 始终以 root(或其他用户)运行**
sudo gmake setuid
无需 `sudo` 即可查看非用户拥有进程的信息,并向任何进程发送信号。
在 make install 后运行,如果安装时使用了 PREFIX,此处也需使用相同的 PREFIX。
设置 `SU_USER` 和 `SU_GROUP` 以选择用户和组,默认为 `root` 和 `wheel`
* **卸载**
sudo gmake uninstall
* **删除源目录中的任何目标文件**
gmake clean
* **删除源目录中的所有目标文件、二进制文件和创建的目录**
gmake distclean
* **显示帮助**
gmake help
` | 启用链接时优化(默认为 ON) |
| `-DCMAKE_INSTALL_PREFIX=` | 安装前缀(默认为 '/usr/local') |
要强制使用任何其他编译器,运行 `CXX= cmake -B build -G Ninja`
4. **安装**
cmake --install build
可能需要 root 权限
5. **卸载**
CMake 默认不生成卸载目标。要删除已安装的文件,运行
cat build/install_manifest.txt | xargs rm -irv
6. **清理构建目录**
cmake --build build -t clean
## 编译 OpenBSD
请注意,在 OpenBSD 上编译需要 GNU make (`gmake`)。
` | 手动设置目标架构 |
| `ADDFLAGS=` | 向编译器和链接器追加标志 |
| `CXX=` | 手动设置要使用的编译器 |
示例:如果仅为自己的系统编译,`gmake ADDFLAGS=-march=native` 可能会带来性能提升。
4. **安装**
sudo gmake install
追加 `PREFIX=/target/dir` 设置目标目录,默认:`/usr/local`
注意!仅在安装到非用户拥有的目录时使用 "sudo"。
5. **(推荐)设置 suid 位以使 btop 始终以 root(或其他用户)运行**
sudo gmake setuid
无需 `sudo` 即可查看非用户拥有进程的信息,并向任何进程发送信号。
在 make install 后运行,如果安装时使用了 PREFIX,此处也需使用相同的 PREFIX。
设置 `SU_USER` 和 `SU_GROUP` 以选择用户和组,默认为 `root` 和 `wheel`
* **卸载**
sudo gmake uninstall
* **删除源目录中的任何目标文件**
gmake clean
* **删除源目录中的所有目标文件、二进制文件和创建的目录**
gmake distclean
* **显示帮助**
gmake help
` | 启用链接时优化(默认为 ON) |
| `-DCMAKE_INSTALL_PREFIX=` | 安装前缀(默认为 '/usr/local') |
要强制使用任何其他编译器,运行 `CXX= cmake -B build -G Ninja`
4. **安装**
cmake --install build
可能需要 root 权限
5. **卸载**
CMake 默认不生成卸载目标。要删除已安装的文件,运行
cat build/install_manifest.txt | xargs rm -irv
6. **清理构建目录**
cmake --build build -t clean
## 测试
测试需要 [CMake](cmake.org)。测试默认构建,可以使用 `ctest --test-dir ` 运行。
如果你想禁用构建测试,请在配置步骤中传递 `-DBUILD_TESTING=OFF`。
## 安装 snap
[](https://snapcraft.io/btop)
### 注意:现在有两个 snap 可用:`btop` 和 `btop-desktop`。桌面版本要大得多,包含了允许点击启动 `btop` 所需的桌面项。
* **安装 snap**
sudo snap install btop
或
sudo snap install btop-desktop
* **从 edge 通道安装最新 snap**
sudo snap install btop --edge
或
sudo snap install btop-desktop --edge
* **连接接口**
sudo snap connect btop:removable-media
或
sudo snap connect btop-desktop:removable-media
## 配置
所有选项均可在 UI 内更改。
配置和日志文件存储在 `$XDG_CONFIG_HOME/btop` 或 `$HOME/.config/btop` 文件夹中
#### btop.conf:(如果未找到则自动生成)
```
#? Config file for btop v.1.4.5
#* Name of a btop++/bpytop/bashtop formatted ".theme" file, "Default" and "TTY" for builtin themes.
#* Themes should be placed in "../share/btop/themes" relative to binary or "$HOME/.config/btop/themes"
color_theme = "Default"
#* If the theme set background should be shown, set to False if you want terminal background transparency.
theme_background = true
#* Sets if 24-bit truecolor should be used, will convert 24-bit colors to 256 color (6x6x6 color cube) if false.
truecolor = true
#* Set to true to force tty mode regardless if a real tty has been detected or not.
#* Will force 16-color mode and TTY theme, set all graph symbols to "tty" and swap out other non tty friendly symbols.
force_tty = false
#* Define presets for the layout of the boxes. Preset 0 is always all boxes shown with default settings. Max 9 presets.
#* Format: "box_name:P:G,box_name:P:G" P=(0 or 1) for alternate positions, G=graph symbol to use for box.
#* Use whitespace " " as separator between different presets.
#* Example: "cpu:0:default,mem:0:tty,proc:1:default cpu:0:braille,proc:0:tty"
presets = "cpu:1:default,proc:0:default cpu:0:default,mem:0:default,net:0:default cpu:0:block,net:0:tty"
#* Set to True to enable "h,j,k,l,g,G" keys for directional control in lists.
#* Conflicting keys for h:"help" and k:"kill" is accessible while holding shift.
vim_keys = false
#* Rounded corners on boxes, is ignored if TTY mode is ON.
rounded_corners = true
#* Use terminal synchronized output sequences to reduce flickering on supported terminals.
terminal_sync = true
#* Default symbols to use for graph creation, "braille", "block" or "tty".
#* "braille" offers the highest resolution but might not be included in all fonts.
#* "block" has half the resolution of braille but uses more common characters.
#* "tty" uses only 3 different symbols but will work with most fonts and should work in a real TTY.
#* Note that "tty" only has half the horizontal resolution of the other two, so will show a shorter historical view.
graph_symbol = "braille"
# 用于 CPU 框中图表的图形符号,可选 "default"、"braille"、"block" 或 "tty"。
graph_symbol_cpu = "default"
# 用于 CPU 框中图表的图形符号,可选 "default"、"braille"、"block" 或 "tty"。
graph_symbol_mem = "default"
# 用于 CPU 框中图表的图形符号,可选 "default"、"braille"、"block" 或 "tty"。
graph_symbol_net = "default"
# 用于 CPU 框中图表的图形符号,可选 "default"、"braille"、"block" 或 "tty"。
graph_symbol_proc = "default"
#* Manually set which boxes to show. Available values are "cpu mem net proc" and "gpu0" through "gpu5", separate values with whitespace.
shown_boxes = "cpu mem net proc"
#* Update time in milliseconds, recommended 2000 ms or above for better sample times for graphs.
update_ms = 2000
#* Processes sorting, "pid" "program" "arguments" "threads" "user" "memory" "cpu lazy" "cpu direct",
#* "cpu lazy" sorts top process over time (easier to follow), "cpu direct" updates top process directly.
proc_sorting = "cpu lazy"
#* Reverse sorting order, True or False.
proc_reversed = false
#* Show processes as a tree.
proc_tree = false
#* Use the cpu graph colors in the process list.
proc_colors = true
#* Use a darkening gradient in the process list.
proc_gradient = true
#* If process cpu usage should be of the core it's running on or usage of the total available cpu power.
proc_per_core = false
#* Show process memory as bytes instead of percent.
proc_mem_bytes = true
#* Show cpu graph for each process.
proc_cpu_graphs = true
#* Use /proc/[pid]/smaps for memory information in the process info box (very slow but more accurate)
proc_info_smaps = false
#* Show proc box on left side of screen instead of right.
proc_left = false
#* (Linux) Filter processes tied to the Linux kernel(similar behavior to htop).
proc_filter_kernel = false
#* Should the process list follow the selected process when detailed view is open.
proc_follow_detailed = true
#* In tree-view, always accumulate child process resources in the parent process.
proc_aggregate = false
#* Should cpu and memory usage display be preserved for dead processes when paused.
keep_dead_proc_usage = false
#* Sets the CPU stat shown in upper half of the CPU graph, "total" is always available.
#* Select from a list of detected attributes from the options menu.
cpu_graph_upper = "Auto"
#* Sets the CPU stat shown in lower half of the CPU graph, "total" is always available.
#* Select from a list of detected attributes from the options menu.
cpu_graph_lower = "Auto"
#* Toggles if the lower CPU graph should be inverted.
cpu_invert_lower = true
#* Set to True to completely disable the lower CPU graph.
cpu_single_graph = false
#* Show cpu box at bottom of screen instead of top.
cpu_bottom = false
#* Shows the system uptime in the CPU box.
show_uptime = true
#* Shows the CPU package current power consumption in watts. Requires running `make setcap` or `make setuid` or running with sudo.
show_cpu_watts = true
#* Show cpu temperature.
check_temp = true
#* Which sensor to use for cpu temperature, use options menu to select from list of available sensors.
cpu_sensor = "Auto"
#* Show temperatures for cpu cores also if check_temp is True and sensors has been found.
show_coretemp = true
#* Set a custom mapping between core and coretemp, can be needed on certain cpus to get correct temperature for correct core.
#* Use lm-sensors or similar to see which cores are reporting temperatures on your machine.
#* Format "x:y" x=core with wrong temp, y=core with correct temp, use space as separator between multiple entries.
#* Example: "4:0 5:1 6:3"
cpu_core_map = ""
#* Which temperature scale to use, available values: "celsius", "fahrenheit", "kelvin" and "rankine".
temp_scale = "celsius"
#* Use base 10 for bits/bytes sizes, KB = 1000 instead of KiB = 1024.
base_10_sizes = false
#* Show CPU frequency.
show_cpu_freq = true
#* How to calculate CPU frequency, available values: "first", "range", "lowest", "highest" and "average".
freq_mode = "first"
#* Draw a clock at top of screen, formatting according to strftime, empty string to disable.
#* Special formatting: /host = hostname | /user = username | /uptime = system uptime
clock_format = "%X"
#* Update main ui in background when menus are showing, set this to false if the menus is flickering too much for comfort.
background_update = true
#* Custom cpu model name, empty string to disable.
custom_cpu_name = ""
#* Optional filter for shown disks, should be full path of a mountpoint, separate multiple values with whitespace " ".
#* Only disks matching the filter will be shown. Prepend exclude= to only show disks not matching the filter. Examples: disk_filter="/boot /home/user", disks_filter="exclude=/boot /home/user"
disks_filter = ""
#* Show graphs instead of meters for memory values.
mem_graphs = true
#* Show mem box below net box instead of above.
mem_below_net = false
#* Count ZFS ARC in cached and available memory.
zfs_arc_cached = true
#* If swap memory should be shown in memory box.
show_swap = true
#* Show swap as a disk, ignores show_swap value above, inserts itself after first disk.
swap_disk = true
#* If mem box should be split to also show disks info.
show_disks = true
#* Filter out non physical disks. Set this to False to include network disks, RAM disks and similar.
only_physical = true
#* Read disks list from /etc/fstab. This also disables only_physical.
use_fstab = true
#* Setting this to True will hide all datasets, and only show ZFS pools. (IO stats will be calculated per-pool)
zfs_hide_datasets = false
#* Set to true to show available disk space for privileged users.
disk_free_priv = false
#* Toggles if io activity % (disk busy time) should be shown in regular disk usage view.
show_io_stat = true
#* Toggles io mode for disks, showing big graphs for disk read/write speeds.
io_mode = false
#* Set to True to show combined read/write io graphs in io mode.
io_graph_combined = false
#* Set the top speed for the io graphs in MiB/s (100 by default), use format "mountpoint:speed" separate disks with whitespace " ".
#* Example: "/mnt/media:100 /:20 /boot:1".
io_graph_speeds = ""
#* Set fixed values for network graphs in Mebibits. Is only used if net_auto is also set to False.
net_download = 100
net_upload = 100
#* Use network graphs auto rescaling mode, ignores any values set above and rescales down to 10 Kibibytes at the lowest.
net_auto = true
#* Sync the auto scaling for download and upload to whichever currently has the highest scale.
net_sync = true
#* Starts with the Network Interface specified here.
net_iface = ""
#* "True" shows bitrates in base 10 (Kbps, Mbps). "False" shows bitrates in binary sizes (Kibps, Mibps, etc.). "Auto" uses base_10_sizes.
base_10_bitrate = "Auto"
#* Show battery stats in top right if battery is present.
show_battery = true
#* Which battery to use if multiple are present. "Auto" for auto detection.
selected_battery = "Auto"
#* Show power stats of battery next to charge indicator.
show_battery_watts = true
#* Set loglevel for "~/.local/state/btop.log" levels are: "ERROR" "WARNING" "INFO" "DEBUG".
#* The level set includes all lower levels, i.e. "DEBUG" will show all logging info.
log_level = "WARNING"
```
#### 命令行选项
```
Usage: btop [OPTIONS]
Options:
-c, --config Path to a config file
-d, --debug Start in debug mode with additional logs and metrics
-f, --filter Set an initial process filter
--force-utf Override automatic UTF locale detection
-l, --low-color Disable true color, 256 colors only
-p, --preset Start with a preset (0-9)
-t, --tty Force tty mode with ANSI graph symbols and 16 colors only
--no-tty Force disable tty mode
-u, --update Set an initial update rate in milliseconds
--default-config Print default config to standard output
-h, --help Show this help message and exit
-V, --version Show a version message and exit (more with --version)
```
## 许可证
[Apache License 2.0](LICENSE)
更多...
##### 2022年1月16日 发布 v1.2.0,支持 FreeBSD。暂不提供 FreeBSD 的发布二进制文件。 再次感谢 [@joske](https://github.com/joske) 的移植工作! 既然已经完成了与 Linux、macOS 和 FreeBSD 的兼容,接下来的重点将是 GPU 监控等新功能。 ##### 2021年11月13日 发布 v1.1.0,支持 macOS。[continuous-build-macos](https://github.com/aristocratos/btop/actions/workflows/continuous-build-macos.yml) 中的二进制文件目前仅为 x86 架构。 发布版本中包含了 x86 和 ARM64 (Apple Silicon) 的 macOS 二进制文件及安装程序。 非常感谢 [@joske](https://github.com/joske),他编写了绝大部分的实现代码! ##### 2021年10月30日 针对 OSX [macOS] 和 FreeBSD 分支的工作,这两者均由 [@joske](https://github.com/joske) 发起并主要完成,可能会在未来几周内完工。 OSX [macOS] 分支有一些内存泄漏问题需要解决,而且这两个分支在进程 CPU 使用率计算方面都存在一些问题,以及其他一些需要修复的小问题。 如果你想提供帮助、测试/修复错误,或者只是想试用这些分支: **macOS / OSX** ``` # 安装并使用 Homebrew 或 MacPorts 包管理器以便轻松安装依赖 brew install coreutils make gcc@11 lowdown git clone https://github.com/aristocratos/btop.git cd btop git checkout OSX gmake ``` **FreeBSD** ``` sudo pkg install gmake gcc11 coreutils git lowdown git clone https://github.com/aristocratos/btop.git cd btop git checkout freebsd gmake ``` 请注意,GNU make (`gmake`) 在 macOS/OSX 上是推荐的但非必须,但在 FreeBSD 上是必须的。 ##### 2021年10月6日 macOS 的开发工作已由 [@joske](https://github.com/joske) 开始,非常感谢 :) 当前进度请参阅 [OSX](https://github.com/aristocratos/btop/tree/OSX) 分支。 ##### 2021年9月18日 btop++ 的 Linux 版本已完成。作为版本 1.0.0 发布。 我将为各种架构提供静态编译的二进制文件,以便那些在编译时遇到问题的用户使用。 编译需要 GCC 11。 请在 [Issues](https://github.com/aristocratos/btop/issues/new?assignees=aristocratos&labels=bug&template=bug_report.md&title=%5BBUG%5D) 页面报告任何错误。 目前的开发计划: * 1.1.0 macOS [OSX] 支持 * 1.2.0 FreeBSD 支持 * 1.3.0 GPU 监控支持 * 1.X.0 其他平台和功能... 目前没有支持 Windows 的计划,但如果其他人愿意接手,我会尝试提供帮助。 ##### 2021年5月5日 这个项目还需要一些时间才能达到与 bpytop 完全的功能对等,因为所有系统信息收集都必须在不使用任何外部库的情况下从头开始编写。 并且需要代码贡献形式的帮助,以实现对 BSD 和 macOS/OSX 的完整支持。### 使用 Make
1. **安装依赖项(以 Ubuntu 24.04 Noble 为例)** sudo apt install coreutils sed git build-essential lowdown 2. **克隆仓库** git clone https://github.com/aristocratos/btop.git cd btop 3. **编译** make make 的选项: | 标志 | 描述 | |---------------------------------|-------------------------------------------------------------------------| | `VERBOSE=true` | 显示完整的编译器/链接器命令 | | `STATIC=true` | 用于静态编译 | | `QUIET=true` | 减少输出信息 | | `STRIP=true` | 强制剥离调试符号(添加 `-s` 链接器标志) | | `DEBUG=true` | 将 OPTFLAGS 设置为 `-O0 -g` 并启用更详细的调试日志 | | `ARCH=### 使用 CMake(社区维护)
1. **安装构建依赖项** 需要 Clang / GCC、CMake、Ninja、Lowdown 和 Git 例如,在 Debian Bookworm 上: sudo apt install cmake git g++ ninja-build lowdown 2. **克隆仓库** git clone https://github.com/aristocratos/btop.git && cd btop 3. **编译** # 配置 cmake -B build -G Ninja # 构建 cmake --build build 这将自动构建 btop 的发布版本。 传递给配置步骤的一些有用选项: | 配置标志 | 描述 | |---------------------------------|-------------------------------------------------------------------------| | `-DBTOP_STATIC=### 使用 Make
1. **安装依赖项(以 Homebrew 为例)** brew install coreutils make gcc@15 lowdown 2. **克隆仓库** git clone https://github.com/aristocratos/btop.git cd btop 3. **编译** gmake make 的选项: | 标志 | 描述 | |---------------------------------|-------------------------------------------------------------------------| | `VERBOSE=true` | 显示完整的编译器/链接器命令 | | `STATIC=true` | 用于静态编译(仅 libgcc 和 libstdc++) | | `QUIET=true` | 减少输出信息 | | `STRIP=true` | 强制剥离调试符号(添加 `-s` 链接器标志) | | `DEBUG=true` | 将 OPTFLAGS 设置为 `-O0 -g` 并启用更详细的调试日志 | | `ARCH=### 使用 CMake(社区维护)
1. **安装构建依赖项** 需要 Clang、CMake、Ninja、Lowdown 和 Git brew update --quiet brew install cmake git llvm ninja lowdown 2. **克隆仓库** git clone https://github.com/aristocratos/btop.git && cd btop 3. **编译** # 配置 export LLVM_PREFIX="$(brew --prefix llvm)" export CXX="$LLVM_PREFIX/bin/clang++" export CPPFLAGS="-I$LLVM_PREFIX/include" export LDFLAGS="-L$LLVM_PREFIX/lib -L$LLVM_PREFIX/lib/c++ -Wl,-rpath,$LLVM_PREFIX/lib/c++ -fuse-ld=$LLVM_PREFIX/bin/ld64.lld" cmake -B build -G Ninja # 构建 cmake --build build 这将自动构建 btop 的发布版本。 传递给配置步骤的一些有用选项: | 配置标志 | 描述 | |---------------------------------|-------------------------------------------------------------------------| | `-DBTOP_LTO=### 使用 gmake
1. **安装依赖项** sudo pkg install gmake coreutils git lowdown 2. **克隆仓库** git clone https://github.com/aristocratos/btop.git cd btop 3. **编译** gmake make 的选项: | 标志 | 描述 | |---------------------------------|-------------------------------------------------------------------------| | `VERBOSE=true` | 显示完整的编译器/链接器命令 | | `STATIC=true` | 用于静态编译(仅 libgcc 和 libstdc++) | | `QUIET=true` | 减少输出信息 | | `STRIP=true` | 强制剥离调试符号(添加 `-s` 链接器标志) | | `DEBUG=true` | 将 OPTFLAGS 设置为 `-O0 -g` 并启用更详细的调试日志 | | `ARCH=### 使用 CMake(社区维护)
1. **安装构建依赖项** 需要 Clang / GCC、CMake、Ninja、Lowdown 和 Git pkg install cmake ninja lowdown 2. **克隆仓库** git clone https://github.com/aristocratos/btop.git && cd btop 3. **编译** # 配置 cmake -B build -G Ninja # 构建 cmake --build build 这将自动构建 btop 的发布版本。 传递给配置步骤的一些有用选项: | 配置标志 | 描述 | |---------------------------------|-------------------------------------------------------------------------| | `-DBTOP_STATIC=### 使用 gmake
1. **安装依赖项** /usr/sbin/pkg_add pkgin pkgin install -y coregutils gcc14 git gmake 2. **克隆仓库** git clone https://github.com/aristocratos/btop.git cd btop 3. **编译** CXX=/usr/pkg/gcc14/bin/g++ gmake CXXFLAGS="-DNDEBUG" make 的选项: | 标志 | 描述 | |---------------------------------|-------------------------------------------------------------------------| | `VERBOSE=true` | 显示完整的编译器/链接器命令 | | `STATIC=true` | 用于静态编译(仅 libgcc 和 libstdc++) | | `QUIET=true` | 减少输出信息 | | `STRIP=true` | 强制剥离调试符号(添加 `-s` 链接器标志) | | `DEBUG=true` | 将 OPTFLAGS 设置为 `-O0 -g` 并启用更详细的调试日志 | | `ARCH=### 使用 CMake(社区维护)
1. **安装构建依赖项** 需要 GCC、CMake、Ninja 和 Git /usr/sbin/pkg_add pkgin pkgin install cmake ninja-build gcc14 git 2. **克隆仓库** git clone https://github.com/aristocratos/btop.git && cd btop 3. **编译** # 配置 CXX="/usr/pkg/gcc14/bin/g++" cmake -B build -G Ninja # 构建 cmake --build build 这将自动构建 btop 的发布版本。 传递给配置步骤的一些有用选项: | 配置标志 | 描述 | |---------------------------------|-------------------------------------------------------------------------| | `-DBTOP_LTO=### 使用 gmake
1. **安装依赖项** pkg_add coreutils git gmake lowdown 2. **克隆仓库** git clone https://github.com/aristocratos/btop.git cd btop 3. **编译** gmake make 的选项: | 标志 | 描述 | |---------------------------------|-------------------------------------------------------------------------| | `VERBOSE=true` | 显示完整的编译器/链接器命令 | | `STATIC=true` | 用于静态编译(仅 libgcc 和 libstdc++) | | `QUIET=true` | 减少输出信息 | | `STRIP=true` | 强制剥离调试符号(添加 `-s` 链接器标志) | | `DEBUG=true` | 将 OPTFLAGS 设置为 `-O0 -g` 并启用更详细的调试日志 | | `ARCH=### 使用 CMake(社区维护)
1. **安装构建依赖项** 需要 GCC、CMake、Ninja、Lowdown 和 Git _**注意:** OpenBSD 7.4 附带的 LLVM libc++ 版本过旧,无法编译 btop。_ pkg_add cmake git ninja lowdown 2. **克隆仓库** git clone https://github.com/aristocratos/btop.git && cd btop 3. **编译** # 配置 cmake -B build -G Ninja # 构建 cmake --build build 这将自动构建 btop 的发布版本。 传递给配置步骤的一些有用选项: | 配置标志 | 描述 | |---------------------------------|-------------------------------------------------------------------------| | `-DBTOP_LTO=标签:Awesome, BSD, C++, CPU监控, htop替代, TUI, 内存监控, 性能分析, 数据挖掘, 数据擦除, 无线安全, 流量嗅探, 系统信息, 系统管理, 终端UI, 资源监视器, 运维工具