0xJacky/nginx-ui
GitHub: 0xJacky/nginx-ui
一个由 Go 和 Vue 构建的 Nginx 可视化管理界面,提供在线配置编辑、证书管理、集群管理和 AI 辅助功能。
Stars: 11213 | Forks: 834

# Nginx UI
又一个 Nginx Web UI,由 [0xJacky](https://jackyu.cn/)、[Hintay](https://blog.kugeek.com/) 和 [Akino](https://github.com/akinoccc) 开发。
[](https://deepwiki.com/0xJacky/nginx-ui)
[](https://deepwiki.com/0xJacky/nginx-ui)
[](https://github.com/0xJacky/nginx-ui/actions/workflows/build.yml)
[](https://github.com/0xJacky/nginx-ui "Click to view the repo on Github")
[](https://github.com/0xJacky/nginx-ui/releases/latest "Click to view the repo on Github")
[](https://github.com/0xJacky/nginx-ui "Click to view the repo on Github")
[](https://github.com/0xJacky/nginx-ui "Click to view the repo on Github")
[](https://github.com/0xJacky/nginx-ui "Click to view the repo on Github")
[](https://github.com/0xJacky/nginx-ui/issues "Click to view the repo on Github")
[](https://hub.docker.com/r/uozi/nginx-ui "Click to view the image on Docker Hub")
[](https://hub.docker.com/r/uozi/nginx-ui "Click to view the image on Docker Hub")
[](https://hub.docker.com/r/uozi/nginx-ui "Click to view the image on Docker Hub")
[](https://weblate.nginxui.com/engage/nginx-ui/)
[](https://hellogithub.com/repository/86f3a8f779934748a34fe6f1b5cd442f)
## 文档
要查看文档,请访问 [nginxui.com](https://nginxui.com)。
## 关于项目
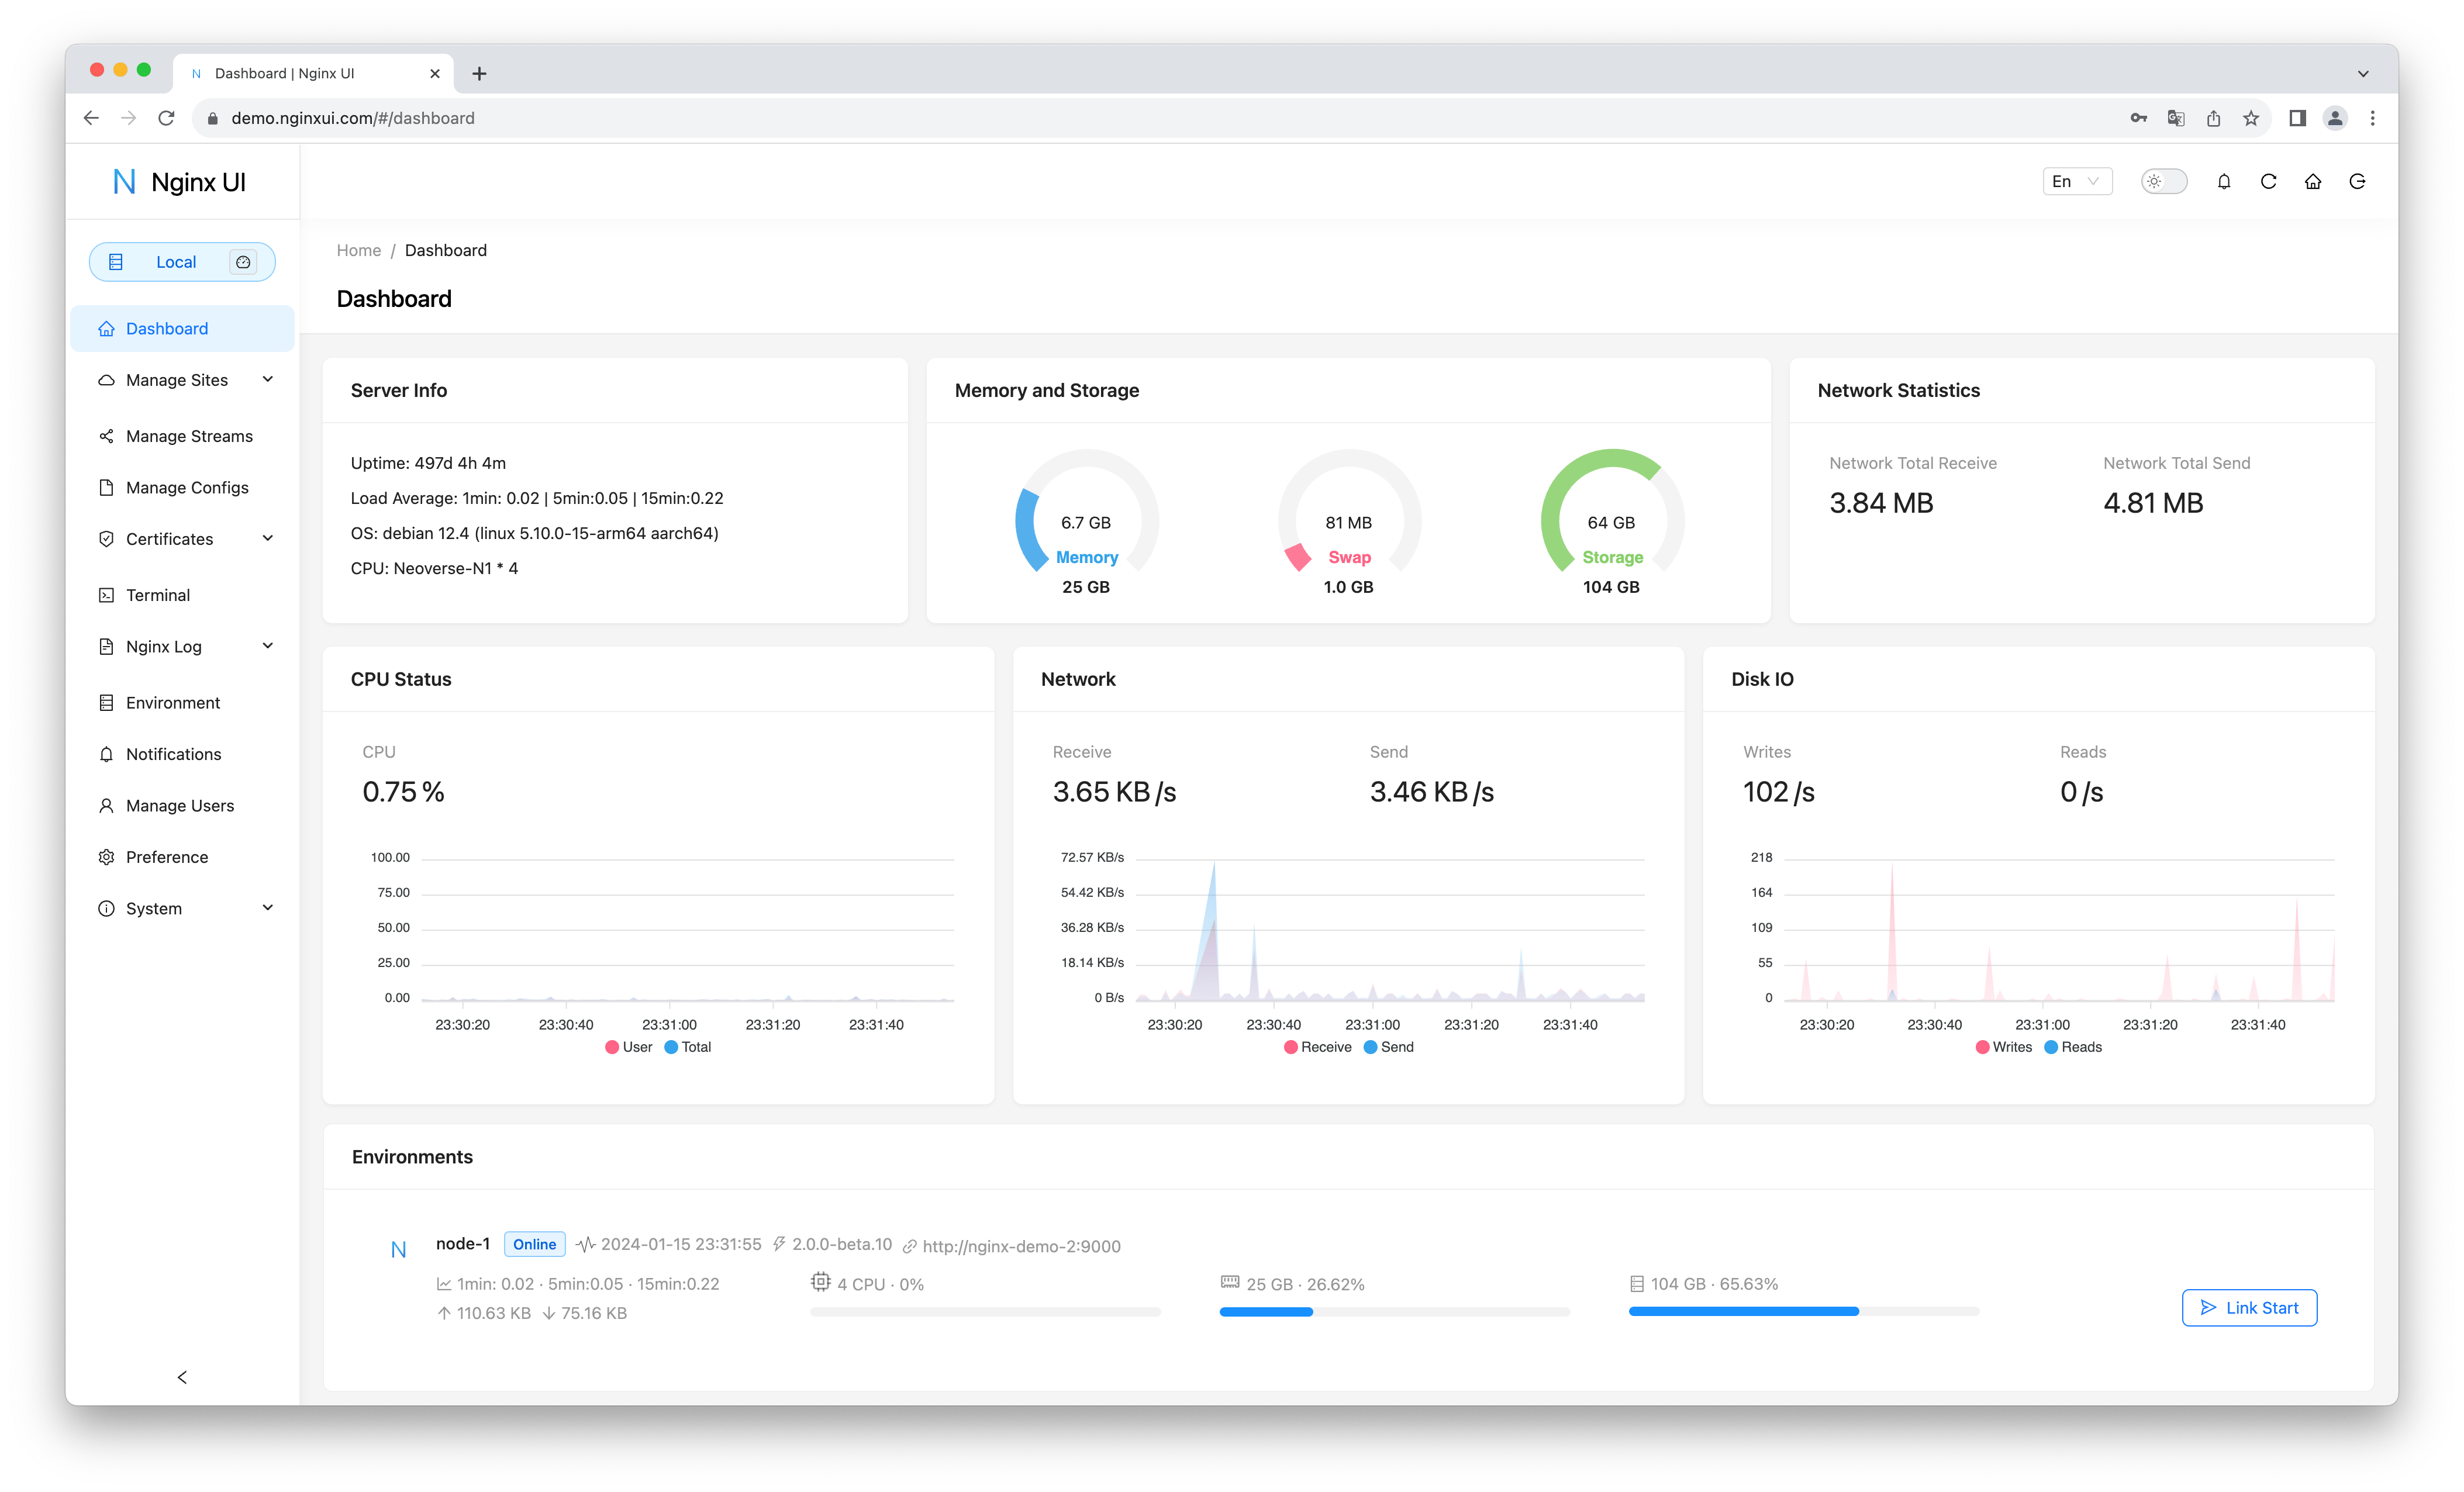
### 演示
URL:[https://demo.nginxui.com](https://demo.nginxui.com)
- 用户名:admin
- 密码:admin
### 功能特性
- 在线统计服务器指标,如 CPU 使用率、内存使用率、负载平均值和磁盘使用率。
- 配置变更后自动备份,支持版本对比和恢复功能
- 集群管理支持镜像操作到多个节点,让多服务器环境轻松管理
- 导出加密的 Nginx / Nginx UI 配置,以便快速部署和恢复到新环境
- 增强的在线 **ChatGPT** 助手支持多种模型,包括 Deepseek-R1 的思维链显示,帮助您更好地理解和优化配置
- **MCP** (Model Context Protocol) 为 AI 智能体提供与 Nginx UI 交互的专用接口,实现自动化配置管理和服务控制。
- 一键部署和自动续期 Let's Encrypt 证书。
- 使用我们自研的 **NgxConfigEditor**(一个用户友好的 nginx 配置块编辑器)或支持 **LLM 代码补全** 和 nginx 配置语法高亮的 **Ace Code Editor** 在线编辑网站配置。
- 在线查看 Nginx 日志
- 使用 Go 和 Vue 编写,分发版为单个可执行二进制文件。
- 保存配置后自动测试配置文件并重载 nginx。
- Web 终端
- 深色模式
- 响应式 Web 设计
### 国际化
我们自豪地提供以下官方支持:
- 英语
- 简体中文
- 繁体中文
作为非英语母语者,我们力求准确,但我们知道总有改进的空间。如果您发现任何问题,我们非常希望收到您的反馈!
感谢我们出色的社区,其他语言也可用!在 [Weblate](https://weblate.nginxui.com) 上探索并贡献翻译。
## 入门指南
### 使用前
Nginx UI 遵循 Debian Web 服务器配置文件标准。创建的站点配置文件将放置在 Nginx 配置文件夹下的 `sites-available` 文件夹中(自动检测)。已启用站点的配置文件将创建一个软链接到 `sites-enabled` 文件夹。您可能需要调整配置文件的组织方式。
对于非 Debian(和 Ubuntu)系统,您可能需要将 `nginx.conf` 配置文件的内容更改为 Debian 样式,如下所示。
```
http {
# ...
include /etc/nginx/conf.d/*.conf;
include /etc/nginx/sites-enabled/*;
}
```
更多信息:[debian/conf/nginx.conf](https://salsa.debian.org/nginx-team/nginx/-/blob/master/debian/conf/nginx.conf#L59-L60)
### 安装
Nginx UI 可在以下平台上使用:
- macOS 11 Big Sur 及更高版本 (amd64 / arm64)
- Windows 10 及更高版本 (amd64 / arm64)
- Linux 2.6.23 及更高版本 (x86 / amd64 / arm64 / armv5 / armv6 / armv7 / mips32 / mips64 / riscv64 / loongarch64)
- 包括但不限于 Debian 7 / 8、Ubuntu 12.04 / 14.04 及更高版本、CentOS 6 / 7、Arch Linux
- FreeBSD
- OpenBSD
- Dragonfly BSD
- Openwrt
您可以访问 [最新发布](https://github.com/0xJacky/nginx-ui/releases/latest) 下载最新发行版,或直接使用 [Linux 安装脚本](#script-for-linux)。
### 用法
在首次运行 Nginx UI 时,请在浏览器中访问 `http://
:` 以完成后续配置。
#### 通过可执行文件
**在终端中运行 Nginx UI**
```
nginx-ui -config app.ini
```
在终端中按 `Control+C` 退出 Nginx UI。
**在后台运行 Nginx UI**
```
nohup ./nginx-ui -config app.ini &
```
使用以下命令停止 Nginx UI。
```
kill -9 $(ps -aux | grep nginx-ui | grep -v grep | awk '{print $2}')
```
#### 使用 Systemd
如果您使用的是 [Linux 安装脚本](#script-for-linux),Nginx UI 将作为 `nginx-ui` 服务安装在 systemd 中。请使用 `systemctl` 命令进行控制。
**启动 Nginx UI**
```
systemctl start nginx-ui
```
**停止 Nginx UI**
```
systemctl stop nginx-ui
```
**重启 Nginx UI**
```
systemctl restart nginx-ui
```
#### 使用 Docker
我们的 Docker 镜像 [uozi/nginx-ui:latest](https://hub.docker.com/r/uozi/nginx-ui) 基于最新的 nginx 镜像,可用于替换主机上的 Nginx。通过将容器的 80 和 443 端口发布到主机,您可以轻松完成切换。
##### 注意
1. 首次使用此容器时,请确保映射到 /etc/nginx 的卷为空。
2. 如果您想托管静态文件,可以将目录映射到容器。
使用 Docker 部署
1. [安装 Docker。](https://docs.docker.com/install/)
2. 然后像这样部署 nginx-ui:
```
docker run -dit \
--name=nginx-ui \
--restart=always \
-e TZ=Asia/Shanghai \
-v /mnt/user/appdata/nginx:/etc/nginx \
-v /mnt/user/appdata/nginx-ui:/etc/nginx-ui \
-v /var/run/docker.sock:/var/run/docker.sock \
-p 8080:80 -p 8443:443 \
uozi/nginx-ui:latest
```
3. 当您的 docker 容器运行时,通过 `http://:8080/install` 登录 nginx-ui 面板。
使用 Docker-Compose 部署
1. [安装 Docker-Compose。](https://docs.docker.com/compose/install/)
2. 创建一个如下的 docker-compose.yml 文件:
```
services:
nginx-ui:
stdin_open: true
tty: true
container_name: nginx-ui
restart: always
environment:
- TZ=Asia/Shanghai
volumes:
- '/mnt/user/appdata/nginx:/etc/nginx'
- '/mnt/user/appdata/nginx-ui:/etc/nginx-ui'
- '/var/www:/var/www'
- '/var/run/docker.sock:/var/run/docker.sock'
ports:
- 8080:80
- 8443:443
image: 'uozi/nginx-ui:latest'
```
3. 然后通过以下命令创建您的容器:
```
docker compose up -d
```
4. 当您的 docker 容器运行时,通过 `http://:8080/install` 登录 nginx-ui 面板。
## 手动构建
在没有官方构建版本的平台,可以手动构建。
### 前置条件
- Make
- Golang 1.23+
- node.js 21+
npx browserslist@latest --update-db
### 构建前端
请在 `app` 目录下执行以下命令。
```
pnpm install
pnpm build
```
### 构建后端
请先构建前端应用,然后在项目根目录下执行以下命令。
```
go generate
go build -tags=jsoniter -ldflags "$LD_FLAGS -X 'github.com/0xJacky/Nginx-UI/settings.buildTime=$(date +%s)'" -o nginx-ui -v main.go
```
## Linux 脚本
### 基本用法
**安装和升级**
```
bash -c "$(curl -L https://cloud.nginxui.com/install.sh)" @ install
```
默认监听端口为 `9000`,默认 HTTP Challenge 端口为 `9180`。
如果存在端口冲突,请手动修改 `/usr/local/etc/nginx-ui/app.ini`,
然后使用 `systemctl restart nginx-ui` 重载 Nginx UI 服务。
**移除 Nginx UI,保留配置和数据库文件**
```
bash -c "$(curl -L https://cloud.nginxui.com/install.sh)" @ remove
```
### 更多用法
```
bash -c "$(curl -L https://cloud.nginxui.com/install.sh)" @ help
```
## Nginx 反向代理配置示例
```
server {
listen 80;
listen [::]:80;
server_name ;
rewrite ^(.*)$ https://$host$1 permanent;
}
map $http_upgrade $connection_upgrade {
default upgrade;
'' close;
}
server {
listen 443 ssl;
listen [::]:443 ssl;
http2 on;
server_name ;
ssl_certificate /path/to/ssl_cert;
ssl_certificate_key /path/to/ssl_cert_key;
location / {
proxy_set_header Host $host;
proxy_set_header X-Real-IP $remote_addr;
proxy_set_header X-Forwarded-For $proxy_add_x_forwarded_for;
proxy_set_header X-Forwarded-Proto $scheme;
proxy_http_version 1.1;
proxy_set_header Upgrade $http_upgrade;
proxy_set_header Connection $connection_upgrade;
proxy_pass http://127.0.0.1:9000/;
}
}
```
## 许可证
本项目采用 GNU Affero General Public License v3.0 许可证授权,详情请见 [LICENSE](LICENSE) 文件。使用、分发或向本项目贡献即表示您同意此许可证的条款和条件。标签:Awesome, Docker, EVTX分析, Go, Let's Encrypt, Nginx, Ruby工具, SSL证书, TCP SYN 扫描, Vue.js, Web UI, Web服务器, 主机监控, 仪表盘, 反向代理, 在线编辑器, 安全防御评估, 日志审计, 服务器管理, 系统管理, 网站管理, 请求拦截, 负载均衡, 运维工具, 配置编辑器