ffffffff0x/f8x
GitHub: ffffffff0x/f8x
一款用 Bash 编写的红蓝队环境自动化部署脚本,支持多平台一键安装渗透测试、蓝队防守及各类开发环境工具。
Stars: 2141 | Forks: 294

红/蓝队环境自动化部署工具
开始 •
选项 •
示例 •
FAQ •
许可证


English | [简体中文](README.zh-cn.md)
## 开始
**下载**
- EdgeOne Pages 链接
- wget : `wget -O f8x https://f8x.wgpsec.org/f8x`
- curl : `curl -o f8x https://f8x.wgpsec.org/f8x`
- github raw
- wget : `wget -O f8x https://raw.githubusercontent.com/ffffffff0x/f8x/main/f8x`
- curl : `curl -o f8x https://raw.githubusercontent.com/ffffffff0x/f8x/main/f8x`
**用法**
```
bash f8x -h
```
建议加入环境变量
- wget : `wget -O f8x https://raw.githubusercontent.com/ffffffff0x/f8x/main/f8x && mv --force f8x /usr/local/bin/f8x && chmod +x /usr/local/bin/f8x`
- `f8x -h`
- curl : `curl -o f8x https://raw.githubusercontent.com/ffffffff0x/f8x/main/f8x && mv --force f8x /usr/local/bin/f8x && chmod +x /usr/local/bin/f8x`
- `f8x -h`
**系统依赖**
f8x 基本上不需要任何依赖,它的诞生就是为了帮你安装各种依赖😁
**f8x-ctf**
该脚本用于部署 CTF 环境 (Web、Misc、Crypto、Pwn、Iot)
- wget : `wget -O f8x-ctf https://raw.githubusercontent.com/ffffffff0x/f8x/main/f8x-ctf`
- `bash f8x-ctf -help`
- curl : `curl -o f8x-ctf https://raw.githubusercontent.com/ffffffff0x/f8x/main/f8x-ctf`
- `bash f8x-ctf -help`
**f8x-dev**
部署中间件、数据库 (apache、nginx、tomcat、Database、php)
- wget : `wget -O f8x-dev https://raw.githubusercontent.com/ffffffff0x/f8x/main/f8x-dev`
- `bash f8x-dev -help`
- curl : `curl -o f8x-dev https://raw.githubusercontent.com/ffffffff0x/f8x/main/f8x-dev`
- `bash f8x-dev -help`
## 选项
f8x 目前支持以下选项
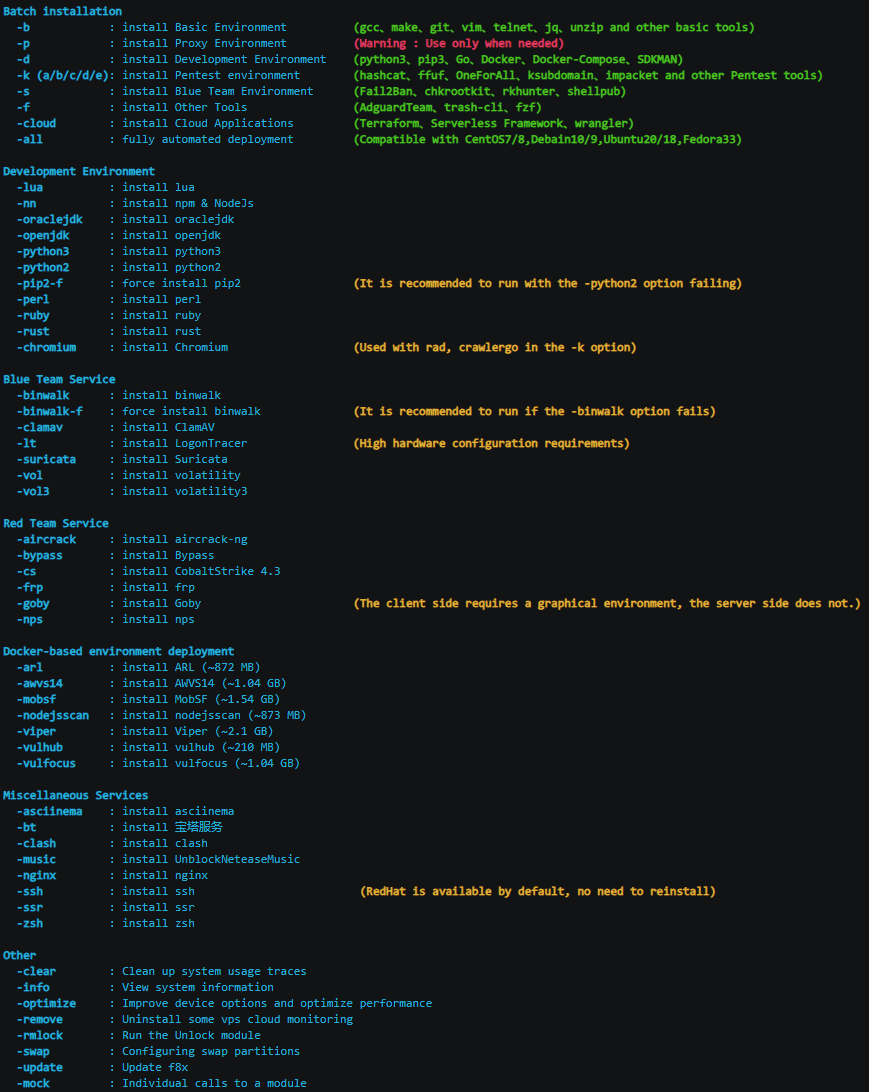
**批量安装**
- `-b` : 安装基础环境 (gcc、make、git、vim、telnet、jq、unzip 及其他基本工具)
- `-p` : 安装代理环境 (警告 : 仅在需要时使用)
- `-d` : 安装开发环境 (python3、pip3、Go、Docker、Docker-Compose、SDKMAN)
- `-k` (`a`/`b`/`c`/`d`/`e`): 安装渗透测试环境 (hashcat、ffuf、OneForAll、ksubdomain、impacket 及其他渗透测试工具)
- `-s` : 安装蓝队环境 (Fail2Ban、chkrootkit、rkhunter、shellpub)
- `-f` : 安装其他工具 (AdguardTeam、trash-cli、fzf)
- `-cloud` : 安装云应用程序 (Terraform、Serverless Framework、wrangler)
- `-all` : 全自动部署 (兼容 CentOS7/8,Debain10/9,Ubuntu20/18,Fedora33)
**开发环境**
- `-docker` : 安装 docker
- `-lua` : 安装 lua
- `-nn` : 安装 npm & NodeJs
- `-go` : 安装 go
- `-oraclejdk(8/11)`: 安装 oraclejdk
- `-openjdk` : 安装 openjdk
- `-py3(7/8/9/10)` : 安装 python3
- `-py2` : 安装 python2
- `-pip2-f` : 强制安装 pip2 (建议在 -python2 选项失败时运行)
- `-perl` : 安装 perl
- `-ruby` : 安装 ruby
- `-rust` : 安装 rust
- `-code` : 安装 code-server
- `-chromium` : 安装 Chromium (配合 -k 选项中的 rad, crawlergo 使用)
- `-phantomjs` : 安装 PhantomJS
**蓝队服务**
- `-binwalk` : 安装 binwalk
- `-binwalk-f` : 强制安装 binwalk (建议在 -binwalk 选项失败时运行)
- `-clamav` : 安装 ClamAV
- `-lt` : 安装 LogonTracer (对硬件配置要求较高)
- `-suricata` : 安装 Suricata
- `-vol` : 安装 volatility
- `-vol3` : 安装 volatility3
**红队服务**
- `-aircrack` : 安装 aircrack-ng
- `-bypass` : 安装 Bypass
- `-goby` : 安装 Goby (客户端需要图形环境,服务端不需要)
- `-wpscan` : 安装 wpscan
- `-yakit` : 安装 yakit
**红队基础设施**
- `-awvs14` : 安装 AWVS14 (~1.04 GB)
- `-cs` : 安装 CobaltStrike 4.3
- `-cs45` : 安装 CobaltStrike 4.5
- `-frp` : 安装 frp
- `-interactsh` : 安装 interactsh (
)
- `-merlin` : 安装 merlin (
)
- `-msf` : 安装 Metasploit
- `-nps` : 安装 nps
- `-pupy` : 安装 pupy (
)
- `-rg` : 安装 RedGuard (
)
- `-sliver` : 安装 sliver-server && client (
)
- `-sliver-client` : 安装 sliver-client
- `-sps` : 安装 SharPyShell (
)
- `-viper` : 安装 Viper (~2.1 GB)
**基于 Docker 的环境部署**
- `-arl` : 安装 ARL (~872 MB)
- `-mobsf` : 安装 MobSF (~1.54 GB)
- `-nodejsscan` : 安装 nodejsscan (~873 MB)
- `-vulhub` : 安装 vulhub (~210 MB)
- `-vulfocus` : 安装 vulfocus (~1.04 GB)
- `-TerraformGoat`: 安装 TerraformGoat
**杂项服务**
- `-asciinema` : 安装 asciinema
- `-bt` : 安装 宝塔服务
- `-clash` : 安装 clash (
)
- `-nginx` : 安装 nginx
- `-ssh` : 安装 ssh (RedHat 默认可用,无需重装)
- `-ssr` : 安装 ssr
- `-zsh` : 安装 zsh
**其他**
- `-clear` : 清理系统使用痕迹
- `-info` : 查看系统信息
- `-optimize` : 改善设备选项并优化性能
- `-remove` : 卸载部分 vps 云监控
- `-rmlock` : 运行解锁模块
- `-swap` : 配置 swap 分区
- `-update` : 更新 f8x
- `-upgrade` : 升级渗透测试工具
## 示例
**-h 查看帮助**
**-all 全自动部署**
以 vultr vps 为例
|
CentOS 7
|
Debian 10
|
| - | - |
|

|

|
|
Fedora 33
|
Ubuntu 20.10
|
|

|

|
## 常见问题解答
**-p 选项有什么用?**
1. 替换你的 DNS (默认为 223.5.5.5)
2. 检查基础编译环境
3. 下载 Proxychains-ng,编译并安装
4. 修改 /etc/proxychains.conf 文件
5. 将 pip 代理修改为 https://mirrors.aliyun.com/pypi/simple/
6. 将 docker 代理修改为 https://docker.mirrors.ustc.edu.cn , 并重启 docker 服务
**想让 f8x 在 CI/CD 中运行,但不要交互?**
只需在 `/tmp` 下创建一个空文件 `IS_CI`
```
touch /tmp/IS_CI
wget -O f8x https://raw.githubusercontent.com/ffffffff0x/f8x/main/f8x && mv --force f8x /usr/local/bin/f8x && chmod +x /usr/local/bin/f8x
f8x -k
```
## 许可证
[Apache License 2.0](https://github.com/ffffffff0x/f8x/blob/main/LICENSE)
# 404StarLink 2.0 - Galaxy

f8x 已加入 404Team [404StarLink 2.0 - Galaxy](https://github.com/knownsec/404StarLink2.0-Galaxy)
标签:CISA项目, CTF环境, Cutter, DevSecOps, GitHub Advanced Security, HTTP工具, JS文件枚举, Linux工具, MITM代理, 上游代理, 中间件, 后渗透, 安全加固, 应用安全, 数据展示, 数据库, 日志审计, 漏洞分析, 特权提升, 环境搭建, 端口探测, 红队, 网络攻防, 自动化部署, 请求拦截, 路径探测, 逆向工具