pimalaya/himalaya
GitHub: pimalaya/himalaya
Himalaya 是一款基于 Rust 的命令行邮件管理工具,支持多账户、多协议后端和 PGP 加密,可通过脚本实现邮件的自动化处理。
Stars: 6428 | Forks: 202
```
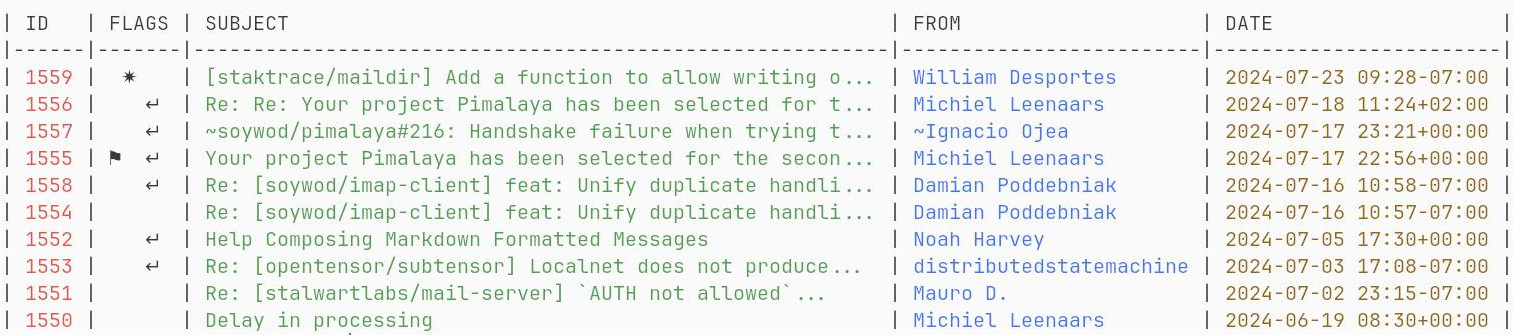
himalaya envelope list --account posteo --folder Archives.FOSS --page 2
```
## 目录
- [功能特性](#features)
- [安装说明](#installation)
- [预编译二进制文件](#pre-built-binary)
- [Cargo](#cargo)
- [Arch Linux](#arch-linux)
- [Homebrew](#homebrew)
- [Scoop](#scoop)
- [Fedora Linux/CentOS/RHEL](#fedora-linuxcentosrhel)
- [Nix](#nix)
- [源码编译](#sources)
- [配置说明](#configuration)
- [Proton Mail](#proton-mail)
- [Gmail](#gmail)
- [Outlook](#outlook)
- [iCloud Mail](#icloud-mail)
- [相关接口](#interfaces)
- [常见问题](#faq)
- [社交社区](#social)
- [赞助支持](#sponsoring)
## 功能特性
- 多账户配置:
- 通过 **wizard** 进行交互式配置(需要启用 `wizard` feature)
- 通过基于 **TOML** 的配置文件手动配置(参见 [`./config.sample.toml`](./config.sample.toml))
- 基于 `$EDITOR` 的邮件编辑
- **IMAP** 后端支持(需要启用 `imap` feature)
- **Maildir** 后端支持(需要启用 `maildir` feature)
- **Notmuch** 后端支持(需要启用 `notmuch` feature)
- **SMTP** 后端支持(需要启用 `smtp` feature)
- **Sendmail** 后端支持(需要启用 `sendmail` feature)
- 全局系统 **keyring** 用于密钥管理(需要启用 `keyring` feature)
- **OAuth 2.0** 授权流程(需要启用 `oauth2` feature)
- 通过 `--output json` 输出 **JSON**
- **PGP** 加密:
- 通过 shell 命令(需要启用 `pgp-commands` feature)
- 通过 [GPG](https://www.gnupg.org/) 绑定(需要启用 `pgp-gpg` feature)
- 通过原生实现(需要启用 `pgp-native` feature)
*Himalaya CLI 使用 [Rust](https://www.rust-lang.org/) 编写,并依赖 [cargo features](https://doc.rust-lang.org/cargo/reference/features.html) 来启用或禁用功能。默认 features 可以在 [`Cargo.toml`](./Cargo.toml#L18) 的 `features` 部分找到,或者访问 [docs.rs](https://docs.rs/crate/himalaya/latest/features)。*
## 安装说明
### 预编译二进制文件
可以使用 `install.sh` 安装脚本安装 Himalaya CLI:
*以 root 身份运行:*
```
curl -sSL https://raw.githubusercontent.com/pimalaya/himalaya/master/install.sh | sudo sh
```
*以普通用户身份运行:*
```
curl -sSL https://raw.githubusercontent.com/pimalaya/himalaya/master/install.sh | PREFIX=~/.local sh
```
这些命令会从 GitHub [releases](https://github.com/pimalaya/himalaya/releases) 部分安装最新的二进制文件。
如果您需要比最新发布版本更新的版本,请查看 [releases](https://github.com/pimalaya/himalaya/actions/workflows/releases.yml) GitHub 工作流并查找 *Artifacts* 部分。您会在那里找到适合您操作系统的预编译二进制文件。这些预编译二进制文件是基于 `master` 分支构建的。
*此类二进制文件使用默认的 cargo features 构建。如果您需要更多功能,请使用其他安装方法。*
### Cargo
可以使用 [cargo](https://doc.rust-lang.org/cargo/) 安装 Himalaya CLI:
```
cargo install himalaya --locked
```
仅安装 IMAP 支持版本:
```
cargo install himalaya --locked --no-default-features --features imap
```
您也可以使用 git 仓库获取更新(但稳定性较低)的版本:
```
cargo install --locked --git https://github.com/pimalaya/himalaya.git
```
### Arch Linux
可以通过社区仓库在 [Arch Linux](https://archlinux.org/) 上安装 Himalaya CLI:
```
pacman -S himalaya
```
或者使用 [用户仓库](https://aur.archlinux.org/):
```
git clone https://aur.archlinux.org/himalaya-git.git
cd himalaya-git
makepkg -isc
```
如果您使用 [yay](https://github.com/Jguer/yay),操作会更简单:
```
yay -S himalaya-git
```
### Homebrew
可以通过 [Homebrew](https://brew.sh/) 安装 Himalaya CLI:
```
brew install himalaya
```
注意:cargo features 与 brew 不兼容。如果您需要诸如 OAuth 2.0 之类的功能,请使用其他安装方式。
### Scoop
可以通过 [Scoop](https://scoop.sh/) 安装 Himalaya CLI:
```
scoop install himalaya
```
### Fedora Linux/CentOS/RHEL
可以通过 [COPR](https://copr.fedorainfracloud.org/coprs/atim/himalaya/) 仓库在 [Fedora Linux](https://fedoraproject.org/)/CentOS/RHEL 上安装 Himalaya CLI:
```
dnf copr enable atim/himalaya
dnf install himalaya
```
### Nix
可以通过 [Nix](https://serokell.io/blog/what-is-nix) 安装 Himalaya CLI:
```
nix-env -i himalaya
```
您也可以使用 git 仓库获取更新(但稳定性较低)的版本:
```
nix-env -if https://github.com/pimalaya/himalaya/archive/master.tar.gz
```
*或者,在源码检出目录内运行:*
```
nix-env -if .
```
如果您启用了 [Flakes](https://nixos.wiki/wiki/Flakes) 功能:
```
nix profile install himalaya
```
*或者,在源码检出目录内运行:*
```
nix profile install
```
*您也可以直接运行 Himalaya 而无需安装:*
```
nix run himalaya
```
### 源码编译
可以从源码编译安装 Himalaya CLI。
首先,您需要安装 Rust 开发环境(参见 [Rust 安装文档](https://doc.rust-lang.org/cargo/getting-started/installation.html)):
```
curl https://sh.rustup.rs -sSf | sh
```
然后,您需要克隆仓库并安装依赖:
```
git clone https://github.com/pimalaya/himalaya.git
cd himalaya
cargo check
```
现在,您可以构建 Himalaya:
```
cargo build --release
```
*编译生成的二进制文件位于 `target/release` 目录下。*
## 配置说明
只需运行 `himalaya`,向导将帮助您配置默认账户。
可以使用命令 `himalaya account configure
` 通过向导(重新)配置账户。
您也可以从头手动编辑您自己的配置:
- 复制 [`./config.sample.toml`](./config.sample.toml) 中的内容
- 将其粘贴到新文件 `~/.config/himalaya/config.toml` 中
- 编辑,然后注释或取消注释您想要的选项
### Proton Mail
使用 Proton Bridge 时,电子邮件会在本地同步,并通过本地 IMAP/SMTP 服务器暴露。这意味着两件事:
- ID 顺序可能会颠倒或打乱,但信封仍然会按日期排序。
- 需要手动停用 SSL/TLS。
- 使用的密码是 Proton Bridge 生成的密码,而不是您的 Proton Mail 账户密码。
```
[accounts.proton]
email = "example@proton.me"
backend.type = "imap"
backend.host = "127.0.0.1"
backend.port = 1143
backend.encryption.type = "none"
backend.login = "example@proton.me"
backend.auth.type = "password"
backend.auth.raw = "*****"
message.send.backend.type = "smtp"
message.send.backend.host = "127.0.0.1"
message.send.backend.port = 1025
message.send.backend.encryption.type = "none"
message.send.backend.login = "example@proton.me"
message.send.backend.auth.type = "password"
message.send.backend.auth.raw = "*****"
```
如果您仍想使用 TLS,则需要导出 Proton Bridge 生成的证书,然后将其提供给 Himalaya:
```
backend.encryption.type = "start-tls"
backend.encryption.cert = "/path/to/exported/cert.pem"
message.send.backend.encryption.type = "start-tls"
message.send.backend.encryption.cert = "/path/to/exported/cert.pem"
```
将密码保留在配置文件中便于测试,但不安全。您有两个更好的替代方案:
- 将密码保存在任何可以通过 CLI 查询的密码管理器中:
backend.auth.cmd = "pass show proton"
- 使用系统的全局 keyring(需要启用 `keyring` cargo feature):
backend.auth.keyring = "proton-example"
运行 `himalaya account configure proton` 将询问您的 IMAP 密码,只需粘贴之前生成的密码即可。
### Gmail
无法直接使用 Google 密码。有两种验证身份的方式:
#### 使用 [应用专用密码](https://support.google.com/mail/answer/185833)
此选项是最简单、最快捷的。首先,请确保:
- 已启用 IMAP
- 已启用两步验证
- 已允许安全性较低的应用访问
首先为 Himalaya 创建一个[专用密码](https://myaccount.google.com/apppasswords)。
```
[accounts.gmail]
email = "example@gmail.com"
folder.aliases.inbox = "INBOX"
folder.aliases.sent = "[Gmail]/Sent Mail"
folder.aliases.drafts = "[Gmail]/Drafts"
folder.aliases.trash = "[Gmail]/Trash"
backend.type = "imap"
backend.host = "imap.gmail.com"
backend.port = 993
backend.login = "example@gmail.com"
backend.auth.type = "password"
backend.auth.raw = "*****"
message.send.backend.type = "smtp"
message.send.backend.host = "smtp.gmail.com"
message.send.backend.port = 465
message.send.backend.login = "example@gmail.com"
message.send.backend.auth.type = "password"
message.send.backend.auth.cmd = "*****"
```
将密码保留在配置文件中便于测试,但不安全。您有两个更好的替代方案:
- 将密码保存在任何可以通过 CLI 查询的密码管理器中:
backend.auth.cmd = "pass show gmail"
- 使用系统的全局 keyring(需要启用 `keyring` cargo feature):
backend.auth.keyring = "gmail-example"
运行 `himalaya configure -a gmail` 将询问您的 IMAP 密码,只需粘贴之前生成的密码即可。
#### 使用 OAuth 2.0
此选项最安全,但配置最困难。它需要启用 `oauth2` 和 `keyring` cargo features。
首先,您需要按照[此指南](https://developers.google.com/identity/protocols/oauth2#1.-obtain-oauth-2.0-credentials-from-the-dynamic_data.setvar.console_name-.)获取 OAuth 2.0 凭据。获得客户端 ID 和客户端密钥后,您可以这样配置您的 Himalaya 账户:
```
[accounts.gmail]
email = "example@gmail.com"
folder.aliases.inbox = "INBOX"
folder.aliases.sent = "[Gmail]/Sent Mail"
folder.aliases.drafts = "[Gmail]/Drafts"
folder.aliases.trash = "[Gmail]/Trash"
backend.type = "imap"
backend.host = "imap.gmail.com"
backend.port = 993
backend.login = "example@gmail.com"
backend.auth.type = "oauth2"
backend.auth.method = "xoauth2"
backend.auth.client-id = "*****"
backend.auth.client-secret.keyring = "gmail-oauth2-client-secret"
backend.auth.access-token.keyring = "gmail-oauth2-access-token"
backend.auth.refresh-token.keyring = "gmail-oauth2-refresh-token"
backend.auth.auth-url = "https://accounts.google.com/o/oauth2/v2/auth"
backend.auth.token-url = "https://www.googleapis.com/oauth2/v3/token"
backend.auth.pkce = true
backend.auth.scope = "https://mail.google.com/"
message.send.backend.type = "smtp"
message.send.backend.host = "smtp.gmail.com"
message.send.backend.port = 465
message.send.backend.login = "example@gmail.com"
message.send.backend.auth.type = "oauth2"
message.send.backend.auth.method = "xoauth2"
message.send.backend.auth.client-id = "*****"
message.send.backend.auth.client-secret.keyring = "gmail-oauth2-client-secret"
message.send.backend.auth.access-token.keyring = "gmail-oauth2-access-token"
message.send.backend.auth.refresh-token.keyring = "gmail-oauth2-refresh-token"
message.send.backend.auth.auth-url = "https://accounts.google.com/o/oauth2/v2/auth"
message.send.backend.auth.token-url = "https://www.googleapis.com/oauth2/v3/token"
message.send.backend.auth.pkce = true
message.send.backend.auth.scope = "https://mail.google.com/"
```
运行 `himalaya account configure gmail` 将完成您的 OAuth 2.0 设置并询问您的客户端密钥。
### Outlook
```
[accounts.outlook]
email = "example@outlook.com"
backend.type = "imap"
backend.host = "outlook.office365.com"
backend.port = 993
backend.login = "example@outlook.com"
backend.auth.type = "password"
backend.auth.raw = "*****"
message.send.backend.type = "smtp"
message.send.backend.host = "smtp-mail.outlook.com"
message.send.backend.port = 587
message.send.backend.encryption.type = "start-tls"
message.send.backend.login = "example@outlook.com"
message.send.backend.auth.type = "password"
message.send.backend.auth.raw = "*****"
```
将密码保留在配置文件中便于测试,但不安全。您有两个更好的替代方案:
- 将密码保存在任何可以通过 CLI 查询的密码管理器中:
backend.auth.cmd = "pass show outlook"
- 使用系统的全局 keyring(需要启用 `keyring` cargo feature):
backend.auth.keyring = "outlook-example"
运行 `himalaya account configure outlook` 将询问您的 IMAP 密码,只需粘贴之前生成的密码即可。
#### 使用 OAuth 2.0
此选项最安全,但配置最困难。首先,您需要按照[此指南](https://learn.microsoft.com/en-us/exchange/client-developer/legacy-protocols/how-to-authenticate-an-imap-pop-smtp-application-by-using-oauth)获取 OAuth 2.0 凭据。获得客户端 ID 和客户端密钥后,您可以这样配置您的 Himalaya 账户:
```
[accounts.outlook]
email = "example@outlook.com"
backend.type = "imap"
backend.host = "outlook.office365.com"
backend.port = 993
backend.login = "example@outlook.com"
backend.auth.type = "oauth2"
backend.auth.client-id = "*****"
backend.auth.client-secret.keyring = "outlook-oauth2-client-secret"
backend.auth.access-token.keyring = "outlook-oauth2-access-token"
backend.auth.refresh-token.keyring = "outlook-oauth2-refresh-token"
backend.auth.auth-url = "https://login.microsoftonline.com/common/oauth2/v2.0/authorize"
backend.auth.token-url = "https://login.microsoftonline.com/common/oauth2/v2.0/token"
backend.auth.pkce = true
backend.auth.scopes = ["https://outlook.office.com/IMAP.AccessAsUser.All", "https://outlook.office.com/SMTP.Send"]
message.send.backend.type = "smtp"
message.send.backend.host = "smtp.mail.outlook.com"
message.send.backend.port = 587
message.send.backend.starttls = true
message.send.backend.login = "example@outlook.com"
message.send.backend.auth.type = "oauth2"
message.send.backend.auth.client-id = "*****"
message.send.backend.auth.client-secret.keyring = "outlook-oauth2-client-secret"
message.send.backend.auth.access-token.keyring = "outlook-oauth2-access-token"
message.send.backend.auth.refresh-token.keyring = "outlook-oauth2-refresh-token"
message.send.backend.auth.auth-url = "https://login.microsoftonline.com/common/oauth2/v2.0/authorize"
message.send.backend.auth.token-url = "https://login.microsoftonline.com/common/oauth2/v2.0/token"
message.send.backend.auth.pkce = true
message.send.backend.auth.scopes = ["https://outlook.office.com/IMAP.AccessAsUser.All", "https://outlook.office.com/SMTP.Send"]
```
运行 `himalaya account configure outlook` 将完成您的 OAuth 2.0 设置并询问您的客户端密钥。
### iCloud Mail
来自 [iCloud Mail](https://support.apple.com/en-us/HT202304) 支持页面:
- IMAP 端口 = `993`。
- IMAP 登录名 = 您的 iCloud Mail 邮箱地址名称(例如 `johnappleseed`,而不是 `johnappleseed@icloud.com`)
- SMTP 端口 = `587` 并使用 `STARTTLS`
- SMTP 登录名 = 完整的 iCloud Mail 邮箱地址(例如 `johnappleseed@icloud.com`,而不是 `johnappleseed`)
```
[accounts.icloud]
email = "johnappleseed@icloud.com"
backend.type = "imap"
backend.host = "imap.mail.me.com"
backend.port = 993
backend.login = "johnappleseed"
backend.auth.type = "password"
backend.auth.raw = "*****"
message.send.backend.type = "smtp"
message.send.backend.host = "smtp.mail.me.com"
message.send.backend.port = 587
message.send.backend.encryption.type = "start-tls"
message.send.backend.login = "johnappleseed@icloud.com"
message.send.backend.auth.type = "password"
message.send.backend.auth.raw = "*****"
folder.aliases.sent = "Sent Messages"
```
将密码保留在配置文件中便于测试,但不安全。您有两个更好的替代方案:
- 将密码保存在任何可以通过 CLI 查询的密码管理器中:
backend.auth.cmd = "pass show icloud"
- 使用系统的全局 keyring(需要启用 `keyring` cargo feature):
backend.auth.keyring = "icloud-example"
运行 `himalaya account configure icloud` 将询问您的 IMAP 密码,只需粘贴之前生成的密码即可。
## 相关接口
这些接口建立在 Himalaya CLI 之上,以改善用户体验:
- [pimalaya/himalaya-vim](https://github.com/pimalaya/himalaya-vim): Vim 插件
- [dantecatalfamo/himalaya-emacs](https://github.com/dantecatalfamo/himalaya-emacs): Emacs 插件
- [jns/himalaya](https://www.raycast.com/jns/himalaya): Raycast 扩展
- [openclaw/openclaw](https://github.com/openclaw/openclaw/blob/main/skills/himalaya/SKILL.md): OpenClaw SKILL
- [parisni/dfzf](https://github.com/parisni/dfzf): dfzf 集成
## 常见问题
它与 aerc、mutt 或 alpine 有何不同?
Aerc、mutt 和 alpine 可以归类为终端用户界面(TUI)。当程序执行时,您的终端会被锁定在一个事件循环中,您需要使用按键绑定与电子邮件进行交互。
Himalaya 也是一个 TUI,但更具体地说是一个命令行界面(CLI)。没有事件循环:您使用 shell 命令以无状态的方式与电子邮件交互。
此外,Himalaya CLI 基于 `email-lib`,这也是 Pimalaya 项目的一部分。其目的不仅仅是提出一个新的终端界面,还要公开用于处理电子邮件的 Rust 工具。任何懂 Rust 语言的人都可以构建自己的电子邮件界面,而无需重复造轮子。
如何撰写邮件?
一封电子邮件由一系列**头部**(`key: val`)和一个**正文**组成。它们共同构成一个模板:
```
Header: value
Header: value
Header: value
Body
```
***头部和正文必须由空行分隔。***
### 头部
以下是有效的电子邮件模板头部的非详尽列表:
- `Message-ID`:表示消息标识符(通常您不需要手动设置)
- `In-Reply-To`:表示回复消息的标识符
- `Date`:表示消息的日期
- `Subject`:表示消息的主题
- `From`:表示发件人的地址
- `To`:表示收件人的地址
- `Reply-To`:表示收件人应回复的地址,而不是 `From` 头部
- `Cc`:表示其他收件人的地址(抄送)
- `Bcc`:表示其他隐藏收件人的地址(密送)
地址可以是:
- 单个电子邮件地址 `user@domain`
- 命名地址 `Name `
- 带引号的命名地址 `"Name" `
多个地址用逗号 `,` 分隔:`user@domain, Name , "Name" `。
### 纯文本正文
电子邮件模板正文可以用纯文本编写。结果将被编译为单个 `text/plain` MIME 部分:
```
From: alice@localhost
To: Bob
Subject: Hello from Himalaya
Hello, world!
```
### MML 正文
电子邮件模板正文也可以用 MML 编写。MIME 元语言由 Emacs [`mml`](https://www.gnu.org/software/emacs/manual/html_node/emacs-mime/Composing.html) ELisp 模块引入。Pimalaya 将其[移植](https://github.com/pimalaya/core/tree/master/mml)到了 Rust。
原始电子邮件根据 [MIME](https://www.rfc-editor.org/rfc/rfc2045) 标准进行结构化。该标准生成的冗长且不友好。MML 应运而生:它简化了电子邮件正文的构建方式。由于其基于 XML 的简单语法,它允许您轻松添加多个部分、附加二进制文件或向正文附加内联图像,而无需处理 MIME 标准。
例如,此 MML 模板:
```
From: alice@localhost
To: bob@localhost
Subject: MML simple
<#multipart type=alternative>
This is a plain text part.
<#part type=text/enriched>
This is a centered enriched part
<#/multipart>
```
编译为以下 MIME 消息:
```
Subject: MML simple
To: bob@localhost
From: alice@localhost
MIME-Version: 1.0
Date: Tue, 29 Nov 2022 13:07:01 +0000
Content-Type: multipart/alternative;
boundary="4CV1Cnp7mXkDyvb55i77DcNSkKzB8HJzaIT84qZe"
--4CV1Cnp7mXkDyvb55i77DcNSkKzB8HJzaIT84qZe
Content-Type: text/plain; charset=utf-8
Content-Transfer-Encoding: 7bit
This is a plain text part.
--4CV1Cnp7mXkDyvb55i77DcNSkKzB8HJzaIT84qZe
Content-Type: text/enriched
Content-Transfer-Encoding: 7bit
This is a centered enriched part
--4CV1Cnp7mXkDyvb55i77DcNSkKzB8HJzaIT84qZe--
```
*更多示例请参见 [pimalaya/core/mml](https://github.com/pimalaya/core/tree/master/mml/examples)。*
如何在邮件中添加附件?
*请先阅读常见问题:如何撰写邮件?*。
```
From: alice@localhost
To: bob@localhost
Subject: How to attach stuff
Regular binary attachment:
<#part filename=/path/to/file.pdf><#/part>
Custom file name:
<#part filename=/path/to/file.pdf name=custom.pdf><#/part>
Inline image:
<#part disposition=inline filename=/path/to/image.png><#/part>
```
*更多示例请参见 [pimalaya/core/mml](https://github.com/pimalaya/core/tree/master/mml/examples)。*
如何调试 Himalaya CLI?
最简单的方法是使用 `--debug` 和 `--trace` 参数。
高级方法基于环境变量:
- `RUST_LOG=`:确定日志级别过滤器,可以是 `off`、`error`、`warn`、`info`、`debug` 或 `trace` 之一。
- `RUST_SPANTRACE=1`:启用跨度跟踪(跨度代表程序在特定上下文中执行的时段)。
- `RUST_BACKTRACE=1`:启用错误回溯。
- `RUST_BACKTRACE=full`:启用完整错误回溯,包括产生错误的源代码行。
日志会写入 `stderr`,这意味着您可以轻松地将它们重定向到文件:
```
RUST_LOG=debug himalaya 2>/tmp/himalaya.log
```
向导如何发现 IMAP/SMTP 配置?
所有查找机制都使用电子邮件地址的域作为查找基础。其灵感主要来自 Thunderbird [自动配置](https://udn.realityripple.com/docs/Mozilla/Thunderbird/Autoconfiguration) 协议。例如,对于电子邮件地址 `test@example.com`,查找按(以下顺序)执行:
1. 检查 `autoconfig.example.com`
2. 在 ISPDB(Thunderbird 中央数据库)中查找 `example.com`
3. 在 DNS 中查找 `MX example.com`,对于 `mx1.mail.hoster.com`,在 ISPDB 中查找 `hoster.com`
4. 在 DNS 中查找 `SRV example.com`
5. 尝试猜测(`imap.example.com`、`smtp.example.com`……)
如何禁用彩色输出?
只需设置环境变量 NO_COLOR=1
## 社交社区
- 在 [Matrix](https://matrix.to/#/#pimalaya:matrix.org) 上交流
- 在 [Mastodon](https://fosstodon.org/@pimalaya) 或 [RSS](https://fosstodon.org/@pimalaya.rss) 上获取动态
- 发送邮件至 [pimalaya.org@posteo.net](mailto:pimalaya.org@posteo.net)
## 赞助支持
[](https://nlnet.nl/)
特别感谢 [NLnet 基金会](https://nlnet.nl/)和[欧盟委员会](https://www.ngi.eu/)多年来对项目的资金支持:
- 2022: [NGI Assure](https://nlnet.nl/project/Himalaya/)
- 2023: [NGI Zero Entrust](https://nlnet.nl/project/Pimalaya/)
- 2024: [NGI Zero Core](https://nlnet.nl/project/Pimalaya-PIM/) *(持续至 2026 年)*
如果您欣赏这个项目,欢迎通过以下平台进行捐赠:
[](https://github.com/sponsors/soywod)
[](https://ko-fi.com/soywod)
[](https://www.buymeacoffee.com/soywod)
[](https://liberapay.com/soywod)
[](https://thanks.dev/soywod)
[](https://www.paypal.com/paypalme/soywod)标签:Awesome, CLI, Gmail, IMAP, Maildir, Notmuch, Outlook, ProtonMail, Python安全, Rust, SMTP, WiFi技术, 动态分析, 可视化界面, 效率工具, 电子邮件, 系统管理, 终端, 网络流量审计, 账号管理, 通知系统, 邮件客户端


