debug-js/debug
GitHub: debug-js/debug
一个模仿 Node.js 核心调试技术的轻量级 JavaScript 调试日志工具,通过命名空间和环境变量实现运行时动态开关调试输出。
Stars: 11449 | Forks: 985
# 调试
 一个微小的 JavaScript 调试实用工具,模仿了 Node.js 核心的调试技术。
适用于 Node.js 和 Web 浏览器。
## 安装说明
```
$ npm install debug
```
## 用法
`debug` 暴露了一个函数;只需将你的模块名称传递给该函数,它就会返回一个带有修饰的 `console.error` 版本,供你传递调试语句。这将允许你切换模块不同部分以及整个模块的调试输出。
示例 _app.js_:
```
var debug = require('debug')('http')
, http = require('http')
, name = 'My App';
// fake app
debug('booting %o', name);
http.createServer(function(req, res){
debug(req.method + ' ' + req.url);
res.end('hello\n');
}).listen(3000, function(){
debug('listening');
});
// fake worker of some kind
require('./worker');
```
示例 _worker.js_:
```
var a = require('debug')('worker:a')
, b = require('debug')('worker:b');
function work() {
a('doing lots of uninteresting work');
setTimeout(work, Math.random() * 1000);
}
work();
function workb() {
b('doing some work');
setTimeout(workb, Math.random() * 2000);
}
workb();
```
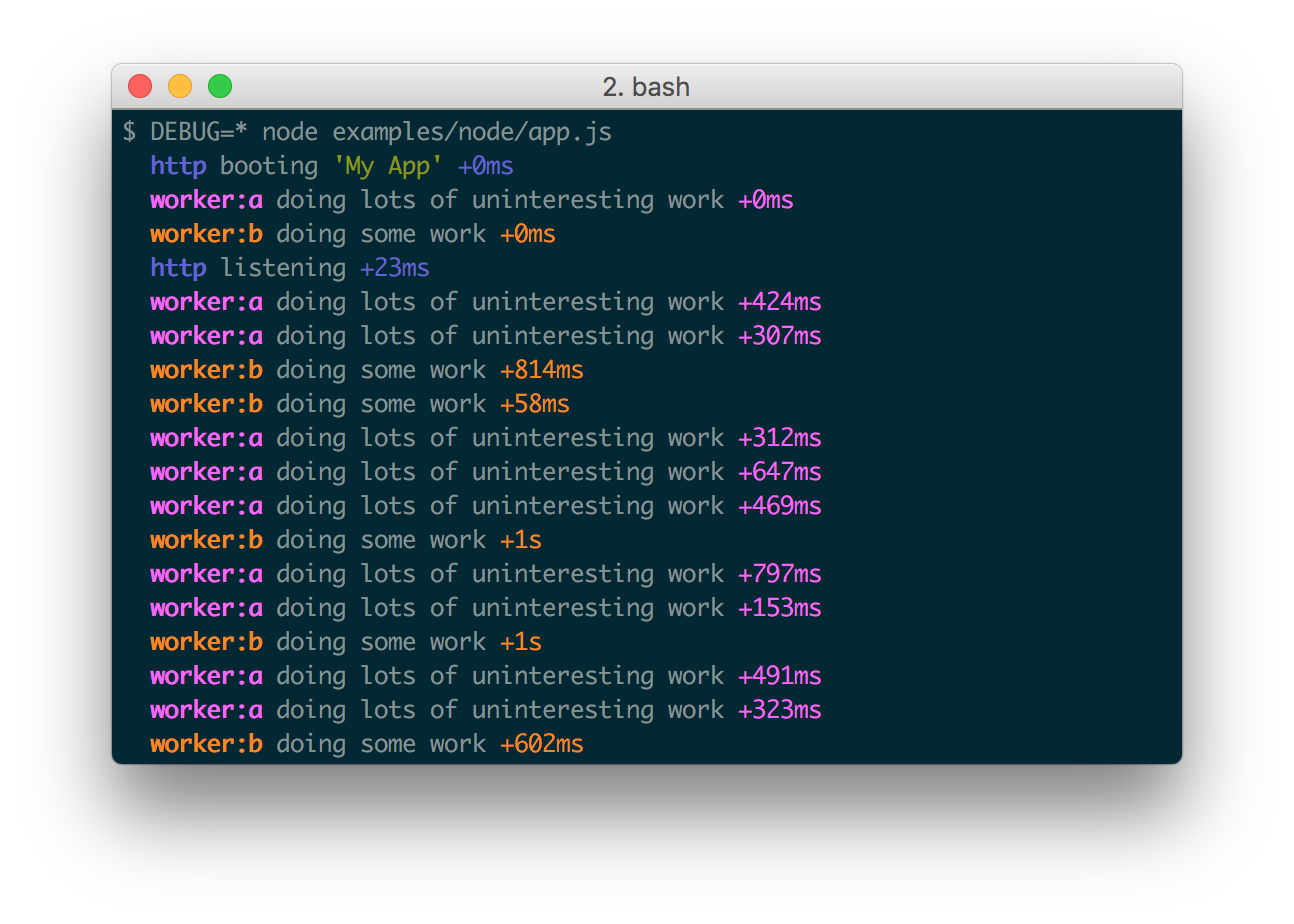
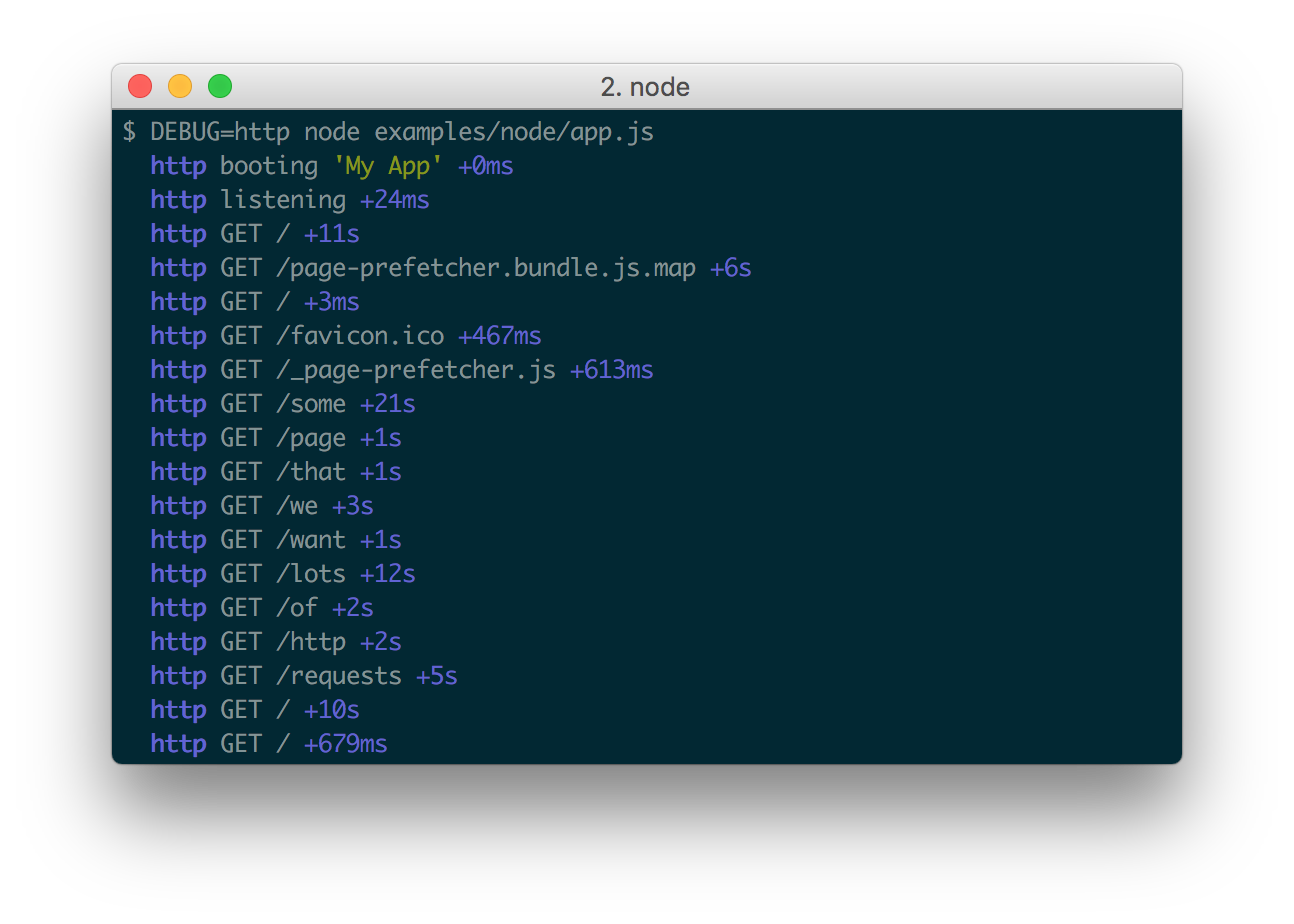
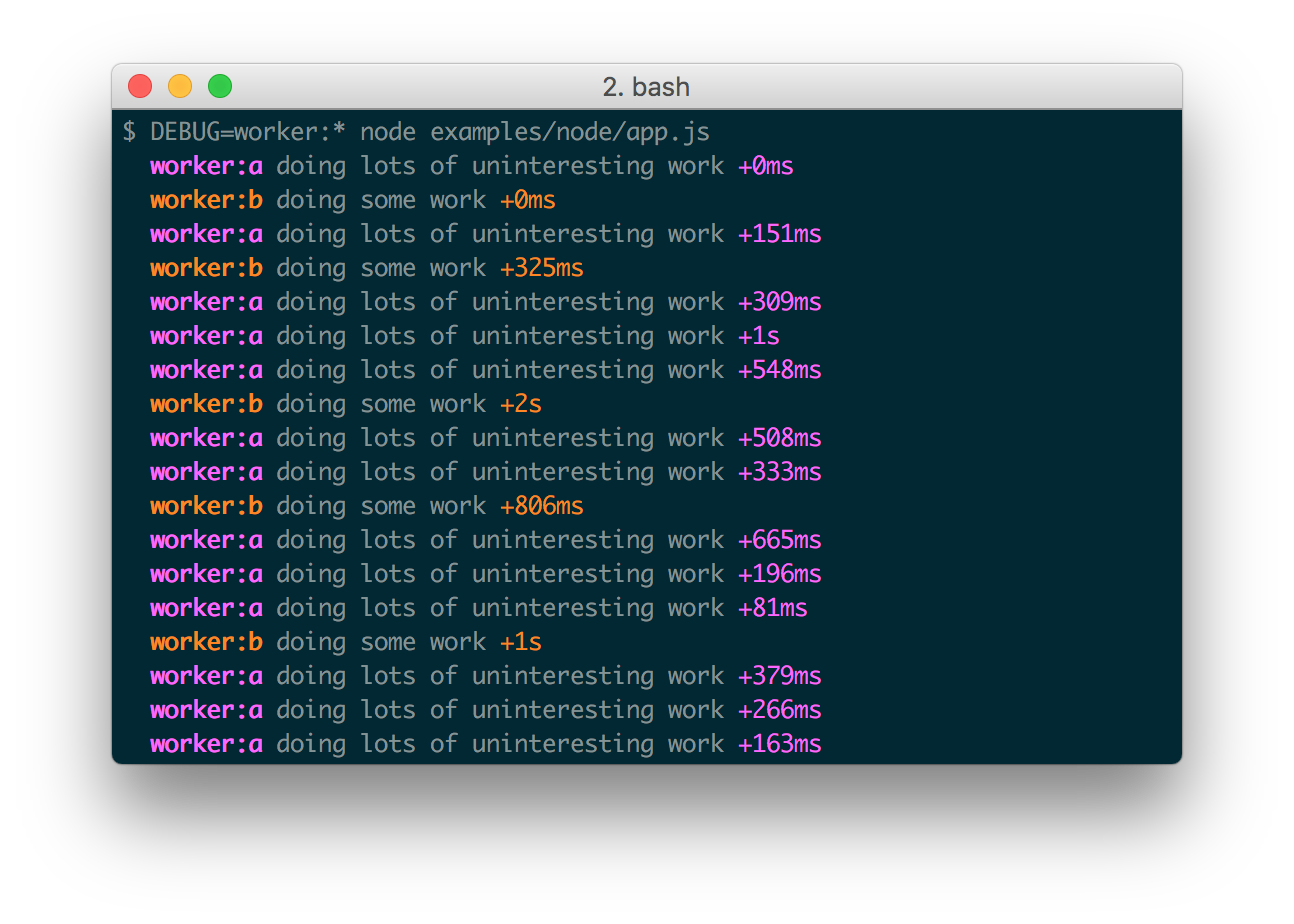
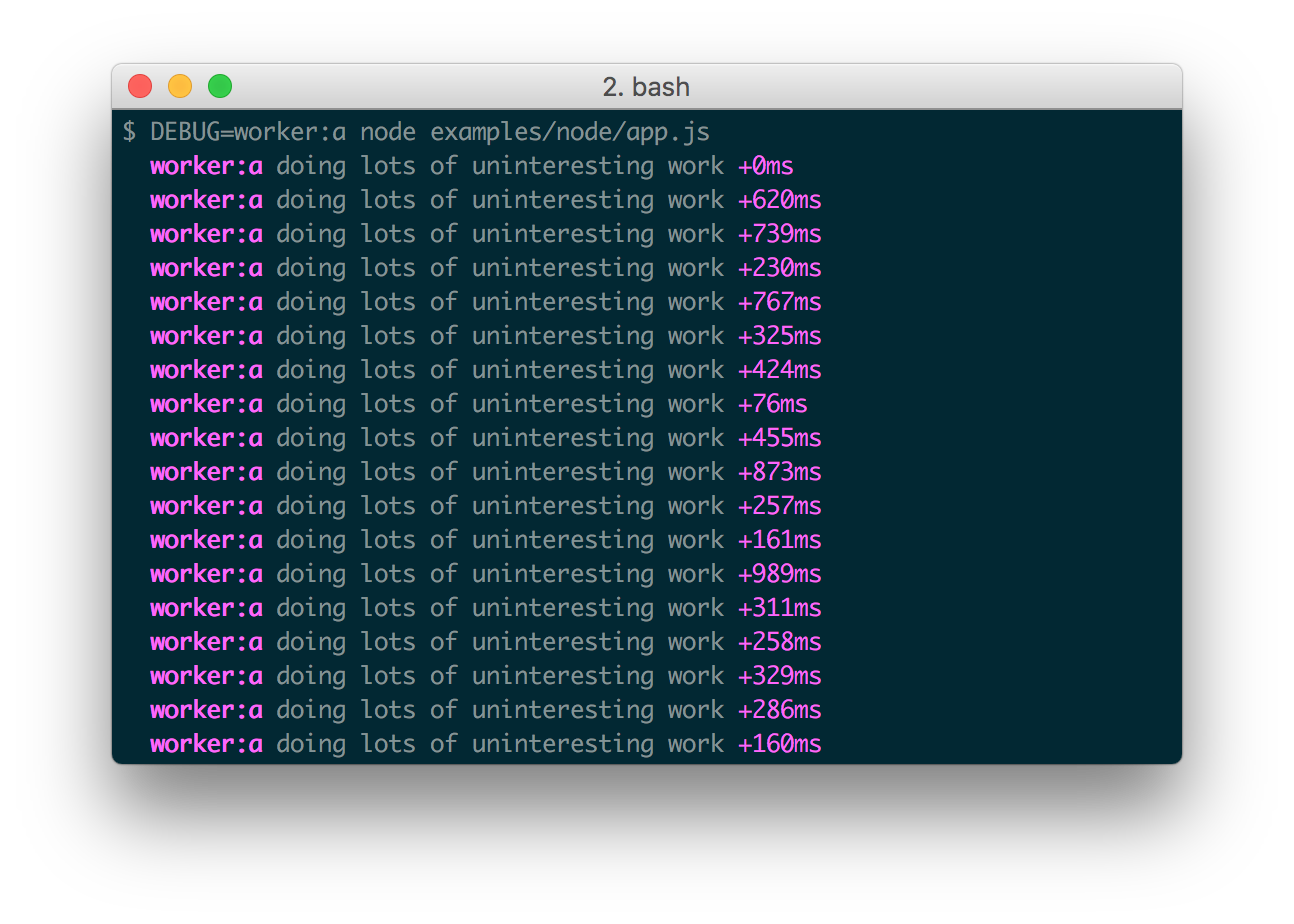
然后使用 `DEBUG` 环境变量,根据空格或逗号分隔的名称来启用它们。
以下是一些示例:
一个微小的 JavaScript 调试实用工具,模仿了 Node.js 核心的调试技术。
适用于 Node.js 和 Web 浏览器。
## 安装说明
```
$ npm install debug
```
## 用法
`debug` 暴露了一个函数;只需将你的模块名称传递给该函数,它就会返回一个带有修饰的 `console.error` 版本,供你传递调试语句。这将允许你切换模块不同部分以及整个模块的调试输出。
示例 _app.js_:
```
var debug = require('debug')('http')
, http = require('http')
, name = 'My App';
// fake app
debug('booting %o', name);
http.createServer(function(req, res){
debug(req.method + ' ' + req.url);
res.end('hello\n');
}).listen(3000, function(){
debug('listening');
});
// fake worker of some kind
require('./worker');
```
示例 _worker.js_:
```
var a = require('debug')('worker:a')
, b = require('debug')('worker:b');
function work() {
a('doing lots of uninteresting work');
setTimeout(work, Math.random() * 1000);
}
work();
function workb() {
b('doing some work');
setTimeout(workb, Math.random() * 2000);
}
workb();
```
然后使用 `DEBUG` 环境变量,根据空格或逗号分隔的名称来启用它们。
以下是一些示例:
 #### Windows 命令提示符注意事项
##### CMD
在 Windows 中,使用 `set` 命令设置环境变量。
```
set DEBUG=*,-not_this
```
示例:
```
set DEBUG=* & node app.js
```
##### PowerShell(VS Code 默认)
PowerShell 使用不同的语法来设置环境变量。
```
$env:DEBUG = "*,-not_this"
```
示例:
```
$env:DEBUG='app';node app.js
```
然后,像往常一样运行要调试的程序。
npm 脚本示例:
```
"windowsDebug": "@powershell -Command $env:DEBUG='*';node app.js",
```
## Namespace 颜色
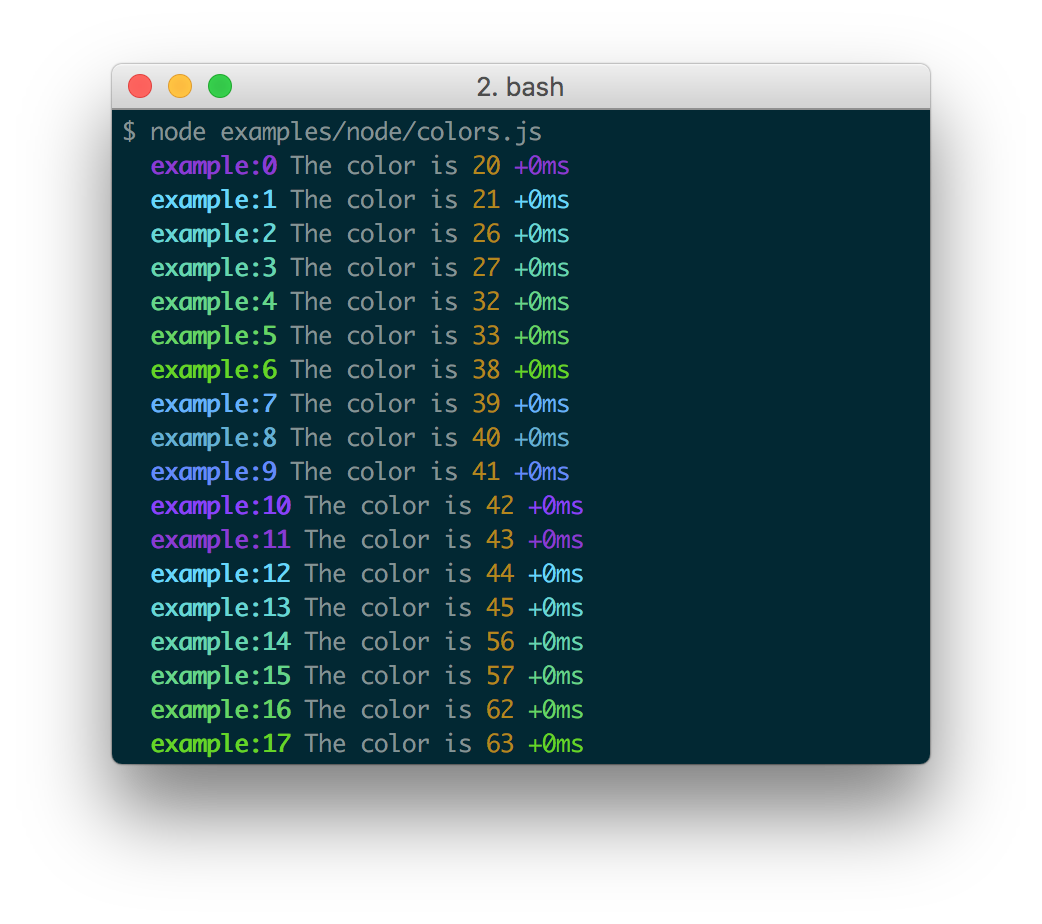
每个 debug 实例都会根据其 namespace 名称生成一种颜色。
这在视觉解析调试输出以识别调试行属于哪个 debug 实例时很有帮助。
#### Node.js
在 Node.js 中,当 stderr 是 TTY 时会启用颜色。你还_应该_在 debug 旁边安装 [`supports-color`](https://npmjs.org/supports-color) 模块,
否则 debug 将只使用少数几种基本颜色。
#### Windows 命令提示符注意事项
##### CMD
在 Windows 中,使用 `set` 命令设置环境变量。
```
set DEBUG=*,-not_this
```
示例:
```
set DEBUG=* & node app.js
```
##### PowerShell(VS Code 默认)
PowerShell 使用不同的语法来设置环境变量。
```
$env:DEBUG = "*,-not_this"
```
示例:
```
$env:DEBUG='app';node app.js
```
然后,像往常一样运行要调试的程序。
npm 脚本示例:
```
"windowsDebug": "@powershell -Command $env:DEBUG='*';node app.js",
```
## Namespace 颜色
每个 debug 实例都会根据其 namespace 名称生成一种颜色。
这在视觉解析调试输出以识别调试行属于哪个 debug 实例时很有帮助。
#### Node.js
在 Node.js 中,当 stderr 是 TTY 时会启用颜色。你还_应该_在 debug 旁边安装 [`supports-color`](https://npmjs.org/supports-color) 模块,
否则 debug 将只使用少数几种基本颜色。
 #### Web 浏览器
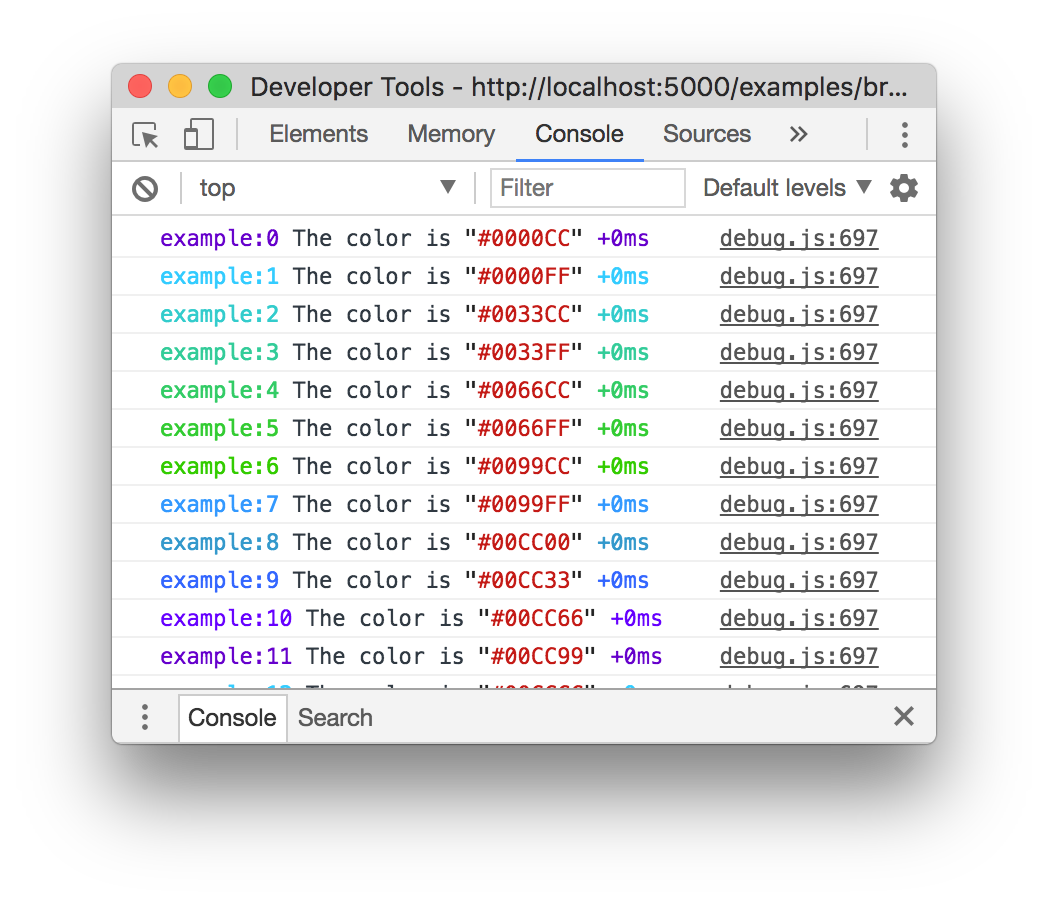
在支持 `%c` 格式化选项的“Web 检查器”中也会启用颜色。这些是 WebKit Web 检查器、Firefox([自版本 31 起](https://hacks.mozilla.org/2014/05/editable-box-model-multiple-selection-sublime-text-keys-much-more-firefox-developer-tools-episode-31/))
以及 Firefox 的 Firebug 插件(任何版本)。
#### Web 浏览器
在支持 `%c` 格式化选项的“Web 检查器”中也会启用颜色。这些是 WebKit Web 检查器、Firefox([自版本 31 起](https://hacks.mozilla.org/2014/05/editable-box-model-multiple-selection-sublime-text-keys-much-more-firefox-developer-tools-episode-31/))
以及 Firefox 的 Firebug 插件(任何版本)。
 ## 毫秒差异
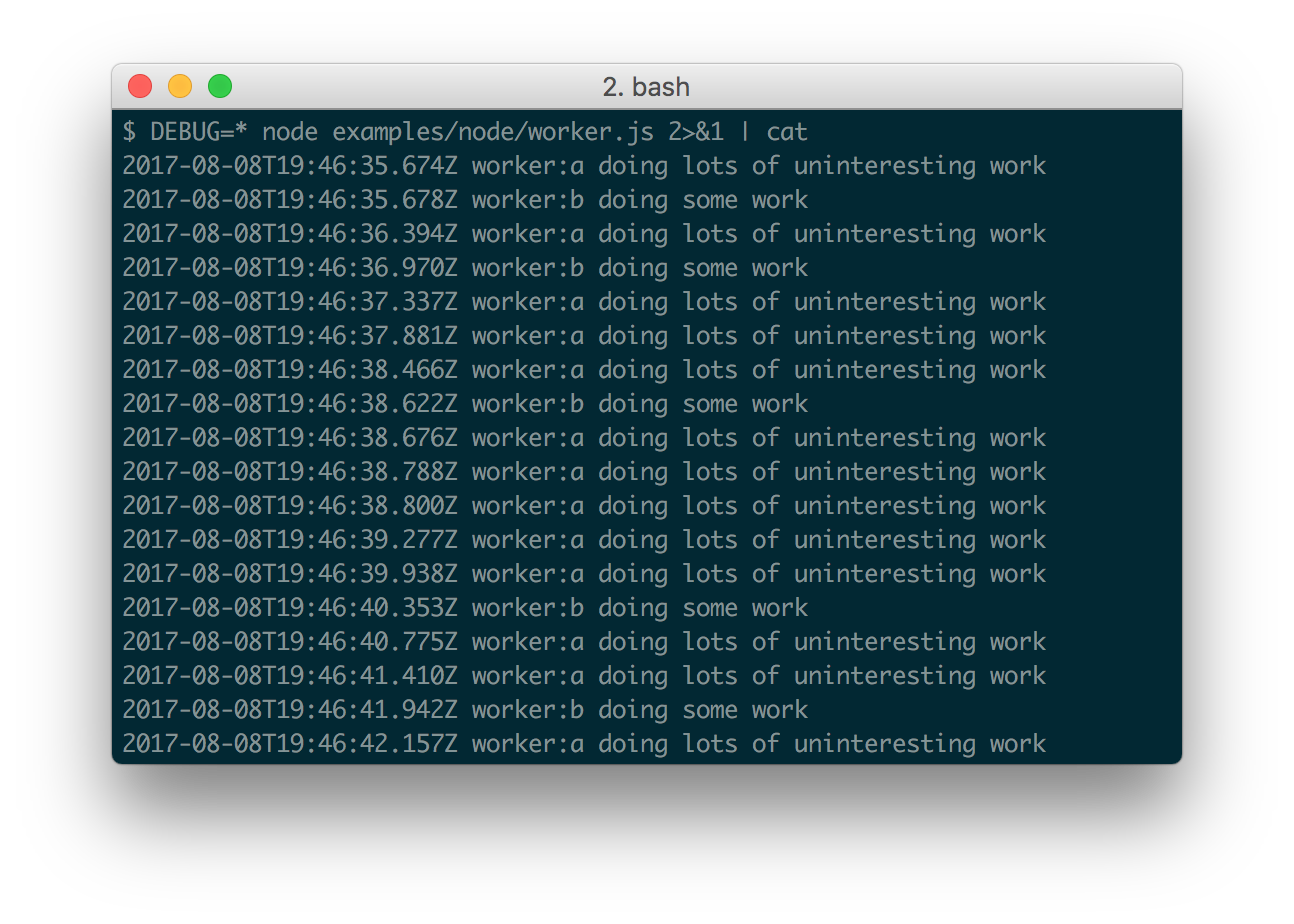
在积极开发应用程序时,查看一次 `debug()` 调用与下一次调用之间花费的时间可能会很有用。例如,假设你在请求资源之前和之后都调用了 `debug()`,“+NNNms”将显示调用之间花费了多少时间。
当 stdout 不是 TTY 时,将使用 `Date#toISOString()`,这使得它对于记录调试信息更有用,如下所示:
## 毫秒差异
在积极开发应用程序时,查看一次 `debug()` 调用与下一次调用之间花费的时间可能会很有用。例如,假设你在请求资源之前和之后都调用了 `debug()`,“+NNNms”将显示调用之间花费了多少时间。
当 stdout 不是 TTY 时,将使用 `Date#toISOString()`,这使得它对于记录调试信息更有用,如下所示:
 ## 约定
如果你在一个或多个库中使用它,你_应该_使用你的库名称,以便开发人员可以根据需要切换调试,而无需猜测名称。如果你有多个 debuggers,你_应该_用你的库名称作为前缀,并使用“:”来分隔特性。例如,来自 Connect 的“bodyParser”将变为“connect:bodyParser”。如果你在名称末尾附加“*”,无论 DEBUG 环境变量的设置如何,它都将始终被启用。然后你可以将其用于正常输出以及调试输出。
## 通配符
`*` 字符可用作通配符。例如,假设你的库中有名为“connect:bodyParser”、“connect:compress”、“connect:session”的 debuggers,你不必使用
`DEBUG=connect:bodyParser,connect:compress,connect:session` 列出所有三个,只需
`DEBUG=connect:*` 即可,或者如果想要运行使用此模块的所有内容,只需使用 `DEBUG=*`。
你也可以通过在特定的 debuggers 前加上“-”字符来排除它们。
例如,`DEBUG=*,-connect:*` 将包含除以“connect:”开头的之外的所有 debuggers。
## 环境变量
通过 Node.js 运行时,你可以设置几个环境变量来
改变调试日志的行为:
| 名称 | 目的 |
|-----------|-------------------------------------------------|
| `DEBUG` | 启用/禁用特定的调试 namespace。 |
| `DEBUG_HIDE_DATE` | 在调试输出中隐藏日期(非 TTY)。 |
| `DEBUG_COLORS`| 是否在调试输出中使用颜色。 |
| `DEBUG_DEPTH` | 对象检查深度。 |
| `DEBUG_SHOW_HIDDEN` | 显示被检查对象的隐藏属性。 |
__注意:__ 以 `DEBUG_` 开头的环境变量最终会被
转换为一个 Options 对象,该对象会与 `%o`/`%O` 格式化程序一起使用。
有关完整列表,请参阅 Node.js 文档中的
[`util.inspect()`](https://nodejs.org/api/util.html#util_util_inspect_object_options)。
## 格式化程序
Debug 使用 [printf 风格](https://wikipedia.org/wiki/Printf_format_string)的格式化。
以下是官方支持的格式化程序:
| 格式化程序 | 表示 |
|-----------|----------------|
| `%O` | 在多行上美观地打印一个对象。 |
| `%o` | 在单行上美观地打印一个对象。 |
| `%s` | 字符串。 |
| `%d` | 数字(包括整数和浮点数)。 |
| `%j` | JSON。如果参数包含循环引用,则替换为字符串 '[Circular]'。 |
| `%%` | 单个百分号 ('%')。这不消耗参数。 |
### 自定义格式化程序
你可以通过扩展 `debug.formatters` 对象来添加自定义格式化程序。
例如,如果你想添加对使用
`%h` 将 Buffer 渲染为十六进制的支持,你可以这样做:
```
const createDebug = require('debug')
createDebug.formatters.h = (v) => {
return v.toString('hex')
}
// …elsewhere
const debug = createDebug('foo')
debug('this is hex: %h', new Buffer('hello world'))
// foo this is hex: 68656c6c6f20776f726c6421 +0ms
```
## 浏览器支持
你可以使用 [browserify](https://github.com/substack/node-browserify) 构建一个适用于浏览器的脚本,
或者如果你不想自己构建,可以直接使用 [browserify-as-a-service](https://wzrd.in/) [构建](https://wzrd.in/standalone/debug@latest)。
Debug 的启用状态目前由 `localStorage` 持久化。
考虑下面显示的情况,你有 `worker:a` 和 `worker:b`,
并且希望调试两者。你可以使用 `localStorage.debug` 启用它们:
```
localStorage.debug = 'worker:*'
```
然后刷新页面。
```
a = debug('worker:a');
b = debug('worker:b');
setInterval(function(){
a('doing some work');
}, 1000);
setInterval(function(){
b('doing some work');
}, 1200);
```
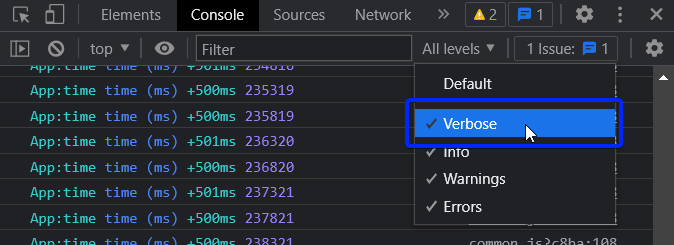
在基于 Chromium 的 Web 浏览器(例如 Brave、Chrome 和 Electron)中,JavaScript 控制台默认仅在“Verbose”日志级别_启用_时才会显示由 `debug` 记录的消息。
## 约定
如果你在一个或多个库中使用它,你_应该_使用你的库名称,以便开发人员可以根据需要切换调试,而无需猜测名称。如果你有多个 debuggers,你_应该_用你的库名称作为前缀,并使用“:”来分隔特性。例如,来自 Connect 的“bodyParser”将变为“connect:bodyParser”。如果你在名称末尾附加“*”,无论 DEBUG 环境变量的设置如何,它都将始终被启用。然后你可以将其用于正常输出以及调试输出。
## 通配符
`*` 字符可用作通配符。例如,假设你的库中有名为“connect:bodyParser”、“connect:compress”、“connect:session”的 debuggers,你不必使用
`DEBUG=connect:bodyParser,connect:compress,connect:session` 列出所有三个,只需
`DEBUG=connect:*` 即可,或者如果想要运行使用此模块的所有内容,只需使用 `DEBUG=*`。
你也可以通过在特定的 debuggers 前加上“-”字符来排除它们。
例如,`DEBUG=*,-connect:*` 将包含除以“connect:”开头的之外的所有 debuggers。
## 环境变量
通过 Node.js 运行时,你可以设置几个环境变量来
改变调试日志的行为:
| 名称 | 目的 |
|-----------|-------------------------------------------------|
| `DEBUG` | 启用/禁用特定的调试 namespace。 |
| `DEBUG_HIDE_DATE` | 在调试输出中隐藏日期(非 TTY)。 |
| `DEBUG_COLORS`| 是否在调试输出中使用颜色。 |
| `DEBUG_DEPTH` | 对象检查深度。 |
| `DEBUG_SHOW_HIDDEN` | 显示被检查对象的隐藏属性。 |
__注意:__ 以 `DEBUG_` 开头的环境变量最终会被
转换为一个 Options 对象,该对象会与 `%o`/`%O` 格式化程序一起使用。
有关完整列表,请参阅 Node.js 文档中的
[`util.inspect()`](https://nodejs.org/api/util.html#util_util_inspect_object_options)。
## 格式化程序
Debug 使用 [printf 风格](https://wikipedia.org/wiki/Printf_format_string)的格式化。
以下是官方支持的格式化程序:
| 格式化程序 | 表示 |
|-----------|----------------|
| `%O` | 在多行上美观地打印一个对象。 |
| `%o` | 在单行上美观地打印一个对象。 |
| `%s` | 字符串。 |
| `%d` | 数字(包括整数和浮点数)。 |
| `%j` | JSON。如果参数包含循环引用,则替换为字符串 '[Circular]'。 |
| `%%` | 单个百分号 ('%')。这不消耗参数。 |
### 自定义格式化程序
你可以通过扩展 `debug.formatters` 对象来添加自定义格式化程序。
例如,如果你想添加对使用
`%h` 将 Buffer 渲染为十六进制的支持,你可以这样做:
```
const createDebug = require('debug')
createDebug.formatters.h = (v) => {
return v.toString('hex')
}
// …elsewhere
const debug = createDebug('foo')
debug('this is hex: %h', new Buffer('hello world'))
// foo this is hex: 68656c6c6f20776f726c6421 +0ms
```
## 浏览器支持
你可以使用 [browserify](https://github.com/substack/node-browserify) 构建一个适用于浏览器的脚本,
或者如果你不想自己构建,可以直接使用 [browserify-as-a-service](https://wzrd.in/) [构建](https://wzrd.in/standalone/debug@latest)。
Debug 的启用状态目前由 `localStorage` 持久化。
考虑下面显示的情况,你有 `worker:a` 和 `worker:b`,
并且希望调试两者。你可以使用 `localStorage.debug` 启用它们:
```
localStorage.debug = 'worker:*'
```
然后刷新页面。
```
a = debug('worker:a');
b = debug('worker:b');
setInterval(function(){
a('doing some work');
}, 1000);
setInterval(function(){
b('doing some work');
}, 1200);
```
在基于 Chromium 的 Web 浏览器(例如 Brave、Chrome 和 Electron)中,JavaScript 控制台默认仅在“Verbose”日志级别_启用_时才会显示由 `debug` 记录的消息。
 ## 输出流
默认情况下,`debug` 将记录到 stderr,但是可以通过覆盖 `log` 方法针对每个 namespace 进行配置:
示例 _stdout.js_:
```
var debug = require('debug');
var error = debug('app:error');
// by default stderr is used
error('goes to stderr!');
var log = debug('app:log');
// set this namespace to log via console.log
log.log = console.log.bind(console); // don't forget to bind to console!
log('goes to stdout');
error('still goes to stderr!');
// set all output to go via console.info
// overrides all per-namespace log settings
debug.log = console.info.bind(console);
error('now goes to stdout via console.info');
log('still goes to stdout, but via console.info now');
```
## 扩展
你可以简单地扩展 debugger
```
const log = require('debug')('auth');
//creates new debug instance with extended namespace
const logSign = log.extend('sign');
const logLogin = log.extend('login');
log('hello'); // auth hello
logSign('hello'); //auth:sign hello
logLogin('hello'); //auth:login hello
```
## 动态设置
你也可以通过调用 `enable()` 方法动态启用 debug:
```
let debug = require('debug');
console.log(1, debug.enabled('test'));
debug.enable('test');
console.log(2, debug.enabled('test'));
debug.disable();
console.log(3, debug.enabled('test'));
```
输出:
```
1 false
2 true
3 false
```
用法:
`enable(namespaces)`
`namespaces` 可以包含由冒号和通配符分隔的模式。
请注意,调用 `enable()` 会完全覆盖之前设置的 DEBUG 变量:
```
$ DEBUG=foo node -e 'var dbg = require("debug"); dbg.enable("bar"); console.log(dbg.enabled("foo"))'
=> false
```
`disable()`
将禁用所有 namespace。这些函数返回当前
启用(并跳过)的 namespace。如果你想在不了解最初启用了什么的情况下暂时禁用调试,这会很有用。
例如:
```
let debug = require('debug');
debug.enable('foo:*,-foo:bar');
let namespaces = debug.disable();
debug.enable(namespaces);
```
注意:无法保证该字符串与初始
启用字符串完全相同,但在语义上它们是相同的。
## 检查 debug target 是否已启用
创建 debug 实例后,你可以通过检查 `enabled` 属性来确定它是否
已启用:
```
const debug = require('debug')('http');
if (debug.enabled) {
// do stuff...
}
```
你也可以手动切换此属性,以强制
启用或禁用 debug 实例。
## 在子进程中的用法
由于 `debug` 检测输出是否为 TTY 的方式,当管道传输 `stderr` 时,子进程中不会显示颜色。解决方案是将 `DEBUG_COLORS=1` 环境变量传递给子进程。
例如:
```
worker = fork(WORKER_WRAP_PATH, [workerPath], {
stdio: [
/* stdin: */ 0,
/* stdout: */ 'pipe',
/* stderr: */ 'pipe',
'ipc',
],
env: Object.assign({}, process.env, {
DEBUG_COLORS: 1 // without this settings, colors won't be shown
}),
});
worker.stderr.pipe(process.stderr, { end: false });
```
## 作者
- TJ Holowaychuk
- Nathan Rajlich
- Andrew Rhyne
- Josh Junon
## 许可证
(The MIT License)
Copyright (c) 2014-2017 TJ Holowaychuk <tj@vision-media.ca>
Copyright (c) 2018-2021 Josh Junon
Permission is hereby granted, free of charge, to any person obtaining
a copy of this software and associated documentation files (the
'Software'), to deal in the Software without restriction, including
without limitation the rights to use, copy, modify, merge, publish,
distribute, sublicense, and/or sell copies of the Software, and to
permit persons to whom the Software is furnished to do so, subject to
the following conditions:
The above copyright notice and this permission notice shall be
included in all copies or substantial portions of the Software.
THE SOFTWARE IS PROVIDED 'AS IS', WITHOUT WARRANTY OF ANY KIND,
EXPRESS OR IMPLIED, INCLUDING BUT NOT LIMITED TO THE WARRANTIES OF
MERCHANTABILITY, FITNESS FOR A PARTICULAR PURPOSE AND NONINFRINGEMENT.
IN NO EVENT SHALL THE AUTHORS OR COPYRIGHT HOLDERS BE LIABLE FOR ANY
CLAIM, DAMAGES OR OTHER LIABILITY, WHETHER IN AN ACTION OF CONTRACT,
TORT OR OTHERWISE, ARISING FROM, OUT OF OR IN CONNECTION WITH THE
SOFTWARE OR THE USE OR OTHER DEALINGS IN THE SOFTWARE.
## 输出流
默认情况下,`debug` 将记录到 stderr,但是可以通过覆盖 `log` 方法针对每个 namespace 进行配置:
示例 _stdout.js_:
```
var debug = require('debug');
var error = debug('app:error');
// by default stderr is used
error('goes to stderr!');
var log = debug('app:log');
// set this namespace to log via console.log
log.log = console.log.bind(console); // don't forget to bind to console!
log('goes to stdout');
error('still goes to stderr!');
// set all output to go via console.info
// overrides all per-namespace log settings
debug.log = console.info.bind(console);
error('now goes to stdout via console.info');
log('still goes to stdout, but via console.info now');
```
## 扩展
你可以简单地扩展 debugger
```
const log = require('debug')('auth');
//creates new debug instance with extended namespace
const logSign = log.extend('sign');
const logLogin = log.extend('login');
log('hello'); // auth hello
logSign('hello'); //auth:sign hello
logLogin('hello'); //auth:login hello
```
## 动态设置
你也可以通过调用 `enable()` 方法动态启用 debug:
```
let debug = require('debug');
console.log(1, debug.enabled('test'));
debug.enable('test');
console.log(2, debug.enabled('test'));
debug.disable();
console.log(3, debug.enabled('test'));
```
输出:
```
1 false
2 true
3 false
```
用法:
`enable(namespaces)`
`namespaces` 可以包含由冒号和通配符分隔的模式。
请注意,调用 `enable()` 会完全覆盖之前设置的 DEBUG 变量:
```
$ DEBUG=foo node -e 'var dbg = require("debug"); dbg.enable("bar"); console.log(dbg.enabled("foo"))'
=> false
```
`disable()`
将禁用所有 namespace。这些函数返回当前
启用(并跳过)的 namespace。如果你想在不了解最初启用了什么的情况下暂时禁用调试,这会很有用。
例如:
```
let debug = require('debug');
debug.enable('foo:*,-foo:bar');
let namespaces = debug.disable();
debug.enable(namespaces);
```
注意:无法保证该字符串与初始
启用字符串完全相同,但在语义上它们是相同的。
## 检查 debug target 是否已启用
创建 debug 实例后,你可以通过检查 `enabled` 属性来确定它是否
已启用:
```
const debug = require('debug')('http');
if (debug.enabled) {
// do stuff...
}
```
你也可以手动切换此属性,以强制
启用或禁用 debug 实例。
## 在子进程中的用法
由于 `debug` 检测输出是否为 TTY 的方式,当管道传输 `stderr` 时,子进程中不会显示颜色。解决方案是将 `DEBUG_COLORS=1` 环境变量传递给子进程。
例如:
```
worker = fork(WORKER_WRAP_PATH, [workerPath], {
stdio: [
/* stdin: */ 0,
/* stdout: */ 'pipe',
/* stderr: */ 'pipe',
'ipc',
],
env: Object.assign({}, process.env, {
DEBUG_COLORS: 1 // without this settings, colors won't be shown
}),
});
worker.stderr.pipe(process.stderr, { end: false });
```
## 作者
- TJ Holowaychuk
- Nathan Rajlich
- Andrew Rhyne
- Josh Junon
## 许可证
(The MIT License)
Copyright (c) 2014-2017 TJ Holowaychuk <tj@vision-media.ca>
Copyright (c) 2018-2021 Josh Junon
Permission is hereby granted, free of charge, to any person obtaining
a copy of this software and associated documentation files (the
'Software'), to deal in the Software without restriction, including
without limitation the rights to use, copy, modify, merge, publish,
distribute, sublicense, and/or sell copies of the Software, and to
permit persons to whom the Software is furnished to do so, subject to
the following conditions:
The above copyright notice and this permission notice shall be
included in all copies or substantial portions of the Software.
THE SOFTWARE IS PROVIDED 'AS IS', WITHOUT WARRANTY OF ANY KIND,
EXPRESS OR IMPLIED, INCLUDING BUT NOT LIMITED TO THE WARRANTIES OF
MERCHANTABILITY, FITNESS FOR A PARTICULAR PURPOSE AND NONINFRINGEMENT.
IN NO EVENT SHALL THE AUTHORS OR COPYRIGHT HOLDERS BE LIABLE FOR ANY
CLAIM, DAMAGES OR OTHER LIABILITY, WHETHER IN AN ACTION OF CONTRACT,
TORT OR OTHERWISE, ARISING FROM, OUT OF OR IN CONNECTION WITH THE
SOFTWARE OR THE USE OR OTHER DEALINGS IN THE SOFTWARE.
一个微小的 JavaScript 调试实用工具,模仿了 Node.js 核心的调试技术。
适用于 Node.js 和 Web 浏览器。
## 安装说明
```
$ npm install debug
```
## 用法
`debug` 暴露了一个函数;只需将你的模块名称传递给该函数,它就会返回一个带有修饰的 `console.error` 版本,供你传递调试语句。这将允许你切换模块不同部分以及整个模块的调试输出。
示例 _app.js_:
```
var debug = require('debug')('http')
, http = require('http')
, name = 'My App';
// fake app
debug('booting %o', name);
http.createServer(function(req, res){
debug(req.method + ' ' + req.url);
res.end('hello\n');
}).listen(3000, function(){
debug('listening');
});
// fake worker of some kind
require('./worker');
```
示例 _worker.js_:
```
var a = require('debug')('worker:a')
, b = require('debug')('worker:b');
function work() {
a('doing lots of uninteresting work');
setTimeout(work, Math.random() * 1000);
}
work();
function workb() {
b('doing some work');
setTimeout(workb, Math.random() * 2000);
}
workb();
```
然后使用 `DEBUG` 环境变量,根据空格或逗号分隔的名称来启用它们。
以下是一些示例:
#### Windows 命令提示符注意事项
##### CMD
在 Windows 中,使用 `set` 命令设置环境变量。
```
set DEBUG=*,-not_this
```
示例:
```
set DEBUG=* & node app.js
```
##### PowerShell(VS Code 默认)
PowerShell 使用不同的语法来设置环境变量。
```
$env:DEBUG = "*,-not_this"
```
示例:
```
$env:DEBUG='app';node app.js
```
然后,像往常一样运行要调试的程序。
npm 脚本示例:
```
"windowsDebug": "@powershell -Command $env:DEBUG='*';node app.js",
```
## Namespace 颜色
每个 debug 实例都会根据其 namespace 名称生成一种颜色。
这在视觉解析调试输出以识别调试行属于哪个 debug 实例时很有帮助。
#### Node.js
在 Node.js 中,当 stderr 是 TTY 时会启用颜色。你还_应该_在 debug 旁边安装 [`supports-color`](https://npmjs.org/supports-color) 模块,
否则 debug 将只使用少数几种基本颜色。
#### Web 浏览器
在支持 `%c` 格式化选项的“Web 检查器”中也会启用颜色。这些是 WebKit Web 检查器、Firefox([自版本 31 起](https://hacks.mozilla.org/2014/05/editable-box-model-multiple-selection-sublime-text-keys-much-more-firefox-developer-tools-episode-31/))
以及 Firefox 的 Firebug 插件(任何版本)。
## 毫秒差异
在积极开发应用程序时,查看一次 `debug()` 调用与下一次调用之间花费的时间可能会很有用。例如,假设你在请求资源之前和之后都调用了 `debug()`,“+NNNms”将显示调用之间花费了多少时间。
当 stdout 不是 TTY 时,将使用 `Date#toISOString()`,这使得它对于记录调试信息更有用,如下所示:
## 约定
如果你在一个或多个库中使用它,你_应该_使用你的库名称,以便开发人员可以根据需要切换调试,而无需猜测名称。如果你有多个 debuggers,你_应该_用你的库名称作为前缀,并使用“:”来分隔特性。例如,来自 Connect 的“bodyParser”将变为“connect:bodyParser”。如果你在名称末尾附加“*”,无论 DEBUG 环境变量的设置如何,它都将始终被启用。然后你可以将其用于正常输出以及调试输出。
## 通配符
`*` 字符可用作通配符。例如,假设你的库中有名为“connect:bodyParser”、“connect:compress”、“connect:session”的 debuggers,你不必使用
`DEBUG=connect:bodyParser,connect:compress,connect:session` 列出所有三个,只需
`DEBUG=connect:*` 即可,或者如果想要运行使用此模块的所有内容,只需使用 `DEBUG=*`。
你也可以通过在特定的 debuggers 前加上“-”字符来排除它们。
例如,`DEBUG=*,-connect:*` 将包含除以“connect:”开头的之外的所有 debuggers。
## 环境变量
通过 Node.js 运行时,你可以设置几个环境变量来
改变调试日志的行为:
| 名称 | 目的 |
|-----------|-------------------------------------------------|
| `DEBUG` | 启用/禁用特定的调试 namespace。 |
| `DEBUG_HIDE_DATE` | 在调试输出中隐藏日期(非 TTY)。 |
| `DEBUG_COLORS`| 是否在调试输出中使用颜色。 |
| `DEBUG_DEPTH` | 对象检查深度。 |
| `DEBUG_SHOW_HIDDEN` | 显示被检查对象的隐藏属性。 |
__注意:__ 以 `DEBUG_` 开头的环境变量最终会被
转换为一个 Options 对象,该对象会与 `%o`/`%O` 格式化程序一起使用。
有关完整列表,请参阅 Node.js 文档中的
[`util.inspect()`](https://nodejs.org/api/util.html#util_util_inspect_object_options)。
## 格式化程序
Debug 使用 [printf 风格](https://wikipedia.org/wiki/Printf_format_string)的格式化。
以下是官方支持的格式化程序:
| 格式化程序 | 表示 |
|-----------|----------------|
| `%O` | 在多行上美观地打印一个对象。 |
| `%o` | 在单行上美观地打印一个对象。 |
| `%s` | 字符串。 |
| `%d` | 数字(包括整数和浮点数)。 |
| `%j` | JSON。如果参数包含循环引用,则替换为字符串 '[Circular]'。 |
| `%%` | 单个百分号 ('%')。这不消耗参数。 |
### 自定义格式化程序
你可以通过扩展 `debug.formatters` 对象来添加自定义格式化程序。
例如,如果你想添加对使用
`%h` 将 Buffer 渲染为十六进制的支持,你可以这样做:
```
const createDebug = require('debug')
createDebug.formatters.h = (v) => {
return v.toString('hex')
}
// …elsewhere
const debug = createDebug('foo')
debug('this is hex: %h', new Buffer('hello world'))
// foo this is hex: 68656c6c6f20776f726c6421 +0ms
```
## 浏览器支持
你可以使用 [browserify](https://github.com/substack/node-browserify) 构建一个适用于浏览器的脚本,
或者如果你不想自己构建,可以直接使用 [browserify-as-a-service](https://wzrd.in/) [构建](https://wzrd.in/standalone/debug@latest)。
Debug 的启用状态目前由 `localStorage` 持久化。
考虑下面显示的情况,你有 `worker:a` 和 `worker:b`,
并且希望调试两者。你可以使用 `localStorage.debug` 启用它们:
```
localStorage.debug = 'worker:*'
```
然后刷新页面。
```
a = debug('worker:a');
b = debug('worker:b');
setInterval(function(){
a('doing some work');
}, 1000);
setInterval(function(){
b('doing some work');
}, 1200);
```
在基于 Chromium 的 Web 浏览器(例如 Brave、Chrome 和 Electron)中,JavaScript 控制台默认仅在“Verbose”日志级别_启用_时才会显示由 `debug` 记录的消息。
## 输出流
默认情况下,`debug` 将记录到 stderr,但是可以通过覆盖 `log` 方法针对每个 namespace 进行配置:
示例 _stdout.js_:
```
var debug = require('debug');
var error = debug('app:error');
// by default stderr is used
error('goes to stderr!');
var log = debug('app:log');
// set this namespace to log via console.log
log.log = console.log.bind(console); // don't forget to bind to console!
log('goes to stdout');
error('still goes to stderr!');
// set all output to go via console.info
// overrides all per-namespace log settings
debug.log = console.info.bind(console);
error('now goes to stdout via console.info');
log('still goes to stdout, but via console.info now');
```
## 扩展
你可以简单地扩展 debugger
```
const log = require('debug')('auth');
//creates new debug instance with extended namespace
const logSign = log.extend('sign');
const logLogin = log.extend('login');
log('hello'); // auth hello
logSign('hello'); //auth:sign hello
logLogin('hello'); //auth:login hello
```
## 动态设置
你也可以通过调用 `enable()` 方法动态启用 debug:
```
let debug = require('debug');
console.log(1, debug.enabled('test'));
debug.enable('test');
console.log(2, debug.enabled('test'));
debug.disable();
console.log(3, debug.enabled('test'));
```
输出:
```
1 false
2 true
3 false
```
用法:
`enable(namespaces)`
`namespaces` 可以包含由冒号和通配符分隔的模式。
请注意,调用 `enable()` 会完全覆盖之前设置的 DEBUG 变量:
```
$ DEBUG=foo node -e 'var dbg = require("debug"); dbg.enable("bar"); console.log(dbg.enabled("foo"))'
=> false
```
`disable()`
将禁用所有 namespace。这些函数返回当前
启用(并跳过)的 namespace。如果你想在不了解最初启用了什么的情况下暂时禁用调试,这会很有用。
例如:
```
let debug = require('debug');
debug.enable('foo:*,-foo:bar');
let namespaces = debug.disable();
debug.enable(namespaces);
```
注意:无法保证该字符串与初始
启用字符串完全相同,但在语义上它们是相同的。
## 检查 debug target 是否已启用
创建 debug 实例后,你可以通过检查 `enabled` 属性来确定它是否
已启用:
```
const debug = require('debug')('http');
if (debug.enabled) {
// do stuff...
}
```
你也可以手动切换此属性,以强制
启用或禁用 debug 实例。
## 在子进程中的用法
由于 `debug` 检测输出是否为 TTY 的方式,当管道传输 `stderr` 时,子进程中不会显示颜色。解决方案是将 `DEBUG_COLORS=1` 环境变量传递给子进程。
例如:
```
worker = fork(WORKER_WRAP_PATH, [workerPath], {
stdio: [
/* stdin: */ 0,
/* stdout: */ 'pipe',
/* stderr: */ 'pipe',
'ipc',
],
env: Object.assign({}, process.env, {
DEBUG_COLORS: 1 // without this settings, colors won't be shown
}),
});
worker.stderr.pipe(process.stderr, { end: false });
```
## 作者
- TJ Holowaychuk
- Nathan Rajlich
- Andrew Rhyne
- Josh Junon
## 许可证
(The MIT License)
Copyright (c) 2014-2017 TJ Holowaychuk <tj@vision-media.ca>
Copyright (c) 2018-2021 Josh Junon
Permission is hereby granted, free of charge, to any person obtaining
a copy of this software and associated documentation files (the
'Software'), to deal in the Software without restriction, including
without limitation the rights to use, copy, modify, merge, publish,
distribute, sublicense, and/or sell copies of the Software, and to
permit persons to whom the Software is furnished to do so, subject to
the following conditions:
The above copyright notice and this permission notice shall be
included in all copies or substantial portions of the Software.
THE SOFTWARE IS PROVIDED 'AS IS', WITHOUT WARRANTY OF ANY KIND,
EXPRESS OR IMPLIED, INCLUDING BUT NOT LIMITED TO THE WARRANTIES OF
MERCHANTABILITY, FITNESS FOR A PARTICULAR PURPOSE AND NONINFRINGEMENT.
IN NO EVENT SHALL THE AUTHORS OR COPYRIGHT HOLDERS BE LIABLE FOR ANY
CLAIM, DAMAGES OR OTHER LIABILITY, WHETHER IN AN ACTION OF CONTRACT,
TORT OR OTHERWISE, ARISING FROM, OUT OF OR IN CONNECTION WITH THE
SOFTWARE OR THE USE OR OTHER DEALINGS IN THE SOFTWARE.标签:CMS安全, GNU通用公共许可证, JavaScript, MITM代理, Node.js, 开发工具库, 数据可视化, 暗色界面, 自定义脚本