aws-solutions/automated-security-response-on-aws
GitHub: aws-solutions/automated-security-response-on-aws
AWS官方开源的Security Hub安全发现自动化修复方案,提供预置Playbook和可扩展架构,帮助企业快速响应并修复云环境中的合规和安全问题。
Stars: 474 | Forks: 133
# AWS 上的自动化安全响应
[🚀 解决方案落地页](https://aws.amazon.com/solutions/implementations/automated-security-response-on-aws/) \| [🚧
功能
请求](https://github.com/aws-solutions/automated-security-response-on-aws/issues/new?assignees=&labels=feature-request%2C+enhancement&template=feature_request.md&title=)
\| [🐛 错误
报告](https://github.com/aws-solutions/automated-security-response-on-aws/issues/new?assignees=&labels=bug%2C+triage&template=bug_report.md&title=)
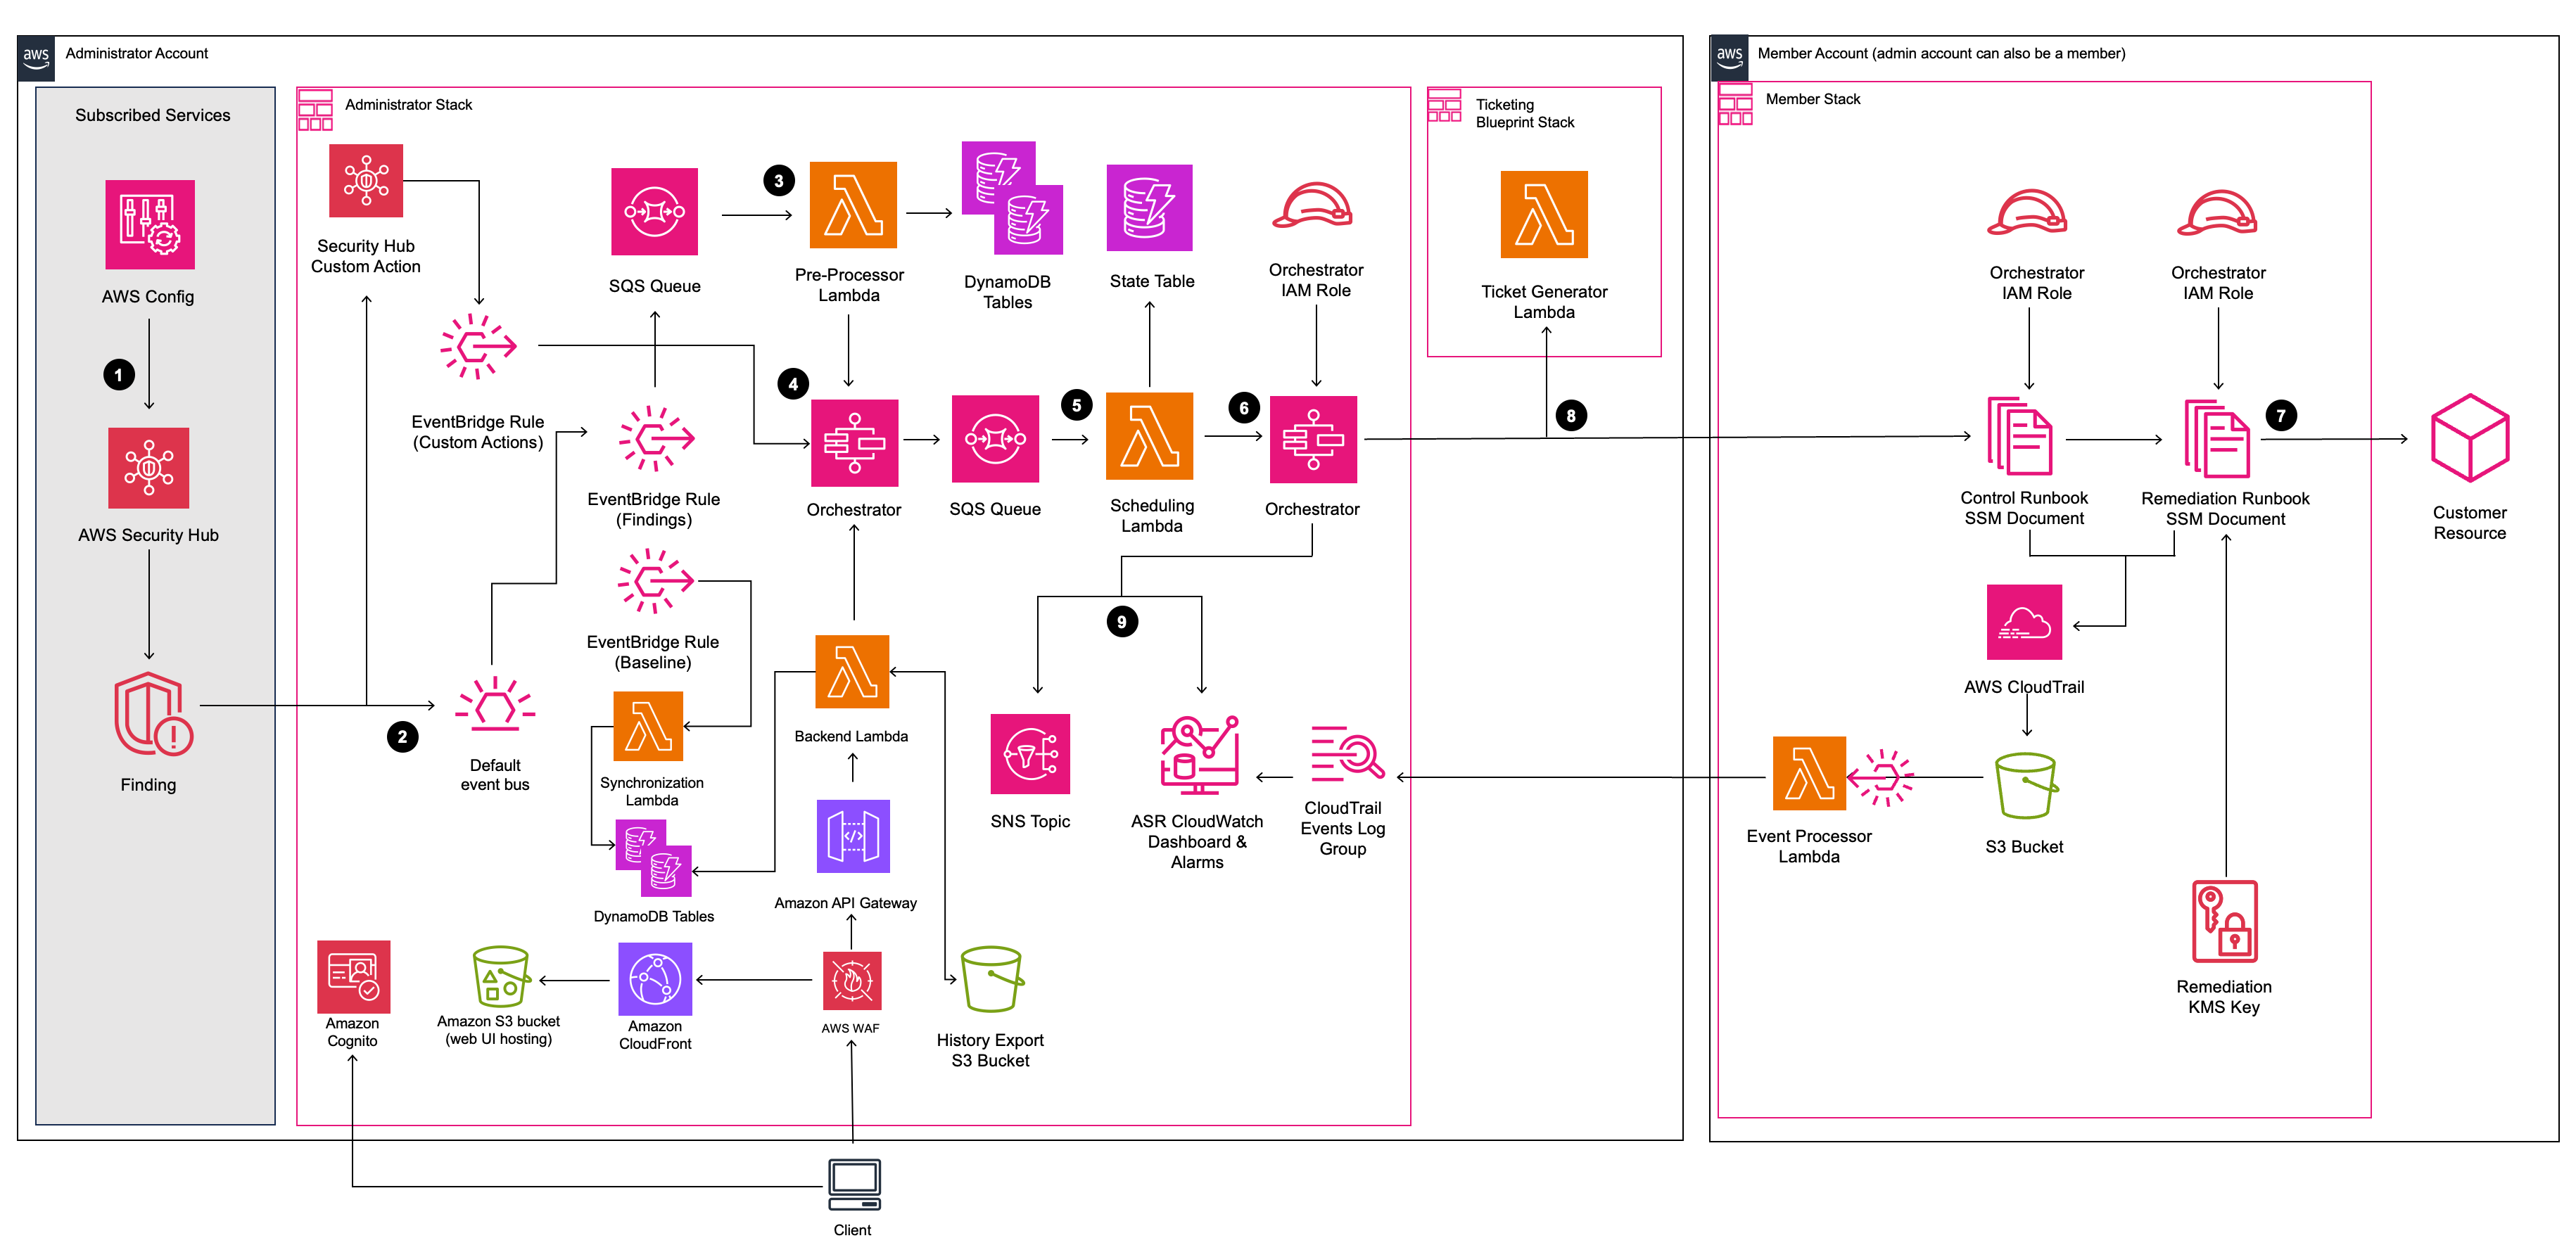
AWS 上的自动化安全响应 (ASR) 是一个解决方案,使 AWS Security Hub 客户能够通过单击操作,使用称为 Playbook 的预定义响应和修复操作集来修复发现的问题。修复措施作为 AWS Systems Manager 自动化文档实现。该解决方案包括针对未使用的访问密钥、开放的安全组、弱账户密码策略、VPC 流日志配置和公开 S3 存储桶等问题的修复。还可以将修复配置为当发现出现在 AWS Security Hub 中时自动触发。
该解决方案包含针对以下标准中定义的某些安全控制的 Playbook 修复:
- AWS Foundational Security Best Practices (FSBP) v1.0.0
- Center for Internet Security (CIS) AWS Foundations Benchmark v1.2.0
- Center for Internet Security (CIS) AWS Foundations Benchmark v1.4.0
- Center for Internet Security (CIS) AWS Foundations Benchmark v3.0.0
- Payment Card Industry (PCI) Data Security Standard (DSS) v3.2.1
- National Institute of Standards and Technology (NIST) Special Publication 800-53 Revision 5
包含一个名为 Security Control 的 Playbook,允许使用 AWS Security Hub 的 Consolidated Control Findings 功能进行操作。
**注意**:要在不从源代码构建的情况下部署解决方案,请使用 [解决方案落地页](https://aws.amazon.com/solutions/implementations/automated-security-response-on-aws/) 中链接的 CloudFormation 模板。
## 架构图
## 自定义解决方案
本节提供了技术演练,用于 (1) 向解决方案现有的 Playbook 添加新的修复,或 (2) 为解决方案中尚未实现的安全标准添加新的 Playbook。
**注意**:如果您选择继续,请注意将需要阅读和调整源代码。
### 自定义的前提条件
- 具有 Linux 客户端及以下软件
- AWS CLI v2
- Python 3.11+ 及 pip
- AWS CDK 2.1025.0+
- Node.js 22+ 及 npm
- Poetry v2 及导出插件
- Java Runtime Environment (JRE) 17.x 或更新版本
- [DynamoDB Local 已安装并设置](https://docs.aws.amazon.com/amazondynamodb/latest/developerguide/DynamoDBLocal.DownloadingAndRunning.html#DynamoDBLocal.DownloadingAndRunning.title)
- 从 GitHub 下载的源代码
#### 获取源代码
从 GitHub 源代码构建将允许您修改解决方案以满足您的特定需求。该过程包括从 GitHub 下载源代码、创建用于部署的存储桶、构建解决方案以及上传部署所需的构件。
将存储库克隆或下载到您的 Linux 客户端上的本地目录。注意:如果您打算修改解决方案,您可能希望创建您自己的 GitHub 存储库分支并从中工作。这允许您将对解决方案的任何更改检入到您的私有副本中。
**Git Clone 示例:**
```
#### git clone https://github.com/aws-solutions/automated-security-response-on-aws.git
**Download Zip example:**
```bash
#### wget https://github.com/aws-solutions/automated-security-response-on-aws/archive/main.zip
### 现有 Playbook 中的自定义 Remediation
In summary the following files in the ASR repo will be modified/added. In this example a new remediation for ElastiCache.2 was added to the SC & AFSBP playbooks.
**Note** that all new remediations should be added to the SC playbook, since it consolidates all remediations available in ASR.
If you intend to deploy only a specific set of playbooks (e.g., AFSBP), then you can either: (1) add the remediation to *only* your intended playbook(s),
or (2) add the remediation to all playbooks for which it exists in the corresponding Security Hub Standard, in addition to the SC playbook. The second option is recommended for flexibility.
In this example, ElastiCache.2 is included in the following Security Hub Standards:
- AFSBP
- NIST.800-53.r5 SI-2
- NIST.800-53.r5 SI-2(2)
- NIST.800-53.r5 SI-2(4)
- NIST.800-53.r5 SI-2(5)
- PCI DSS v4.0.1/6.3.3.
Since, by default, ASR only implements playbooks for AFSBP & NIST.800-53, we will add this new remediation to those playbooks in addition to SC.
**Modify**
- source/lib/remediation-runbook-stack.ts
- source/playbooks/AFSBP/lib/afsbp_remediations.ts
- source/playbooks/NIST80053/lib/control_runbooks-construct.ts
- source/playbooks/NIST80053/lib/nist80053_remediations.ts
- source/playbooks/SC/lib/control_runbooks-construct.ts
- source/playbooks/SC/lib/sc_remediations.ts
- source/test/regex_registry.ts
**Add**
- source/playbooks/SC/ssmdocs/SC_ElastiCache.2.ts
- source/playbooks/SC/ssmdocs/descriptions/ElastiCache.2.md
- source/remediation_runbooks/EnableElastiCacheVersionUpgrades.yaml
> ℹ️ **_NOTE:_** The name chosen for the runbook can be any string, as long as it is consistent with the rest of the changes made.
- source/playbooks/NIST80053/ssmdocs/NIST80053_ElastiCache.2.ts
- source/playbooks/AFSBP/ssmdocs/AFSBP_ElastiCache.2.yaml
#### 步骤 1:创建 Remediation Runbook
This is the SSM document used to remediate resources. It must include the `AutomationAssumeRole` parameter,
which is the IAM role with permissions to execute the remediation. View the existing file `source/remediation_runbooks/EnableElastiCacheVersionUpgrades.yaml` as a reference to create new remediation runbooks.
All new runbooks should be added in the `source/remediation_runbooks/` directory.
#### 步骤 2:创建 Control Runbook。
A control runbook is a playbook-specific runbook that parses the finding data from the given standard and executes the correct Remediation Runbook.
Since we will be adding the ElastiCache.2 remediation to SC, AFSBP, and NIST80053 playbooks, we must create a new control runbook for each. The following files are created:
- source/playbooks/SC/ssmdocs/SC_ElastiCache.2.ts
- source/playbooks/NIST80053/ssmdocs/NIST80053_ElastiCache.2.ts
- source/playbooks/AFSBP/ssmdocs/AFSBP_ElastiCache.2.yaml
> ℹ️ **_NOTE:_** The naming of these files is important and must follow the format <*PLAYBOOK_NAME*>_<*CONTROL.ID*>.ts/yaml
Some playbooks in ASR support IaC control runbooks in typescript, while others must be written in raw YAML. Reference the existing remediations in the given playbook as examples of each. In this example, we will cover the SC playbook which uses IaC.
In the SC playbook, your new control runbook will export a new class that extends `ControlRunbookDocument` and matches the name you chose for your remediation runbook.
#### 请看下面的示例:
export class EnableElastiCacheVersionUpgrades extends ControlRunbookDocument {
constructor(scope: Construct, id: string, props: ControlRunbookProps) {
super(scope, id, {
...props,
securityControlId: 'ElastiCache.2',
remediationName: 'EnableElastiCacheVersionUpgrades',
scope: RemediationScope.REGIONAL,
resourceIdRegex: String.raw`^arn:(?:aws|aws-cn|aws-us-gov):elasticache:(?:[a-z]{2}(?:-gov)?-[a-z]+-\d):(?:\d{12}):cluster:([a-zA-Z](?:(?!--)[a-zA-Z0-9-]){0,48}[a-zA-Z0-9]$|[a-zA-Z]$)`,
resourceIdName: 'ClusterId',
updateDescription: new StringFormat('Automatic minor version upgrades enabled for cluster %s.', [
StringVariable.of(`ParseInput.ClusterId`),
]),
});
}
#### }
- `securityControlId` is the control ID for the remediation that you are adding, as it is defined in the [consolidated controls view in Security Hub](https://docs.aws.amazon.com/securityhub/latest/userguide/asff-changes-consolidation.html#securityhub-findings-format-changes-ids-titles).
- `remediationName` is the name you have chosen for your remediation runbook.
- `scope` is the scope of the resource you are remediating, indicating whether it exists globally or in a specific region.
- `resourceIdRegex` is the regex used to capture the resource ID that you would like to pass to the remediation runbook as a parameter. Only one group should be captured, all other groups should be non-capturing. If you would like to pass the entire ARN, omit this field.
- `resourceIdName` is the name you would like to set for the resource ID captured using `resourceIdRegex`, this should match the resource ID parameter name in your remediation runbook.
- `updateDescription` is the string you would like to assign to the "notes" section of the finding in Security Hub once the remediation succeeds.
#### 您还必须导出一个名为 `createControlRunbook` 的函数,该函数返回您的类的新实例。对于 ElastiCache.2,如下所示:
export function createControlRunbook(scope: Construct, id: string, props: PlaybookProps): ControlRunbookDocument {
return new EnableElastiCacheVersionUpgrades(scope, id, { ...props, controlId: 'ElastiCache.2' });
#### }
where `controlId` is the control ID as defined in the Security Standard associated with the playbook under which you are operating.
If the Security Hub control has parameters that you would like to pass to your remediation runbook, you can pass them by adding overrides to the following methods:
- `getExtraSteps`: defines default values for each parameter implemented for the control in Security Hub
> ℹ️ **_NOTE:_** Each parameter from Security Hub must be given a default value
- `getInputParamsStepOutput`: defines the outputs for the GetInputParams step of the control runbook
- Each output has a `name`, `outputType`, and `selector`. The `selector` should be the same selector used in the `getExtraSteps` method override.
- `getRemediationParams`: defines the parameters passed to the remediation runbook, fetched from the GetInputParams step outputs.
To view an example, navigate to the `source/playbooks/SC/ssmdocs/SC_DynamoDB.1.ts` file.
#### 步骤 3:将每个 Control Runbook 与 Playbook 集成
For each control runbook you created in the previous step, you must now integrate with the infrastructure definitions in the associated playbook. For each control runbook you created, follow the steps below.
##### 集成 /__/control_runbooks-construct.ts
> ⚠️ **_IMPORTANT:_** If you created the control runbook using raw YAML instead of typescript IaC, skip to the next section.
In `/__/control_runbooks-construct.ts`
#### 像这样导入您新创建的 control runbook 文件:
#### import * as elasticache_2 from '../ssmdocs/SC_ElastiCache.2';
#### 接下来,转到以下数组
#### const controlRunbooksRecord: Record
#### 并添加一个新条目,将(特定于 Playbook 的)Control ID 映射到您创建的 `createControlRunbook` 方法:
#### 'ElastiCache.2': elasticache_2.createControlRunbook,
##### 添加到 __\_remediations.ts
#### 将特定于 Playbook 的 Control ID 添加到 `__\_remediations.ts` 中的 Remediation 列表中,如下所示:
#### { control: 'ElastiCache.2', versionAdded: '2.3.0' },
The `versionAdded` field should be the latest version of the solution. If adding the remediation breaches the template size limit, increase the `versionAdded`. You can adjust the number of remediations included in each playbook member stack in `solution_env.sh`.
#### 步骤 4:创建 Markdown 文件
In order for the solution to build, you must create a markdown file that describes the remediation runbook you've created. The name of the markdown file must match the control ID in the SC playbook; for example, `ElastiCache.2.md` is created in the path `source/playbooks/SC/ssmdocs/descriptions/ElastiCache.2.md`. This markdown file describes what the runbook does, the input and output parameters, and links to the Security Hub documentation.
> ⚠️ **_IMPORTANT:_** You must create this file following the described naming convention in order to successfully build the solution.
#### 步骤 5:创建 Remediation IAM Role 并集成 Remediation Runbook
Each remediation has its own IAM role with custom permissions required to execute the remediation runbook. In addition, the `RunbookFactory.createRemediationRunbook` method needs to be invoked to add the remediation runbook you created in Step 1 to the solution's CloudFormation templates.
#### 在 `remediation-runook-stack.ts` 中,每个 Remediation 在 `RemediationRunbookStack` 类中都有自己的代码块。以下代码块展示了为 ElastiCache.2 Remediation 创建新 IAM Role 和 Remediation Runbook 集成:
//-----------------------
// EnableElastiCacheVersionUpgrades
//
{
const remediationName = 'EnableElastiCacheVersionUpgrades'; // should match the name of your remediation runbook
const inlinePolicy = new Policy(props.roleStack, `ASR-Remediation-Policy-${remediationName}`);
const remediationPolicy = new PolicyStatement();
remediationPolicy.addActions('elasticache:ModifyCacheCluster');
remediationPolicy.effect = Effect.ALLOW;
remediationPolicy.addResources(`arn:${this.partition}:elasticache:*:${this.account}:cluster:*`);
inlinePolicy.addStatements(remediationPolicy);
new SsmRole(props.roleStack, 'RemediationRole ' + remediationName, { // creates the remediation IAM role
solutionId: props.solutionId,
ssmDocName: remediationName,
remediationPolicy: inlinePolicy,
remediationRoleName: `${remediationRoleNameBase}${remediationName}`,
});
RunbookFactory.createRemediationRunbook(this, 'ASR ' + remediationName, { // adds the remediation runbook to the solution's cloudformation templates
ssmDocName: remediationName,
ssmDocPath: ssmdocs,
ssmDocFileName: `${remediationName}.yaml`,
scriptPath: `${ssmdocs}/scripts`,
solutionVersion: props.solutionVersion,
solutionDistBucket: props.solutionDistBucket,
solutionId: props.solutionId,
namespace: namespace,
});
#### }
#### 步骤 6:构建并更新 Unit Tests
Please build your new remediation before run Unit Tests. Navigate to the **Build and Deploy** section below for instructions on *building* the solution with your new changes.
We recommend updating and running the unit tests after adding a new remediation.
First, you must add any new regular expressions (that are not already added) into the `source/test/regex_registry.ts` file.
This file enforces testing for each new regular expression included in the solution's runbooks. Take a look at the `addElastiCacheClusterTestCases` function as an example, which is used to test regular expressions used in ElastiCache remediations.
#### 最后,您需要更新每个 Stack 的快照。快照是受版本控制的 CloudFormation 模板定义,用于跟踪对 ASR 基础设施所做的更改。您可以通过从 `deployment` 目录运行以下命令来更新这些快照文件:
#### ./run-unit-tests.sh update
Now you are ready to deploy your new remediation! Navigate to the **Build and Deploy** section below for instructions on building and deploying the solution with your new changes.
### 自定义 Playbook
Go to source/playbooks in the solution source downloaded above. In this folder is a Playbook skeleton, **NEWPLAYBOOK**.
Copy this entire folder and its contents as a new folder under source/playbooks. The naming convention is the security
standard abbreviation followed by the version number, as they appear in the StandardsControlArn in the AWS Standard
Finding Format for the security control.
> ⚠️ **_WARNING:_** You do not need to create a new playbook in order to add new custom remediations to ASR. New remediations can be added to existing playbooks by following the instructions in the [Custom Remediations in Existing Playbooks](#custom-remediations-in-existing-playbooks) section.
**Example**
For PCI-DSS, we used "PCI" for the standard abbreviation. The version is 321: **PCI321**
```yaml
#### "StandardsControlArn": "arn:aws:securityhub:us-east-1:111111111111:control/pci-dss/v/3.2.1/PCI.IAM.7"
For CIS AWS Foundations Benchmark, we use "CIS". The version is 120: **CIS120**
```yaml
#### "StandardsControlArn": "arn:aws:securityhub:us-east-1:111111111111:control/cis-aws-foundations-benchmark/v/1.2.0/2.4"
Unless noted, all of the following changes are within the folder you just created for your new playbook.
1. Rename the typescript file in **bin** to match the (lower case) name of your new playbook. Ex. **pci321.ts**
2. Update cdk.json with the new file name
3. Rename the test typescript in the **test** subfolder similarly. Ex. **pci321_stack.test.ts**
4. Update the description.txt, README.md, and support.txt, following the example within.
5. Rename ssmdocs/scripts/newplaybook_parse_input.py as desired. This script parses the finding data. You will likely
not need to modify it, as it's fairly robust. See other Playbooks for examples of its use.
#### 配置 Playbook
Edit **bin/\.ts**. The following 3 lines are critical to definition of the Playbook. These values enable ASR
to map from the StandardsControlArn in a finding to your remediations.
```typescript
const standardShortName = "NPB";
const standardLongName = "New Playbook";
#### const standardVersion = "1.1.1"; // 不要包含 'V'
**standardShortName** can be as you wish. General recommendation is to make it short and meaningful. Ex. PCI, CIS,
FSBP. This is the name used in many labels throughout the solution. **standardLongName** must match the
StandardsControlArn, as _pci-dss_ in the above example. **standardVersion** must match the StandardsControlArn version,
as _.../v/3.2.1/..._ in the above example.
Having established these values, your runbooks in **/ssmdocs** will be named: -.yaml
As you write your SSM runbooks, you will add them to the stack in the following code, where control must match the field
from the StandardsControlArn:
```typescript
#### const remediations: IControl[] = [{ control: "RDS.6" }];
#### 在解决方案模板中将您的 Playbook 添加为新的 Nested Stack
Edit **playbooks/playbook-index.ts** to include the new playbook.
Add the new playbook to the end of the `standardPlaybookProps` array.
Interface:
```typescript
export interface PlaybookProps {
name: string; // Playbook short name
defaultParameterValue?: 'yes' | 'no'; // Default value for enabling this playbook in CloudFormation. Will default to 'no' if not provided.
description?: string; // Description for the CloudFormation parameter. Solution will provide a generated description if left blank.
#### }
#### 创建 Remediation
Follow steps in the [Custom Remediations in Existing Playbooks](#custom-remediations-in-existing-playbooks) section above to add remediations to your new playbook. If you would like to add existing remediations to the playbook, skip to **Step 2**.
## 构建并部署
AWS Solutions use two buckets: a bucket for global access to templates, which is accessed via HTTPS, and regional
buckets for access to assets within the region, such as Lambda code.
- Pick a unique bucket name, `e.g. asr-staging`. Set two environment variables on your terminal, one should be the base bucket name with `-reference` as suffix, the other with your intended deployment region as suffix:
```bash
export BASE_BUCKET_NAME=asr-staging-$(date +%s)
export TEMPLATE_BUCKET_NAME=$BASE_BUCKET_NAME-reference
export REGION=us-east-1
#### export ASSET_BUCKET_NAME=$BASE_BUCKET_NAME-$REGION
- In your AWS account, create two buckets with these names,
e.g. `asr-staging-reference` and `asr-staging-us-east-1`. (The reference bucket will hold the CloudFormation templates, the regional bucket will hold all other assets like the lambda code bundle.)
- Your buckets should be encrypted and disallow public access
> ⚠️ **_IMPORTANT:_** If you created your `*-reference` bucket in a region other than us-east-1,
> you must set the `CUSTOM_REFERENCE_BUCKET_REGION` environment variable before running the build script E.g.,
> `export CUSTOM_REFERENCE_BUCKET_REGION=us-gov-east-1`. Your reference bucket policy must also give the custom resource Lambda permission to read objects.
```bash
aws s3 mb s3://$TEMPLATE_BUCKET_NAME/
#### aws s3 mb s3://$ASSET_BUCKET_NAME/
**Note**: When creating your buckets, ensure they are not publicly accessible. Use random bucket names. Disable public
access. Use KMS encryption. And verify bucket ownership before uploading.
### 构建解决方案
First ensure that you've run `npm install` in the _source_ folder.
Next from the _deployment_ folder in your cloned repo, run build-s3-dist.sh, passing the root name of your bucket (ex.
mybucket) and the version you are building (ex. v1.0.0). We recommend using a semver version based on the version
downloaded from GitHub (ex. GitHub: v1.0.0, your build: v1.0.0.mybuild)
```bash
chmod +x build-s3-dist.sh
export SOLUTION_NAME=automated-security-response-on-aws
export SOLUTION_VERSION=v1.0.0.mybuild
#### ./build-s3-dist.sh -b $BASE_BUCKET_NAME -v $SOLUTION_VERSION
### Unit Tests
#### 先决条件
*Poetry*
In order to run the unit tests locally, you must first install and configure Poetry. Poetry is a tool used for managing dependencies and packaging within Python projects.
We recommend using [pipx](https://pipx.pypa.io/stable/installation/) to install and manage Poetry. You can find other ways to install Poetry in the [Poetry installation guide](https://python-poetry.org/docs/#installation).
**Note**: You must install Poetry version 2 to execute the `run-unit-tests.sh` script. Since version 2, the `export` command is no longer included by default in Poetry. To use it, you need to install the poetry-plugin-export plugin.
Follow these steps to install and setup Poetry on your local machine:
1. Install version 2.1.2 of Poetry by running `pipx install poetry==2.1.2`
2. Set the `POETRY_HOME` environment variable to be the path to your local installation of Poetry. E.g., `POETRY_HOME=/Users/YOUR_USERNAME/.local/pipx/venvs/poetry`
3. Install Poetry export plugin by running `poetry self add poetry-plugin-export@1.9.0`
*DynamoDB Local*
The unit tests also rely on DynamoDB Local, which must be installed and setup prior to running the unit tests. DynamoDB Local is a tool used to develop and test applications without accessing the DynamoDB web service.
You can learn more about DynamoDB Local by visiting the [official AWS documentation page](https://docs.aws.amazon.com/amazondynamodb/latest/developerguide/DynamoDBLocal.html).
Follow these steps to install and setup DynamoDB Local:
1. Ensure you have installed Java Runtime Environment (JRE) version 17.x or newer.
2. Download DynamoDB local using the links provided in [the documentation](https://docs.aws.amazon.com/amazondynamodb/latest/developerguide/DynamoDBLocal.DownloadingAndRunning.html).
3. Set the `DDB_LOCAL_HOME` environment variable to be the path to your local installation of DynamoDB Local. E.g., `DDB_LOCAL_HOME=/Users/YOUR_USERNAME/dynamodb_local_latest`
#### 4. 配置本地 AWS Credentials。可下载的 DynamoDB 需要任何凭证才能工作,如下例所示:
AWS Access Key ID: "fakeMyKeyId"
AWS Secret Access Key: "fakeSecretAccessKey"
#### Default Region Name: "fakeRegion"
##### 运行 Unit Tests
Some Python unit tests execute AWS API calls. The calls that create, read, or modify resources are stubbed, but some
calls to APIs that do not require any permissions execute against the real AWS APIs (e.g. STS GetCallerIdentity). The
recommended way to run the unit tests is to configure your credentials for a no-access console role.
All stubbed AWS API calls expect the local partition to be `us-east-1`, meaning you must either run the `export AWS_DEFAULT_REGION=us-east-1` command before running the unit tests,
or set your AWS config file to use `us-east-1` region while running the tests.
```bash
cd ./deployment
export AWS_DEFAULT_REGION=us-east-1
chmod +x ./run-unit-tests.sh
#### ./run-unit-tests.sh
Confirm that all unit tests pass.
### 上传到您的存储桶
**Note**: Verify bucket ownership before uploading.
By default, the templates created by build-s3-dist.sh expect the software to be stored in
**automated-security-response-on-aws/\**. If in doubt, view the template.
Upload the build artifacts from `global-s3-assets/` to the template bucket and the artifacts from `regional-s3-assets/` to the regional bucket:
```bash
aws s3 ls s3://$TEMPLATE_BUCKET_NAME --region $REGION # test that bucket exists - should not give an error
aws s3 ls s3://$ASSET_BUCKET_NAME --region $REGION # test that bucket exists - should not give an error
cd ./deployment
aws s3 cp global-s3-assets/ s3://$TEMPLATE_BUCKET_NAME/$SOLUTION_NAME/$SOLUTION_VERSION/ --recursive --acl bucket-owner-full-control --region $REGION
#### aws s3 cp regional-s3-assets/ s3://$ASSET_BUCKET_NAME/$SOLUTION_NAME/$SOLUTION_VERSION/ --recursive --acl bucket-owner-full-control --region $REGION
_✅ All assets are now staged on your S3 buckets. You or any user may use S3 links for deployments_
## 部署
Consult the [Automated Security Response on AWS Implementation
Guide](https://docs.aws.amazon.com/solutions/latest/automated-security-response-on-aws/solution-overview.html) for detailed
deployment instructions and set all deployment parameters according to your needs.
When following the instructions, keep in mind to use the URLs to the templates in your own bucket.
If you anticipate that you will need to deploy multiple times during your development iterations, you can alternatively compose an `aws cloudformation create-stack` command with your desired parameter values, and deploy from the terminal.
For example:
```bash
export ADMIN_TEMPLATE_URL=https://$TEMPLATE_BUCKET_NAME.s3.$REGION.amazonaws.com/$SOLUTION_NAME/$SOLUTION_VERSION/automated-security-response-admin.template
aws cloudformation create-stack \
--capabilities CAPABILITY_NAMED_IAM \
--stack-name ASR-Admin-$(date +%s) \
--template-url $ADMIN_TEMPLATE_URL \
--region $REGION \
--parameters \
ParameterKey=LoadSCAdminStack,ParameterValue=yes \
ParameterKey=LoadAFSBPAdminStack,ParameterValue=no \
ParameterKey=LoadCIS120AdminStack,ParameterValue=no \
ParameterKey=LoadCIS140AdminStack,ParameterValue=no \
ParameterKey=LoadCIS300AdminStack,ParameterValue=no \
ParameterKey=LoadNIST80053AdminStack,ParameterValue=no \
ParameterKey=LoadPCI321AdminStack,ParameterValue=no \
ParameterKey=ReuseOrchestratorLogGroup,ParameterValue=no \
ParameterKey=UseCloudWatchMetrics,ParameterValue=yes \
ParameterKey=UseCloudWatchMetricsAlarms,ParameterValue=yes \
ParameterKey=RemediationFailureAlarmThreshold,ParameterValue=5 \
ParameterKey=EnableEnhancedCloudWatchMetrics,ParameterValue=no \
ParameterKey=ShouldDeployWebUI,ParameterValue=yes \
ParameterKey=AdminUserEmail,ParameterValue={AdminUserEmail} \
ParameterKey=TicketGenFunctionName,ParameterValue=""
export NAMESPACE=$(date +%s | tail -c 9)
export MEMBER_TEMPLATE_URL=https://$TEMPLATE_BUCKET_NAME.s3.$REGION.amazonaws.com/$SOLUTION_NAME/$SOLUTION_VERSION/automated-security-response-member.template
aws cloudformation create-stack \
--capabilities CAPABILITY_NAMED_IAM \
--stack-name ASR-Member-$(date +%s) \
--template-url $MEMBER_TEMPLATE_URL \
--region $REGION \
--parameters \
ParameterKey=LoadSCMemberStack,ParameterValue=yes \
ParameterKey=LoadAFSBPMemberStack,ParameterValue=no \
ParameterKey=LoadCIS120MemberStack,ParameterValue=no \
ParameterKey=LoadCIS140MemberStack,ParameterValue=no \
ParameterKey=LoadCIS300MemberStack,ParameterValue=no \
ParameterKey=LoadNIST80053MemberStack,ParameterValue=no \
ParameterKey=LoadPCI321MemberStack,ParameterValue=no \
ParameterKey=CreateS3BucketForRedshiftAuditLogging,ParameterValue=no \
ParameterKey=LogGroupName,ParameterValue=random-log-group-123456789012 \
ParameterKey=Namespace,ParameterValue=$NAMESPACE \
ParameterKey=SecHubAdminAccount,ParameterValue={SecHubAdminAccount} \
ParameterKey=EnableCloudTrailForASRActionLog,ParameterValue=no
export MEMBER_ROLES_TEMPLATE_URL=https://$TEMPLATE_BUCKET_NAME.s3.$REGION.amazonaws.com/$SOLUTION_NAME/$SOLUTION_VERSION/automated-security-response-member-roles.template
aws cloudformation create-stack \
--capabilities CAPABILITY_NAMED_IAM \
--stack-name ASR-Member-Roles-$(date +%s) \
--template-url $MEMBER_ROLES_TEMPLATE_URL \
--region $REGION \
--parameters \
ParameterKey=Namespace,ParameterValue=$NAMESPACE \
#### ParameterKey=SecHubAdminAccount,ParameterValue={SecHubAdminAccount}
## 目录结构
|-.github/                [ GitHub pull request template, issue templates, and workflows ]

|-deployment/             [ Scripts used to build, test, and upload templates for the solution ]

  |-manifest-generator/   [ Manifest generation tool ]

  |-utils/                [ Utility scripts for deployment ]

|-docs/                   [ Solution documentation and diagrams ]

|-simtest/                [ Tool and sample data used to simulate findings for testing ]

|-source/                 [ Solution source code and tests ]

  |-blueprints/           [ Blueprint integrations (Jira, ServiceNow) ]

  |-data-models/          [ TypeScript data models ]

  |-lambdas/              [ Lambda functions (API, pre-processor, synchronization) ]

  |-layer/                [ Common functions used by the Orchestrator and custom resource providers ]

  |-lib/                  [ Solution CDK ]

    |-cdk-helper/         [ CDK helper functions ]

    |-member/             [ Member stack helper functions ]

    |-parameters/         [ Stack common parameters ]

    |-webui/              [ Web UI infrastructure ]

  |-Orchestrator/         [ Orchestrator Step Function Lambda Functions ]

  |-playbooks/            [ Playbooks ]

    |-AFSBP/              [ AWS FSBP v1.0.0 playbook ]

    |-CIS120/             [ CIS v1.2.0 playbook ]

    |-CIS140/             [ CIS v1.4.0 playbook ]

    |-CIS300/             [ CIS v3.0.0 playbook ]

    |-common/             [ Common scripts used by multiple playbooks ]

    |-NEWPLAYBOOK/        [ Example playbook ]

      |-bin/              [ Playbook CDK App ]

      |-ssmdocs/          [ Control runbooks ]

    |-NIST80053/          [ NIST80053 playbook ]

    |-PCI321/             [ PCI-DSS v3.2.1 playbook ]

    |-SC/                 [ Security Control playbook ]

  |-remediation_runbooks/ [ Shared remediation runbooks ]

    |-scripts/            [ Scripts used by remediation runbooks ]

  |-solution_deploy/      [ Solution CDK App and custom resource providers ]

    |-bin/                [ Solution CDK App ]

    |-source/             [ Custom resource providers ]

  |-test/                 [ CDK and SSM document unit tests ]

  |-webui/                [ Web UI source code ]

|-test-stack/             [ Test stack for solution validation ]
## 数据收集
This solution sends operational metrics to AWS (the “Data”) about the use of this solution. We use this Data to better understand how customers use this solution and related services and products. AWS’s collection of this Data is subject to the [AWS Privacy Notice](https://aws.amazon.com/privacy/).
## 许可证
Distributed under the Apache License Version 2.0. For more information, see [LICENSE.txt](LICENSE.txt).
```
标签:AWS, CIS, CloudFormation, DevSecOps, DPI, EC2, IaC, MITM代理, NIST, PB级数据处理, PCI DSS, PE 加载器, Playbook, Security Hub, SOAR, Systems Manager, 上游代理, 人工智能安全, 合规性, 安全态势, 安全编排与自动化响应, 安全运维, 端点安全, 自动化攻击, 自动化攻击, 自动响应, 补丁管理, 逆向工具, 配置加固, 隐私计算