LanceMcCarthy/DevOpsExamples
GitHub: LanceMcCarthy/DevOpsExamples
一个展示如何在多种主流 CI/CD 系统中安全配置私有 NuGet 源并构建发布 .NET 容器镜像的实战示例仓库。
Stars: 170 | Forks: 86
# DevOps - Pipeline 和 Workflow 示例
本仓库包含了一套丰富的 CI-CD 演示,我将向您展示如何:
- 连接到私有 nuget feed;Azure、GitHub packages 以及自定义源(例如 Telerik)。
- 构建 .NET 应用并发布到容器 registry;Docker、Azure、GitHub 等。
尽管我在这些演示中使用了 Telerik 的 NuGet 服务器,但该方法适用于任何私有 feed;只需替换您的源和凭据即可。
## 目录
- [CI 系统](https://github.com/LanceMcCarthy/DevOpsExamples#ci-systems)
- [构建徽章](https://github.com/LanceMcCarthy/DevOpsExamples#badges)
- [Docker 示例](https://github.com/LanceMcCarthy/DevOpsExamples#docker-examples)
- [视频:在 Azure DevOps 中进行身份验证](https://github.com/LanceMcCarthy/DevOpsExamples#videos)
- [提示与故障排除](https://github.com/LanceMcCarthy/DevOpsExamples#tips-and-troubleshooting)
- [演练:使用 GitHub Secrets](https://github.com/LanceMcCarthy/DevOpsExamples#github-actions-using-secrets-to-set-environment-variables)
- [示例:动态更新 package source](https://github.com/LanceMcCarthy/DevOpsExamples#powershell-update-package-source-dynamically)
- [示例:使用 Telerik NuGet Keys](https://github.com/LanceMcCarthy/DevOpsExamples#using-telerik-nuget-keys)
- [Dockerfile:使用 Secrets](https://github.com/LanceMcCarthy/DevOpsExamples#dockerfile-using-secrets)
- [Telerik 许可证方案](https://github.com/LanceMcCarthy/DevOpsExamples#telerik-license-approaches)
- 相关博客文章
- [博客:DevOps 和 Telerik NuGet Packages](https://www.telerik.com/blogs/azure-devops-and-telerik-nuget-packages)
- [博客:宣布推出 Telerik NuGet Keys](https://www.telerik.com/blogs/announcing-nuget-keys)
## CI 系统
| 系统 | CI/CD 文件 |
|---------------|------------------|
| GitHub Actions | [.github/workflows](/.github/workflows) |
| Azure DevOps (YAML) | [azure-pipelines.yml](https://github.com/LanceMcCarthy/DevOpsExamples/blob/main/azure-pipelines.yml) |
| Azure DevOps (经典) | 点击徽章 |
| GitLab CI/CD | [.gitlab-ci.yml](https://gitlab.com/LanceMcCarthy/DevOpsExamples/-/blob/main/.gitlab-ci.yml) ↗|
| Tekton in Kuberbetes | [tekton-task-run.yaml](https://github.com/LanceMcCarthy/DevOpsExamples/blob/main/tekton-task-run.yaml) |
## Docker 示例
这些示例展示了如何构建和发布容器镜像。虽然它们发布到 Docker Hub,但同样适用于任何镜像 registry。
| 镜像 | GitHub Action | Dockerfile | 运行中的站点 |
|-------|---------------|------------|--------------|
| `myblazorapp` | [](https://github.com/LanceMcCarthy/DevOpsExamples/actions/workflows/main_docker-blazor.yml) | [链接](https://github.com/LanceMcCarthy/DevOpsExamples/blob/main/src/Blazor/MyBlazorApp/Dockerfile "MyBlazorApp/Dockerfile") | [在线演示](https://blazor-reporting.dvlup.com/) |
| `aspnetcore-reporting-from-msftbase` | [](https://github.com/LanceMcCarthy/DevOpsExamples/actions/workflows/main_docker-aspnetcore.yml) | [链接](https://github.com/LanceMcCarthy/DevOpsExamples/blob/main/src/AspNetCore/MyAspNetCoreApp/Dockerfile_MSRuntimeBase "MyAspNetCoreApp/Dockerfile_MSRuntimeBase") | [在线演示](https://aspnetcore-reporting.dvlup.com/) |
| `aspnetcore-reporting-from-centosbase` | [](https://github.com/LanceMcCarthy/DevOpsExamples/actions/workflows/main_docker-aspnetcore.yml) | [链接](https://github.com/LanceMcCarthy/DevOpsExamples/blob/main/src/AspNetCore/MyAspNetCoreApp/Dockerfile_CentOS "MyAspNetCoreApp/Dockerfile_CentOS") | - |
## 视频
### Azure DevOps 与 Telerik NuGet Server
以下 **4 分钟**的视频将带您了解将私有 NuGet feed 添加为 Service Connection,并在三种不同的 pipeline 设置中使用该服务的所有步骤。
[](https://www.youtube.com/watch?v=rUWU2n6FwgA)
- [0:09](https://youtu.be/rUWU2n6FwgA?t=9) 添加指向 Telerik 服务器的 Service connection
- [1:14](https://youtu.be/rUWU2n6FwgA?t=74) .NET Core 的经典 pipeline
- [1:47](https://youtu.be/rUWU2n6FwgA?t=107) 经典的 .NET Framework pipeline
- [2:25](https://youtu.be/rUWU2n6FwgA?t=145) .NET Core 的 YAML pipeline 设置
## 提示与故障排除
### GitHub Actions:使用 Secrets 设置环境变量
如果您的 nuget.config 文件中包含环境变量占位符,您可以使用 GitHub Secrets 轻松设置它们。例如,假设在您的 packageSourceCredentials 中,有以下环境变量占位符 `%TELERIK_USERNAME%` 和 `%TELERIK_PASSWORD%`
```
...
...
```
您可以在调用 `dotnet restore/build/publish` 命令的同一步骤中直接设置这些变量。例如,这里我使用了来自我 GitHub Actions Secrets 的 API key 作为凭据
```
- name: Restore NuGet Packages
run: dotnet restore src/MyProject.csproj --configfile src/nuget.config
env:
TELERIK_USERNAME: "api-key"
TELERIK_PASSWORD: ${{secrets.TELERIK_API_KEY}}
```
### Powershell:动态添加或更新 Package Source
#### 选项 1 - 更新现有的 package source
您也可以动态更新在 nuget.config 文件中定义的 Package Source 的凭据。当您不想使用包含环境变量的 `packageSourceCredentials` 部分时,这是一个很好的选择。
```
# 为 nuget.config 文件中定义的 'Telerik_v3_Feed' 设置凭据。
dotnet nuget update source "Telerik_v3_Feed" -s "https://nuget.telerik.com/v3/index.json" -u '${{secrets.MyTelerikEmail}}' -p '${{secrets.MyTelerikPassword}}' --configfile "src/nuget.config" --store-password-in-clear-text
```
该命令将在 nuget.config 中查找 key 为 `Telerik_v3_Feed` 的 package source,然后为该源添加/更新凭据。
#### 选项 2 - 添加新的 package source
另一种方法更简单一些,因为您不需要自定义 nuget.config 文件。只需使用 dotnet nuget add source 命令即可
```
dotnet nuget add source 'https://nuget.telerik.com/v3/index.json' -n "AddedTelerikServer" -u ${{secrets.MyTelerikEmail}} -p ${{secrets.MyTelerikPassword}} --store-password-in-clear-text
```
### 使用 Telerik NuGet Keys
您可以使用与上一节相同的方法。一切都完全相同,只是您将 `api-key` 用作用户名,将 NuGet key 用作密码。
请访问 [宣布推出 NuGet Keys](https://www.telerik.com/blogs/announcing-nuget-keys) 博客文章,了解有关如何创建 key 以及如何使用它的更多详细信息。
```
dotnet nuget update source "Telerik_v3_Feed" -s "https://nuget.telerik.com/v3/index.json" -u 'api-key' -p '${{secrets.MyNuGetKey}}' --configfile "src/nuget.config" --store-password-in-clear-text
```
### Dockerfile:使用 Secrets
当使用 Dockerfile 构建使用 Telerik NuGet 服务器的 .NET 项目时,您需要一种安全可靠的方式来处理您的 NuGet 凭据和 Telerik 许可证密钥。这可以通过挂载 Docker secret 来完成。
在您的 GitHub Actions workflow 中,您可以在 docker build 步骤中定义并设置 docker secrets。在以下示例中,请注意我们是如何使用 GitHub secrets 中的值来设置两个 docker secrets(`nuget-sec` 和 `license-sec`)的。
```
- uses: docker/build-push-action@v3
with:
secrets: |
nuget-sec=${{secrets.MY_NUGET_KEY}}
license-sec=${{secrets.MY_TELERIK_LICENSE_KEY}}
```
现在,在 Dockerfile 内部,您可以挂载并使用这些 secrets。请参见以下示例中的 Stage 2:
```
### STAGE 1 ###
FROM --platform=$BUILDPLATFORM mcr.microsoft.com/dotnet/aspnet:10.0 AS base
WORKDIR /app
### STAGE 2 ###
FROM mcr.microsoft.com/dotnet/sdk:10.0 AS build
WORKDIR /src
COPY . .
# STEP 1. 挂载 'nuget-sec' secret,然后:
# a. 添加 Telerik package 源
# b. 还原 packages
RUN --mount=type=secret,id=nuget-sec,required \
dotnet nuget add source 'https://nuget.telerik.com/v3/index.json' -n "Telerik_v3_Feed" -u "api-key" -p "$(cat /run/secrets/nuget-sec)" --store-password-in-clear-text \
&& \
dotnet restore "MyBlazorApp.csproj"
# STEP 2. 挂载 "license-sec" secret,然后:
# a. 创建 license 文件
# b. 构建项目
# c. 删除该文件,以免将其分发到您的 image 中(重要!)
RUN --mount=type=secret,id=license-key,required \
mkdir -p ~/.telerik && echo "$(cat /run/secrets/license-sec)" > ~/.telerik/telerik-license.txt \
&& \
dotnet publish "Researcher.Web/Researcher.Web.csproj" -o /app/publish /p:UseAppHost=false --no-restore --self-contained false \
&& \
rm -rf ~/.telerik
### STAGE 3 ###
# 从 base 构建最终 image,但仅从 stage 2 复制 PUBLISH ARTIFACTS
FROM base AS final
WORKDIR /app
COPY --from=build /app/publish .
ENTRYPOINT ["dotnet", "MyBlazorApp.dll"]
```
### Telerik 许可证方案
根据您构建代码的方式,有几种方法可以在构建的适当时机引入 Telerik 许可证密钥。让我为您展示两种方式:变量和文件。
- [方案 1 - 使用环境变量](https://github.com/LanceMcCarthy/DevOpsExamples?tab=readme-ov-file#approach-1---using-a-variable)
- [方案 2 - 使用许可证文件](https://github.com/LanceMcCarthy/DevOpsExamples?tab=readme-ov-file#approach-2---using-a-file)
- [在 YAML Pipeline 中](https://github.com/LanceMcCarthy/DevOpsExamples?tab=readme-ov-file#yaml-pipeline)
- [在经典 Pipeline 中](https://github.com/LanceMcCarthy/DevOpsExamples?tab=readme-ov-file#classic-pipeline)
- [方案 1 - 使用变量](https://github.com/LanceMcCarthy/DevOpsExamples#approach-1---using-a-variable)
- [方案 2 - 使用文件](https://github.com/LanceMcCarthy/DevOpsExamples#approach-2---using-a-file)
- [Secure File - YAML Pipeline](https://github.com/LanceMcCarthy/DevOpsExamples#secure-file---yaml-pipeline)
- [Secure File - 经典 Pipeline](https://github.com/LanceMcCarthy/DevOpsExamples#secure-file---classic-pipeline)
- [场景 1 - 带有环境变量输入的 Task](https://github.com/LanceMcCarthy/DevOpsExamples#scenario-1---task-with-env-var-inputs)
- [场景 2 - 不带环境变量输入的 Task](https://github.com/LanceMcCarthy/DevOpsExamples#scenario-2---task-without-env-var-inputs)
- [场景 3 - 移动 Secure File](https://github.com/LanceMcCarthy/DevOpsExamples#scenario-3---move-secure-file)
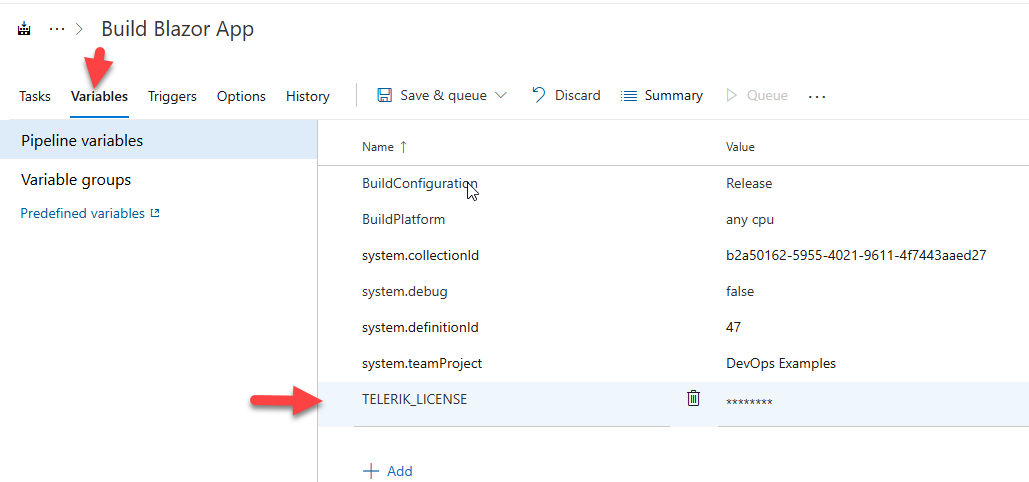
#### 方案 1 - 使用变量
这是目前最简单、最安全的方法。您可以使用 secret(GitHub Action secret 或 AzDO Variable secret),并在项目编译之前设置 `TELERIK_LICENSE` 环境变量。
在 YAML workflow/pipeline 中,您可以在 job 开始时或需要它的步骤中设置环境变量。
GH Actions
```
- run: dotnet publish MyApp.csproj -o /app/publish /p:UseAppHost=false --no-restore
env:
TELERIK_LICENSE: ${{secrets.TELERIK_LICENSE_KEY}}
```
Azure Pipelines YAML
```
- powershell: dotnet publish MyApp.csproj -o /app/publish /p:UseAppHost=false --no-restore
displayName: 'Build and publish the project'
env:
TELERIK_LICENSE: $(MY_TELERIK_LICENSE_KEY) # AzDO pipeline secret variable
```
如果您使用的是经典 pipeline,则可以使用 pipeline 变量:
#### 方案 2 - 使用文件
对于基于文件的选项,您有两种选择。设置 TELERIK_LICENSE_PATH 变量,或者将一个名为 **telerik-license.txt** 的文件添加到项目目录中。许可 runtime 将从项目目录到根目录进行递归检查,最后是 %appdata%/telerik/。
在 Azure DevOps 上,有一个名为 Secure Files 的强大功能。它允许您上传文件然后在 pipeline 中使用它。转到您的 Library 选项卡,然后选择 Secure File。将 Secure File 上传到您的 Azure DevOps 项目后,您就可以在 pipeline 中使用它了。
以下是使用该 Secure File 的几种方法。
##### YAML Pipeline
使用 YAML pipeline,您可以使用 **DownloadSecureFile@1** task,然后使用 `$(name.secureFilePath)` 来引用它。例如:
```
- task: DownloadSecureFile@1
name: DownloadTelerikLicenseFile # defining the 'name' is important
displayName: 'Download Telerik License Key File'
inputs:
secureFile: 'telerik-license.txt'
- task: MSBuild@1
displayName: 'Build Project'
inputs:
solution: 'myapp.csproj'
platform: Any CPU
configuration: Release
msbuildArguments: '/p:RestorePackages=false'
env:
# use the name.secureFilePath value to set the special TELERIK_LICENSE_PATH
TELERIK_LICENSE_PATH: $(DownloadTelerikLicenseFile.secureFilePath)
```
##### 经典 Pipeline
使用经典 pipeline,您可以使用相同的 `DownloadSecureFile` Task
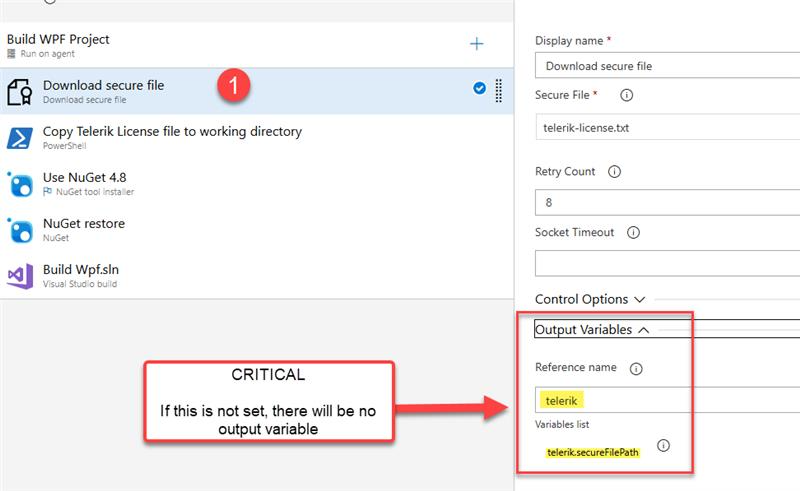
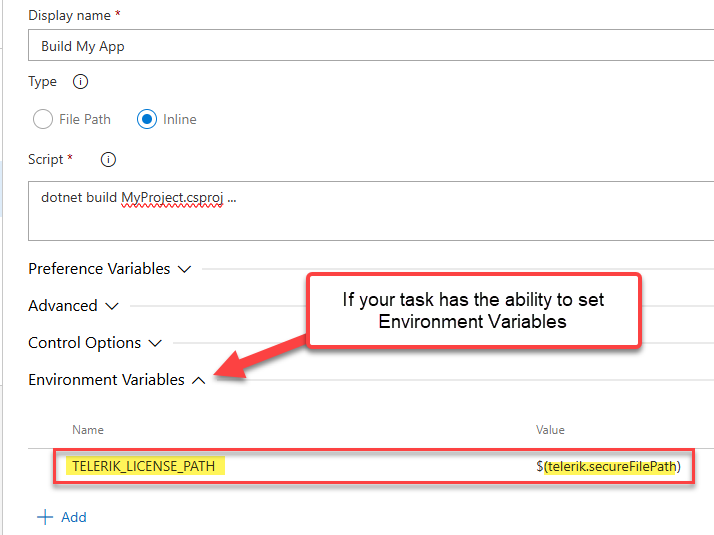
###### 场景 1 - 带有环境变量输入的 Task
将 secure file 下载到 runner 后,您现在可以使用 `$(telerik.secureFilePath)` 来设置 **TELERIK_LICENSE_PATH** 变量。
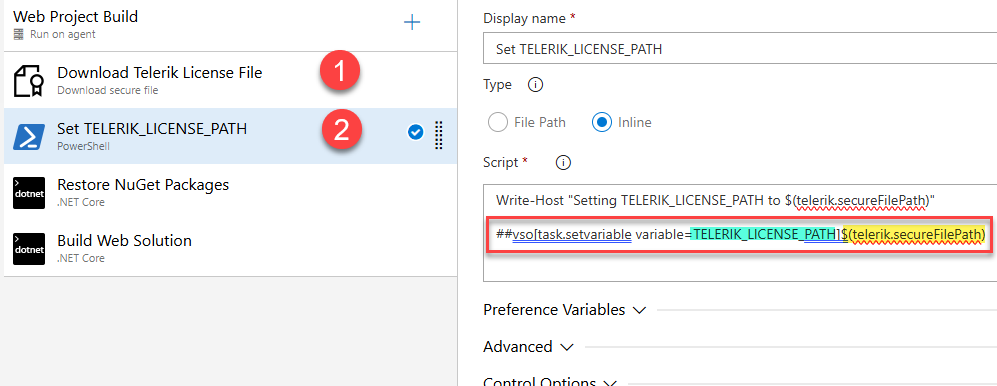
 ###### 场景 2 - 不带环境变量输入的 Task
并非所有的 AzDO task 都有“环境变量”部分(例如 MsBuild task 就没有)。要解决此问题,您可以在该 task 之前设置一个 pipeline 变量。使用 secure file
1. 添加一个新的 Powershell 或 Bash task(位于 Download Secure File task _之后_)
2. 使用 `task.setvariable` 命令(设置 `issecret=true`)以及 secure file task 的输出变量来设置 **TELERIK_LICENSE_PATH**
```
# 如果使用 Powershell
Write-Host "##vso[task.setvariable variable=TELERIK_LICENSE_PATH;issecret=true]$(telerik.secureFilePath)"
# 如果使用 Bash
echo "##vso[task.setvariable variable=TELERIK_LICENSE_PATH;issecret=true]$(telerik.secureFilePath)"
```
###### 场景 2 - 不带环境变量输入的 Task
并非所有的 AzDO task 都有“环境变量”部分(例如 MsBuild task 就没有)。要解决此问题,您可以在该 task 之前设置一个 pipeline 变量。使用 secure file
1. 添加一个新的 Powershell 或 Bash task(位于 Download Secure File task _之后_)
2. 使用 `task.setvariable` 命令(设置 `issecret=true`)以及 secure file task 的输出变量来设置 **TELERIK_LICENSE_PATH**
```
# 如果使用 Powershell
Write-Host "##vso[task.setvariable variable=TELERIK_LICENSE_PATH;issecret=true]$(telerik.secureFilePath)"
# 如果使用 Bash
echo "##vso[task.setvariable variable=TELERIK_LICENSE_PATH;issecret=true]$(telerik.secureFilePath)"
```
 ###### 场景 3 - 移动 Secure File
如果您在使用 TELERIK_LICENSE_PATH 变量时遇到任何问题,您可以直接将该文件移动到根构建目录。
1. 添加一个新的 Powershell 或 Bash task(位于 Download Secure File task _之后_)
```
Move-Item -Path "$(telerik.secureFilePath)" -Destination "$(Build.Repository.LocalPath)/telerik-license.txt" -Force
```
2. 构建代码
3. 删除该文件(以免您意外将其包含在您的发布版本中)
```
Remove-Item -Path "$(Build.Repository.LocalPath)/telerik-license.txt" -Force
```
如您所见,有非常多的选项。您选择哪一种在很大程度上取决于您的环境和 CI 需求。
###### 场景 3 - 移动 Secure File
如果您在使用 TELERIK_LICENSE_PATH 变量时遇到任何问题,您可以直接将该文件移动到根构建目录。
1. 添加一个新的 Powershell 或 Bash task(位于 Download Secure File task _之后_)
```
Move-Item -Path "$(telerik.secureFilePath)" -Destination "$(Build.Repository.LocalPath)/telerik-license.txt" -Force
```
2. 构建代码
3. 删除该文件(以免您意外将其包含在您的发布版本中)
```
Remove-Item -Path "$(Build.Repository.LocalPath)/telerik-license.txt" -Force
```
如您所见,有非常多的选项。您选择哪一种在很大程度上取决于您的环境和 CI 需求。
###### 场景 2 - 不带环境变量输入的 Task
并非所有的 AzDO task 都有“环境变量”部分(例如 MsBuild task 就没有)。要解决此问题,您可以在该 task 之前设置一个 pipeline 变量。使用 secure file
1. 添加一个新的 Powershell 或 Bash task(位于 Download Secure File task _之后_)
2. 使用 `task.setvariable` 命令(设置 `issecret=true`)以及 secure file task 的输出变量来设置 **TELERIK_LICENSE_PATH**
```
# 如果使用 Powershell
Write-Host "##vso[task.setvariable variable=TELERIK_LICENSE_PATH;issecret=true]$(telerik.secureFilePath)"
# 如果使用 Bash
echo "##vso[task.setvariable variable=TELERIK_LICENSE_PATH;issecret=true]$(telerik.secureFilePath)"
```
###### 场景 3 - 移动 Secure File
如果您在使用 TELERIK_LICENSE_PATH 变量时遇到任何问题,您可以直接将该文件移动到根构建目录。
1. 添加一个新的 Powershell 或 Bash task(位于 Download Secure File task _之后_)
```
Move-Item -Path "$(telerik.secureFilePath)" -Destination "$(Build.Repository.LocalPath)/telerik-license.txt" -Force
```
2. 构建代码
3. 删除该文件(以免您意外将其包含在您的发布版本中)
```
Remove-Item -Path "$(Build.Repository.LocalPath)/telerik-license.txt" -Force
```
如您所见,有非常多的选项。您选择哪一种在很大程度上取决于您的环境和 CI 需求。标签:AI合规, Docker, NuGet, 多人体追踪, 安全防御评估, 自动化流水线, 请求拦截