GoogleCloudPlatform/df-ml-anomaly-detection
GitHub: GoogleCloudPlatform/df-ml-anomaly-detection
基于谷歌云组件的实时异常检测参考方案,通过机器学习分析 Netflow 日志与金融交易,用于识别网络安全威胁及欺诈活动。
Stars: 192 | Forks: 49
# 使用 Google Cloud Stream Analytics 和 AI 服务进行实时异常检测
此仓库提供了一个 Cloud Dataflow 流水线参考实现,该流水线与 BigQuery ML、Cloud AI Platform 和 AutoML(即将推出!)集成,作为实时 AI 模式的一部分执行异常检测用例。它包含以下实时异常检测用例的参考实现:
1. 在 netflow 日志中发现异常行为,以识别电信用例中的网络安全威胁。
2. 发现异常交易,以识别金融服务用例中的欺诈活动。
## 目录
* [Netflow 日志中的异常检测](#anomaly-detection-in-netflow-log).
* [参考架构](#anomaly-detection-reference-architecture-using-bqml).
* [快速开始](#quick-start).
* [了解更多](#learn-more-about-this-solution).
* [使用 Dataflow 向 Pub/Sub 生成模拟数据](#test).
* [使用 BQ ML 训练和归一化数据](#create-a-k-means-model-using-bq-ml )
* [使用 Dataflow 进行特征提取](#feature-extraction-after-aggregation).
* [使用 Dataflow 进行实时异常值检测](#find-the-outliers).
* [使用 Cloud DLP 对敏感数据 (IMSI) 进行去标识化](#dlp-integration).
* [Looker 集成](#looker-integration).
* [金融交易中的异常检测](#anomaly-detection-in-financial-transactions).
* [参考架构](#anomaly-detection-reference-architecture-using-cloud-ai).
* [构建与运行](#build--run-1)
* [测试](#test-1)
## Netflow 日志中的异常检测
本节包含一个基于 ML 的网络异常检测解决方案的参考实现,使用了 Pub/Sub、Dataflow、BQML 和 Cloud DLP。它使用 BQML 中易于使用的内置 K-Means 聚类模型来训练和归一化 netflow 日志数据。实现的关键部分使用 Dataflow 进行特征提取和实时异常值检测,该部分已经过测试,可处理超过 20TB 的数据(250k 消息/秒)。最后,它还使用 Cloud DLP 对 IMSI(国际移动用户识别码)进行标记化处理,因为流式 Dataflow 流水线从 Pub/Sub 接入数百万条 netflow 日志。
对于许多客户而言,保护其内部网络免受恶意软件和安全威胁的侵害至关重要。随着恶意软件环境的不断变化以及物联网 (IoT) 和机器对机器 (M2M) 活动的爆发,现有的基于签名的恶意软件检测解决方案已不再足够。此概念验证 (PoC) 重点介绍了一个基于 ML 的网络异常检测解决方案,使用 PubSub、Dataflow、BQ ML 和 DLP 来检测订阅者设备上的移动恶意软件以及无线网络中的可疑行为。
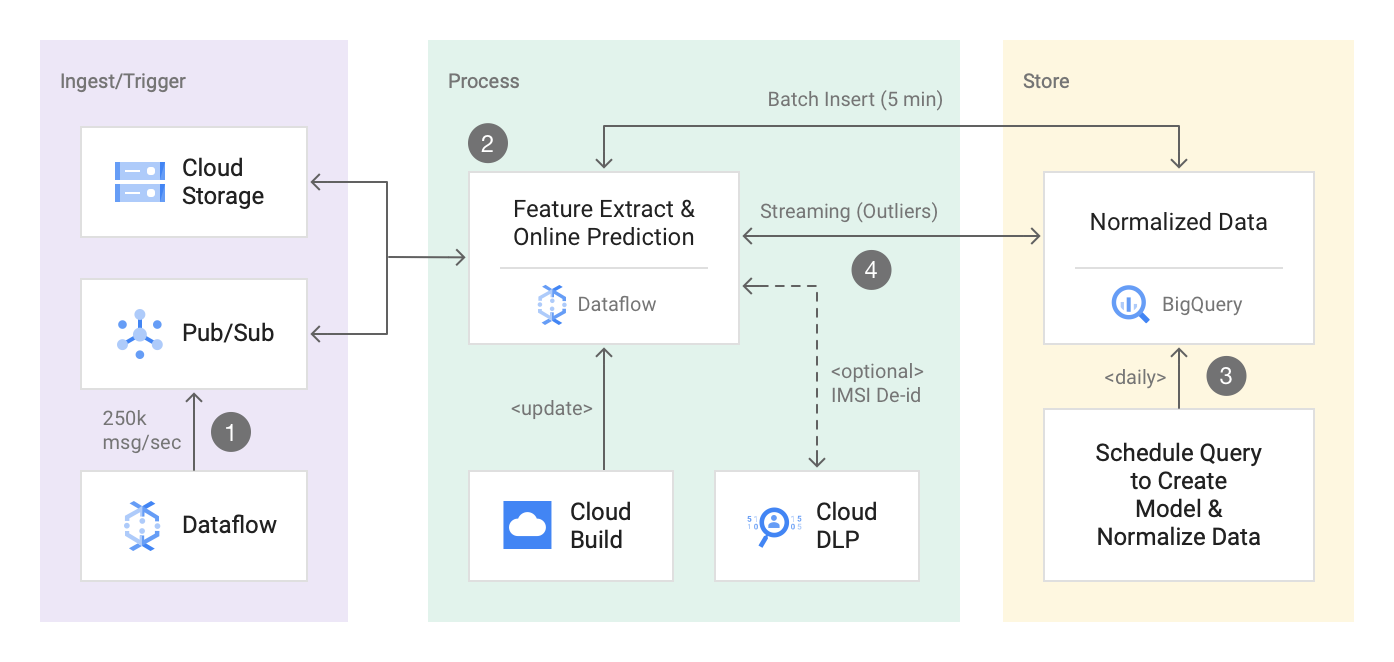
此解决方案实现了下面重点介绍的参考架构。您将执行一个 dataflow streaming pipeline 来处理来自 GCS 和/或 PubSub 的 netflow 日志,以实时发现 netflow 日志中的异常值。此解决方案还使用了通过 BQ-ML 创建的内置 K-Means 聚类模型。要查看指导您实现此解决方案的分步教程,请参阅 [使用 Dataflow、BigQuery ML 和 Cloud Data Loss Prevention 构建安全的异常检测解决方案](https://cloud.google.com/solutions/building-anomaly-detection-dataflow-bigqueryml-dlp)。
总之,您可以使用此解决方案演示以下 3 个用例:
1. 通过使用 Dataflow/Beam 实现大规模流式分析。(特征提取和在线预测)。
2. 通过使用 BQ ML K-Means 聚类创建模型,让机器学习变得简单易行。
3. 通过使用 Cloud DLP 基于加密的标记化来保护敏感信息,例如:“IMSI(国际移动用户识别码)”。
## 使用 BQML 的异常检测参考架构
## 快速开始
[](https://console.cloud.google.com/cloudshell/editor?cloudshell_git_repo=https://github.com/GoogleCloudPlatform/df-ml-anomaly-detection.git)
### 启用 API
```
gcloud services enable storage_component
gcloud services enable dataflow
gcloud services enable cloudbuild.googleapis.com
gcloud config set project
```
### 访问 Cloud Build 服务帐号
```
export PROJECT_NUMBER=$(gcloud projects list --filter=${PROJECT_ID} --format="value(PROJECT_NUMBER)")
gcloud projects add-iam-policy-binding ${PROJECT_ID} --member serviceAccount:$PROJECT_NUMBER@cloudbuild.gserviceaccount.com --role roles/editor
gcloud projects add-iam-policy-binding ${PROJECT_ID} --member serviceAccount:$PROJECT_NUMBER@cloudbuild.gserviceaccount.com --role roles/storage.objectAdmin
```
#### 导出所需参数
```
export DATASET=bq-dataset-name
export SUBSCRIPTION_ID=subscription_id
export TOPIC_ID=topic_id
export DATA_STORAGE_BUCKET=${PROJECT_ID}-data-storage-bucket
```
您还可以导出 DLP 模板和批处理大小以在流水线中启用 DLP 转换
* 批处理大小以字节为单位,允许的最大值小于 520KB/payload
```
export DEID_TEMPLATE=projects/{id}/deidentifyTemplates/{template_id}
export BATCH_SIZE = 350000
```
#### 触发 Cloud Build 脚本
```
gcloud builds submit scripts/. --config scripts/cloud-build-demo.yaml --substitutions \
_DATASET=$DATASET,\
_DATA_STORAGE_BUCKET=$DATA_STORAGE_BUCKET,\
_SUBSCRIPTION_ID=${SUBSCRIPTION_ID},\
_TOPIC_ID=${TOPIC_ID},\
_API_KEY=$(gcloud auth print-access-token)
```
#### (可选)使用 flex template 触发流水线
如果您已经拥有所有其他资源(如 BigQuery 表、PubSub 主题和订阅者、GCS 存储桶)或之前已创建,您可以使用以下命令通过公共镜像触发流水线。这对于运行流水线进行实时演示可能会有所帮助。
生成 10k 消息/秒的随机 netflow 日志数据:
```
gcloud beta dataflow flex-template run data-generator --project= --region= --template-file-gcs-location=gs://df-ml-anomaly-detection-mock-data/dataflow-flex-template/dynamic_template_data_generator_template.json --parameters=autoscalingAlgorithm="NONE",numWorkers=5,maxNumWorkers=5,workerMachineType=n1-standard-4,qps=10000,schemaLocation=gs://df-ml-anomaly-detection-mock-data/schema/next-demo-schema.json,eventType=net-flow-log,topic=projects//topics/events
```
生成 1k 消息/秒的随机异常值数据:
```
gcloud beta dataflow flex-template run data-generator --project= --region= --template-file-gcs-location=gs://df-ml-anomaly-detection-mock-data/dataflow-flex-template/dynamic_template_data_generator_template.json --parameters=autoscalingAlgorithm="NONE",numWorkers=5,maxNumWorkers=5,workerMachineType=n1-standard-4,qps=1000,schemaLocation=gs://df-ml-anomaly-detection-mock-data/schema/next-demo-schema-outlier.json,eventType=net-flow-log,topic=projects//topics/
```
触发异常检测流水线:
```
gcloud beta dataflow flex-template run "anomaly-detection" --project=--region=us-central1 --template-file-gcs-location=gs://df-ml-anomaly-detection-mock-data/dataflow-flex-template/dynamic_template_secure_log_aggr_template.json --parameters=autoscalingAlgorithm="NONE",numWorkers=20,maxNumWorkers=20,workerMachineType=n1-highmem-4,subscriberId=projects//subscriptions/events-sub,tableSpec=:.cluster_model_data,batchFrequency=10,customGcsTempLocation=gs://df-tmp-data/temp,tempLocation=gs://df-temp-data/temp,clusterQuery=gs:///normalized_cluster_data.sql,outlierTableSpec=:.outlier_data,inputFilePattern=gs://df-ml-anomaly-detection-mock-data/flow_log*.json,enbaleStreamingEngine=true,windowInterval=5,writeMethod=FILE_LOADS,streaming=true
```
### 在 PubSub 主题中生成一些模拟数据(1k 事件/秒)
```
gradle run -DmainClass=com.google.solutions.df.log.aggregations.StreamingBenchmark \
-Pargs="--streaming --runner=DataflowRunner --project=${PROJECT_ID} --autoscalingAlgorithm=NONE --workerMachineType=n1-standard-4 --numWorkers=3 --maxNumWorkers=3 --qps=1000 --schemaLocation=gs://df-ml-anomaly-detection-mock-data/schema/netflow_log_json_schema.json --eventType=netflow --topic=${TOPIC_ID} --region=us-central1"
```
### 发布具有异常 tx 和 rx 字节的异常值
```
gcloud pubsub topics publish events --message "{\"subscriberId\": \"00000000000000000\", \
\"srcIP\": \"12.0.9.4\", \
\"dstIP\": \"12.0.1.3\", \
\"srcPort\": 5000, \
\"dstPort\": 3000, \
\"txBytes\": 150000, \
\"rxBytes\": 40000, \
\"startTime\": 1570276550, \
\"endTime\": 1570276550, \
\"tcpFlag\": 0, \
\"protocolName\": \"tcp\", \
\"protocolNumber\": 0}"
```
### 清理
请从 UI 手动停止/取消 dataflow 流水线。
## 了解有关此解决方案的更多信息
### 示例输入日志数据和聚合后的输出
示例输入数据
```
{
\"subscriberId\": \"100\",
\"srcIP\": \"12.0.9.4",
\"dstIP\": \"12.0.1.2\",
\"srcPort\": 5000,
\"dstPort\": 3000,
\"txBytes\": 15,
\"rxBytes\": 40,
\"startTime\": 1570276550,
\"endTime\": 1570276559,
\"tcpFlag\": 0,
\"protocolName\": \"tcp\",
\"protocolNumber\": 0
},
{
\"subscriberId\": \"100\",
\"srcIP\": \"12.0.9.4\",
\"dstIP\": \"12.0.1.2\",
\"srcPort\": 5000,
\"dstPort\": 3000,
\"txBytes\": 10,
\"rxBytes\": 40,
\"startTime\": 1570276650,
\"endTime\": 11570276750,,
\"tcpFlag\": 0,
\"protocolName\": \"tcp\",
\"protocolNumber\": 0
}
```
### 聚合后的特征提取
1. 添加处理时间戳。
2. 按目标子网和 subscriberId 分组
3. 近似唯一 IP 的数量
4. 近似唯一端口的数量
5. 唯一记录的数量
6. txBytes 的最大值、最小值、平均值
7. rxBytes 的最大值、最小值、平均值
8. duration 的最大值、最小值、平均值
```
{
"transaction_time": "2019-10-27 23:22:17.848000",
"subscriber_id": "100",
"dst_subnet": "12.0.1.2/22",
"number_of_unique_ips": "1",
"number_of_unique_ports": "1",
"number_of_records": "2",
"max_tx_bytes": "15",
"min_tx_bytes": "10",
"avg_tx_bytes": "12.5",
"max_rx_bytes": "40",
"min_rx_bytes": "40",
"avg_rx_bytes": "40.0",
"max_duration": "100",
"min_duration": "9",
"avg_duration": "54.5"
}
```
### 使用 Beam Schema 推断进行特征提取
```
Group.byFieldNames("subscriberId", "dstSubnet")
.aggregateField(
"srcIP",
new ApproximateUnique.ApproximateUniqueCombineFn(
SAMPLE_SIZE, StringUtf8Coder.of()),
"number_of_unique_ips")
.aggregateField(
"srcPort",
new ApproximateUnique.ApproximateUniqueCombineFn(
SAMPLE_SIZE, VarIntCoder.of()),
"number_of_unique_ports")
.aggregateField("srcIP", Count.combineFn(), "number_of_records")
.aggregateField("txBytes", new AvgCombineFn(), "avg_tx_bytes")
.aggregateField("txBytes", Max.ofIntegers(), "max_tx_bytes")
.aggregateField("txBytes", Min.ofIntegers(), "min_tx_bytes")
.aggregateField("rxBytes", new AvgCombineFn(), "avg_rx_bytes")
.aggregateField("rxBytes", Max.ofIntegers(), "max_rx_bytes")
.aggregateField("rxBytes", Min.ofIntegers(), "min_rx_bytes")
.aggregateField("duration",new AvgCombineFn(), "avg_duration")
.aggregateField("duration", Max.ofIntegers(), "max_duration")
.aggregateField("duration", Min.ofIntegers(), "min_duration"));
```
### 使用 BQ ML 创建 K-Means 模型
请使用 json schema (aggr_log_table_schema.json) 在 BQ 中创建表。
Cluster_model_data 表按 'ingestion timestamp' 分区,并按 dst_subnet 和 subscriber_id 聚类。
```
CREATE or REPLACE TABLE network_logs.train_data as (select * from {dataset_name}.cluster_model_data
where _PARTITIONDATE between 'date_from' AND 'date_to';
--> create model
CREATE OR REPLACE {dataset_name}.log_cluster options(model_type='kmeans', num_clusters=4, standardize_features = true)
AS select * except (transaction_time, subscriber_id, number_of_unique_ips, number_of_unique_ports, dst_subnet)
from network_logs.train_data;
```
### 使用 BQ 存储过程归一化数据
1. 在训练数据集上进行预测,以获取每条记录到质心的最近距离。
2. 计算每个点的标准差 (STD DEV) 以进行归一化
3. 将它们存储在 dataflow 流水线可以用作侧输入 的表中
```
with centroid_details AS (
select centroid_id,array_agg(struct(feature as name, round(numerical_value,1) as value) order by centroid_id) AS cluster
from ML.CENTROIDS(model network_logs.log_cluster_2)
group by centroid_id),
cluster as (select centroid_details.centroid_id as centroid_id,
(select value from unnest(cluster) where name = 'number_of_records') AS number_of_records,
(select value from unnest(cluster) where name = 'max_tx_bytes') AS max_tx_bytes,
(select value from unnest(cluster) where name = 'min_tx_bytes') AS min_tx_bytes,
(select value from unnest(cluster) where name = 'avg_tx_bytes') AS avg_tx_bytes,
(select value from unnest(cluster) where name = 'max_rx_bytes') AS max_rx_bytes,
(select value from unnest(cluster) where name = 'min_rx_bytes') AS min_rx_bytes,
(select value from unnest(cluster) where name = 'avg_rx_bytes') AS avg_rx_bytes,
(select value from unnest(cluster) where name = 'max_duration') AS max_duration,
(select value from unnest(cluster) where name = 'min_duration') AS min_duration,
(select value from unnest(cluster) where name = 'avg_duration') AS avg_duration
from centroid_details order by centroid_id asc),
predict as (select * from ML.PREDICT(model {dataset_name}.log_cluster_2, (select * from network_logs.train_data)))
select c.centroid_id as centroid_id,
(stddev((p.number_of_records-c.number_of_records)
+(p.max_tx_bytes-c.max_tx_bytes)
+(p.min_tx_bytes-c.min_tx_bytes)
+(p.avg_tx_bytes-c.min_tx_bytes)
+(p.max_rx_bytes-c.max_rx_bytes)
+(p.min_rx_bytes-c.min_rx_bytes)
+(p.avg_rx_bytes-c.min_rx_bytes)
+(p.max_duration-c.max_duration)
+(p.min_duration-c.min_duration)
+(p.avg_duration-c.avg_duration)))as normalized_dest,
any_value(c.number_of_records) as number_of_records,
any_value(c.max_tx_bytes) as max_tx_bytes,
any_value(c.min_tx_bytes) as min_tx_bytes ,
any_value(c.avg_tx_bytes) as avg_tx_bytes,
any_value(c.max_rx_bytes) as max_rx_bytes,
any_value(c.min_tx_bytes) as min_rx_bytes,
any_value(c.avg_rx_bytes) as avg_rx_bytes,
any_value(c.avg_duration) as avg_duration,
any_value(c.max_duration) as max_duration,
any_value(c.min_duration) as min_duration
from predict as p
inner join cluster as c on c.centroid_id = p.centroid_id
group by c.centroid_id);
```
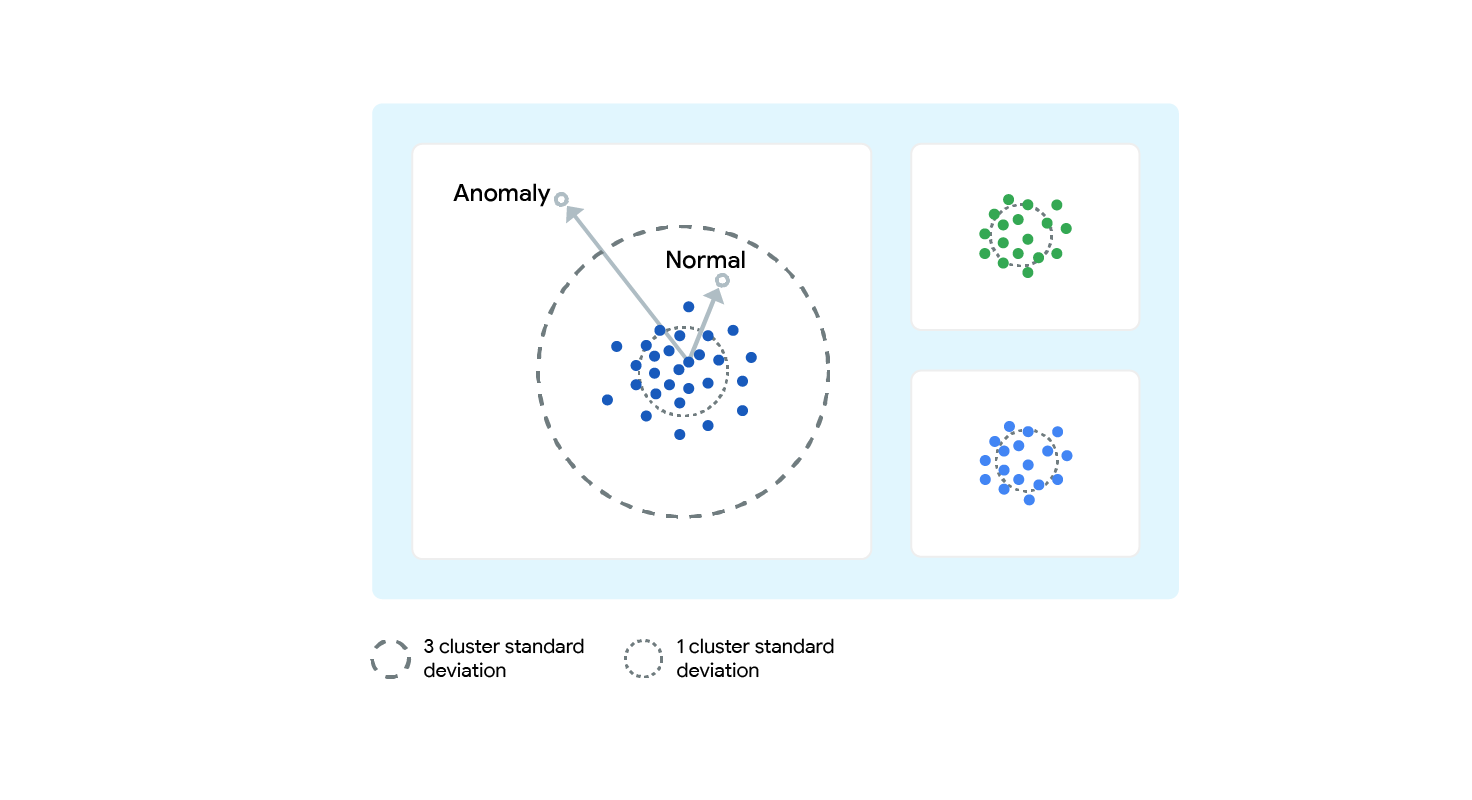
### 查找异常值
1. 查找到质心的最近距离。
2. 计算输入向量和质心向量之间的标准差 (STD DEV)
3. 查找 Z 分数(样本中的值与平均值之间的差值,再除以标准差)
4. 分数为 2(比平均值高 2 个标准差即为异常值)。
## 开始之前(如果不使用 Cloud Build 脚本,则为可选步骤)
```
gcloud services enable dataflow
gcloud services enable big query
gcloud services enable storage_component
```
## 创建 BigQuery 数据集和表
数据集
```
bq --location=US mk -d \
--description "Network Logs Dataset \
```
聚合数据表
```
bq mk -t --schema aggr_log_table_schema.json \
--time_partitioning_type=DAY \
--clustering_fields=dst_subnet, subscriber_id \
--description "Network Log Partition Table" \
--label myorg:prod \
:.cluster_model_data
```
异常值表
```
bq mk -t --schema outlier_table_schema.json \
--label myorg:prod \
:.network_logs.outlier_data
```
## 构建与运行
构建
```
gradle spotlessApply -DmainClass=com.google.solutions.df.log.aggregations.SecureLogAggregationPipeline
gradle build -DmainClass=com.google.solutions.df.log.aggregations.SecureLogAggregationPipeline
gcloud auth configure-docker
gradle jib --image=gcr.io/${PROJECT_ID}/df-ml-anomaly-detection:latest -DmainClass=com.google.solutions.df.log.aggregations.SecureLogAggregationPipeline
```
运行
```
gcloud beta dataflow flex-template run "anomaly-detection" \
--project=${PROJECT_ID} \
--region=us-central1 \
--template-file-gcs-location=gs://${DF_TEMPLATE_CONFIG_BUCKET}/dynamic_template_secure_log_aggr_template.json \
--parameters=autoscalingAlgorithm="NONE",\
numWorkers=5,\
maxNumWorkers=5,\
workerMachineType=n1-highmem-4,\
subscriberId=projects/${PROJECT_ID}/subscriptions/${SUBSCRIPTION_ID},\
tableSpec=${PROJECT_ID}:${DATASET_NAME}.cluster_model_data,\
batchFrequency=2,\
customGcsTempLocation=gs://${DF_TEMPLATE_CONFIG_BUCKET}/temp,\
tempLocation=gs://${DF_TEMPLATE_CONFIG_BUCKET}/temp,\
clusterQuery=gs://${DF_TEMPLATE_CONFIG_BUCKET}/normalized_cluster_data.sql,\
outlierTableSpec=${PROJECT_ID}:${DATASET_NAME}.outlier_data,\
inputFilePattern=gs://df-ml-anomaly-detection-mock-data/flow_log*.json,\
workerDiskType=compute.googleapis.com/projects/${PROJECT_ID}/zones/us-central1-b/diskTypes/pd-ssd,\
diskSizeGb=5,\
windowInterval=10,\
writeMethod=FILE_LOADS,\
streaming=true
```
## 测试
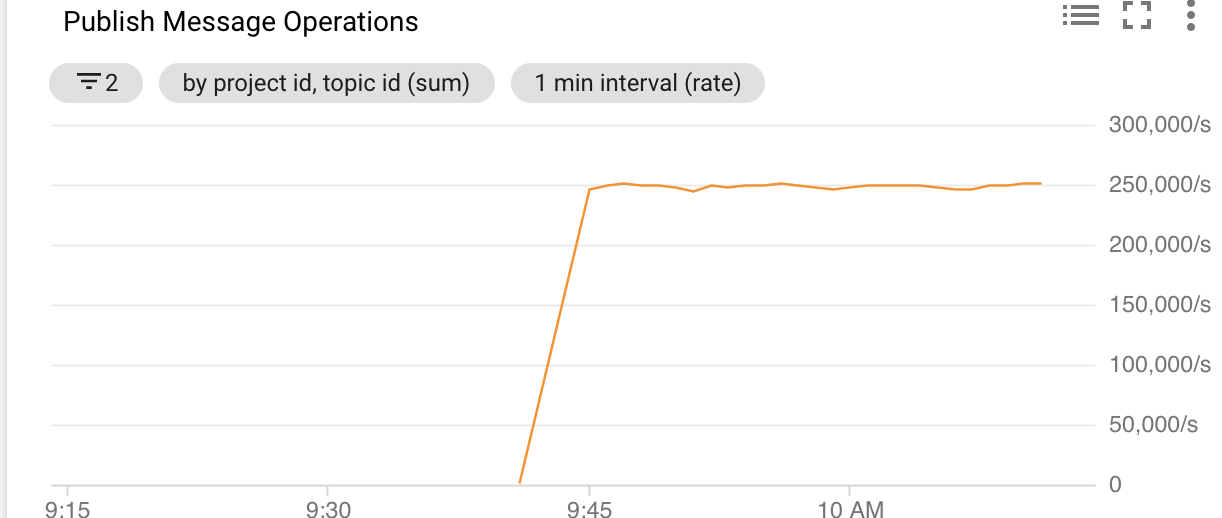
以 250k 消息/秒的速度发布模拟日志数据
用于负载测试的 Schema:
```
{
"subscriberId": "{{long(1111111111,9999999999)}}",
"srcIP": "{{ipv4()}}",
"dstIP": "{{subnet()}}",
"srcPort": {{integer(1000,5000)}},
"dstPort": {{integer(1000,5000)}},
"txBytes": {{integer(10,1000)}},
"rxBytes": {{integer(10,1000)}},
"startTime": {{starttime()}},
"endTime": {{endtime()}},
"tcpFlag": {{integer(0,65)}},
"protocolName": "{{random("tcp","udp","http")}}",
"protocolNumber": {{integer(0,1)}}
}
```
运行:
```
export PROJECT_ID=$(gcloud config get-value project)
export TOPIC_ID=topic-id
gcloud pubsub topics create $TOPIC_ID
gcloud builds submit . --machine-type=n1-highcpu-8 --config scripts/cloud-build-data-generator.yaml --substitutions _TOPIC_ID=${TOPIC_ID}
```
异常值测试
```
gcloud pubsub topics publish \
--message "{\"subscriberId\": \"demo1\",\"srcIP\": \"12.0.9.4\",\"dstIP\": \"12.0.1.3\",\"srcPort\": 5000,\"dstPort\": 3000,\"txBytes\": 150000,\"rxBytes\": 40000,\"startTime\": 1570276550,\"endTime\": 1570276550,\"tcpFlag\": 0,\"protocolName\": \"tcp\",\"protocolNumber\": 0}"
gcloud pubsub topics publish \
--message "{\"subscriberId\": \"demo1\",\"srcIP\": \"12.0.9.4\",\"dstIP\": \"12.0.1.3\",\"srcPort\": 5000,\"dstPort\": 3000,\"txBytes\": 15000000,\"rxBytes\": 4000000,\"startTime\": 1570276550,\"endTime\": 1570276550,\"tcpFlag\": 0,\"protocolName\": \"tcp\",\"protocolNumber\": 0}"
```
特征提取测试
```
gcloud pubsub topics publish \
--message "{\"subscriberId\": \"100\",\"srcIP\": \"12.0.9.4\",\"dstIP\": \"12.0.1.2\",\"srcPort\": 5000,\"dstPort\": 3000,\"txBytes\": 10,\"rxBytes\": 40,\"startTime\": 1570276550,\"endTime\": 1570276559,\"tcpFlag\": 0,\"protocolName\": \"tcp\",\"protocolNumber\": 0}"
gcloud pubsub topics publish \
--message "{\"subscriberId\": \"100\",\"srcIP\": \"13.0.9.4\",\"dstIP\": \"12.0.1.2\",\"srcPort\": 5001,\"dstPort\": 3000,\"txBytes\": 15,\"rxBytes\": 40,\"startTime\": 1570276650,\"endTime\": 1570276750,\"tcpFlag\": 0,\"protocolName\": \"tcp\",\"protocolNumber\": 0}"
OUTPUT: INFO: row value Row:[2, 2, 2, 12.5, 15, 10, 50]
```
```
gcloud pubsub topics publish \
--message "{\"subscriberId\": \"100\",\"srcIP\": \"12.0.9.4\",\"dstIP\": \"12.0.1.2\",\"srcPort\": 5000,\"dstPort\": 3000,\"txBytes\": 10,\"rxBytes\": 40,\"startTime\": 1570276550,\"endTime\": 1570276550,\"tcpFlag\": 0,\"protocolName\": \"tcp\",\"protocolNumber\": 0}"
gcloud pubsub topics publish \
--message "{\"subscriberId\": \"100\",\"srcIP\": \"12.0.9.4\",\"dstIP\": \"12.0.1.2\",\"srcPort\": 5000,\"dstPort\": 3000,\"txBytes\": 15,\"rxBytes\": 40,\"startTime\": 1570276550,\"endTime\": 1570276550,\"tcpFlag\": 0,\"protocolName\": \"tcp\",\"protocolNumber\": 0}"
OUTPUT INFO: row value Row:[1, 1, 2, 12.5, 15, 10, 0]
```
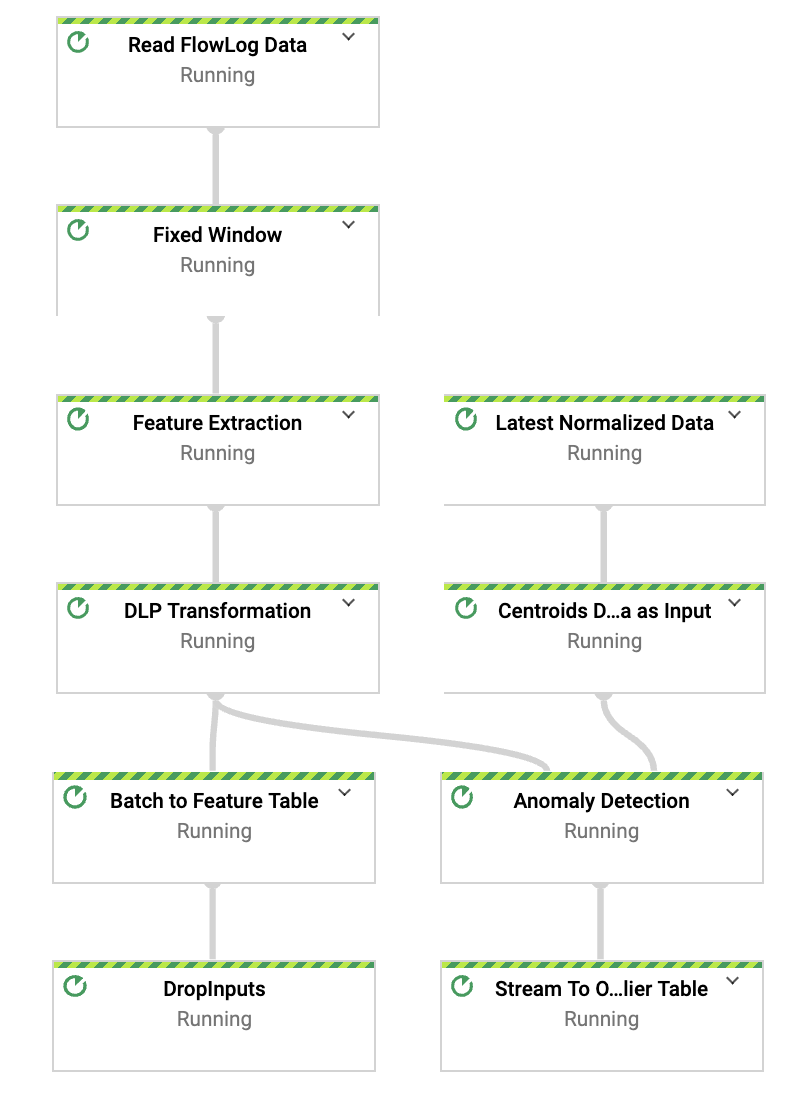
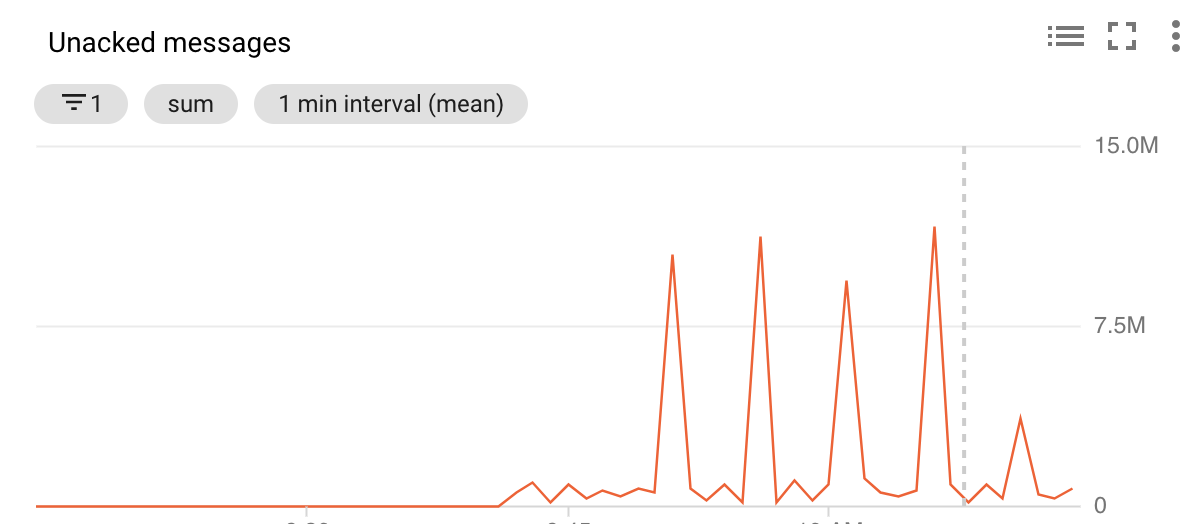
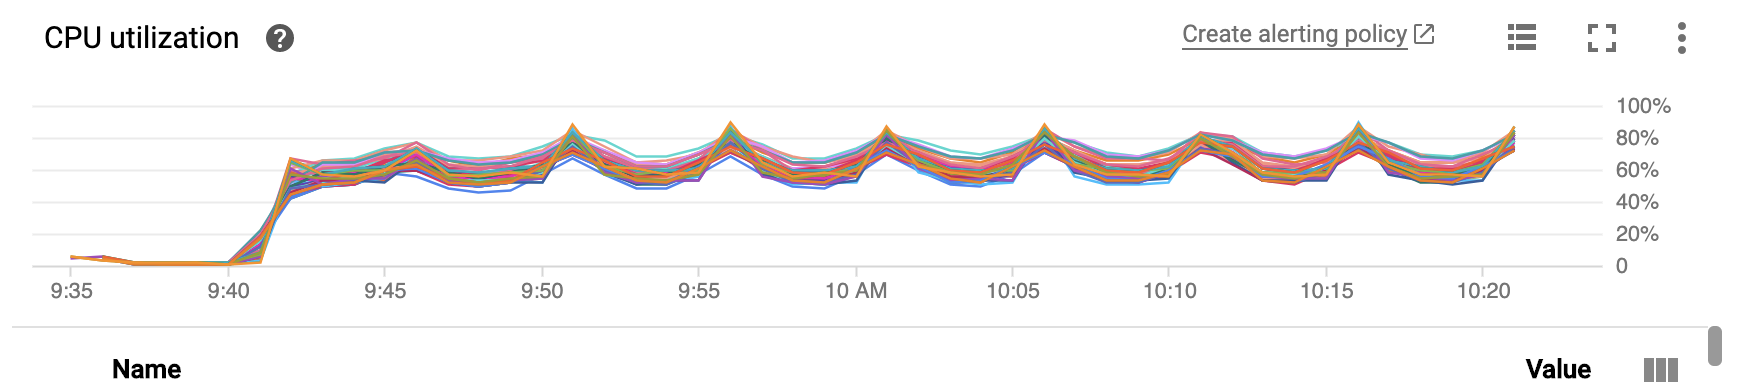
## 250k 消息/秒下的流水线性能
流水线 DAG(待办事项:使用更新的流水线 DAG 进行更改)
消息速率
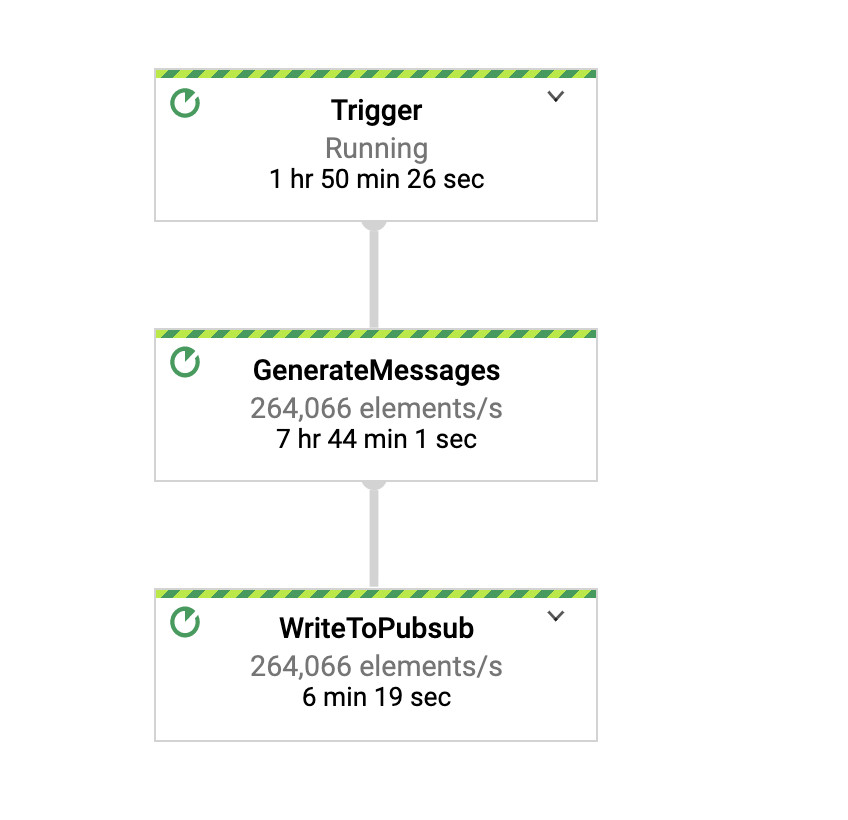
确认消息速率
CPU 利用率
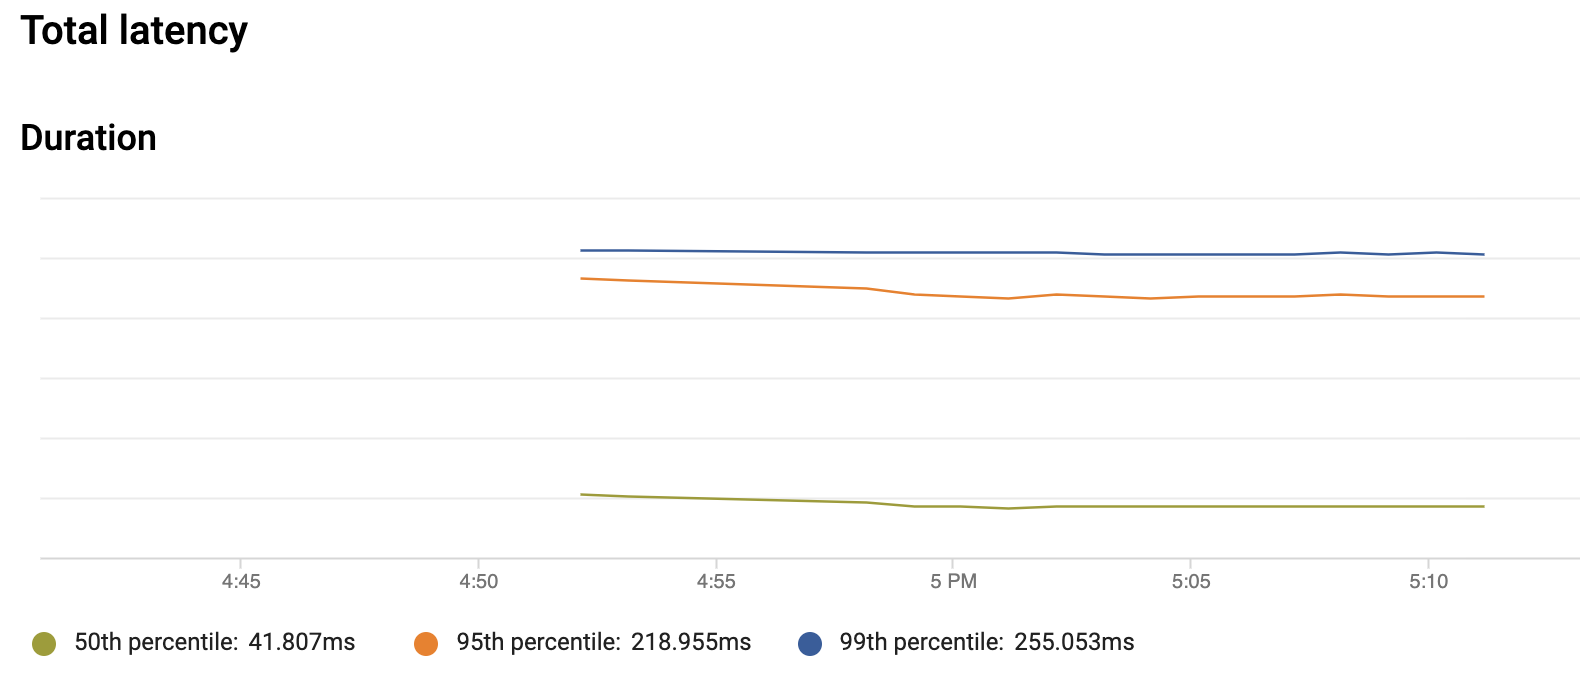
系统延迟

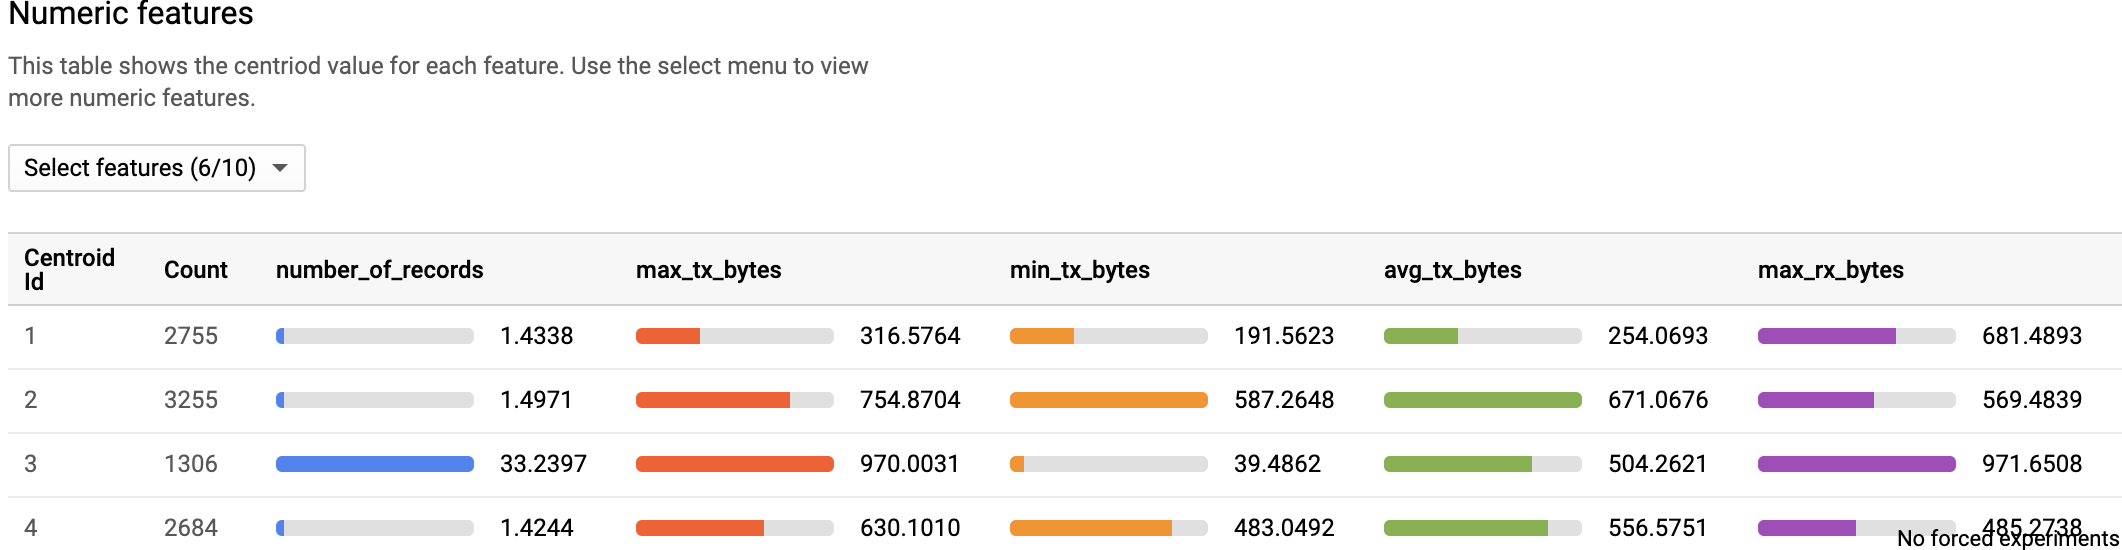
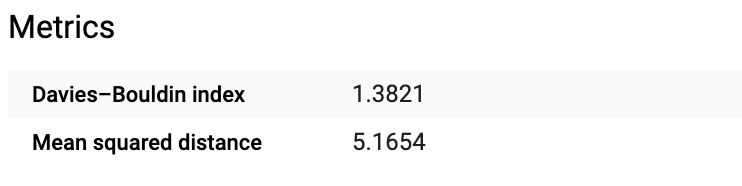
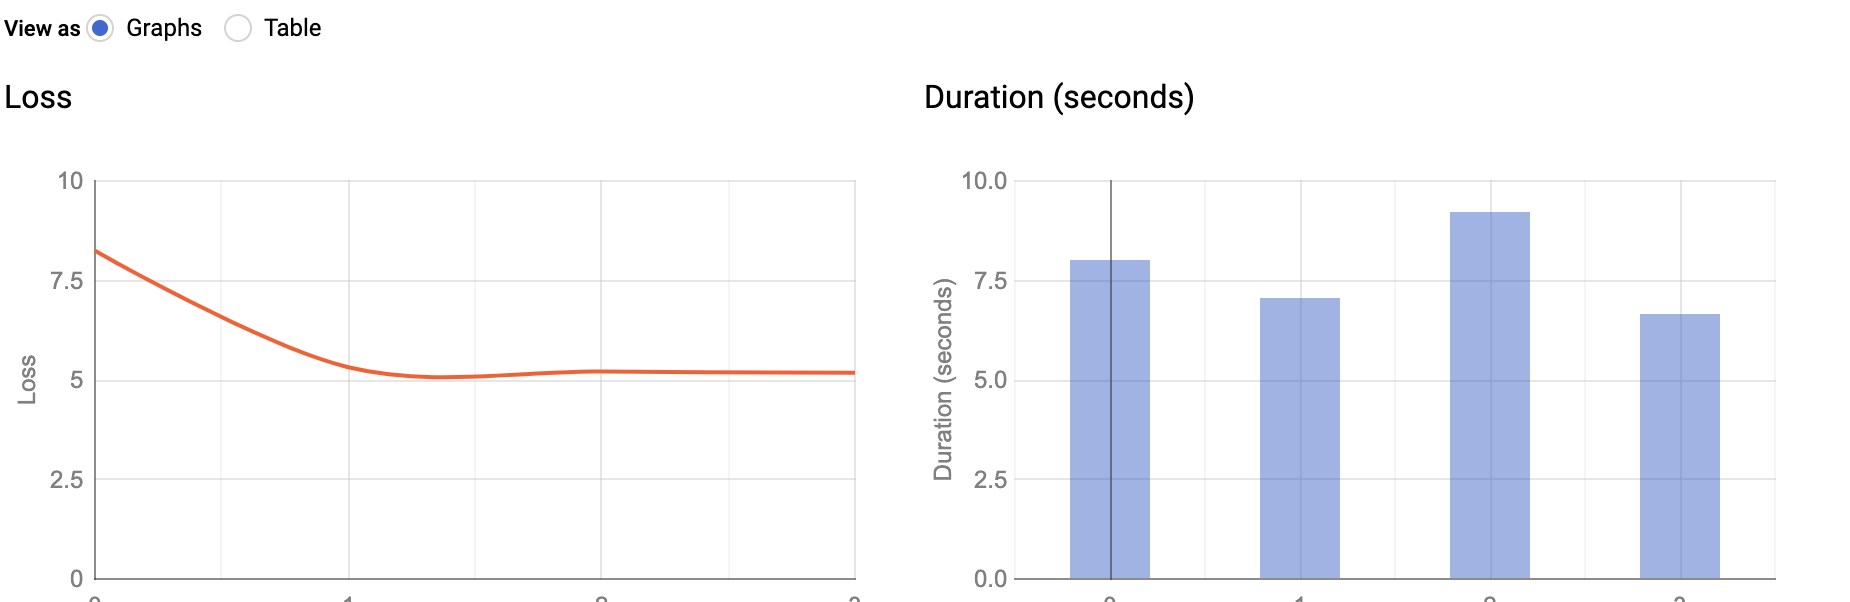
### 使用 BQ-ML 进行 K-Means 聚类(模型评估)

### DLP 集成
为了保护日志中的任何敏感数据,您可以在数据存储到 BigQuery 之前使用 Cloud DLP 进行检查和去标识化。这是我们参考架构中的一个可选集成。要启用它,请按照以下步骤操作:
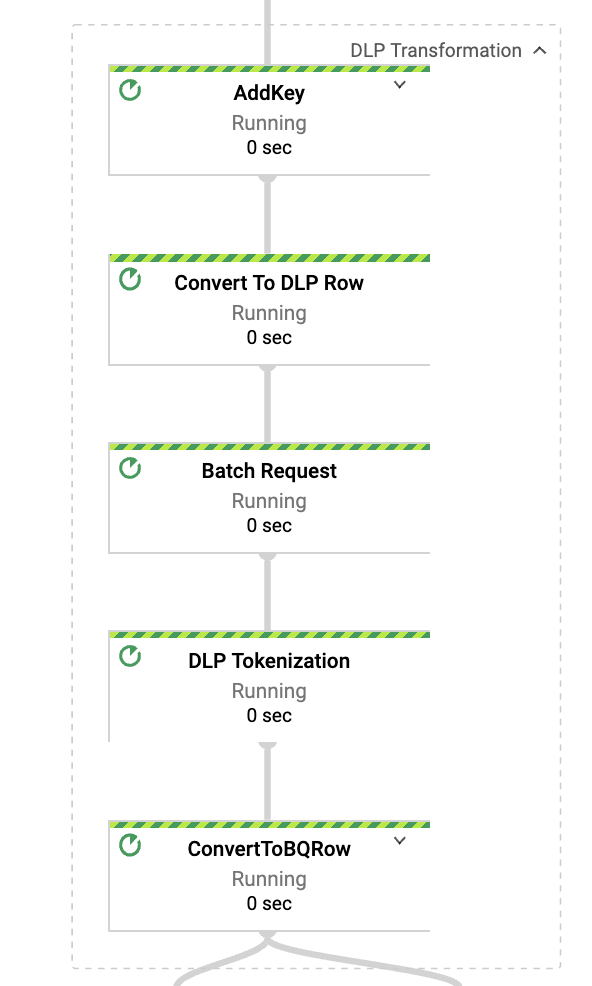
* 更新 scripts/deid_imei_number.json 中的 JSON 文件,以添加适用于您的用例的去标识化转换。下面的屏幕截图使用了基于加密的确定性转换来对 IMSI 号码进行去标识化。要了解如何使用 DLP 转换,请参阅此 [指南](https://cloud.google.com/solutions/de-identification-re-identification-pii-using-cloud-dlp)。
```
{
"deidentifyTemplate":{
"displayName":"Config to DeIdentify IMEI Number",
"description":"IMEI Number masking transformation",
"deidentifyConfig":{
"recordTransformations":{
"fieldTransformations":[
{
"fields":[
{
"name":"subscriber_id"
}
],
"primitiveTransformation":{
"cryptoDeterministicConfig":{
"cryptoKey":{
}
},
"surrogateInfoType":{
"name":"IMSI_TOKEN"
}
}
}
}
]
}
}
},
"templateId":"dlp-deid-subid"
}
```
* 运行此脚本 (deid_template.sh) 在您的项目中创建模板。
```
PROJECT_ID=$(gcloud config get-value project)
DEID_CONFIG="@deid_imei_number.json"
DEID_TEMPLATE_OUTPUT="deid-template.json"
API_KEY=$(gcloud auth print-access-token)
API_ROOT_URL="https://dlp.googleapis.com"
DEID_TEMPLATE_API="${API_ROOT_URL}/v2/projects/${PROJECT_ID}/deidentifyTemplates"
curl -X POST -H "Content-Type: application/json" \
-H "Authorization: Bearer ${API_KEY}" \
"${DEID_TEMPLATE_API}"`` \
-d "${DEID_CONFIG}"\
-o "${DEID_TEMPLATE_OUTPUT}"
```
* 将 DLP 模板名称传递给 Dataflow 流水线。
```
--deidTemplateName=projects//deidentifyTemplates/dlp-deid-subid"
```
注意:请查看此 [repo](https://github.com/GoogleCloudPlatform/dlp-dataflow-deidentification) 以了解有关端到端数据标记化解决方案的更多信息。

如果您从 DAG 中点击 DLP 转换,您将看到以下子转换:
### Looker 集成
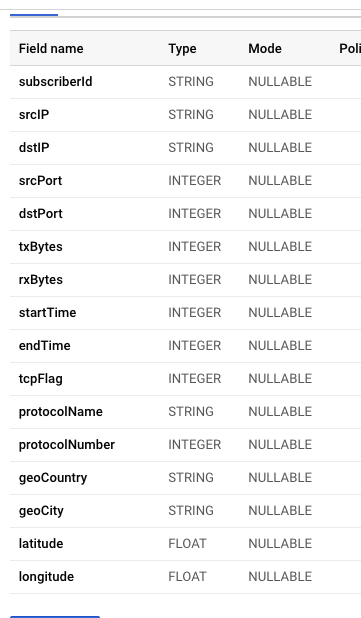
除了特征表和异常值表之外,您还可以在 BigQuery 表中包含原始 netflow 日志数据。这包括从模拟 IP 派生的地理位置数据,如国家、城市、纬度、经度。流水线使用 [MaxMind-GeoIP2 Java API](https://maxmind.github.io/GeoIP2-java/)。
#### 创建一个表来存储原始日志 netflow 数据
```
bq mk -t --schema src/main/resources/netflow_log_raw_datat.json \
--time_partitioning_type=DAY \
--clustering_fields="geoCountry,geoCity" \
--description "Raw Netflow Log Data" \
${PROJECT_ID}:${DATASET_NAME}.netflow_log_data
```
#### Looker 仓库
您可以利用此 [开源代码](https://github.com/llooker/anomaly_detection_network_logs/tree/master) 为您的用例导入 Looker 仪表板和底层的 LookML。
####
在流水线中传递参数。如果未传递,流水线假定不需要存储原始日志数据。特征和异常值数据将按预期存储。
```
--logTableSpec=:.netflow_log_data
```

## 金融交易中的异常检测
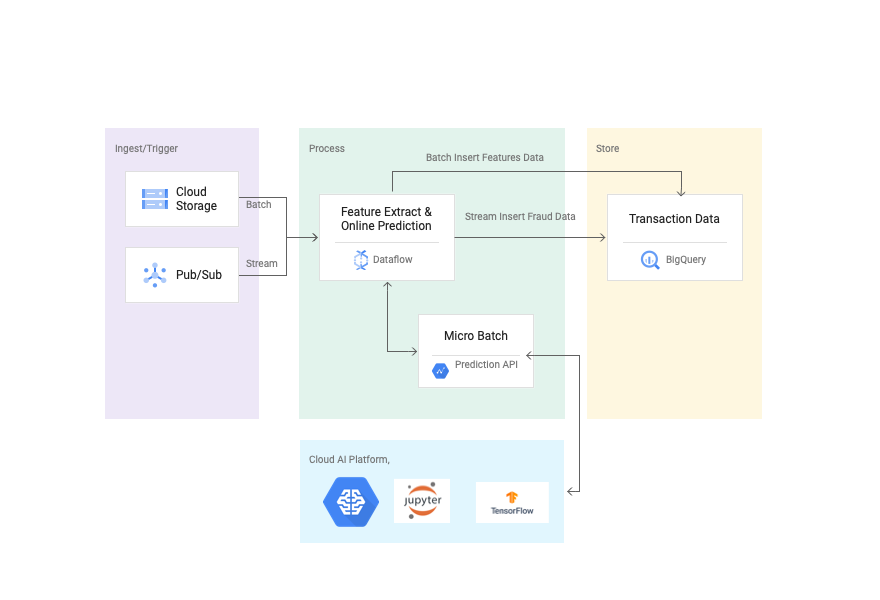
本节包含一个使用 Dataflow 和 Cloud AI 查找欺诈交易的参考实现。第一步是使用 [Kaggle 数据集](https://www.kaggle.com/ntnu-testimon/paysim1) 创建 TensorFlow 提升树 模型,并将模型部署在 Cloud AI 中进行在线预测。然后使用下面参考架构中重点介绍的 Dataflow 流水线对在线预测请求进行微批处理。最后,交易数据存储在一个名为 transactions 的 BigQuery 表中,异常值数据存储在一个名为 fraud_prediction 的表中。可以通过 transactionId 列连接两个表。默认情况下,概率设置为 0.99 (99%) 以识别欺诈交易。
要查看指导您实现此解决方案的分步教程,请参阅 [使用 AI Platform、Dataflow 和 BigQuery 检测金融交易中的异常](https://cloud.google.com/solutions/detecting-anomalies-in-financial-transactions)。
## 使用 Cloud AI 的异常检测参考架构
## 使用 Flex Template 触发流水线
您可以使用以下命令通过公共镜像作为 Dataflow flex template 触发流水线
```
gcloud beta dataflow flex-template run "anomaly-detection-finserv" --project= --region= --template-file-gcs-location=gs://df-ml-anomaly-detection-mock-data/dataflow-flex-template/dynamic_template_finserv_fraud_detection.json --parameters=autoscalingAlgorithm="NONE",numWorkers=30,maxNumWorkers=30,workerMachineType=n1-highmem-8,subscriberId=projects//subscriptions/,tableSpec=project:dataset.transactions,outlierTableSpec=project:dataset.fraud_prediction,tempLocation=gs:///temp,inputFilePattern=gs://df-ml-anomaly-detection-mock-data/finserv_fraud_detection/fraud_data_kaggle.json,modelId=,versionId=,keyRange=1024,batchSize=500000
```
## 构建与运行
1. 请遵循此 [代码实验室](https://codelabs.developers.google.com/codelabs/fraud-detection-ai-explanations/#7) 在 Cloud AI 中构建和部署 [TensorFlow 模型](https://www.tensorflow.org/api_docs/python/tf/estimator/BoostedTreesClassifier)。另外,请注意笔记本中的更改,即添加 transactionId 作为服务函数的一部分。更新后的笔记本可以在[这里](https://github.com/GoogleCloudPlatform/df-ml-anomaly-detection/blob/finserv-fraud-detection-tf-cloud-ai/fraud-detection-notebook/credit-card-fraud-detection-v1.ipynb)找到。
2. 使用以下命令在 BigQuery 中创建数据集和两个表。
```
bq --location=US mk -d \
--description "FinServ Transaction Dataset \
```
```
bq mk -t --schema src/main/resources/transactions.json \
--label myorg:prod \
:.transactions
```
```
bq mk -t --schema src/main/resources/fraud_prediction.json \
--label myorg:prod \
:.fraud_prediction
```
3. 通过传递所有必需参数来触发 Dataflow 流水线。流水线使用 state 和 timer api 对预测 API 的调用进行微批处理。
```
gradle run -DmainClass=com.google.solutions.df.log.aggregations.FraudDetectionFinServTranPipeline -Pargs="--runner=DataflowRunner --project=> \
--inputFilePattern=gs://df-ml-anomaly-detection-mock-data/finserv_fraud_detection/fraud_data_kaggle.json \
--subscriberId=projects//subscriptions/ \
--modelId= \
--versionId= \
--outlierTableSpec=:.fraud_prediction \
--tableSpec=:.transactions \
--keyRange=1024 \
--autoscalingAlgorithm=NONE \
--numWorkers=30 \
--maxNumWorkers=30 \
--workerMachineType=n1-highmem-8 \
--batchSize=500000 \
--region=us-central1 \
--gcpTempLocation=gs://df-temp-data/temp"
```
## 测试
1. 从 GCS 存储桶读取完整的 kaggle 数据集 (6M+) 并在 PubSub 主题中发布一些随机模拟数据
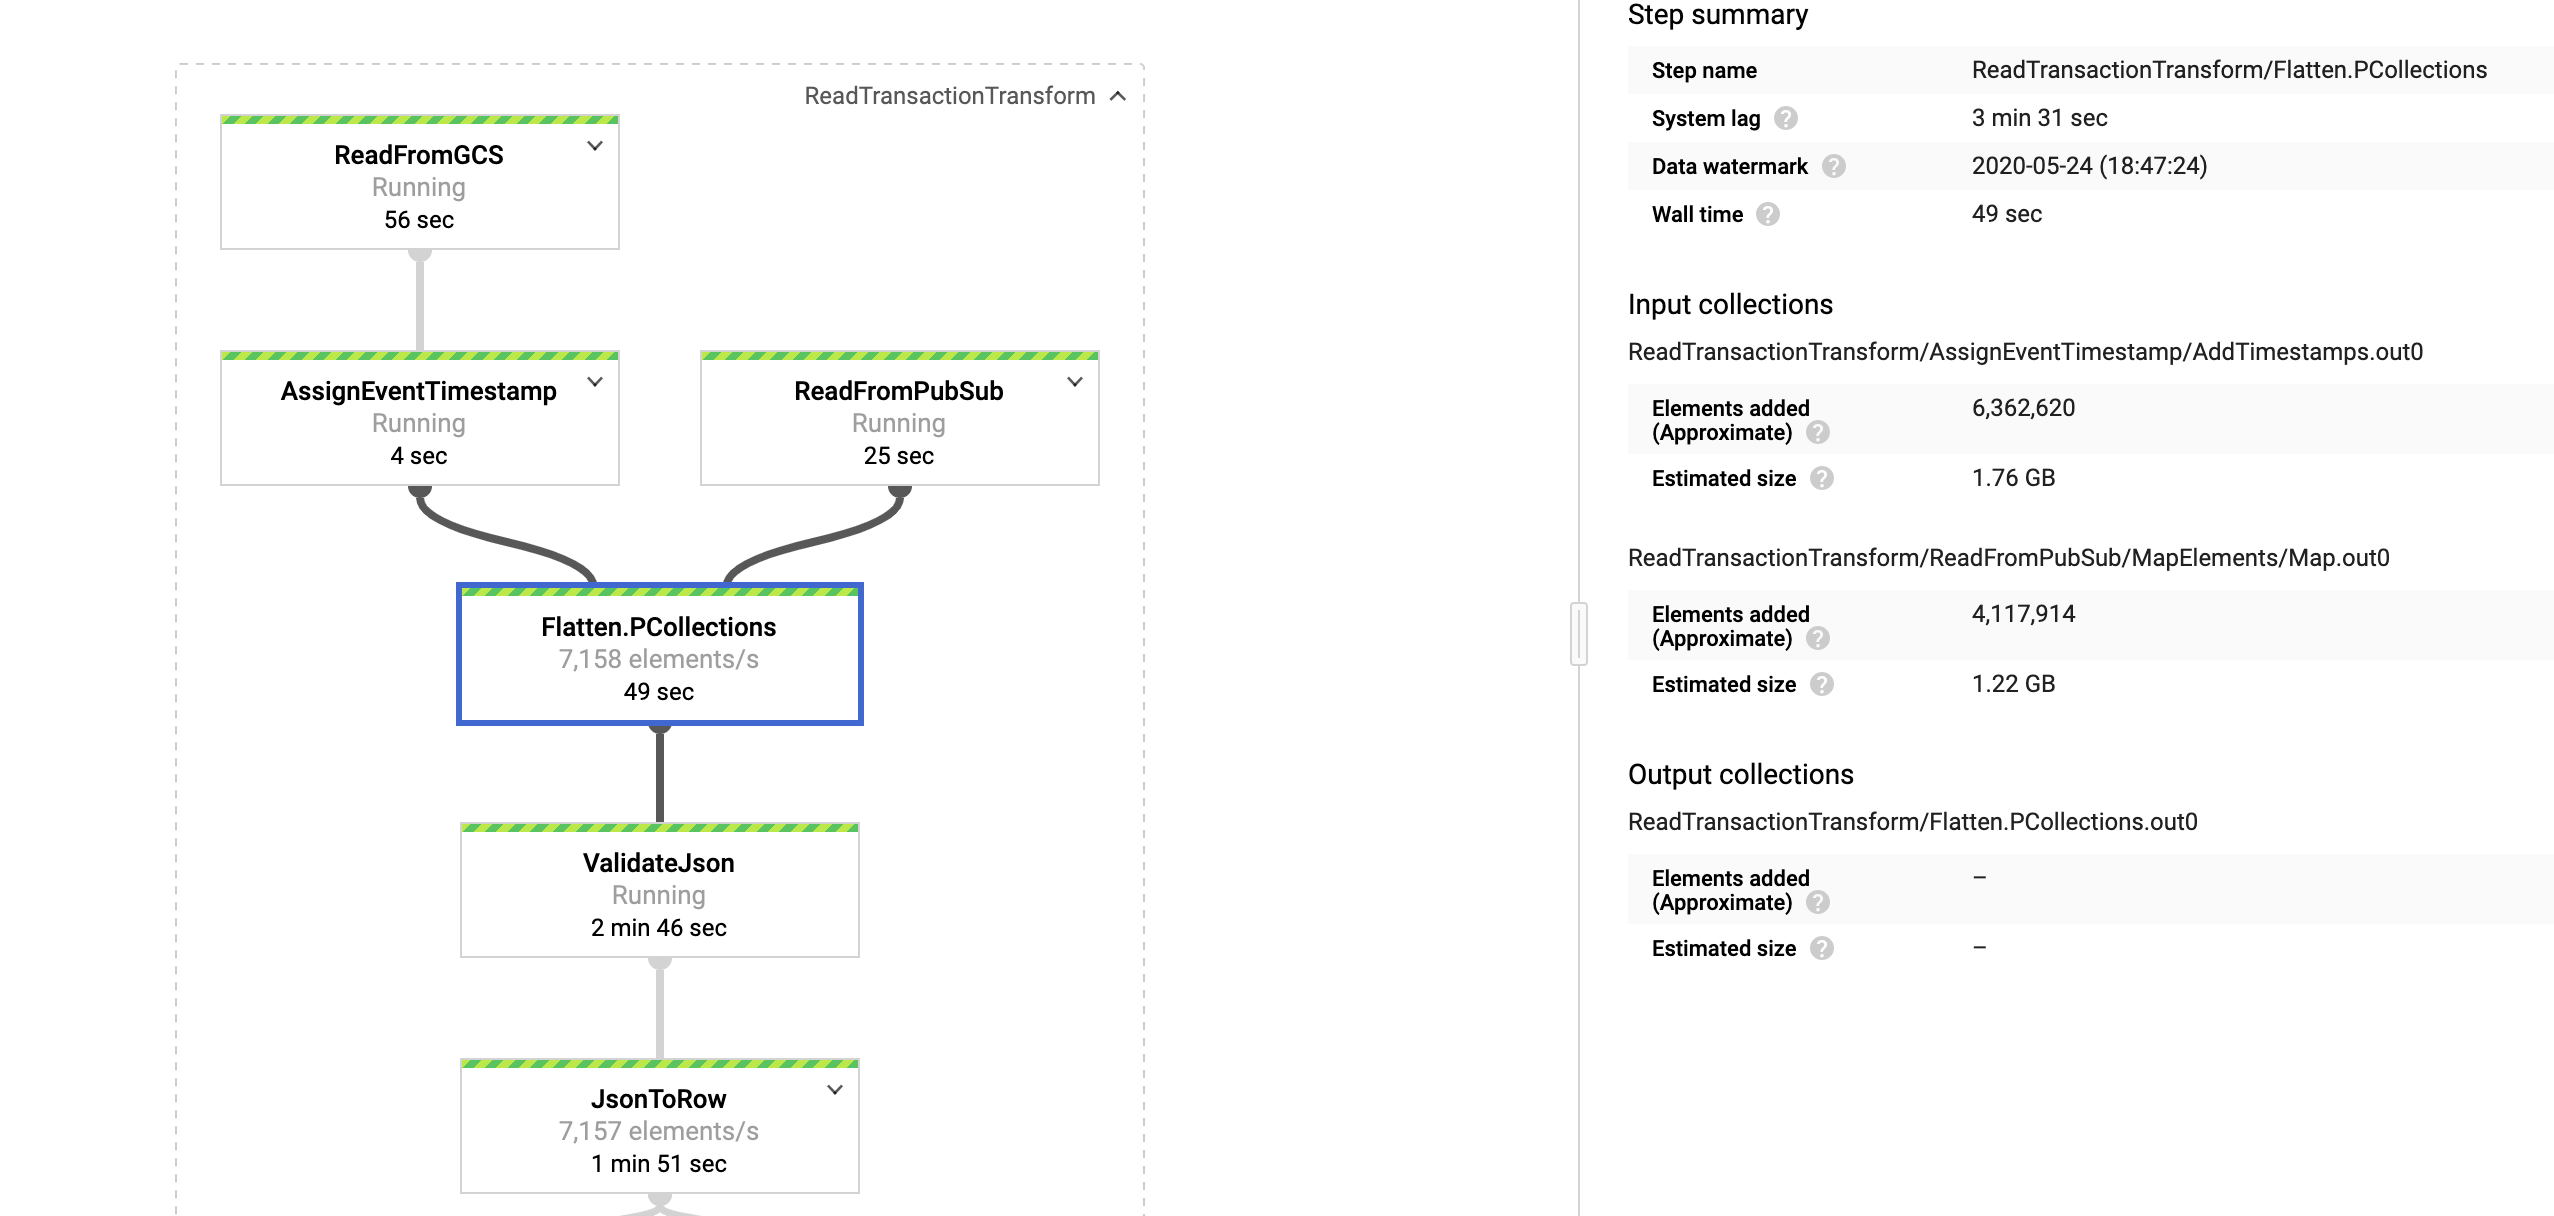.
完整 DAG
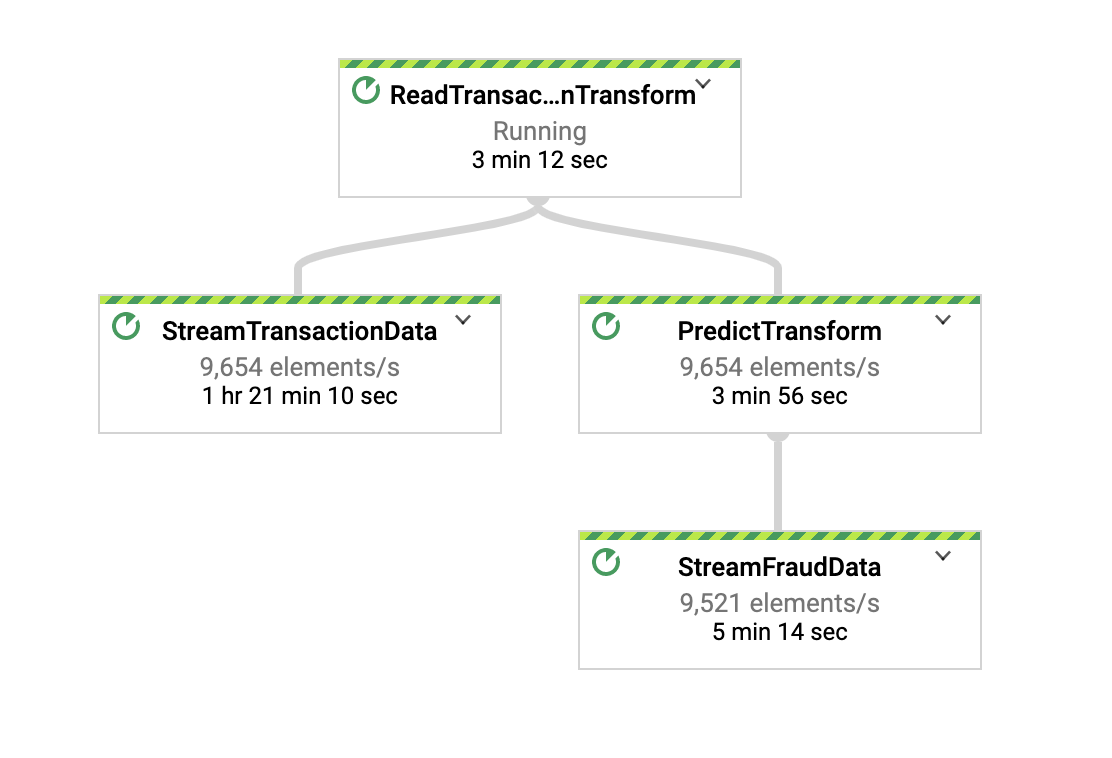.
2. 具有 500KB payload/请求的预测转换
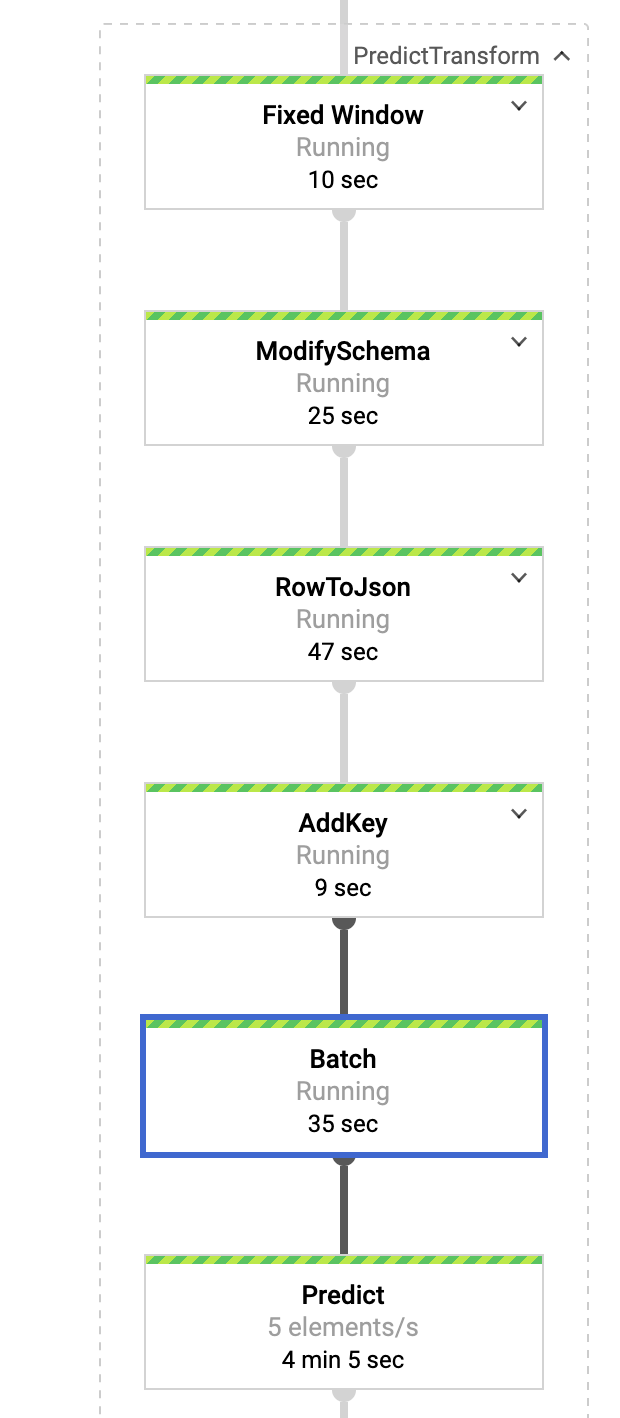.
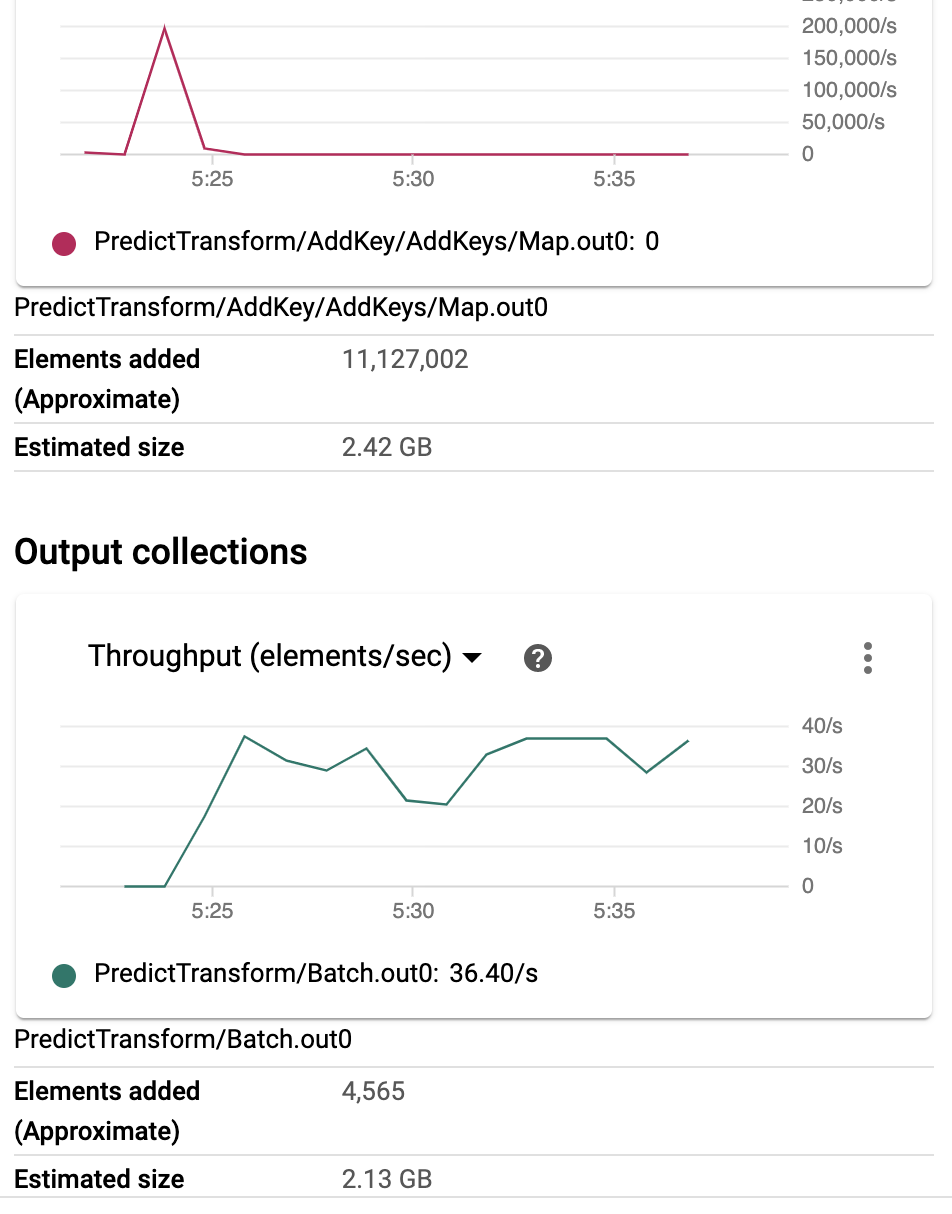.
3. BigQuery 验证
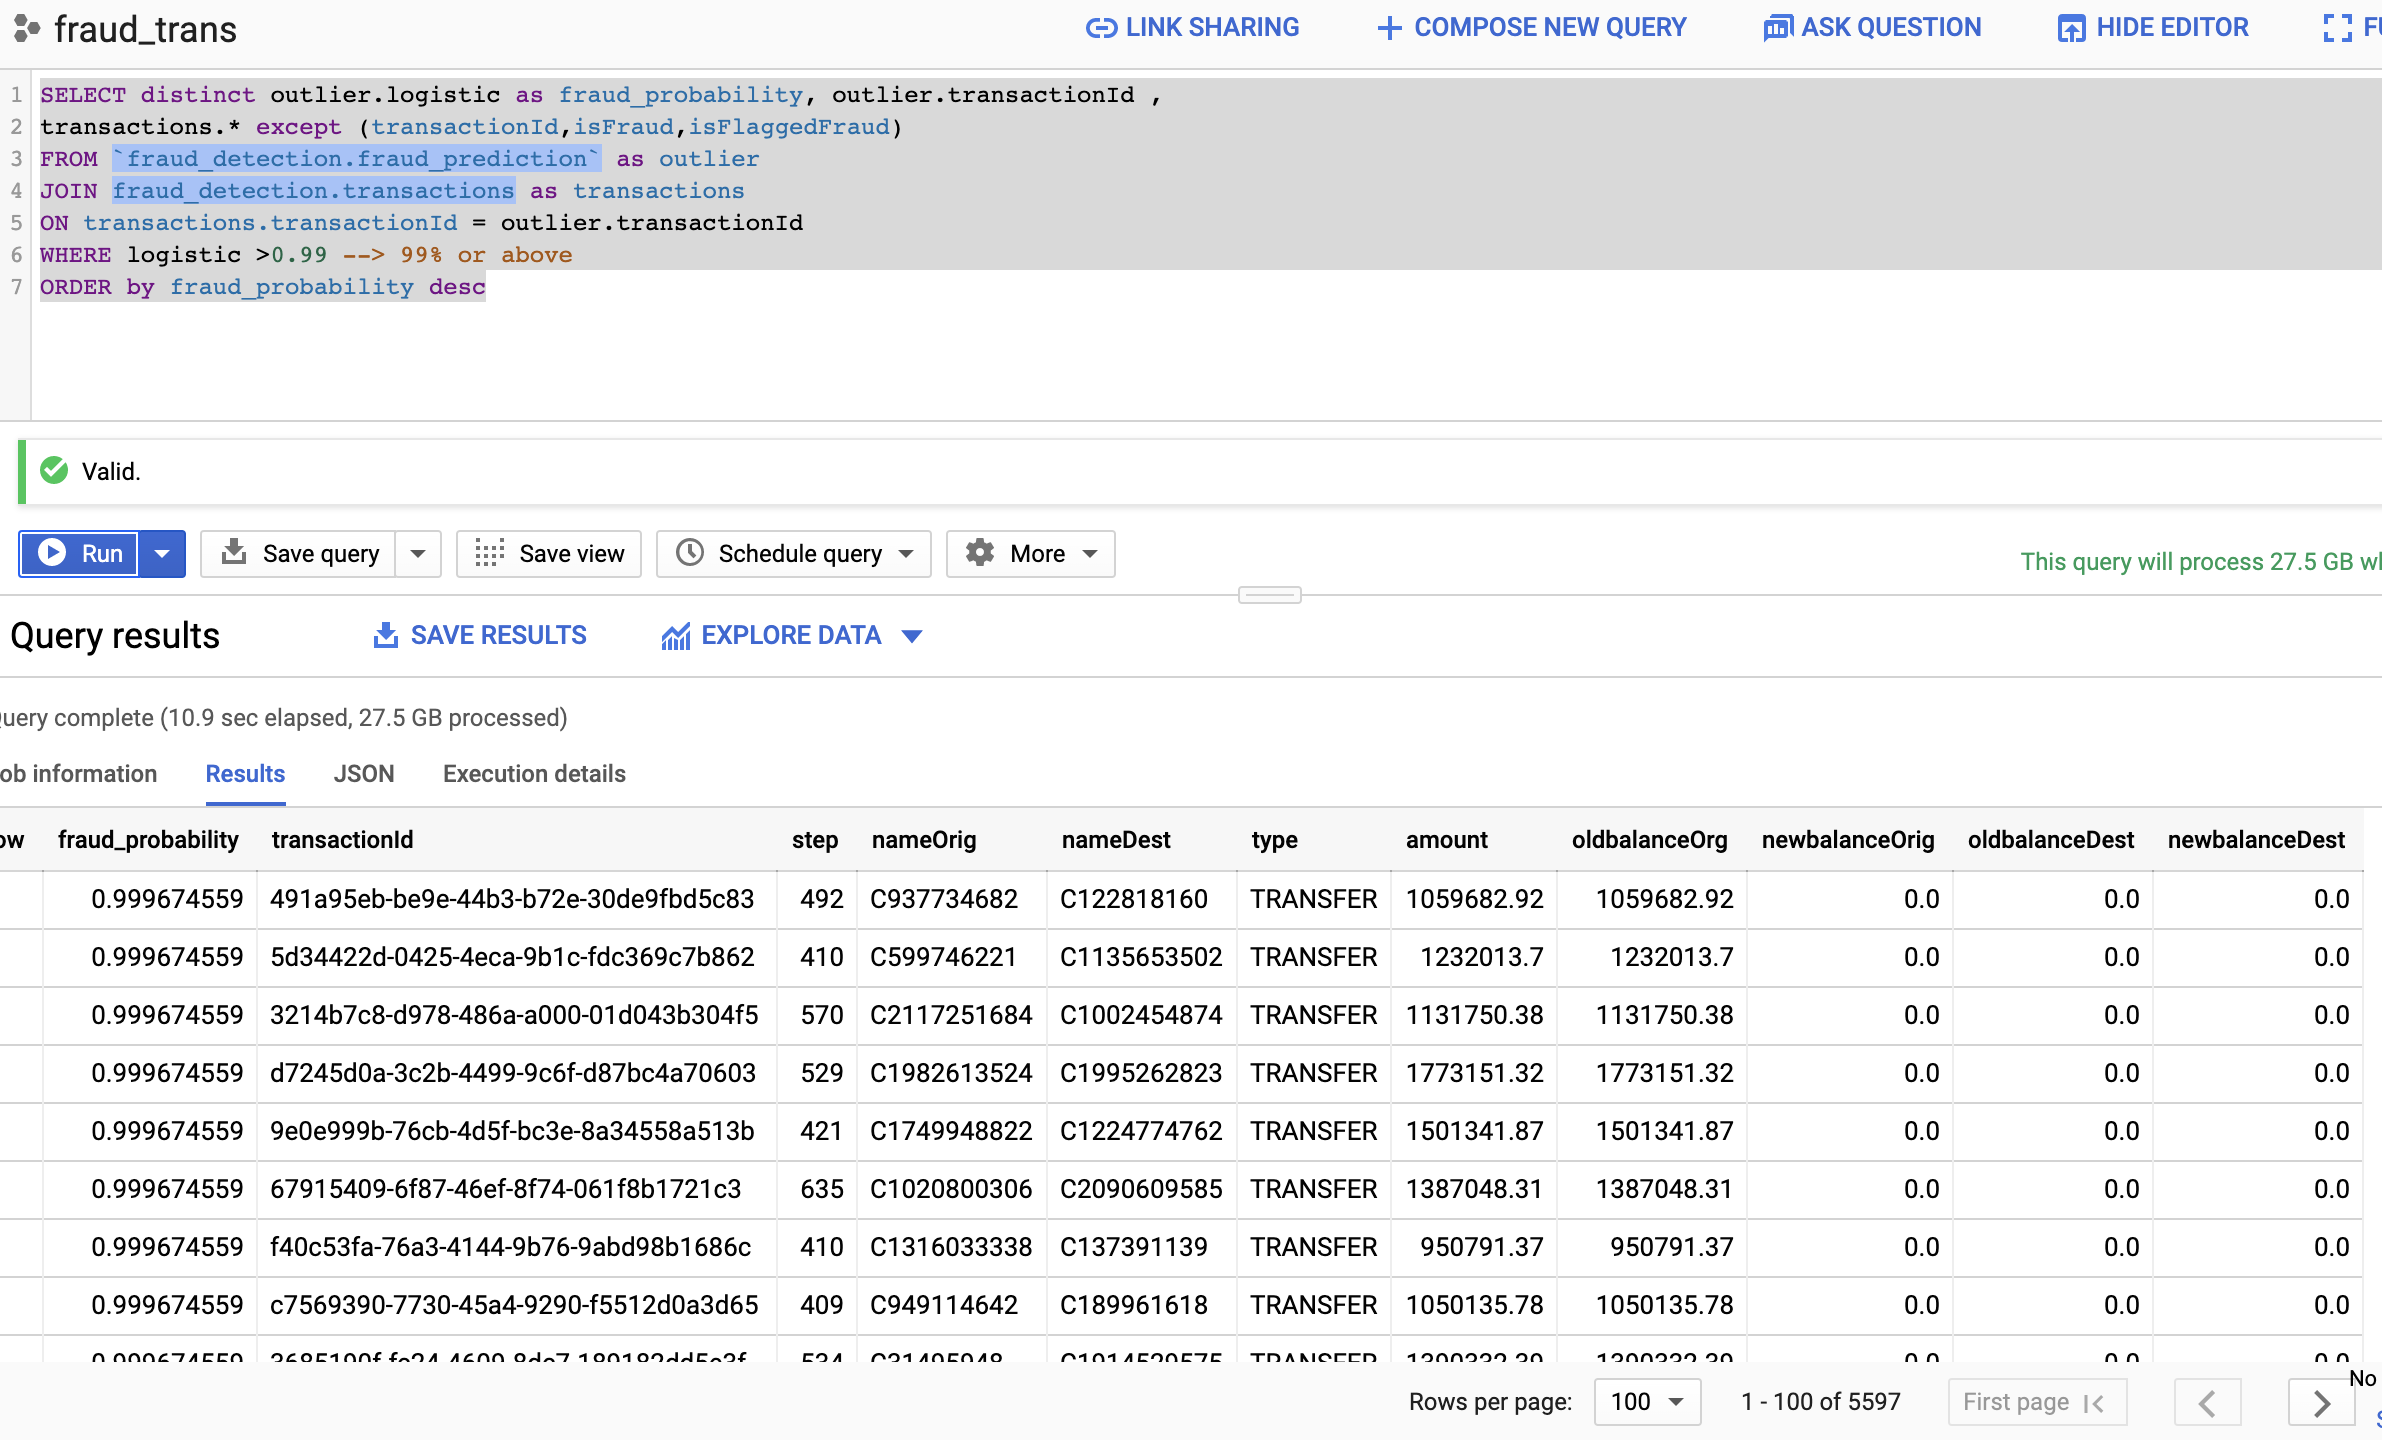.
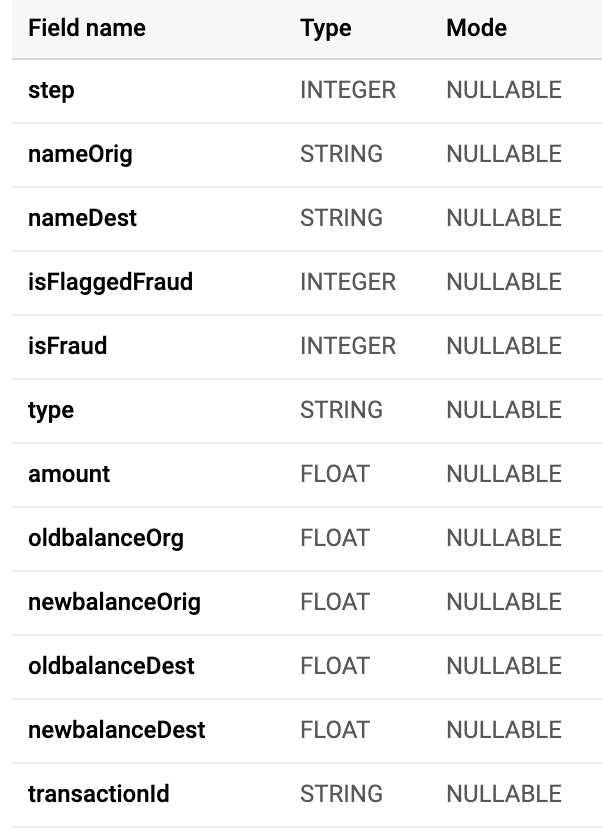.
.
4. Cloud AI 中的预测 API
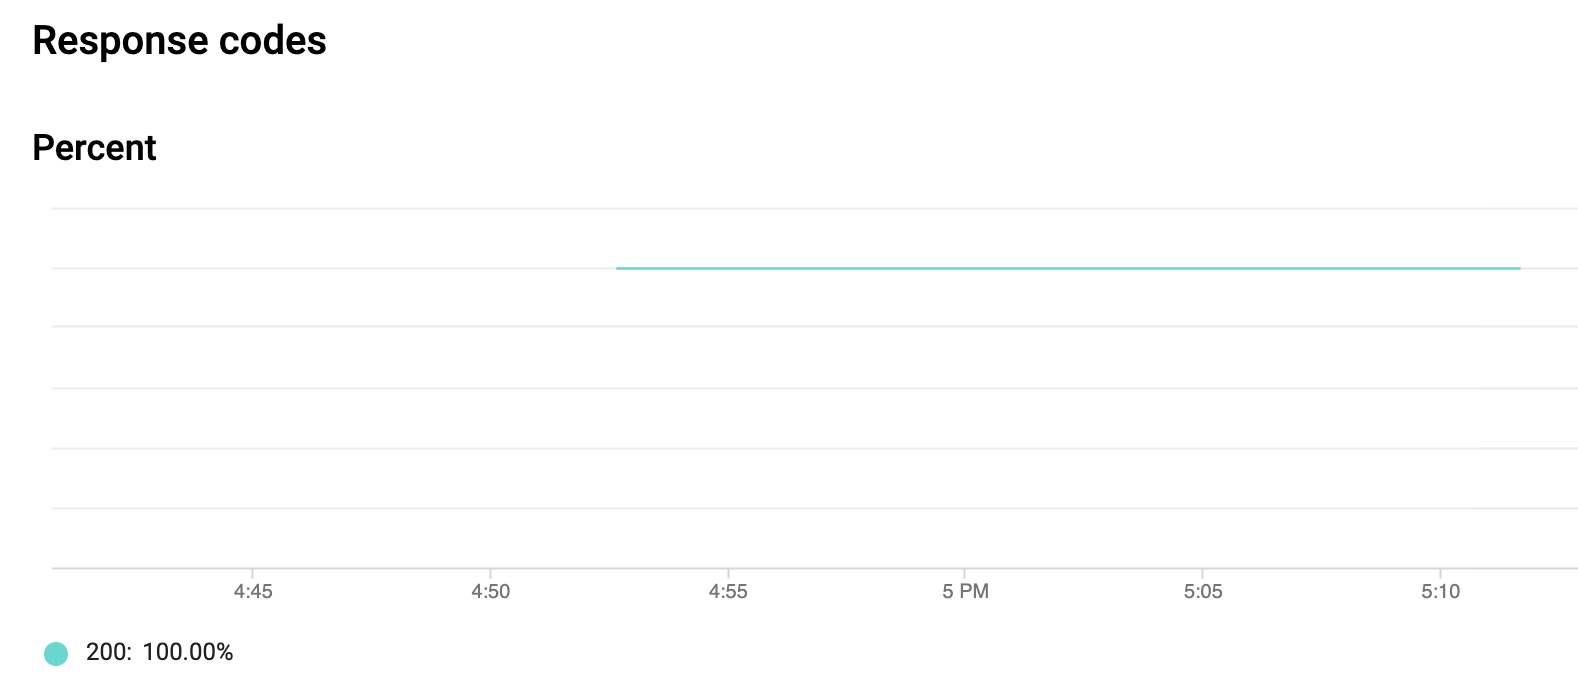.
.
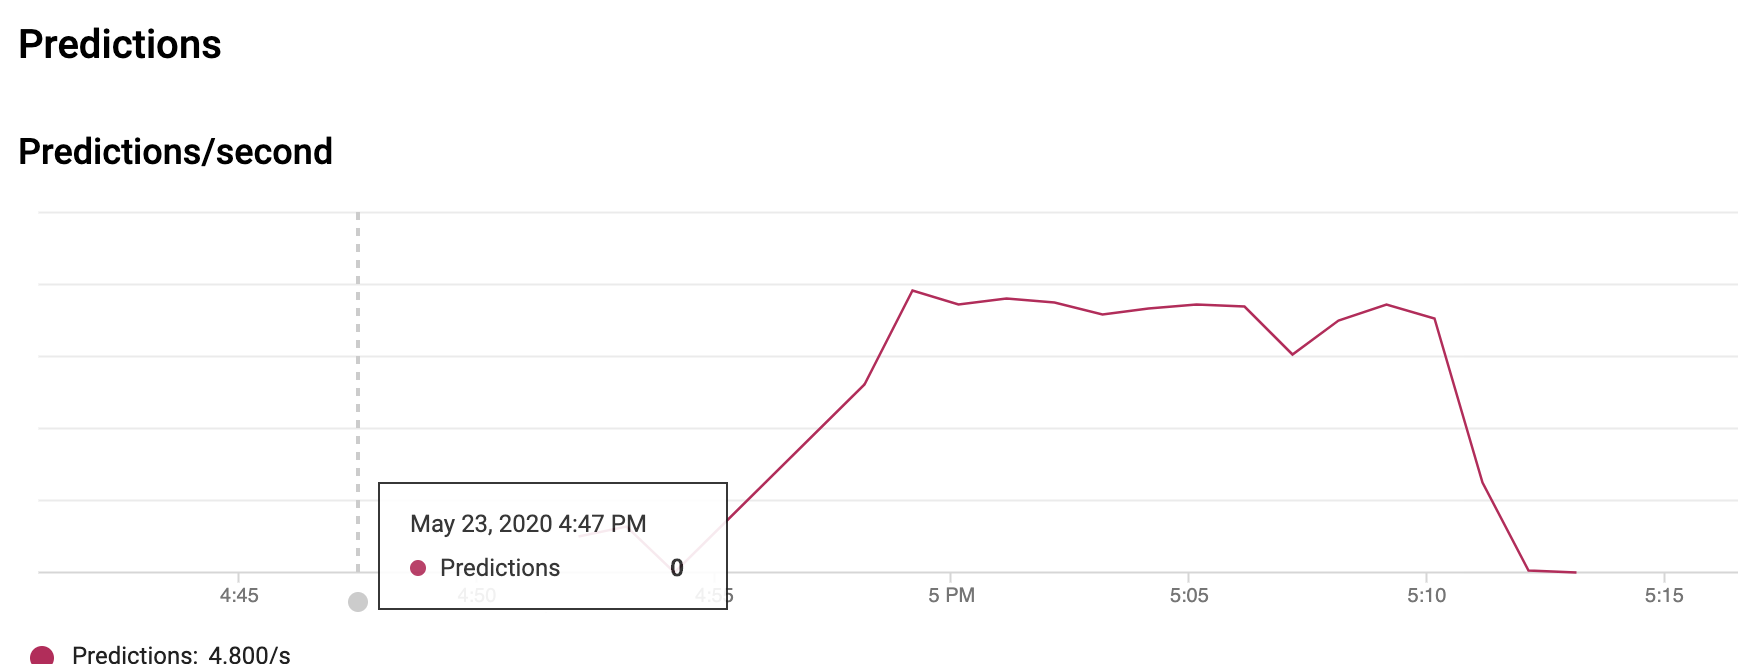.
4. Dataflow UI 中的自定义计数器
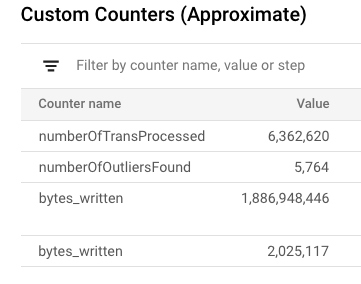.
标签:AMSI绕过, Apex, AutoML, BigQuery ML, BQML, Caido项目解析, Cloud Dataflow, Cloud DLP, Google Cloud, IMSI去标识化, K-Means聚类, Looker, Netflow, Pub/Sub, 交易异常, 人工智能, 参考架构, 域名枚举, 大数据, 威胁检测, 实时异常检测, 数据脱敏, 无监督学习, 机器学习, 欺诈检测, 流式处理, 特征提取, 用户模式Hook绕过, 电信行业, 目录扫描, 网络安全, 谷歌云, 金融服务, 金融风控, 隐私保护