la3ar0v/TuxResponse
GitHub: la3ar0v/TuxResponse
TuxResponse 是一个基于 Bash 的 Linux 事件响应自动化脚本,旨在通过一键式操作快速收集系统信息、进程、网络与持久化痕迹等取证数据。
Stars: 90 | Forks: 21
# TuxResponse (v1.1)
Linux 事件响应
TuxResponse 是一个用 bash 编写的 Linux 系统事件响应脚本。它可以自动化 Linux 系统上的事件响应活动,使您能够快速对系统进行分类处理,同时不影响结果。通常,企业系统会具备某种监控和控制机制,但由于影子 IT 和企业中部署的非标准镜像,总会出现一些例外情况。
原本需要输入 10 条命令并进行反复测试的操作,现在只需按一下按钮即可完成。
测试环境:
- Ubuntu 14+
- CentOS 7+
主要目的:
- 利用 Linux 中的内置工具和功能(如 dd、awk、grep、cat、netstat 等工具)
- 减少事件响应人员在响应场景中需要记住/使用的命令数量。
- 自动化
包中的外部工具:
- LiME
- Exif
- Chckrootkit
- Yara + Linux 扫描规则(需要网络来获取仓库)
###### 自动化示例:
```
INSTALL LiME
function init_lime(){
if [ -f /usr/bin/yum ]; then
yum -y install make kernel-headers kernel-devel gcc
elif [ -f /usr/bin/apt-get ]; then
apt-add-repository universe
apt-get -y install make linux-headers-$(uname -r) gcc
fi
rm -f /tmp/v1.8.1.zip
wget -P/tmp https://github.com/504ensicsLabs/LiME/archive/v1.8.1.zip
unzip /tmp/v1.8.1.zip
rm -f /tmp/v1.8.1.zip
pushd LiME-1.8.1/src
make
mv lime-*.ko /tmp/lime.ko
popd
rm -rf LiME-1.8.1
}
```
在响应事件时,如果您必须通过手动输入所有命令来安装 LiME,这将大大降低您的工作效率。
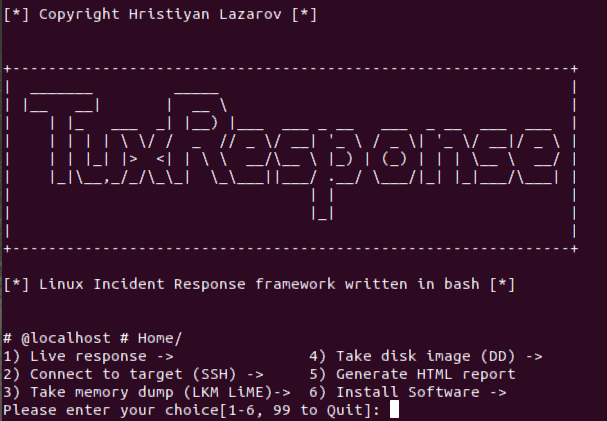
### 功能
##### 1) 实时响应
###### 1) 系统足迹
```
1)System info, IP, Date, Time, local TZ, last boot - 'hostnamectl; who -b; uname -a; uptime; ifconfig; date; last reboot'
```
###### 2) 文件系统工具
```
1)Check mounted filesystems -'df -h'
2)Hash executables (MD5) - 'find /usr/bin -type f -exec file "{}" \; | grep -i "elf" | cut -f1 -d: | xargs -I "{}" -n 1 md5sum {}'
3)Modified files - 'modified_files_period_select' (calling a function in tuxresponse.sh)
4)List all hidden directories - 'find / -type d -name "\.*"'
5)Files/dirs with no user/group name - 'find / \( -nouser -o -nogroup \) -exec ls -l {} \; 2>/dev/null'
6)Changed files from packages -'packaged_files_changed' (calling a function in tuxresponse.sh)
```
###### 3) YARA, CHKROOTKIT, EXIFTool
```
1) Check for rootkits - runs 'chkrootkit'
2) Yara scan - calling a function tuxresponse.sh 'yara_select' (scans system with all YARA linux rules available in master repo)
3) EXIFTool - calling a function tuxresponse.sh 'exiftool_select' (installs EXIFTool)
```
###### 4) 进程分析工具
```
1) List running processes - 'ps -axu'
2) Deleted binaries still running - 'ls -alR /proc/*/exe 2> /dev/null | grep deleted'
3) Active Network Connections (TCP, UDP) - 'ss -tunap | sed "s/[ \t]\+/|/g"'
4) Dump process based on PID - 'dump_process_select' (calling a function in tuxresponse.sh)
1) Enter PID to dump: **(this is the command executed - gcore -a -o "${DUMP_FILE}" ${DUMP_PID} )**
5) Process running from /tmp, /dev - 'ls -alR /proc/*/cwd 2> /dev/null | grep -E "tmp|dev"'
```
###### 5) 网络连接分析
```
1) List all active network connections/raw sockets - 'netstat -nalp; netstat -plant'
```
###### 6) 用户
```
1) List all users connected to the system - 'w'
2) Get users with passwords - 'getent passwd'
```
###### 7) Bash
```
1) Check bash history file - 'cat ~/.bash_history | nl'
```
###### 8) 持久化证据
```
1) List All Cron Jobs - 'list_all_crontab' (calling a function in tuxresponse.sh)
2) List All on-startup/boot programs - 'list_all_onstartup' (calling a function in tuxresponse.sh)
```
###### 9) 导出所有日志 (/var/log)
```
1) Dump Users .bash_history - 'cat_all_bash_history' (calling a function in tuxresponse.sh)
2) Find logs with binary inside - 'grep [[:cntrl:]] /var/log/*.log'
```
##### 2) 连接目标 - 使用 SSH 传输脚本并分析远程系统。
```
That option enables you to connect to a remote system, copy over all scripts and tools and analyze the system.
```
##### 3) 获取内存转储 (LKM LiME)
```
That option enables you to compile LiME from source and dump the RAM memory off the system. This is the easiest way to do it as the other way around would be to compile from source for all major kernel versions and insert the LKM.
```
##### 4) 获取磁盘镜像 (DD)
```
That option enables you to do a full disk image of the target system using well-known tool - dd. The function is taking source and destination as parameters and inserts them in the following command 'dd if=${IMAGE_IN} | pv | dd of='${IMAGE_OUT}' bs=4K conv=noerror,sync'. If you're investigating remote system, the script is going to copy itself there. Then if the parameter ${TARGET_HOST} is set, then the script is going to download the image to analyst system using this command >> "ssh -p${TARGET_PORT} ${TARGET_USER}@${TARGET_HOST} 'dd if=${IMAGE_IN} bs=4K conv=noerror,sync' | pv | dd of='${IMAGE_OUT}'" (im heavily using pv to make sure progress is tracked)
```
##### 5) 生成 HTML 报告
您所做的所有操作都会记录在文本文件中,因此可以轻松回溯和查看输出。这样做的好处是您可以将其上传到您最喜欢的日志分析工具中,并在后期对其进行分析。除此之外,您可以使用该功能生成 HTML 报告,并以更易读的形式查看命令生成的输出。
##### 6) 安装软件
```
Install binaries that are required by the script to function correctly.
1) Dependancies
2) Yara and rules
3) ExifTool
4) Init check
5) chckrootkit
6) LiME
```
## 更新日志
### v1.1
对 `tuxresponse.sh` 进行了加固和取证可靠性改进:
- **取证可靠性**
- 证据文件名现在使用 UTC ISO-8601 (`YYYYMMDDTHHMMSSZ`) 而不是本地时间,以提供无可辩驳的时间戳。
- 每个捕获的证据文件都会被哈希处理(SHA-256)并记录到新的 `evidence/manifest.txt` 中;磁盘镜像会生成一个同级的 `.sha256` 文件。
- `modified_files_period_select` 不再在目标文件系统上 `touch` 时间戳文件(这之前会在 `find` 遍历之前污染 `/tmp` 的 atime/mtime)。它现在使用 `find / -xdev -newermt "1 $opt ago"`。
- **安全性 / 注入修复**
- 移除了 `_create_disk_image` 中的 `eval ${DD_CMD}`;`dd`/`ssh` 管道将直接运行,并且源设备在使用前会通过 `^/dev/[a-zA-Z0-9]+$` 进行验证。
- `dump_process_select` 在调用 `gcore` 之前会验证 PID 是否为数字以及 `/proc/` 是否存在。
- `exec_CMD` 不再使用 `eval`;来自内部目录的 shell 管道命令将通过 `bash -c` 分发执行。
- **健壮性**
- 脚本现在在预先初始化全局变量的情况下以 `set -euo pipefail` 模式运行。
- 修复了 Arch Linux 检测分支中 `DISTO` → `DISTRO` 的拼写错误(之前会静默错误命名发行版)。
- 修复了错误的 Ubuntu 依赖安装:`apt-get install netstat` → `net-tools`。
- HTML 报告生成器现在通过 glob 模式(不再使用 `ls` 解析)遍历 `evidence/*.txt` 并跳过 manifest 文件;输出变量已加引号保护。
- **其他**
- 添加了 `VERSION='1.1'` 常量;启动横幅会打印版本号。
- `shellcheck -S error` 检查已保持无错误通过。
标签:Bash 脚本, CentOS, Chkrootkit, HTTP工具, LiME, Linux 安全, Linux 应急响应, Live Response, Mr. Robot, PB级数据处理, Python3.6, SecList, Web归档检索, Yara, 内存取证, 后渗透, 后门检测, 子域名变形, 安全运维, 应急响应脚本, 应用安全, 恶意软件扫描, 数字取证, 数字取证, 无线安全, 电子取证, 系统分诊, 网络安全审计, 自动化脚本, 自动化脚本