cookpad/deepalert
GitHub: cookpad/deepalert
一个基于 AWS Serverless 的 SOAR 框架,用于自动检查、评估和响应安全告警。
Stars: 51 | Forks: 8
# DeepAlert
Serverless SOAR(Security Orchestration, Automation and Response)框架,用于自动检查和评估安全告警。
## 概述
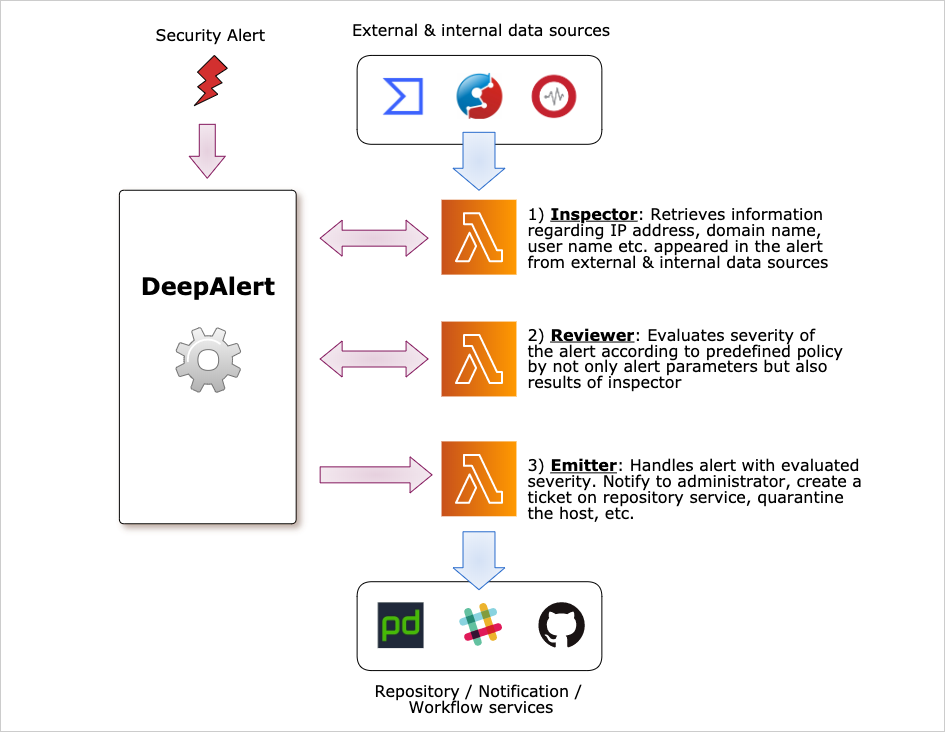
DeepAlert 接收来自安全视角的关注事件(安全告警),并自动响应。DeepAlert 包含三个自动响应部分。
- **Inspector**:调查告警中出现的实体(包括 IP 地址、域名),并存储结果:信誉度、恶意活动历史、关联的云实例等。以下组件已提供以集成到您的 DeepAlert 环境。您也可以创建自定义 Inspector 来检查存储在原始日志存储或日志搜索系统中的日志。
- **Reviewer**:接收 Inspector 的结果并评估告警的严重性。Reviewer 需要由您组织的安全操作员/管理员编写,因为不同组织的安全策略不同。
- **Emitter**:接收 Reviewer 评估后的告警结果,然后将告警发送到外部集成系统。例如 PagerDuty、Slack、GitHub Enterprise 等。还可以通过 AWS Lambda 函数配置自动隔离。
## 部署
### 前置条件
- 工具
- `aws-cdk` >= 1.75.0
- `go` >= 1.26
- `node` >= 14.7.0
- `npm` >= 6.14.9
- 凭证
- 部署 CloudFormation 的 AWS CLI 凭证。详细信息请参考[此处](https://docs.aws.amazon.com/cli/latest/userguide/cli-chap-configure.html)。
### 配置您的堆栈
首先,您需要创建 AWS CDK 仓库并以 npm 模块形式安装 deepalert。
```
$ mkdir your-stack
$ cd your-stack
$ cdk init --language typescript
$ npm i @deepalert/deepalert
```
然后,编辑 `./bin/your-stack.ts` 文件,示例如下。
```
#!/usr/bin/env node
import 'source-map-support/register';
import * as cdk from '@aws-cdk/core';
import { DeepAlertStack } from '@deepalert/deepalert';
const app = new cdk.App();
new DeepAlertStack(app, 'YourDeepAlert', {});
```
### 部署堆栈
首先构建 Lambda 二进制文件,然后进行部署:
```
$ make build
$ cdk deploy
```
## 告警
### 告警数据模式
```
{
"detector": "your-anti-virus",
"rule_name": "detected malware",
"rule_id": "detect-malware-by-av",
"alert_key": "xxxxxxxx",
"timestamp": "2006-01-02T15:03:04Z",
"attributes": [
{
"type": "ipaddr",
"key": "IP address of detected machine",
"value": "10.2.3.4",
"context": [
"local",
"client"
],
},
]
}
```
- `detector`:监控系统的被监控对象名称
- `rule_id`:可读性规则标识
- `timestamp`:检测时间戳
- `rule_name`(可选):可读规则名称
- `alert_key`(可选):告警聚合键(如需要)
- `attributes`(可选):`attribute` 列表
- `type`:从 `ipaddr`、`domain`、`username`、`filehashvalue`、`json` 和 `url` 中选择
- `key`:值的标签
- `value`:实际值
- `context`:描述属性上下文的标签。一个或多个。请参考 [alert.go](alert.go) 中的 `AttrContext`
### 通过 API 发送告警
运行 `cdk deploy` 后会在当前工作目录(CWD)生成 `apikey.json`,其中包含访问 deepalert API 的 `X-API-KEY`。
```
$ export AWS_REGION=ap-northeast-1 # set your region
$ export API_KEY=`cat apikey.json | jq '.["X-API-KEY"]' -r`
$ export API_ID=`aws cloudformation describe-stack-resources --stack-name YourDeepAlert | jq -r '.StackResources[] | select(.ResourceType == "AWS::ApiGateway::RestApi") | .PhysicalResourceId'`
$ curl -X POST \
-H "X-API-KEY: $API_KEY" \
https://$API_ID.execute-api.$AWS_REGION.amazonaws.com/prod/api/v1/alert \
-d '{
"detector": "your-anti-virus",
"rule_name": "detected malware",
"rule_id": "detect-malware-by-av",
"alert_key": "xxxxxxxx"
}'
```
### 通过 SQS 发送告警
```
$ export QUEUE_URL=`aws cloudformation describe-stack-resources --stack-name YourDeepAlert | jq -r '.StackResources[] | select(.LogicalResourceId | startswith("alertQueue")) | .PhysicalResourceId'`
$ aws sqs send-message --queue-url $QUEUE_URL --message-body '{
"detector": "your-anti-virus",
"rule_name": "detected malware",
"rule_id": "detect-malware-by-av",
"alert_key": "xxxxxxxx"
}'
```
### 构建并部署 Reviewer
请参考示例并将其作为 Lambda 函数部署。
- Inspector 示例:[./examples/inspector](./examples/inspector)
- Emitter 示例:[./examples/emitter](./examples/inspector)
## 开发
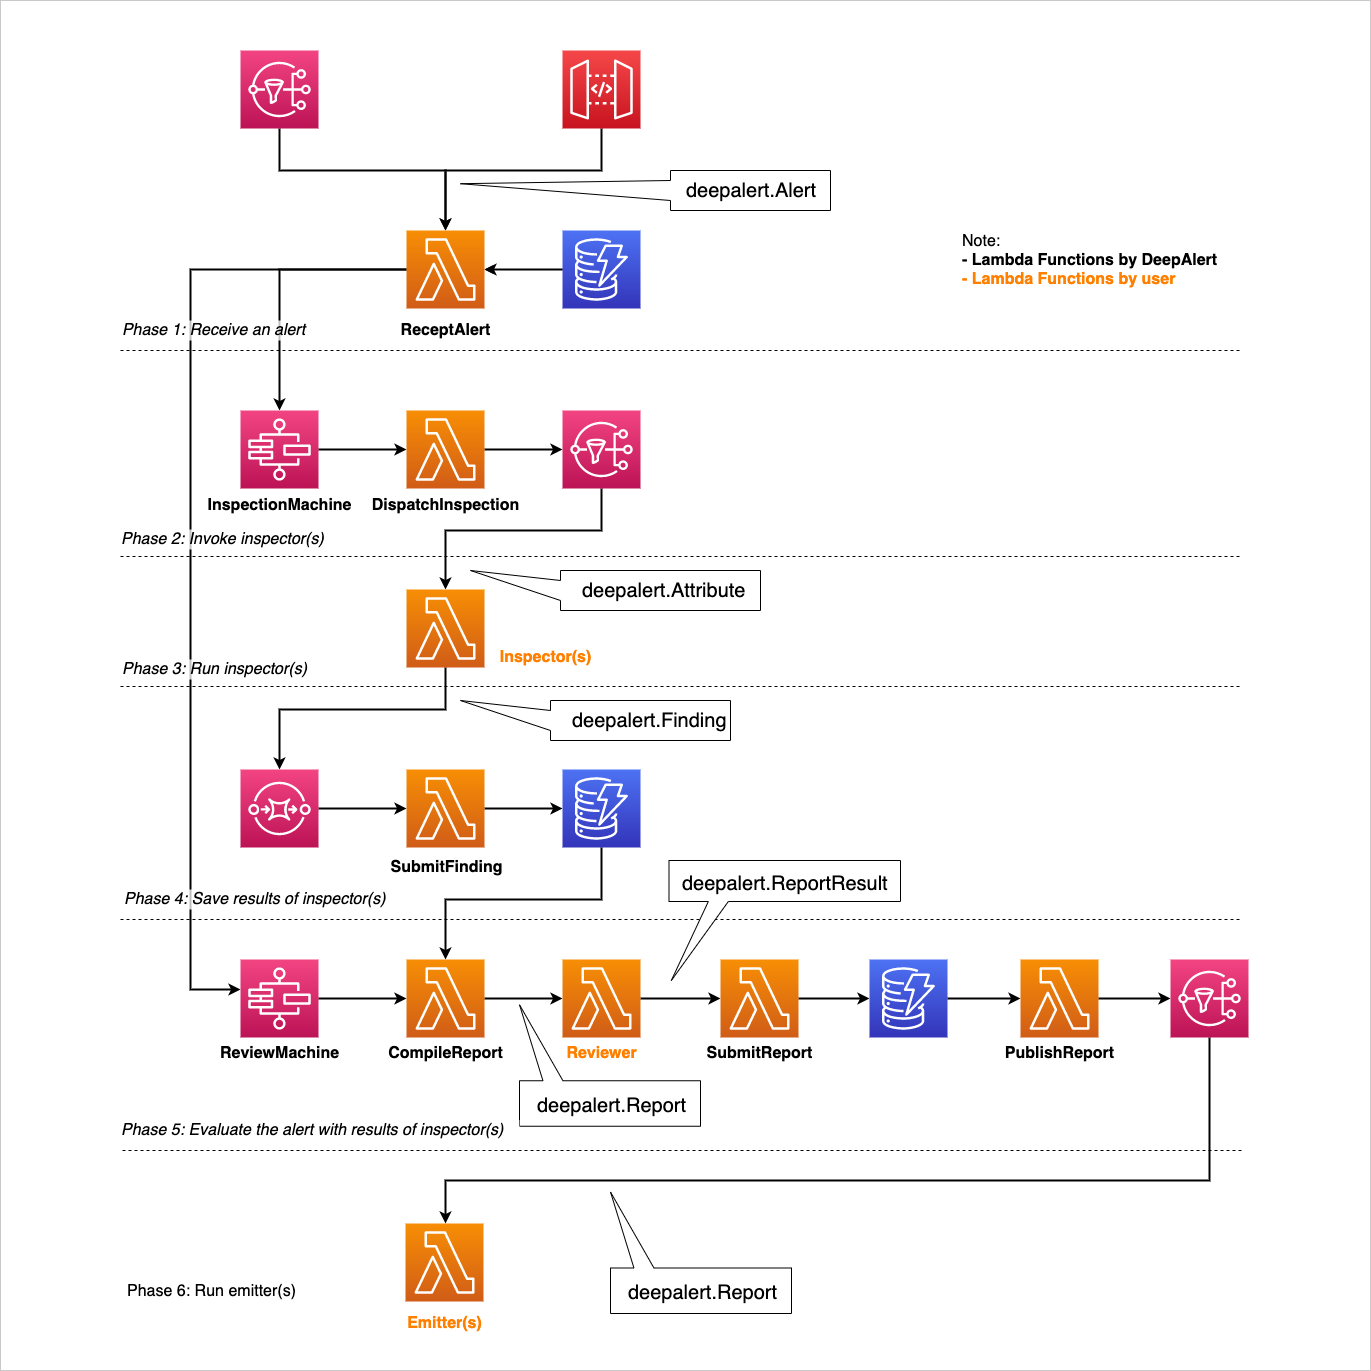
### 架构
### 单元测试
```
$ go test ./...
```
### 集成测试
集成测试需要已部署的 AWS 堆栈,默认情况下会排除在 `go test ./...` 之外。请进入 `./test/workflow/` 目录并运行以下命令以部署测试堆栈并执行集成测试。
```
$ npm i
$ make deploy
$ make test
```
若要直接运行集成测试而不使用 `make`,请执行以下命令:
```
$ go test -tags integration -count=1 -v ./test/workflow/...
```
## 许可证
MIT License
标签:AWS CDK, AWS CLI, AWS Lambda, Cilium, CloudFormation, Emitter, EVTX分析, FTP漏洞扫描, Github Enterprise, GNU通用公共许可证, Go, Inspector, Node.js, NPM, PagerDuty, PB级数据处理, Reviewer, Ruby工具, Serverless, Slack, SOAR, TypeScript, 云实例关联, 关键词SEO, 声誉评估, 多云环境, 安全告警, 安全插件, 安全策略, 安全编排, 安全运维, 安全运营中心, 开源安全工具, 恶意活动历史, 提示词设计, 日志存储, 日志审计, 日志检索, 网络映射, 自动化响应, 自动检查, 自动评估, 自动隔离, 调试插件, 逆向工程平台, 集成系统