mohammad-zisadul-islam/Wazuh-Tracecat-SOAR-Build-in-Manually
GitHub: mohammad-zisadul-islam/Wazuh-Tracecat-SOAR-Build-in-Manually
该项目提供了在 Ubuntu 上手动构建并集成 Wazuh SIEM 与 Tracecat SOAR 的完整指南,用于实现安全告警自动化分诊与事件响应。
Stars: 0 | Forks: 0
 概述
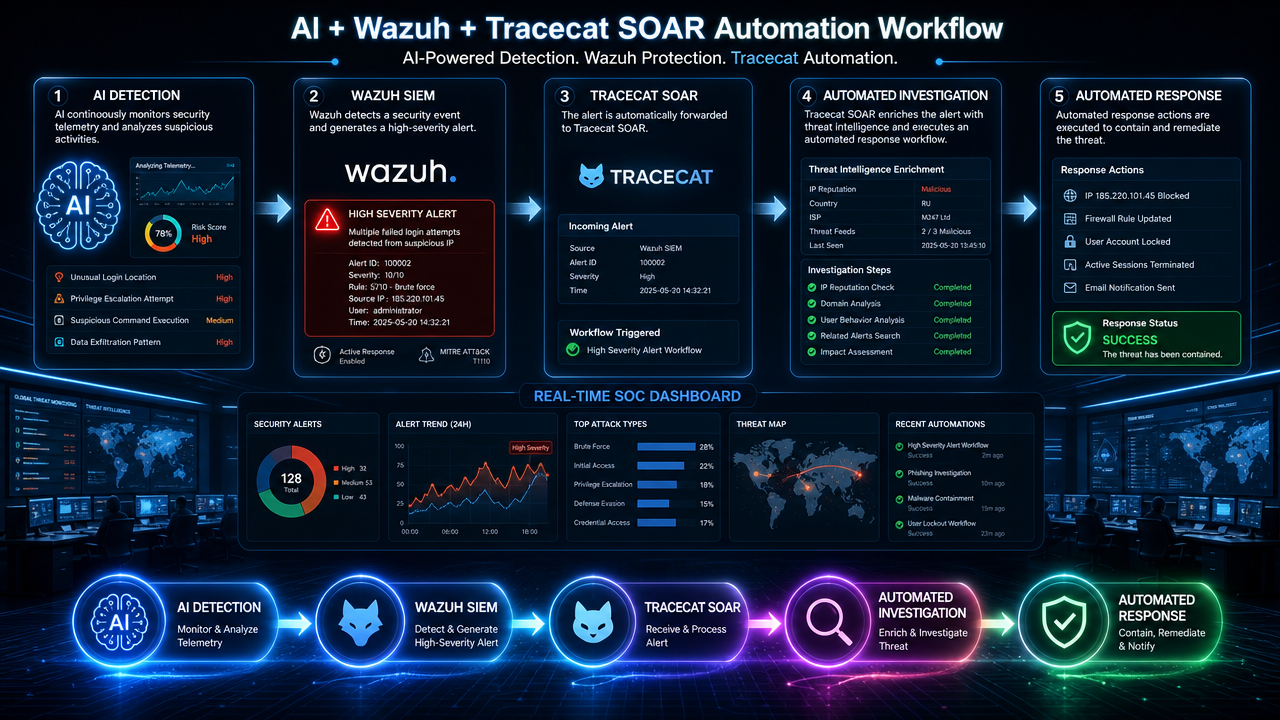
**Wazuh + Tracecat SOAR(手动构建与安装)是一个自托管的安全自动化实验室,其中 Wazuh SIEM 通过手动安装和配置与 Tracecat SOAR 进行了集成。该环境旨在自动化告警分诊、事件响应、IOC 丰富化和安全工作流,从而实现对网络威胁的更快检测、调查和响应,同时提供现代 SOC 操作的实践经验**
## 要求
- Tracecat 安装 (Ubuntu 24.04)
- 8 GB 内存,100 GB 存储空间
- 最后更新日期:2026年2月4日
- 背景:MOHAMMAD ZISADUL ISLAM
## Tracecat 安装 (Ubuntu 24.04)
**更新系统**
```
sudo apt update && sudo apt upgrade -y
```
### 安装必需的软件包
```
sudo apt install -y git curl wget ca-certificates gnupg lsb-release
```
*安装下载和管理 Tracecat 所需的工具。*
### 安装 Docker
*移除旧的 Docker 包(如果已安装)*
```
sudo apt remove docker docker-engine docker.io containerd runc
```
#### 安装 Docker
```
curl -fsSL https://get.docker.com | sudo sh
```
```
apt update && apt install -y docker.io docker-compose
```
```
systemctl enable --now docker
```
```
docker compose up -d
```
*将你的用户添加到 Docker 组中*
```
sudo usermod -aG docker $USER
```
*在不注销登录的情况下应用新的用户组*
#### 检查 Docker
```
docker --version
```
### 通过 GitHub 链接下载 Tracecat 项目
```
git clone -b 1.0.0-beta.15 https://github.com/TracecatHQ/tracecat.git
```
```
cd tracecat
```
```
cp ../env.sh .
```
```
./env.sh
```
#### 确认一切正常并检查 Docker 和 Tracecat
```
docker-compose up -d
```
#### 添加 Tracecat 文件
```
cd tracecat
nano .env
```
**在文件末尾添加**
```
AUTH_STRATEGY=password
DISABLE_SIGNUP=false
```
**设置密码**
```
docker-compose exec api tracecat auth create-user --email youremain@gmail.com --password anyappswoed --role superadmin
```
#### 重启并启动 Tracecat
```
docker-compose down
docker-compose up -d
```
#### Tracecat 登录凭据
- 用户名 : yourmaild@gamail.com
- 密码 : anypasswoed8
**然后配置 Wazuh manager**
```
sudo nano /var/ossec/etc/ossec.conf
```
- *添加*
```
概述
**Wazuh + Tracecat SOAR(手动构建与安装)是一个自托管的安全自动化实验室,其中 Wazuh SIEM 通过手动安装和配置与 Tracecat SOAR 进行了集成。该环境旨在自动化告警分诊、事件响应、IOC 丰富化和安全工作流,从而实现对网络威胁的更快检测、调查和响应,同时提供现代 SOC 操作的实践经验**
## 要求
- Tracecat 安装 (Ubuntu 24.04)
- 8 GB 内存,100 GB 存储空间
- 最后更新日期:2026年2月4日
- 背景:MOHAMMAD ZISADUL ISLAM
## Tracecat 安装 (Ubuntu 24.04)
**更新系统**
```
sudo apt update && sudo apt upgrade -y
```
### 安装必需的软件包
```
sudo apt install -y git curl wget ca-certificates gnupg lsb-release
```
*安装下载和管理 Tracecat 所需的工具。*
### 安装 Docker
*移除旧的 Docker 包(如果已安装)*
```
sudo apt remove docker docker-engine docker.io containerd runc
```
#### 安装 Docker
```
curl -fsSL https://get.docker.com | sudo sh
```
```
apt update && apt install -y docker.io docker-compose
```
```
systemctl enable --now docker
```
```
docker compose up -d
```
*将你的用户添加到 Docker 组中*
```
sudo usermod -aG docker $USER
```
*在不注销登录的情况下应用新的用户组*
#### 检查 Docker
```
docker --version
```
### 通过 GitHub 链接下载 Tracecat 项目
```
git clone -b 1.0.0-beta.15 https://github.com/TracecatHQ/tracecat.git
```
```
cd tracecat
```
```
cp ../env.sh .
```
```
./env.sh
```
#### 确认一切正常并检查 Docker 和 Tracecat
```
docker-compose up -d
```
#### 添加 Tracecat 文件
```
cd tracecat
nano .env
```
**在文件末尾添加**
```
AUTH_STRATEGY=password
DISABLE_SIGNUP=false
```
**设置密码**
```
docker-compose exec api tracecat auth create-user --email youremain@gmail.com --password anyappswoed --role superadmin
```
#### 重启并启动 Tracecat
```
docker-compose down
docker-compose up -d
```
#### Tracecat 登录凭据
- 用户名 : yourmaild@gamail.com
- 密码 : anypasswoed8
**然后配置 Wazuh manager**
```
sudo nano /var/ossec/etc/ossec.conf
```
- *添加*
```
 ## 1. 创建工作流
- 要创建工作流,首先我们需要在 Tracecat 中添加 Wazuh 服务器的凭据
#### 步骤 1:将凭据添加到 Tracecat 中
#### **Tracecat → Settings → Secrets → 新建 Secret**
## 1. 创建工作流
- 要创建工作流,首先我们需要在 Tracecat 中添加 Wazuh 服务器的凭据
#### 步骤 1:将凭据添加到 Tracecat 中
#### **Tracecat → Settings → Secrets → 新建 Secret**
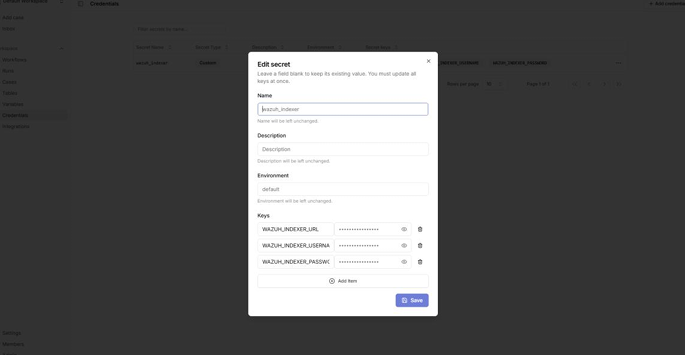
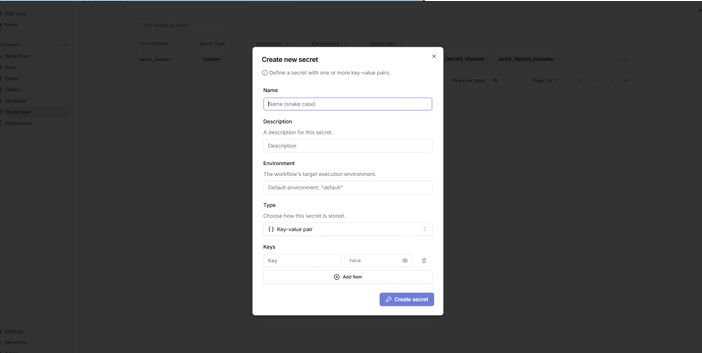 ## 步骤 2:逐一添加凭据(Wazuh URL、用户名、密码)
```
Wazuh_URL : ${{SECRETS.”credentials_name”.” Key Name”}}
username: ${{SECRETS.”credentials_name”.” Key Name”}}
password: ${{SECRETS.”credentials_name”.” Key Name”}}
```
## 步骤 2:逐一添加凭据(Wazuh URL、用户名、密码)
```
Wazuh_URL : ${{SECRETS.”credentials_name”.” Key Name”}}
username: ${{SECRETS.”credentials_name”.” Key Name”}}
password: ${{SECRETS.”credentials_name”.” Key Name”}}
```
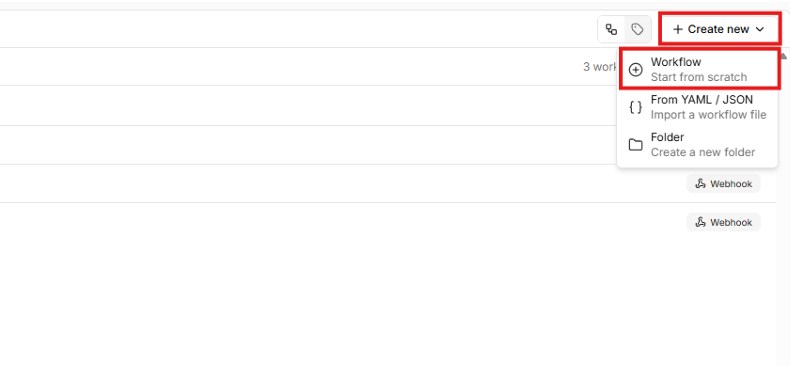
 ### 步骤 3:创建工作流
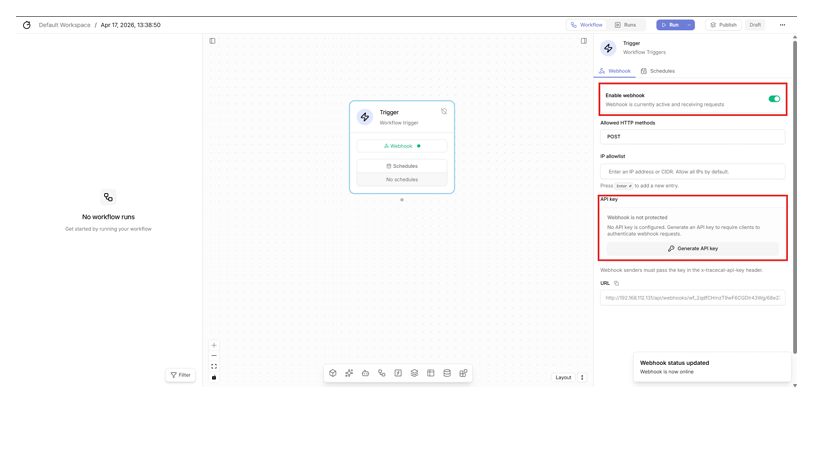
 ### 步骤 4:启用 Webhook 并生成 API Key
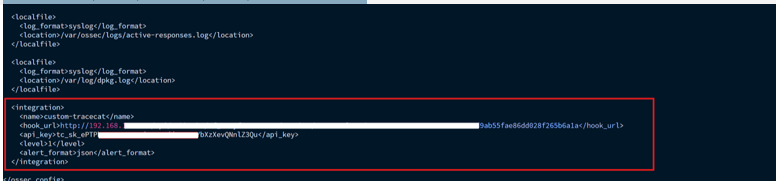
 ### 步骤 5:在 Wazuh OSSEC 文件中添加 API Key 和 URL
```
sudo cd /var/ossec/etc/ossec.conf
```
### 步骤 5:在 Wazuh OSSEC 文件中添加 API Key 和 URL
```
sudo cd /var/ossec/etc/ossec.conf
```
 ### 步骤 6:检查 firewall-drop 命令块是否已经存在
```
grep -n "firewall-drop" /var/ossec/etc/ossec.conf
```
- **如果没有输出,请在
### 步骤 6:检查 firewall-drop 命令块是否已经存在
```
grep -n "firewall-drop" /var/ossec/etc/ossec.conf
```
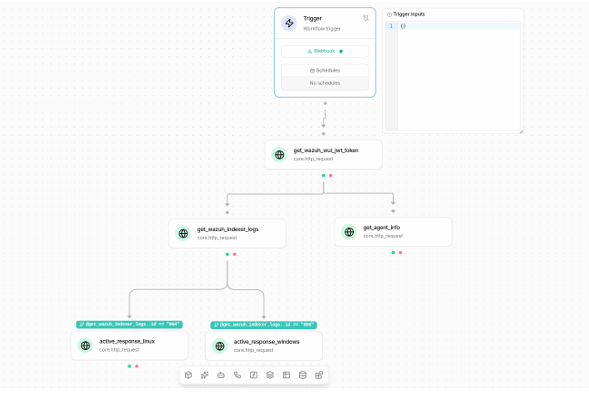
- **如果没有输出,请在 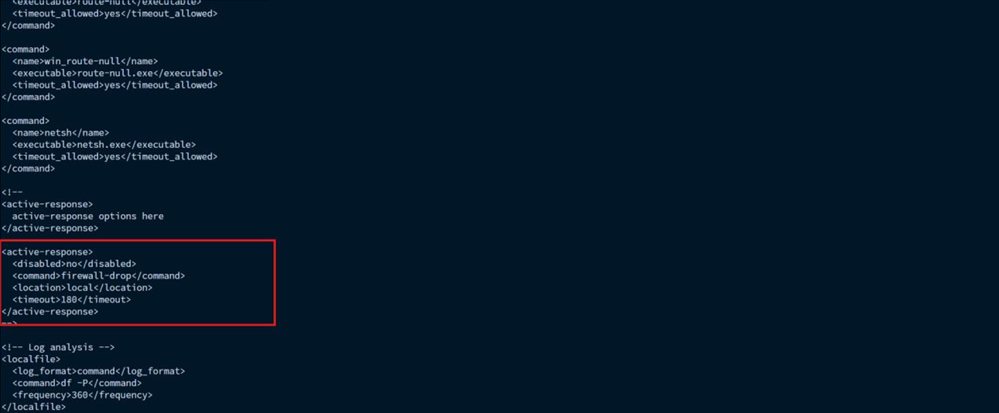 ### 步骤 7:添加一个 core.http_request 用于生成 token,将其与触发器连接,并给它取一个合适的名字
- *core.http_request 配置:*
```
url: https://192.168.3.5:55000/security/user/authenticate?raw=true
method: POST
verify_ssl: false
auth:
username: wazuh-wui
password: 8VRg?**********************8eR*Dot
```
### 步骤 7:添加一个 core.http_request 用于生成 token,将其与触发器连接,并给它取一个合适的名字
- *core.http_request 配置:*
```
url: https://192.168.3.5:55000/security/user/authenticate?raw=true
method: POST
verify_ssl: false
auth:
username: wazuh-wui
password: 8VRg?**********************8eR*Dot
```
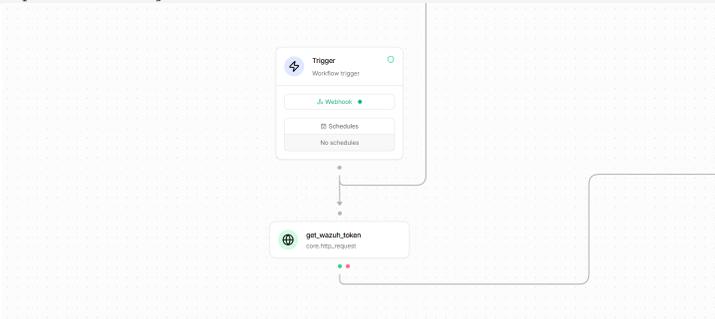 ### - *运行它,你将得到如下输出:*
```
{3 Items
data: "eyJhbGciOiJFUzUxMiIsInR5cCI6IkpXVCJ9.**************************
****************************** bmJmIjoxNz..."
headers: {11 Items
cache-control: "no-store"
content-length: "404"
content-security-policy: "none"
content-type: "text/plain"
date: "Fri, 1 Apr 2026 06:15:23 GMT"
referrer-policy: "no-referrer, strict-origin-when-cross-origin"
server: "Wazuh"
strict-transport-security: "max-age=63072000; includeSubdomains"
x-content-type-options: "nosniff"
x-frame-options: "deny"
x-xss-protection: "0"
}
status_code: 200
}
```
## 步骤 8:添加另一个 core.http_request 用于将日志从 Wazuh 拉取到 Tracecat 中,将其与前一个 http_request 连接,并给它取一个合适的名字
```
core.http_request configuration:
method: POST
url: https://192.168.3.5:9200/wazuh-alerts*/_search
verify_ssl: false
auth:
username: admin
password: JMXa3vK7k?WfhZHo*AEMyp+8GteOd3Pj
payload:
size: 100
sort:
- "@timestamp":
order: desc
query:
bool:
must:
- range:
rule.level:
gte: 5
- range:
"@timestamp":
gte: now-1h
- terms:
rule.groups:
- sshd
- authentication_failed
```
### - *运行它,你将得到如下输出:*
```
{3 Items
data: "eyJhbGciOiJFUzUxMiIsInR5cCI6IkpXVCJ9.**************************
****************************** bmJmIjoxNz..."
headers: {11 Items
cache-control: "no-store"
content-length: "404"
content-security-policy: "none"
content-type: "text/plain"
date: "Fri, 1 Apr 2026 06:15:23 GMT"
referrer-policy: "no-referrer, strict-origin-when-cross-origin"
server: "Wazuh"
strict-transport-security: "max-age=63072000; includeSubdomains"
x-content-type-options: "nosniff"
x-frame-options: "deny"
x-xss-protection: "0"
}
status_code: 200
}
```
## 步骤 8:添加另一个 core.http_request 用于将日志从 Wazuh 拉取到 Tracecat 中,将其与前一个 http_request 连接,并给它取一个合适的名字
```
core.http_request configuration:
method: POST
url: https://192.168.3.5:9200/wazuh-alerts*/_search
verify_ssl: false
auth:
username: admin
password: JMXa3vK7k?WfhZHo*AEMyp+8GteOd3Pj
payload:
size: 100
sort:
- "@timestamp":
order: desc
query:
bool:
must:
- range:
rule.level:
gte: 5
- range:
"@timestamp":
gte: now-1h
- terms:
rule.groups:
- sshd
- authentication_failed
```
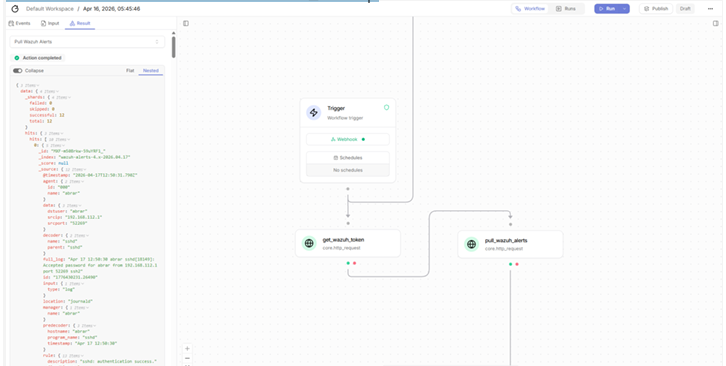 *运行它,你将在结果部分看到日志(如上图所示)。*
#### *注意:根据你的需要调整规则级别(rules level)和规则组(rules group)。这个特定的*
- 配置旨在仅拉取与 SSH 攻击相关的日志。
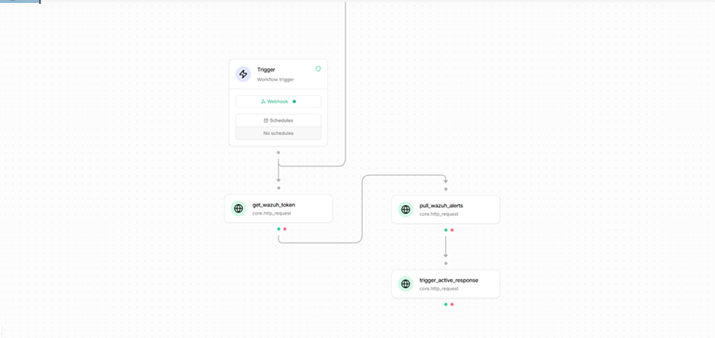
## 步骤 9:添加另一个 http_request 向 Wazuh 发送请求,以阻止这些特定的 IP 从而防止攻击,将其与前一个 http_request 连接,并给它取一个合适的名字
### core.http_request 配置:
```
url: https://192.168.3.5:55000/active-response?agents_list=002
method: PUT
verify_ssl: false
headers:
Authorization: Bearer ${{ACTIONS.get_wazuh_token.result.data}}
Content-Type: application/json
payload:
command: "!firewall-drop"
alert:
data:
srcip:
${{ACTIONS.pull_wazuh_alerts.result.data.hits.hits[0]._source.data.src
ip}}
```
*运行它,你将在结果部分看到日志(如上图所示)。*
#### *注意:根据你的需要调整规则级别(rules level)和规则组(rules group)。这个特定的*
- 配置旨在仅拉取与 SSH 攻击相关的日志。
## 步骤 9:添加另一个 http_request 向 Wazuh 发送请求,以阻止这些特定的 IP 从而防止攻击,将其与前一个 http_request 连接,并给它取一个合适的名字
### core.http_request 配置:
```
url: https://192.168.3.5:55000/active-response?agents_list=002
method: PUT
verify_ssl: false
headers:
Authorization: Bearer ${{ACTIONS.get_wazuh_token.result.data}}
Content-Type: application/json
payload:
command: "!firewall-drop"
alert:
data:
srcip:
${{ACTIONS.pull_wazuh_alerts.result.data.hits.hits[0]._source.data.src
ip}}
```
 # 2. 可能的故障排除:
### 问题 1:主动响应未注册
#### 症状
- **运行 agent_control 返回:“Selected active response does not exist”**
#### 根本原因
*
# 2. 可能的故障排除:
### 问题 1:主动响应未注册
#### 症状
- **运行 agent_control 返回:“Selected active response does not exist”**
#### 根本原因
* ossec.conf 中的
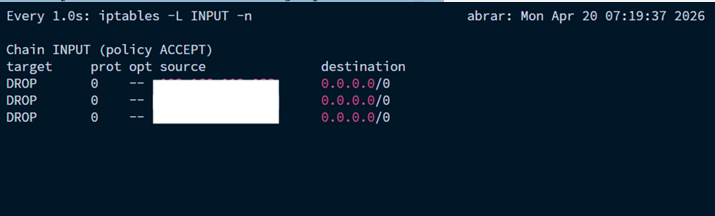
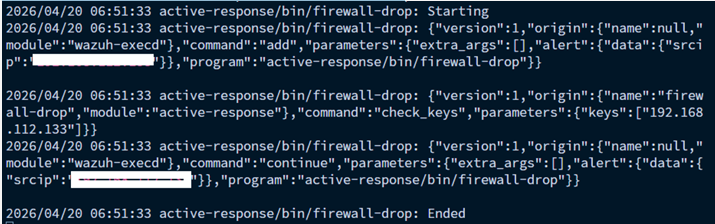 ## 4. 验证 IP 是否被阻止
```
sudo iptables -L INPUT -n | grep ATTACKER_IP
```
## 4. 验证 IP 是否被阻止
```
sudo iptables -L INPUT -n | grep ATTACKER_IP
```
 - **谢谢**
- **欢迎下期再见**
- zisad
- **谢谢**
- **欢迎下期再见**
- zisad标签:请求拦截, 逆向工具