N0va-7/styx-mcp
GitHub: N0va-7/styx-mcp
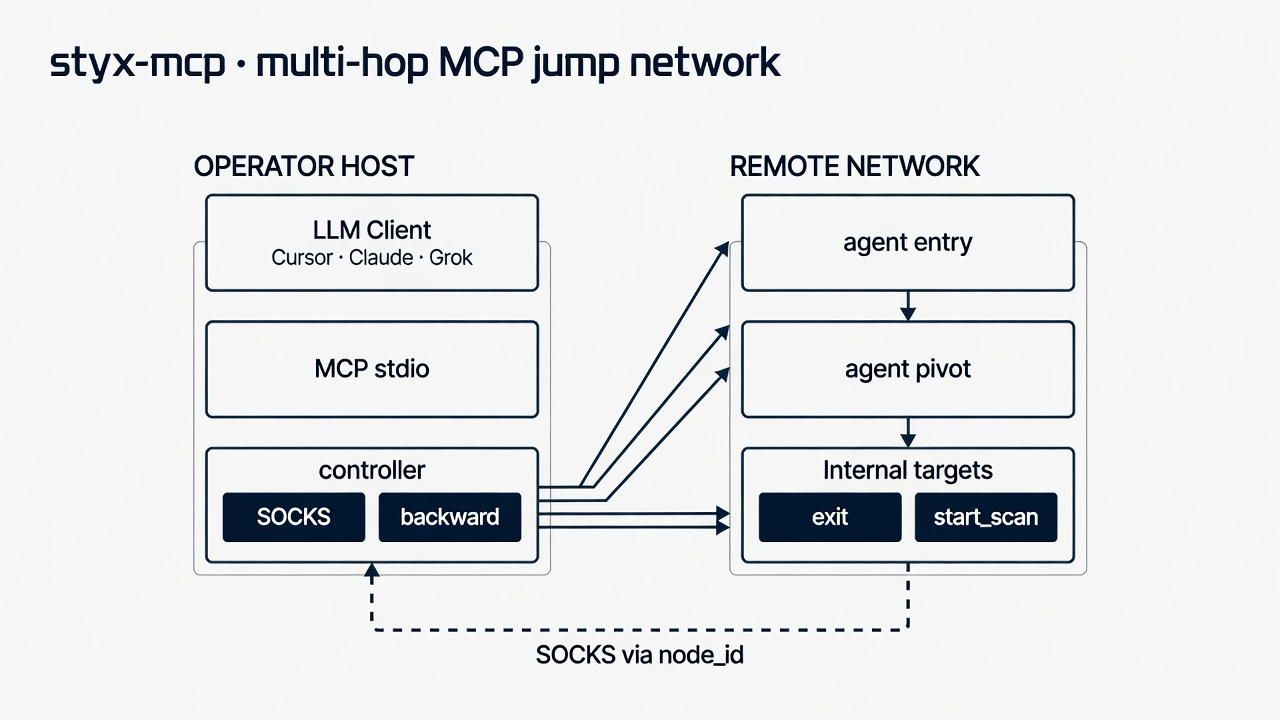
一款基于 MCP 协议的内网渗透编排工具,通过 LLM 调度多级跳板、SOCKS 代理、端口转发和内网扫描等安全评估能力。
Stars: 2 | Forks: 0



English · 简体中文
## 免责声明
**使用前请阅读本 README(特别是 [SOCKS vs forward vs backward vs scan](#socks-vs-forward-vs-backward-vs-scan))。**
## 功能
- 树状拓扑:主动 (`-c`) / 被动 (`-l`),多级跳板
- 双向 **HMAC** 预认证 + 可选 **TLS**
- 控制端的 **SOCKS5** —— 本地工具通过选定的节点出口
- 基于流的 **字节窗口流控**(controller 与 agent 必须匹配)
- **Forward**(在 agent 上监听)与 **backward**(在 controller 上监听)
- **异步 `start_cmd`** —— 一次性远程命令 (`task_id`)
- **异步 `start_scan`** —— 存活探测 → 端口扫描 → 轻量级指纹识别 + **refs**
- **异步 `pull_file`** / `upload_file`
- 异步任务 + `get_task_status`(包含阶段状态及用于长时间扫描的 `result.progress`)
- **Agent 意外断开后自动重连**(保持 `node_id` 稳定重新上线;`SHUTDOWN` 会禁用此功能)
- 交叉编译:Linux / Windows / macOS (`make build-all`)
## 目录
- [快速开始](#quick-start)
- [Cursor / Codex MCP 设置](#cursor--codex-mcp-setup)
- [MCP 工具](#mcp-tools)
- [内网扫描 (`start_scan`)](#intranet-scan-start_scan)
- [示例](#examples)
- [CLI 参数](#cli-flags)
- [安全说明](#security-notes)
- [项目结构](#project-layout)
- [致谢](#acknowledgments)
- [许可证](#license)
## 快速开始
```
git clone https://github.com/N0va-7/styx-mcp.git
cd styx-mcp
make build # → release/
-/
```
```
# Terminal A — controller(保留 MCP 的 stdio;仅用于 CLI smoke)
./release/$(uname -s | tr A-Z a-z)-$(uname -m | sed 's/x86_64/amd64/;s/aarch64/arm64/')/controller \
-s change-me -l 127.0.0.1:19137
# Terminal B — agent
./release/.../agent -s change-me -c 127.0.0.1:19137
```
更喜欢使用 **Cursor**?跳过终端 A 并使用下方的 [wrapper](#cursor-mcp-setup),然后只需启动 agent 即可。
```
make build-all # linux-amd64 / windows-amd64 / darwin-arm64
make test
```
**预编译二进制文件:** 当维护者发布时,请参见 [Releases](https://github.com/N0va-7/styx-mcp/releases)
(运行 `make build-all`,然后手动上传压缩包)。tag 触发 Release 的 CI **未**启用。
## Cursor / Codex MCP 设置
1. 运行 `make build` 以生成 `release/-/controller`。
2. `~/.cursor/mcp.json`(或项目中的 `.cursor/mcp.json`):
```
{
"mcpServers": {
"styx-mcp": {
"command": "/absolute/path/to/styx-mcp/scripts/styx-mcp-wrapper.sh",
"env": {
"STYX_SECRET": "change-me-to-a-strong-secret",
"STYX_LISTEN": "127.0.0.1:19137",
"STYX_LOG": "/tmp/styx-mcp-controller.log"
}
}
}
}
```
3. Cursor → **Settings → MCP** → 启用 / 刷新 **styx-mcp**。
4. 在跳板机上:
```
./agent -s change-me -c :19137
```
| 环境变量 | 默认值 | 含义 |
| :--- | :--- | :--- |
| `STYX_SECRET` | *(必填)* | 共享密钥 (`-s`) |
| `STYX_LISTEN` | `127.0.0.1:19137` | Controller 上的 agent 监听地址 |
| `STYX_LOG` | `/tmp/styx-mcp-controller.log` | Controller 日志 |
| `STYX_MCP_LOG` | *(未设置)* | 可选的原始 MCP stdio 日志路径 |
| `STYX_BIN_DIR` | `release/-` | 二进制文件目录覆盖 |
切勿将真实密钥提交到公共配置中。
### Codex
1. 运行 `make build` 以生成 `release/-/controller`。
2. 添加到 `~/.codex/config.toml`(需使用绝对路径;设置强密钥):
```
[mcp_servers.styx-mcp]
command = "/absolute/path/to/styx-mcp/scripts/styx-mcp-wrapper.sh"
enabled = true
startup_timeout_sec = 45
[mcp_servers.styx-mcp.env]
STYX_SECRET = "change-me-to-a-strong-secret"
STYX_LISTEN = "127.0.0.1:19137"
STYX_LOG = "/tmp/styx-mcp-controller.log"
```
3. 重新加载 MCP / 启动新的 Codex 任务,使工具(`list_nodes`, …)出现。
4. 只能有 **一个** controller 绑定 `STYX_LISTEN`(不要在同一端口上同时运行 Cursor 和 Codex 的 wrapper)。
5. 在跳板机上:`./agent -s change-me -c :19137`
## MCP 工具
| 工具 | 功能 | 监听 / 操作位置 |
| :--- | :--- | :--- |
| `list_nodes` | 查看拓扑 | — |
| `get_node_detail` | 查看详情 | — |
| `add_node_memo` / `delete_node_memo` | 管理备注 | — |
| `start_listener` | 等待子 agent 连入 | **Agent** |
| `connect_node` | 拨号连接子节点 | **Agent** |
| `start_socks` | 为本地工具提供 SOCKS5 | **Controller** → 通过节点出口 |
| `start_forward` | 端口转发 | **Agent** 监听 → 目标 |
| `start_backward` | 反向转发 | **Controller** → 经由节点 → 目标 |
| `upload_file` | 上传文件 | Controller → agent |
| `pull_file` | 拉取文件到 controller | Agent → controller 路径 |
| `start_cmd` | 一次性远程命令 | Agent `sh -c` (异步 `task_id`) |
| `start_scan` | 内网端口扫描 + 轻量级指纹识别 | **Agent** (异步 `task_id`) |
| `get_task_status` | 轮询异步任务 | — |
| `shutdown_node` | 终止节点 | — |
长时间运行的任务会返回 `task_id` → 可通过 `get_task_status` 进行轮询。
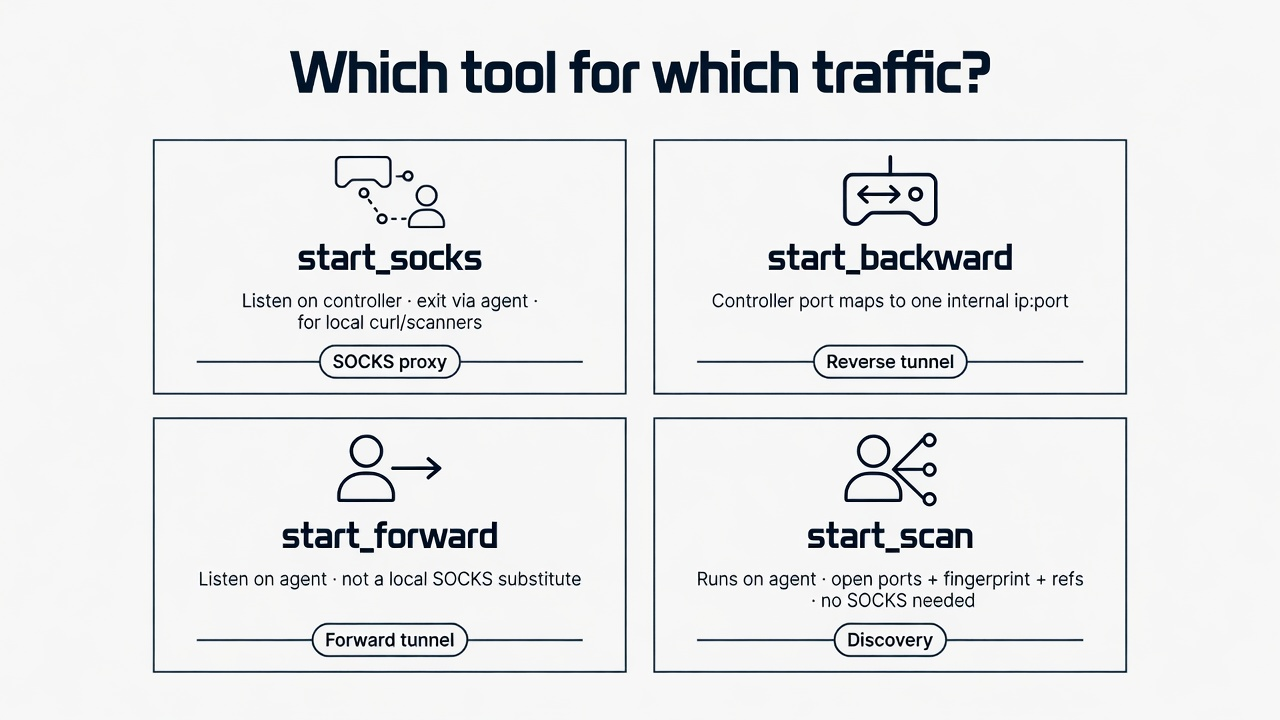
### SOCKS vs forward vs backward vs scan
| 需求场景 | 推荐工具 |
| :--- | :--- |
| 在 **controller 主机**上使用 `curl` / 扫描器访问内部网络 | `start_socks` |
| 将 **controller** 的一个端口映射到某个内部的 `ip:port` | `start_backward` |
| 在**跳板机**上开放一个端口用于向外部拨号 | `start_forward` |
| 获取来自 **agent** 的结构化开放端口 / 指纹信息 | `start_scan` |
## 内网扫描 (`start_scan`)
在选定的 **agent** 上运行(流量从该主机发出)。
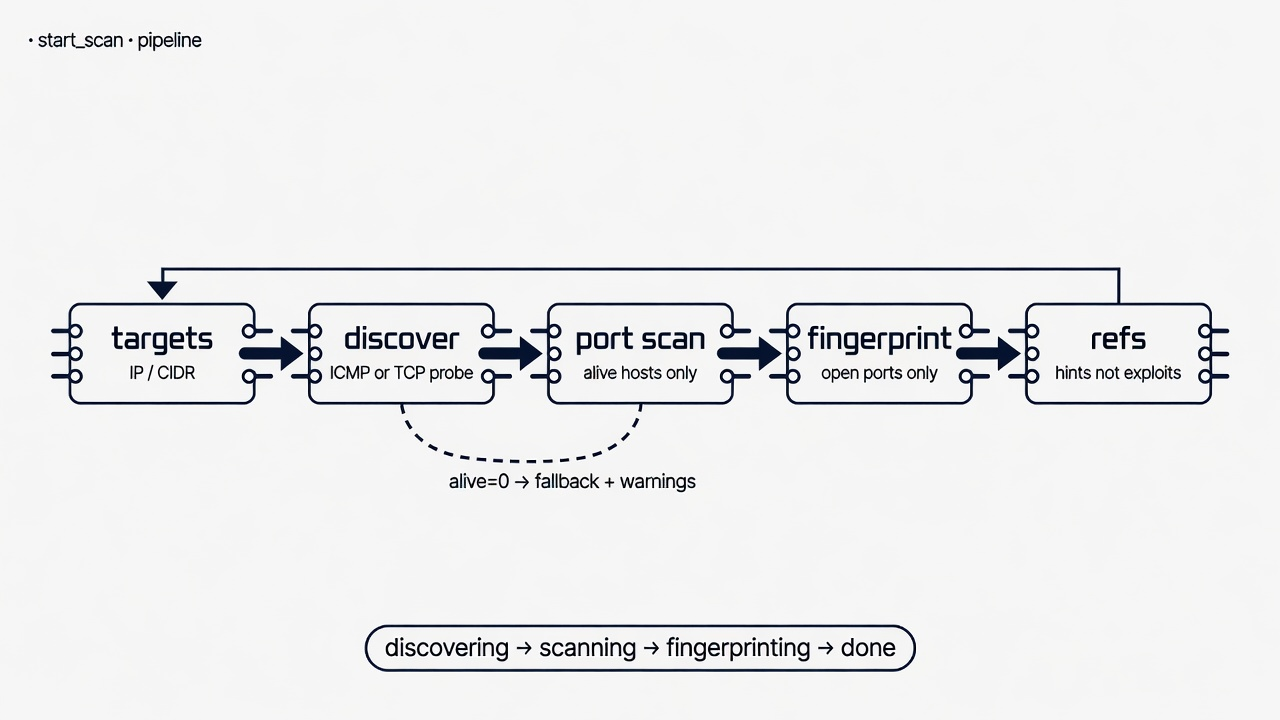
**存活探测(混合模式,默认开启):** 如果 **ICMP 探测成功或者**任何 TCP 探测端口开放,则判定主机存活。
如果没有存活主机,任务将**回退**到扫描所有目标,并设置 `warnings`(以避免出现无提示的空结果)。
**端口扫描方式:** `auto`(默认)在 agent 拥有原始 IPv4 TCP 权限(Linux 下的 root / CAP_NET_RAW)时使用 **SYN**,否则使用 **TCP connect**。可以通过 `method=connect` 或 `method=syn` 强制指定。
| 参数 | 默认值 | 说明 |
| :--- | :--- | :--- |
| `node_id` | 必填 | 通过该 agent 作为出口 |
| `targets` | 必填 | IPv4 IP / CIDR / 逗号分隔列表 |
| `mode` | `fast` | `fast` \| `normal` \| `full` \| `custom` (`full` 的开销很大) |
| `ports` | — | `custom` 模式下必填 (`22,80,8000-8100`) |
| `fingerprint` | `true` | 仅对开放端口进行指纹识别 |
| `discover` | `true` | 优先进行混合存活探测 |
| `method` | `auto` | `auto` \| `connect` \| `syn` |
| `concurrency` | `200` | 最大 500 |
| `timeout_ms` | `500` | 单次探测超时时间 |
**阶段**(通过 `get_task_status` 获取):`discovering` → `scanning` → `fingerprinting` → `done`。
在探测阶段,`result.progress` 可能包含 `stage`、`icmp_done` / `icmp_total`、`icmp_alive`、`alive_n`、`tcp_probes`。
**重构注意:** 协议变更(SCAN*)后,controller 和 agent 必须基于**同一个 commit** 进行构建。
实验助手(仅限授权网段;使用端口 **19139** 以免占用 MCP 的 `:19137`):
```
STYX_SECRET=… STYX_CALLBACK= ./scripts/lab-scan-e2e.sh
```
## 示例
SOCKS5
```
{ "name": "start_socks", "arguments": { "node_id": 0, "address": "127.0.0.1:10801" } }
```
```
curl --socks5-hostname 127.0.0.1:10801 http:///
export ALL_PROXY=socks5h://127.0.0.1:10801
```
两级拓扑
```
./agent -s change-me -l 127.0.0.1:19138 # child, passive
```
```
{ "name": "connect_node", "arguments": { "node_id": 0, "address": "127.0.0.1:19138" } }
```
Forward / backward / upload
```
{
"name": "start_forward",
"arguments": {
"node_id": 0,
"listen_address": "127.0.0.1:19141",
"target_address": "10.0.0.5:80"
}
}
```
连接到 **agent 主机上**的 `listen_address`。
```
{
"name": "start_backward",
"arguments": {
"node_id": 0,
"local_address": "127.0.0.1:19142",
"target_address": "10.0.0.5:80"
}
}
```
连接到 **controller 主机上**的 `127.0.0.1:19142`。
```
{
"name": "upload_file",
"arguments": {
"node_id": 0,
"local_path": "/path/to/tool",
"remote_path": "/tmp/tool"
}
}
```
内网扫描
```
{
"name": "start_scan",
"arguments": {
"node_id": 0,
"targets": "172.16.23.0/24",
"mode": "fast",
"discover": true,
"method": "auto",
"fingerprint": true
}
}
```
```
{ "name": "get_task_status", "arguments": { "task_id": "start_scan-1" } }
```
有用的结果字段:`stats`、`open[]`、`summary.interesting[]`,可选的 `warnings[]` / `refs`。
## CLI 参数
controller
| 参数 | 说明 |
| :--- | :--- |
| `-s` | 共享密钥 |
| `-l` | 监听 agent 连入 `[ip]:port` |
| `-c` | 可选的主动连接 |
| `-down` | 仅限 `raw`(拒绝 `ws`) |
| `-tls-enable` | 在节点链路上启用 TLS |
| `-domain` | TLS SNI / WS 域名 |
| `-heartbeat` | 发送至首个节点的心跳 |
| `-reconnect-max` | 最大主动 (`-c`) 拨号尝试次数(默认 `3`;`0` = 仅尝试一次) |
agent
| 参数 | 说明 |
| :--- | :--- |
| `-s` | 共享密钥 |
| `-c` | 连接到父节点 / controller |
| `-l` | 被动监听 |
| `-up` / `-down` | 仅限 `raw`(拒绝 `ws`) |
| `-tls-enable` / `-domain` | TLS |
| `-reconnect` | 意外断开后的基础重连延迟秒数(默认 `10`;`0` = 关闭) |
| `-reconnect-max` | 断开后的最大重连尝试次数(默认 `3`) |
| `-socks5-proxy` / `-socks5-proxyu` / `-socks5-proxyp` | 通过 SOCKS5 连接父节点 |
| `-http-proxy` | 通过 HTTP proxy 连接父节点 |
controller 和 agent 必须共享**相同的密钥**(以及匹配的 TLS/WS 选项)。在更改了重连/重新上线握手逻辑后,请基于同一个 commit 重新构建**两端**的二进制文件。
## 安全说明
- 像对待密码一样对待 `-s` / `STYX_SECRET`;在共享实验环境后请轮换密钥。wrapper **强制要求** `STYX_SECRET`(不存在弱默认值)。
- Payload 加密使用由 **HKDF-SHA256** 派生的 AES-256-GCM 密钥(controller 和 agent 必须运行匹配的版本)。
- 可选的 TLS(`-tls-enable`)会从共享密钥派生出稳定的证书并验证对端(仍需使用强密钥)。
- wrapper 默认监听 `127.0.0.1:19137`;仅在需要为远程 agent 提供服务时设置 `STYX_LISTEN=0.0.0.0:…`。
- 除非有意暴露,否则请将 SOCKS 绑定到 `127.0.0.1`。
- 上传路径允许绝对路径目标,但会拒绝 `..`;单文件最大传输限制为 32 MiB。
- MCP stdio 日志默认**关闭**;仅在调试时设置 `STYX_MCP_LOG=/path`(可能包含密钥信息)。
- 协议变更后,请基于同一个 commit 重新构建 controller **和** agent。
## 项目结构
```
cmd/controller/ controller + MCP entrypoint
cmd/agent/ agent entrypoint
scripts/ MCP wrapper, lab-scan-e2e.sh, lab_scan_smoke.go
pkg/controller/ control plane, SOCKS / backward / scan tasks
pkg/mcp/ MCP tools
pkg/node/ agent handlers (incl. scan job)
pkg/scan/ targets, discover, connect/SYN port check
pkg/fingerprint/ light fingerprint + vuln ref table
pkg/protocol/ wire protocol
pkg/share/preauth/ HMAC mutual preauth
```
## 致谢
- [Stowaway](https://github.com/ph4ntonn/Stowaway)
- [fscan](https://github.com/shadow1ng/fscan)
- [mcp-go](https://github.com/mark3labs/mcp-go)
## 许可证
[MIT](LICENSE)标签:EVTX分析, Go语言, MCP协议, PE 加载器, SOCKS5代理, 内网穿透, 底层编程, 插件系统, 数据统计, 日志审计, 横向移动, 程序破解, 端口扫描, 编程规范