Skyrider31/Threat-Hunting-Workflow-n8n
GitHub: Skyrider31/Threat-Hunting-Workflow-n8n
一个基于 n8n 的自动化威胁狩猎工作流,通过从 GitLab 拉取 KQL 查询在 Microsoft Defender XDR 上执行,并自动将检测结果同步至 GitLab Issue 和 Microsoft Teams。
Stars: 1 | Forks: 0
# 🛠️ 安装指南:自动化威胁狩猎流水线
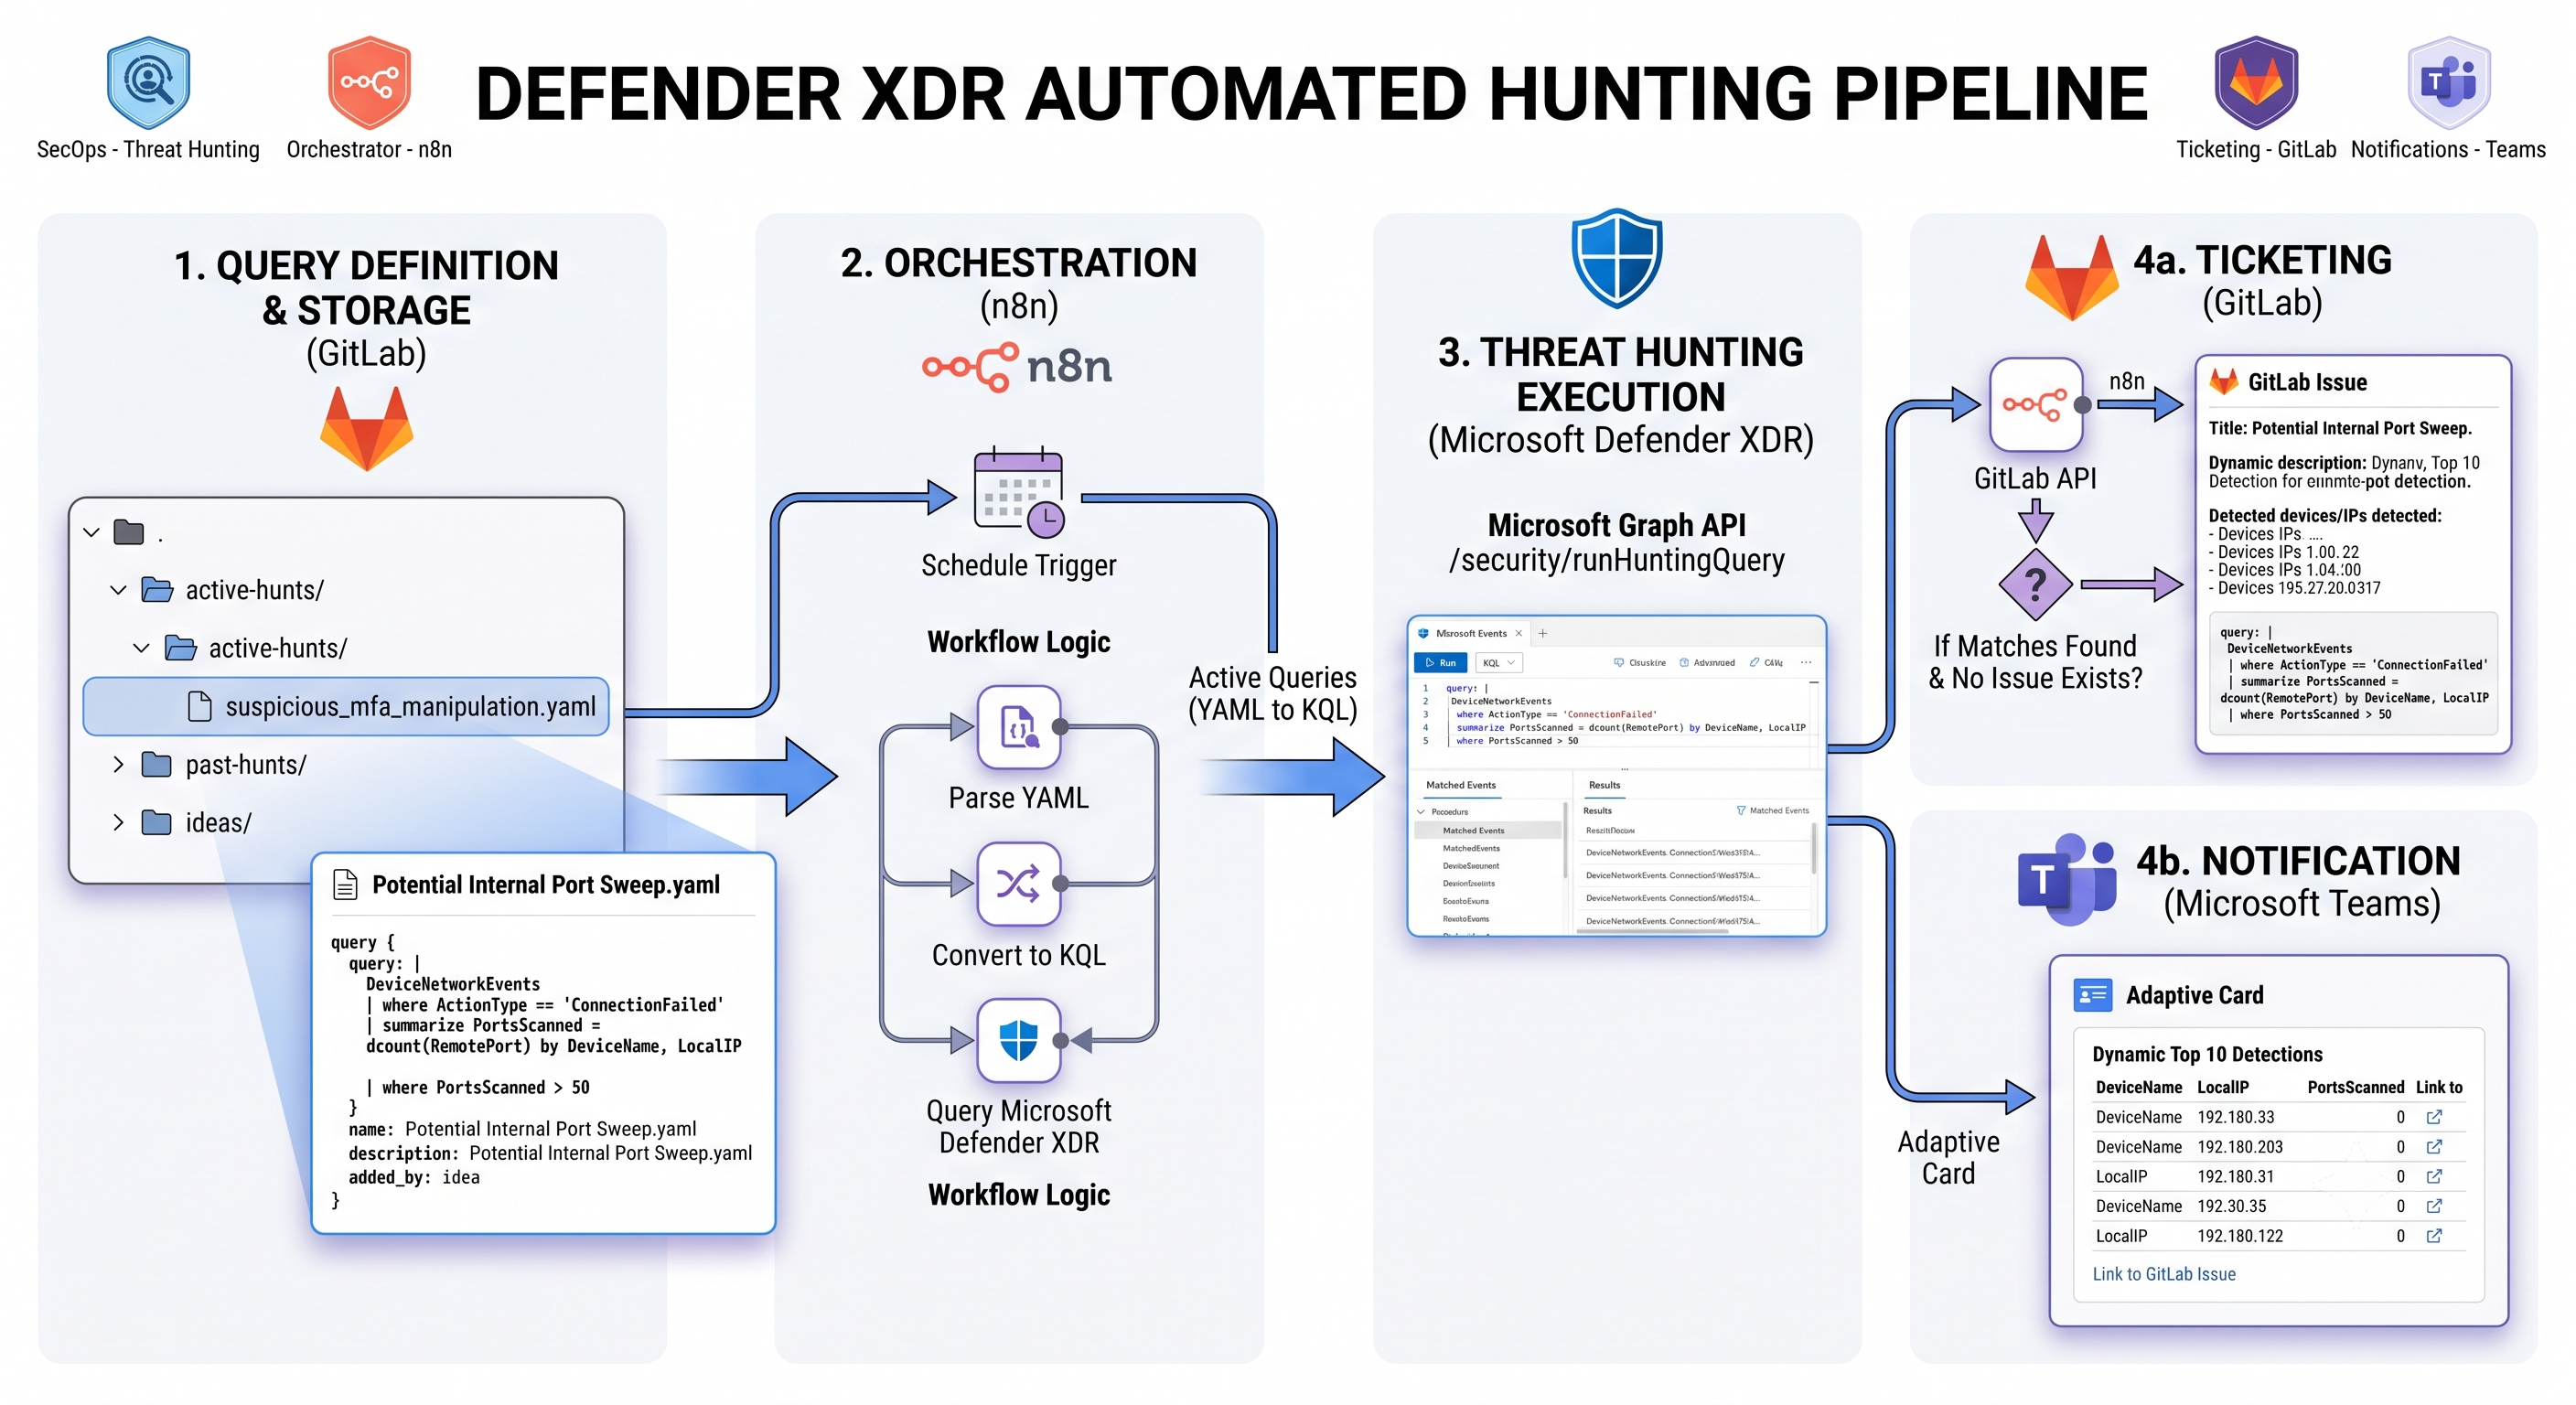
本指南详细介绍了配置和部署**自动化威胁狩猎流水线**所需的步骤。该系统会检索存储在 GitLab 仓库中的 KQL 查询,在 Microsoft Defender XDR 上执行它们,将任何检测结果记录为 GitLab Issue,并向 Microsoft Teams 发送交互式通知。
## 🏗️ 整体架构
该流水线在 n8n 上定期运行,以自动化执行威胁狩猎扫描和警报分发:
## 📋 前置条件与访问权限
在配置 n8n 之前,您必须配置访问权限并获取 Microsoft Entra ID、GitLab 和 Microsoft Teams 的凭证。
### Microsoft Graph / Defender XDR (Entra ID)
为了允许 n8n 在您的 Microsoft Defender XDR 租户上执行 KQL 查询,您需要在 Microsoft Entra ID 中注册一个应用程序。
1. 连接到 **Microsoft Entra 管理中心** (Azure Active Directory)。
2. 转到 **Applications** > **App registrations** > **New registration**。
* **Name**: `n8n-Threat-Hunting-Pipeline`
* **Supported account types**: *Accounts in this organizational directory only (Single tenant)*。
3. 转到 **Certificates & secrets** > **New client secret**。
* 立即复制并保存密钥的 **Value**(它只会显示一次)。
4. 转到 **API permissions** > **Add a permission** > **Microsoft Graph**。
* 选择 **Application permissions**。
* 搜索并勾选:`ThreatHunting.Read.All`
5. 点击 **Grant admin consent for [您的组织名称]**(这是激活应用程序级别权限的必经步骤)。
6. 从应用程序的 **Overview** 页面检索以下值:
* **Application (client) ID**
* **Directory (tenant) ID**
### 2. GitLab 仓库
该流水线需要读取活动的 KQL 文件并创建 Issue。
1. 在 GitLab 中创建一个 **Personal Access Token** 或 **Project Access Token**。
* 转到您的个人资料设置或项目设置 > **Access Tokens**。
* 勾选权限范围:`api`(或者至少需要用于创建 Issue的 `read_repository` 和 `write_repository` + `api`)。
2. 保存生成的 **Access Token**(例如,`glpat-...`)。
3. 找到您的 GitLab **Project ID**(显示在项目主页标题下方)。如果您的项目位于子组中,请使用 URL 编码的路径或数字 ID(例如,`12345678` 或 `path%2Fto%2Fproject`)。
### 3. Microsoft Teams(频道与 Power Automate 工作流设置)
该流水线将交互式警报直接发送到 Teams 频道。由于 Microsoft 正在弃用经典的 Office 365 connector 和 webhook,您必须使用 Power Automate 工作流来接收这些通知。
#### 步骤 A:创建或准备 Teams 频道
1. 打开 **Microsoft Teams**。
2. 导航到您希望发布警报的 Team(例如,`SOC Team` 或 `IT Security`)。
3. 点击 Team 名称旁边的三个点 (`...`) 并选择 **Add channel**。
4. 配置频道:
* **Channel name**: `SecOps - Hunt Alerts`
* **Description**: 用于接收来自 Microsoft Defender XDR 的自动化威胁狩猎警报的频道。
* **Privacy**: 根据您的策略设置为 **Standard**(对团队中的每个人开放)或 **Shared**。
5. 点击 **Add** 创建频道。
#### 步骤 B:设置 Webhook 工作流(两种选项)
##### 选项 1:使用 Teams Workflows 应用(最简单快捷)
1. 在 Microsoft Teams 中,点击左下角侧边栏的 **Apps**。
2. 搜索并打开 **Workflows**。
3. 转到 **Templates** 标签页并搜索:`Post to a channel when a webhook request is received` 或 `Post an Adaptive Card to a channel when a webhook request is received`。
4. 点击该模板。系统将提示您验证您的 Microsoft 账户。
5. 配置工作流设置:
* **Team**: 选择您的 Team(例如,`SOC Team`)。
* **Channel**: 选择您的新频道(例如,`SecOps - Hunt Alerts`)。
6. 点击 **Next** / **Add workflow**。
7. 创建完成后,Power Automate 将显示一个 **Webhook URL**(一个 HTTP POST URL)。
8. 复制此 URL。您将把它粘贴到 n8n 的 `Teams Notification` 节点中。
##### 选项 2:使用 Power Automate 门户(可定制性更强)
如果您想完全控制工作流逻辑,或者想直接传递 Adaptive Card body:
1. 登录 [make.powerautomate.com](https://make.powerautomate.com)。
2. 点击 **Create** > **Instant cloud flow**。
3. 为您的流命名(例如,`n8n Threat Hunting Alerts Webhook`)。
4. 选择触发器 **When an HTTP request is received**,然后点击 **Create**。
5. 在触发器设置中:
* 将 *Request Body JSON Schema* 留空(或点击 *Use sample payload to generate schema* 并粘贴示例 Adaptive Card 结构)。
* 确保 **Method** 设置为 `POST`。
6. 点击 **+ New step** 并搜索 **Microsoft Teams** connector。
7. 选择操作 **Post adaptive card in a chat or channel**。
8. 配置操作参数:
* **Post as**: `Flow bot`
* **Post in**: `Channel`
* **Team**: 选择您的 Team。
* **Channel**: 选择您的频道。
* **Adaptive Card**: 在此文本区域中,选择动态内容 **Body**(或输入 `@triggerBody()`)。这会指示 Power Automate 渲染由 n8n 节点构建并发送的确切 Adaptive Card payload。
9. 保存该流。Power Automate 现在将在触发器步骤中生成一个 **HTTP POST URL**。
10. 复制此 URL 以便在 n8n 的 `Teams Notification` 节点中使用。
## 🚀 分步部署
### 1. 导入 n8n
1. 打开您的 n8n 实例。
2. 创建一个新的 Workflow。
3. 点击选项菜单(右上角)> **Import from File** 并加载 `threat_hunting_workflow_template.json` 文件。
### 2. 配置 n8n 节点
#### A. `Git Config` 节点 (Set Node)
双击 `Git Config` 节点以指定您的 GitLab 变量:
* **`gitLabProjectId`**: 您的 GitLab 项目的数字 ID 或 URL 编码的路径(例如,`code%2Fit-security%2Fdetection%2Fhunting`)。
* **`branch`**: 包含您的威胁狩猎任务的 Git 分支(通常是 `main`)。
* **`folderPath`**: 包含活动 KQL 狩猎任务的子文件夹(`active-hunts`)。
#### B. GitLab HTTP 请求配置
该工作流包含 4 个与 GitLab 交互的 HTTP Request 节点:
* `List Git Files`
* `Get File Content`
* `GitLab Search Issue`
* `GitLab Create Issue`
对于这些节点中的每一个:
1. 打开节点并查看 **Headers** 部分。
2. 将 `PRIVATE-TOKEN` header 的默认值替换为您的 GitLab 访问令牌。
#### C. `Defender XDR KQL Query` 节点 (Microsoft Graph)
该节点使用自定义 OAuth2 凭证在 Microsoft API 上执行查询。
1. 在 **Credential for OAuth2 API** 参数中,点击下拉菜单并选择 **Create New Credential**:
* **Grant Type**: `Client Credentials`
* **Access Token URL**: `https://login.microsoftonline.com/{YOUR_TENANT_ID}/oauth2/v2.0/token`(将 `{YOUR_TENANT_ID}` 替换为您的 Azure Tenant ID)。
* **Client ID**: Entra ID Application (client) ID。
* **Client Secret**: 在 Entra ID 中生成的客户端密钥。
* **Scope**: `https://graph.microsoft.com/.default`
2. 保存并测试凭证。
#### D. `Teams Notification` 节点
1. 双击 `Teams Notification` 节点。
2. 将 **URL** 参数中的 URL 替换为您的 Teams HTTP POST URL 或 Webhook。
### 3. 激活工作流
1. 验证 **Schedule Trigger** 节点是否配置为您期望的运行间隔。默认情况下,它每 1 小时触发一次。
2. 切换工作流状态为 **Active**(右上角)。
## 📝 查询格式与生命周期
Git 仓库中的每个狩猎文件都必须遵循此确切的 YAML schema:
```
name: "Potential Internal Port Sweep"
description: "Identifies internal port sweeps based on high volume of failed connections."
added_by: "Robin"
schedule: "daily" # Execution frequency: hourly, daily, or weekly (default: daily)
query: |
DeviceNetworkEvents
| where Timestamp > ago(1d) // Important: Align this timeframe with your schedule frequency!
| where ActionType == 'ConnectionFailed'
| summarize PortsScanned = dcount(RemotePort) by DeviceName, LocalIP
| where PortsScanned > 50
```
### 执行调度规则(`Parse YAML` 节点):
执行工作流在 n8n 上每小时触发一次,并根据 YAML 文件中的 `schedule` 参数过滤文件:
* **`hourly`**: 每小时执行一次(24/7 全天候)。
* **`daily`**: 每天在 **上午 08:00** 执行一次(苏黎世/巴黎时间)。
* **`weekly`**: 每周 **一上午 08:00** 执行一次。
标签:GitLab, Microsoft Defender, Microsoft Teams, n8n, 安全编排与自动化响应, 自动化运维