sarthakdewanda/wazuh-siem-lab
GitHub: sarthakdewanda/wazuh-siem-lab
该项目提供了一套完整的 Wazuh SIEM 家庭实验室方案,涵盖端点监控、攻击模拟、自定义检测规则、漏洞关联与 NIST CSF 事件报告的 SOC 全流程。
Stars: 0 | Forks: 0
# Wazuh SIEM 家庭实验室:SOC 检测与响应工作流
一个以 Wazuh 为核心构建的 SIEM 家庭实验室。涵盖 manager 部署、Windows agent 注册、实时文件完整性监控、Sysmon 遥测、使用 Atomic Red Team 进行攻击模拟、映射到 MITRE ATT&CK 的自定义检测规则、原生漏洞检测、漏洞与告警的关联,以及使用 NIST 网络安全框架编写的事件报告。
## 📑 目录
- [概述](#overview)
- [实验室架构](#lab-architecture)
- [前置条件](#prerequisites)
- [环境搭建](#setup)
- [1. 在 Ubuntu 上安装 Wazuh Manager](#1-install-wazuh-manager-on-ubuntu)
- [2. 访问 Wazuh Dashboard](#2-access-the-wazuh-dashboard)
- [3. 在 Windows 上安装 Wazuh Agent](#3-install-the-wazuh-agent-on-windows)
- [4. 将 Agent 注册到 Manager](#4-register-the-agent-with-the-manager)
- [5. 配置文件完整性监控](#5-configure-file-integrity-monitoring)
- [6. 设置 Windows 11 VM(攻击模拟端点)](#6-set-up-the-windows-11-vm-attack-simulation-endpoint)
- [7. 使用 Atomic Red Team 生成攻击遥测](#7-generate-attack-telemetry-with-atomic-red-team)
- [8. 编写自定义检测规则 + MITRE ATT&CK 映射](#8-write-a-custom-detection-rule--mitre-attck-mapping)
- [9. 启用原生漏洞检测](#9-enable-native-vulnerability-detection)
- [10. 将漏洞与检测结果进行关联](#10-correlate-vulnerabilities-with-detections)
- [11. 事件报告(NIST CSF)](#11-incident-report-nist-csf)
- [验证配置](#verifying-the-setup)
- [资源](#resources)
## 概述
本实验室构建了一个可运行的 SOC pipeline,涵盖:
- 在 Ubuntu 上部署 Wazuh Manager 和 Dashboard
- Windows agent 注册与实时文件完整性监控(FIM)
- 部署 Sysmon 以获取高保真的 Windows 进程遥测数据
- 将日志从 Sysmon 转发至 Wazuh
- 使用 Atomic Red Team 进行攻击模拟(MITRE ATT&CK T1033,系统所有者/用户发现)
- 直接映射到 MITRE ATT&CK 的自定义 Wazuh 检测规则
- 原生 Wazuh 漏洞检测(通过 Syscollector 收集 CVE 清单,无需外部扫描器)
- 手动将同一资产上的漏洞发现与实时检测进行关联
- 使用 NIST 网络安全框架 2.0(治理、识别、保护、检测、响应、恢复)编写的事件报告
## 实验室架构
```
┌─────────────────────────────────┐
│ Ubuntu VM │
│ Wazuh Manager + Dashboard │
│ (VirtualBox, Bridged) │
└──────────────┬────────────────────┘
│
Bridged Network Adapter
┌──────────────┴────────────────────┐
│ │
┌──────────────┴───────────────┐ ┌────────────────┴───────────────┐
│ Windows Host │ │ Windows 11 VM │
│ Wazuh Agent │ │ Wazuh Agent + Sysmon │
│ File Integrity Monitoring │ │ Atomic Red Team │
│ │ │ (agent: win-lab) │
└────────────────────────────────┘ └──────────────────────────────────┘
Windows Host ──▶ File integrity events ──▶ Wazuh Manager
win-lab ──▶ Sysmon telemetry + attack simulation ──▶ Wazuh Manager
Wazuh Manager──▶ Detection, MITRE mapping, vuln scan, alerts ──▶ Dashboard
```
| 组件 | 主机 | 角色 |
|---|---|---|
| Wazuh Manager + Dashboard | Ubuntu VM (VirtualBox) | 收集、分析、关联并展示来自所有 agent 的数据 |
| Wazuh Agent | Windows 主机(物理机) | 文件完整性监控端点 |
| Wazuh Agent + Sysmon + Atomic Red Team | Windows 11 VM (`win-lab`) | 攻击模拟、自定义检测规则、MITRE 映射、漏洞清单 |
## 前置条件
- 已安装 VirtualBox
- 在 VirtualBox 中运行 Ubuntu Server 20.04+(桥接网络)
- 在 VirtualBox 中运行 Windows 11 VM(桥接网络)
- 拥有 Windows 主机的管理员访问权限
- Ubuntu VM 和 Windows 11 VM 具有互联网访问权限
## 环境搭建
### 1. 在 Ubuntu 上安装 Wazuh Manager
在您的 Ubuntu VM 上运行以下命令。
**添加 Wazuh GPG 密钥:**
```
curl -s https://packages.wazuh.com/key/GPG-KEY-WAZUH | sudo gpg --dearmor -o /usr/share/keyrings/wazuh-archive-keyring.gpg
```
**下载并运行安装脚本:**
```
curl -sO https://packages.wazuh.com/4.xx/wazuh-install.sh && sudo bash ./wazuh-install.sh -a -i
```
- `-a` 安装所有组件(manager、indexer、dashboard)
- `-i` 以交互模式运行
安装大约需要 20-30 分钟。脚本结束时将显示 Dashboard 凭证,请妥善保存。
### 2. 访问 Wazuh Dashboard
获取 Ubuntu VM 的 IP 地址:
```
ifconfig
```
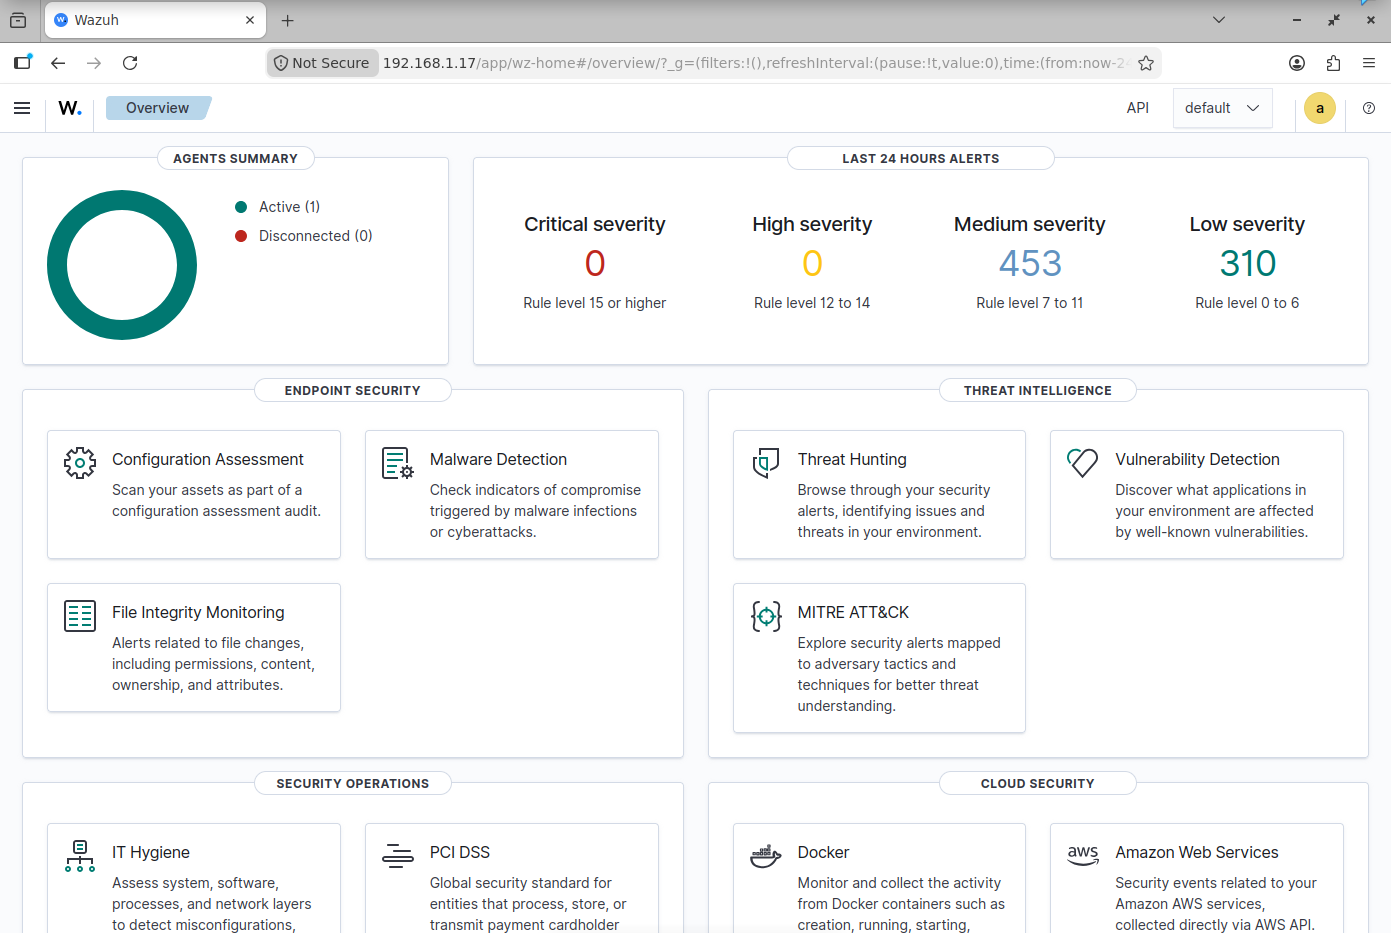
打开浏览器并访问 `https://`。接受自签名证书警告,并使用安装脚本提供的凭证登录。
### 3. 在 Windows 上安装 Wazuh Agent
从 [Wazuh 官方文档](https://documentation.wazuh.com/current/installation-guide/wazuh-agent/wazuh-agent-package-windows.html) 下载最新的 MSI 安装程序,并使用默认设置进行安装。
### 4. 将 Agent 注册到 Manager
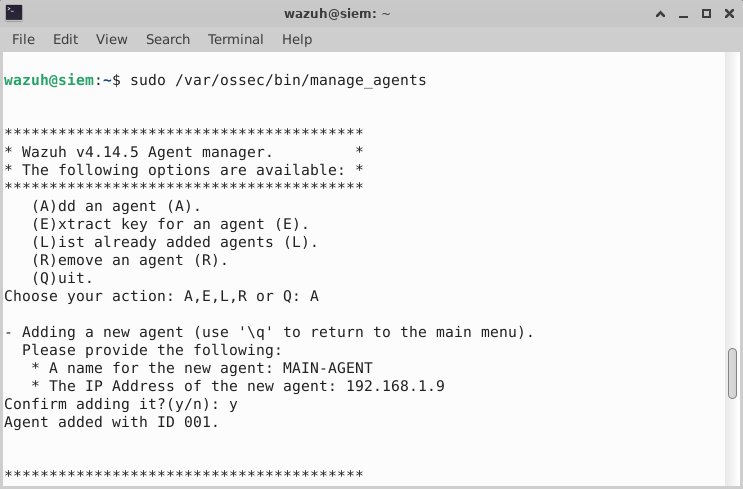
**在 Ubuntu 上,添加 agent:**
```
sudo /var/ossec/bin/manage_agents
```
选择 `A` 添加新 agent,为其分配名称和 IP,然后确认。
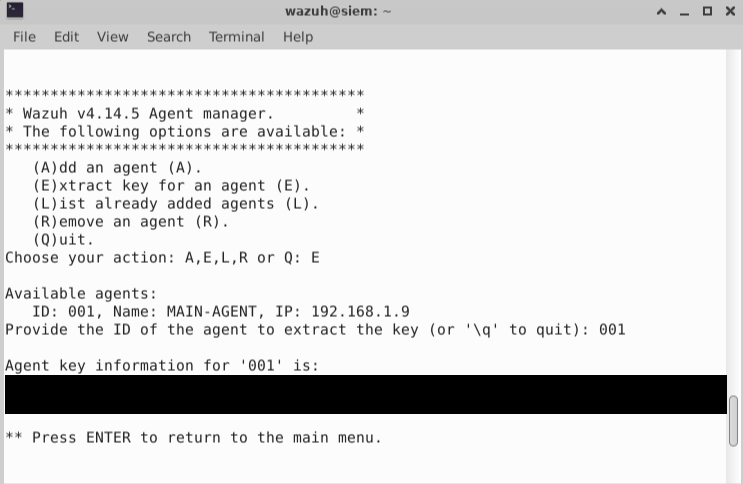
返回主菜单,选择 `E` 为该 agent 提取身份验证密钥。复制输出的密钥。
**在 Windows 上,应用该密钥:**
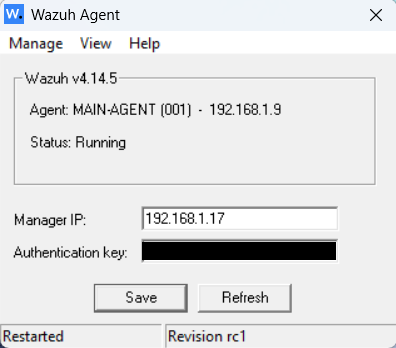
从开始菜单打开 **Wazuh Agent Manager**,输入 Ubuntu VM 的 IP 作为 Manager IP,粘贴刚才复制的密钥,然后保存并重启 agent 服务。
### 5. 配置文件完整性监控
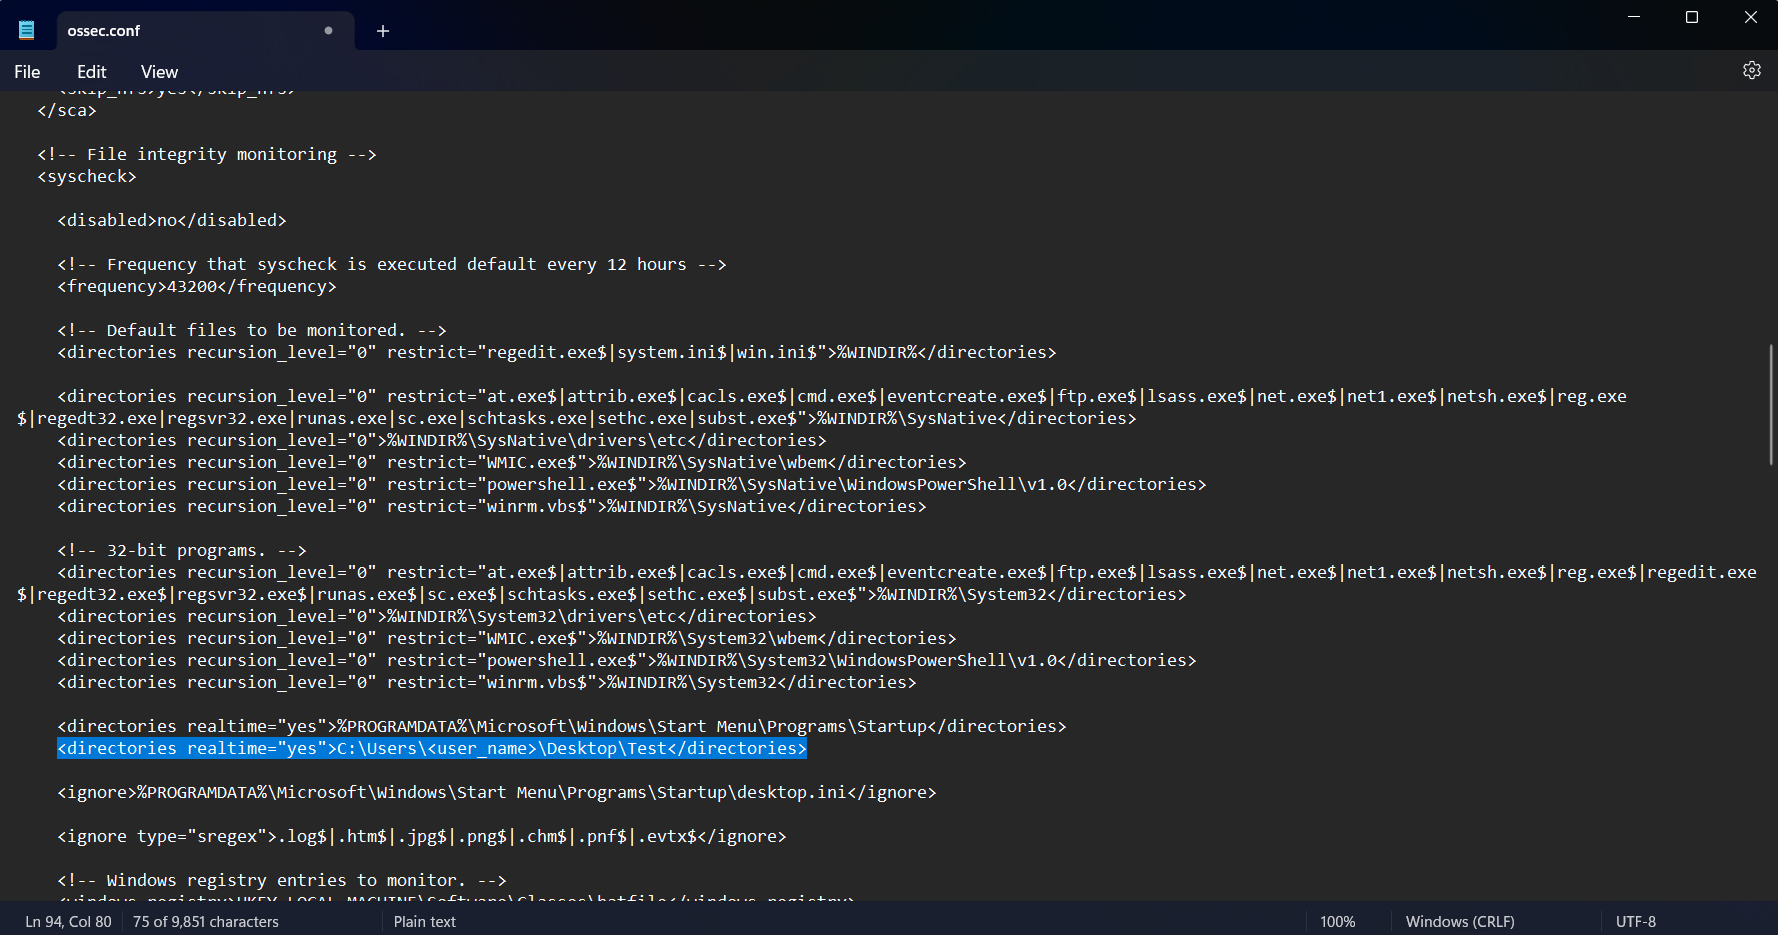
Wazuh 的 **Syscheck** 模块可以实时监控文件和文件夹的变更。
在 Windows 上,以管理员身份打开 agent 配置文件:
```
C:\Program Files (x86)\ossec-agent\ossec.conf
```
在 `` 块中添加以下内容,指向需要监控的文件夹:
```
C:\Users\YourUser\Desktop\Test
```
保存文件并重启 Wazuh Agent 服务以应用更改。
### 6. 设置 Windows 11 VM(攻击模拟端点)
按照与步骤 3 和 4 相同的过程安装 Wazuh agent 并将其注册到 manager。在本实验的后续部分中使用的 agent 名称为:**win-lab**。
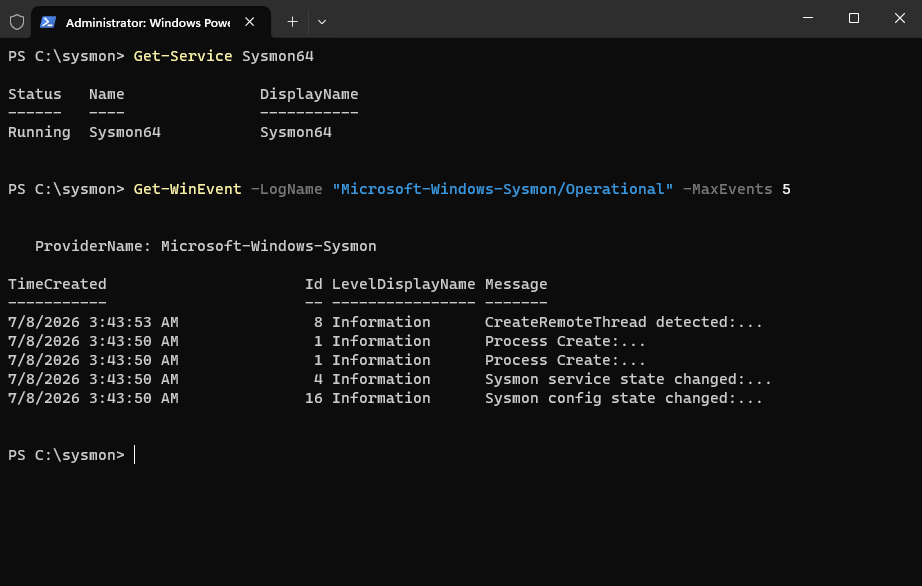
**安装 Sysmon** 以获取高保真进程遥测数据,使用 SwiftOnSecurity 基线配置:
```
mkdir C:\sysmon; cd C:\sysmon
Invoke-WebRequest -Uri "https://download.sysinternals.com/files/Sysmon.zip" -OutFile "Sysmon.zip"
Expand-Archive .\Sysmon.zip -DestinationPath . -Force
Invoke-WebRequest -Uri "https://raw.githubusercontent.com/SwiftOnSecurity/sysmon-config/master/sysmonconfig-export.xml" -OutFile "sysmonconfig.xml"
.\Sysmon64.exe -accepteula -i sysmonconfig.xml
```
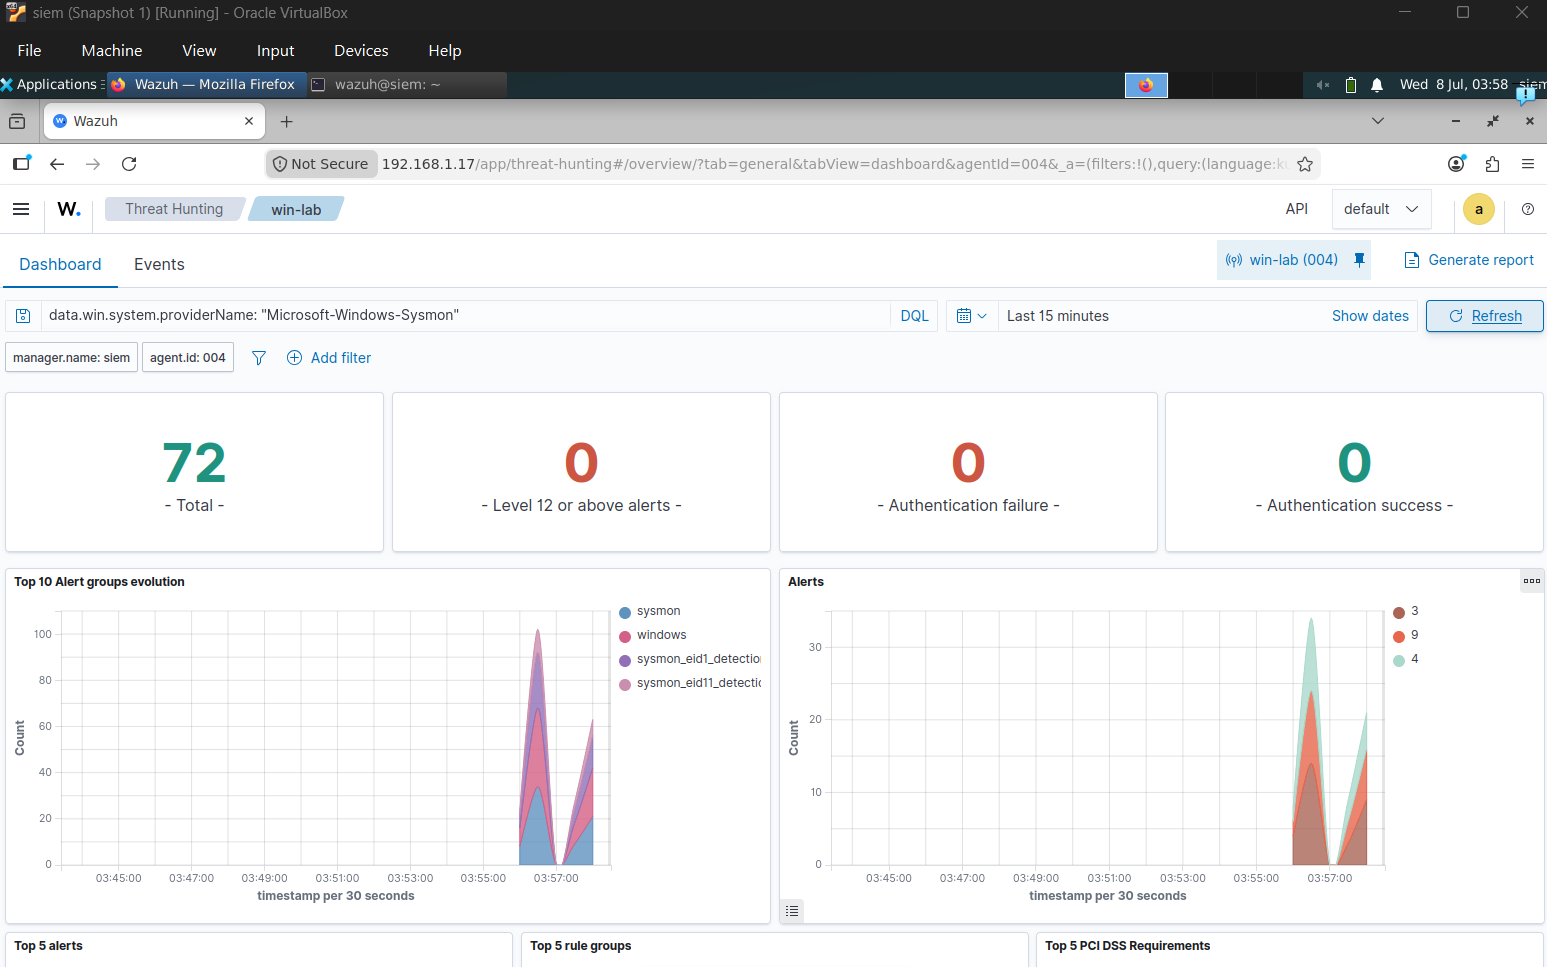
**将 Sysmon 日志转发至 Wazuh。** 在 Windows 11 VM 上编辑 `C:\Program Files (x86)\ossec-agent\ossec.conf`,并在 `` 中添加:
```
Microsoft-Windows-Sysmon/Operational
eventchannel
```
重启 agent 服务。在 **Wazuh Dashboard → Threat Hunting** 中验证:
```
data.win.system.providerName: "Microsoft-Windows-Sysmon"
```
### 7. 使用 Atomic Red Team 生成攻击遥测
在 Windows 11 VM 上安装 Atomic Red Team(事先已拍摄 VirtualBox 快照):
```
Set-ExecutionPolicy Bypass -Scope Process -Force
IEX (IWR 'https://raw.githubusercontent.com/redcanaryco/invoke-atomicredteam/master/install-atomicredteam.ps1' -UseBasicParsing)
Install-AtomicRedTeam -getAtomics
Add-MpPreference -ExclusionPath "C:\AtomicRedTeam"
Import-Module "C:\AtomicRedTeam\invoke-atomicredteam\Invoke-AtomicRedTeam.psd1" -Force
```
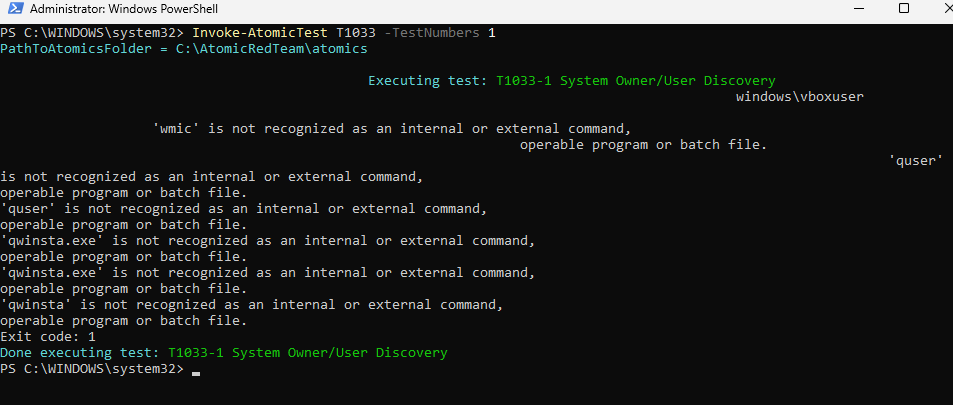
运行 **T1033,系统所有者/用户发现**:
```
Invoke-AtomicTest T1033 -TestNumbers 1
```
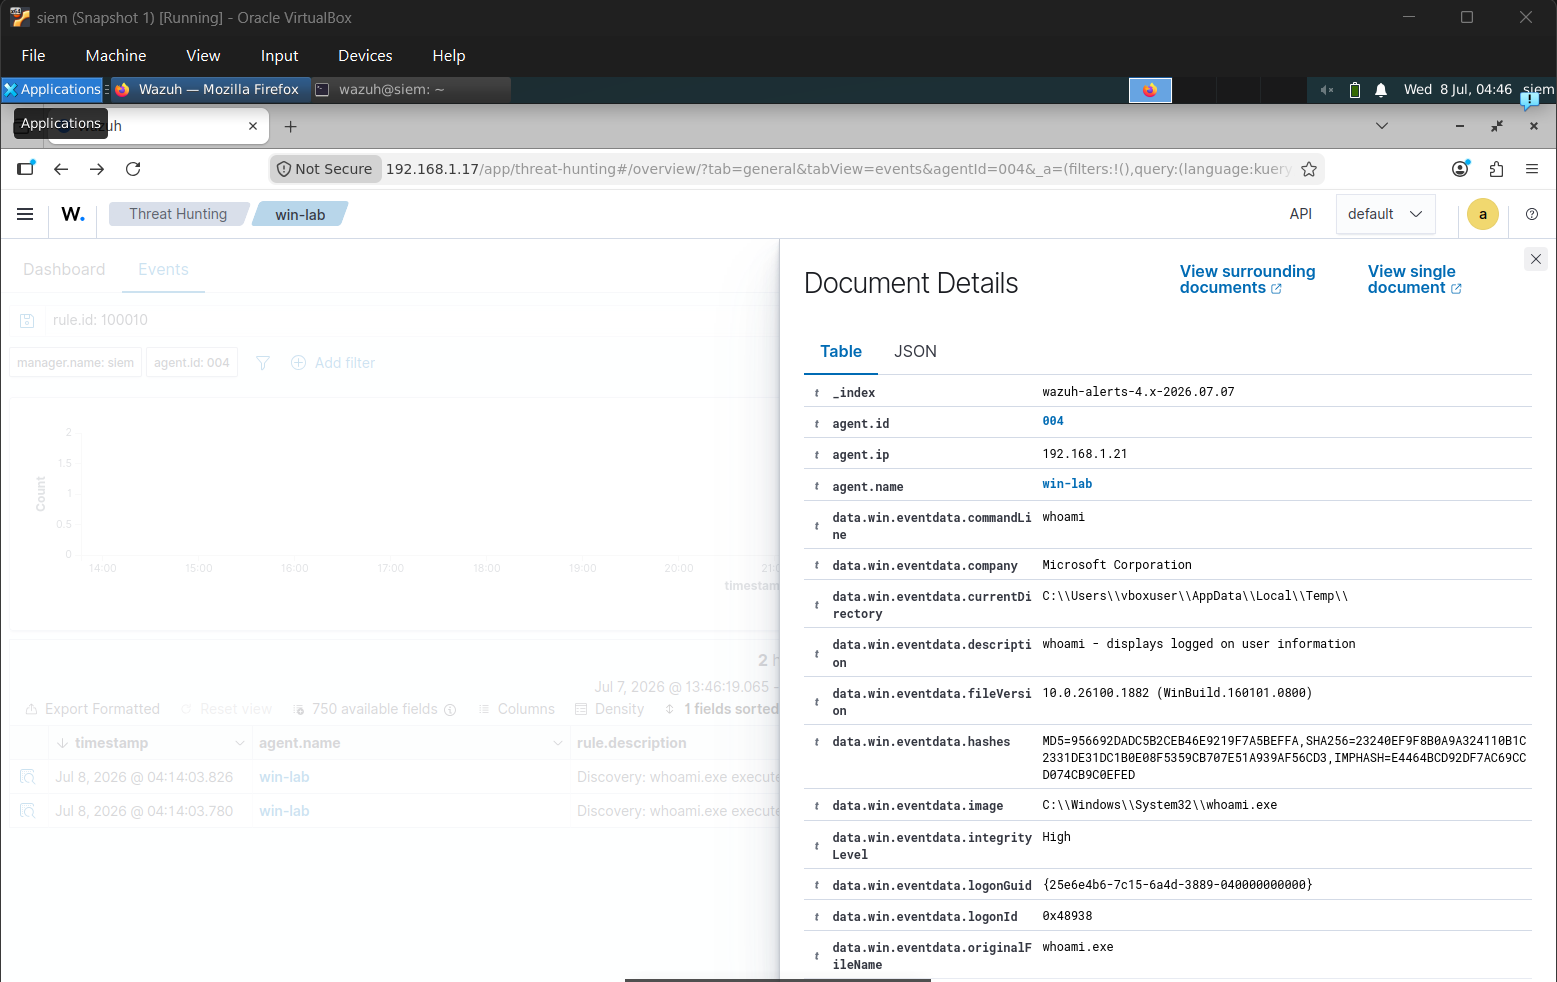
这将执行 `whoami` 命令,Sysmon 会将其记录为进程创建事件并转发至 Wazuh。
### 8. 编写自定义检测规则 + MITRE ATT&CK 映射
在 Ubuntu manager 上的 `/var/ossec/etc/rules/local_rules.xml` 添加自定义规则:
```
sysmon_event1
(?i)\\whoami\.exe
Discovery: whoami.exe executed - possible System Owner/User Discovery (T1033)
T1033
```
```
sudo systemctl restart wazuh-manager
```
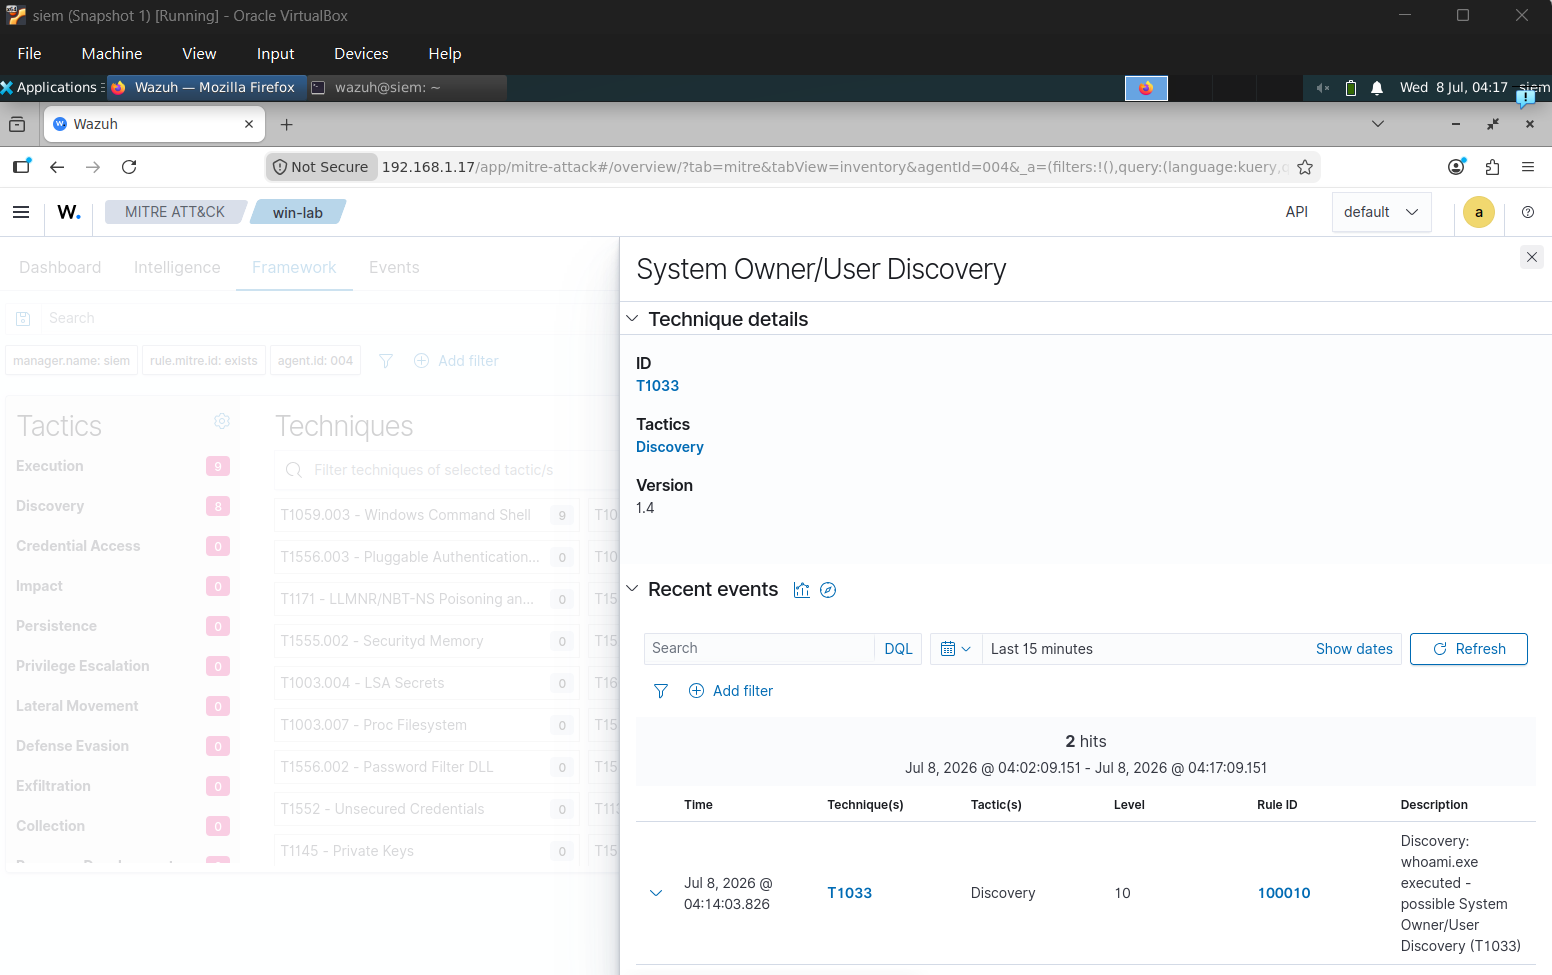
该规则在 Sysmon Event ID 1 触发,即当执行 `whoami.exe` 时触发,并被标记为 MITRE 技术 **T1033**。已在 Threat Hunting(`rule.id: 100010`)和 MITRE ATT&CK 模块中确认。
### 9. 启用原生漏洞检测
Wazuh 的漏洞检测模块会直接在 SIEM 中将每个 agent 已安装的软件(由 Syscollector 收集)与 CVE 数据源进行比对,无需单独的扫描器。
确认在 manager 上已启用(`/var/ossec/etc/ossec.conf`):
```
yes
yes
60m
```
在 Windows 11 VM agent 配置中缩短 Syscollector 的间隔以更快获取结果:
```
no
10m
yes
yes
yes
```
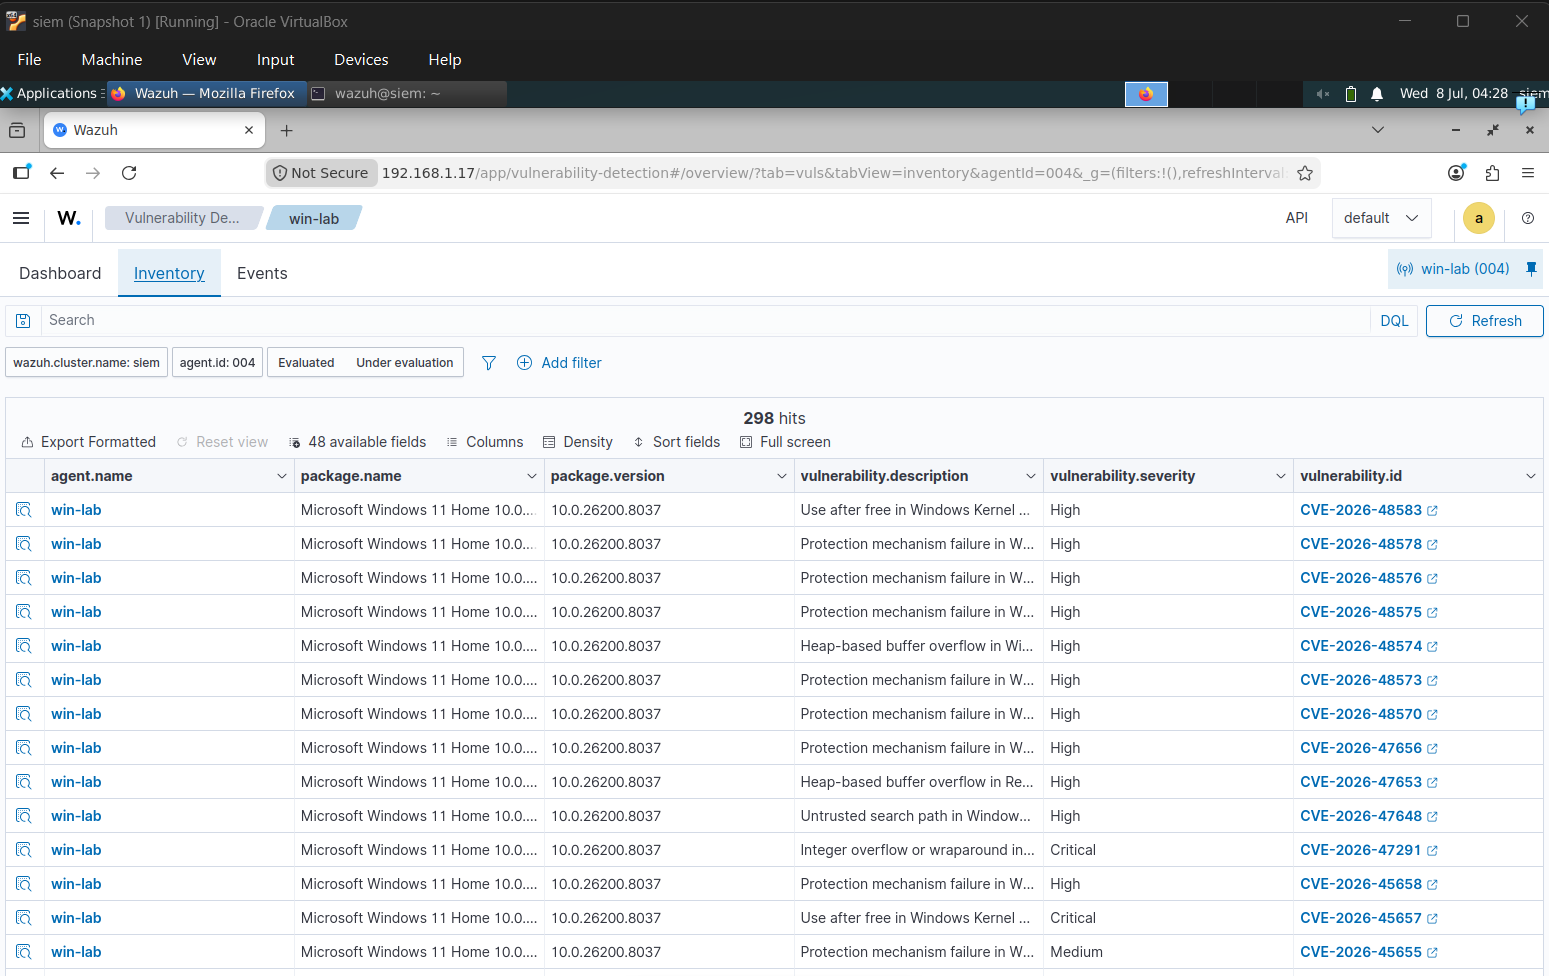
在 agent `win-lab` 的 **Vulnerability Detection → Inventory** 结果中:发现 298 个 CVE,包括多个严重级别(Critical)的发现(例如 CVE-2026-47291 和 CVE-2026-45657)。
### 10. 将漏洞与检测结果进行关联
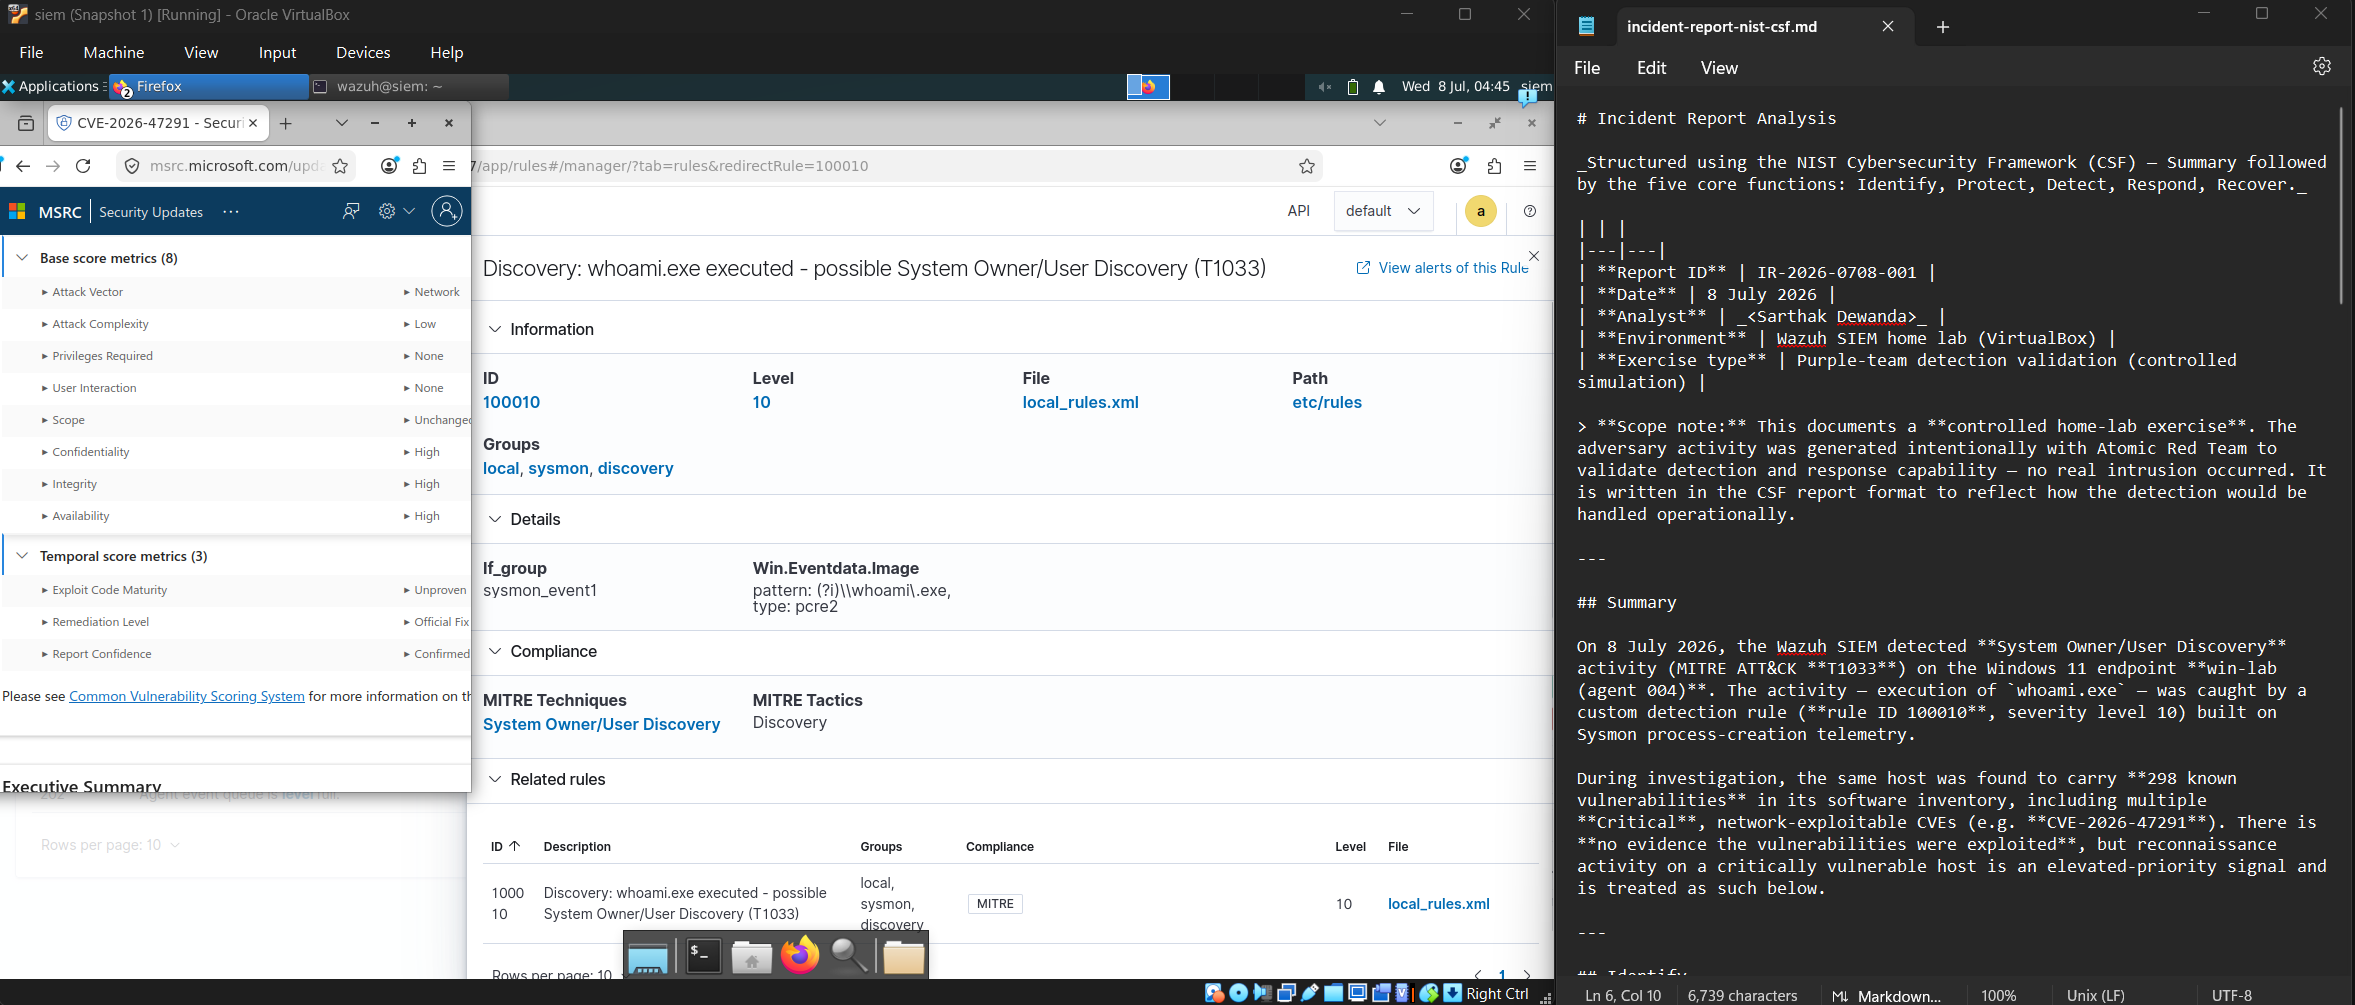
从 T1033 检测(规则 100010,agent `win-lab`)切入,查看同一 agent 的漏洞清单,以便在上下文中而非孤立地评估风险。
**发现:** win-lab 显示通过 `whoami.exe` 进行了系统所有者/用户发现(T1033)活动,并带有严重的、可通过网络利用且无需身份验证的 CVE(CVE-2026-47291:AV:N/AC:L/PR:N/UI:N)。在具有此类暴露风险的主机上的发现活动将被视为调查的高优先级事项。
### 11. 事件报告(NIST CSF)
使用 NIST 网络安全框架 2.0 结构(治理、识别、保护、检测、响应、恢复)编写的完整事件报告,涵盖 T1033 检测、受影响的资产、漏洞关联以及修复步骤。
📄 [事件报告](Incident%20Report.md)
## 资源
- [Wazuh 官方文档](https://documentation.wazuh.com)
- [Wazuh GitHub 仓库](https://github.com/wazuh/wazuh)
- [Atomic Red Team](https://github.com/redcanaryco/atomic-red-team)
- [MITRE ATT&CK 框架](https://attack.mitre.org)
- [NIST 网络安全框架](https://www.nist.gov/cyberframework)
- [VirtualBox 下载](https://www.virtualbox.org/wiki/Downloads)
- [Ubuntu Server 下载](https://ubuntu.com/download/server)
标签:Wazuh, x64dbg, 安全运营, 实验环境, 扫描框架