Young-Zizo/CodeAlpha_NetworkIntrusionDetectionSystem
GitHub: Young-Zizo/CodeAlpha_NetworkIntrusionDetectionSystem
一个基于 Suricata 的网络入侵检测系统,提供自定义检测规则、Python 告警处理管线和 Flask 实时仪表板,用于检测端口扫描、SSH 暴力破解、SQL 注入和 C2 信标等攻击行为。
Stars: 0 | Forks: 0
# CodeAlpha 网络入侵检测系统
一个基于 **Suricata** 构建的网络入侵检测系统 (NIDS),包含自定义的 Python
告警处理 pipeline、SQLite 存储、实时的 Flask 仪表板,以及用于高危事件的
webhook/邮件通知器。
## 实时仪表板
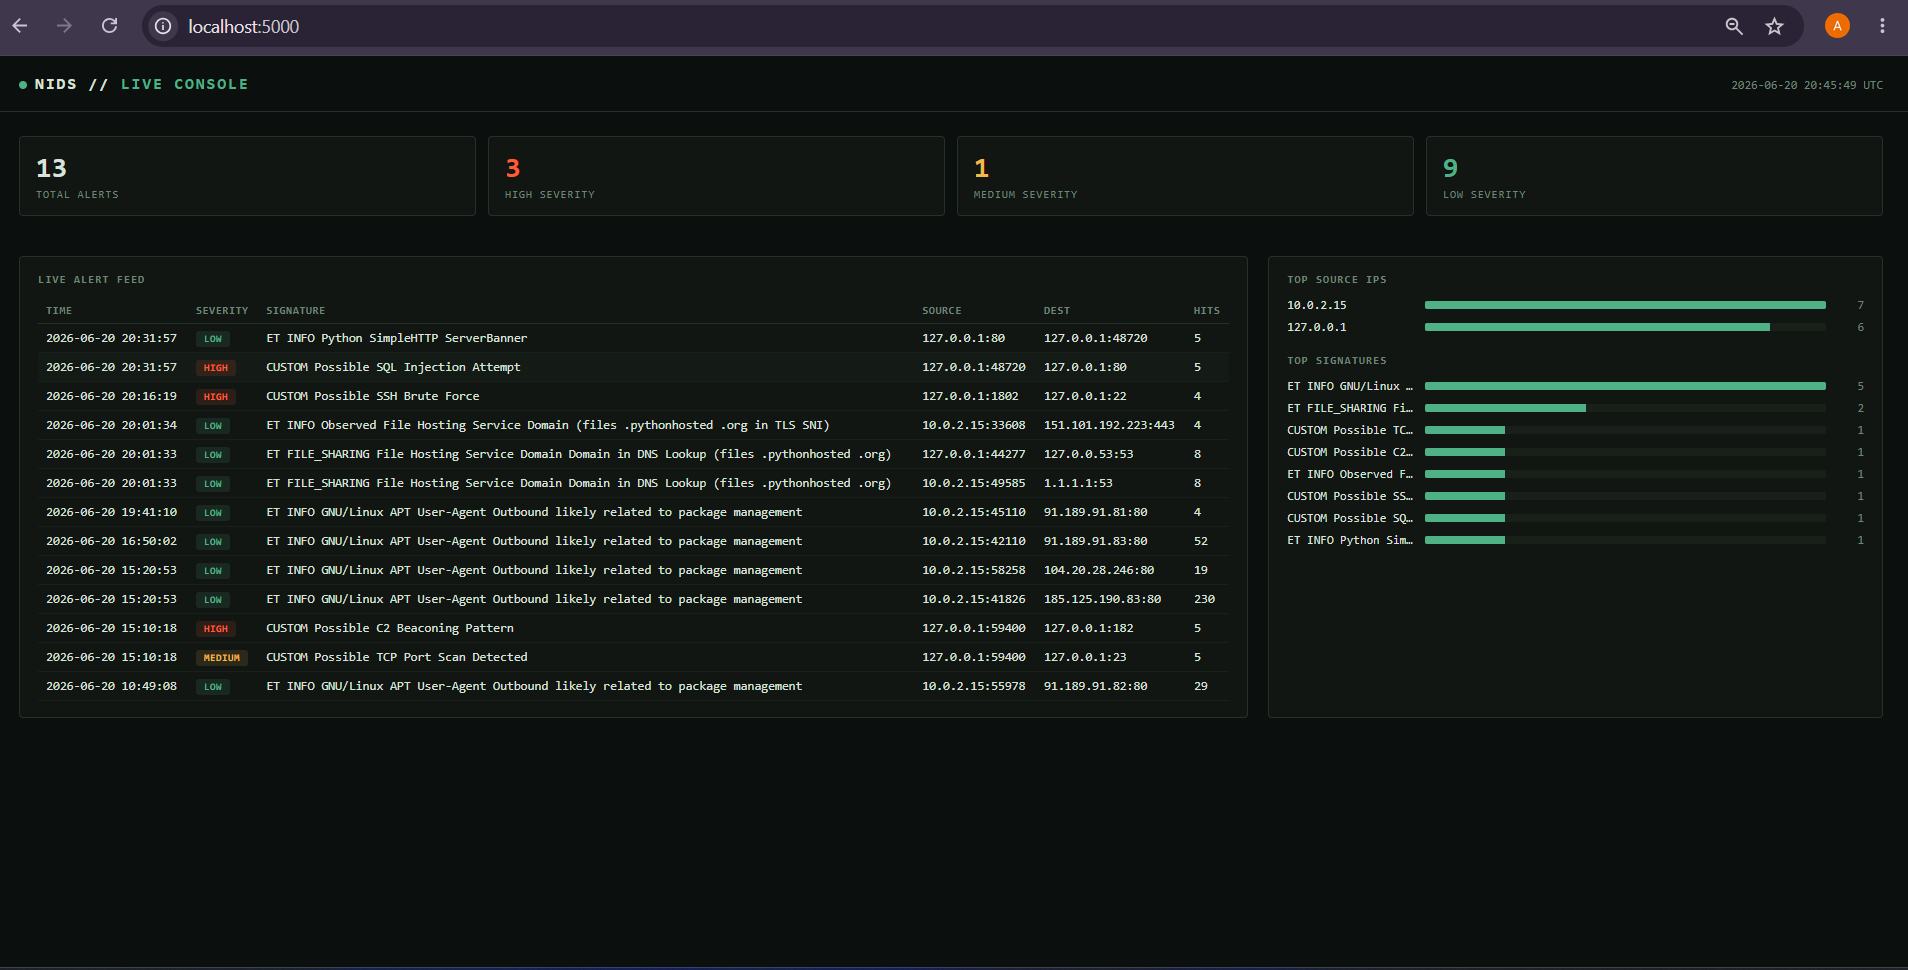
在此构建版本中,已确认所有 4 条自定义规则均被触发:**Port Scan**、**SSH Brute Force**、
**SQL Injection** 和 **C2 Beaconing** — 请参阅 `docs/screenshots/README.md` 获取包含所有 7 张截图的完整
演示过程(配置验证 → 服务运行 → 每一项检测 →
最终仪表板)。
## 架构
```
┌────────────────┐
Traffic ───▶ │ Suricata │ (IDS mode — detection only, no blocking)
(pcap replay) │ + custom.rules│
└───────┬────────┘
│ writes
▼
eve.json (JSON alert log)
│
▼
┌──────────────────┐
│ log_pipeline.py │ tails eve.json, parses, dedupes,
│ │ classifies severity, stores rows
└─────────┬────────┘
▼
alerts.db (SQLite)
│
┌────────────┴─────────────┐
▼ ▼
┌─────────────┐ ┌─────────────────┐
│ Flask │ │ notifier.py │
│ dashboard │ │ (Discord/Slack/ │
│ (live charts)│ │ email webhook) │
└─────────────┘ └─────────────────┘
```
## 1. 设置虚拟机
1. 在 VirtualBox 或 VMware 中安装 **Ubuntu Server 22.04 LTS**(2 CPU / 2GB 内存即可)。
2. 更新系统:
sudo apt update && sudo apt upgrade -y
## 2. 安装 Suricata
```
sudo add-apt-repository ppa:oisf/suricata-stable -y
sudo apt update
sudo apt install suricata -y
suricata --build-info # confirm install
```
查找你的网络接口名称:
```
ip a
```
## 3. 配置 Suricata
编辑 `/etc/suricata/suricata.yaml`:
- 将 `HOME_NET` 设置为你虚拟机的子网,例如 `"[192.168.1.0/24]"`。
- 在 `outputs:` 下,确保启用了 `eve-log`,并设置 `filetype: regular` 和
`filename: eve.json`(默认路径:`/var/log/suricata/eve.json`)。
- 指定默认规则及你的自定义规则:
default-rule-path: /etc/suricata/rules
rule-files:
- suricata.rules
- custom.rules
将本项目的 `rules/custom.rules` 复制到 `/etc/suricata/rules/custom.rules`。
## 4. 针对 pcap 文件运行 Suricata(离线 / 重放模式)
这是演示检测功能最安全且最易复现的方法 —— 无需实时攻击流量,
任何克隆你仓库的人都可以重新运行完全相同的测试。
```
sudo suricata -r sample_pcaps/sample_traffic.pcap -c /etc/suricata/suricata.yaml -l /var/log/suricata/
```
检查触发的告警:
```
cat /var/log/suricata/eve.json | grep '"event_type":"alert"' | python3 -m json.tool
```
## 5. 运行告警 pipeline
```
cd scripts
pip3 install -r requirements.txt
python3 log_pipeline.py --eve /var/log/suricata/eve.json --db ../alerts.db
```
这会持续追踪 `eve.json`,解析每一条告警,对重复的命中进行去重,分配
严重性等级,并将数据行写入 `alerts.db`。
## 6. 运行仪表板
```
cd dashboard
pip3 install -r requirements.txt
python3 app.py
```
访问 `http://:5000` 查看:
- 实时告警源
- 随时间变化的告警(图表)
- 高频来源 IP
- 严重性分布
## 7. (可选)启用通知
编辑 `scripts/notifier.py`,添加你的 Discord/Slack webhook URL 或 SMTP 凭证,然后将其
与 `log_pipeline.py` 一起运行 —— 它会轮询 `alerts.db` 并将新的高危告警推送出去。
```
python3 notifier.py --db ../alerts.db --webhook ""
```
## 仓库结构
```
CodeAlpha_NetworkIntrusionDetectionSystem/
├── README.md
├── rules/
│ └── custom.rules # hand-written detection rules
├── scripts/
│ ├── log_pipeline.py # eve.json -> SQLite
│ ├── notifier.py # SQLite -> webhook/email alerts
│ └── requirements.txt
├── dashboard/
│ ├── app.py # Flask app
│ ├── templates/
│ │ └── dashboard.html
│ └── requirements.txt
├── sample_pcaps/
│ └── README.md # where to get legal test pcaps
└── docs/
└── detections_writeup.md # explanation of each custom rule + screenshots placeholder
```
## 在你的 LinkedIn 视频 / GitHub 撰写的文章中应包含的内容
1. 解释 IDS *为何*重要(可见性与预防的区别 —— IDS 负责检测,IPS 负责拦截)。
2. 演示你的 2-3 条自定义规则,并在仪表板中展示匹配到的告警。
3. 展示上方的架构图。
4. 提及实际的局限性(无内联拦截、单机实验室、基于签名 —— 无法捕获
zero-day)—— 评审人员更看重对范围的坦诚,而不是夸大其词。
## 文章撰写注意事项:需预先说明的局限性
- 这是**基于签名的检测** —— 它只能捕获已知的攻击模式,无法应对新型攻击。
- 在演示中采用针对 pcap 的**离线/重放模式**(而非实时流量)是一种
合理且常见的测试方法,但必须明确说明 —— 不要暗示这是在生产环境
中实时捕获的。
- 这**仅用于检测**,不用于预防(可以提及 Suricata 的 inline/IPS 模式作为未来的
工作方向)。
标签:CISA项目, Flask, IP 地址批量处理, Metaprompt, Python, SQLite, Suricata, 插件系统, 无后门, 现代安全运营, 逆向工具