shank078/Dual-SIEM-Detection-Lab
GitHub: shank078/Dual-SIEM-Detection-Lab
基于 Azure 蜜罐真实攻击流量的双 SIEM 检测实验室,在 Sentinel 与 Splunk 上实现跨平台一致的威胁检测。
Stars: 0 | Forks: 0
# 🛡️ 双 SIEM 检测实验室
### Microsoft Sentinel + Splunk Enterprise | 在 Azure 蜜罐上进行真实攻击检测
Windows Server 2022
Public IP — Exposed to Internet"] subgraph SENTINEL["Microsoft Sentinel Pipeline"] B["law-dual-siem
Log Analytics Workspace"] C["Microsoft Sentinel
KQL Detections
Automated Incidents ✅"] B --> C end subgraph SPLUNK["Splunk Pipeline"] D["vm-splunk
Ubuntu 24.04
Splunk Enterprise 9.4.1
SPL Detections ✅"] end A -->|"Azure Monitor Agent
DCR: dcr-honeypot-security-events"| B A -->|"Splunk Universal Forwarder
WinEventLog:Security → Port 9997"| D end INTERNET["🌍 Real Attackers
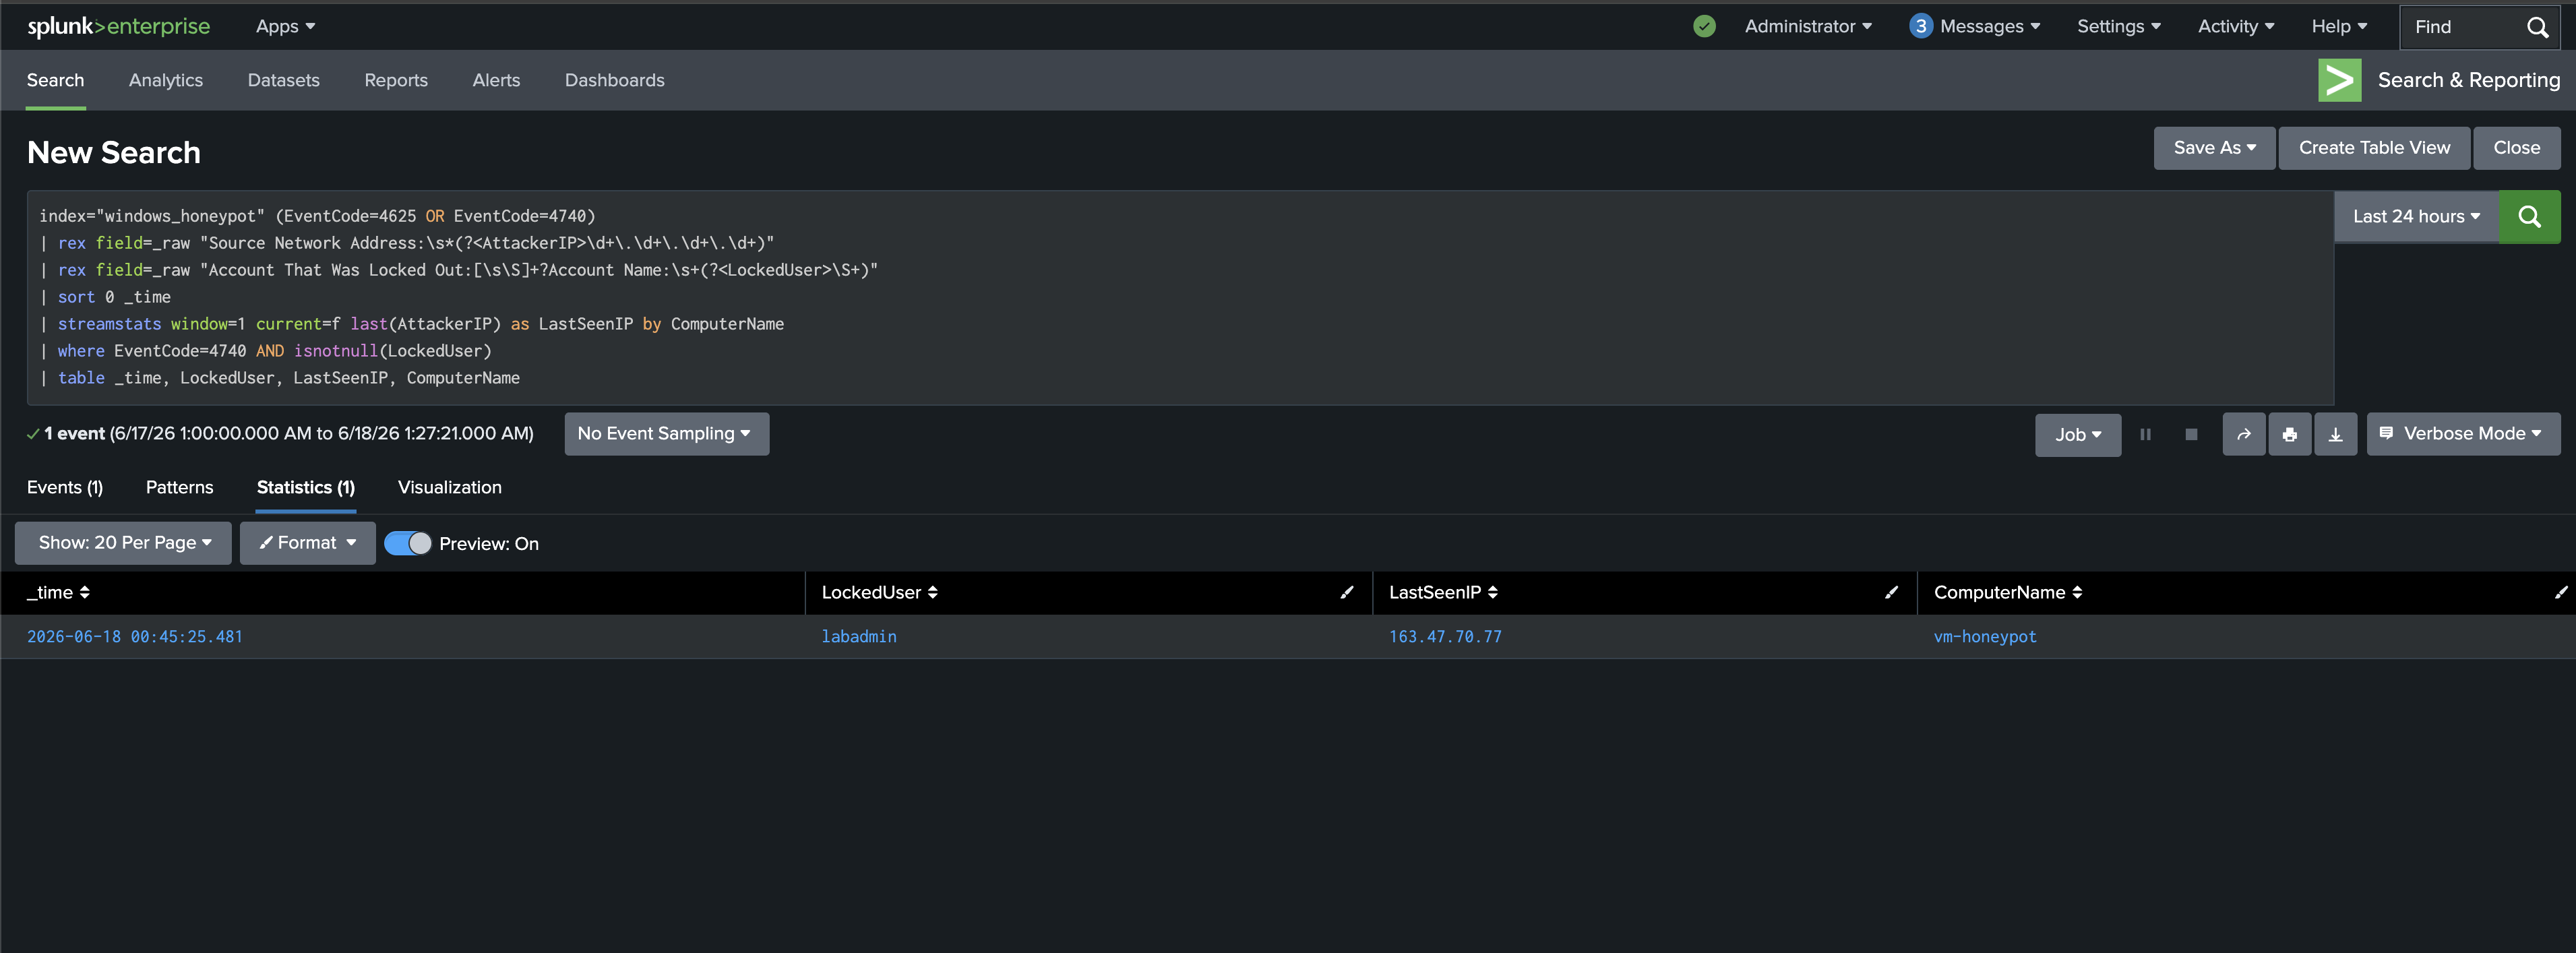
Brute Force / Credential Attacks"] -->|"EventID: 4625 4740 4672 4720 4732"| A ``` ## 🛠️ 技术栈 | 组件 | 技术 | 详情 | |-----------|-----------|---------| | **云平台** | Microsoft Azure | 澳大利亚东部区域 | | **蜜罐 VM** | Windows Server 2022 Datacenter | Standard D2als v6 — 2 vCPUs, 4 GiB RAM | | **SIEM 1** | Microsoft Sentinel | Workspace: `law-dual-siem` | | **SIEM 2** | Splunk Enterprise 9.4.1 | Ubuntu 24.04, `vm-splunk` | | **日志转发 → Sentinel** | Azure Monitor Agent + DCR | `dcr-honeypot-security-events` — AllEvents | | **日志转发 → Splunk** | Splunk Universal Forwarder 10.4.0 | Index: `windows_honeypot` | | **查询语言 1** | KQL (Kusto Query Language) | Sentinel 检测 | | **查询语言 2** | SPL (Splunk Processing Language) | Splunk 检测 | | **检测框架** | MITRE ATT&CK | T1110.001, T1110, T1078, T1078.003, T1136.001 | ## 🚀 快速开始 **1. 配置基础设施** - 在 Azure(澳大利亚东部)创建资源组 `rg-dual-siem-lab` - 部署 `vm-honeypot` — Windows Server 2022, Standard D2als v6, 启用公网 IP - 部署 `vm-splunk` — Ubuntu 24.04, Standard D2als v6 **2. 配置网络** - 在 `vm-splunk-nsg` 上:开放入站端口 22 (SSH), 8000 (Splunk Web), 9997 (Forwarder) - 在 `vm-honeypot-nsg` 上:保留 RDP 开放以供管理(在生产环境中按 IP 限制) **3. 设置 Splunk** - 在 `vm-splunk` 上安装 Splunk Enterprise 9.4.1 - 创建 index `windows_honeypot` - 启用端口 9997 上的接收功能 **4. 设置 Splunk Universal Forwarder** - 在 `vm-honeypot` 上安装 Splunk UF 10.4.0 - 配置 `inputs.conf` — 监控 `WinEventLog://Security`,目标 index 为 `windows_honeypot` - 配置 `outputs.conf` — 转发至 `vm-splunk:9997` - 重启 Forwarder 并验证事件流 **5. 设置 Microsoft Sentinel** - 创建 Log Analytics Workspace `law-dual-siem` - 在该 Workspace 上部署 Microsoft Sentinel - 从 Content Hub 安装 **Windows Security Events** - 通过 AMA connector 创建 DCR `dcr-honeypot-security-events` — 过滤 AllEvents,目标为 `vm-honeypot` - 使用 `SecurityEvent | take 10` 进行验证 **6. 部署检测** - 将 `queries/kql/` 中的 `.kql` 文件加载到 Sentinel Analytics 中 - 将 `queries/spl/` 中的 `.spl` 文件加载到 Splunk Search & Reporting 中 - 为检测 1 配置 Sentinel analytic rule — 每 5 分钟运行一次 ## 🔧 实验室基础设施设置 ### 步骤 1 — Azure Resource Group 所有资源均部署在 **Australia East** 的 `rg-dual-siem-lab` 下 —— 总共 15 个资源,包括两台 VM、网络组件、Log Analytics Workspace 和 Sentinel。 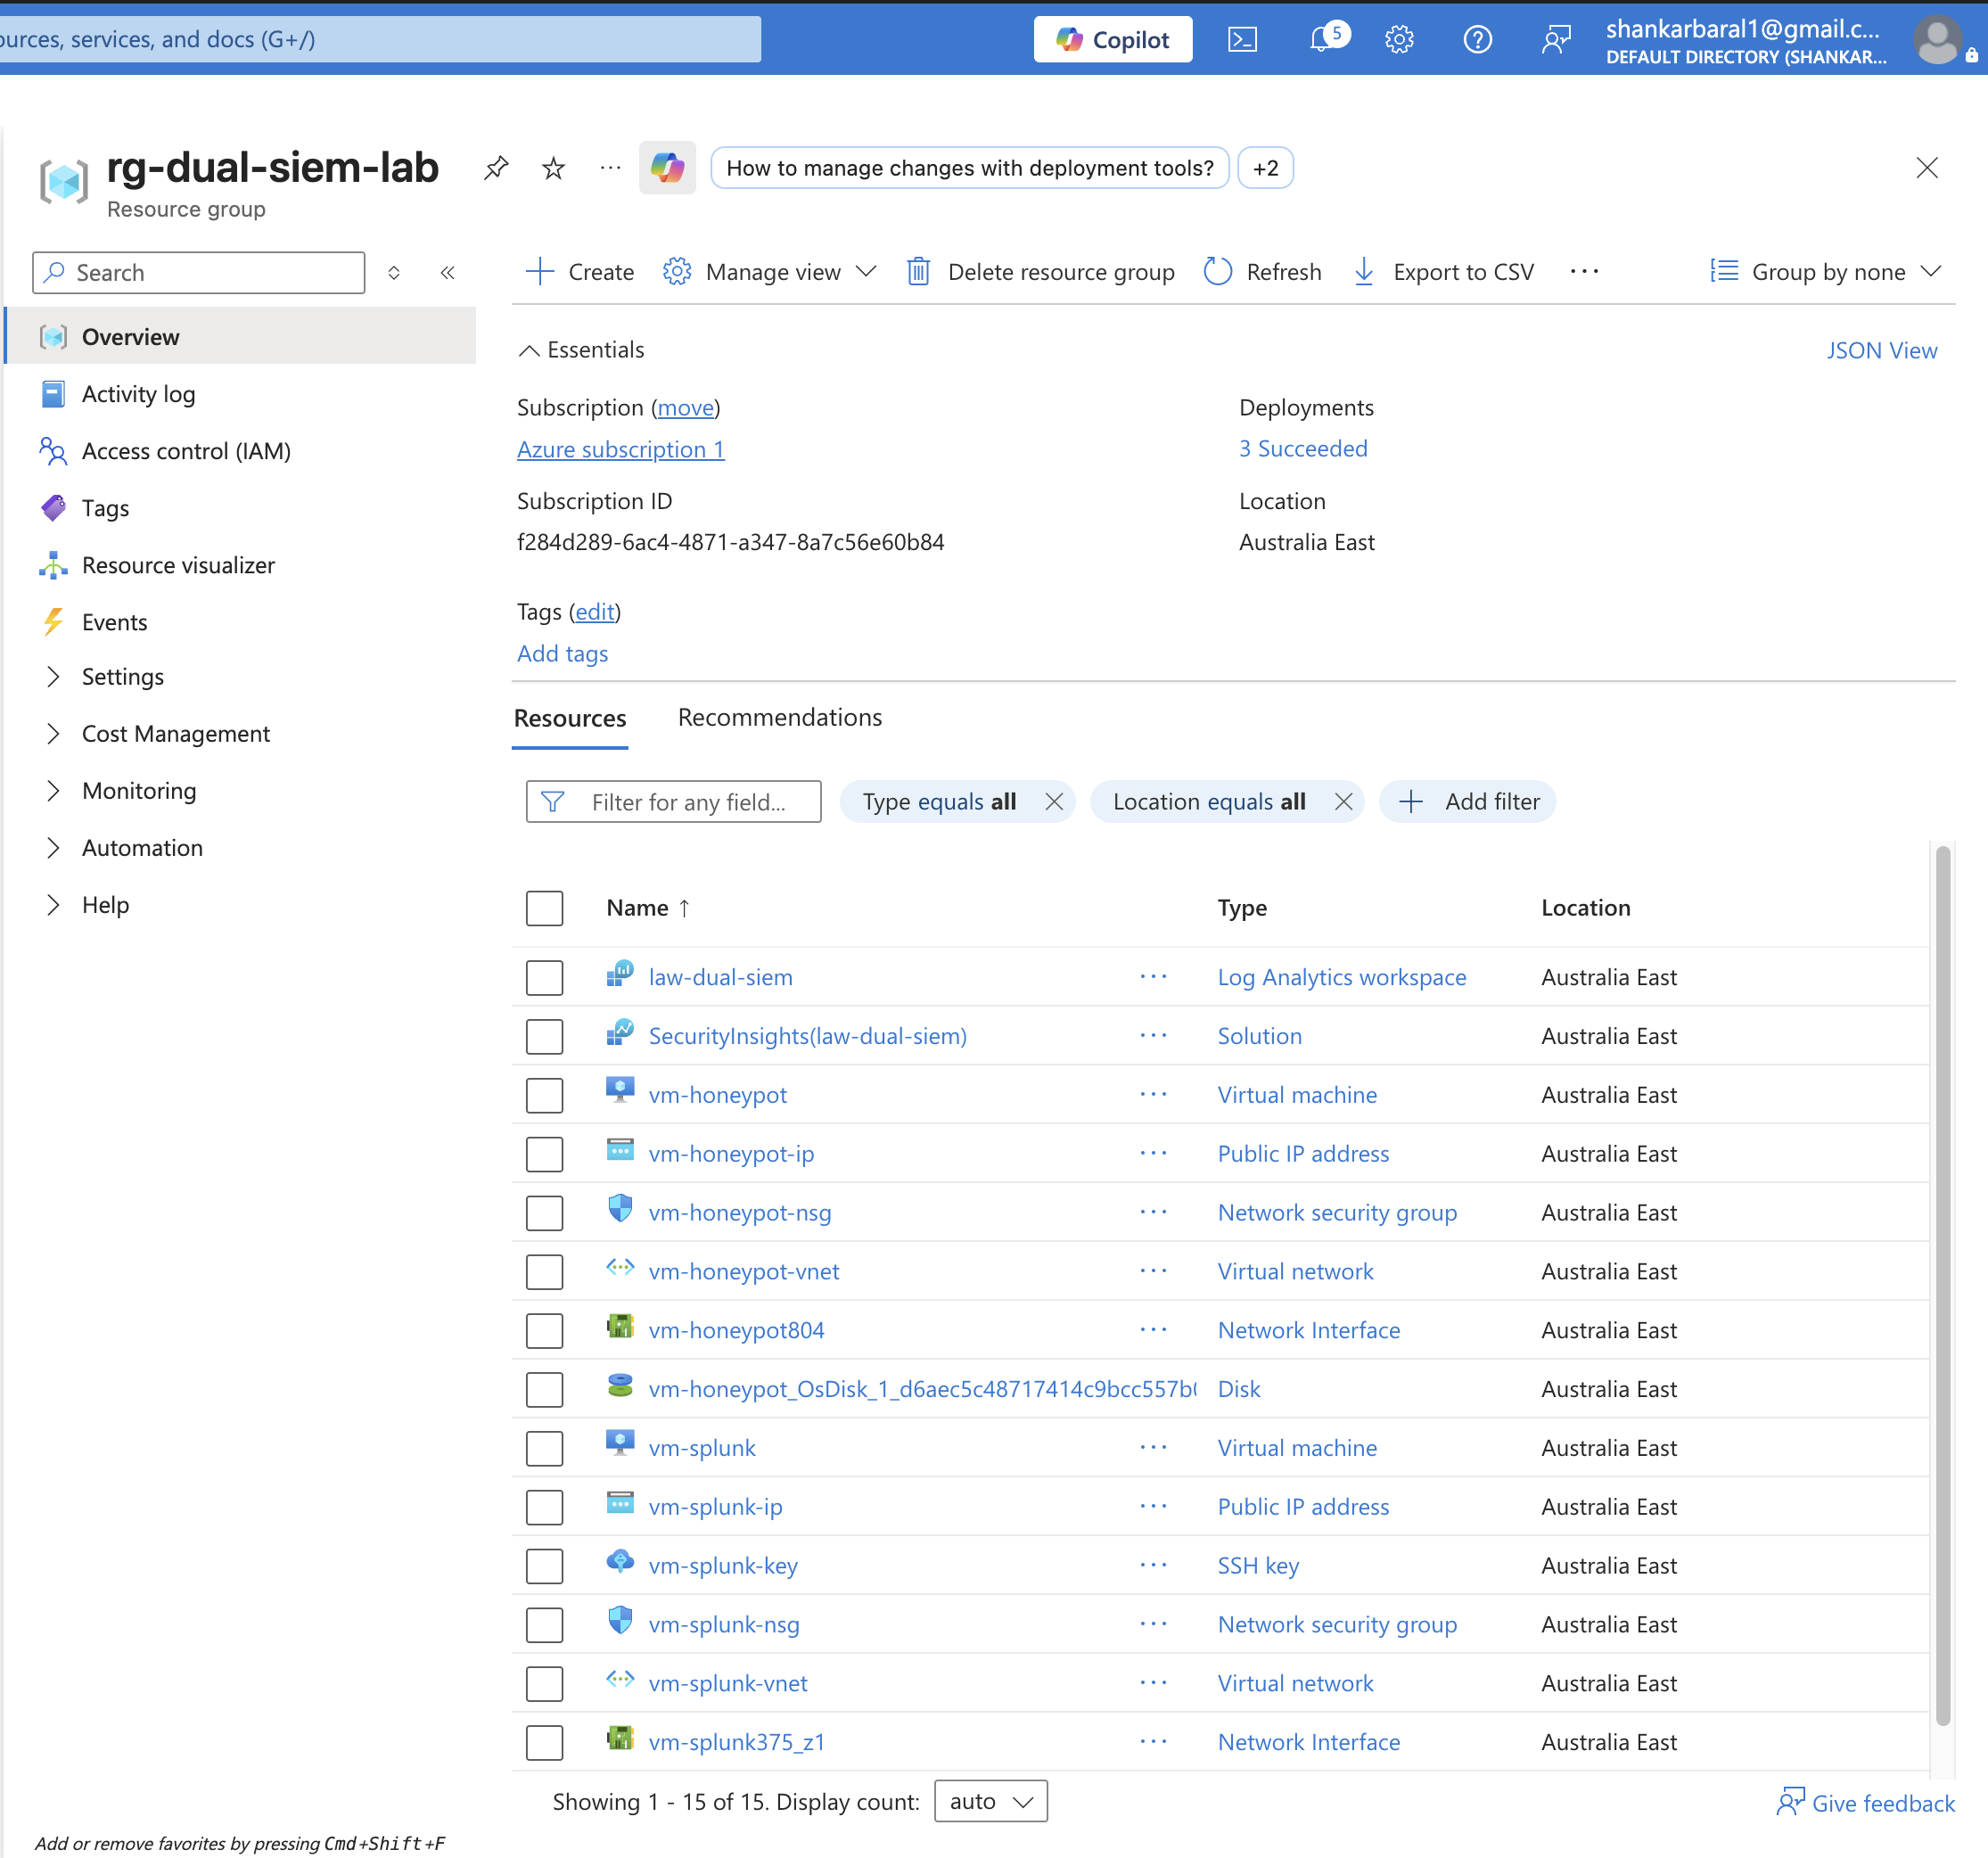 ### 步骤 2 — 蜜罐 VM (Windows Server 2022) `vm-honeypot` 被部署为一台 Windows Server 2022 Datacenter VM(Standard D2als v6, 2 vCPUs, 4 GiB RAM)并带有公网 IP —— 被故意配置为对互联网开放的攻击目标。 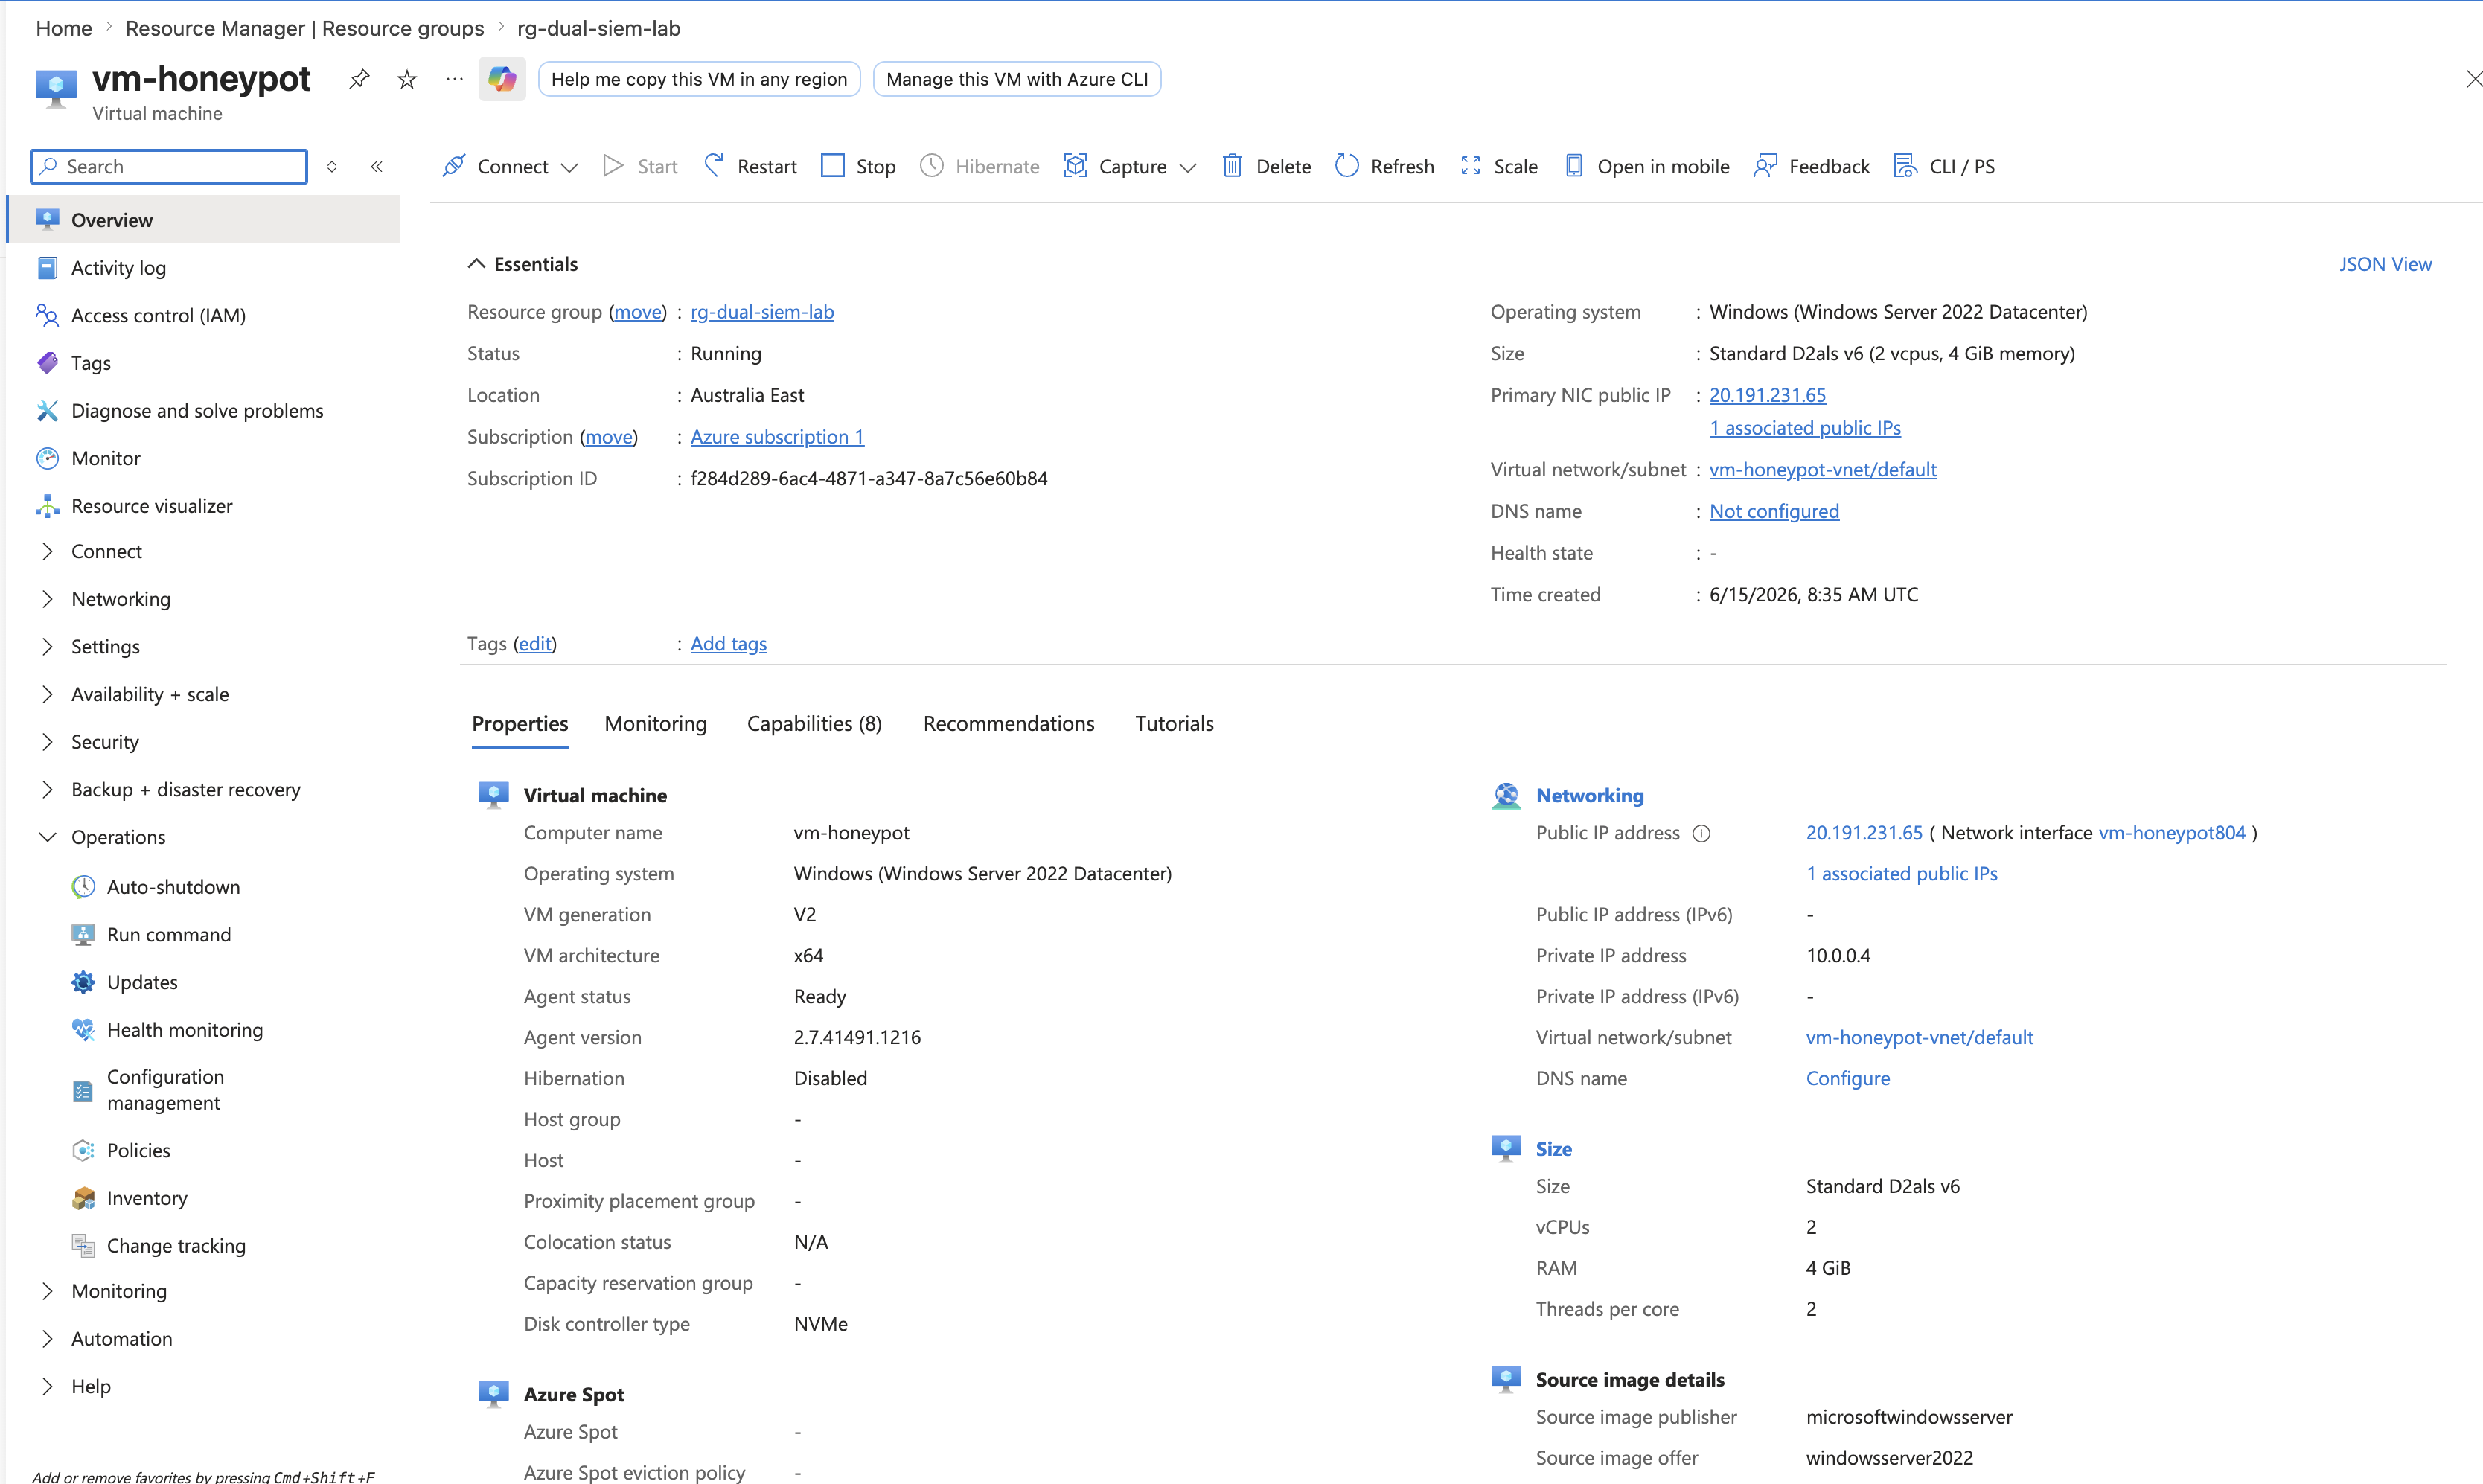 ### 步骤 3 — Log Analytics Workspace `law-dual-siem` workspace(按需付费)已创建,作为 Microsoft Sentinel 的中央数据存储,通过 Azure Monitor Agent 接收所有 Windows 安全事件。 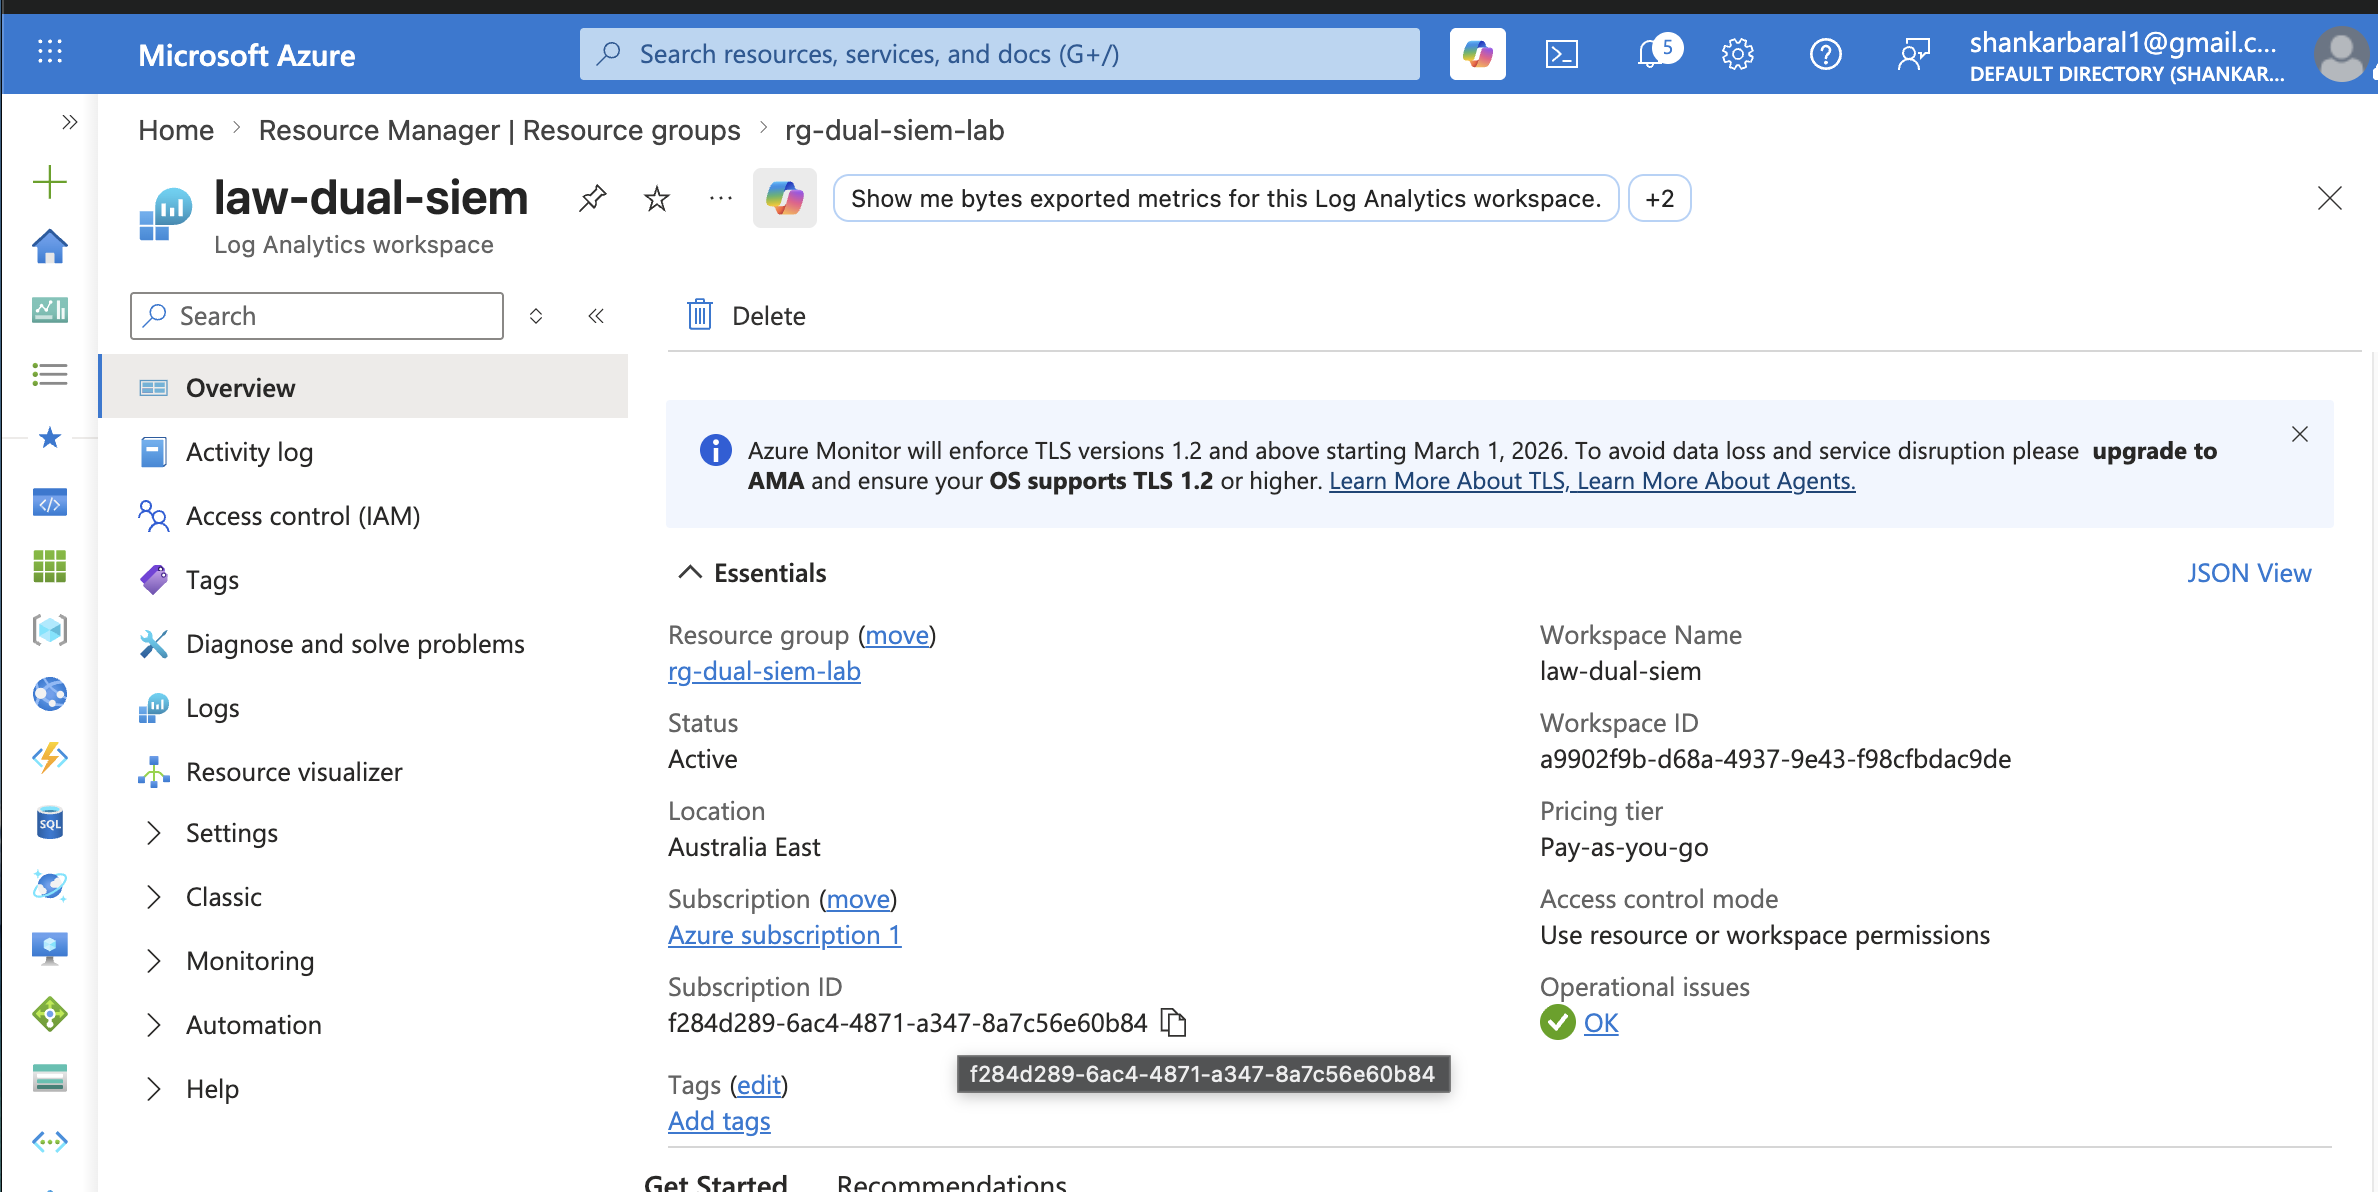 ### 步骤 4 — 部署 Microsoft Sentinel Microsoft Sentinel 已部署并附加到 `law-dual-siem` workspace,准备好摄取事件并触发自动化的 analytic rules。  ### 步骤 5 — Splunk VM (Ubuntu 24.04) `vm-splunk` 已部署 —— Ubuntu 24.04 VM(Standard D2als v6)运行 Splunk Enterprise 9.4.1,Azure NSG 规则开放了端口 **8000** (Web UI) 和 **9997** (Forwarder 接收端)。 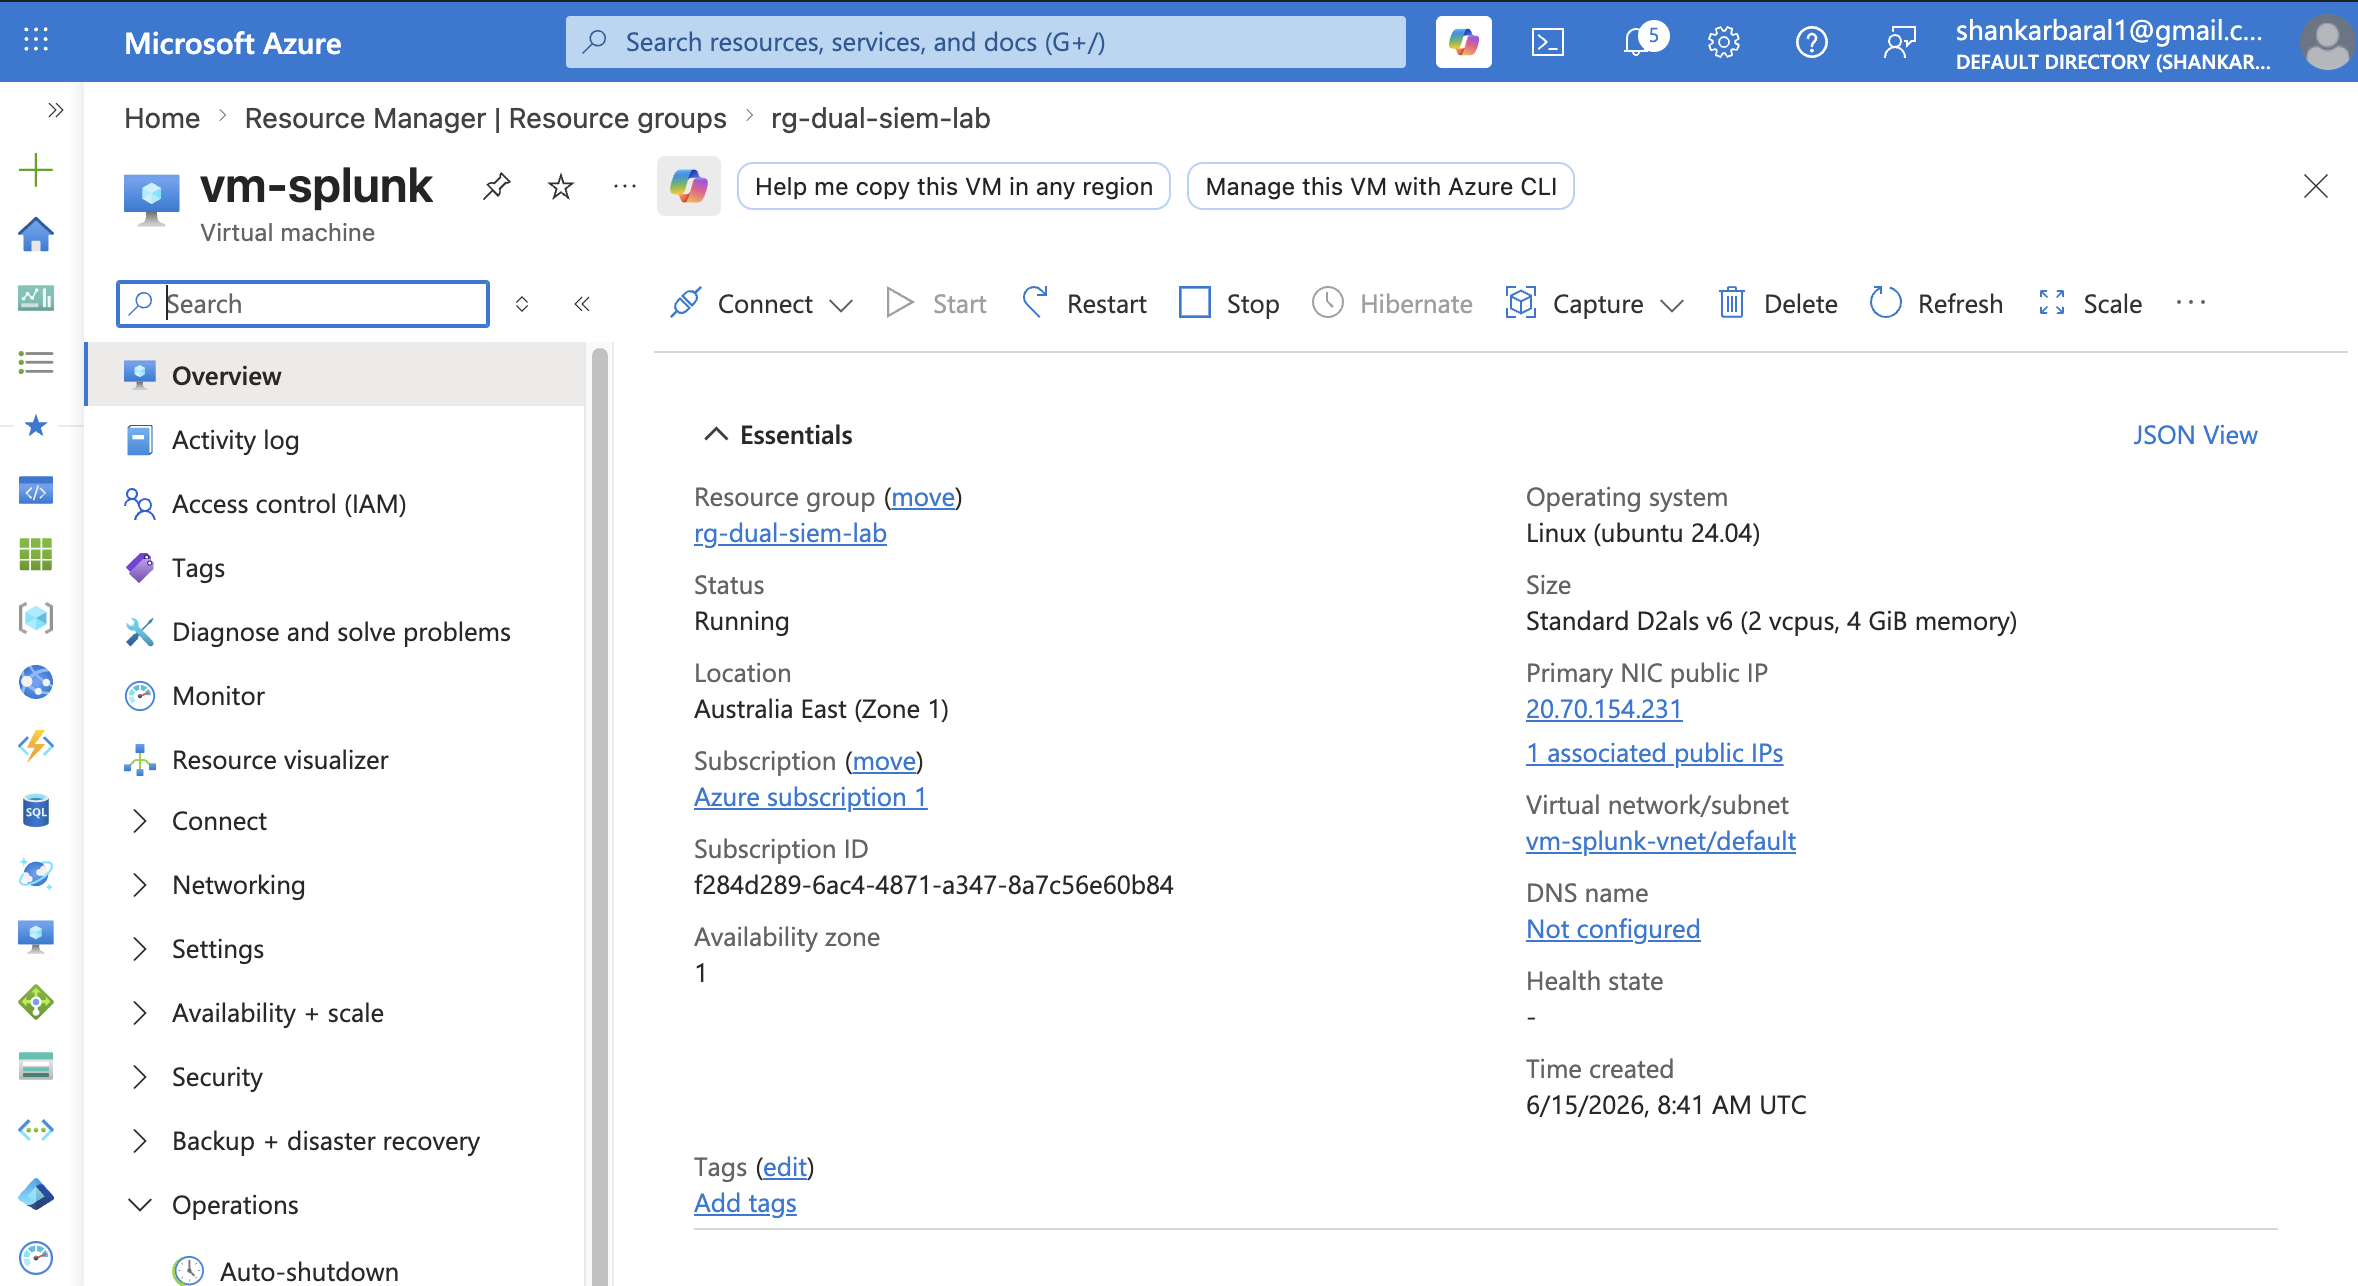 ### 步骤 6 — Splunk Enterprise Web UI Splunk Enterprise 9.4.1 正在运行并可通过浏览器访问,准备将转发的 Windows 安全事件接收到 `windows_honeypot` index 中。 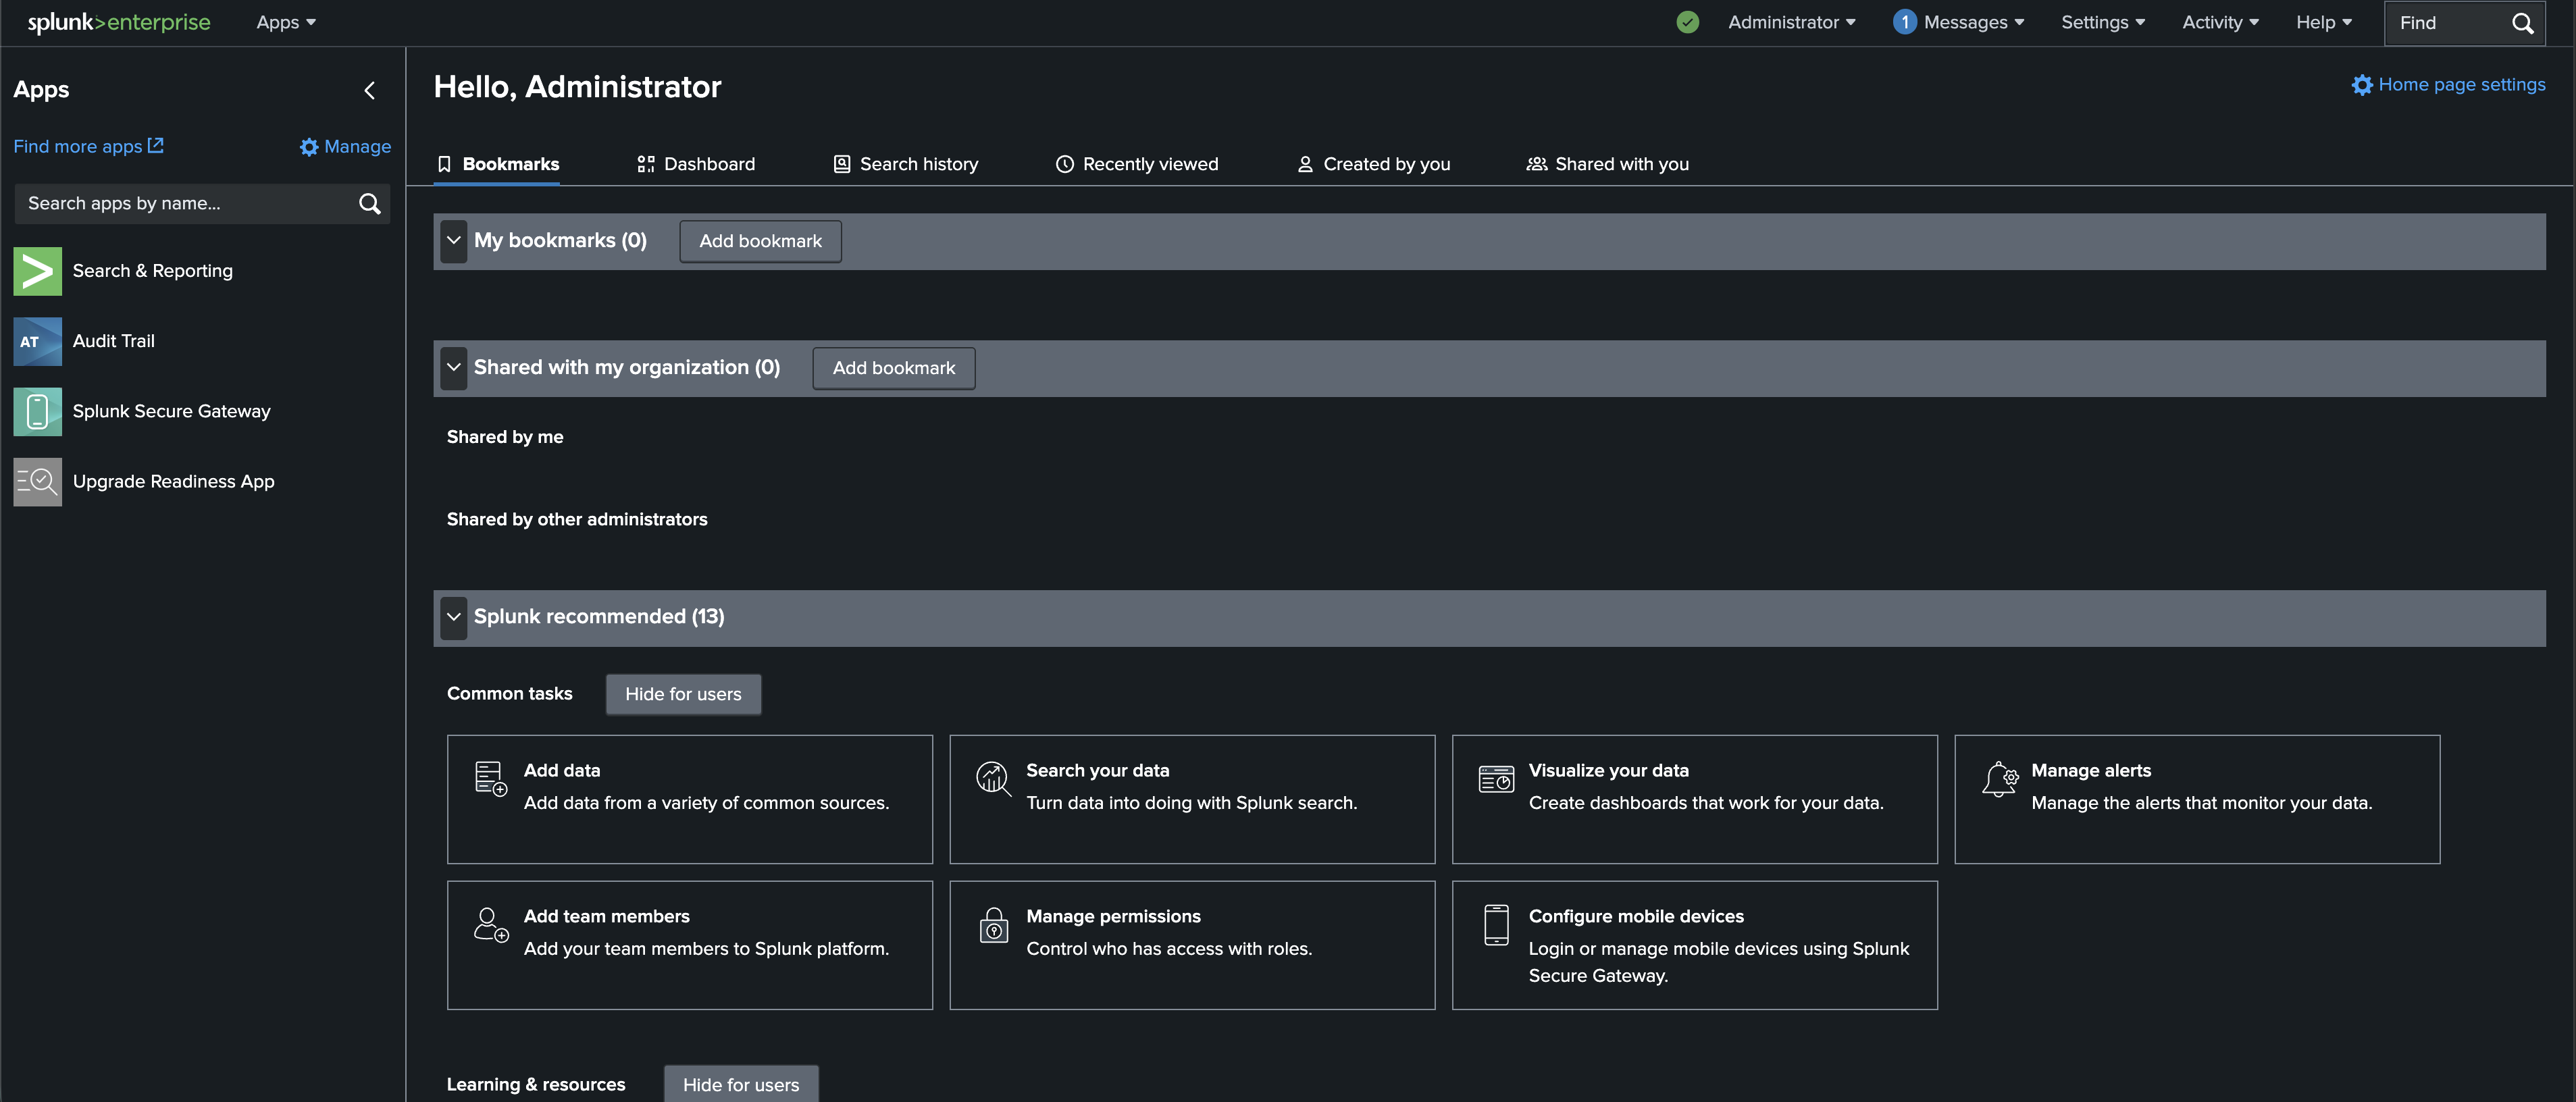 ### 步骤 7 — Splunk 的 NSG 规则 Azure NSG `vm-splunk-nsg` 配置了入站规则:SSH (22)、Splunk Web (8000)、Splunk Forwarder (9997)。 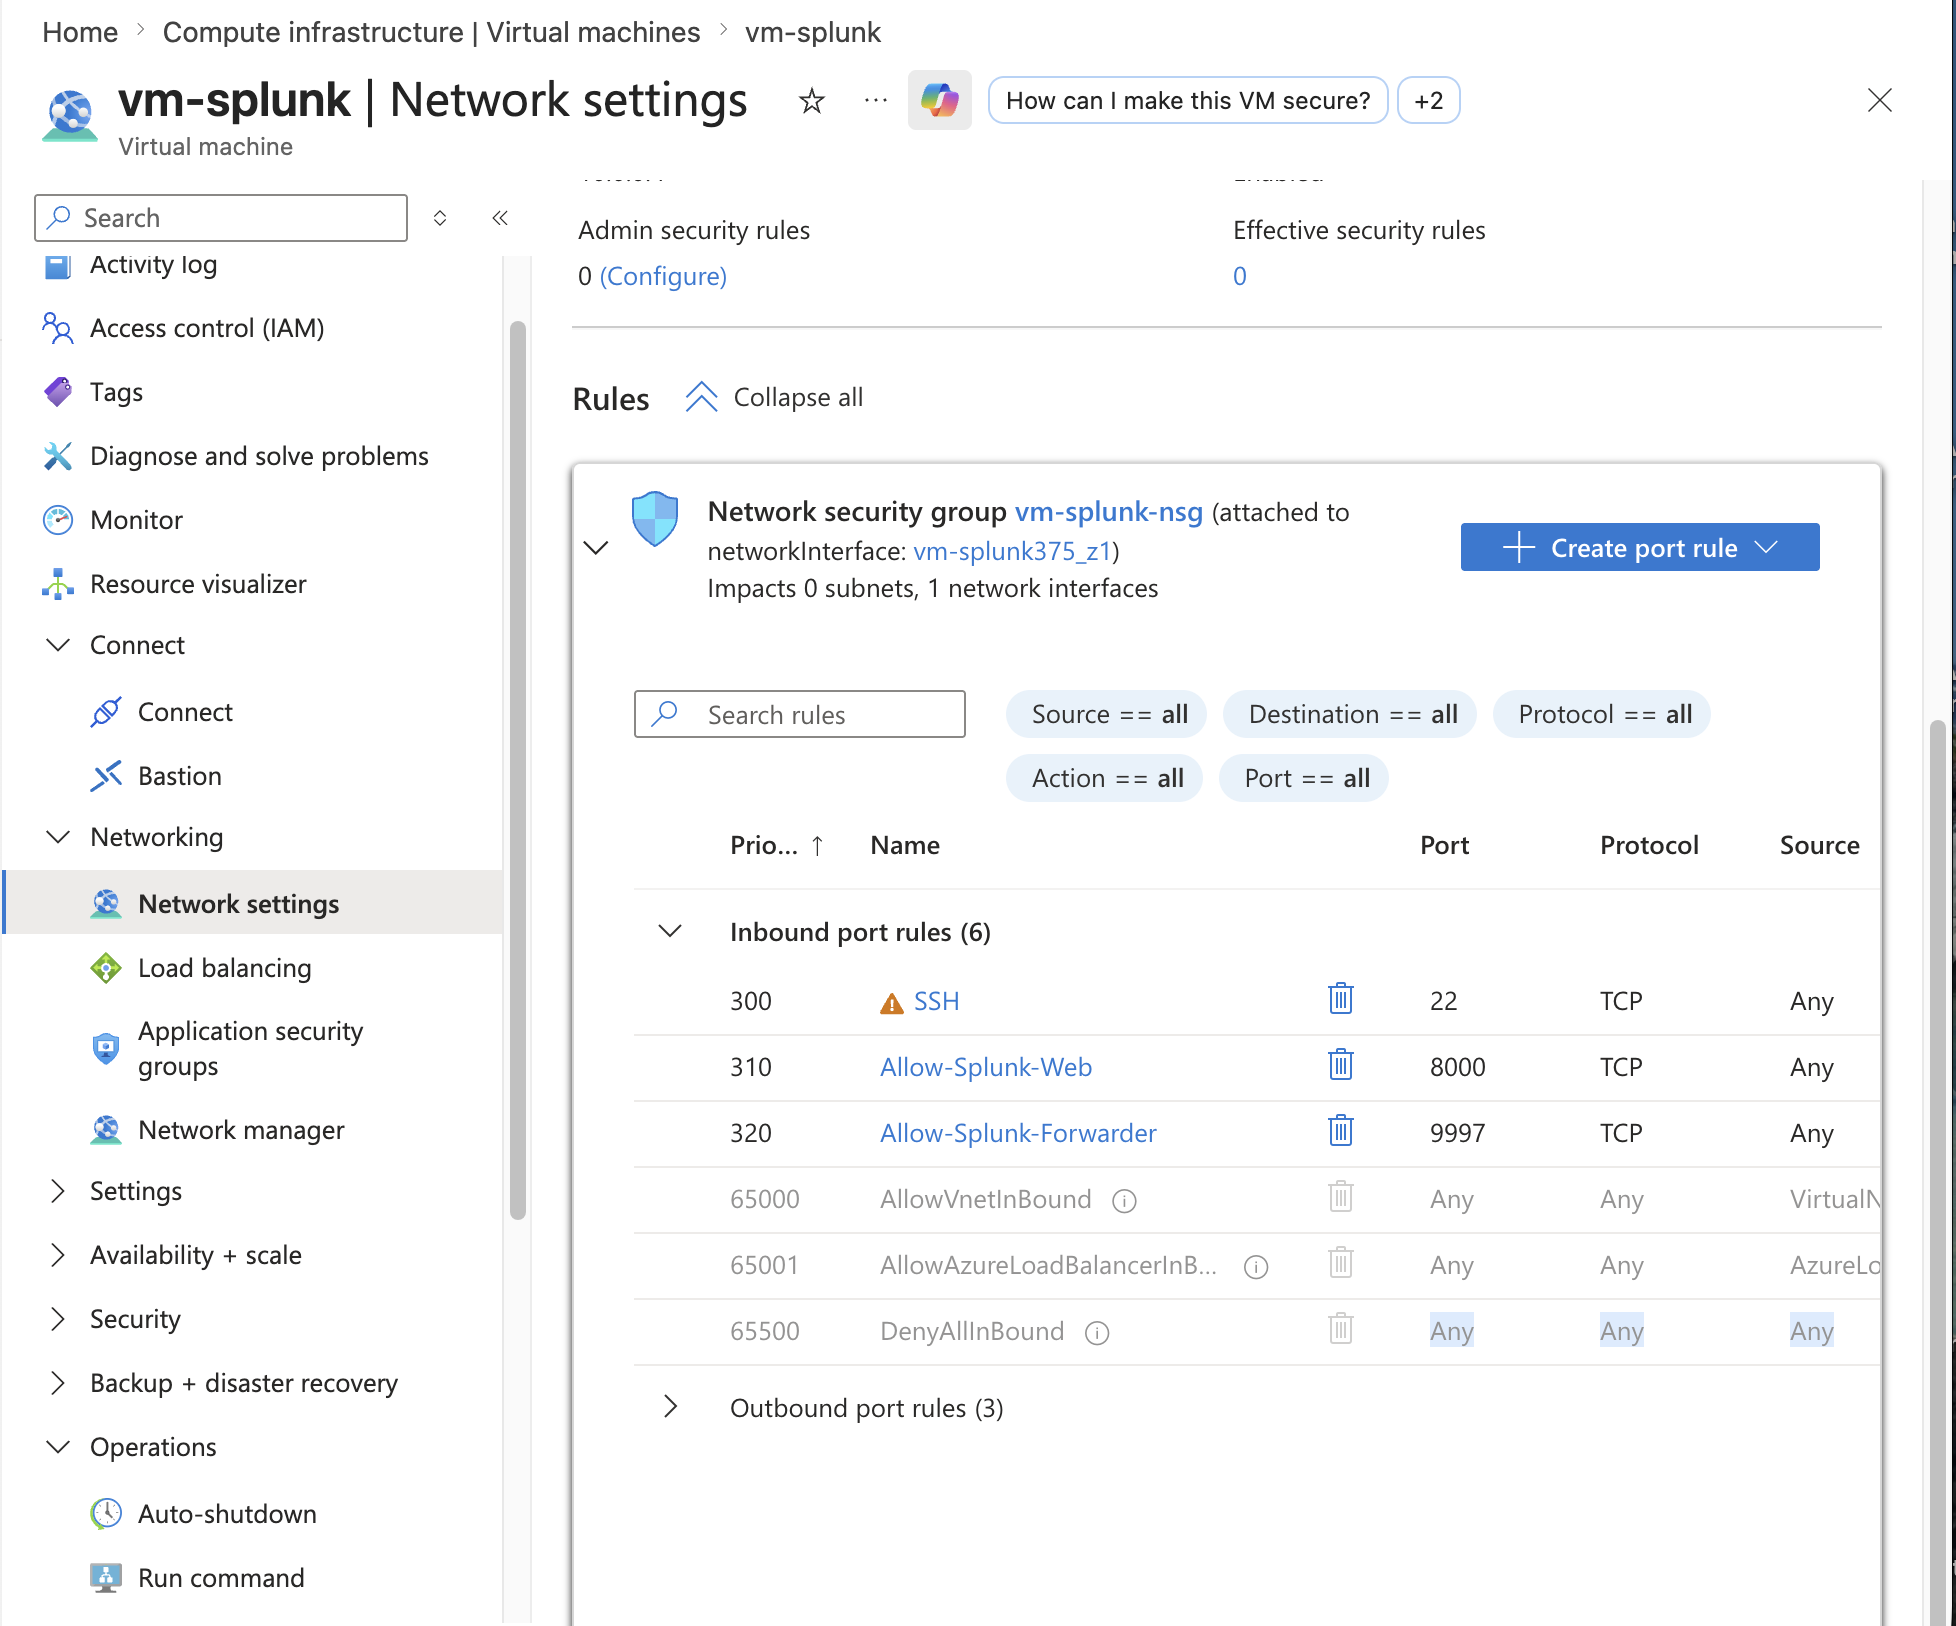 ### 步骤 8 — 安装 Splunk Universal Forwarder Splunk Universal Forwarder 10.4.0 已安装在蜜罐 VM 上,配置为将 `WinEventLog:Security` 事件发送到端口 9997 上的 Splunk indexer。 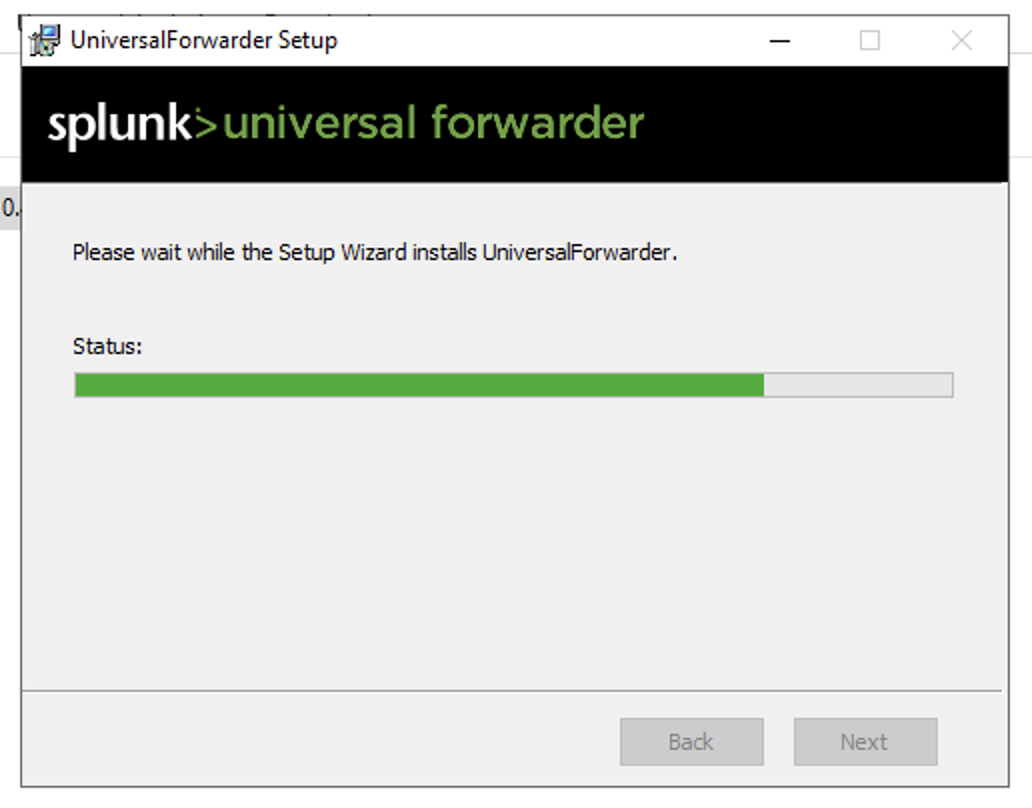 ### 步骤 9 — 通过 RDP 进入蜜罐 已确认到 `vm-honeypot` 的 RDP 会话 —— 运行 Server Manager 的 Windows Server 2022。这是真实攻击者正在从互联网进行攻击的活跃机器。 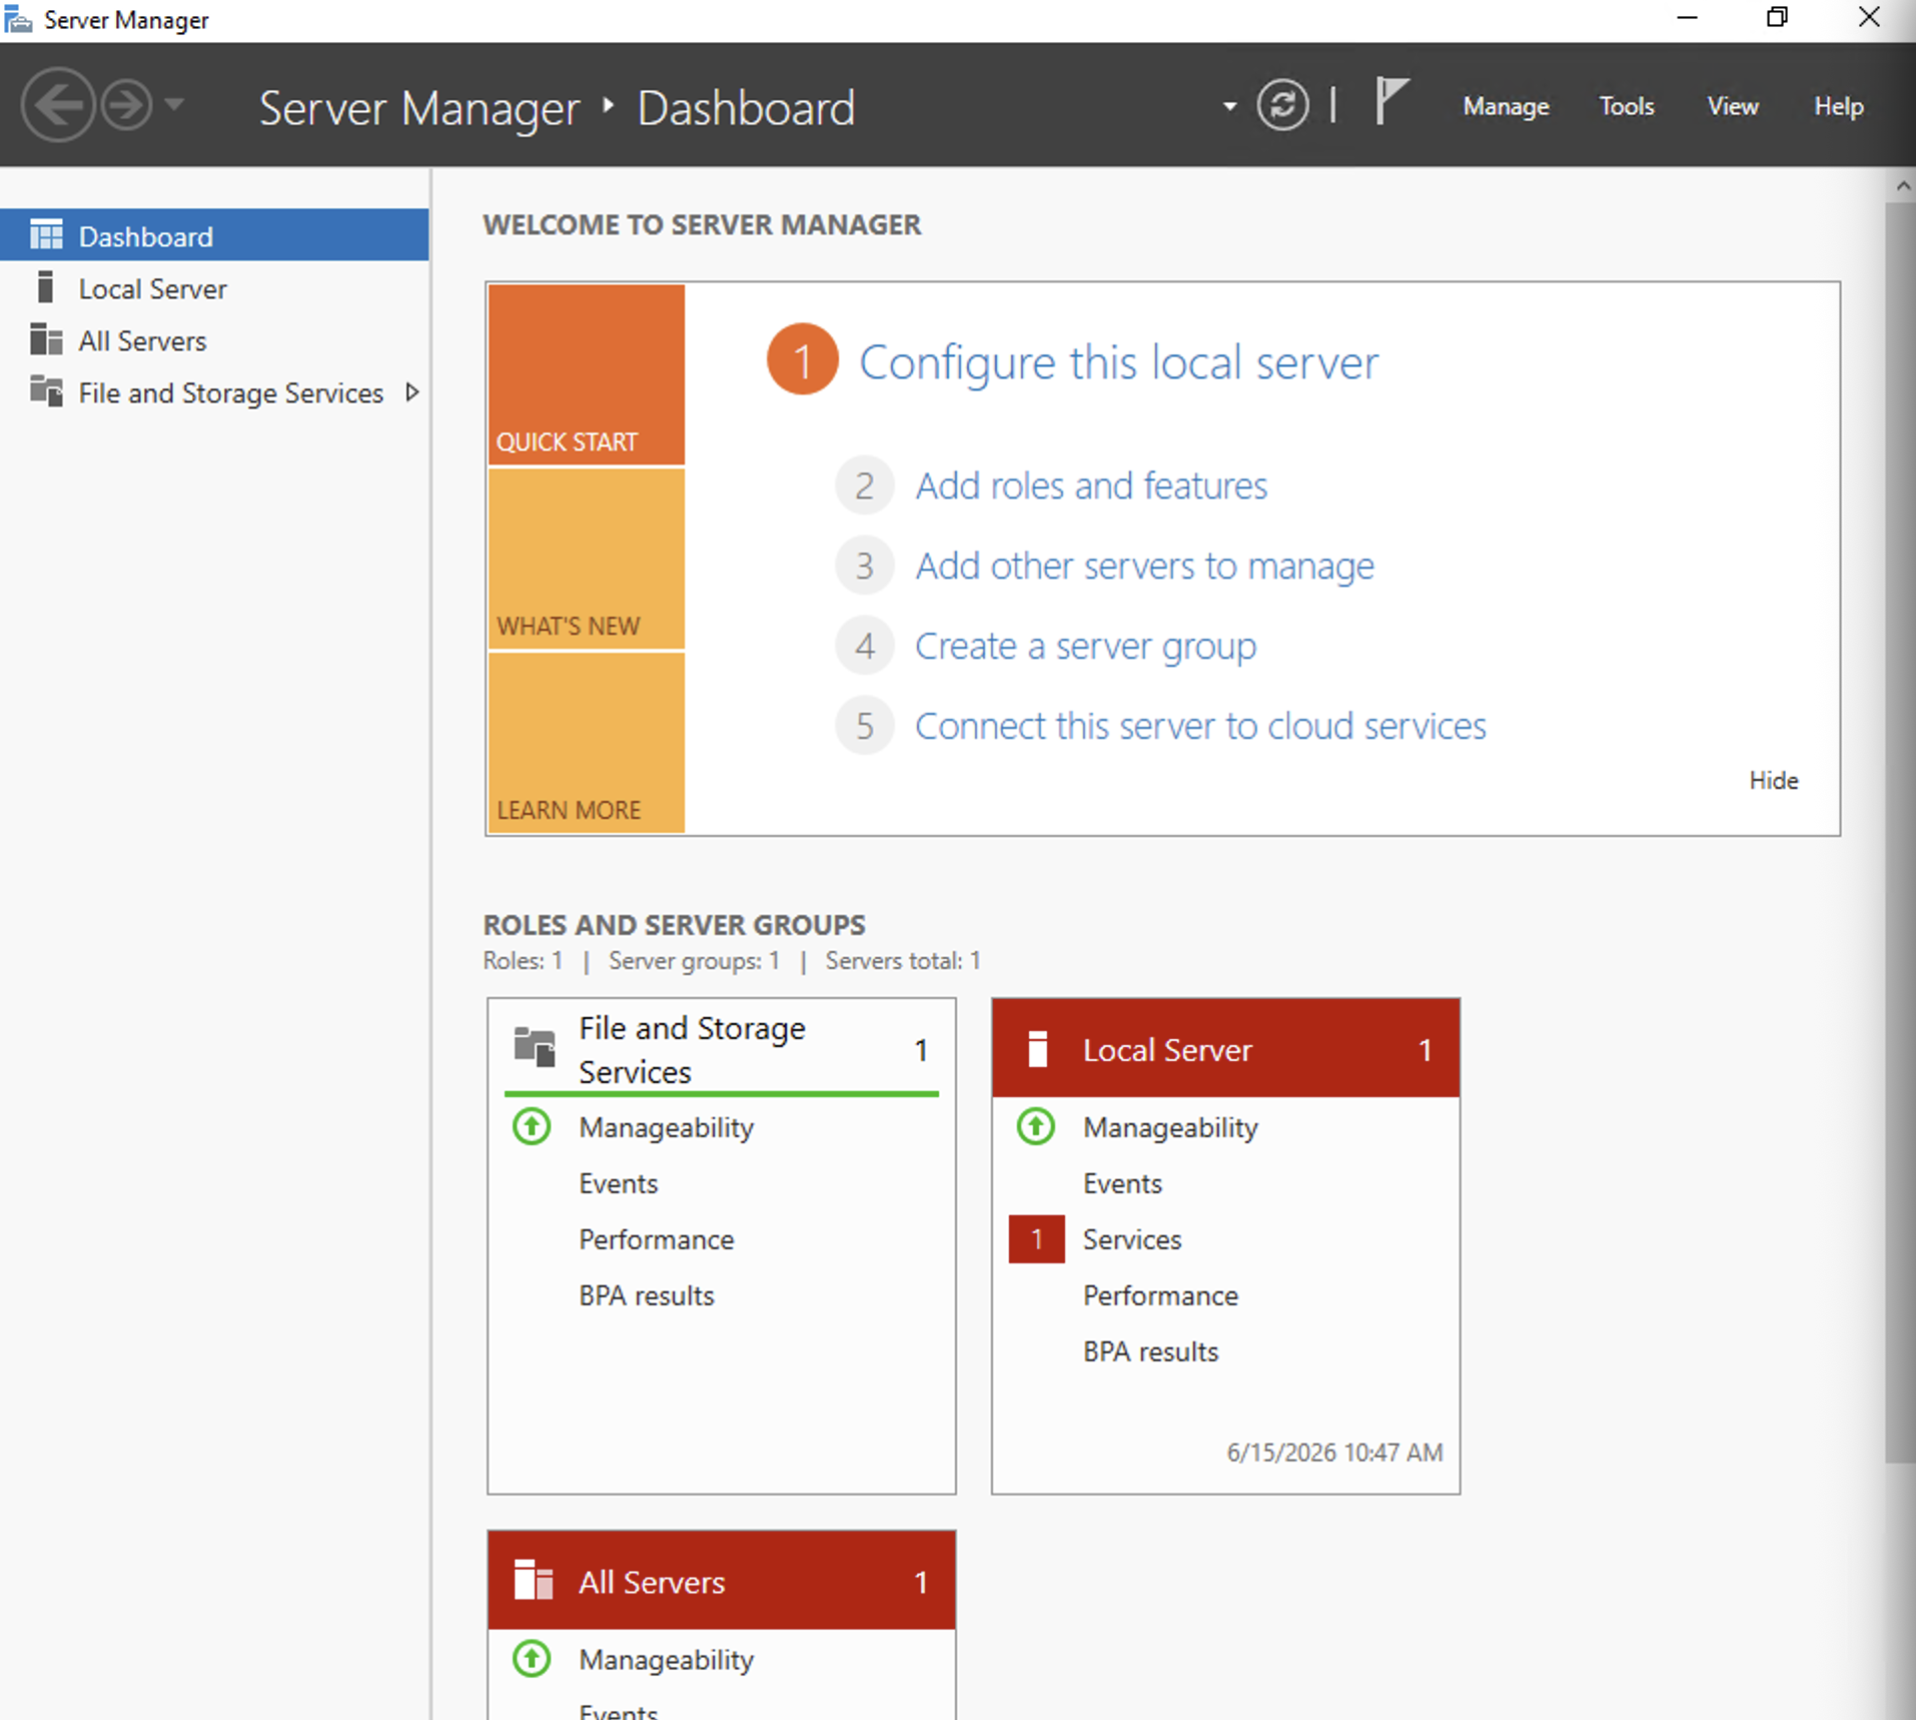 ### 步骤 10 — 配置 inputs.conf 在 Universal Forwarder 上配置了 `inputs.conf`,监控 `WinEventLog://Security`,设置 `index = windows_honeypot` 和 `disabled = false`。Forwarder 已重启并确认正在运行 (pid 3216)。 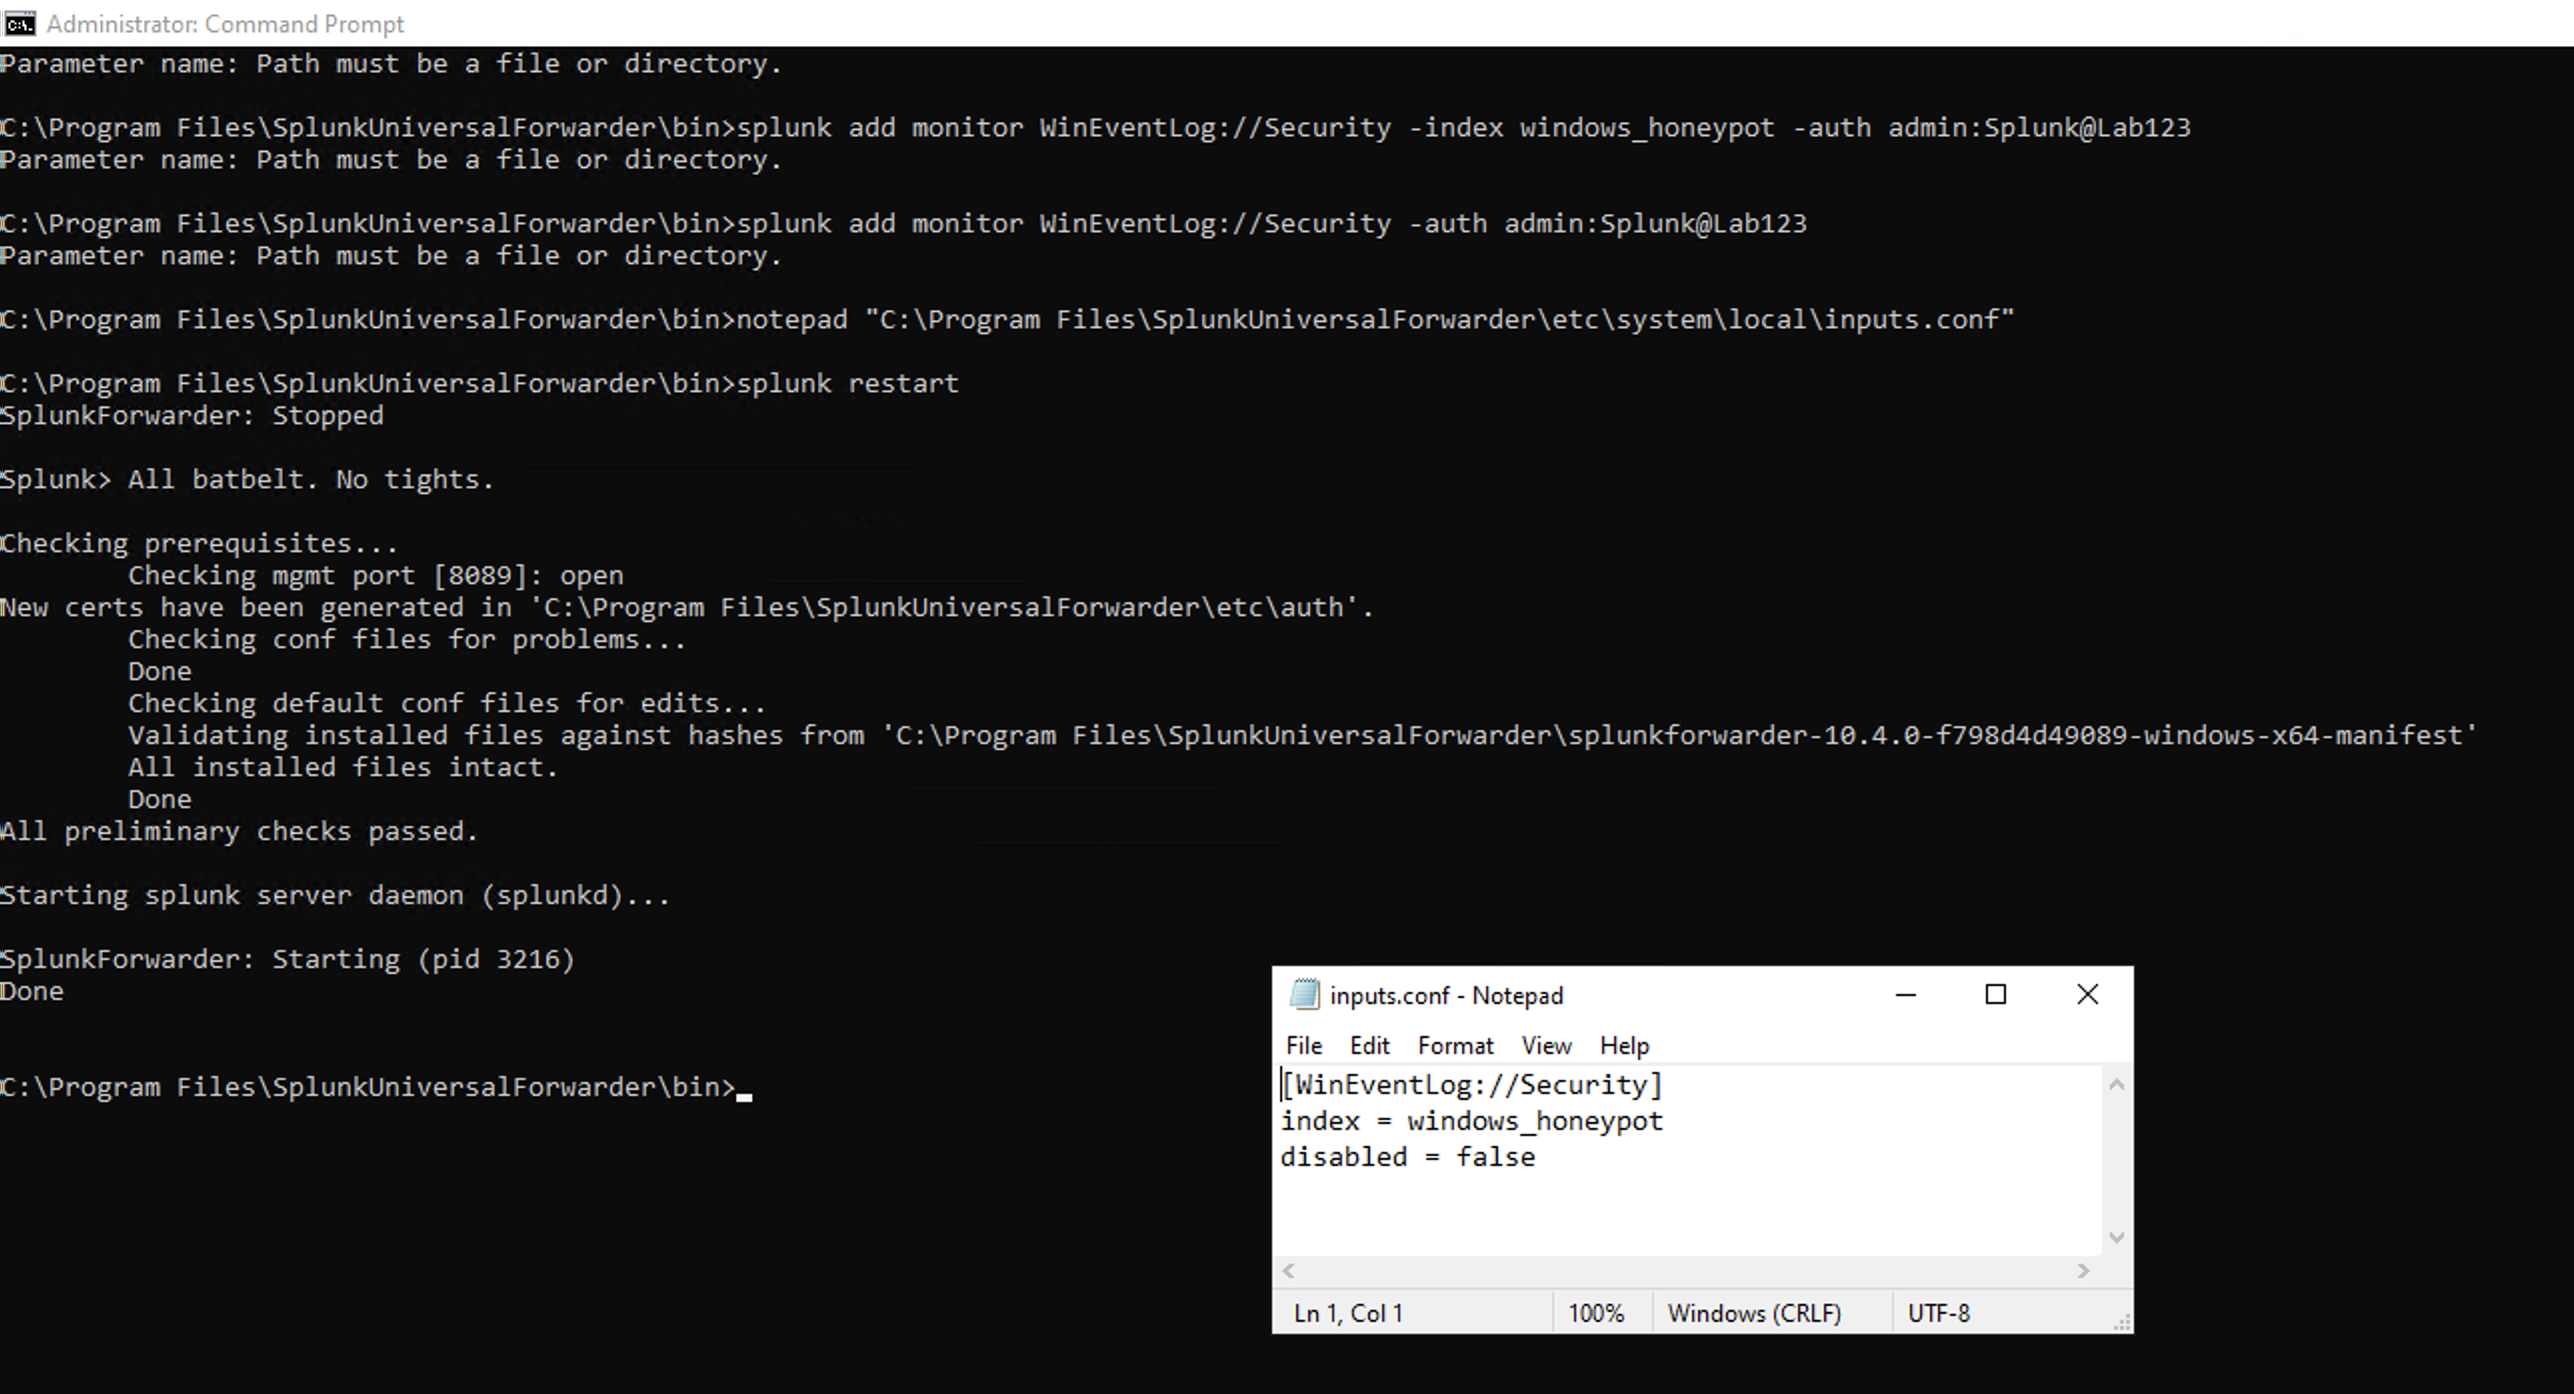 ## 📡 数据管道 ### Splunk — Windows 安全事件正在流动 ✅ `index=windows_honeypot | head 10` 确认了实时摄取 —— `LogName=Security`, `EventCode=4688`, `ComputerName=vm-honeypot`, `source=WinEventLog:Security`。 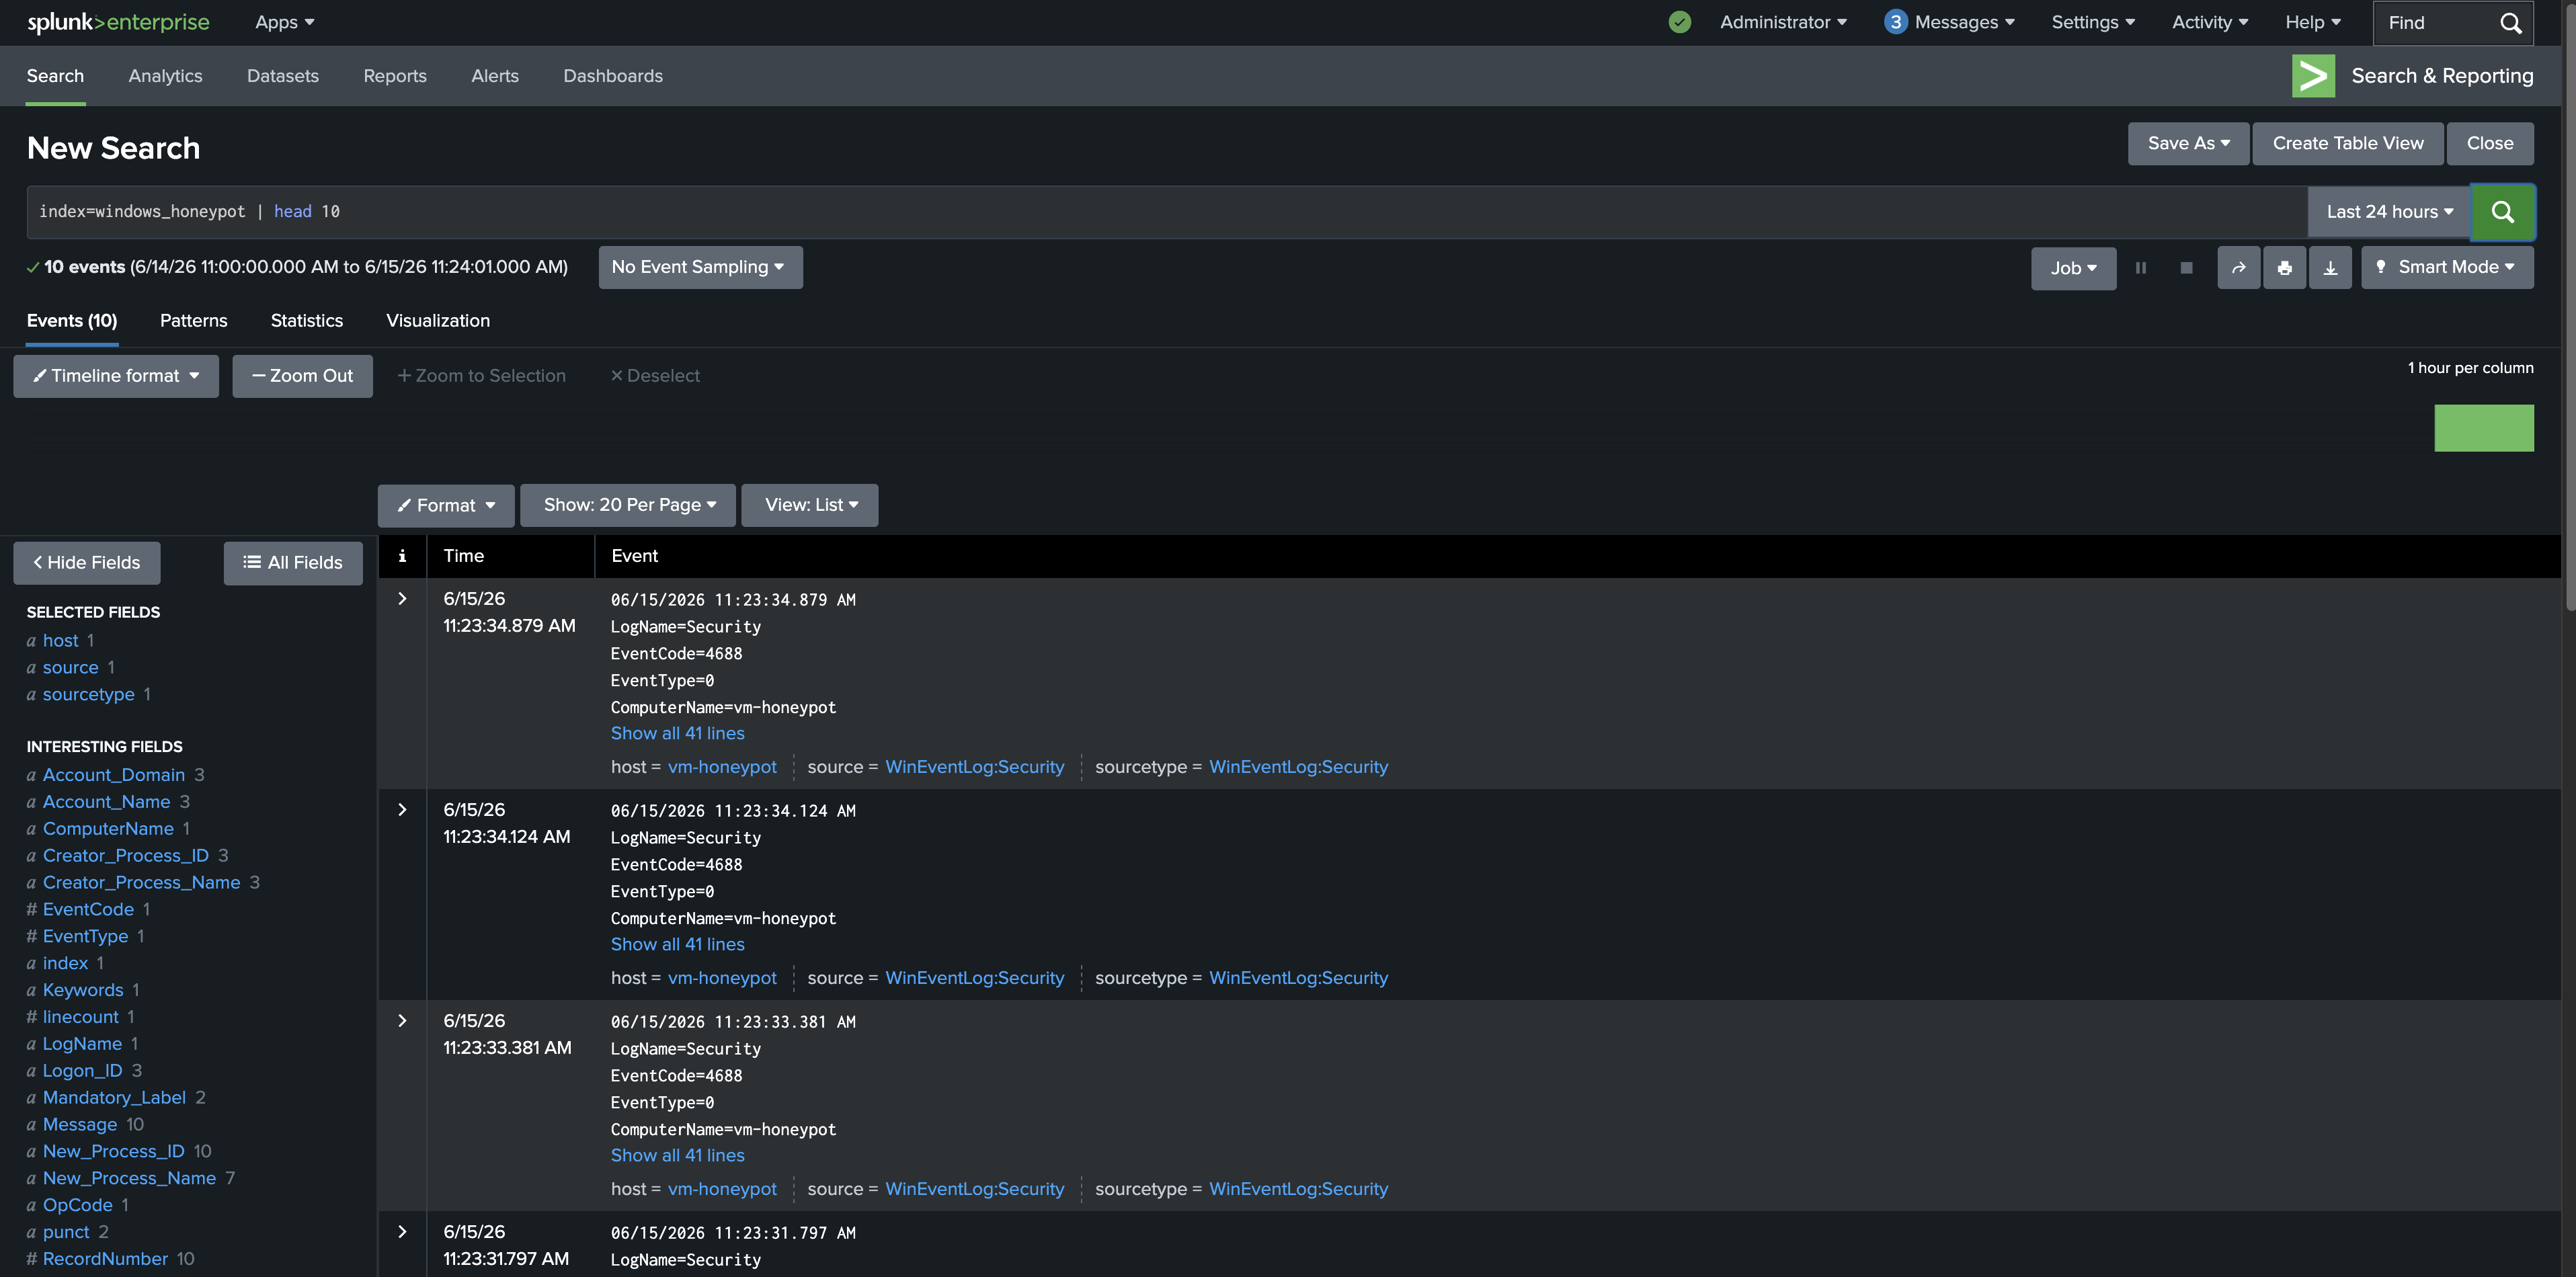 ### Sentinel — Content Hub Connector 已安装 ✅ 从 Sentinel Content Hub 安装了 **Windows Security Events** 解决方案(v3.0.12,Microsoft)—— 包含 2 个数据 connector、20 条 analytic rules、2 个 workbook 和 50 个 hunting queries。 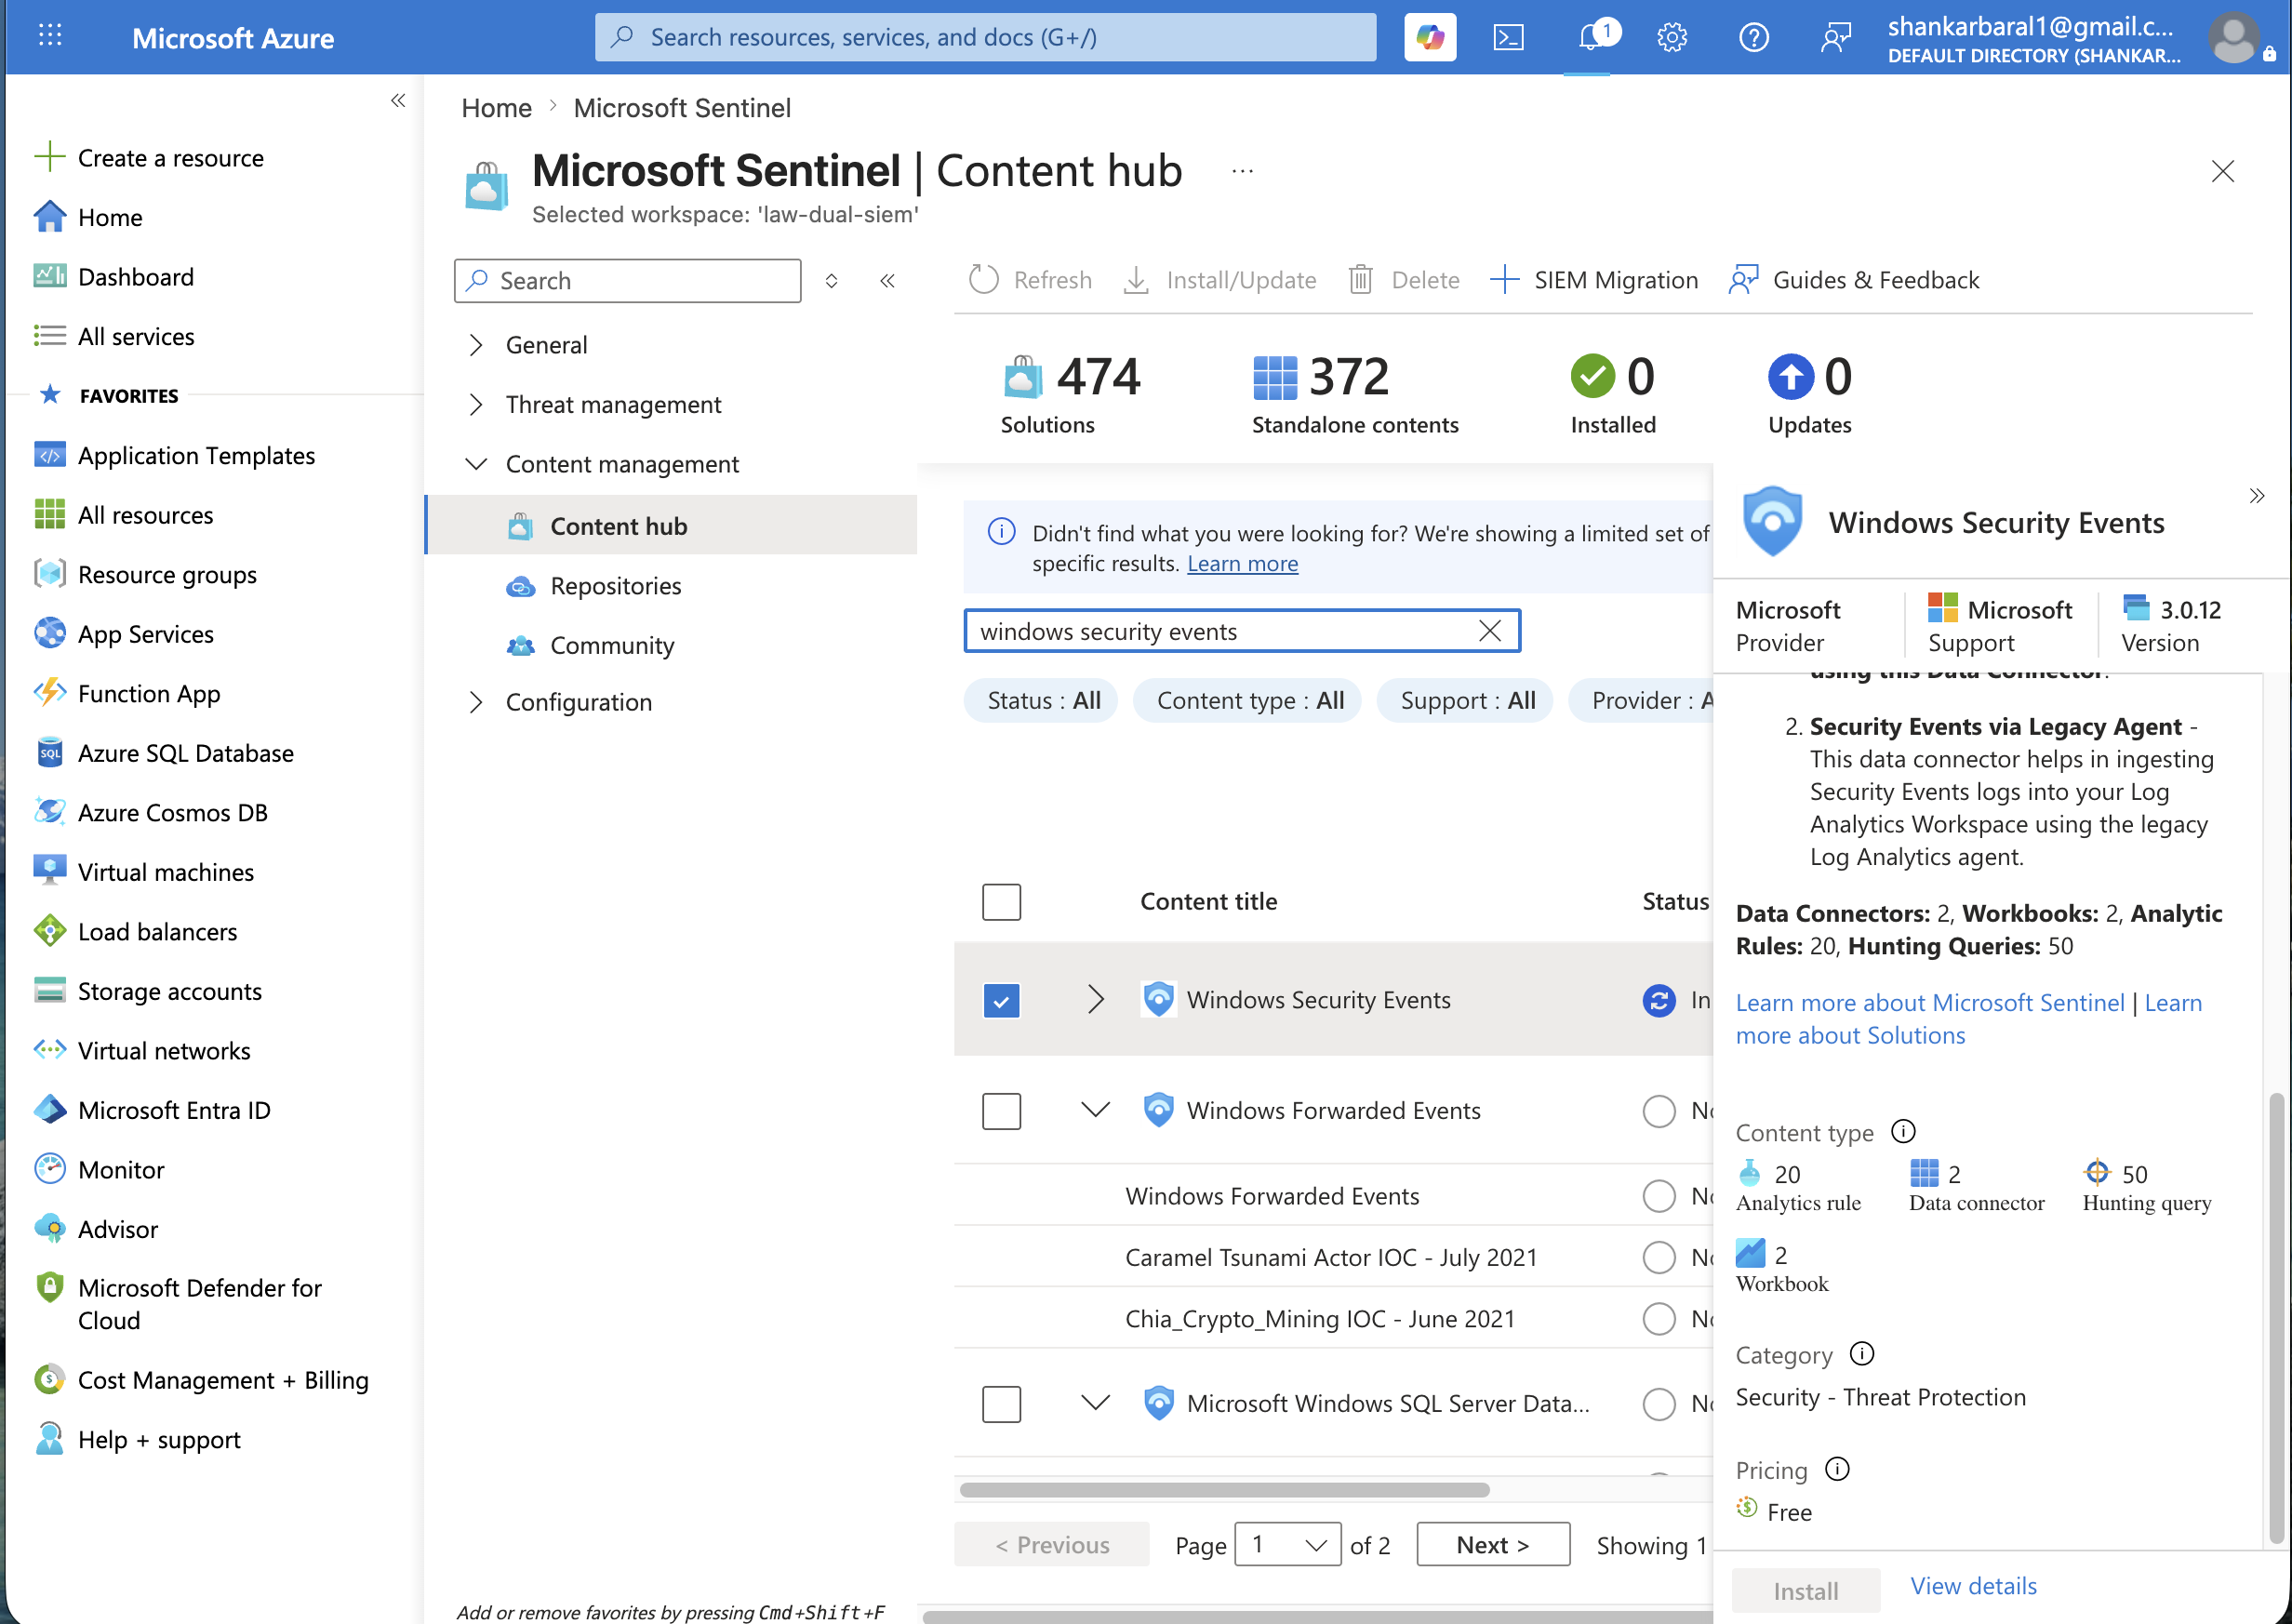 ### Sentinel — Data Collection Rule 已创建 ✅ 通过 **Windows Security Events via AMA** connector 成功创建了 DCR `dcr-honeypot-security-events` —— 过滤器:`AllEvents`,由 Sentinel 创建,目标为蜜罐 VM。 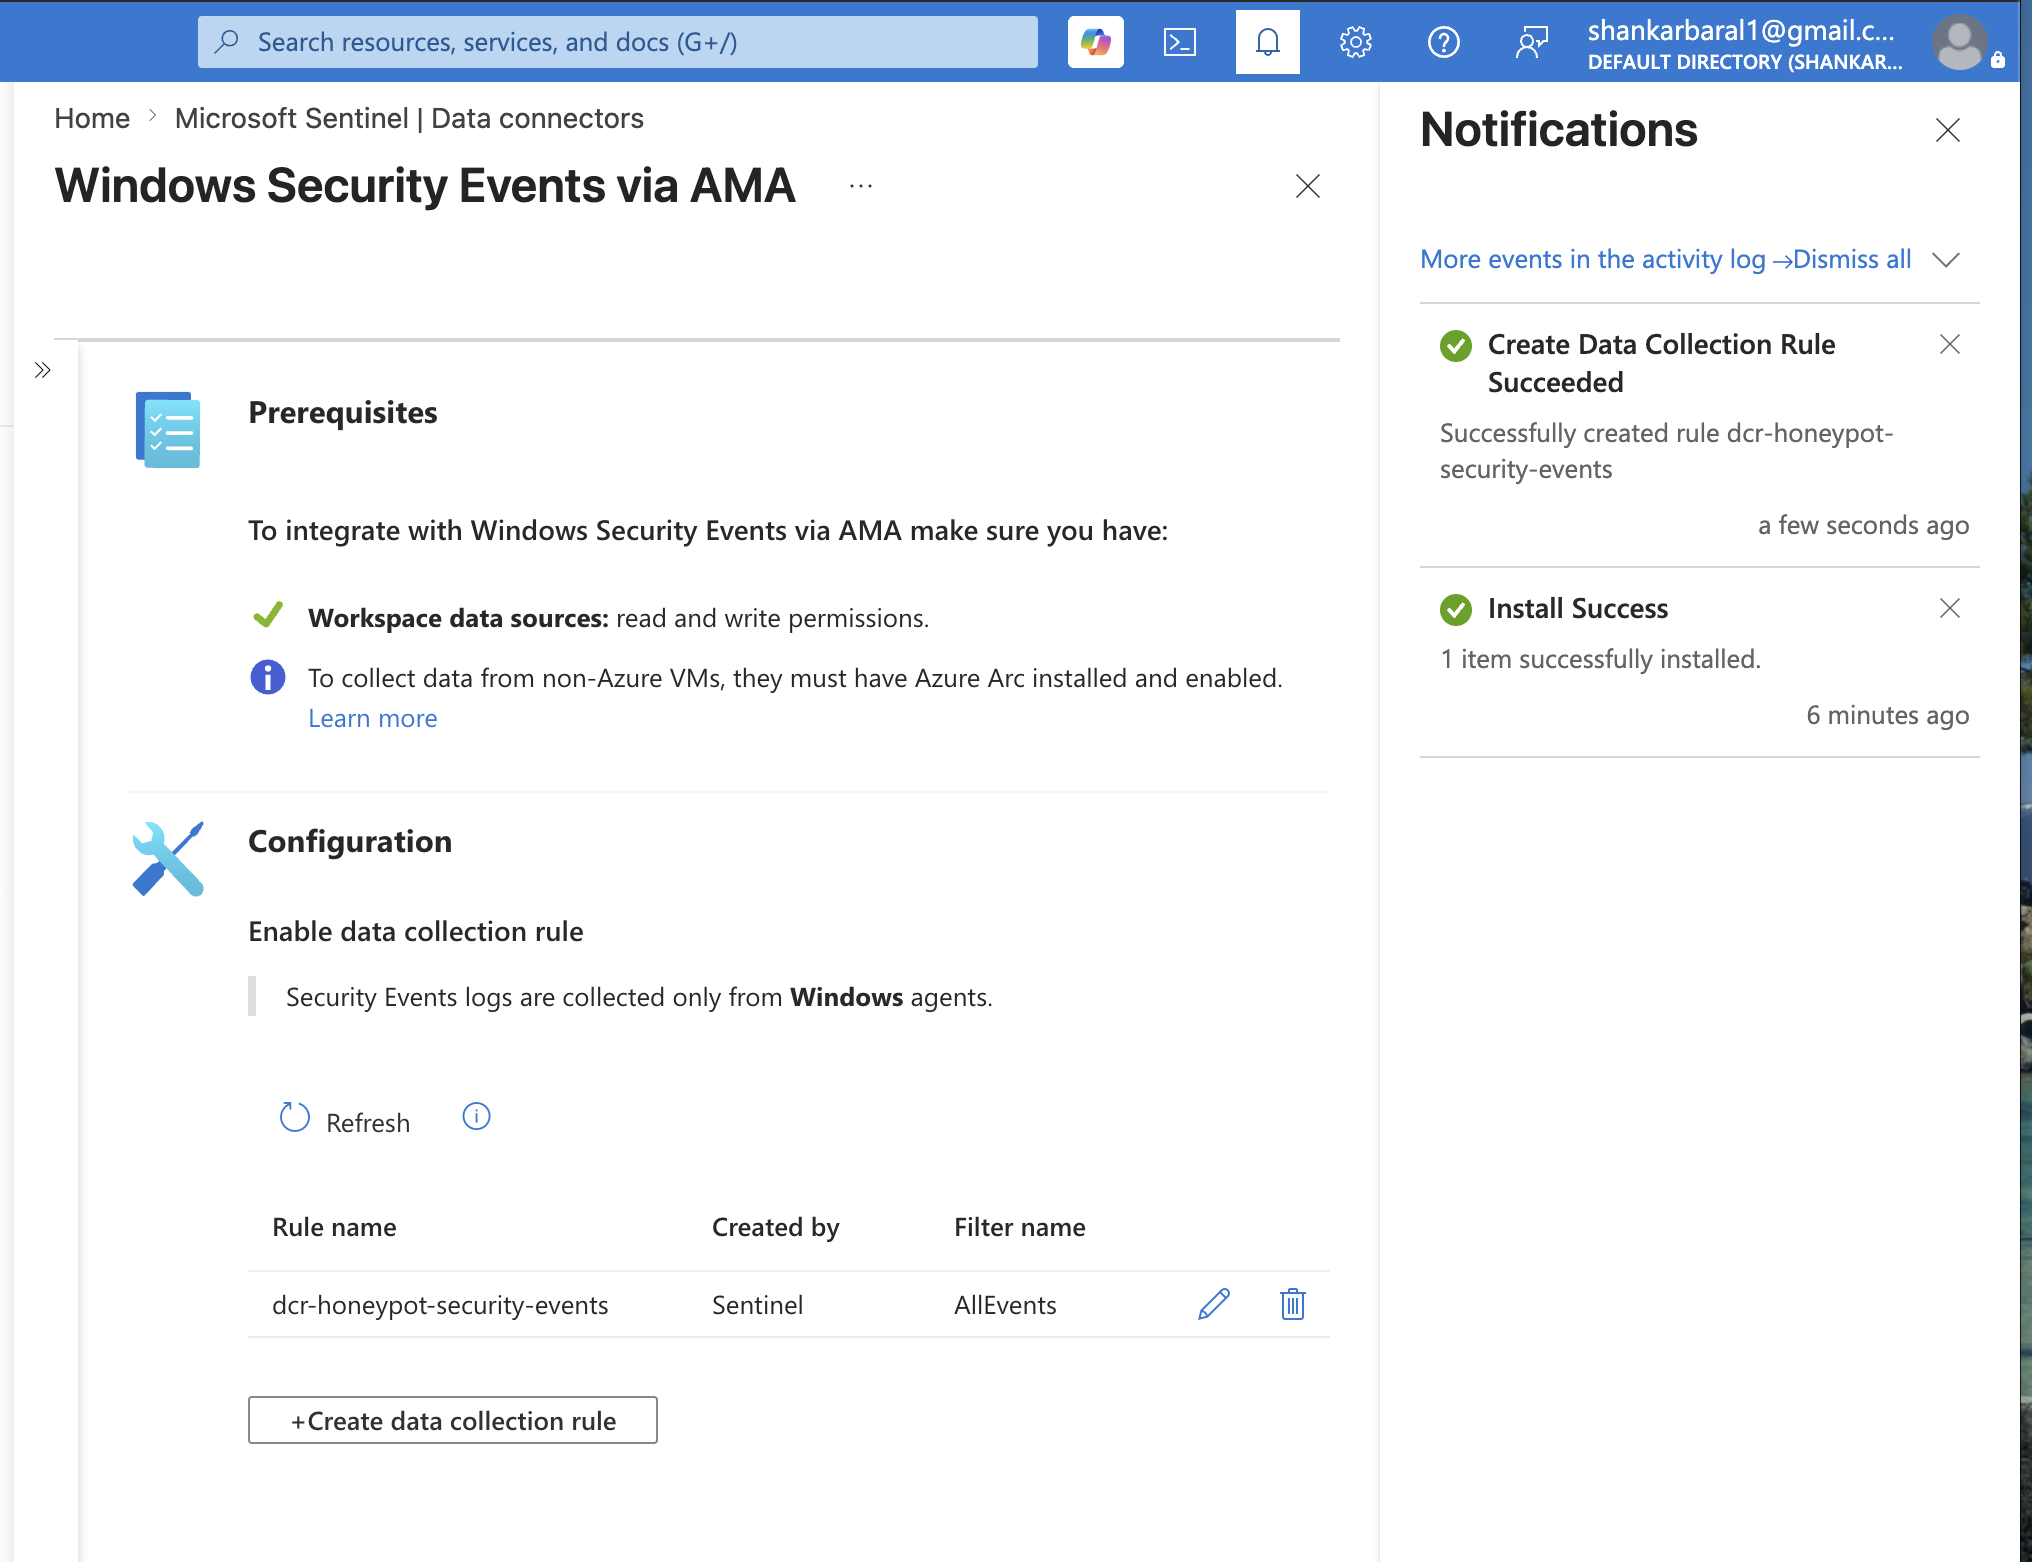 ### Sentinel — Agent 部署前基线 (无数据) ✅ 在部署 AMA 之前进行了刻意的基线检查:`SecurityEvent | where EventID == 4624` 返回 **0 个结果** —— 证实事先没有发生被动的数据收集。 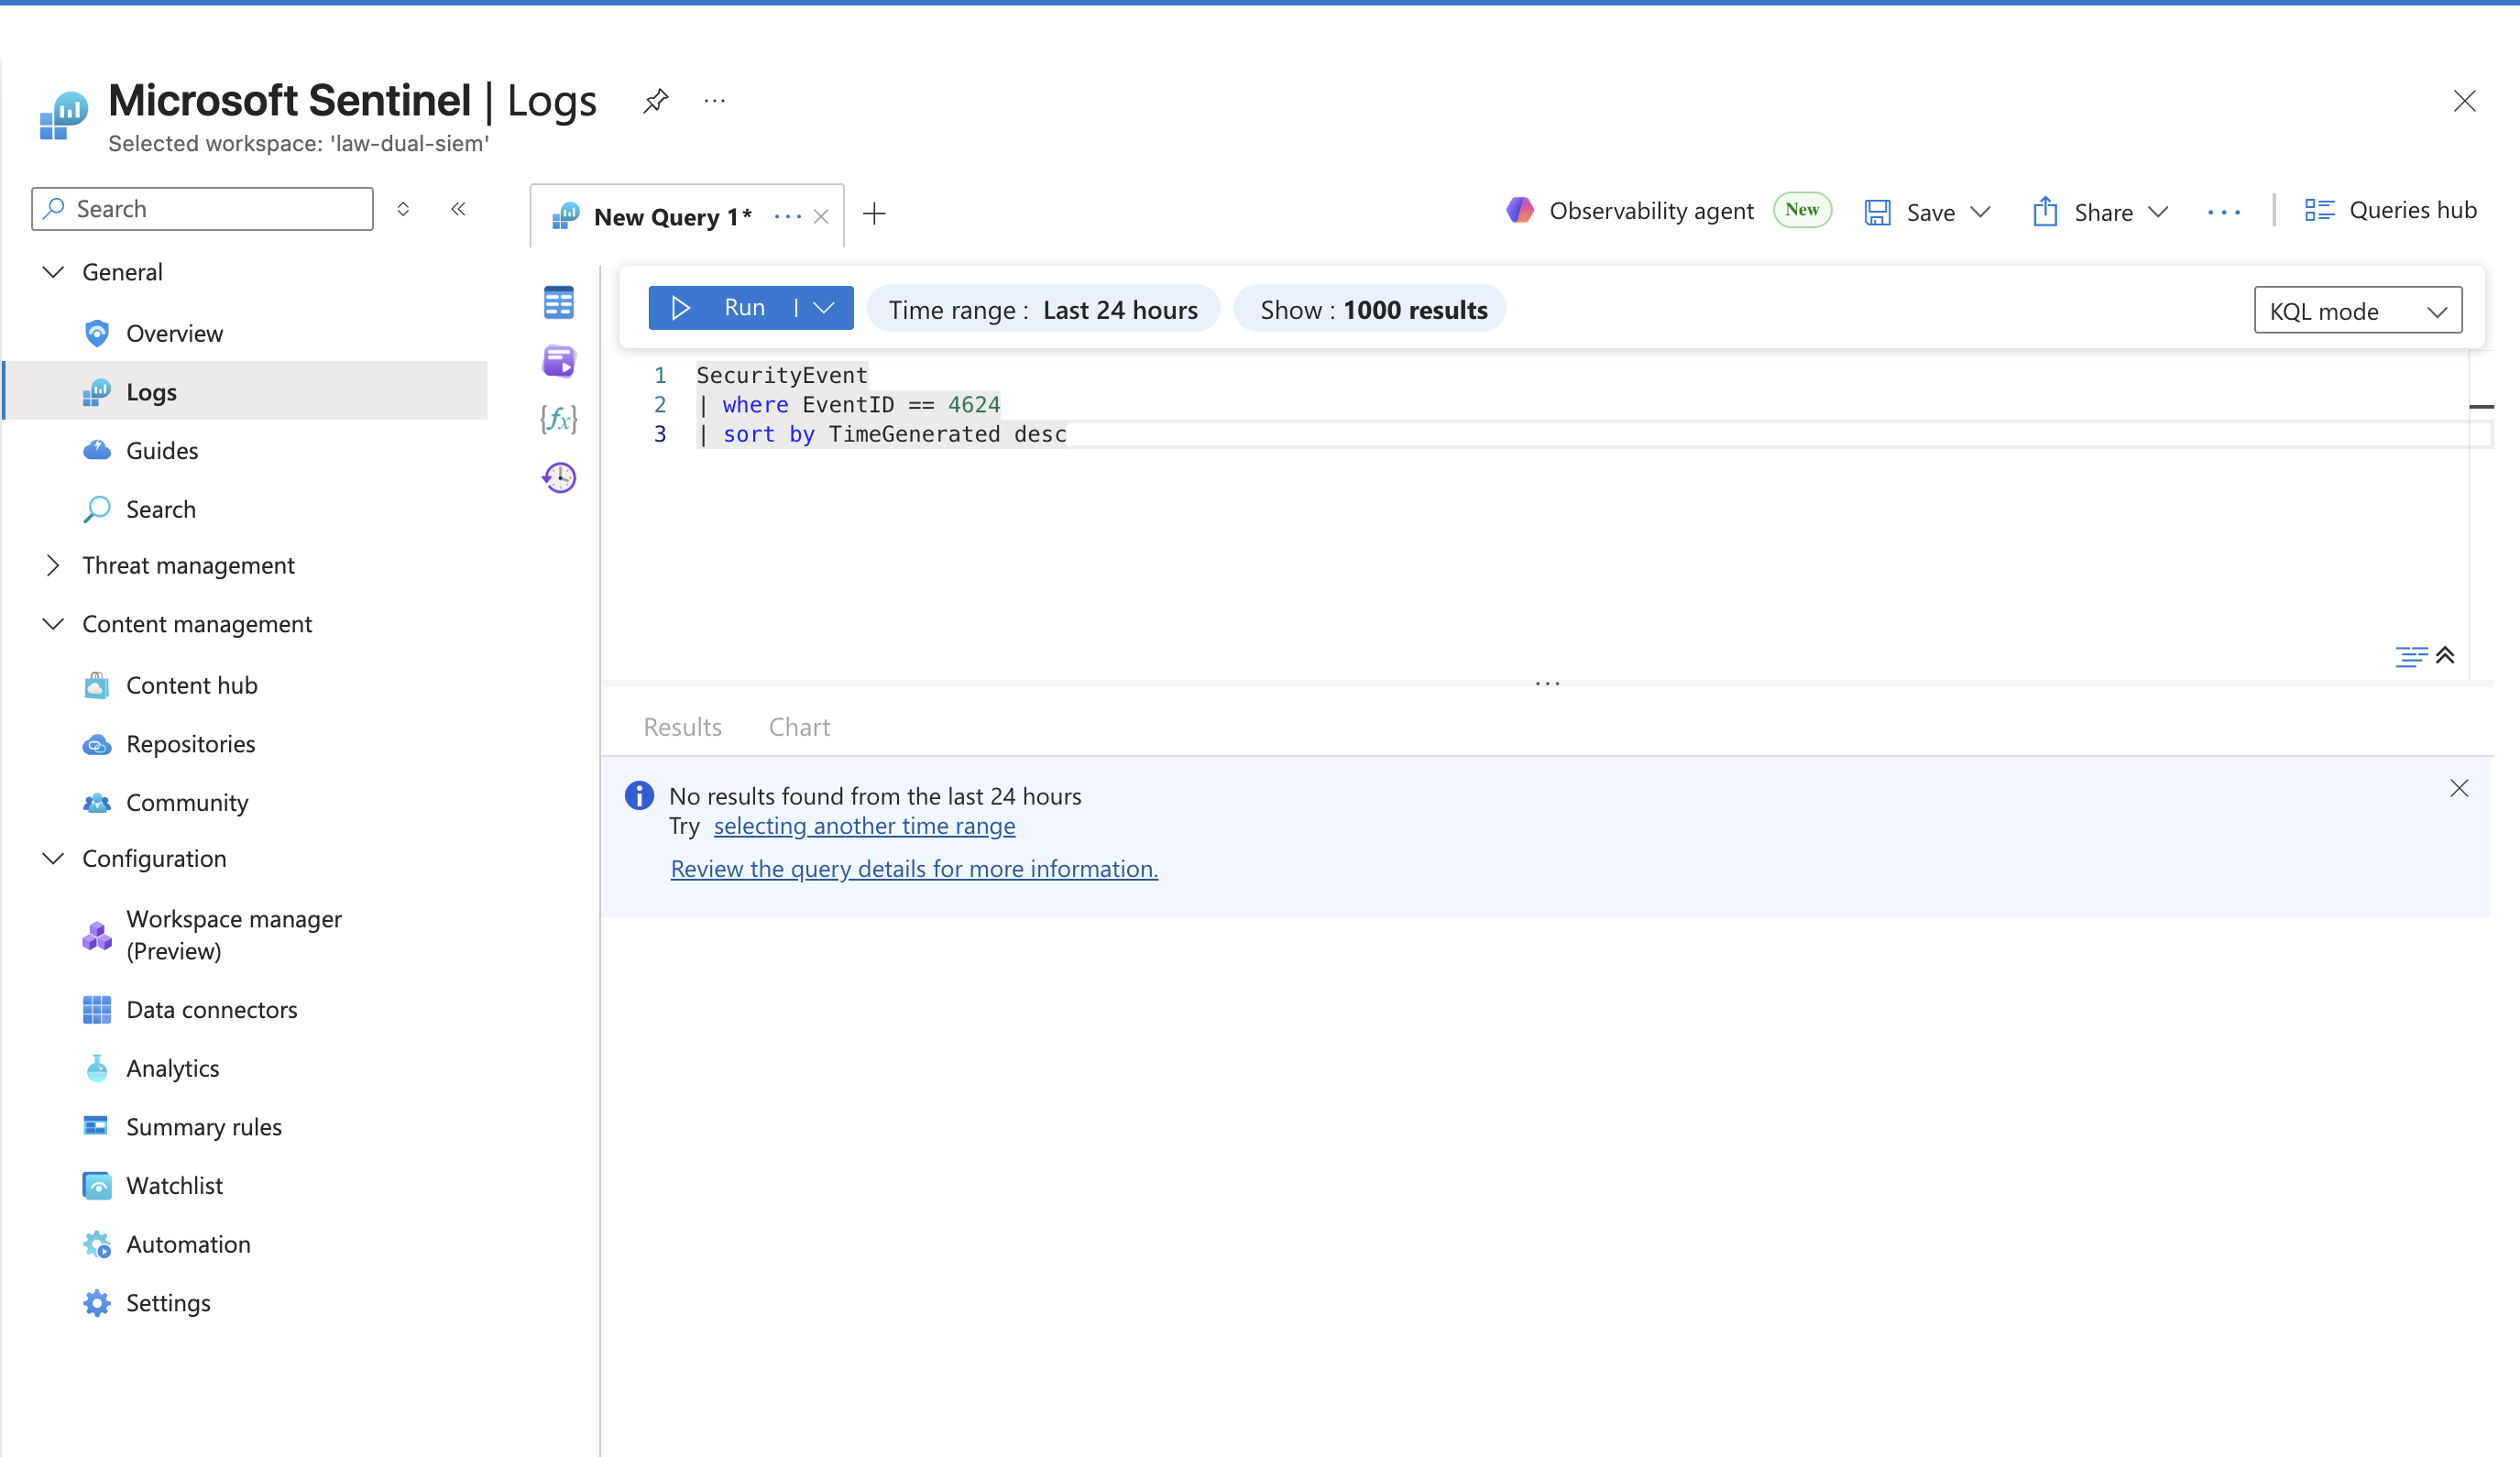 ### Sentinel — 已验证实时事件 ✅ 部署后:`SecurityEvent | take 10` 返回了来自 `vm-honeypot` 的真实事件 —— 可以看到 `NT SERVICE\SplunkForwarder` 和 `NT AUTHORITY\SYSTEM` 账户,确认两个 SIEM 正在同时从同一数据源摄取数据。 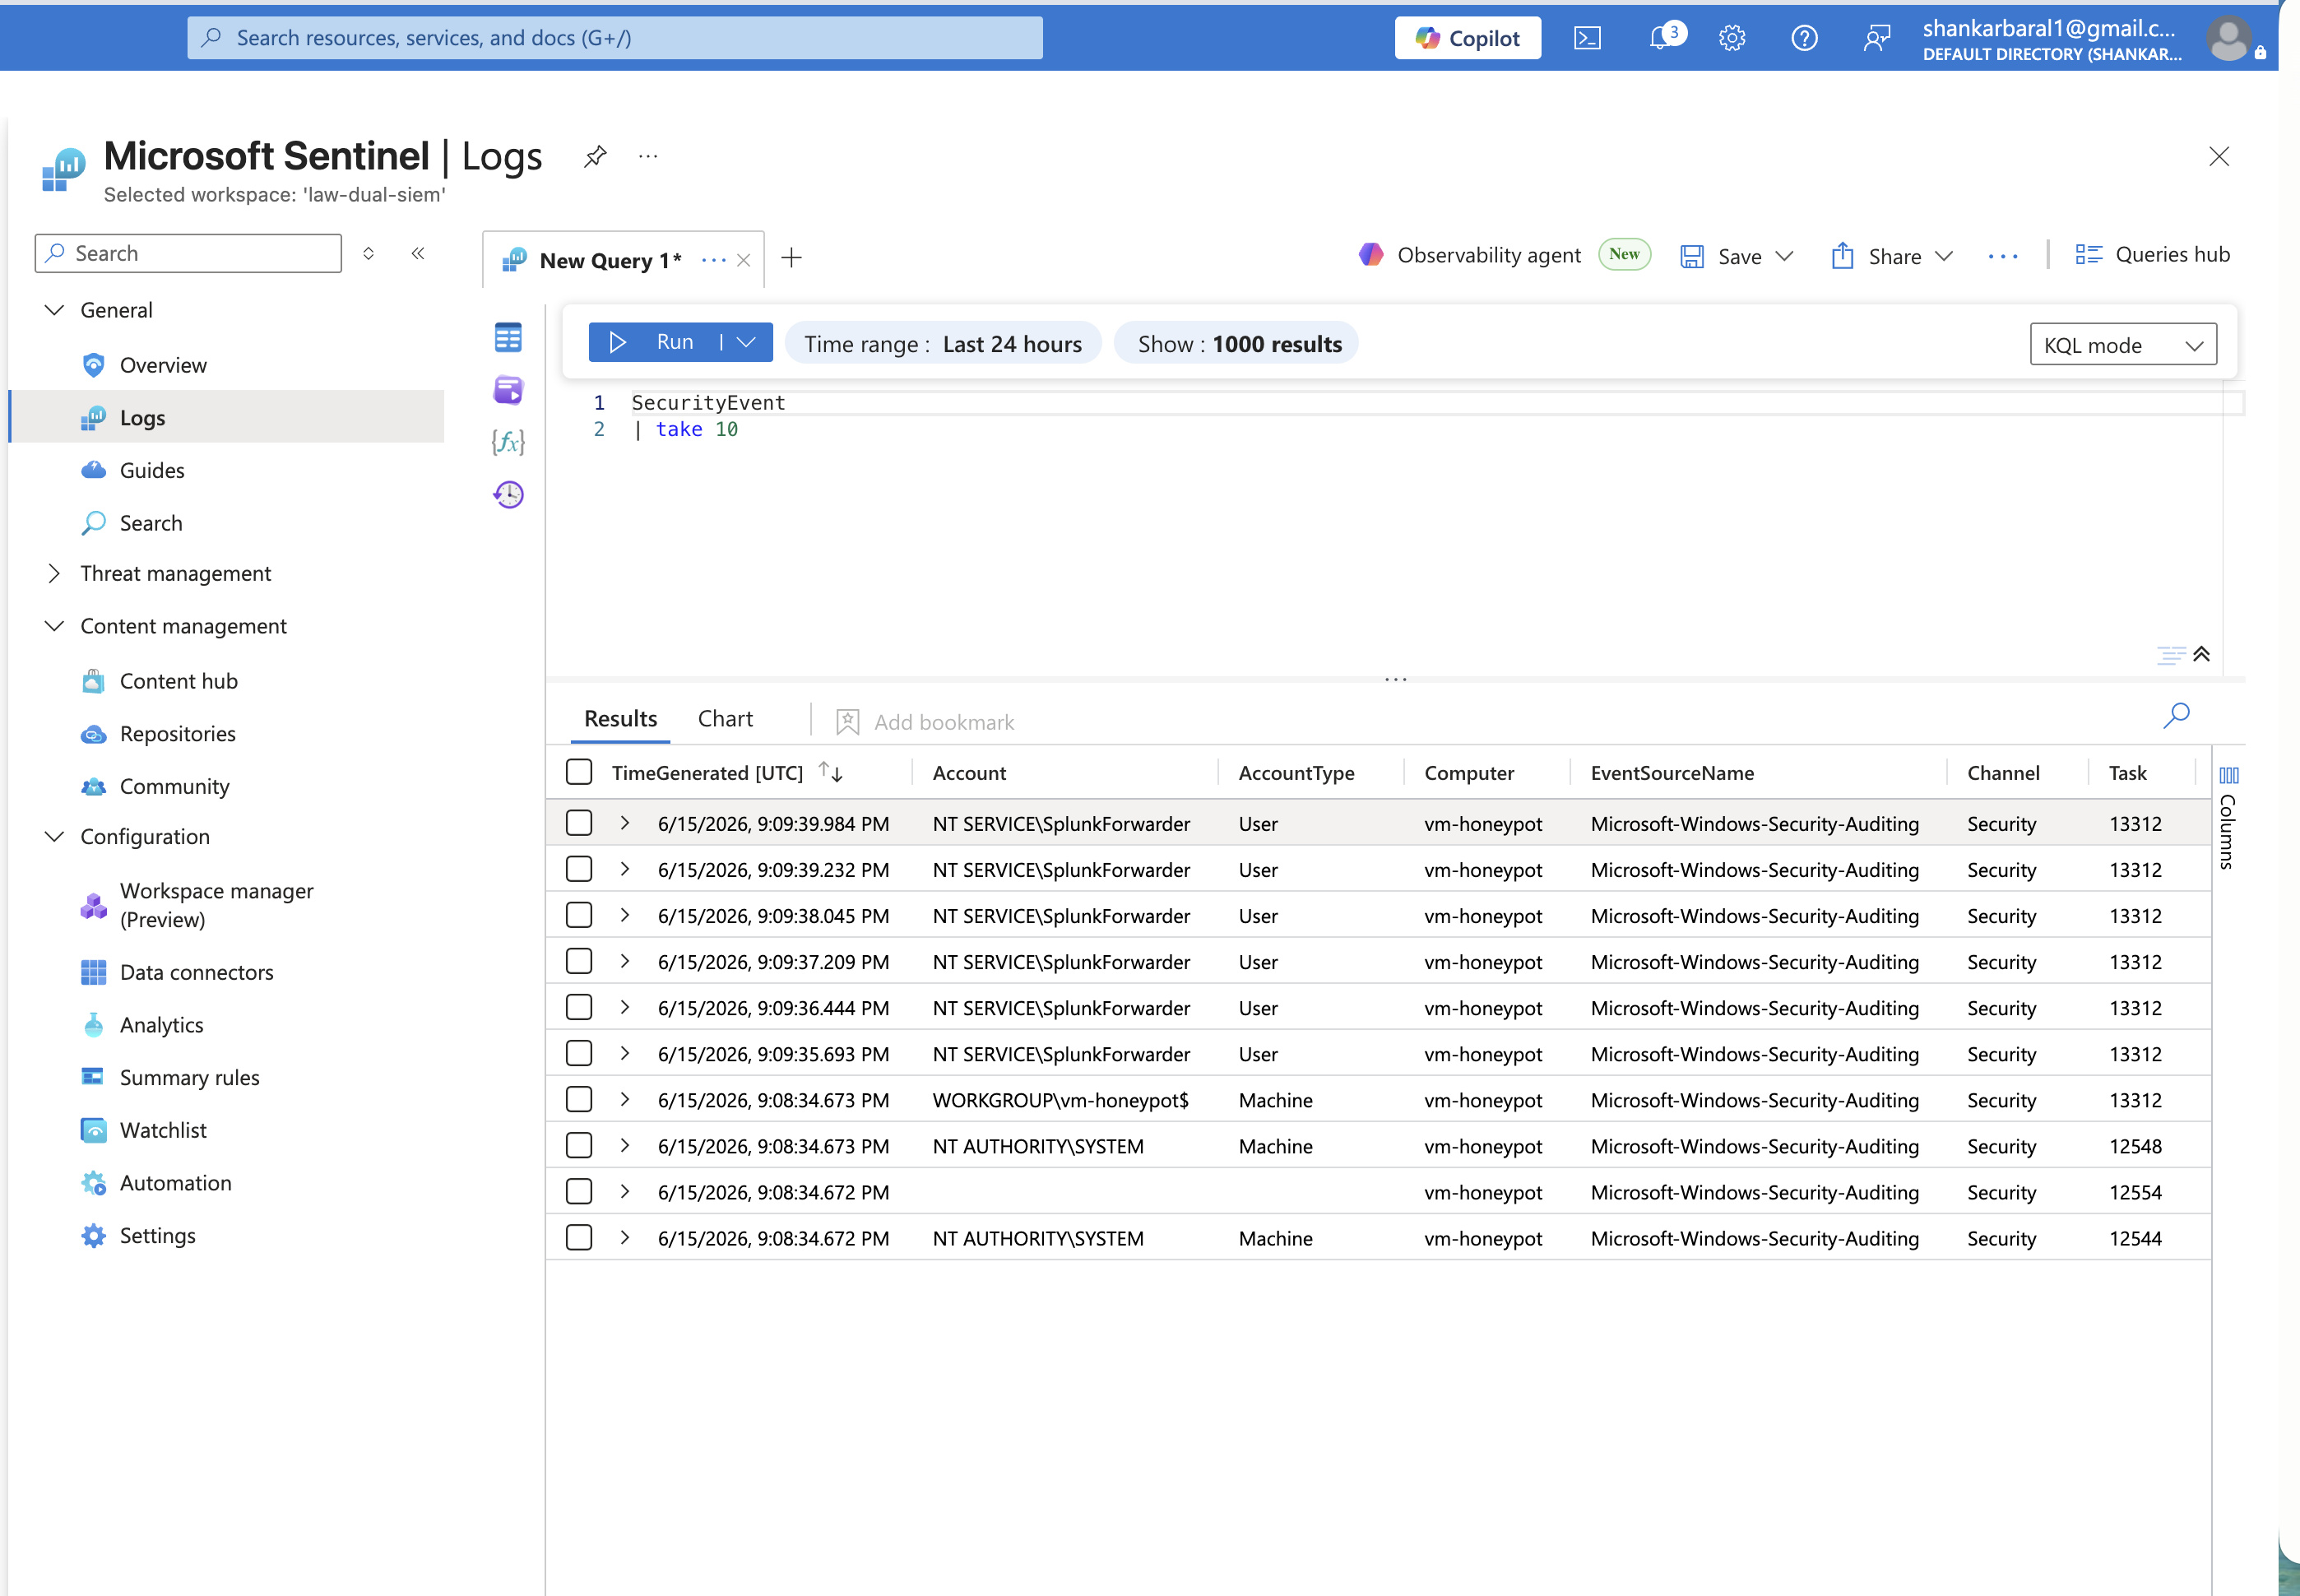 ## 🔍 检测规则 所有 5 条检测规则均在 **KQL (Sentinel) 和 SPL (Splunk)** 中实现,并拥有来自真实攻击者活动的验证结果。 ### 检测 1 — 按源 IP 进行暴力破解 `MITRE:T1110.001` 识别在任何 5 分钟时间窗口内产生超过 10 次失败登录尝试(EventID 4625)的外部 IP —— 这是自动化密码喷洒或暴力破解工具最清晰的信号。 **KQL — Microsoft Sentinel** ``` SecurityEvent | where EventID == 4625 | summarize FailedAttempts = count() by IpAddress, bin(TimeGenerated, 5m) | where FailedAttempts > 10 | project TimeGenerated, IpAddress, FailedAttempts | order by FailedAttempts desc ``` **结果 — Sentinel:** 检测到 4 个攻击者 IP。头号违规者 `163.47.70.77` —— 在单个 5 分钟窗口内发生了 14 次失败尝试。  **SPL — Splunk Enterprise** ``` index=windows_honeypot EventCode=4625 | bin span=5m _time | stats count as FailedAttempts by _time, Source_Network_Address | where FailedAttempts > 10 | sort - FailedAttempts ``` **结果 — Splunk:** 在 104 条原始事件中检测到 6 个攻击者 IP。`45.142.193.166` 和 `163.47.70.77` 均有 14 次尝试 —— 跨平台结果一致。 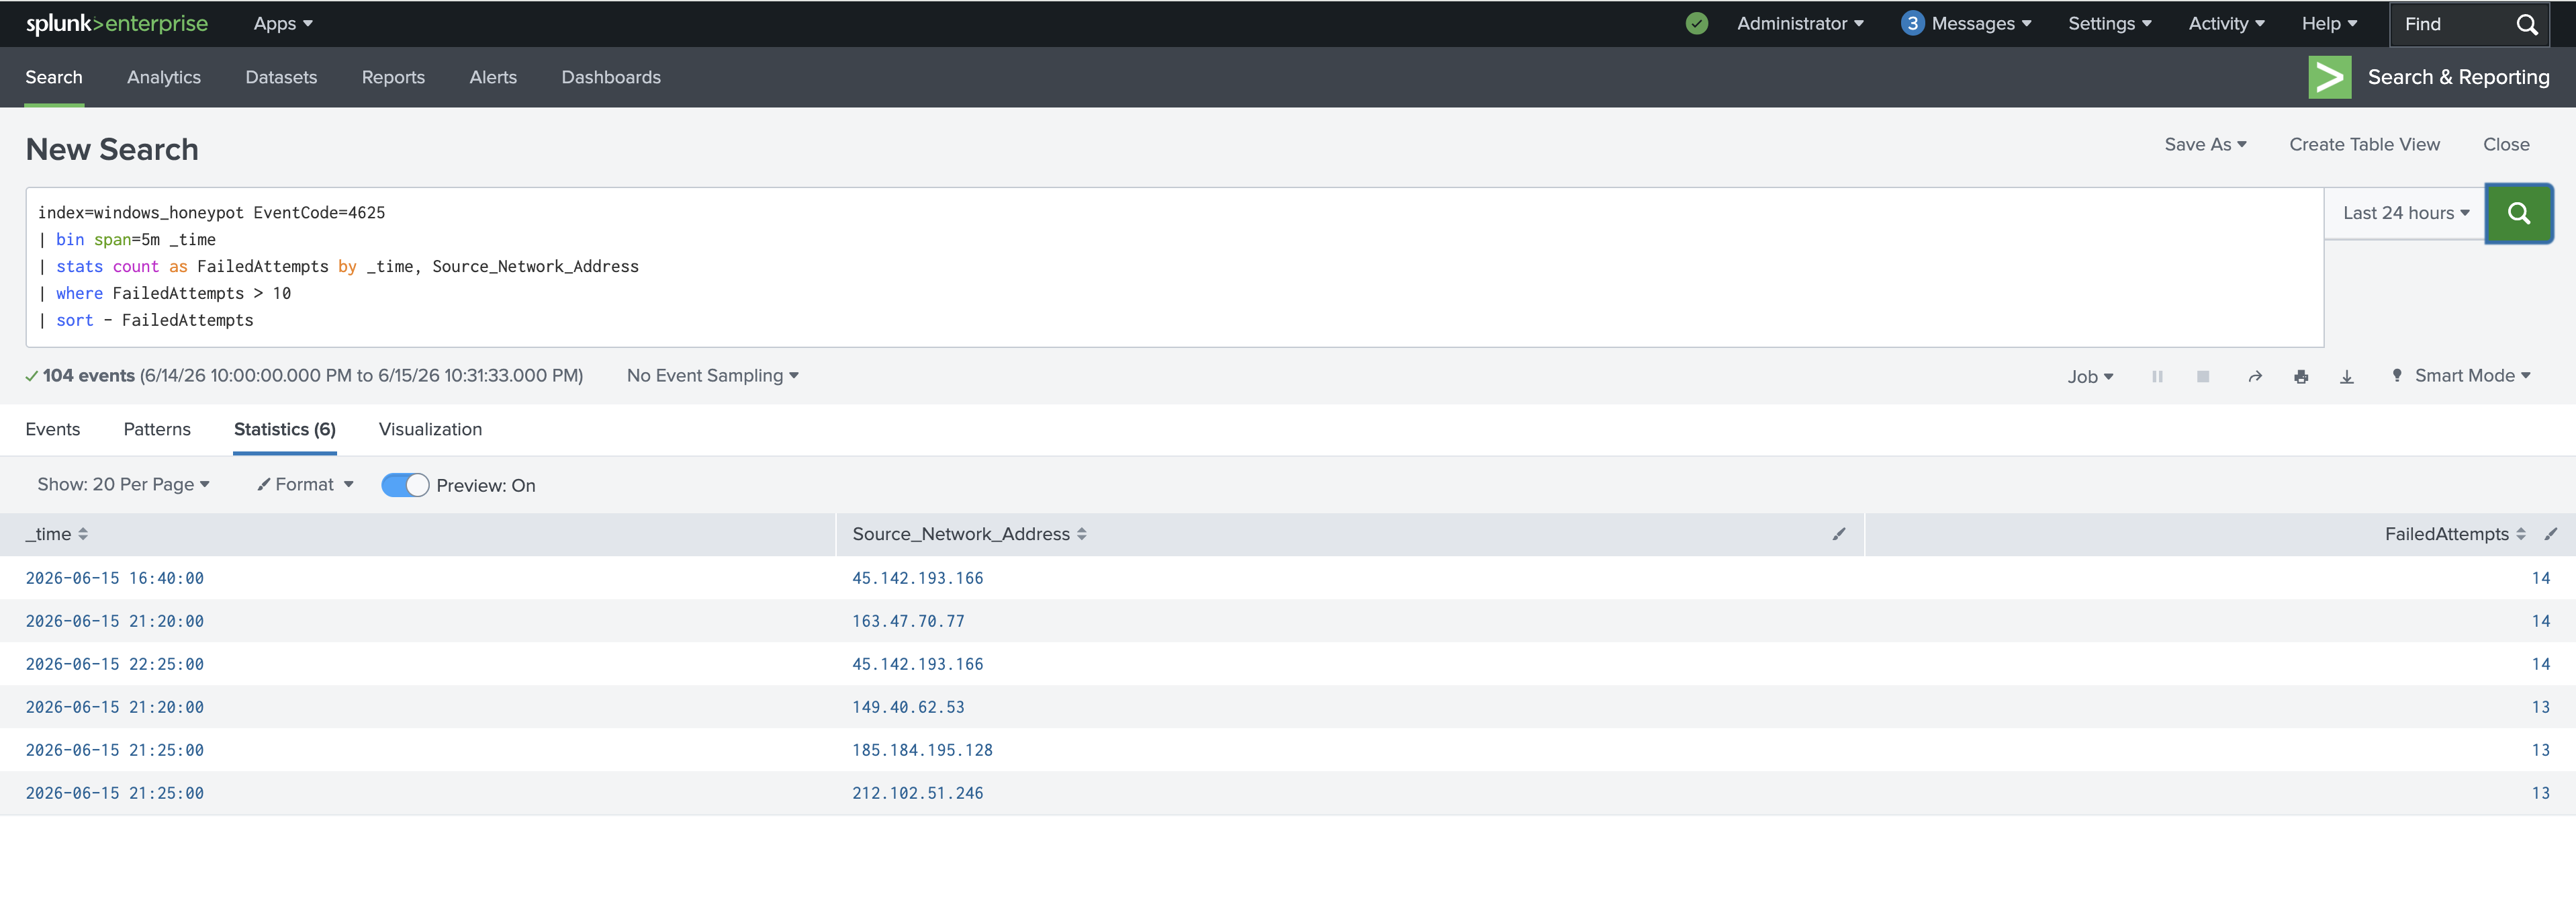 ### 检测 2 — 账户锁定关联 `MITRE:T1110` 将失败登录(EventID 4625)与账户锁定事件(EventID 4740)相关联,以确认账户被主动暴力破解超过了其锁定阈值 —— 从噪声转化为已确认的攻击。 **KQL — Microsoft Sentinel (Advanced Hunting)** ``` SecurityEvent | where EventID in (4625, 4740) | where TimeGenerated > ago(1h) | summarize FailedLogins = countif(EventID == 4625), Lockouts = countif(EventID == 4740) by TargetUserName | where FailedLogins >= 3 and Lockouts > 0 | project TargetUserName, FailedLogins, Lockouts | order by Lockouts desc ``` **结果 — Sentinel:** `labadmin` —— 11 次失败登录最终导致 1 次确认锁定。已确认针对性攻击。 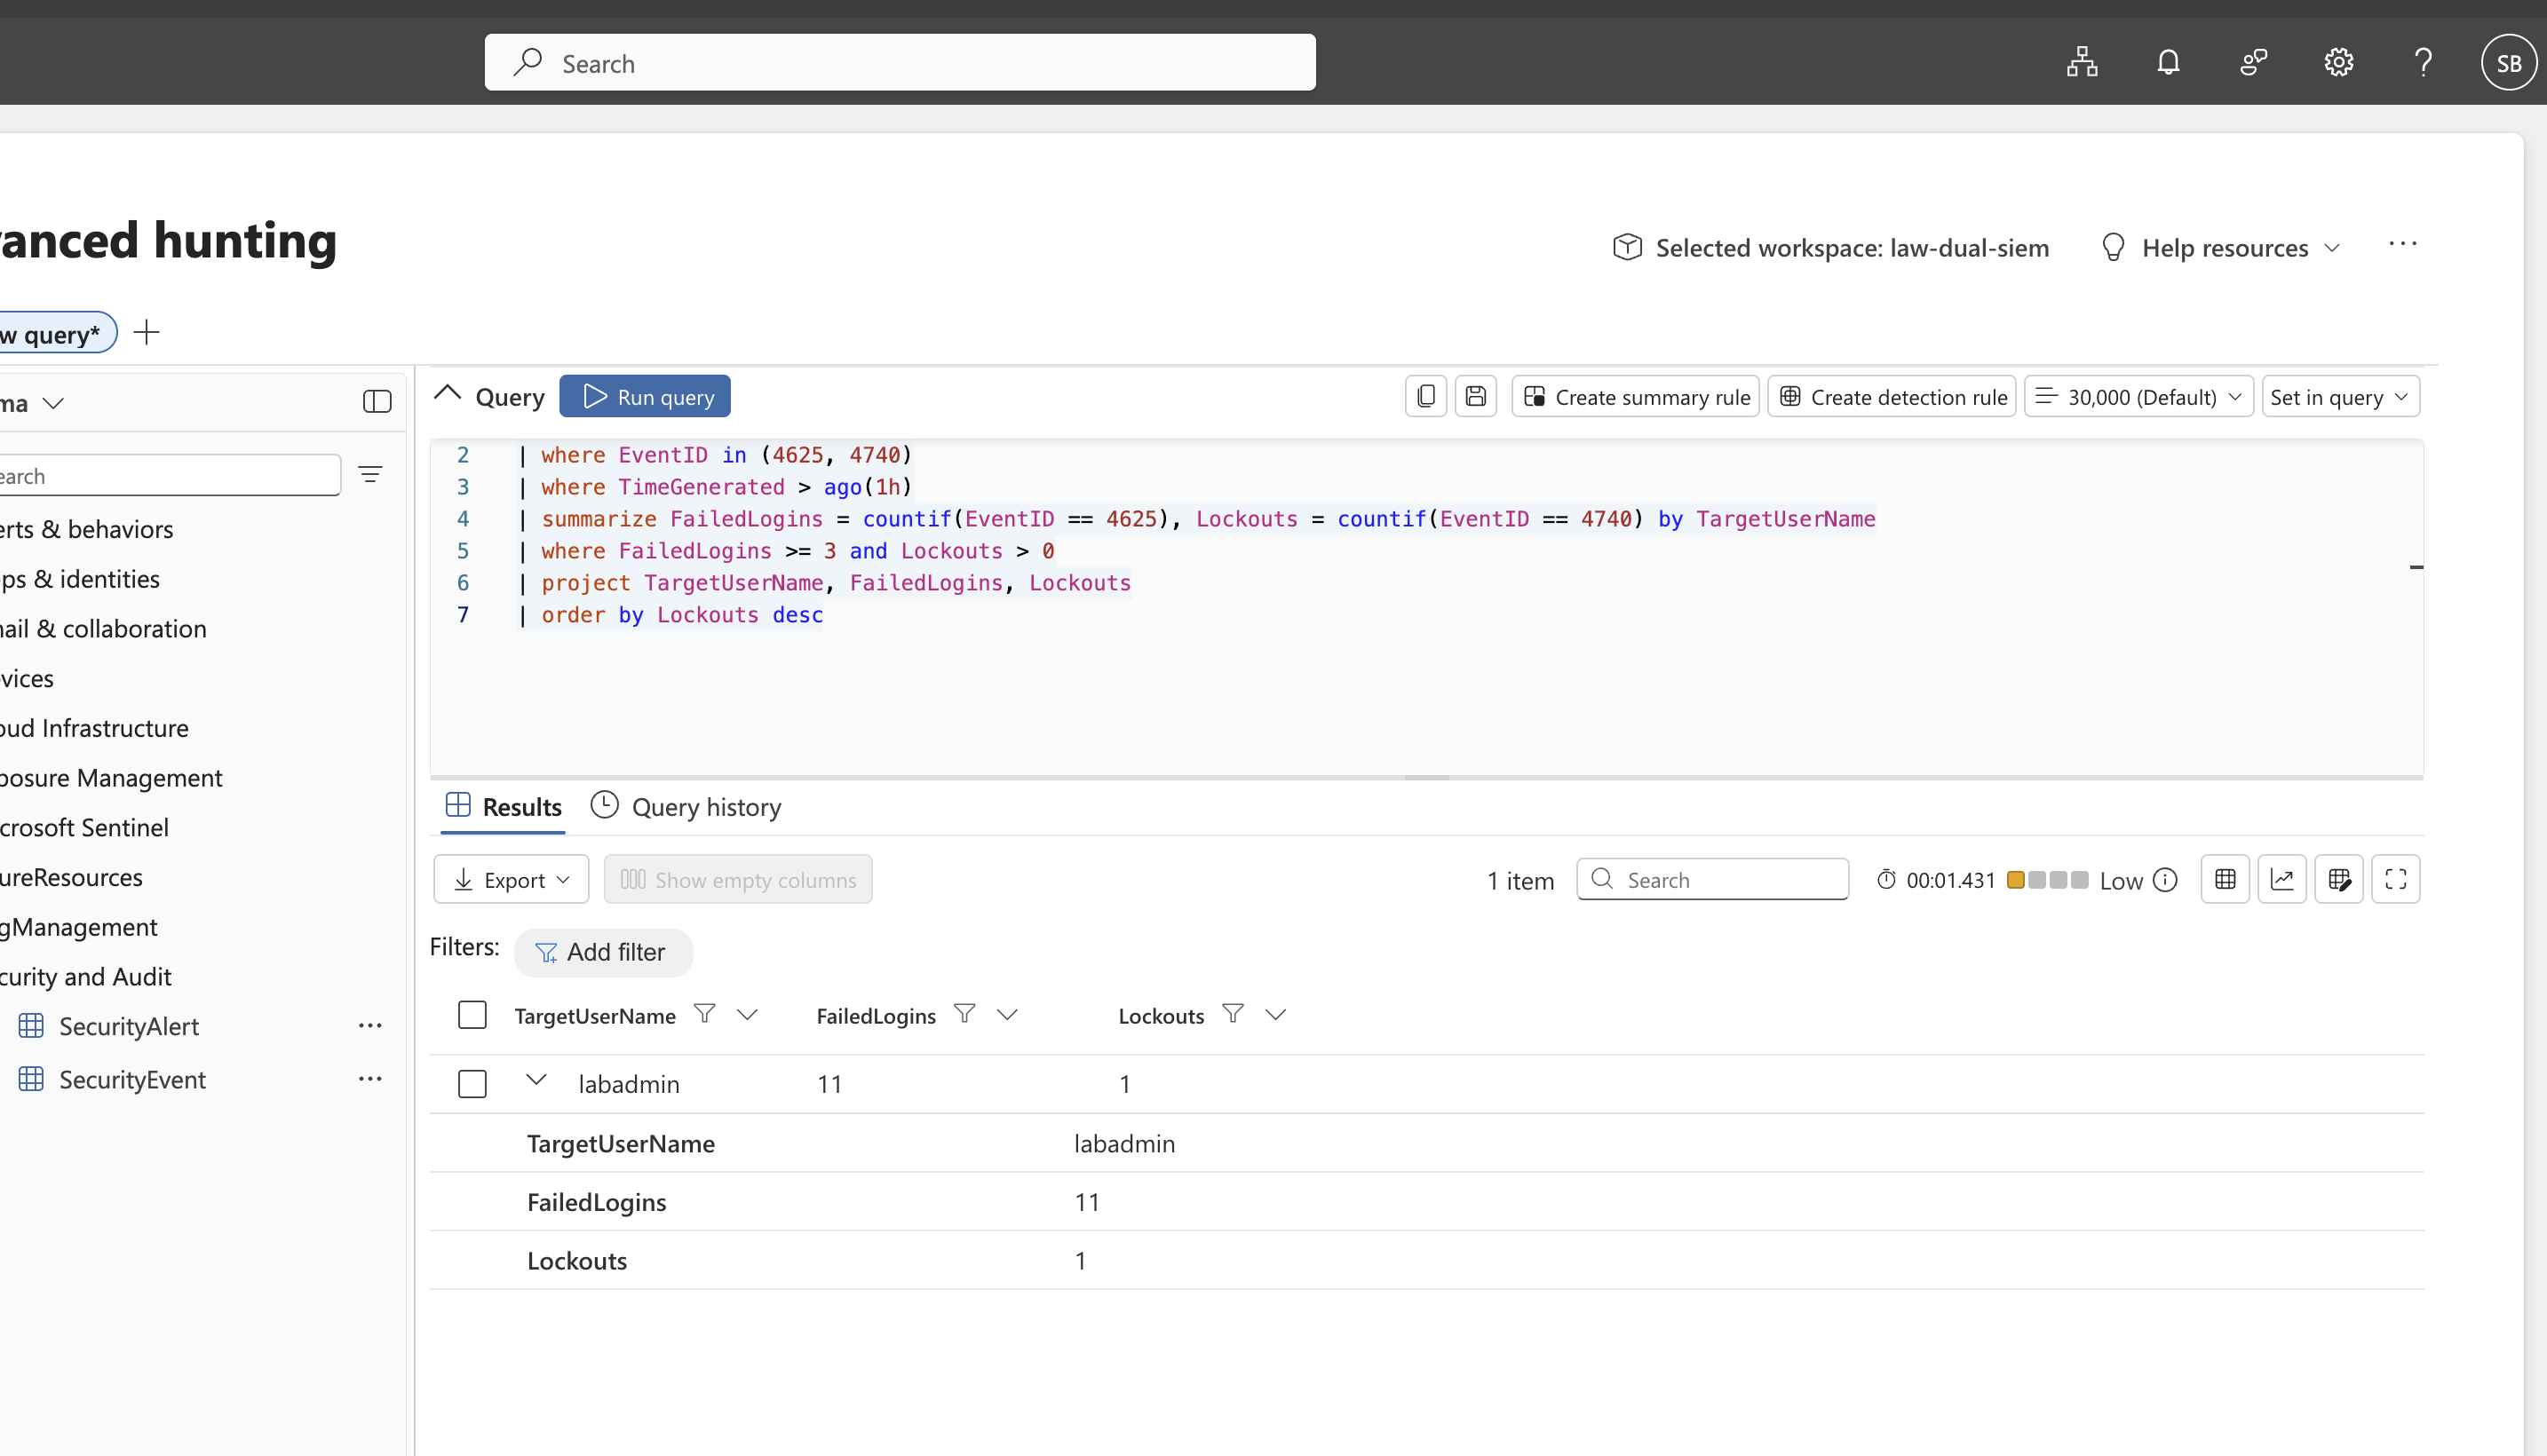 **SPL — Splunk Enterprise** ``` index="windows_honeypot" (EventCode=4625 OR EventCode=4740) | rex field=_raw "Source Network Address:\s*(?\d+\.\d+\.\d+\.\d+)"
| rex field=_raw "Account That Was Locked Out:[\s\S]*?Account Name:\s+(?\S+)"
| sort 0 _time
| streamstats window=1 current=f last(AttackerIP) as LastSeenIP by ComputerName
| where EventCode=4740 AND isnotnull(LockedUser)
| table _time, LockedUser, LastSeenIP, ComputerName
```
**结果 — Splunk:** `labadmin` 被锁定,在 `vm-honeypot` 上最后看到的攻击者 IP 为 `163.47.70.77` —— 相同的攻击者,相同的账户,独立地在两个平台上得到确认。
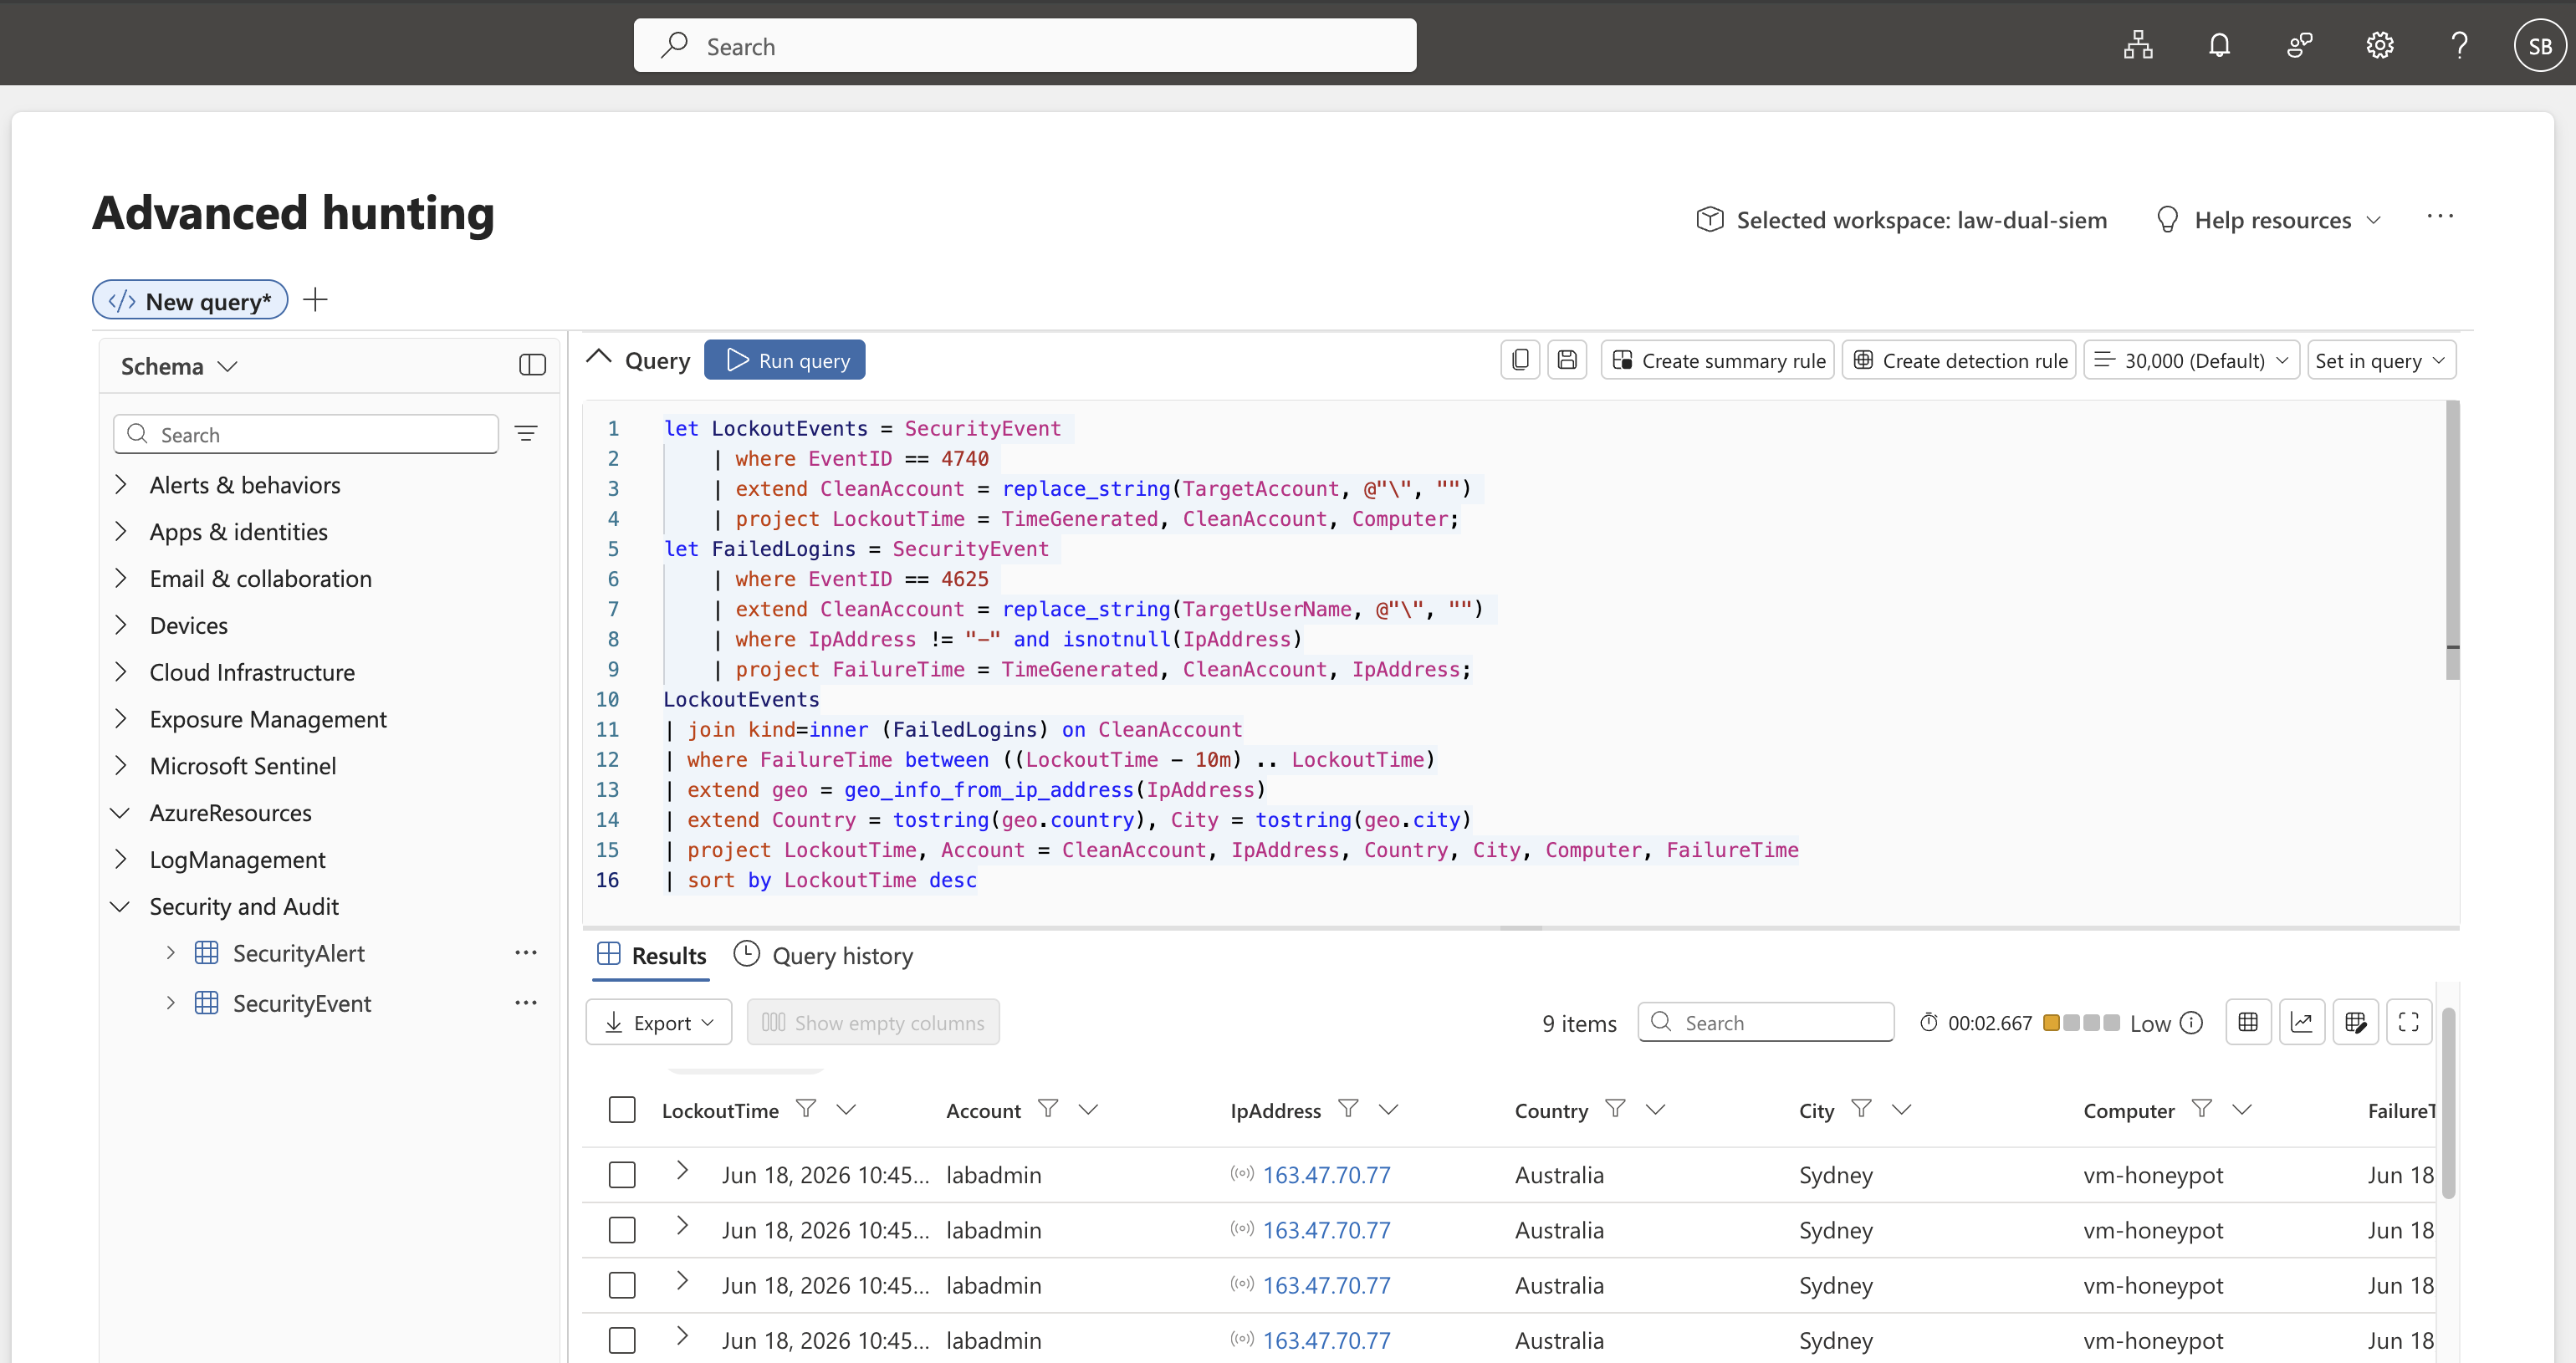
### 检测 3 — 地理异常锁定 `MITRE:T1078`
通过地理位置数据丰富锁定关联信息,以揭示源自意外国家或城市的攻击 —— 将原始 IP 转化为可操作的威胁情报背景。
**KQL — Microsoft Sentinel (Advanced Hunting)**
```
let LockoutEvents = SecurityEvent
| where EventID == 4740
| extend CleanAccount = replace_string(TargetAccount, @"\", "")
| project LockoutTime = TimeGenerated, CleanAccount, Computer;
let FailedLogins = SecurityEvent
| where EventID == 4625
| extend CleanAccount = replace_string(TargetUserName, @"\", "")
| where IpAddress != "-" and isnotnull(IpAddress)
| project FailureTime = TimeGenerated, CleanAccount, IpAddress;
LockoutEvents
| join kind=inner (FailedLogins) on CleanAccount
| where FailureTime between ((LockoutTime - 10m) .. LockoutTime)
| extend geo = geo_info_from_ip_address(IpAddress)
| extend Country = tostring(geo.country), City = tostring(geo.city)
| project LockoutTime, Account = CleanAccount, IpAddress, Country, City, Computer, FailureTime
| sort by LockoutTime desc
```
**结果 — Sentinel:** 9 个关联的锁定事件。攻击者 IP `163.47.70.77` 被地理定位到 **Australia, Sydney** —— 正在主动 targeting 同样托管在 Australia East 的蜜罐。
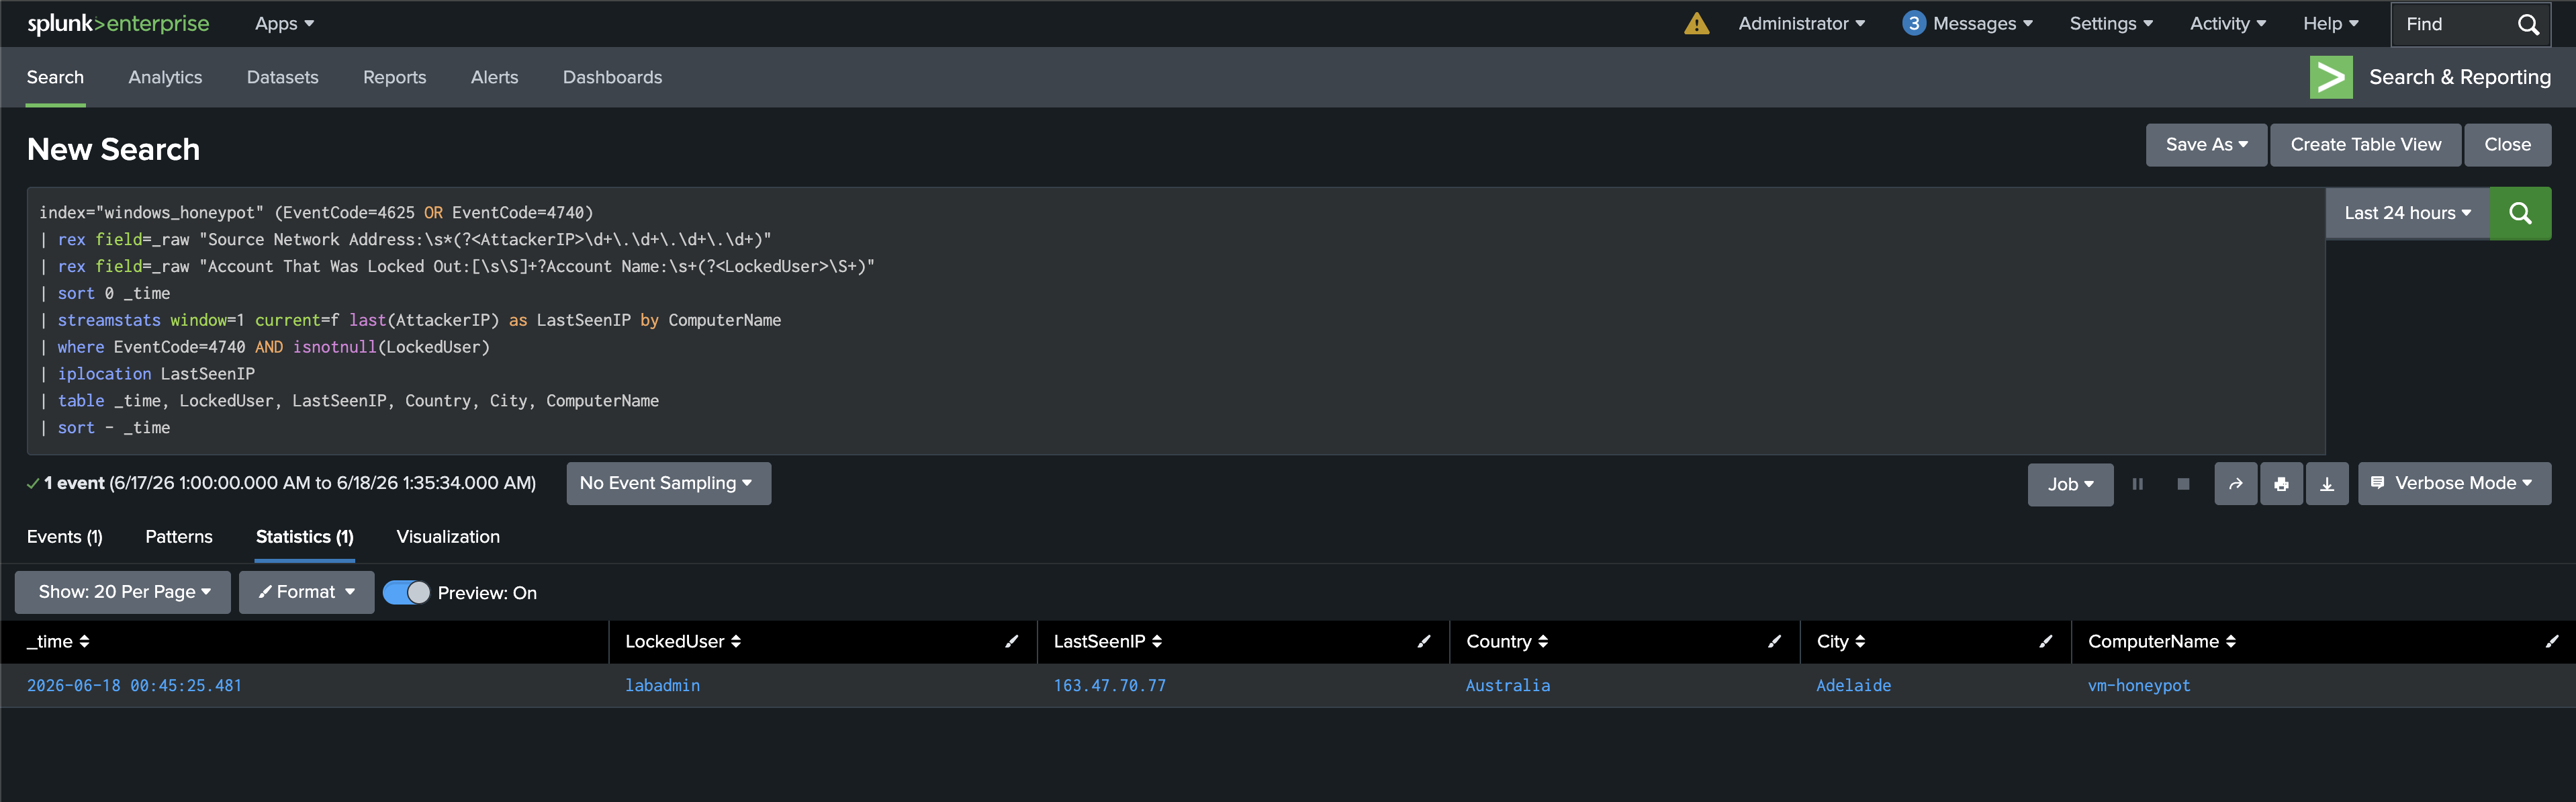
**SPL — Splunk Enterprise**
```
index="windows_honeypot" (EventCode=4625 OR EventCode=4740)
| rex field=_raw "Source Network Address:\s*(?\d+\.\d+\.\d+\.\d+)"
| rex field=_raw "Account That Was Locked Out:[\s\S]*?Account Name:\s+(?\S+)"
| sort 0 _time
| streamstats window=1 current=f last(AttackerIP) as LastSeenIP by ComputerName
| where EventCode=4740 AND isnotnull(LockedUser)
| iplocation LastSeenIP
| table _time, LockedUser, LastSeenIP, Country, City, ComputerName
| sort - _time
```
**结果 — Splunk:** 同一攻击者 `163.47.70.77` 通过 Splunk 的 `iplocation` 被定位到 **Australia, Adelaide** —— 平台之间细微的 geo-DB 差异是预期内的;两个 SIEM 确认了相同的国家。
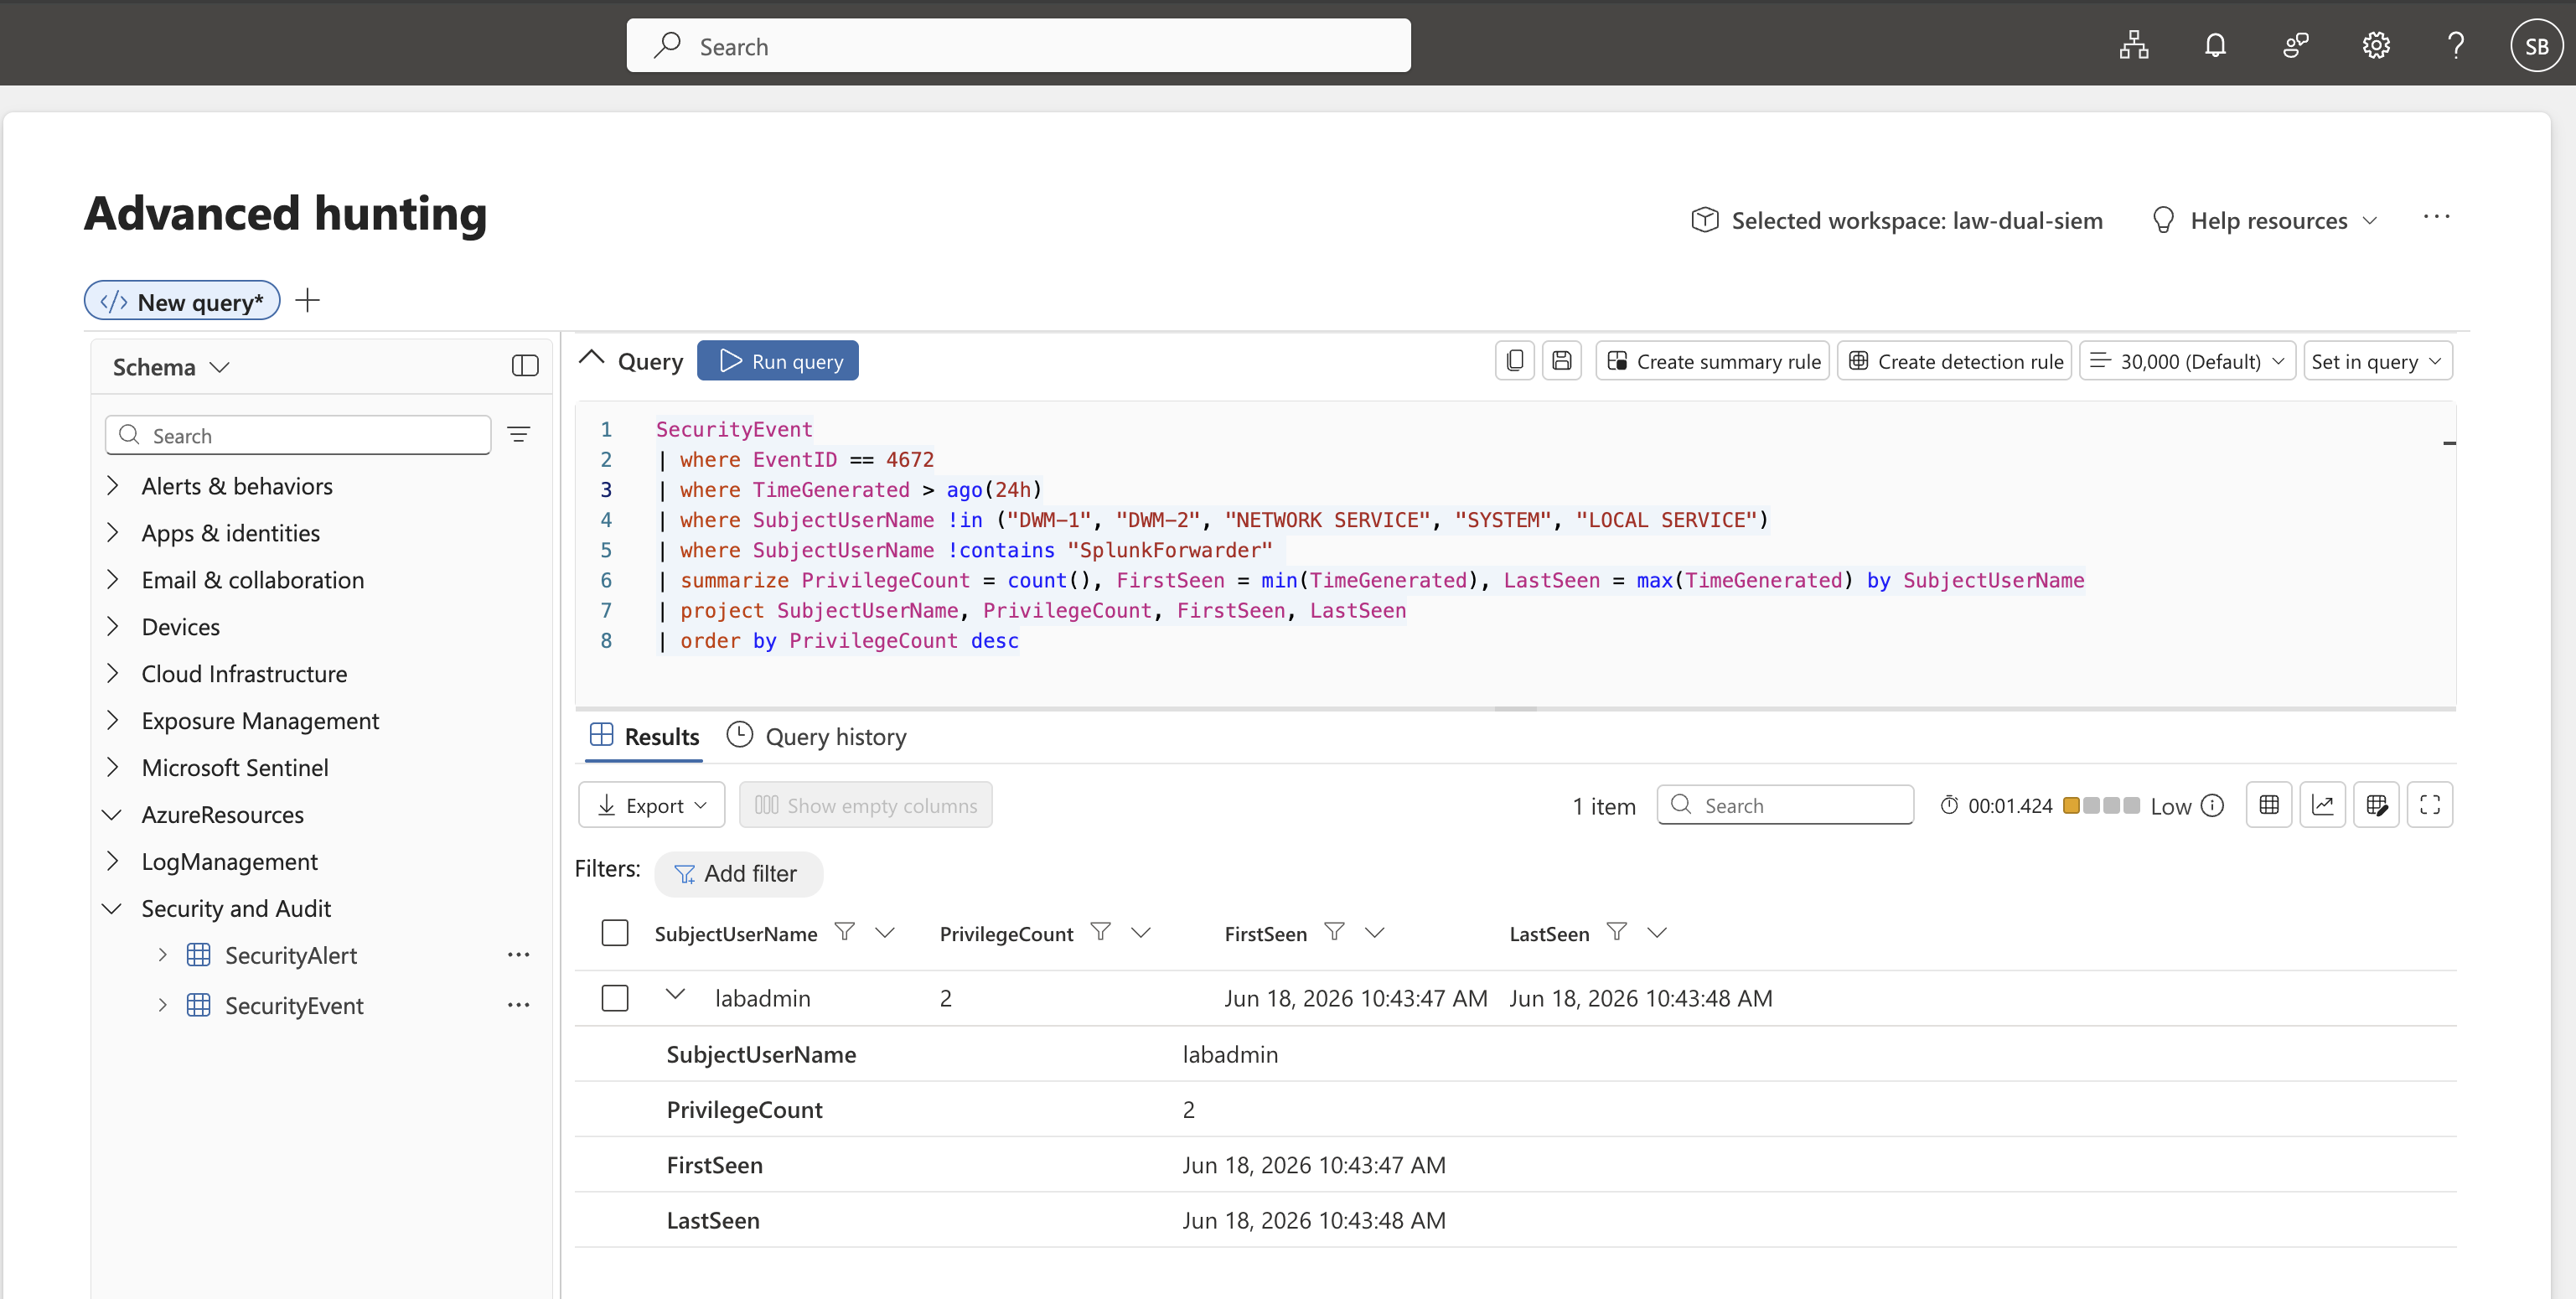
### 检测 4 — 权限提升行为基线 `MITRE:T1078.003`
对 24 小时内每个非系统用户账户的特殊权限分配事件(EventID 4672)进行基线化 —— 向非系统账户密集爆发地授予权限是强烈的后渗透指标。
**KQL — Microsoft Sentinel (Advanced Hunting)**
```
SecurityEvent
| where EventID == 4672
| where TimeGenerated > ago(24h)
| where SubjectUserName !in ("DWM-1", "DWM-2", "NETWORK SERVICE", "SYSTEM", "LOCAL SERVICE")
| summarize PrivilegeCount = count(),
FirstSeen = min(TimeGenerated),
LastSeen = max(TimeGenerated) by SubjectUserName
| project SubjectUserName, PrivilegeCount, FirstSeen, LastSeen
| order by PrivilegeCount desc
```
**结果 — Sentinel:** `labadmin` 在 10:43:47–10:43:48 AM 之间被授予了 2 次特殊权限 —— 这种 1 秒的爆发符合后渗透工具或脚本化横向移动的特征。
**SPL — Splunk Enterprise**
```
index=windows_honeypot EventCode=4672
| stats count as PrivilegeCount,
min(_time) as FirstSeen,
max(_time) as LastSeen by Account
| eval FirstSeen=strftime(FirstSeen,"%Y-%m-%d %H:%M:%S"),
LastSeen=strftime(LastSeen,"%Y-%m-%d %H:%M:%S")
| sort - PrivilegeCount
```
**结果 — Splunk:** 确认 `labadmin` 账户存在完全相同的 1 秒权限提升爆发 —— `PrivilegeCount`、`FirstSeen` 和 `LastSeen` 精确映射了两个平台上的 KQL 发现。
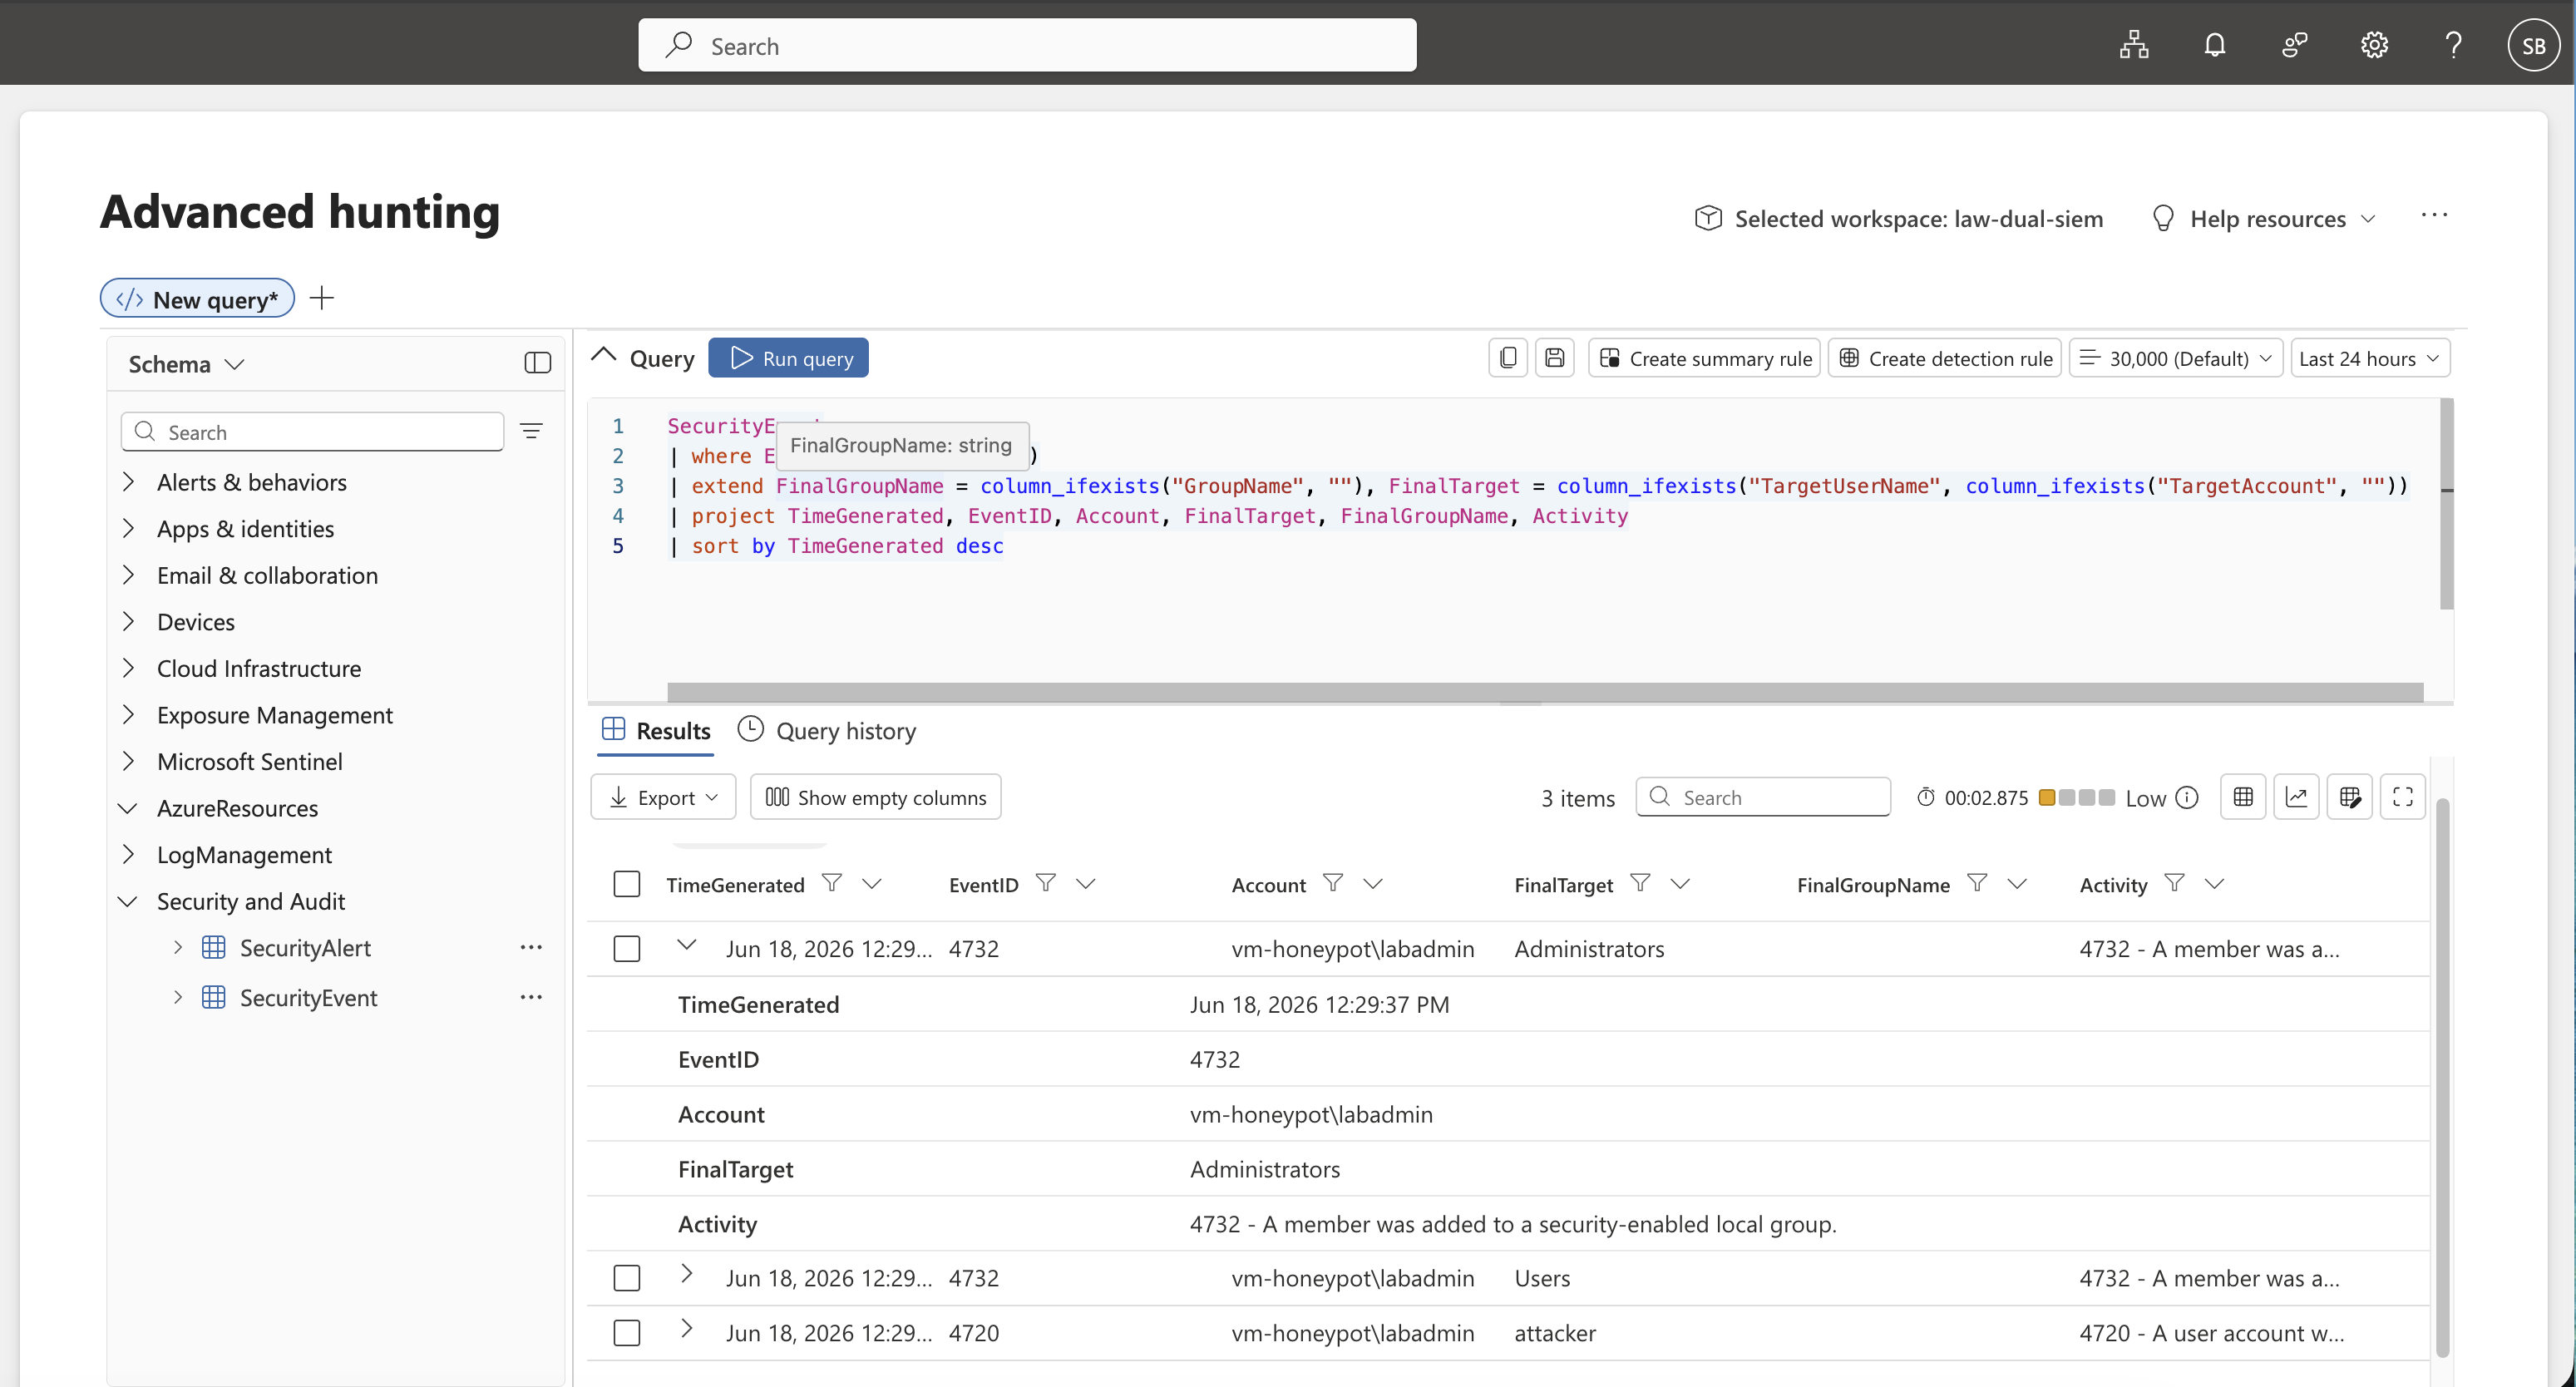
### 检测 5 — 新用户账户 + 持久化 `MITRE:T1136.001`
检测经典的攻击者持久化链:创建后门本地账户(EventID 4720),然后将其添加到 Administrators(EventID 4732)—— 端到端捕获完整的攻击链。
**KQL — Microsoft Sentinel (Advanced Hunting)**
```
SecurityEvent
| where EventID in (4720, 4732)
| extend FinalGroupName = column_ifexists("GroupName", ""),
FinalTarget = column_ifexists("TargetUserName", column_ifexists("TargetAccount", ""))
| project TimeGenerated, EventID, Account, FinalTarget, FinalGroupName, Activity
| sort by TimeGenerated desc
```
**结果 — Sentinel:** 3 个事件。`vm-honeypot\labadmin` 创建了名为 `attacker` 的账户(EventID 4720),并在下午 12:29 立即将其添加到 `Administrators` 和 `Users` 组(EventID 4732)—— 捕获到了完整的持久化链。
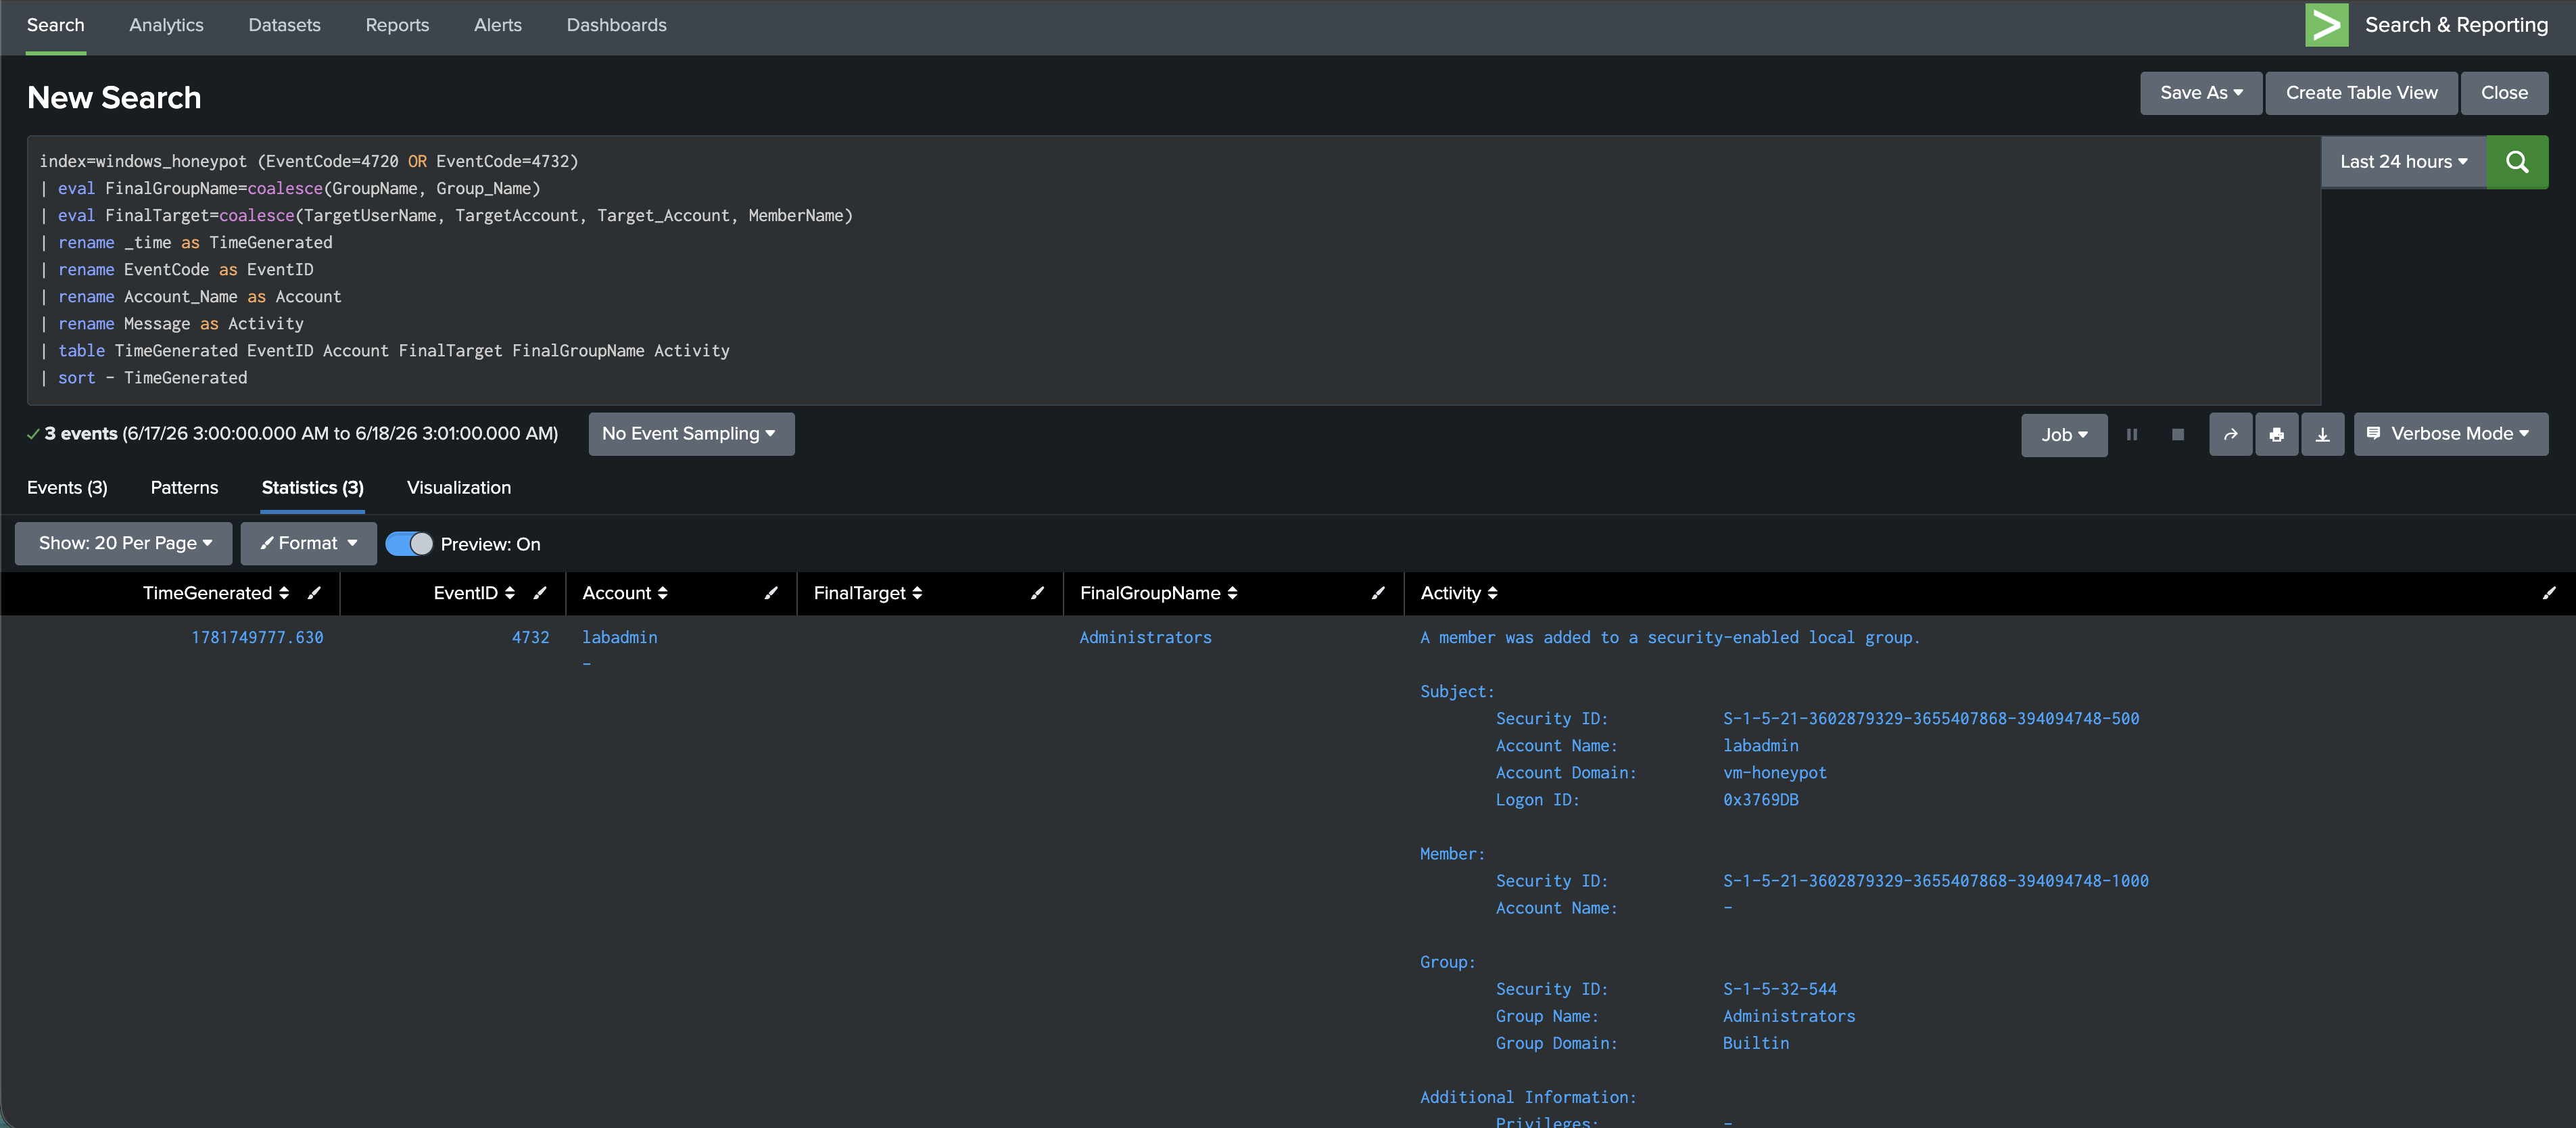
**SPL — Splunk Enterprise**
```
index=windows_honeypot (EventCode=4720 OR EventCode=4732)
| eval FinalGroupName=coalesce(GroupName, Group_Name)
| eval FinalTarget=coalesce(TargetUserName, TargetAccount, Target_Account, MemberName)
| rename _time as TimeGenerated, EventCode as EventID,
Account_Name as Account, Message as Activity
| table TimeGenerated EventID Account FinalTarget FinalGroupName Activity
| sort - TimeGenerated
```
**结果 — Splunk:** 确认 `labadmin` → `Administrators` (S-1-5-32-544, Group Domain: Builtin)。捕获了完整的原始事件详情,包括 Security IDs、Account Domain `vm-honeypot` 和组 SID。
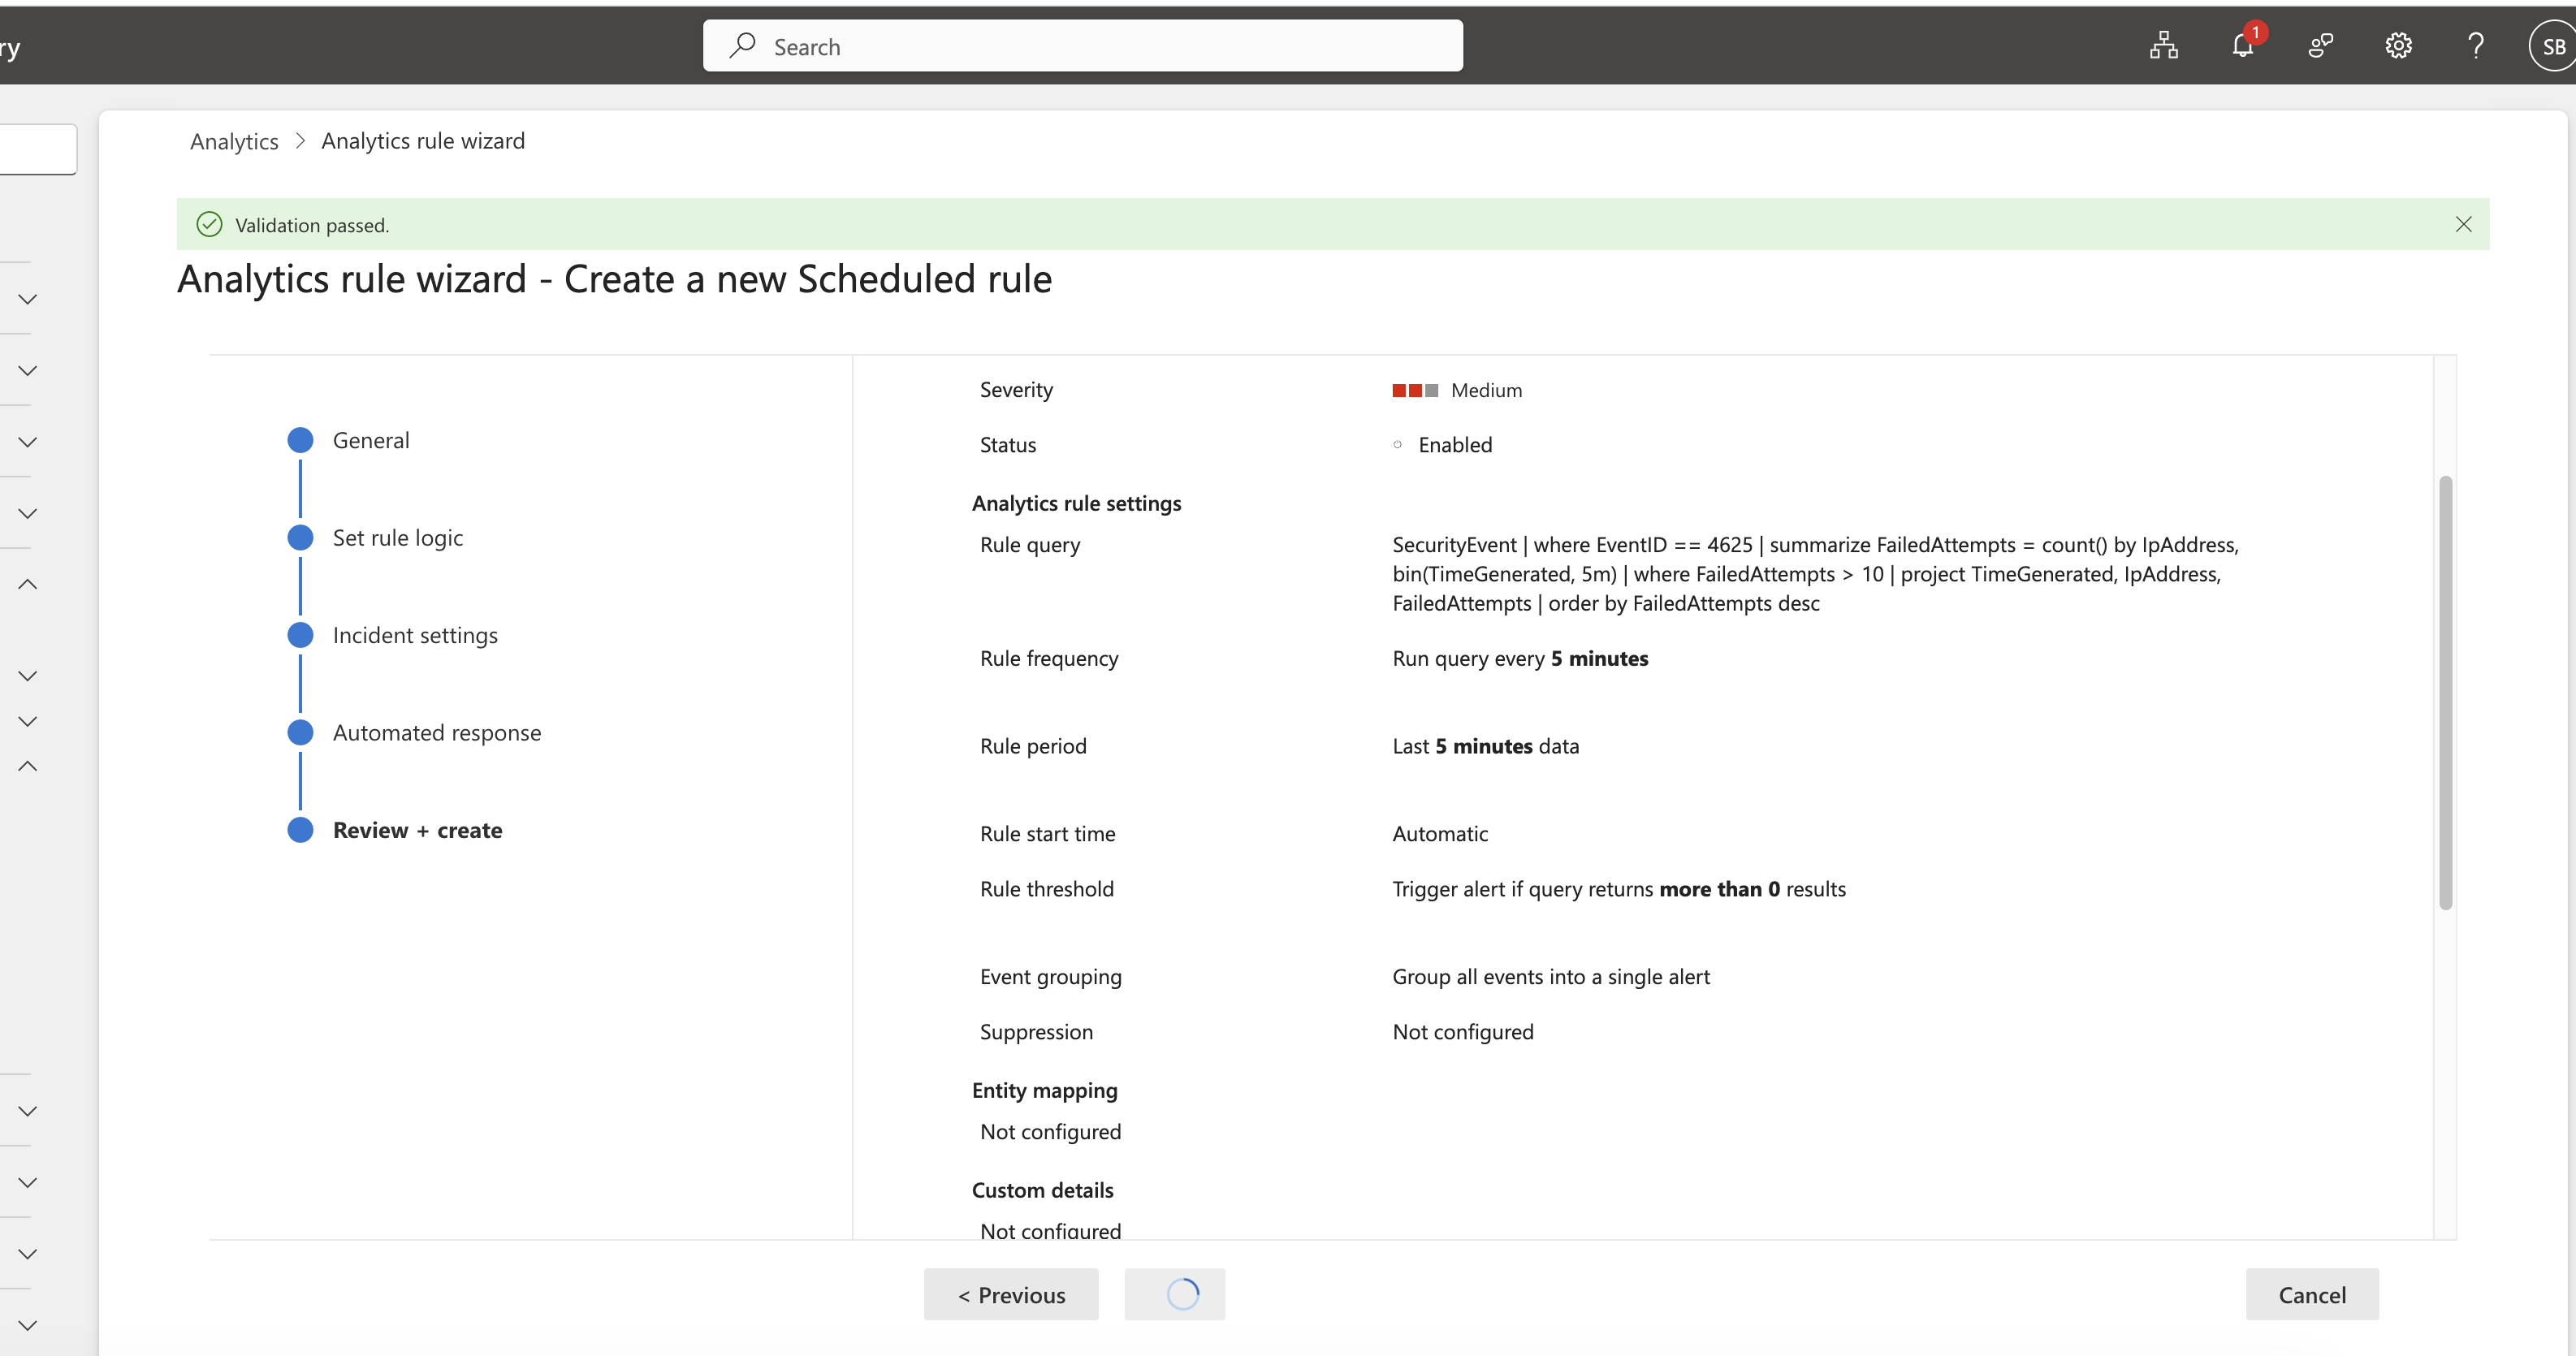
## 🚨 Sentinel 中的自动化告警
### 创建 Analytic Rule
在 Sentinel 中为检测 1 部署了一个定时的 analytic rule —— 每 **5 分钟** 对过去 5 分钟的数据运行一次,在任何结果上触发(阈值 > 0)。严重程度:**Medium**。类别:**Credential Access** (MITRE T1110.001)。验证通过 ✅
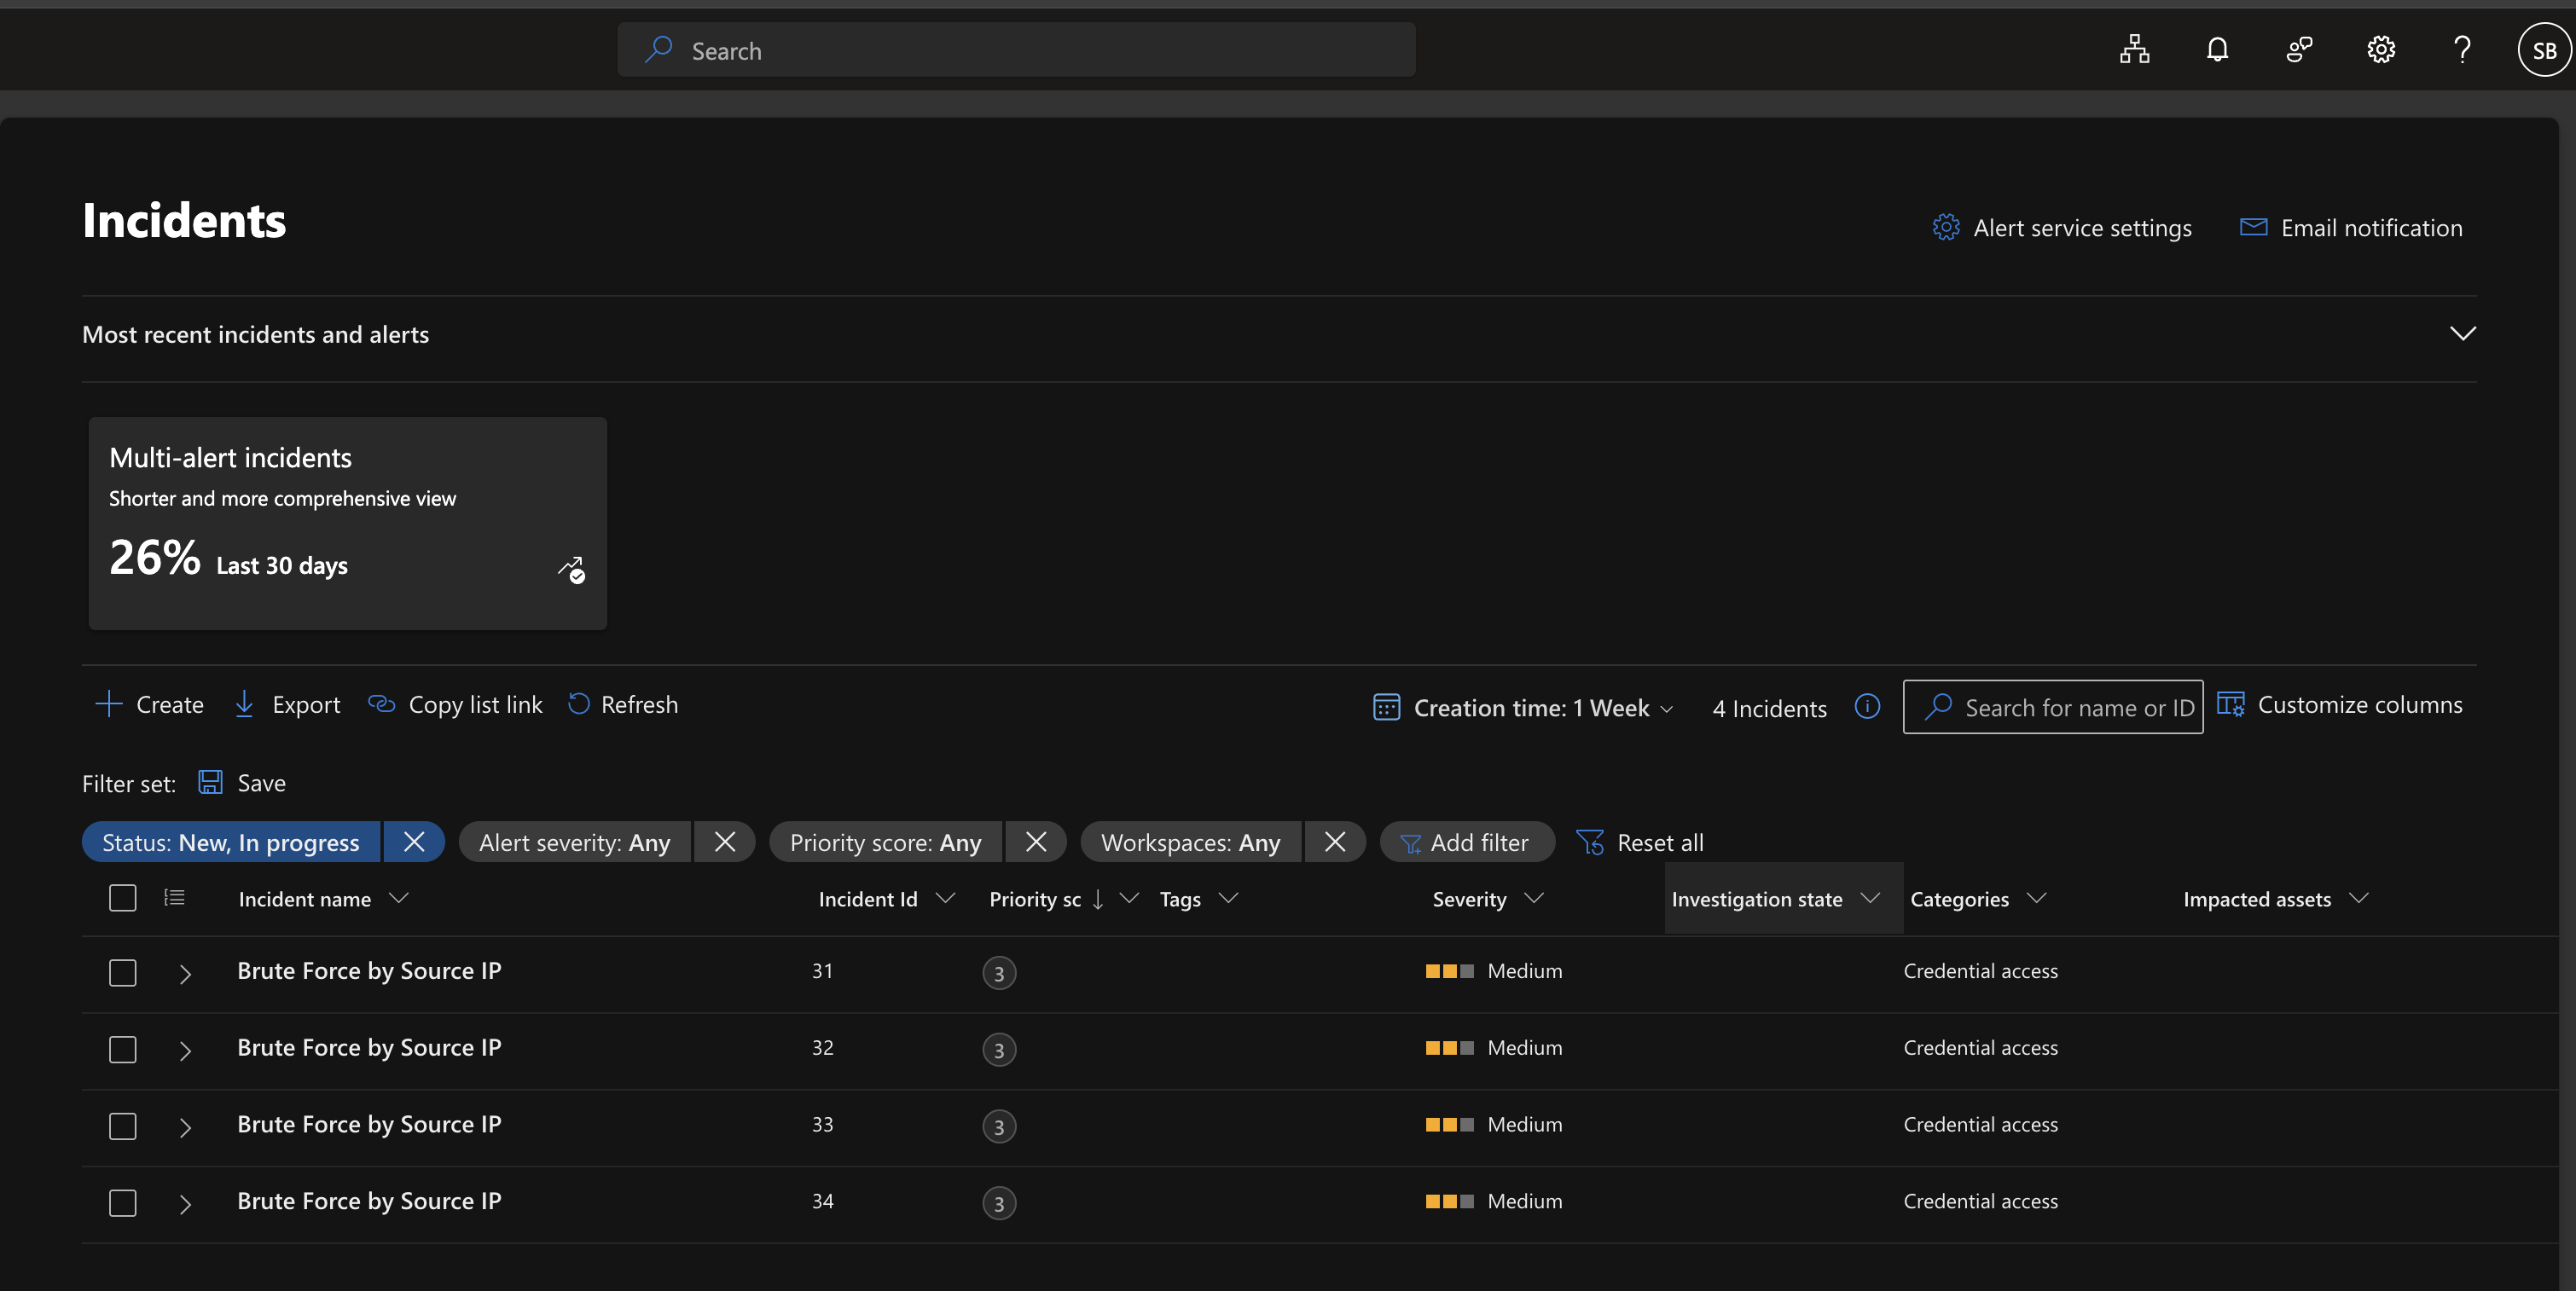
### 自动生成 4 个事件 ✅
该规则在没有任何人工干预的情况下触发 —— 在第一周内生成了 **4 个事件**(ID 31–34)。全部被归类为 `Brute Force by Source IP`,严重程度为 Medium,属于 Credential access。零漏报,零手动触发。
## 📁 代码库结构
```
DUAL-SIEM-DETECTION-LAB/
│
├── architecture/
│ └── .gitkeep
│
├── queries/
│ ├── kql/
│ │ ├── 01-brute-force-by-source-ip.kql
│ │ ├── 02-account-lockout-correlation.kql
│ │ ├── 03-geo-anomaly-lockout.kql
│ │ ├── 04-privilege-escalation-baseline.kql
│ │ └── 05-new-user-persistence.kql
│ │
│ └── spl/
│ ├── 01-brute-force-by-source-ip.spl
│ ├── 02-account-lockout-correlation.spl
│ ├── 03-geo-anomaly-lockout.spl
│ ├── 04-privilege-escalation-baseline.spl
│ └── 05-new-user-persistence.spl
│
├── screenshots/
│ ├── setup/
│ │ ├── 01-azure-resource-group-rg-dual-siem-lab.png
│ │ ├── 02-vm-honeypot-windows-server-2022-overview.png
│ │ ├── 03-log-analytics-workspace-law-dual-siem.png
│ │ ├── 04-microsoft-sentinel-deployed-law-dual-siem.png
│ │ ├── 05-vm-splunk-ubuntu-2404-azure-overview.png
│ │ ├── 06-splunk-enterprise-941-web-ui-home.png
│ │ ├── 07-azure-nsg-ports-8000-9997-splunk.png
│ │ ├── 08-splunk-universal-forwarder-1040-install.png
│ │ ├── 09-rdp-session-vm-honeypot-server-manager.png
│ │ ├── 10-inputs-conf-wineventlog-security-forwarder.png
│ │ ├── 11-windows-security-events-flowing-splunk-index.png
│ │ ├── 12-sentinel-content-hub-windows-security-events-connector.png
│ │ ├── 13-dcr-honeypot-security-events-ama-created.png
│ │ ├── 14-sentinel-logs-no-results-pre-agent-deploy.png
│ │ └── 15-sentinel-security-events-verified-flowing.png
│ │
│ └── detections/
│ ├── 16-kql-detection1-brute-force-by-source-ip-results.png
│ ├── 17-sentinel-analytic-rule-brute-force-t1110001-created.png
│ ├── 18-sentinel-incidents-brute-force-triggered-4-alerts.png
│ ├── 19-spl-detection1-brute-force-6-attacker-ips-results.png
│ ├── 20-kql-detection2-account-lockout-labadmin-11-failed.png
│ ├── 21-spl-detection2-account-lockout-streamstats-ip-correlation.png
│ ├── 22-kql-detection3-geo-anomaly-lockout-australia-sydney.png
│ ├── 23-spl-detection3-geo-anomaly-iplocation-adelaide-australia.png
│ ├── 24-kql-detection4-priv-escalation-labadmin-behavioral-baseline.png
│ ├── 25-kql-detection5-new-user-4720-4732-attacker-account.png
│ └── 26-spl-detection5-new-user-4732-administrators-group.png
│
└── .gitignore
```
## 🎯 关键发现
| # | 发现 | 攻击者 IP | MITRE | 检测位置 |
|---|---------|-------------|-------|-------------|
| 1 | 暴力破解 — 5 分钟内 14 次尝试 | `163.47.70.77` | T1110.001 | Sentinel + Splunk |
| 2 | 暴力破解 — 14 次尝试 (第二个攻击者) | `45.142.193.166` | T1110.001 | Splunk |
| 3 | 账户锁定 — `labadmin` (11 次失败 → 锁定) | `163.47.70.77` | T1110 | Sentinel + Splunk |
| 4 | 地理异常 — 确认源自 Australia | `163.47.70.77` | T1078 | Sentinel + Splunk |
| 5 | 权限提升爆发 — `labadmin` 4672 x2 | 内部 | T1078.003 | Sentinel + Splunk |
| 6 | 创建新的后门用户 `attacker` | 内部 | T1136.001 | Sentinel + Splunk |
| 7 | 后门用户被添加到 `Administrators` 组 | 内部 | T1136.001 | Sentinel + Splunk |
## 🧠 经验总结与挑战
**1. inputs.conf 字段映射冲突**
Splunk Universal Forwarder 默认的 Windows add-on 使用的字段名称与预期不同(`Source_Network_Address` 对比 `src_ip`)。通过检查原始事件并直接在 SPL 查询中编写显式的 `rex` 字段提取(而不是依赖字段别名)解决了该问题 —— 使得检测逻辑自成一体且与具体环境无关。所有 SPL 查询也显式限定在 `index=windows_honeypot` 而不是 `index=*` —— 对 index 使用通配符会迫使 Splunk 搜索所有数据 bucket,这是企业 SOC 团队明令禁止的一种性能反模式。
**2. 平台间的 Geo-IP 数据库差异**
Azure Sentinel 的 `geo_info_from_ip_address()` 和 Splunk 的 `iplocation` 命令使用不同的底层 geo-IP 数据库。同一个攻击者 IP `163.47.70.77` 在 Sentinel 中解析为 **Sydney**,而在 Splunk 中解析为 **Adelaide**。这是预期的行为 —— 两者都正确识别出 Australia 是源发国,这才是可操作的情报。这被记录为已知的跨平台差异,而不是 bug。
**3. AMA agent 部署时机**
在创建 DCR 后,大约有 10 分钟的延迟,Azure Monitor Agent 才在蜜罐 VM 上激活并且事件才开始流动。特意拍摄了 agent 部署前的基线截图(无结果)以记录这一空白,并证明管道在部署 agent 之前并未被动收集数据。
**4. Sentinel 中的 SplunkForwarder 噪声**
最初的 Sentinel 查询返回 `NT SERVICE\SplunkForwarder` 作为高频账户,污染了权限提升基线结果。通过添加 `SubjectUserName !contains "SplunkForwarder"` 作为排除过滤器解决了此问题 —— 这是任何 SOC 分析师都会面临的现实调优决策。
**5. 用于架构差异的 KQL `column_ifexists`**
Windows 安全 EventID 4720 和 4732 根据事件子类型(`TargetUserName` 对比 `TargetAccount`)将目标账户存储在不同的字段名称中。使用 `column_ifexists()` 作为弹性字段访问器来处理架构差异而不会导致查询中断 —— 这是一种可用于生产环境的模式。
## 💡 展示的技能
| 类别 | 详情 |
|----------|--------|
| **云基础设施** | Azure VM 配置、NSG 规则、Log Analytics Workspace、资源组设计 |
| **双 SIEM 架构** | 并行摄取管道 —— AMA/DCR → Sentinel 和 Universal Forwarder → Splunk |
| **KQL** | `summarize`, `join`, `bin`, `countif`, `column_ifexists`, `geo_info_from_ip_address`, `replace_string` |
| **SPL** | `rex`, `streamstats`, `iplocation`, `coalesce`, `eval`, `stats`, `rename`, 时间分桶 |
| **MITRE ATT&CK** | T1110.001, T1110, T1078, T1078.003, T1136.001 |
| **检测工程** | 阈值告警、行为基线化、地理丰富、持久化链检测(符合 SC-200 和 BTL1 的实际目标) |
| **检测调优** | 噪声降低、字段提取、具备架构弹性的查询、跨平台一致性验证 |
| **事件响应** | 自动化的 Sentinel analytic rules、事件 triage、跨平台关联 |
| **安全运营** | 活跃的蜜罐操作、真实攻击者流量分析、Windows 安全事件取证 |
## 🔮 下一步计划
- [x] 添加了 **[COMPARISON.md](./COMPARISON.md)** — 基于该实验室数据的完整 Sentinel 与 Splunk 平台分析
- [ ] 集成 **AbuseIPDB** 威胁情报查询 —— 在两个 SIEM 中利用已知的恶意信誉评分丰富攻击者 IP 信息
- [ ] 构建 **Sentinel Workbook** — 与蜜罐 SIEM 仪表板相匹配的实时攻击地图
- [ ] 扩展至 **检测 6** — 通过 EventID 4624 登录类型分析进行横向移动检测
- [ ] **🤖 试点 AI 驱动的 Triage** — 探索 **IBM watsonx Orchestrate** agents,自主利用威胁情报丰富暴力破解事件,并在任何人工接触工单之前将其路由到正确的响应队列
## 🔗 相关项目
| 项目 | 描述 |
|---------|-------------|
| [Azure Sentinel Honeypot SIEM](https://github.com/shank078/azure-sentinel-honeypot-siem) | 原始蜜罐 — 通过地理丰富信息在全球范围内映射了 1,400 多次真实攻击 |
| [SOAR Pipeline — Sentinel to Jira](https://github.com/shank078/azure-sentinel-jira-soar-pipeline) | 来自 Sentinel 的零接触自动化事件工单生成 |
| [Azure Identity Security Lab](https://github.com/shank078/azure-identity-security-lab) | 完整的 红队/蓝队 MFA 妥协与 IR 周期 |
| [Splunk SOC Detection Lab](https://github.com/shank078/splunk-soc-detection-lab) | 独立的 Splunk — 28,963 条事件,4 个攻击者 IP,执行了实时 IR |
## 👨💻 关于作者
一个构建于 Azure 之上的生产级双 SIEM 检测实验室 —— 将来自活跃蜜罐 VM 的真实 Windows 安全事件同时摄取到 Microsoft Sentinel 和 Splunk Enterprise 中,包含 5 条映射到 MITRE ATT&CK 的检测规则、自动化事件告警以及跨平台查询一致性。
Windows Server 2022
Public IP — Exposed to Internet"] subgraph SENTINEL["Microsoft Sentinel Pipeline"] B["law-dual-siem
Log Analytics Workspace"] C["Microsoft Sentinel
KQL Detections
Automated Incidents ✅"] B --> C end subgraph SPLUNK["Splunk Pipeline"] D["vm-splunk
Ubuntu 24.04
Splunk Enterprise 9.4.1
SPL Detections ✅"] end A -->|"Azure Monitor Agent
DCR: dcr-honeypot-security-events"| B A -->|"Splunk Universal Forwarder
WinEventLog:Security → Port 9997"| D end INTERNET["🌍 Real Attackers
Brute Force / Credential Attacks"] -->|"EventID: 4625 4740 4672 4720 4732"| A ``` ## 🛠️ 技术栈 | 组件 | 技术 | 详情 | |-----------|-----------|---------| | **云平台** | Microsoft Azure | 澳大利亚东部区域 | | **蜜罐 VM** | Windows Server 2022 Datacenter | Standard D2als v6 — 2 vCPUs, 4 GiB RAM | | **SIEM 1** | Microsoft Sentinel | Workspace: `law-dual-siem` | | **SIEM 2** | Splunk Enterprise 9.4.1 | Ubuntu 24.04, `vm-splunk` | | **日志转发 → Sentinel** | Azure Monitor Agent + DCR | `dcr-honeypot-security-events` — AllEvents | | **日志转发 → Splunk** | Splunk Universal Forwarder 10.4.0 | Index: `windows_honeypot` | | **查询语言 1** | KQL (Kusto Query Language) | Sentinel 检测 | | **查询语言 2** | SPL (Splunk Processing Language) | Splunk 检测 | | **检测框架** | MITRE ATT&CK | T1110.001, T1110, T1078, T1078.003, T1136.001 | ## 🚀 快速开始 **1. 配置基础设施** - 在 Azure(澳大利亚东部)创建资源组 `rg-dual-siem-lab` - 部署 `vm-honeypot` — Windows Server 2022, Standard D2als v6, 启用公网 IP - 部署 `vm-splunk` — Ubuntu 24.04, Standard D2als v6 **2. 配置网络** - 在 `vm-splunk-nsg` 上:开放入站端口 22 (SSH), 8000 (Splunk Web), 9997 (Forwarder) - 在 `vm-honeypot-nsg` 上:保留 RDP 开放以供管理(在生产环境中按 IP 限制) **3. 设置 Splunk** - 在 `vm-splunk` 上安装 Splunk Enterprise 9.4.1 - 创建 index `windows_honeypot` - 启用端口 9997 上的接收功能 **4. 设置 Splunk Universal Forwarder** - 在 `vm-honeypot` 上安装 Splunk UF 10.4.0 - 配置 `inputs.conf` — 监控 `WinEventLog://Security`,目标 index 为 `windows_honeypot` - 配置 `outputs.conf` — 转发至 `vm-splunk:9997` - 重启 Forwarder 并验证事件流 **5. 设置 Microsoft Sentinel** - 创建 Log Analytics Workspace `law-dual-siem` - 在该 Workspace 上部署 Microsoft Sentinel - 从 Content Hub 安装 **Windows Security Events** - 通过 AMA connector 创建 DCR `dcr-honeypot-security-events` — 过滤 AllEvents,目标为 `vm-honeypot` - 使用 `SecurityEvent | take 10` 进行验证 **6. 部署检测** - 将 `queries/kql/` 中的 `.kql` 文件加载到 Sentinel Analytics 中 - 将 `queries/spl/` 中的 `.spl` 文件加载到 Splunk Search & Reporting 中 - 为检测 1 配置 Sentinel analytic rule — 每 5 分钟运行一次 ## 🔧 实验室基础设施设置 ### 步骤 1 — Azure Resource Group 所有资源均部署在 **Australia East** 的 `rg-dual-siem-lab` 下 —— 总共 15 个资源,包括两台 VM、网络组件、Log Analytics Workspace 和 Sentinel。  ### 步骤 2 — 蜜罐 VM (Windows Server 2022) `vm-honeypot` 被部署为一台 Windows Server 2022 Datacenter VM(Standard D2als v6, 2 vCPUs, 4 GiB RAM)并带有公网 IP —— 被故意配置为对互联网开放的攻击目标。  ### 步骤 3 — Log Analytics Workspace `law-dual-siem` workspace(按需付费)已创建,作为 Microsoft Sentinel 的中央数据存储,通过 Azure Monitor Agent 接收所有 Windows 安全事件。  ### 步骤 4 — 部署 Microsoft Sentinel Microsoft Sentinel 已部署并附加到 `law-dual-siem` workspace,准备好摄取事件并触发自动化的 analytic rules。  ### 步骤 5 — Splunk VM (Ubuntu 24.04) `vm-splunk` 已部署 —— Ubuntu 24.04 VM(Standard D2als v6)运行 Splunk Enterprise 9.4.1,Azure NSG 规则开放了端口 **8000** (Web UI) 和 **9997** (Forwarder 接收端)。  ### 步骤 6 — Splunk Enterprise Web UI Splunk Enterprise 9.4.1 正在运行并可通过浏览器访问,准备将转发的 Windows 安全事件接收到 `windows_honeypot` index 中。  ### 步骤 7 — Splunk 的 NSG 规则 Azure NSG `vm-splunk-nsg` 配置了入站规则:SSH (22)、Splunk Web (8000)、Splunk Forwarder (9997)。  ### 步骤 8 — 安装 Splunk Universal Forwarder Splunk Universal Forwarder 10.4.0 已安装在蜜罐 VM 上,配置为将 `WinEventLog:Security` 事件发送到端口 9997 上的 Splunk indexer。  ### 步骤 9 — 通过 RDP 进入蜜罐 已确认到 `vm-honeypot` 的 RDP 会话 —— 运行 Server Manager 的 Windows Server 2022。这是真实攻击者正在从互联网进行攻击的活跃机器。  ### 步骤 10 — 配置 inputs.conf 在 Universal Forwarder 上配置了 `inputs.conf`,监控 `WinEventLog://Security`,设置 `index = windows_honeypot` 和 `disabled = false`。Forwarder 已重启并确认正在运行 (pid 3216)。  ## 📡 数据管道 ### Splunk — Windows 安全事件正在流动 ✅ `index=windows_honeypot | head 10` 确认了实时摄取 —— `LogName=Security`, `EventCode=4688`, `ComputerName=vm-honeypot`, `source=WinEventLog:Security`。  ### Sentinel — Content Hub Connector 已安装 ✅ 从 Sentinel Content Hub 安装了 **Windows Security Events** 解决方案(v3.0.12,Microsoft)—— 包含 2 个数据 connector、20 条 analytic rules、2 个 workbook 和 50 个 hunting queries。  ### Sentinel — Data Collection Rule 已创建 ✅ 通过 **Windows Security Events via AMA** connector 成功创建了 DCR `dcr-honeypot-security-events` —— 过滤器:`AllEvents`,由 Sentinel 创建,目标为蜜罐 VM。  ### Sentinel — Agent 部署前基线 (无数据) ✅ 在部署 AMA 之前进行了刻意的基线检查:`SecurityEvent | where EventID == 4624` 返回 **0 个结果** —— 证实事先没有发生被动的数据收集。  ### Sentinel — 已验证实时事件 ✅ 部署后:`SecurityEvent | take 10` 返回了来自 `vm-honeypot` 的真实事件 —— 可以看到 `NT SERVICE\SplunkForwarder` 和 `NT AUTHORITY\SYSTEM` 账户,确认两个 SIEM 正在同时从同一数据源摄取数据。  ## 🔍 检测规则 所有 5 条检测规则均在 **KQL (Sentinel) 和 SPL (Splunk)** 中实现,并拥有来自真实攻击者活动的验证结果。 ### 检测 1 — 按源 IP 进行暴力破解 `MITRE:T1110.001` 识别在任何 5 分钟时间窗口内产生超过 10 次失败登录尝试(EventID 4625)的外部 IP —— 这是自动化密码喷洒或暴力破解工具最清晰的信号。 **KQL — Microsoft Sentinel** ``` SecurityEvent | where EventID == 4625 | summarize FailedAttempts = count() by IpAddress, bin(TimeGenerated, 5m) | where FailedAttempts > 10 | project TimeGenerated, IpAddress, FailedAttempts | order by FailedAttempts desc ``` **结果 — Sentinel:** 检测到 4 个攻击者 IP。头号违规者 `163.47.70.77` —— 在单个 5 分钟窗口内发生了 14 次失败尝试。  **SPL — Splunk Enterprise** ``` index=windows_honeypot EventCode=4625 | bin span=5m _time | stats count as FailedAttempts by _time, Source_Network_Address | where FailedAttempts > 10 | sort - FailedAttempts ``` **结果 — Splunk:** 在 104 条原始事件中检测到 6 个攻击者 IP。`45.142.193.166` 和 `163.47.70.77` 均有 14 次尝试 —— 跨平台结果一致。  ### 检测 2 — 账户锁定关联 `MITRE:T1110` 将失败登录(EventID 4625)与账户锁定事件(EventID 4740)相关联,以确认账户被主动暴力破解超过了其锁定阈值 —— 从噪声转化为已确认的攻击。 **KQL — Microsoft Sentinel (Advanced Hunting)** ``` SecurityEvent | where EventID in (4625, 4740) | where TimeGenerated > ago(1h) | summarize FailedLogins = countif(EventID == 4625), Lockouts = countif(EventID == 4740) by TargetUserName | where FailedLogins >= 3 and Lockouts > 0 | project TargetUserName, FailedLogins, Lockouts | order by Lockouts desc ``` **结果 — Sentinel:** `labadmin` —— 11 次失败登录最终导致 1 次确认锁定。已确认针对性攻击。  **SPL — Splunk Enterprise** ``` index="windows_honeypot" (EventCode=4625 OR EventCode=4740) | rex field=_raw "Source Network Address:\s*(?
使用真实的攻击者流量构建。没有模拟数据。每一次检测都是针对来自互联网的真实威胁触发的。
标签:AMSI绕过, Microsoft Sentinel, 威胁检测, 安全运营, 扫描框架, 红队行动, 蜜罐, 证书利用