TradexLogic/ReconKit-by-KamrulHasan-Automated-Web-Reconnaissance-Scanner
GitHub: TradexLogic/ReconKit-by-KamrulHasan-Automated-Web-Reconnaissance-Scanner
一个模块化的自动化 Web 安全侦察平台,将多种行业标准的命令行安全工具整合并提供实时可视化仪表盘,以简化渗透测试和漏洞挖掘流程。
Stars: 0 | Forks: 0
# 🔍 ReconKit — 自动化 Web 侦察与漏洞扫描器


 ## 🌟 什么是 ReconKit?
ReconKit 是一个开源的、基于 Web 的自动化安全扫描平台,它将 **Subfinder**、**httpx**、**Katana**、**Nuclei**、**Dalfox** 和 **SQLMap** 等行业标准工具的强大功能结合在一起,整合到一个统一的仪表板中并提供实时动态更新。
无论您是在进行 Bug Bounty 搜寻、渗透测试还是安全研究 —— ReconKit 都能自动化您的整个工作流程,从子域名发现到漏洞检测。
## ✨ 核心功能
- 🔎 **子域名枚举** — 结合 Subfinder + Assetfinder 以实现最大覆盖率
- ✅ **存活主机检测** — 由 httpx 驱动的存活/失效主机过滤
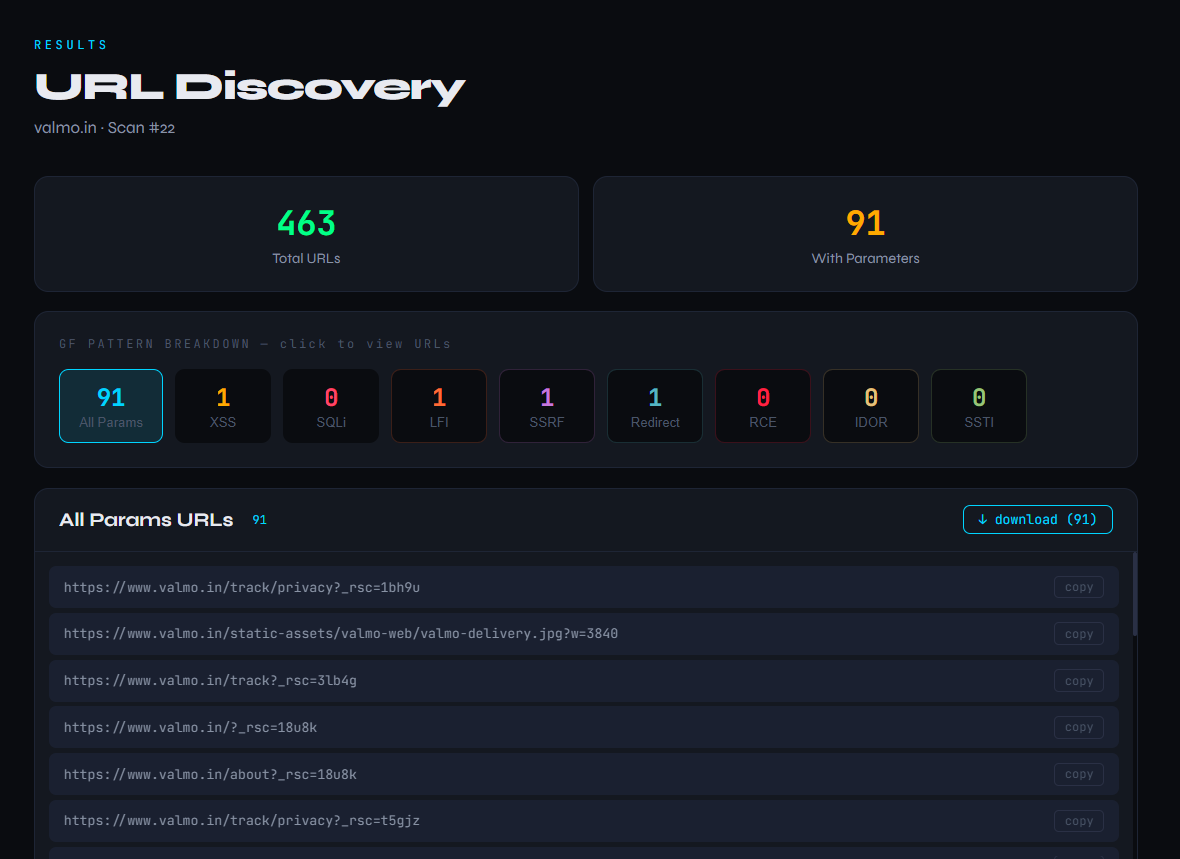
- 🌐 **URL 发现** — Waybackurls + GAU + Katana 爬虫
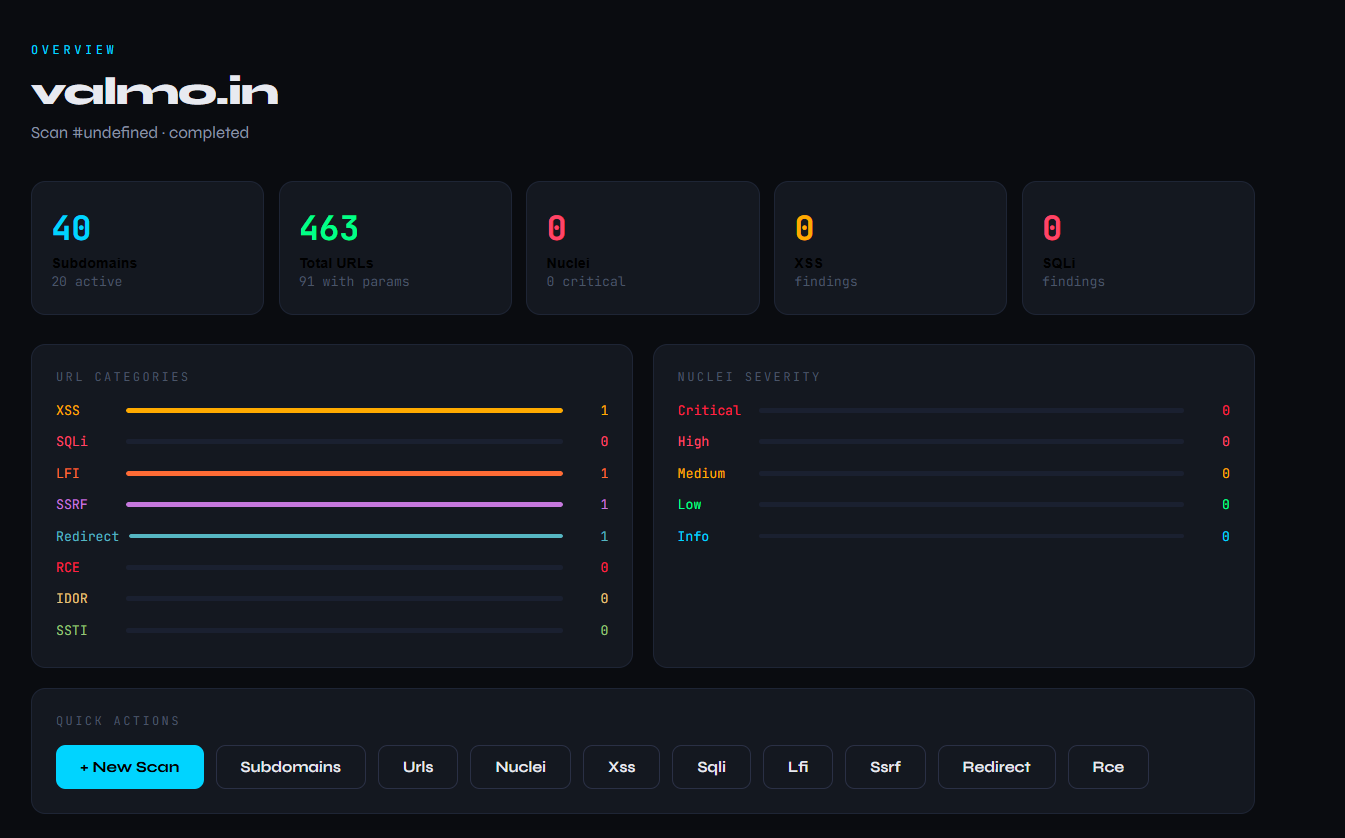
- 🎯 **智能 URL 分类** — GF patterns 自动按漏洞类型(XSS、SQLi、LFI、SSRF、RCE、IDOR、SSTI、重定向)对 URL 进行排序
- 💉 **XSS 检测** — Dalfox 自动化 XSS 扫描器
- 🗄️ **SQLi 检测** — SQLMap 集成
- ☢️ **漏洞扫描** — 具有完整模板支持的 Nuclei
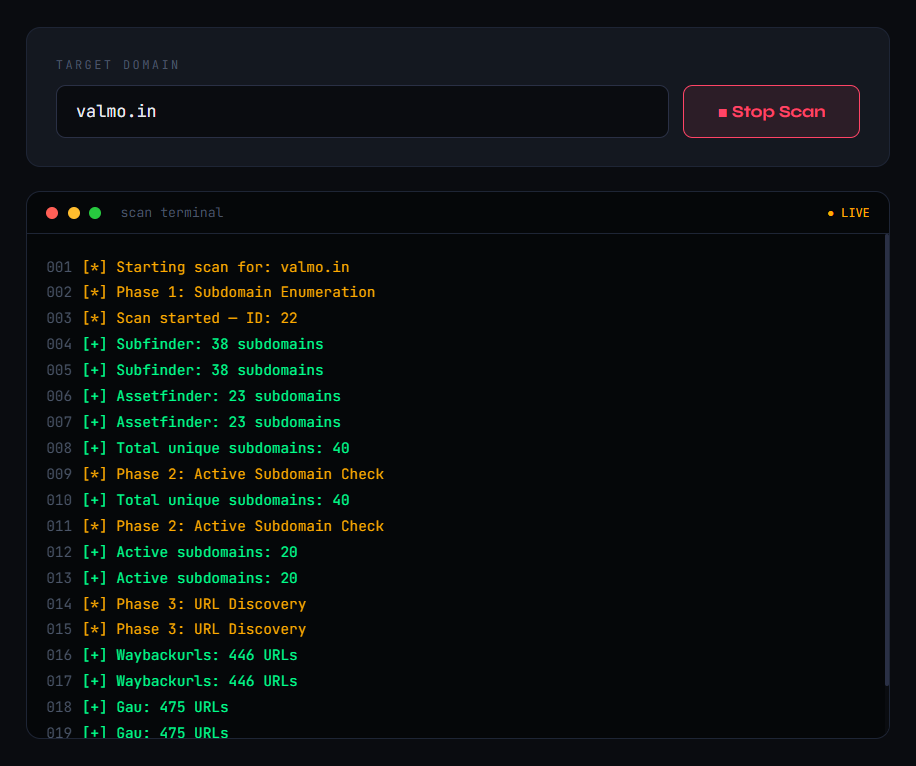
- 📡 **实时仪表板** — 基于 WebSocket 的扫描进度实时更新
- 🔐 **认证扫描** — 为需要登录的目标提供 Session cookie 支持
- 📥 **导出结果** — 将任何 URL 列表或发现下载为 .txt 文件
- 🗂️ **扫描历史** — 由 SQLite 支持的持久化扫描记录
- 🧩 **模块化架构** — 每个工具都是独立的模块,易于扩展
## 🖥️ 仪表板预览
```
┌─────────────────────────────────────────────────────┐
│ RECON ScanKit supernovas.indrive.com │
│─────────────────────────────────────────────────────│
│ ⬡ Dashboard │ OVERVIEW │
│ ◈ New Scan │ Subdomains: 3 | URLs: 3000 │
│ ◷ History │ Nuclei: 12 | XSS: 2 | SQLi: 1 │
│─────────────────│ │
│ RECON │ [URL CATEGORIES — LIVE] │
│ ◎ Subdomains │ XSS ████████░░ 24 │
│ ⊹ URLs │ SQLi █████░░░░░ 15 │
│─────────────────│ LFI ███░░░░░░░ 8 │
│ VULNERABILITIES│ SSRF ██░░░░░░░░ 5 │
│ ▸ Nuclei │ │
│ ▸ XSS │ [NUCLEI SEVERITY — LIVE] │
│ ▸ SQL Injection│ Critical ██░░░░░░░░ 2 │
│ ▸ LFI │ High ████░░░░░░ 8 │
│ ▸ SSRF │ Medium ██████░░░░ 15 │
│ ▸ RCE │ │
└─────────────────────────────────────────────────────┘
```
## 🛠️ 技术栈
| 层级 | 技术 |
|---|---|
| 后端 | Python 3.10+ + FastAPI |
| 实时通信 | WebSocket |
| 前端 | React 18 + TypeScript |
| 数据库 | SQLite |
| 侦察工具 | Subfinder, Assetfinder, httpx |
| URL 发现 | Waybackurls, GAU, Katana |
| 漏洞扫描 | Nuclei, Dalfox, SQLMap |
| URL 过滤 | GF Patterns |
## ⚙️ 安装说明
### 前置条件
- **操作系统:** Linux 或 Windows WSL2(推荐使用 Ubuntu)
- **Python:** 3.10+
- **Node.js:** 18+
- **Go:** 1.22+
### 步骤 1 — 克隆仓库
```
git clone https://github.com/YOUR_USERNAME/reconkit.git
cd reconkit
```
### 步骤 2 — 安装 Go 工具
```
# Go 安装
wget https://go.dev/dl/go1.22.0.linux-amd64.tar.gz
sudo tar -C /usr/local -xzf go1.22.0.linux-amd64.tar.gz
echo 'export PATH=$PATH:/usr/local/go/bin:~/go/bin' >> ~/.bashrc
source ~/.bashrc
# Recon 工具
go install -v github.com/projectdiscovery/subfinder/v2/cmd/subfinder@latest
go install -v github.com/tomnomnom/assetfinder@latest
go install -v github.com/projectdiscovery/httpx/cmd/httpx@latest
go install -v github.com/tomnomnom/waybackurls@latest
go install -v github.com/lc/gau/v2/cmd/gau@latest
go install -v github.com/projectdiscovery/katana/cmd/katana@latest
go install -v github.com/projectdiscovery/nuclei/v3/cmd/nuclei@latest
go install -v github.com/hahwul/dalfox/v2@latest
go install -v github.com/tomnomnom/gf@latest
# Nuclei 模板
nuclei -update-templates
# GF patterns
git clone https://github.com/1ndianl33t/Gf-Patterns /tmp/gf-patterns
mkdir -p ~/.gf
cp /tmp/gf-patterns/*.json ~/.gf/
```
### 步骤 3 — 安装 SQLMap
```
cd ~
git clone https://github.com/sqlmapproject/sqlmap.git
```
### 步骤 4 — 后端配置
```
cd reconkit/backend
python3 -m venv venv
source venv/bin/activate
pip install fastapi uvicorn websockets httpx
```
### 步骤 5 — 前端配置
```
cd reconkit/frontend
npm install
```
### 步骤 6 — 运行 ReconKit
**终端 1 — 后端 (WSL/Linux):**
```
cd reconkit/backend
source venv/bin/activate
python3 -m uvicorn main:app --reload --host 0.0.0.0 --port 8000
```
**终端 2 — 前端:**
```
cd reconkit/frontend
npm start
```
在浏览器中打开:`http://localhost:3000`
## 🚀 使用说明
### 基础扫描
1. 打开 `http://localhost:3000`
2. 点击 **New Scan**
3. 输入目标域名(例如 `example.com`)
4. 点击 **Start Scan**
5. 观察所有面板中实时显示的扫描结果
### 认证扫描(适用于需要登录的目标)
1. 在浏览器中登录目标站点
2. 复制您的 Session cookie(例如 `PHPSESSID=abc123`)
3. 在扫描前将其粘贴到 **Session Cookie** 字段中
4. ReconKit 会将 cookie 传递给 Katana、Dalfox、SQLMap 和 Nuclei
### 本地测试 (DVWA)
```
docker run -d -p 80:80 --name dvwa vulnerables/web-dvwa
```
- URL: `http://localhost/login.php`
- 用户名: `admin` | 密码: `password`
- 点击 "Create / Reset Database"
- 使用 Session cookie 扫描 `localhost`
## 📁 项目结构
```
reconkit/
├── backend/
│ ├── main.py # FastAPI app entry point
│ ├── core/
│ │ ├── workflow.py # Main scan pipeline orchestrator
│ │ └── websocket_manager.py # Real-time WebSocket manager
│ ├── modules/
│ │ ├── subfinder.py # Subdomain enumeration
│ │ ├── assetfinder.py # Subdomain enumeration
│ │ ├── httpx_runner.py # Active host detection
│ │ ├── waybackurls.py # URL discovery
│ │ ├── gau.py # URL discovery
│ │ ├── katana.py # Web crawler
│ │ ├── gf_runner.py # URL categorization
│ │ ├── dalfox.py # XSS scanner
│ │ ├── sqlmap_runner.py # SQLi scanner
│ │ └── nuclei.py # Vulnerability scanner
│ └── database/
│ └── db.py # SQLite database
└── frontend/
└── src/
├── App.tsx
└── components/
├── Sidebar.tsx
├── Dashboard.tsx
├── ScanPanel.tsx
├── Results.tsx
└── History.tsx
```
## 🔄 扫描工作流
```
Target Domain Input
↓
┌─── Phase 1: Subdomain Enumeration ───┐
│ Subfinder + Assetfinder │
│ → Merge & deduplicate │
└──────────────────────────────────────┘
↓
┌─── Phase 2: Active Host Detection ───┐
│ httpx → filter live hosts │
└──────────────────────────────────────┘
↓
┌─── Phase 3: URL Discovery ────────────┐
│ Waybackurls + GAU + Katana crawler │
│ → Merge & deduplicate │
└───────────────────────────────────────┘
↓
┌─── Phase 4: URL Categorization ───────┐
│ GF Patterns │
│ → XSS, SQLi, LFI, SSRF, RCE, IDOR │
└───────────────────────────────────────┘
↓
┌─── Phase 5: Vulnerability Scanning ───┐
│ Dalfox → XSS detection │
│ SQLMap → SQLi detection │
└───────────────────────────────────────┘
↓
┌─── Phase 6: Nuclei Full Scan ─────────┐
│ All templates → Critical/High/Medium │
└───────────────────────────────────────┘
↓
Dashboard Results
```
## ➕ 添加新模块
ReconKit 采用插件友好的架构构建。要添加新的扫描器:
1. 创建 `backend/modules/your_tool.py`
2. 实现 `async def run_your_tool(targets: list) -> list`
3. 在 `core/workflow.py` 中导入并调用它
4. 在 `frontend/src/components/Results.tsx` 中添加结果显示
## ⚠️ 法律免责声明
## 📄 许可证
MIT 许可证 — 详情请参阅 [LICENSE](LICENSE)。
## 🙏 致谢
ReconKit 由以下令人惊叹的开源工具提供支持:
- [Subfinder](https://github.com/projectdiscovery/subfinder) — ProjectDiscovery
- [httpx](https://github.com/projectdiscovery/httpx) — ProjectDiscovery
- [Nuclei](https://github.com/projectdiscovery/nuclei) — ProjectDiscovery
- [Katana](https://github.com/projectdiscovery/katana) — ProjectDiscovery
- [Assetfinder](https://github.com/tomnomnom/assetfinder) — tomnomnom
- [Waybackurls](https://github.com/tomnomnom/waybackurls) — tomnomnom
- [GF](https://github.com/tomnomnom/gf) — tomnomnom
- [GAU](https://github.com/lc/gau) — lc
- [Dalfox](https://github.com/hahwul/dalfox) — hahwul
- [SQLMap](https://github.com/sqlmapproject/sqlmap) — sqlmapproject
## 🌟 什么是 ReconKit?
ReconKit 是一个开源的、基于 Web 的自动化安全扫描平台,它将 **Subfinder**、**httpx**、**Katana**、**Nuclei**、**Dalfox** 和 **SQLMap** 等行业标准工具的强大功能结合在一起,整合到一个统一的仪表板中并提供实时动态更新。
无论您是在进行 Bug Bounty 搜寻、渗透测试还是安全研究 —— ReconKit 都能自动化您的整个工作流程,从子域名发现到漏洞检测。
## ✨ 核心功能
- 🔎 **子域名枚举** — 结合 Subfinder + Assetfinder 以实现最大覆盖率
- ✅ **存活主机检测** — 由 httpx 驱动的存活/失效主机过滤
- 🌐 **URL 发现** — Waybackurls + GAU + Katana 爬虫
- 🎯 **智能 URL 分类** — GF patterns 自动按漏洞类型(XSS、SQLi、LFI、SSRF、RCE、IDOR、SSTI、重定向)对 URL 进行排序
- 💉 **XSS 检测** — Dalfox 自动化 XSS 扫描器
- 🗄️ **SQLi 检测** — SQLMap 集成
- ☢️ **漏洞扫描** — 具有完整模板支持的 Nuclei
- 📡 **实时仪表板** — 基于 WebSocket 的扫描进度实时更新
- 🔐 **认证扫描** — 为需要登录的目标提供 Session cookie 支持
- 📥 **导出结果** — 将任何 URL 列表或发现下载为 .txt 文件
- 🗂️ **扫描历史** — 由 SQLite 支持的持久化扫描记录
- 🧩 **模块化架构** — 每个工具都是独立的模块,易于扩展
## 🖥️ 仪表板预览
```
┌─────────────────────────────────────────────────────┐
│ RECON ScanKit supernovas.indrive.com │
│─────────────────────────────────────────────────────│
│ ⬡ Dashboard │ OVERVIEW │
│ ◈ New Scan │ Subdomains: 3 | URLs: 3000 │
│ ◷ History │ Nuclei: 12 | XSS: 2 | SQLi: 1 │
│─────────────────│ │
│ RECON │ [URL CATEGORIES — LIVE] │
│ ◎ Subdomains │ XSS ████████░░ 24 │
│ ⊹ URLs │ SQLi █████░░░░░ 15 │
│─────────────────│ LFI ███░░░░░░░ 8 │
│ VULNERABILITIES│ SSRF ██░░░░░░░░ 5 │
│ ▸ Nuclei │ │
│ ▸ XSS │ [NUCLEI SEVERITY — LIVE] │
│ ▸ SQL Injection│ Critical ██░░░░░░░░ 2 │
│ ▸ LFI │ High ████░░░░░░ 8 │
│ ▸ SSRF │ Medium ██████░░░░ 15 │
│ ▸ RCE │ │
└─────────────────────────────────────────────────────┘
```
## 🛠️ 技术栈
| 层级 | 技术 |
|---|---|
| 后端 | Python 3.10+ + FastAPI |
| 实时通信 | WebSocket |
| 前端 | React 18 + TypeScript |
| 数据库 | SQLite |
| 侦察工具 | Subfinder, Assetfinder, httpx |
| URL 发现 | Waybackurls, GAU, Katana |
| 漏洞扫描 | Nuclei, Dalfox, SQLMap |
| URL 过滤 | GF Patterns |
## ⚙️ 安装说明
### 前置条件
- **操作系统:** Linux 或 Windows WSL2(推荐使用 Ubuntu)
- **Python:** 3.10+
- **Node.js:** 18+
- **Go:** 1.22+
### 步骤 1 — 克隆仓库
```
git clone https://github.com/YOUR_USERNAME/reconkit.git
cd reconkit
```
### 步骤 2 — 安装 Go 工具
```
# Go 安装
wget https://go.dev/dl/go1.22.0.linux-amd64.tar.gz
sudo tar -C /usr/local -xzf go1.22.0.linux-amd64.tar.gz
echo 'export PATH=$PATH:/usr/local/go/bin:~/go/bin' >> ~/.bashrc
source ~/.bashrc
# Recon 工具
go install -v github.com/projectdiscovery/subfinder/v2/cmd/subfinder@latest
go install -v github.com/tomnomnom/assetfinder@latest
go install -v github.com/projectdiscovery/httpx/cmd/httpx@latest
go install -v github.com/tomnomnom/waybackurls@latest
go install -v github.com/lc/gau/v2/cmd/gau@latest
go install -v github.com/projectdiscovery/katana/cmd/katana@latest
go install -v github.com/projectdiscovery/nuclei/v3/cmd/nuclei@latest
go install -v github.com/hahwul/dalfox/v2@latest
go install -v github.com/tomnomnom/gf@latest
# Nuclei 模板
nuclei -update-templates
# GF patterns
git clone https://github.com/1ndianl33t/Gf-Patterns /tmp/gf-patterns
mkdir -p ~/.gf
cp /tmp/gf-patterns/*.json ~/.gf/
```
### 步骤 3 — 安装 SQLMap
```
cd ~
git clone https://github.com/sqlmapproject/sqlmap.git
```
### 步骤 4 — 后端配置
```
cd reconkit/backend
python3 -m venv venv
source venv/bin/activate
pip install fastapi uvicorn websockets httpx
```
### 步骤 5 — 前端配置
```
cd reconkit/frontend
npm install
```
### 步骤 6 — 运行 ReconKit
**终端 1 — 后端 (WSL/Linux):**
```
cd reconkit/backend
source venv/bin/activate
python3 -m uvicorn main:app --reload --host 0.0.0.0 --port 8000
```
**终端 2 — 前端:**
```
cd reconkit/frontend
npm start
```
在浏览器中打开:`http://localhost:3000`
## 🚀 使用说明
### 基础扫描
1. 打开 `http://localhost:3000`
2. 点击 **New Scan**
3. 输入目标域名(例如 `example.com`)
4. 点击 **Start Scan**
5. 观察所有面板中实时显示的扫描结果
### 认证扫描(适用于需要登录的目标)
1. 在浏览器中登录目标站点
2. 复制您的 Session cookie(例如 `PHPSESSID=abc123`)
3. 在扫描前将其粘贴到 **Session Cookie** 字段中
4. ReconKit 会将 cookie 传递给 Katana、Dalfox、SQLMap 和 Nuclei
### 本地测试 (DVWA)
```
docker run -d -p 80:80 --name dvwa vulnerables/web-dvwa
```
- URL: `http://localhost/login.php`
- 用户名: `admin` | 密码: `password`
- 点击 "Create / Reset Database"
- 使用 Session cookie 扫描 `localhost`
## 📁 项目结构
```
reconkit/
├── backend/
│ ├── main.py # FastAPI app entry point
│ ├── core/
│ │ ├── workflow.py # Main scan pipeline orchestrator
│ │ └── websocket_manager.py # Real-time WebSocket manager
│ ├── modules/
│ │ ├── subfinder.py # Subdomain enumeration
│ │ ├── assetfinder.py # Subdomain enumeration
│ │ ├── httpx_runner.py # Active host detection
│ │ ├── waybackurls.py # URL discovery
│ │ ├── gau.py # URL discovery
│ │ ├── katana.py # Web crawler
│ │ ├── gf_runner.py # URL categorization
│ │ ├── dalfox.py # XSS scanner
│ │ ├── sqlmap_runner.py # SQLi scanner
│ │ └── nuclei.py # Vulnerability scanner
│ └── database/
│ └── db.py # SQLite database
└── frontend/
└── src/
├── App.tsx
└── components/
├── Sidebar.tsx
├── Dashboard.tsx
├── ScanPanel.tsx
├── Results.tsx
└── History.tsx
```
## 🔄 扫描工作流
```
Target Domain Input
↓
┌─── Phase 1: Subdomain Enumeration ───┐
│ Subfinder + Assetfinder │
│ → Merge & deduplicate │
└──────────────────────────────────────┘
↓
┌─── Phase 2: Active Host Detection ───┐
│ httpx → filter live hosts │
└──────────────────────────────────────┘
↓
┌─── Phase 3: URL Discovery ────────────┐
│ Waybackurls + GAU + Katana crawler │
│ → Merge & deduplicate │
└───────────────────────────────────────┘
↓
┌─── Phase 4: URL Categorization ───────┐
│ GF Patterns │
│ → XSS, SQLi, LFI, SSRF, RCE, IDOR │
└───────────────────────────────────────┘
↓
┌─── Phase 5: Vulnerability Scanning ───┐
│ Dalfox → XSS detection │
│ SQLMap → SQLi detection │
└───────────────────────────────────────┘
↓
┌─── Phase 6: Nuclei Full Scan ─────────┐
│ All templates → Critical/High/Medium │
└───────────────────────────────────────┘
↓
Dashboard Results
```
## ➕ 添加新模块
ReconKit 采用插件友好的架构构建。要添加新的扫描器:
1. 创建 `backend/modules/your_tool.py`
2. 实现 `async def run_your_tool(targets: list) -> list`
3. 在 `core/workflow.py` 中导入并调用它
4. 在 `frontend/src/components/Results.tsx` 中添加结果显示
## ⚠️ 法律免责声明
## 📄 许可证
MIT 许可证 — 详情请参阅 [LICENSE](LICENSE)。
## 🙏 致谢
ReconKit 由以下令人惊叹的开源工具提供支持:
- [Subfinder](https://github.com/projectdiscovery/subfinder) — ProjectDiscovery
- [httpx](https://github.com/projectdiscovery/httpx) — ProjectDiscovery
- [Nuclei](https://github.com/projectdiscovery/nuclei) — ProjectDiscovery
- [Katana](https://github.com/projectdiscovery/katana) — ProjectDiscovery
- [Assetfinder](https://github.com/tomnomnom/assetfinder) — tomnomnom
- [Waybackurls](https://github.com/tomnomnom/waybackurls) — tomnomnom
- [GF](https://github.com/tomnomnom/gf) — tomnomnom
- [GAU](https://github.com/lc/gau) — lc
- [Dalfox](https://github.com/hahwul/dalfox) — hahwul
- [SQLMap](https://github.com/sqlmapproject/sqlmap) — sqlmapproject
Click to see screenshots
怀着 ❤️ 为 Bug Bounty 社区打造
标签:Bug Bounty, CISA项目, DOE合作, Web安全, 可自定义解析器, 实时处理, 密码管理, 自动化侦察, 蓝队分析, 逆向工具