sujalpanchal-25/FlowShield
GitHub: sujalpanchal-25/FlowShield
一款基于 React 和 Express 构建的 DevSecOps CI/CD 仪表板,集成多种安全扫描器实现自动化漏洞检测与隔离报告生成。
Stars: 1 | Forks: 0
# 🔐 SecureFlow — 完整的 DevSecOps CI/CD 流水线仪表板
[](LICENSE)
[](https://react.dev)
[](https://www.typescriptlang.org)
[](https://vitejs.dev)
[](https://tailwindcss.com)
**SecureFlow** 是一款企业级的 DevSecOps CI/CD 仪表板应用程序。它为开发人员和安全团队提供了一个交互式门户,该门户映射了实时流水线配置,充当 GitHub Actions 设置的文档存储库,并提供安全的身份验证端点。SecureFlow 秉承**安全第一**的理念,具备多层漏洞扫描、自定义静态分析和隔离的报告生成功能。
## 🌐 在线演示
🔗 **网站:** https://flowshield.onrender.com
体验响应式支持桌面和移动端的实时 SecureFlow 平台。
## 🧪 演示账户
想要探索 SecureFlow 而不创建新账户?请使用下面的演示凭据。
| 角色 | 邮箱 | 密码 |
|------|--------|----------|
| 管理员 | `admin234@gmail.com` | `Admin$4545` |
## 📐 流水线架构工作流
```
graph TD
A[Push to main] --> B(Checkout Repository)
%% Stage 1: Secret Scan
B --> C[Stage 1: GitLeaks Secret Scan]
%% Stage 2: Dependency Scan
C --> D[Stage 2: Dependency Scan]
D --> D1[Trivy File Scan]
D --> D2{manifests?}
D2 -->|requirements.txt| D3[pip-audit]
D2 -->|package.json| D4[npm audit]
%% Stage 3: Static Scan
C --> E[Stage 3: Static Security Scan]
E --> E1[Semgrep SAST]
E --> E2{Python files?}
E2 -->|Yes| E3[Bandit Scan]
%% Stage 4: Report Generation
D1 & D3 & D4 & E1 & E3 --> F[Stage 4: Generate Security Dashboard]
F --> F1[Compute Weighted Score / 100]
F --> F2[Create Isolated report_dist/index.html]
F --> F3[Upload Workflow Artifact]
%% Stage 5: Deploy
F3 --> G[Stage 5: Deploy to GitHub Pages]
```
### 流水线任务执行流程
1. **`secret_scan` (通用)**:
* **目的**: 检查提交中暴露的密钥、凭据和配置机密。
* **扫描器**: `GitLeaks v2` Action。
* **规则**: 失败时立即停止流水线,以防止安全泄露。
2. **`dependency_scan` (通用 + 条件触发 Python/Node.js)**:
* **通用扫描**: 对所有文件运行 Aquasecurity `Trivy` 文件系统审计,以查找 OS/库级别的 CVE。
* **Python 审计**: 检查是否存在 `requirements.txt`。如果存在,则安装并执行 `pip-audit`。
* **Node.js 审计**: 检查是否存在 `package.json`。如果存在,则安装并执行 `npm audit --audit-level=high`。
3. **`static_security_scan` (通用 + 条件触发 Python)**:
* **通用扫描**: 运行配置为 `auto` 规则集的 `Semgrep` 静态分析扫描。
* **Python SAST**: 扫描目录中的任何 `.py` 源文件。如果存在,则在目录上递归运行 `Bandit`。
4. **`security_report` (始终运行)**:
* **条件**: 通过 `if: always()` 执行,以确保即使检查失败也能发布仪表板报告。
* **逻辑**: 收集 `secret_scan`、`dependency_scan` 和 `static_security_scan` 的结果。计算满分为 100 分的得分(机密: 30%,依赖项: 40%,SAST: 30%)。
* **隔离**: 创建一个隔离的 `report_dist` 目录以构建独立的 HTML 安全摘要。*仅*将报告文件夹上传到 Pages 以防止源代码泄露。
5. **`deploy` (GitHub Pages 部署)**:
* **权限要求**: `pages: write`、`id-token: write` 和 `contents: read`。
* **目标**: 将隔离的 `report_dist` 直接部署到实时的 GitHub Pages 站点。
## 🚀 详细的 GitHub Actions 工作流设置与部署指南
要在您的 GitHub 仓库中部署此安全流水线并成功在 GitHub Pages 上托管仪表板,请按照以下详细步骤操作:
### 1️⃣ 第一步:创建工作流文件
在您的仓库根目录中,创建文件夹结构 `.github/workflows/` 并添加一个名为 `secureflow.yml` 的文件:
```
mkdir -p .github/workflows
touch .github/workflows/secureflow.yml
```
将本应用程序**文档**部分(或从**完整工作流 YAML** 部分)中提供的完整 YAML 代码复制并粘贴到此文件中。
### 2️⃣ 第二步:配置 GitHub Pages 发布源
必须将 GitHub Pages 配置为从 **GitHub Actions** 构建,而不是从特定分支构建:
1. 导航到 **GitHub.com** 上的仓库页面。
2. 点击顶部的 **Settings** 选项卡。
3. 在左侧边栏中,点击 **Pages**(位于“Code and automation”部分下)。
4. 在 **Build and deployment → Source** 下,将下拉选择从 *Deploy from a branch* 更改为 **GitHub Actions**。
### 3️⃣ 第三步:授予工作流写入权限
GitHub Actions 需要写入权限才能上传构建产物并为 GitHub Pages 协调 token 握手:
1. 在仓库的 **Settings** 选项卡中,点击左侧边栏中的 **Actions → General**。
2. 滚动到底部的 **Workflow permissions** 部分。
3. 将选项切换为 **Read and write permissions**。
4. 勾选 **Allow GitHub Actions to create and approve pull requests** 的复选框(可选但推荐)。
5. 点击 **Save** 按钮。
### 4️⃣ 第四步:提交并推送以触发流水线
提交新的工作流文件并将其推送到 `main` 分支以触发您的首次安全扫描:
```
git add .github/workflows/secureflow.yml
git commit -m "ci: integrate SecureFlow DevSecOps pipeline"
git push origin main
```
导航到您的 GitHub 仓库的 **Actions** 选项卡,以观察每个阶段按顺序运行。
### 5️⃣ 第五步:访问仪表板和产物
* **实时仪表板 URL**: 一旦最终的 `deploy` 任务成功完成,请返回 **Settings → Pages**。您的实时仪表板 URL 将显示在顶部(例如 `https://.github.io//`)。
* **下载原始报告**: 在已完成的 Actions 运行摘要页面下,向下滚动到底部的 **Artifacts** 部分以下载原始的 `security-report.zip`(包含 `security_report.html`),以便在本地离线使用。
## 📂 项目目录结构
```
SecureFlow/
├── .github/
│ └── workflows/
│ └── secureflow.yml # CI/CD DevSecOps Action Pipeline
├── public/ # Public assets
│ ├── placeholder.svg
│ └── screenshots/ # App previews & tour captures
│ ├── landing.png
│ ├── login.png
│ ├── signup.png
│ └── documentation.png
├── server/ # Express.js Backend Server
│ ├── models/
│ │ └── User.js # Mongoose Database Model (bcrypt + verification)
│ ├── routes/
│ │ └── auth.js # Authentication endpoints (signup, login, profile/me)
│ └── index.js # Server Entry Point (CORS, Express, DB Config)
├── src/ # React Frontend Application
│ ├── components/
│ │ ├── layout/ # Shared layout layouts (Navbar, Footer)
│ │ ├── sections/ # Landing page interactive panels (Hero, Overview, Workflow)
│ │ ├── three/ # Three.js 3D Graphic Models (PipelineScene)
│ │ ├── ui/ # Reusable Shadcn UI Blocks
│ │ ├── AnimatedSection.tsx
│ │ └── NavLink.tsx
│ ├── contexts/
│ │ └── AuthContext.tsx # Global JWT & Auth State Provider
│ ├── hooks/
│ │ ├── use-toast.ts
│ │ ├── use-mobile.tsx
│ │ └── useAuth.ts # Custom Wrapper Hook for State Access
│ ├── lib/
│ │ └── utils.ts # Utility functions (clsx, tailwind-merge)
│ ├── pages/
│ │ ├── Index.tsx # Home Landing Page Dashboard
│ │ ├── Documentation.tsx # Workflow Details & Integration Guide
│ │ ├── Login.tsx # Auth Credentials Login
│ │ ├── Signup.tsx # Auth Register Onboarding
│ │ └── NotFound.tsx # 404 Routing Page
│ ├── App.css
│ ├── index.css # Main CSS Style Variables
│ ├── main.tsx # App Entry Mount
│ └── vite-env.d.ts # Vite Type Definitions
├── eslint.config.js # Code syntax validator
├── postcss.config.js # Styles compiler
├── tailwind.config.ts # Tailwind Theme Configurations
├── tsconfig.json # TypeScript Rules Config
├── vite.config.ts # Vite configurations & proxies
└── package.json # Project manifests & scripts
```
## 🎨 用户界面预览
体验 SecureFlow 的高级深色模式界面、毛玻璃面板样式和响应式布局设计。
| 页面界面 | 视觉截图预览 |
| :--- | :--- |
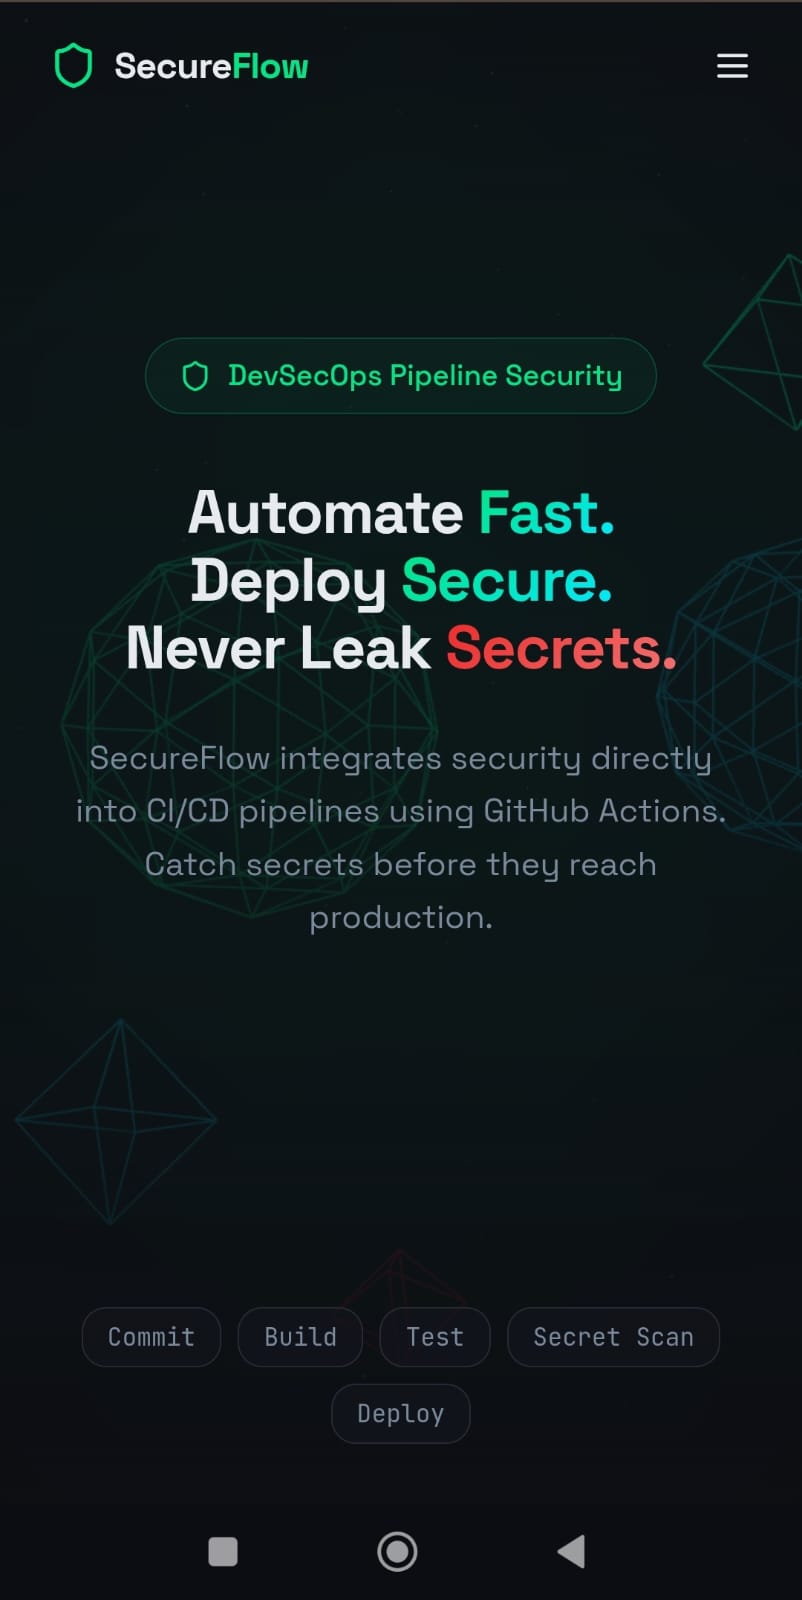
| **✨ 首页落地页**
包含交互式板块、three.js 画布动画、技术栈列表以及扫描器逻辑的简明教程。 |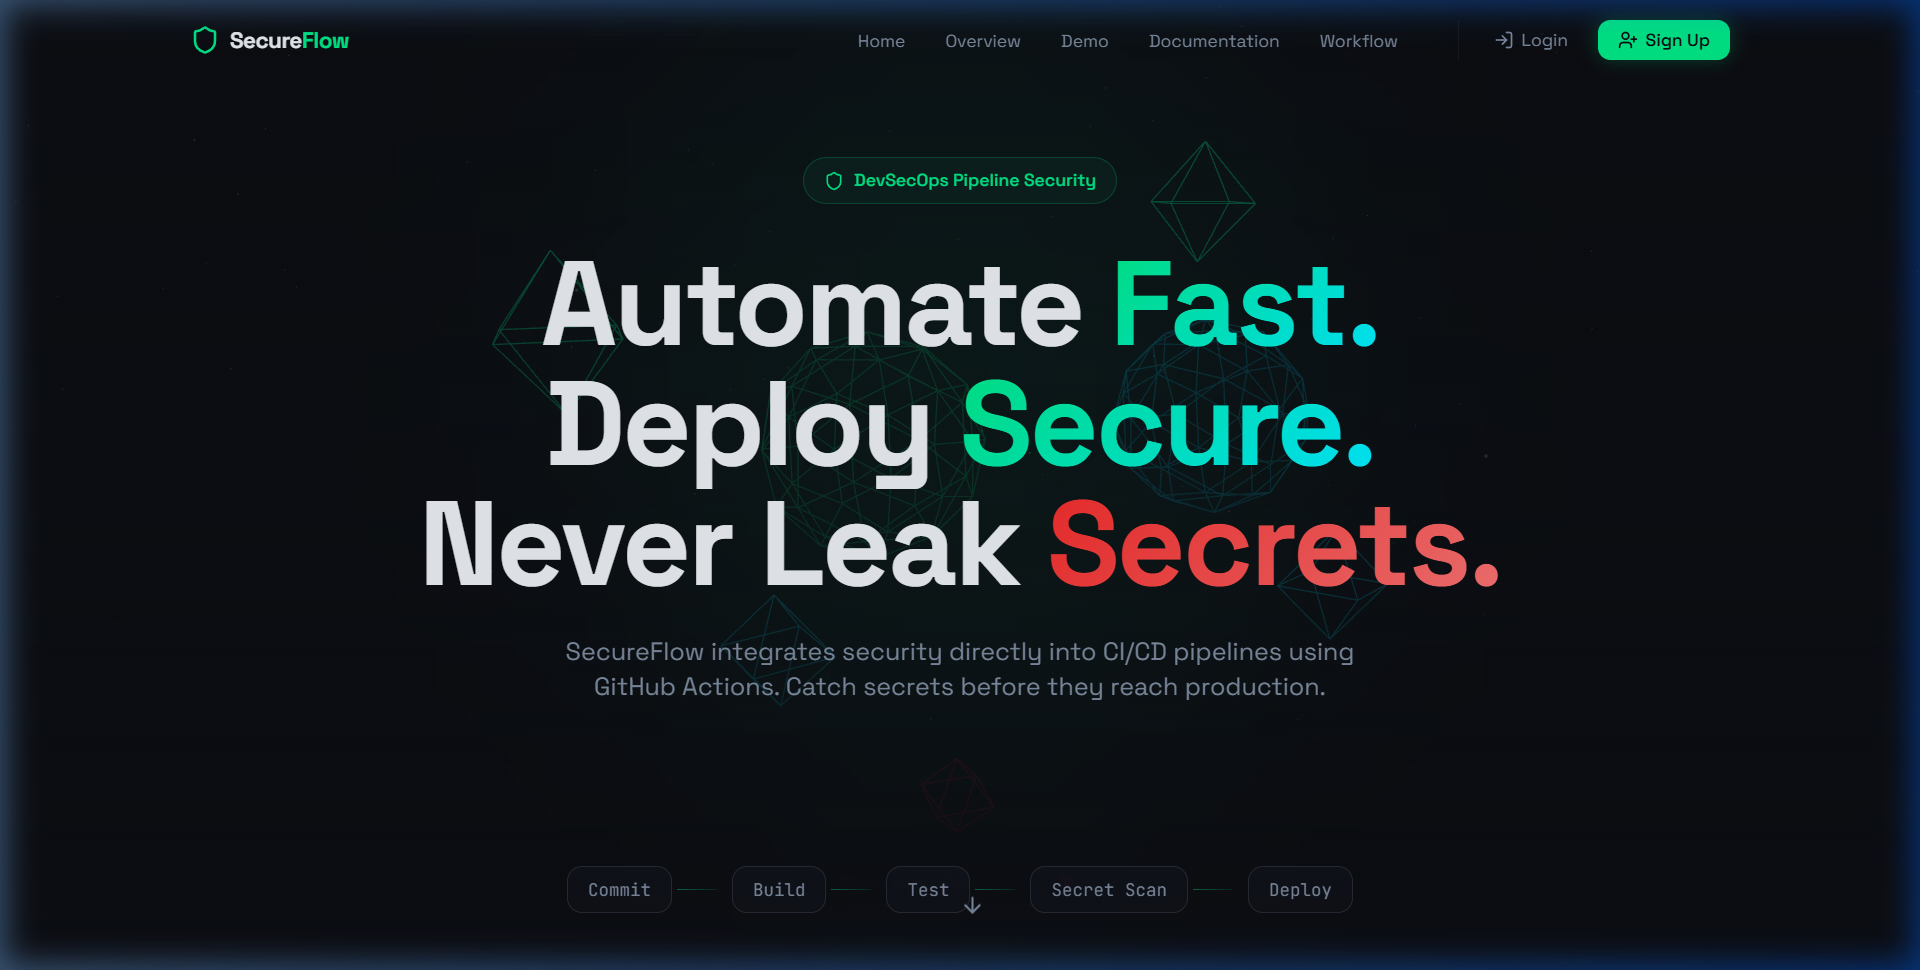 |
| **🔐 凭据登录**
|
| **🔐 凭据登录**
完全响应式的凭据访问面板,对服务器凭据进行身份验证并存储会话状态。 |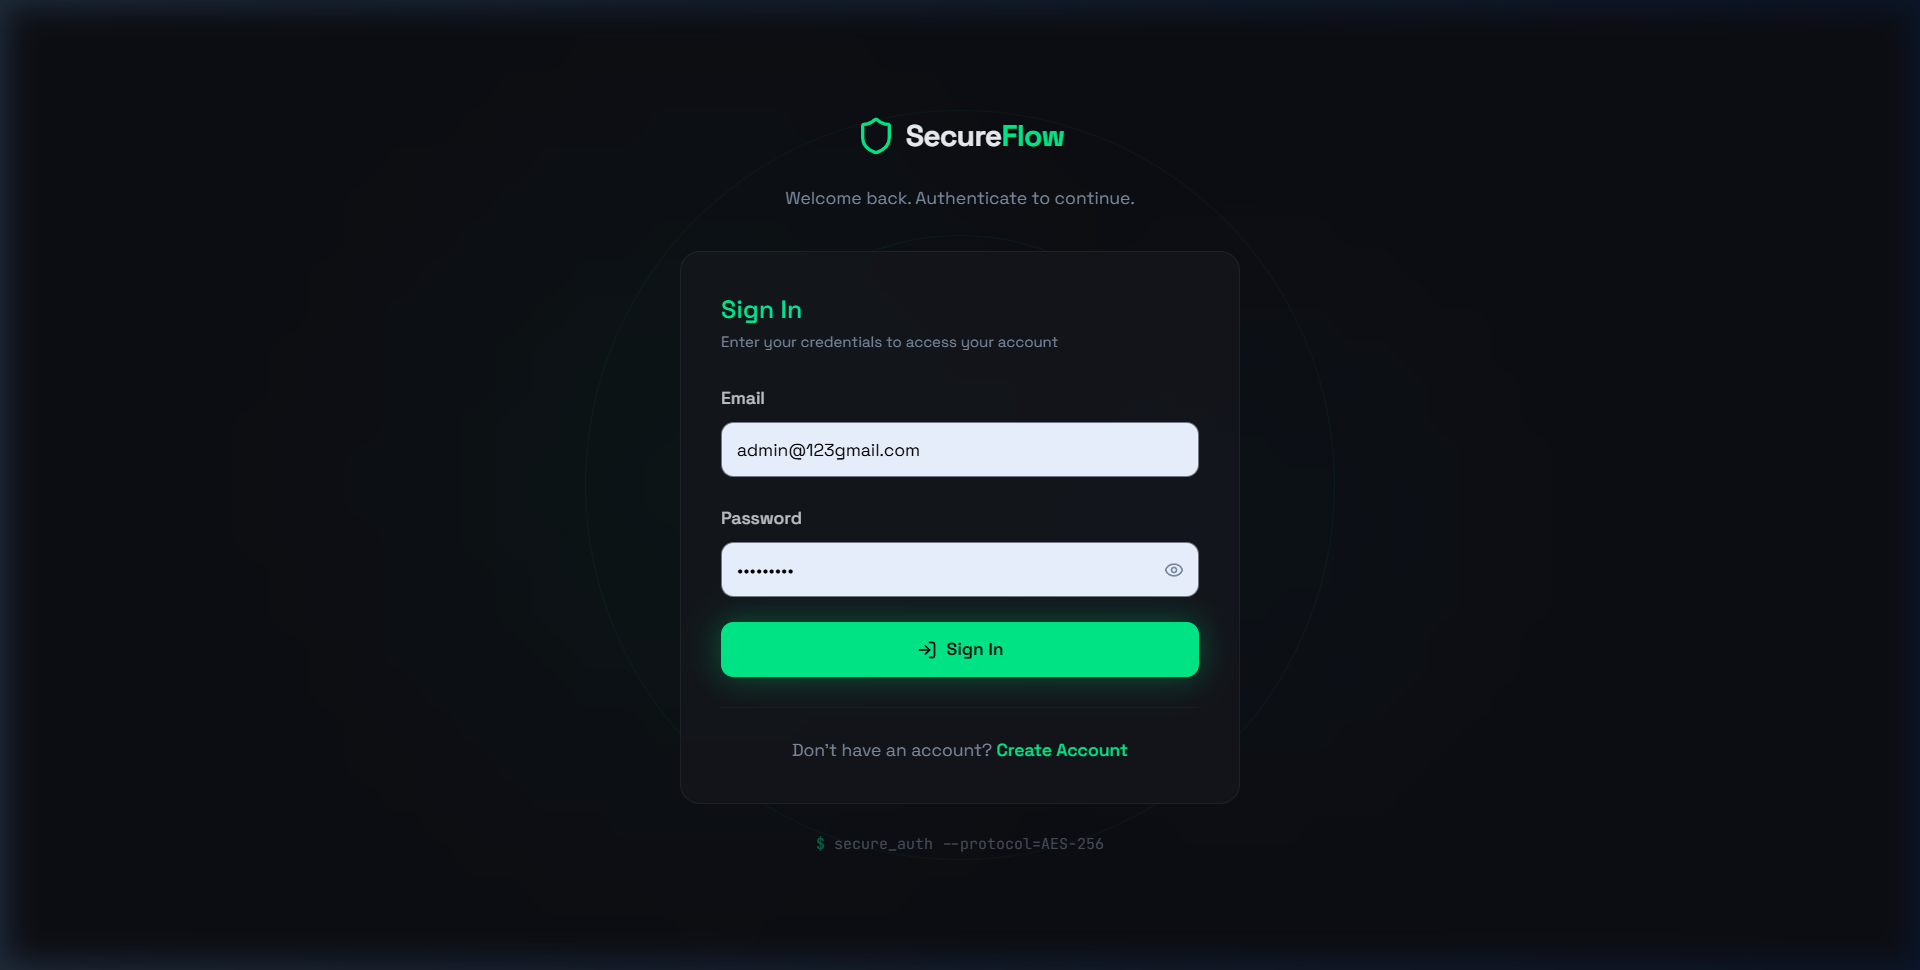 |
| **🚀 账户创建**
|
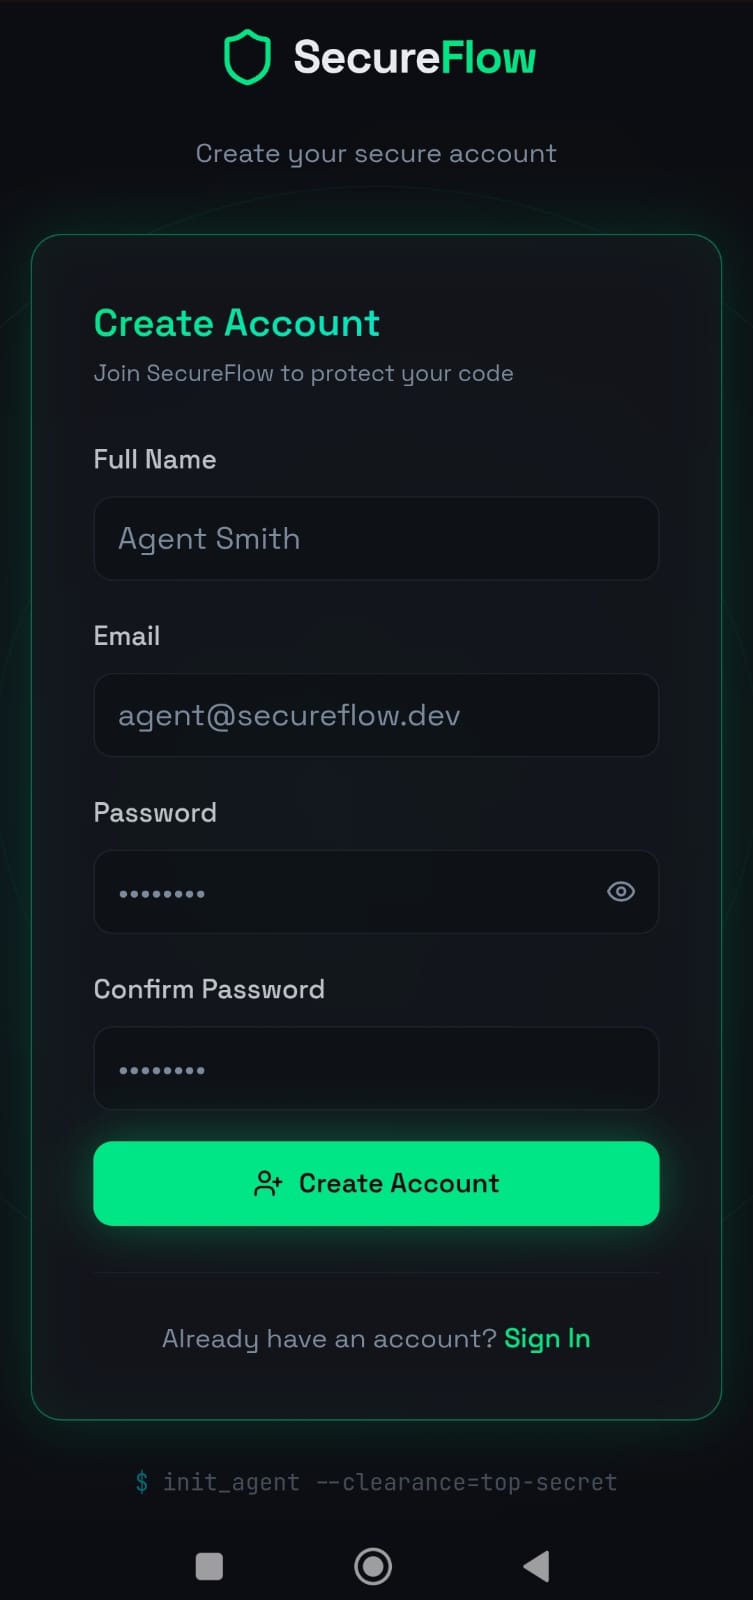
| **🚀 账户创建**
自定义注册面板,验证匹配的密码和最低安全长度要求。 |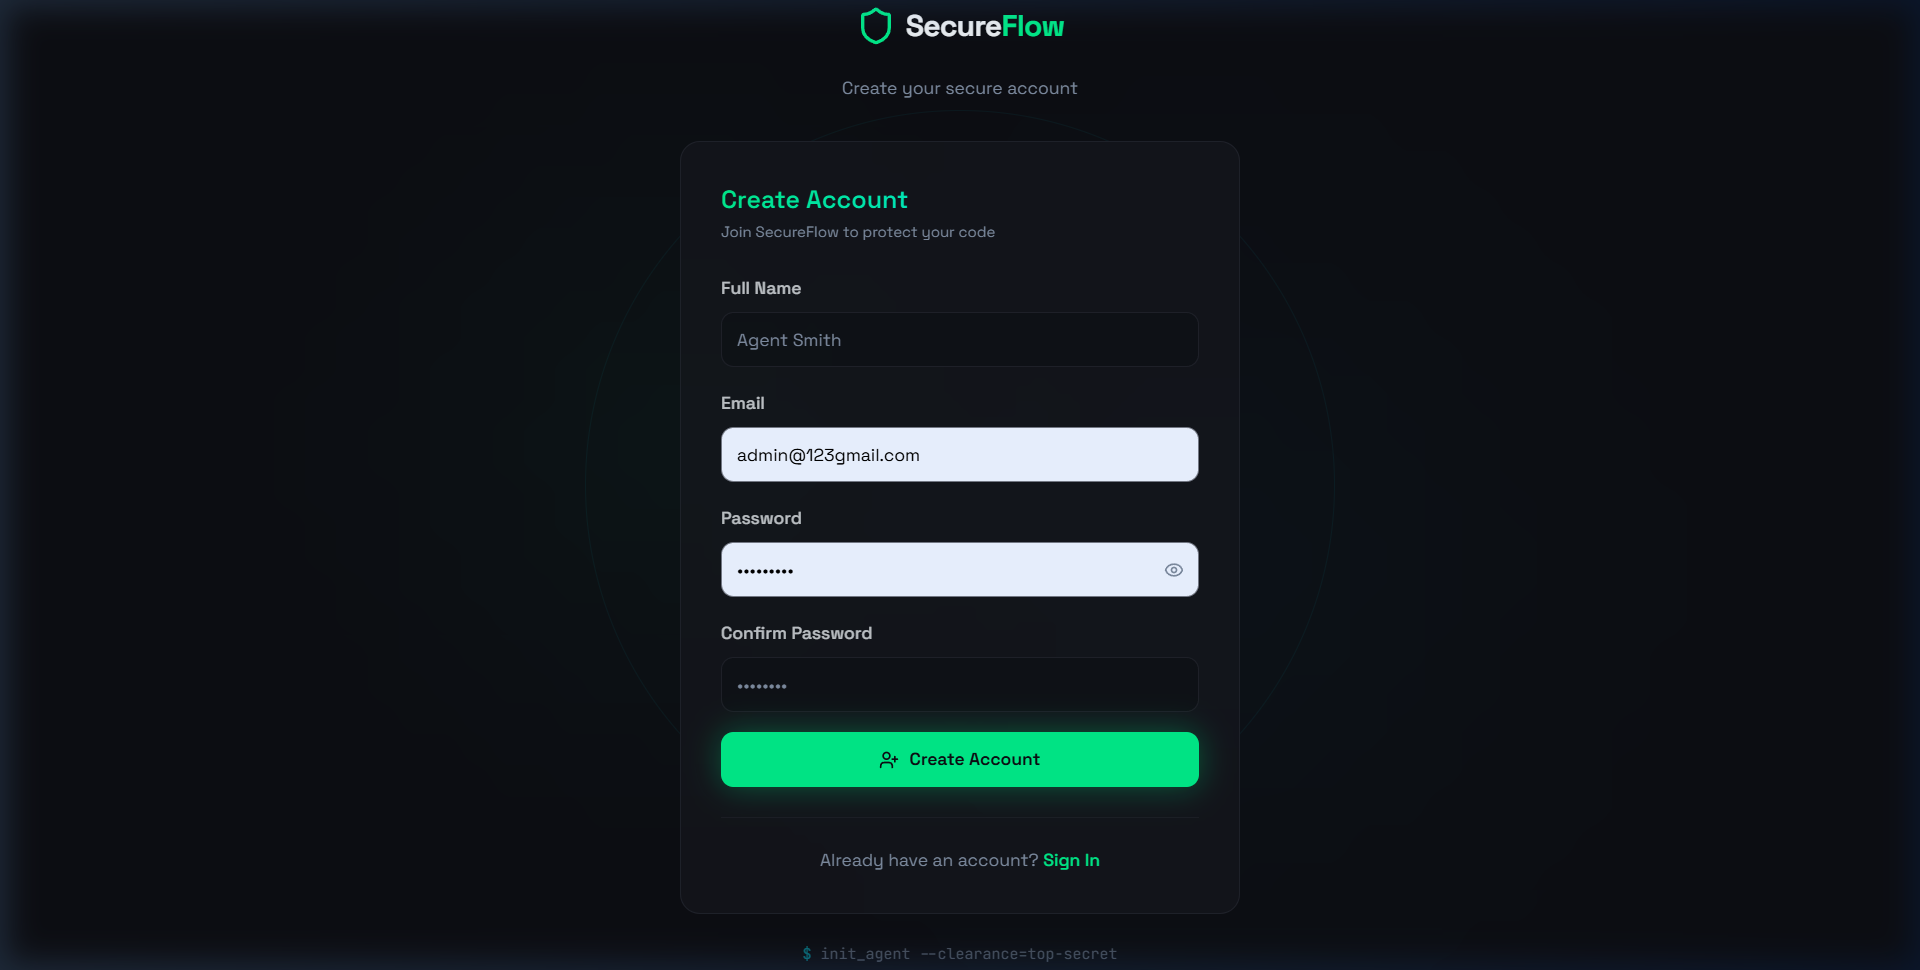 |
| **📖 完整文档**
|
| **📖 完整文档**
侧边栏控制的导航,索引了流水线任务、设置步骤、完整的 YAML 下载和需求。 |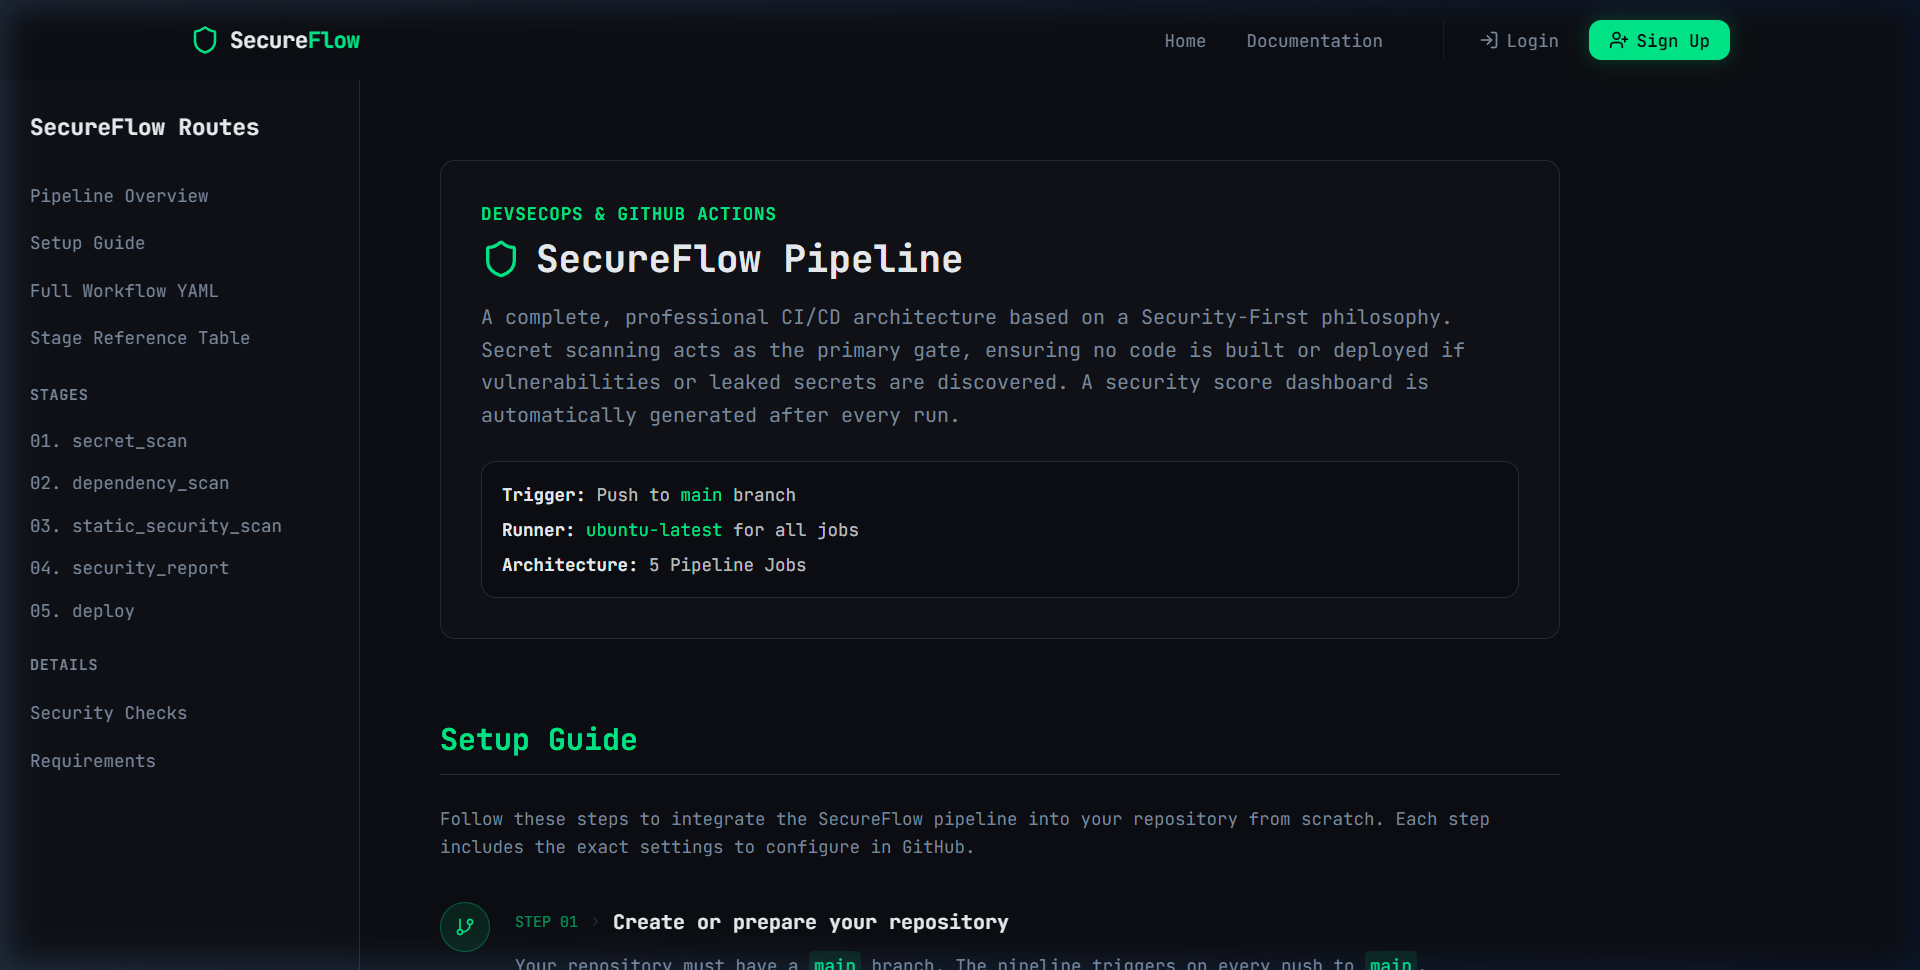 |
### 📱 移动端响应式视图
SecureFlow 具有完全的响应性并针对移动设备进行了优化。
| 🏠 移动端落地页 | 🚀 移动端注册 | 🔐 移动端登录 |
|:---:|:---:|:---:|
|
|
### 📱 移动端响应式视图
SecureFlow 具有完全的响应性并针对移动设备进行了优化。
| 🏠 移动端落地页 | 🚀 移动端注册 | 🔐 移动端登录 |
|:---:|:---:|:---:|
|  |
|  |
|  |
## 🚀 本地入门指南
### 🔧 安装
1. **克隆仓库**:
git clone https://github.com/sujalpanchal-25/FlowShield.git
cd FlowShield/SecureFlow
2. **安装工作区依赖**:
npm install
3. **配置环境变量 (`.env`)**:
在根目录下创建一个 `.env` 文件:
PORT=5000
MONGO_URI=mongodb://localhost:27017/secureflow # 留空以使用内存数据库回退
JWT_SECRET=your-custom-jwt-secret-key-string
4. **启动开发环境**:
使用独立的终端同时启动后端和前端服务器:
* **后端 Express 服务器**:
npm run server
* **前端 Dev 服务器**:
npm run dev
* **Urls**:
* 客户端 UI: [http://localhost:8080](http://localhost:8080)
* 服务器 API: [http://localhost:5000](http://localhost:5000)
## 🛠️ 项目脚本清单
项目 package 配置中提供以下脚本:
| 命令 | 动作 | 描述 |
| :--- | :--- | :--- |
| `npm run dev` | 运行 Vite 客户端 | 在端口 `8080` 上启动前端 Dev 服务器,具有快速的模块热替换 (HMR)。 |
| `npm run server` | 启动服务器 | 启动连接到数据库的 Node.js Express 服务器(端口 `5000`)。 |
| `npm run build` | 编译应用程序 | 在 `dist` 文件夹中生成优化的生产客户端文件。 |
| `npm run lint` | 语法验证 | 跨组件和配置执行 ESLint 验证检查。 |
| `npm run test` | 单元测试 | 使用 Vitest 执行单元测试套件。 |
## 🛡️ 强制执行的安全最佳实践
* **隔离的 Pages 构建**: GitHub Actions 工作流输出在上传到 GitHub Pages 之前,会严格隔离 `report_dist` 目录,确保不会泄露任何源文件或配置清单。
* **凭据哈希**: 在插入数据库之前,使用 `bcryptjs` 以 12 的盐值因子进行哈希处理,以确保免受字典攻击的安全性。
* **路由保护与 JWT 验证**: Profile 端点请求 Bearer token,并使用 JWT 逻辑根据加密签名密钥进行验证。
* **安全的 JSON 输出解析**: Schema 规范在字符串转换 (`toJSON`) 时会移除密码哈希,以防止意外泄露。
|
## 🚀 本地入门指南
### 🔧 安装
1. **克隆仓库**:
git clone https://github.com/sujalpanchal-25/FlowShield.git
cd FlowShield/SecureFlow
2. **安装工作区依赖**:
npm install
3. **配置环境变量 (`.env`)**:
在根目录下创建一个 `.env` 文件:
PORT=5000
MONGO_URI=mongodb://localhost:27017/secureflow # 留空以使用内存数据库回退
JWT_SECRET=your-custom-jwt-secret-key-string
4. **启动开发环境**:
使用独立的终端同时启动后端和前端服务器:
* **后端 Express 服务器**:
npm run server
* **前端 Dev 服务器**:
npm run dev
* **Urls**:
* 客户端 UI: [http://localhost:8080](http://localhost:8080)
* 服务器 API: [http://localhost:5000](http://localhost:5000)
## 🛠️ 项目脚本清单
项目 package 配置中提供以下脚本:
| 命令 | 动作 | 描述 |
| :--- | :--- | :--- |
| `npm run dev` | 运行 Vite 客户端 | 在端口 `8080` 上启动前端 Dev 服务器,具有快速的模块热替换 (HMR)。 |
| `npm run server` | 启动服务器 | 启动连接到数据库的 Node.js Express 服务器(端口 `5000`)。 |
| `npm run build` | 编译应用程序 | 在 `dist` 文件夹中生成优化的生产客户端文件。 |
| `npm run lint` | 语法验证 | 跨组件和配置执行 ESLint 验证检查。 |
| `npm run test` | 单元测试 | 使用 Vitest 执行单元测试套件。 |
## 🛡️ 强制执行的安全最佳实践
* **隔离的 Pages 构建**: GitHub Actions 工作流输出在上传到 GitHub Pages 之前,会严格隔离 `report_dist` 目录,确保不会泄露任何源文件或配置清单。
* **凭据哈希**: 在插入数据库之前,使用 `bcryptjs` 以 12 的盐值因子进行哈希处理,以确保免受字典攻击的安全性。
* **路由保护与 JWT 验证**: Profile 端点请求 Bearer token,并使用 JWT 逻辑根据加密签名密钥进行验证。
* **安全的 JSON 输出解析**: Schema 规范在字符串转换 (`toJSON`) 时会移除密码哈希,以防止意外泄露。
包含交互式板块、three.js 画布动画、技术栈列表以及扫描器逻辑的简明教程。 |
|
| **🔐 凭据登录** 完全响应式的凭据访问面板,对服务器凭据进行身份验证并存储会话状态。 |
|
| **🚀 账户创建** 自定义注册面板,验证匹配的密码和最低安全长度要求。 |
|
| **📖 完整文档** 侧边栏控制的导航,索引了流水线任务、设置步骤、完整的 YAML 下载和需求。 |
|
### 📱 移动端响应式视图
SecureFlow 具有完全的响应性并针对移动设备进行了优化。
| 🏠 移动端落地页 | 🚀 移动端注册 | 🔐 移动端登录 |
|:---:|:---:|:---:|
| | | |
## 🚀 本地入门指南
### 🔧 安装
1. **克隆仓库**:
git clone https://github.com/sujalpanchal-25/FlowShield.git
cd FlowShield/SecureFlow
2. **安装工作区依赖**:
npm install
3. **配置环境变量 (`.env`)**:
在根目录下创建一个 `.env` 文件:
PORT=5000
MONGO_URI=mongodb://localhost:27017/secureflow # 留空以使用内存数据库回退
JWT_SECRET=your-custom-jwt-secret-key-string
4. **启动开发环境**:
使用独立的终端同时启动后端和前端服务器:
* **后端 Express 服务器**:
npm run server
* **前端 Dev 服务器**:
npm run dev
* **Urls**:
* 客户端 UI: [http://localhost:8080](http://localhost:8080)
* 服务器 API: [http://localhost:5000](http://localhost:5000)
## 🛠️ 项目脚本清单
项目 package 配置中提供以下脚本:
| 命令 | 动作 | 描述 |
| :--- | :--- | :--- |
| `npm run dev` | 运行 Vite 客户端 | 在端口 `8080` 上启动前端 Dev 服务器,具有快速的模块热替换 (HMR)。 |
| `npm run server` | 启动服务器 | 启动连接到数据库的 Node.js Express 服务器(端口 `5000`)。 |
| `npm run build` | 编译应用程序 | 在 `dist` 文件夹中生成优化的生产客户端文件。 |
| `npm run lint` | 语法验证 | 跨组件和配置执行 ESLint 验证检查。 |
| `npm run test` | 单元测试 | 使用 Vitest 执行单元测试套件。 |
## 🛡️ 强制执行的安全最佳实践
* **隔离的 Pages 构建**: GitHub Actions 工作流输出在上传到 GitHub Pages 之前,会严格隔离 `report_dist` 目录,确保不会泄露任何源文件或配置清单。
* **凭据哈希**: 在插入数据库之前,使用 `bcryptjs` 以 12 的盐值因子进行哈希处理,以确保免受字典攻击的安全性。
* **路由保护与 JWT 验证**: Profile 端点请求 Bearer token,并使用 JWT 逻辑根据加密签名密钥进行验证。
* **安全的 JSON 输出解析**: Schema 规范在字符串转换 (`toJSON`) 时会移除密码哈希,以防止意外泄露。标签:CISA项目, DevSecOps, Express, MongoDB, React, StruQ, Syscalls, Vite, 上游代理, 自动化攻击