Siriin4k/Multi-Host-Security-Operations-Home-Lab

GitHub: Siriin4k/Multi-Host-Security-Operations-Home-Lab

一个基于 Wazuh SIEM 的多主机网络安全家庭实验室,通过模拟跨平台真实攻击来实践威胁检测、日志分析与事件调查。

Stars: 0 | Forks: 0

Wazuh Ubuntu Windows Kali Linux MITRE ATT&CK Cybersecurity SIEM SOC

🛡️ SOCVerse – 攻击模拟与检测工程实验室

概述架构基础设施技术栈仓库结构设置指南攻击技能

## 📋 项目概述 **SOCVerse** 是一个全面的网络安全家庭实验室环境,旨在模拟真实的安全运营中心 (SOC) 工作流程。本项目展示了在威胁检测、攻击模拟、日志分析和事件调查方面的端到端能力——所有这些都映射到 **MITRE ATT&CK** 框架。 该实验室利用 **Wazuh SIEM** 作为集中监控平台,多个端点(Windows 和 Linux)同时作为攻击目标和受监控资产。攻击模拟从专用的 **Kali Linux** 攻击机发起,以模拟杀伤链中的对手行为。 ### 🎯 项目目标 - 构建一个具有集中式 SIEM 的全功能 SOC 监控环境 - 模拟跨 Windows 和 Linux 端点的真实网络攻击 - 在 Wazuh 中开发自定义检测规则和告警逻辑 - 将所有攻击模拟映射到 MITRE ATT&CK 技术和战术 - 记录每个事件的完整调查生命周期 ### 📚 学习成果 - 了解 SOC 一级/二级分析师的工作流程 - 获得 SIEM 部署、配置和调优的实践经验 - 熟练分析 Windows Event Logs、Sysmon 和 Linux syslog 日志 - 掌握攻击方法论和对手模拟的实用知识 - 检测工程——编写和调整关联规则 - 事件调查和响应文档 ## 🏗️ 架构 ### 网络拓扑 ![网络拓扑](https://static.pigsec.cn/wp-content/uploads/repos/2026/06/8d1a07cb25112127.png) ### 
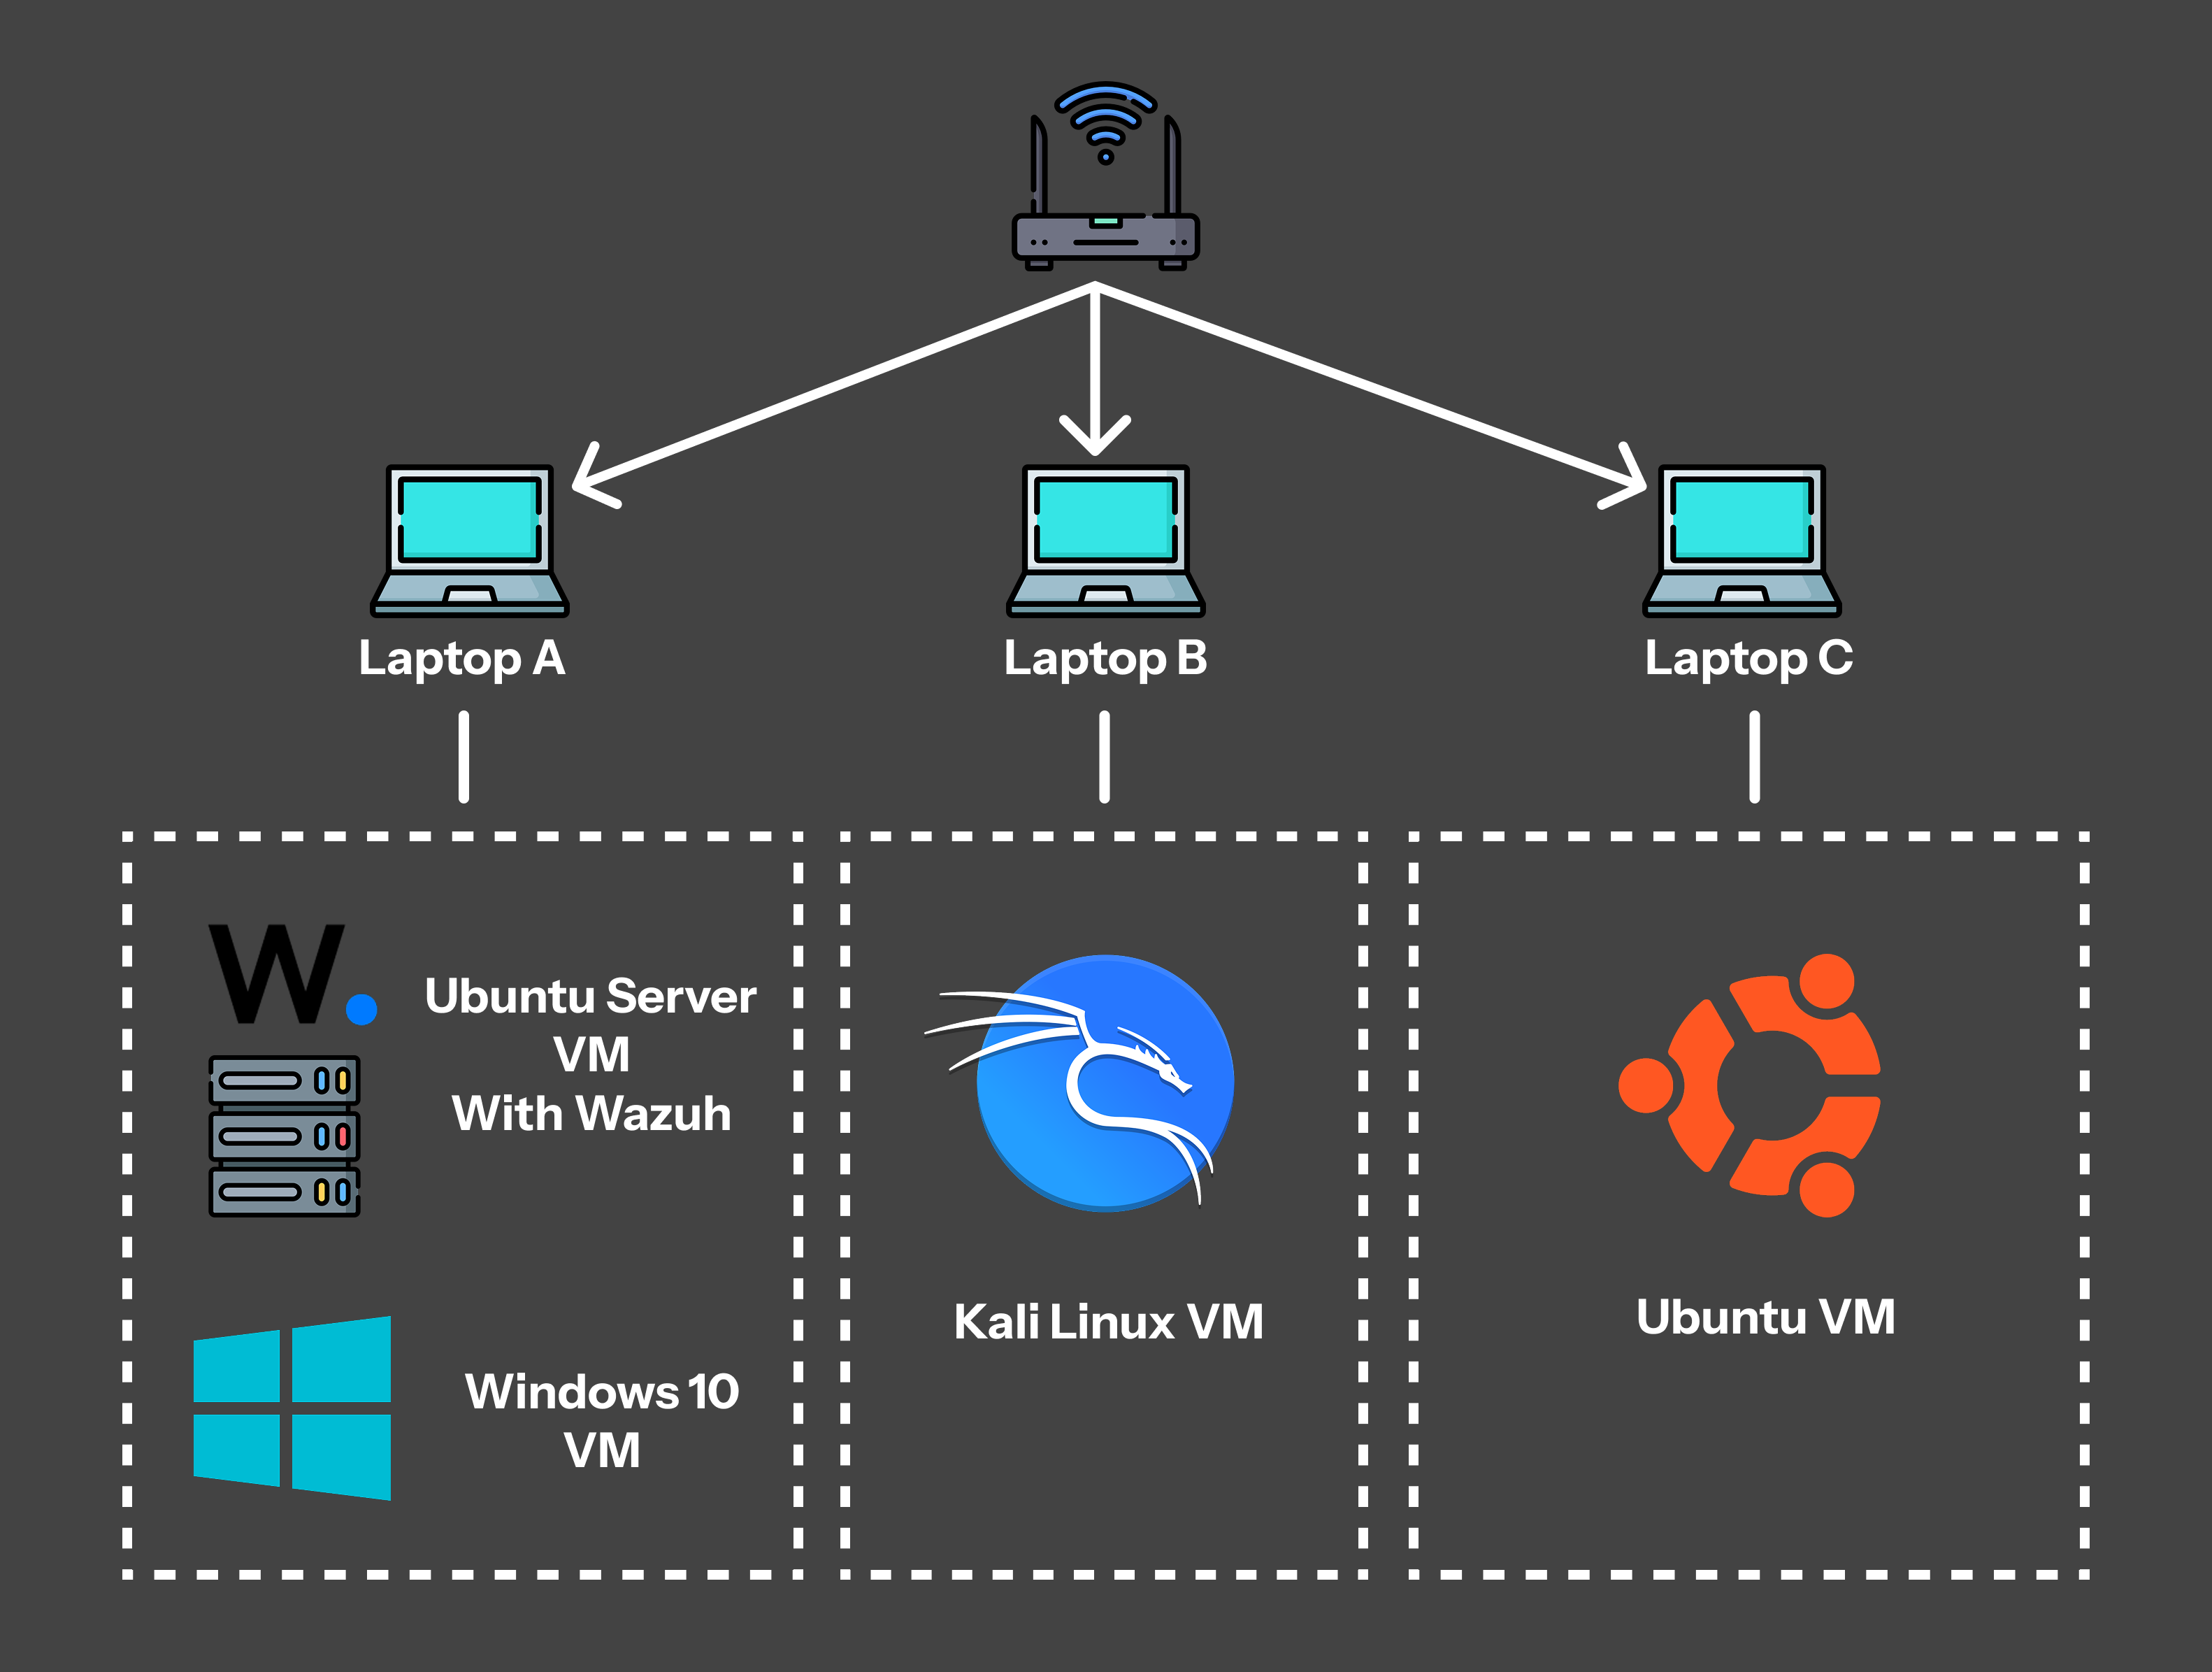
ASCII 网络图 ``` ┌─────────────────────────────────────────────────────────────────────────────┐ │ SOCVerse Lab Network (Bridged) │ │ Subnet: 192.168.1.0/24 │ ├─────────────────────────────────────────────────────────────────────────────┤ │ │ │ ┌─────────────┐ ┌─────────────────┐ ┌─────────────────┐ │ │ │ LAPTOP A │ │ LAPTOP B │ │ LAPTOP C │ │ │ │ (Host: Win) │ │ (Host: Win) │ │ (Host: Ubuntu) │ │ │ └──────┬───┬──┘ └───────┬─────────┘ └───────┬─────────┘ │ │ │ │ │ │ │ │ │ │ │ │ │ │ ┌──────▼──┐ ┌──────▼──┐ ┌─▼───────────┐ ┌───────▼─────────┐ │ │ │ VM 1 │ │ VM 2 │ │ VM 3 │ │ VM 4 │ │ │ │ Wazuh │ │ Win 10 │ │ Kali Linux │ │ Ubuntu Desktop │ │ │ │ Server │ │Endpoint │ │ Attacker │ │ Endpoint │ │ │ │ (SIEM) │ │(Victim) │ │ │ │ (Victim) │ │ │ │ │ │ │ │ │ │ │ │ │ │ Ubuntu │ │ Wazuh │ │ Nmap,Hydra │ │ Wazuh Agent │ │ │ │ Server │ │ Agent + │ │ Metasploit │ │ Monitored │ │ │ │ 26.04 │ │ Sysmon │ │ Nikto, etc. │ │ Ubuntu 26.04 │ │ │ └────┬────┘ └────┬────┘ └──────┬──────┘ └───────┬─────────┘ │ │ │ │ │ │ │ │ ─────┴───────────┴──────────────┴──────────────────┴────────────── │ │ Bridged Network (192.168.x.0/24) │ │ │ │ ┌──────────────────────────────────────────────────────────────┐ │ │ │ DATA FLOW │ │ │ │ Kali ──attack──▶ Win10/Ubuntu ──logs──▶ Wazuh Server │ │ │ │ │ │ │ │ │ ┌─────▼─────┐ │ │ │ │ │ Dashboard │ │ │ │ │ │ Alerts │ │ │ │ │ │ Analysis │ │ │ │ │ └───────────┘ │ │ │ └──────────────────────────────────────────────────────────────┘ │ └─────────────────────────────────────────────────────────────────────────────┘ ``` ## 🖥️ 基础设施 | 主机设备 | 虚拟机 | 操作系统 | 内存 | CPU | 存储 | 角色 | 网络 | |---|---|---|---|---|---|---|---| | Laptop A | VM 1 – Wazuh Server | Ubuntu Server 26.04 | 5 GB | 4 vCPUs | 60 GB | 集中式 SIEM、日志收集、告警生成、事件关联、仪表盘 | 桥接 | | Laptop A | VM 2 – Windows Endpoint | Windows 10 | 3 GB | 4 vCPUs | 50 GB | 受害者端点、Agent 监控、攻击目标 | 桥接 | | Laptop B | VM 3 – Kali Linux | Kali Linux 2025.2 | 4 GB | 2 vCPUs | 25 GB | 攻击模拟、侦察、漏洞利用、对手模拟 | 桥接 | | Laptop C | VM 4 – Ubuntu Endpoint | Ubuntu Desktop 26.04 | 3 GB | 3 vCPUs | 25 GB | Linux 受害者端点、Wazuh 监控、Linux 攻击目标 | 桥接 | ## 🔧 技术栈 | 类别 | 技术 | 用途 | |---|---|---| | SIEM 平台 | Wazuh 4.14 | 集中式日志管理、告警和威胁检测 | | 日志收集器 | Wazuh Agent | 端点遥测数据收集与转发 | | Windows 遥测 | Sysmon (System Monitor) | 高级 Windows 事件日志记录(进程创建、网络连接、文件更改) | | 攻击平台 | Kali Linux 2025.2 | 渗透测试和对手模拟 | | 攻击工具 | Nmap, Hydra, Metasploit, Nikto, Gobuster | 侦察、暴力破解、漏洞利用 | | 威胁框架 | MITRE ATT&CK | 技术映射和检测覆盖率分析 | | 虚拟化 | VirtualBox / VMware | 虚拟机管理 | | 服务器操作系统 | Ubuntu Server 26.04 | Wazuh SIEM 托管 | | 端点操作系统 | Windows 10, Ubuntu Desktop 26.04 | 受监控的受害者端点 | | 文档 | Markdown, GitHub | 专业文档和版本控制 | ## 📁 仓库结构 ``` SOC-Home-Lab/ │ ├── README.md # Main project documentation ├── screenshots/ # All lab screenshots │ ├── windows-endpoint/ # Windows attack simulations │ ├── README.md # Windows endpoint overview │ ├── attack-01-nmap-scan-README.md # Nmap reconnaissance report │ ├── attack-02-bruteforce-README.md # Brute-force attack report │ ├── attack-03-powershell-execution-README.md # PowerShell execution report │ ├── attack-04-persistence-README.md # Persistence mechanism report │ └── attack-05-privilege-escalation-README.md # Privilege escalation report │ └── ubuntu-endpoint/ # Ubuntu attack simulations ├── README.md # Ubuntu endpoint overview ├── attack-01-nmap-scan-README.md # Nmap reconnaissance report ├── attack-02-ssh-bruteforce-README.md # SSH brute-force report ├── attack-03-privilege-escalation-README.md # Privilege escalation report ├── attack-04-persistence-README.md # Persistence mechanism report └── attack-05-suspicious-file-activity-README.md # Suspicious file activity report ``` ## 🚀 设置指南 ### 设置目录 | # | 章节 | 描述 | |---|---|---| | 1 | [Ubuntu Server 安装](#1-ubuntu-server-installation) | 为 Wazuh 安装 Ubuntu Server 26.04 | | 2 | [Windows 端点设置](#2-windows-endpoint-setup) | 配置 Windows 10 受害者机器 | | 3 | [Ubuntu 端点设置](#3-ubuntu-endpoint-setup) | 配置 Ubuntu Desktop 受害者机器 | | 4 | [Kali Linux 设置](#4-kali-linux-setup) | 设置攻击机 | | 5 | [Wazuh 安装](#5-wazuh-installation) | 在 Ubuntu Server 上安装 Wazuh SIEM | | 6 | [Wazuh 仪表盘访问](#6-wazuh-dashboard-access) | 访问 Wazuh Web 界面 | | 7 | [Agent 注册](#7-agent-enrollment) | 将端点注册到 Wazuh manager | | 8 | [Wazuh Agent – Windows](#8-wazuh-agent-installation-on-windows) | 在 Windows 10 上安装 agent | | 9 | [Sysmon 安装](#9-sysmon-installation) | 在 Windows 上部署 Sysmon | | 10 | [Sysmon 配置](#10-sysmon-configuration) | 使用自定义 XML 配置 Sysmon | | 11 | [Wazuh Agent – Ubuntu](#11-wazuh-agent-installation-on-ubuntu) | 在 Ubuntu Desktop 上安装 agent | | 12 | [验证](#12-verification-steps) | 验证所有组件 | | 13 | [故障排除](#13-troubleshooting) | 常见问题及修复方法 | ### 1. Ubuntu Server 安装 ![虚拟机设置](https://static.pigsec.cn/wp-content/uploads/repos/2026/06/2cc54968aa112133.png) 
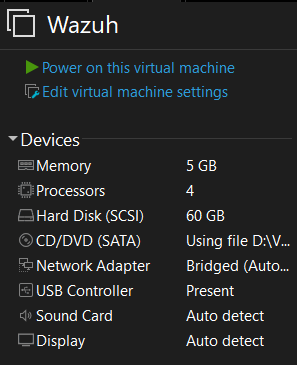
1. 从 [ubuntu.com](https://ubuntu.com/download/server) 下载 **Ubuntu Server 26.04 LTS** ISO 2. 在 VirtualBox/VMware 中按照上述配置创建一个新的虚拟机 3. 挂载 ISO 并启动虚拟机 4. 按照安装向导操作: - 选择语言和键盘布局 - 配置网络接口(桥接适配器 — DHCP 或静态 IP) - 设置存储(使用整个磁盘) - 创建用户账户(例如 `socadmin`) - 在安装过程中启用 **OpenSSH Server** - 完成安装并重启 5. 安装后: sudo apt update && sudo apt upgrade -y sudo hostnamectl set-hostname wazuh-server ip a # 记录 IP 地址以供日后使用 以下截图按执行的时间顺序展示了 Ubuntu Server 的安装过程:
📸 点击展开逐步的 Ubuntu Server 安装截图
以下截图按执行的时间顺序说明了 Ubuntu Server 的安装过程: ### 1. 语言选择 ![1. 语言选择](https://raw.githubusercontent.com/Siriin4k/Multi-Host-Security-Operations-Home-Lab/main/screenshots/Ubuntu%20(1).png) ### 2. 键盘配置 ![2. 键盘配置](https://raw.githubusercontent.com/Siriin4k/Multi-Host-Security-Operations-Home-Lab/main/screenshots/Ubuntu%20(2).png) ### 3. 安装类型选择 ![3. 安装类型选择](https://raw.githubusercontent.com/Siriin4k/Multi-Host-Security-Operations-Home-Lab/main/screenshots/Ubuntu%20(3).png) ### 4. 网络接口配置(分配 DHCP IP) ![4. 网络接口配置](https://raw.githubusercontent.com/Siriin4k/Multi-Host-Security-Operations-Home-Lab/main/screenshots/Ubuntu%20(4).png) ### 5. Ubuntu 归档镜像配置 ![5. Ubuntu 归档镜像配置](https://raw.githubusercontent.com/Siriin4k/Multi-Host-Security-Operations-Home-Lab/main/screenshots/Ubuntu%20(5).png) ### 6. 引导式存储布局配置(初始分配 45GB) ![6. 引导式存储布局配置](https://raw.githubusercontent.com/Siriin4k/Multi-Host-Security-Operations-Home-Lab/main/screenshots/Ubuntu%20(6).png) ### 7. 文件系统摘要确认 ![7. 文件系统摘要确认](https://raw.githubusercontent.com/Siriin4k/Multi-Host-Security-Operations-Home-Lab/main/screenshots/Ubuntu%20(7).png) ### 8. 用户配置文件与服务器主机名配置 (`wazuh`) ![8. 用户配置文件配置](https://raw.githubusercontent.com/Siriin4k/Multi-Host-Security-Operations-Home-Lab/main/screenshots/Ubuntu%20(8).png) ### 9. OpenSSH Server 安装设置 ![9. OpenSSH Server 安装设置](https://raw.githubusercontent.com/Siriin4k/Multi-Host-Security-Operations-Home-Lab/main/screenshots/Ubuntu%20(9).png) ### 10. 安装完成并提示重启 ![10. 安装完成](https://raw.githubusercontent.com/Siriin4k/Multi-Host-Security-Operations-Home-Lab/main/screenshots/Ubuntu%20(10).png) ### 11. 初始 SSH 登录与 Shell 验证 ![11. 初始 SSH 登录](https://raw.githubusercontent.com/Siriin4k/Multi-Host-Security-Operations-Home-Lab/main/screenshots/Ubuntu%20(11).png) ### 12. 执行 Wazuh 安装脚本 ![12. 运行 Wazuh 安装脚本](https://raw.githubusercontent.com/Siriin4k/Multi-Host-Security-Operations-Home-Lab/main/screenshots/Ubuntu%20(12).png) ### 13. 重新进行存储配置(调整为 60GB 磁盘分配) ![13. 存储配置 (60GB)](https://raw.githubusercontent.com/Siriin4k/Multi-Host-Security-Operations-Home-Lab/main/screenshots/Ubuntu%20(13).png) ### 14. 重新进行存储摘要(60GB 磁盘验证) ![14. 存储摘要 (60GB)](https://raw.githubusercontent.com/Siriin4k/Multi-Host-Security-Operations-Home-Lab/main/screenshots/Ubuntu%20(14).png) ### 15. 配置文件设置(设置为 Wazuh-Server 凭据) ![15. 配置文件设置](https://raw.githubusercontent.com/Siriin4k/Multi-Host-Security-Operations-Home-Lab/main/screenshots/Ubuntu%20(15).png)
### 2. Windows 端点设置 ![虚拟机设置](https://static.pigsec.cn/wp-content/uploads/repos/2026/06/a9eab762ff112259.png) 1. 从 [Microsoft](https://www.microsoft.com/en-us/software-download/windows10) 下载 **Windows 10** ISO 2. 按照上述配置创建一个新的虚拟机 3. 使用默认设置安装 Windows 10 4. 安装后: - 禁用 Windows Defender 实时保护(用于实验室目的) - 将网络设置为 **专用** - 启用 **远程桌面**(可选) - 记录 IP 地址:`ipconfig` - 重命名电脑:`设置 → 系统 → 关于 → 重命名这台电脑`(例如 `WIN-ENDPOINT`) ## ![虚拟机锁屏](https://static.pigsec.cn/wp-content/uploads/repos/2026/06/68e73ad0e5112304.png) ### 3. Ubuntu 端点设置 ![虚拟机设置](https://static.pigsec.cn/wp-content/uploads/repos/2026/06/44d5e825bc112310.png) 1. 从 [ubuntu.com](https://ubuntu.com/download/desktop) 下载 **Ubuntu Desktop 26.04 LTS** 2. 按照上述配置创建一个新的虚拟机 3. 使用默认设置安装 Ubuntu Desktop 4. 安装后: sudo apt update && sudo apt upgrade -y sudo hostnamectl set-hostname ubuntu-endpoint ip a # 记录 IP 地址 ## ![虚拟机锁屏](https://static.pigsec.cn/wp-content/uploads/repos/2026/06/5f6922091b112318.png) ### 4. Kali Linux 设置 ![虚拟机设置](https://static.pigsec.cn/wp-content/uploads/repos/2026/06/7246d4dadc112324.png) 1. 从 [kali.org](https://www.kali.org/get-kali/) 下载 **Kali Linux 2025.2** 2. 使用预构建的虚拟机镜像(推荐)或从 ISO 安装 3. 按照上述配置导入/创建虚拟机 4. 安装后: sudo apt update && sudo apt upgrade -y ip a # 记录 IP 地址 5. 验证攻击工具: nmap --version hydra -h msfconsole --version nikto -Version ## ![虚拟机锁屏](https://static.pigsec.cn/wp-content/uploads/repos/2026/06/22f5d83db4112330.png) ### 5. Wazuh 安装 通过 SSH 登录到 Wazuh Server(Ubuntu Server 虚拟机)并执行: ``` # 下载并运行 Wazuh 安装助手 curl -sO https://packages.wazuh.com/4.14/wazuh-install.sh sudo bash ./wazuh-install.sh -a ``` ![Wazuh-安装](https://static.pigsec.cn/wp-content/uploads/repos/2026/06/51a3ef594c112335.png) ### 6. Wazuh 仪表盘访问 1. 打开浏览器并导航至:`https://192.168.1.13` 2. 使用安装输出中的凭据登录 3. 接受自签名证书警告 4. 验证仪表盘是否成功加载 ![Wazuh-仪表盘](https://static.pigsec.cn/wp-content/uploads/repos/2026/06/224237b938112341.png) ### 7. Agent 注册 从 Wazuh 仪表盘中: 1. 导航至 **Agents → Deploy New Agent** 2. 为每个端点选择相应的操作系统 3. 复制注册命令 4. 指定 Wazuh server 地址 ## ![注册](https://static.pigsec.cn/wp-content/uploads/repos/2026/06/606ba3d20d112347.png) ![注册](https://static.pigsec.cn/wp-content/uploads/repos/2026/06/d280c654dc112353.png) ### 8. 在 Windows 上安装 Wazuh Agent 在 Wazuh/Ubuntu-Server 终端上: ``` sudo /var/ossec/bin/manage_agents ``` 1. 之后选择 A 以添加新 agent。 2. 填写必要的详细信息。 3. 按 O 获取该 agent 的注册密钥。 4. 复制密钥并在 Windows 虚拟机的 Wazuh agent 中使用。 ![Windows-Agent 注册](https://static.pigsec.cn/wp-content/uploads/repos/2026/06/69c016b8ef112359.png) 在 **Windows 10 端点**上: 1. 从 Wazuh 仪表盘下载 Wazuh agent MSI 安装程序,或: Invoke-WebRequest -Uri https://packages.wazuh.com/4.x/windows/wuh-agent-4.9.0-1.msi -OutFile wazuh-agent.msi 2. 在 GUI 中,添加 Manager 服务器 IP 和注册密钥 ![Wazuh-GUI](https://static.pigsec.cn/wp-content/uploads/repos/2026/06/4ec0b54aa9112404.png) 3. 启动 agent 服务: NET START Wazuh 4. 在 Wazuh Dashboard → Agents 中验证 ## ![Windows Agent](https://static.pigsec.cn/wp-content/uploads/repos/2026/06/24a2f0d38a112410.png) ### 9. Sysmon 安装 在 **Windows 10 端点**上: 1. 从 [Sysinternals](https://learn.microsoft.com/en-us/sysinternals/downloads/sysmon) 下载 Sysmon: Invoke-WebRequest -Uri https://download.sysinternals.com/files/Sysmon.zip -OutFile Sysmon.zip Expand-Archive Sysmon.zip -DestinationPath C:\Sysmon 2. 下载 Sysmon 配置文件 (SwiftOnSecurity): Invoke-WebRequest -Uri https://raw.githubusercontent.com/SwiftOnSecurity/sysmon-config/master/sysmonconfig-export.xml -OutFile C:\Sysmon\sysmonconfig.xml 3. 安装 Sysmon: C:\Sysmon\Sysmon64.exe -accepteula -i C:\Sysmon\sysmonconfig.xml ## ![Sysmon-安装](https://static.pigsec.cn/wp-content/uploads/repos/2026/06/3e82b51ba2112415.png) ### 10. Sysmon 配置 通过编辑 Wazuh agent 配置,将 Wazuh 配置为收集 Sysmon 日志: ``` Microsoft-Windows-Sysmon/Operational eventchannel ``` ![Sysmon-配置](https://static.pigsec.cn/wp-content/uploads/repos/2026/06/c23e77ce33112421.png) 重启 Wazuh agent: ``` NET STOP Wazuh NET START Wazuh ``` | 事件 ID | 描述 | |---|---| | 1 | 进程创建 | | 3 | 网络连接 | | 7 | 镜像加载 | | 8 | CreateRemoteThread | | 11 | 文件创建 | | 12/13/14 | 注册表事件 | | 15 | FileCreateStreamHash | | 22 | DNS 查询 | | 25 | 进程篡改 | ### 11. 在 Ubuntu 上安装 Wazuh Agent 在 **Ubuntu Desktop 端点**上: ``` # 导入 Wazuh 仓库的 GPG key curl -s https://packages.wazuh.com/key/GPG-KEY-WAZUH | sudo gpg --no-default-keyring --keyring gnupg-ring:/usr/share/keyrings/wazuh.gpg --import && sudo chmod 644 /usr/share/keyrings/wazuh.gpg # 添加 Wazuh 仓库 echo "deb [signed-by=/usr/share/keyrings/wazuh.gpg] https://packages.wazuh.com/4.x/apt/ stable main" | sudo tee /etc/apt/sources.list.d/wazuh.list # 安装 agent sudo apt update sudo WAZUH_MANAGER="" WAZUH_AGENT_NAME="UBUNTU-ENDPOINT" apt install wazuh-agent -y # 启用并启动 agent sudo systemctl daemon-reload sudo systemctl enable wazuh-agent sudo systemctl start wazuh-agent # 验证状态 sudo systemctl status wazuh-agent ``` ## ![Ubuntu-注册](https://static.pigsec.cn/wp-content/uploads/repos/2026/06/e5310633a4112427.png) ![Ubuntu-agent](https://static.pigsec.cn/wp-content/uploads/repos/2026/06/b11e7b9993112433.png) ### 12. 验证步骤 | 组件 | 验证命令 | 预期结果 | |---|---|---| | Wazuh Manager | `sudo systemctl status wazuh-manager` | Active (running) | | Wazuh Indexer | `sudo systemctl status wazuh-indexer` | Active (running) | | Wazuh Dashboard | `https://:443` | 登录页面可访问 | | Windows Agent | `NET START \| findstr Wazuh` | Wazuh 服务正在运行 | | Ubuntu Agent | `sudo systemctl status wazuh-agent` | Active (running) | | Sysmon | `Get-Service Sysmon64` | 正在运行 | | Agent 注册 | Wazuh Dashboard → Agents | 所有 agent 可见且处于活动状态 | ### 13. 故障排除 | 问题 | 解决方案 | |---|---| | Agent 无法连接到 manager | 检查防火墙规则:在 Wazuh server 上允许端口 `1514/TCP` 和 `1515/TCP` | | Dashboard 无法加载 | 检查 `wazuh-indexer` 和 `wazuh-dashboard` 服务是否正在运行 | | Sysmon 事件未出现 | 验证 `ossec.conf` 是否包含 Sysmon eventchannel;重启 agent | | 虚拟机无法通信 | 确保所有虚拟机使用**桥接适配器**且位于同一子网中 | | Agent 显示“已断开连接” | 重启 agent 服务;检查 `ossec.conf` 中的 manager IP | | Wazuh Server CPU 占用过高 | 增加分配的 RAM/CPU;检查 indexer 堆大小 | | 日志未转发 | 检查 agent 的 `ossec.log` 是否有错误:`/var/ossec/logs/ossec.log` | ## ⚔️ 攻击模拟 ### Windows 端点攻击 | # | 攻击场景 | MITRE 战术 | 关键技术 | |---|---|---|---| | 1 | [Nmap 侦察扫描](windows-endpoint/attack-01-nmap-scan/) | 侦察 | T1046 – 网络服务扫描 | | 2 | [暴力破解攻击](windows-endpoint/attack-02-bruteforce/) | 凭据访问 | T1110 – 暴力破解 | | 3 | [PowerShell 执行](windows-endpoint/attack-03-powershell-execution/) | 执行 | T1059.001 – PowerShell | | 4 | [持久化机制](windows-endpoint/attack-04-persistence/) | 持久化 | T1053 – 计划任务/作业 | | 5 | [权限提升](windows-endpoint/attack-05-privilege-escalation/) | 权限提升 | T1548 – 滥用提权控制 | ### Ubuntu 端点攻击 | # | 攻击场景 | MITRE 战术 | 关键技术 | |---|---|---|---| | 1 | [Nmap 侦察扫描](ubuntu-endpoint/attack-01-nmap-scan/) | 侦察 | T1046 – 网络服务扫描 | | 2 | [SSH 暴力破解攻击](ubuntu-endpoint/attack-02-ssh-bruteforce/) | 凭据访问 | T1110.001 – 密码猜测 | | 3 | [权限提升](ubuntu-endpoint/attack-03-privilege-escalation/) | 权限提升 | T1548.003 – Sudo 和 Sudo 缓存 | | 4 | [持久化机制](ubuntu-endpoint/attack-04-persistence/) | 持久化 | T1053.003 – Cron | | 5 | [可疑文件活动](ubuntu-endpoint/attack-05-suspicious-file-activity/) | 收集 | T1005 – 来自本地系统的数据 | ## 🧠 展示的技能 | 技能领域 | 描述 | |---|---| | **SOC 运营** | 一级/二级告警分类、调查和升级工作流程 | | **检测工程** | 自定义 Wazuh 规则创建、告警调优和误报减少 | | **威胁狩猎** | 跨端点主动搜索入侵指标 | | **事件响应** | 结构化调查、遏制和文档记录 | | **SIEM 管理** | Wazuh 部署、Agent 管理和仪表盘配置 | | **Linux 管理** | Ubuntu server 管理、服务配置和日志分析 | | **Windows 安全监控** | 事件日志分析、Sysmon 遥测和端点加固 | | **日志分析** | 解析和关联 Windows Event Logs、Sysmon 和 syslog | | **MITRE ATT&CK 映射** | 技术识别、战术分类和覆盖率分析 | | **网络安全** | 网络侦察检测、流量分析和分段 | ## 📜 许可证 本项目仅用于**教育和作品集目的**。所有攻击模拟均在隔离的实验室环境中进行。未经明确授权,请勿将这些技术用于任何系统。 ## 👤 作者 **您的名字** - GitHub: [@siriin4k](https://github.com/Siriin4k) - LinkedIn: [Shreenivas Jagdale](https://linkedin.com/in/siriin4k) - Github: [@monkencrypts](https://github.com/monkencrypts) - LinkedIn: [Kartik Manurkar](https://linkedin.com/in/kartik-manurkar)

带着💻对网络安全和持续学习的热情构建。

"# Multi-Host-Security-Operations-Home-Lab"
标签:SOC分析, Wazuh, 攻击模拟, 网络安全实验室, 驱动签名利用