ductrl/CommitGate
GitHub: ductrl/CommitGate
一款 AI 驱动的 Git 安全门控工具,在 commit 或 push 阶段结合 Gitleaks 规则扫描与 AI 语义审查,阻止机密信息和高风险代码进入代码库。
Stars: 14 | Forks: 0
# CommitGate
一个由 AI 驱动的 Git 安全门控。在每次 `git commit` 或每次 `git push` 时,CommitGate 都会扫描你的更改,并在机密信息或高风险代码进入你的历史记录之前**阻止它们**。
## 演示
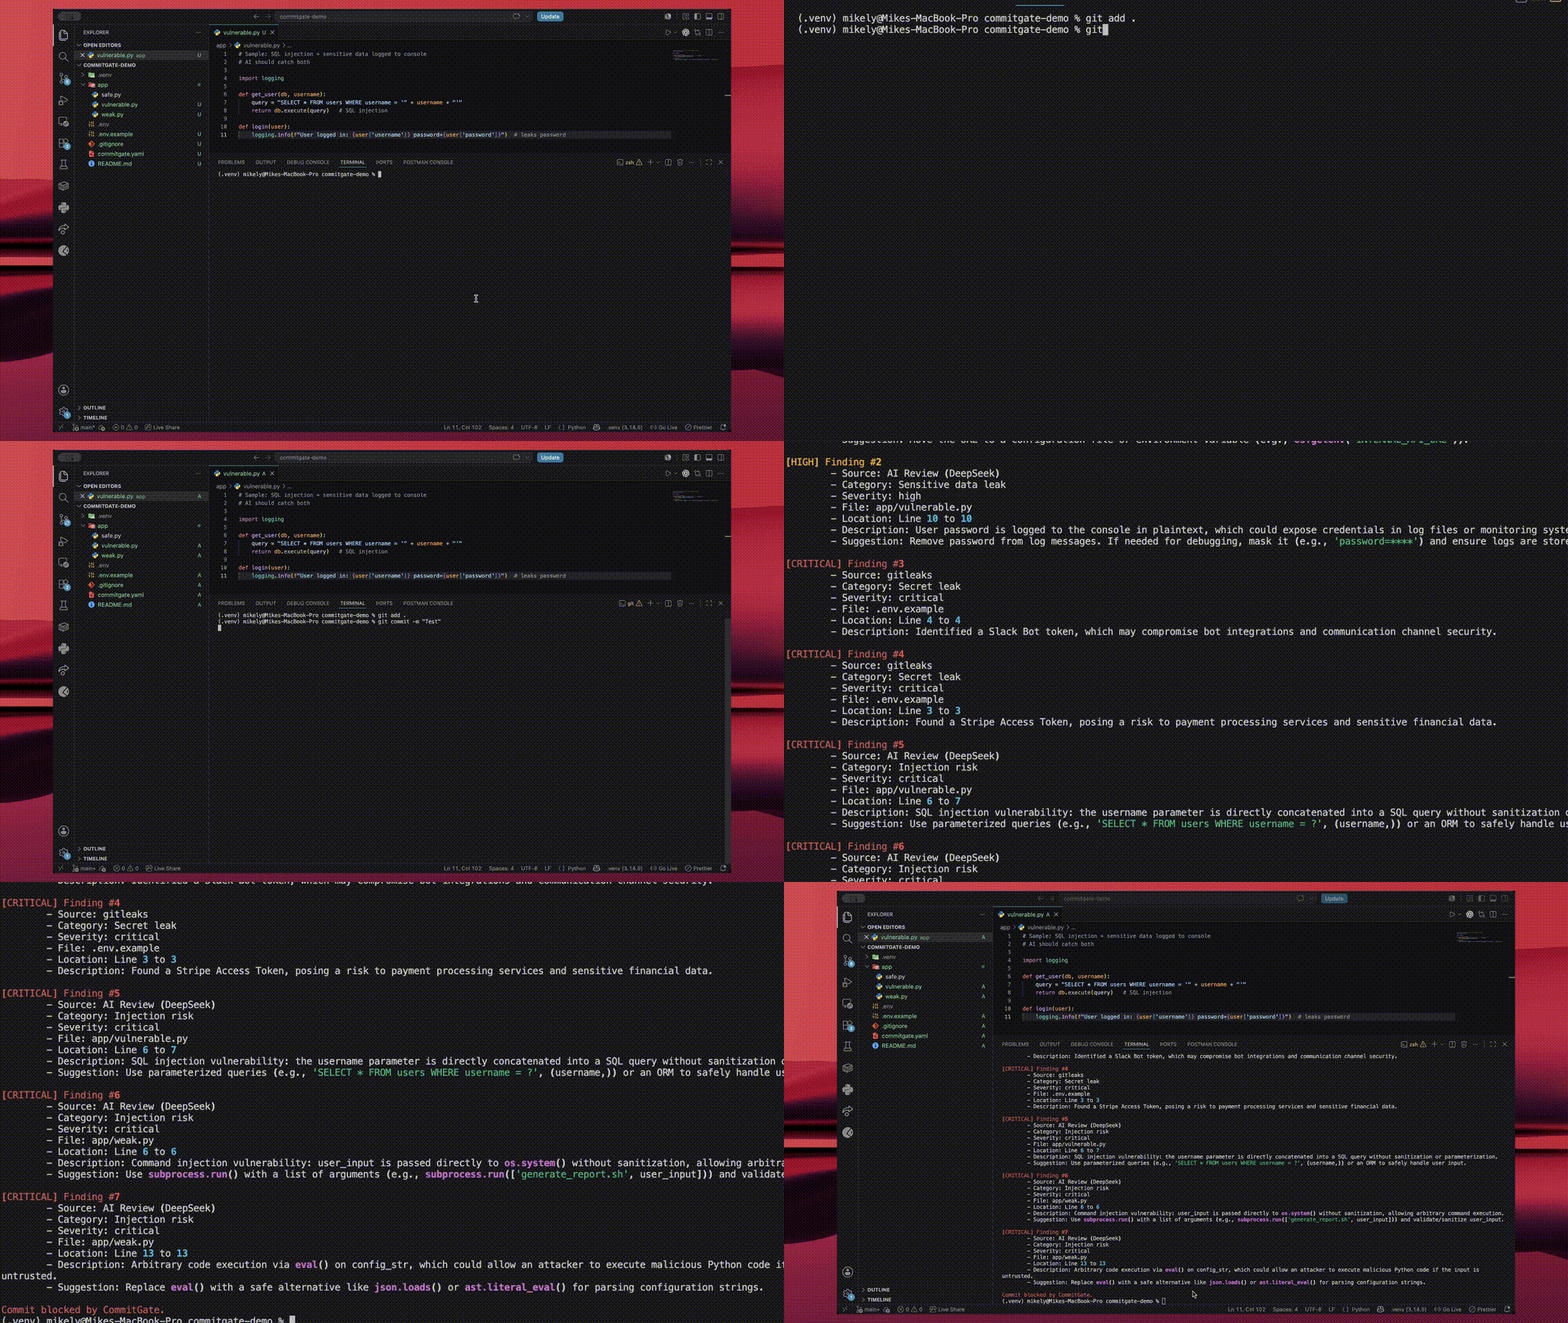
*CommitGate 在易受攻击的提交进入 Git 历史记录之前将其拦截。*
## 扫描器
CommitGate 会对你的更改运行两个扫描器,并合并它们的扫描结果:
| 扫描器 | 捕捉内容 |
|---------|---------|
| [][gitleaks-link] | 已知的机密格式 —— 匹配标准模式的 API key、token、密码 |
| **AI 审查器** | 正则表达式遗漏的内容 —— 代码理解、私有知识与数据 |
## 可用的 Provider
这些是我们在 AI 审查器中支持的可用 Provider。你可以选择使用兼容 OpenAI 的 API key(推荐),或者使用你自己的 AI agent(Claude 或 Codex)。
| 类型 | Provider |
|------|-----------|
| **兼容 OpenAI 的 API**(需要 API key) | [][openai-link] [][gemini-link] [][deepseek-link] [][groq-link] |
| **AI Agent**(无需 API key —— 使用你的本地登录凭证) | [][claude-link] [][codex-link] |
## 工作原理
1. 你运行 `git commit`(或 `git push`)。已安装的 Git hook 会将你的更改交给 CommitGate。
2. 两个扫描器会扫描 diff —— **Gitleaks**(已知的机密模式)和 **AI 审查器**(其他所有内容)。
3. **决策引擎**合并扫描结果,并做出 **allow**(允许)、**warn**(警告)或 **block**(阻止)的裁决。
4. 你会在终端中收到一份报告。如果裁决为 **block**,则提交或推送将被停止;否则将继续执行。
有关逐个模块的设计,请参阅 [`docs/architecture.md`](docs/architecture.md)。
## 安装说明
### 1. 安装前置条件
| 要求 | 安装方法 |
|-------------|----------------|
| **Python ≥ 3.10** | [python.org](https://www.python.org/downloads/) |
| **Git** | [git-scm.com](https://git-scm.com/downloads) |
| **Gitleaks**(独立的二进制文件,*不*由 `pip` 安装) | 请参阅下方的安装说明。 |
#### 安装 Gitleaks
- **Windows**
winget install gitleaks
- **macOS**
brew install gitleaks
- **Linux**
- 从
[Gitleaks Releases](https://github.com/gitleaks/gitleaks/releases) 下载最新版本
- 将该二进制文件放置在你的 `PATH` 路径下的某个位置
- 关于其他安装方式(Snap、Docker、包管理器等),请查阅官方的 [Gitleaks 安装指南](https://github.com/gitleaks/gitleaks#installing)。
确认 Gitleaks 已准备就绪:
```
gitleaks version
```
### 2. 安装 CommitGate
```
pip install git+https://github.com/ductrl/CommitGate.git
```
### 3. 保护你的仓库
在**你需要保护的仓库中**运行以下命令:
```
commitgate init
```
这会创建一个 `commitgate.yaml` 配置文件并安装一个 Git hook。它会询问你想要使用 **pre-commit** 还是 **pre-push** hook —— 请参阅[使用方法](#how-to-use)。
### 4. 设置 AI 审查器
打开 `commitgate.yaml` 并将 `provider` 设置为与以下路径之一匹配。
**选项 A —— API key**(OpenAI · Gemini · DeepSeek · Groq)
```
ai:
provider: groq # or openai / gemini / deepseek
```
在你的项目根目录下创建一个 `.env` 文件并添加你的 key(在 [console.groq.com](https://console.groq.com) 获取的 Groq key 是**免费**的):
```
AI_KEY=your-api-key-here
```
不要将 `.env` 提交到 Git —— 它包含了你的 key。
**选项 B —— AI Agent**(Claude Code 或 Codex,无需 API key)
首先确认该 agent 已安装并登录:
```
claude --version # Claude Code
codex --version # Codex
```
然后设置 provider:
```
ai:
provider: claude-cli # or codex-cli
```
**选项 C —— 不使用 AI**(仅使用 Gitleaks)
```
ai:
enabled: false
```
建议将 `commitgate.yaml` 提交到代码库,以便你的整个团队共享相同的门控策略。该文件不包含也不应该包含任何机密信息。
## 使用方法
在运行 `commitgate init` 后,只需像往常一样执行 `git commit` / `git push` —— CommitGate 会自动运行。
### pre-commit 与 pre-push 对比
你在运行 `commitgate init`(或 `commitgate install-hook`)时选择其一:
| Hook | 运行时机 | 扫描范围 |
|------|---------|-------|
| **pre-commit** | 每次 `git commit` | 你暂存的更改 —— 速度快,提供逐次提交的反馈 |
| **pre-push** | 每次 `git push` | 推送范围内的每一个提交 —— 代码离开你的机器前的最后一道防线 |
如需切换,或稍后添加另一个 hook,请运行 `commitgate install-hook` 并进行选择。建议两者都安装以实现纵深防御。
### 每种结果的含义
| 结果 | 触发时机 | 最终状态 |
|---------|------|--------|
| `allow` | 无扫描结果 | 继续 —— 退出代码 `0` |
| `warn` | 扫描结果**低于**阻止的严重程度 | 继续,打印扫描结果 —— 退出代码 `0` |
| `block` | 扫描结果**达到或超过**阻止的严重程度(默认:`high`) | 已停止 —— 退出代码 `1` |
在 `commitgate.yaml` 中使用 `policy.block_severity` 更改标准(`low` / `medium` / `high` / `critical`)。
### 手动扫描
你可以随时检查暂存的更改,而无需提交:
```
git add app.py
commitgate scan
```
如果 `app.py` 硬编码了机密信息,你将会看到:
```
CommitGate detected 1 security finding(s):
[CRITICAL] Finding #1
- Source: gitleaks
- Category: Secret leak
- Severity: critical
- File: app.py
- Location: Line 12 to 12
- Description: AWS Access Key detected
Commit blocked by CommitGate.
```
### 跳过一次
如果你需要为某一次提交绕过门控:
```
SKIP=commitgate git commit -m "your message"
```
## 数据隐私
当启用 AI 审查器时,CommitGate 会将你**暂存的代码 diff 发送至你在 `commitgate.yaml` 中配置的 AI provider**。这也适用于 AI Agent(Claude Code → Anthropic,Codex → OpenAI),因为你的 diff 仍然会被发送给它们的 provider,因此它们*不是*隔离网络环境下的方案。
**未经组织授权,请勿**在机密或专有代码上使用 AI 审查器。设置 `ai.enabled: false` 可仅运行 Gitleaks。完全本地化的 LLM 支持(Ollama)已在路线图中。
## Splunk 审计日志(可选)
CommitGate 可以在每次扫描后向 Splunk 发送审计事件,从而为你提供每次提交决策的可搜索历史记录。
### 1. 创建 Splunk 账户
在 `splunk.com` 注册。从你的账户控制面板启动 **Splunk Cloud 免费试用**。
### 2. 启用 HTTP Event Collector (HEC)
在你的 Splunk UI 中:
1. **Settings** → **Data Inputs** → **HTTP Event Collector**
2. 点击 **Global Settings** → 将 **All Tokens** 设置为 **Enabled** → **Save**
### 3. 创建 HEC token
1. 仍在 HTTP Event Collector 页面 → **New Token**
2. **Name:** `commitgate-audit`
3. 点击 **Next** → **Source type:** 输入 `commitgate:audit` 并选择 **New**
4. **Index:** `main` → **Review** → **Submit**
5. 复制确认屏幕上显示的 token
### 4. 添加到你的 `.env` 中
```
SPLUNK_HEC_TOKEN=your-token-here
SPLUNK_HEC_URL=https://prd-p-yourinstance.splunkcloud.com:8088/services/collector/event
SPLUNK_VERIFY_SSL=false
```
### 5. 验证连接
暂存任意文件并运行手动扫描:
```
git add
commitgate scan
git restore --staged
```
如果审计事件成功到达 Splunk,你在输出中就不会看到黄色的“Splunk audit log failed”警告。
### 6. 在 Splunk 中查看事件
**Search & Reporting** → 运行:
```
sourcetype="commitgate:audit"
```
每次 `commitgate scan` 都会显示为一个包含 `action`、`reason`、`findings_count` 以及完整扫描结果列表的事件。
### Splunk 仪表板
使用以下搜索构建一个 **CommitGate Security Gate** 仪表板:
| 面板 | 类型 | 搜索 |
|-------|------|--------|
| 决策随时间变化趋势 | 折线图 | `sourcetype="commitgate:audit" action!="allow" \| timechart count by action` |
| 今日拦截次数 | 单值图 | `sourcetype="commitgate:audit" action=block \| stats count as Blocked` |
| 触发频率最高的类别 | 柱状图 | `sourcetype="commitgate:audit" \| stats count by findings{}.category \| sort -count` |
| 按严重程度划分的扫描结果 | 饼图 | `sourcetype="commitgate:audit" \| stats count by findings{}.severity` |
| 最近被阻止的提交 | 表格 | `sourcetype="commitgate:audit" \| table _time reason findings_count \| sort -_time` |
## 许可证
[MIT](LICENSE) © 2026 Mike Ly
CommitGate 是免费的,你可以根据 MIT License 的条款使用、修改和分发它。
标签:AI代码审查, Git钩子, Petitpotam, Python, StruQ, 代码安全, 开发安全, 无后门, 机密检测, 漏洞枚举, 网络安全研究, 逆向工具