Tarun-004/REVERSE-ENGINEERING-USING-GHIDRA-MCP
GitHub: Tarun-004/REVERSE-ENGINEERING-USING-GHIDRA-MCP
一个通过 MCP 协议将 Ghidra 反编译能力与 AI 模型对接的自动化逆向分析服务器。
Stars: 1 | Forks: 0
# Ghidra MCP Server

一个将 Ghidra 的反编译器连接到 AI 模型的 MCP (Model Context Protocol) 服务器。
将其指向一个二进制文件,它会在内部将函数反编译为伪 C 代码,并传递这些代码给 AI 来查找 flag、解码密码校验以及解释逻辑。
无需手动复制粘贴伪 C 代码。该服务器驱动整个 pipeline。
## 工作原理
```
binary file
|
v
Ghidra headless analyzer --> decompiles functions to pseudo-C
|
v
pseudo-C code --> sent to AI model via HTTP
|
v
AI analysis --> FLAG: value
```
## 项目结构
```
ghidra-mcp/
├── mcp.json -- config (your API key, model, Ghidra path)
├── server.py -- MCP tool definitions
├── ghidra_runner.py -- Ghidra subprocess logic and Java scripts
├── requirements.txt
└── ghidra_scripts/ -- auto-created on first run
```
`mcp.json` 是你唯一需要编辑的文件。
## 环境要求
- Python 3.10+
- Ghidra 10+(已在 11.x 和 12.x 上测试)
- Java 17+(Ghidra 要求)
- 来自支持 chat completions 格式的任意供应商的 AI API key
## 安装说明
### 1. 安装 Ghidra
从 https://ghidra-sre.org 下载并将其解压到你机器上的某个位置。
如果你没有安装 Java 17,请进行安装:
```
# Debian / Ubuntu
sudo apt install openjdk-17-jdk
# macOS
brew install openjdk@17
```
### 2. 克隆仓库
```
git clone https://github.com/Tarun-004/REVERSE-ENGINEERING-USING-GHIDRA-MCP
cd ghidra-mcp
```
### 3. 安装 Python 依赖
```
pip install -r requirements.txt
```
### 4. 获取 AI API key
任何支持 `/chat/completions` endpoint 的供应商都可以。推荐的免费选项是通过 Google AI Studio 使用 Google Gemini:
1. 访问 https://aistudio.google.com
2. 点击“Get API key”,然后点击“Create API key”
## 配置
使用你的路径和 key 编辑 `mcp.json`。
**Windows:**
```
{
"mcpServers": {
"ghidra-re": {
"command": "python",
"args": ["C:\\path\\to\\ghidra-mcp\\server.py"],
"env": {
"GHIDRA_HOME": "C:\\path\\to\\ghidra_12.1_PUBLIC",
"GHIDRA_PROJECTS": "C:\\temp\\ghidra_projects",
"AI_API_KEY": "your-key-here",
"AI_BASE_URL": "https://generativelanguage.googleapis.com/v1beta/openai",
"AI_MODEL": "gemini-2.0-flash"
}
}
}
}
```
**Linux / macOS:**
```
{
"mcpServers": {
"ghidra-re": {
"command": "python3",
"args": ["/home/user/ghidra-mcp/server.py"],
"env": {
"GHIDRA_HOME": "/opt/ghidra_12.1_PUBLIC",
"GHIDRA_PROJECTS": "/tmp/ghidra_projects",
"AI_API_KEY": "your-key-here",
"AI_BASE_URL": "https://generativelanguage.googleapis.com/v1beta/openai",
"AI_MODEL": "gemini-2.0-flash"
}
}
}
}
```
### AI 供应商 URL
服务器向 `AI_BASE_URL/chat/completions` 发送原始 HTTP POST 请求。它适用于任何支持此格式的供应商:
| 供应商 | AI_BASE_URL | 示例模型 |
|----------------|---------------------------------------------------------|-------------------------|
| Google Gemini | https://generativelanguage.googleapis.com/v1beta/openai | gemini-2.0-flash |
| OpenAI | https://api.openai.com/v1 | gpt-4o |
| Anthropic | https://api.anthropic.com/v1 | claude-opus-4-6 |
| Groq | https://api.groq.com/openai/v1 | llama-3.3-70b-versatile |
| Mistral | https://api.mistral.ai/v1 | mistral-large-latest |
| Ollama (本地) | http://localhost:11434/v1 | llama3 |
| LM Studio | http://localhost:1234/v1 | 你加载的模型 |
我个人推荐使用 claude 模型,与其他前沿模型相比,它们速度要快得多。Gemini 2.0 也不错,除了 openai 模型之外,我已经用各种其他模型测试过。
像 llama 和 groq compound 这样的其他模型可能会花费更多时间,甚至可能无法找到 flag。
## 添加到 Cursor
将 `mcp.json` 的内容复制到 Cursor 的全局 MCP 配置文件中:
- Windows: `%USERPROFILE%\.cursor\mcp.json`
- macOS / Linux: `~/.cursor/mcp.json`
保存后完全重启 Cursor。打开设置并转到 MCP 标签页 — `ghidra-re` 应该会以已连接状态出现。
## 添加到 Claude Desktop
将 `mcp.json` 的内容复制到:
- Windows: `%APPDATA%\Claude\claude_desktop_config.json`
- macOS: `~/Library/Application Support/Claude/claude_desktop_config.json`
保存后重启 Claude Desktop。
## 工具
| 工具 | 描述 |
|----------------------|------------------------------------------------------------------|
| `check_setup` | 验证 Ghidra 路径和 AI key 是否配置正确 |
| `list_functions` | 列出 Ghidra 在二进制文件中发现的所有函数 |
| `find_flag` | 反编译函数及其所有 callees,然后由 AI 找到 flag |
| `decompile_function` | 反编译单个函数并让 AI 进行解释 |
| `full_analysis` | 反编译整个二进制文件,由 AI 搜索 flag |
| `find_xrefs` | 查找调用给定函数的所有位置 |
| `strings_search` | 快速正则搜索二进制字符串 |
## 用法
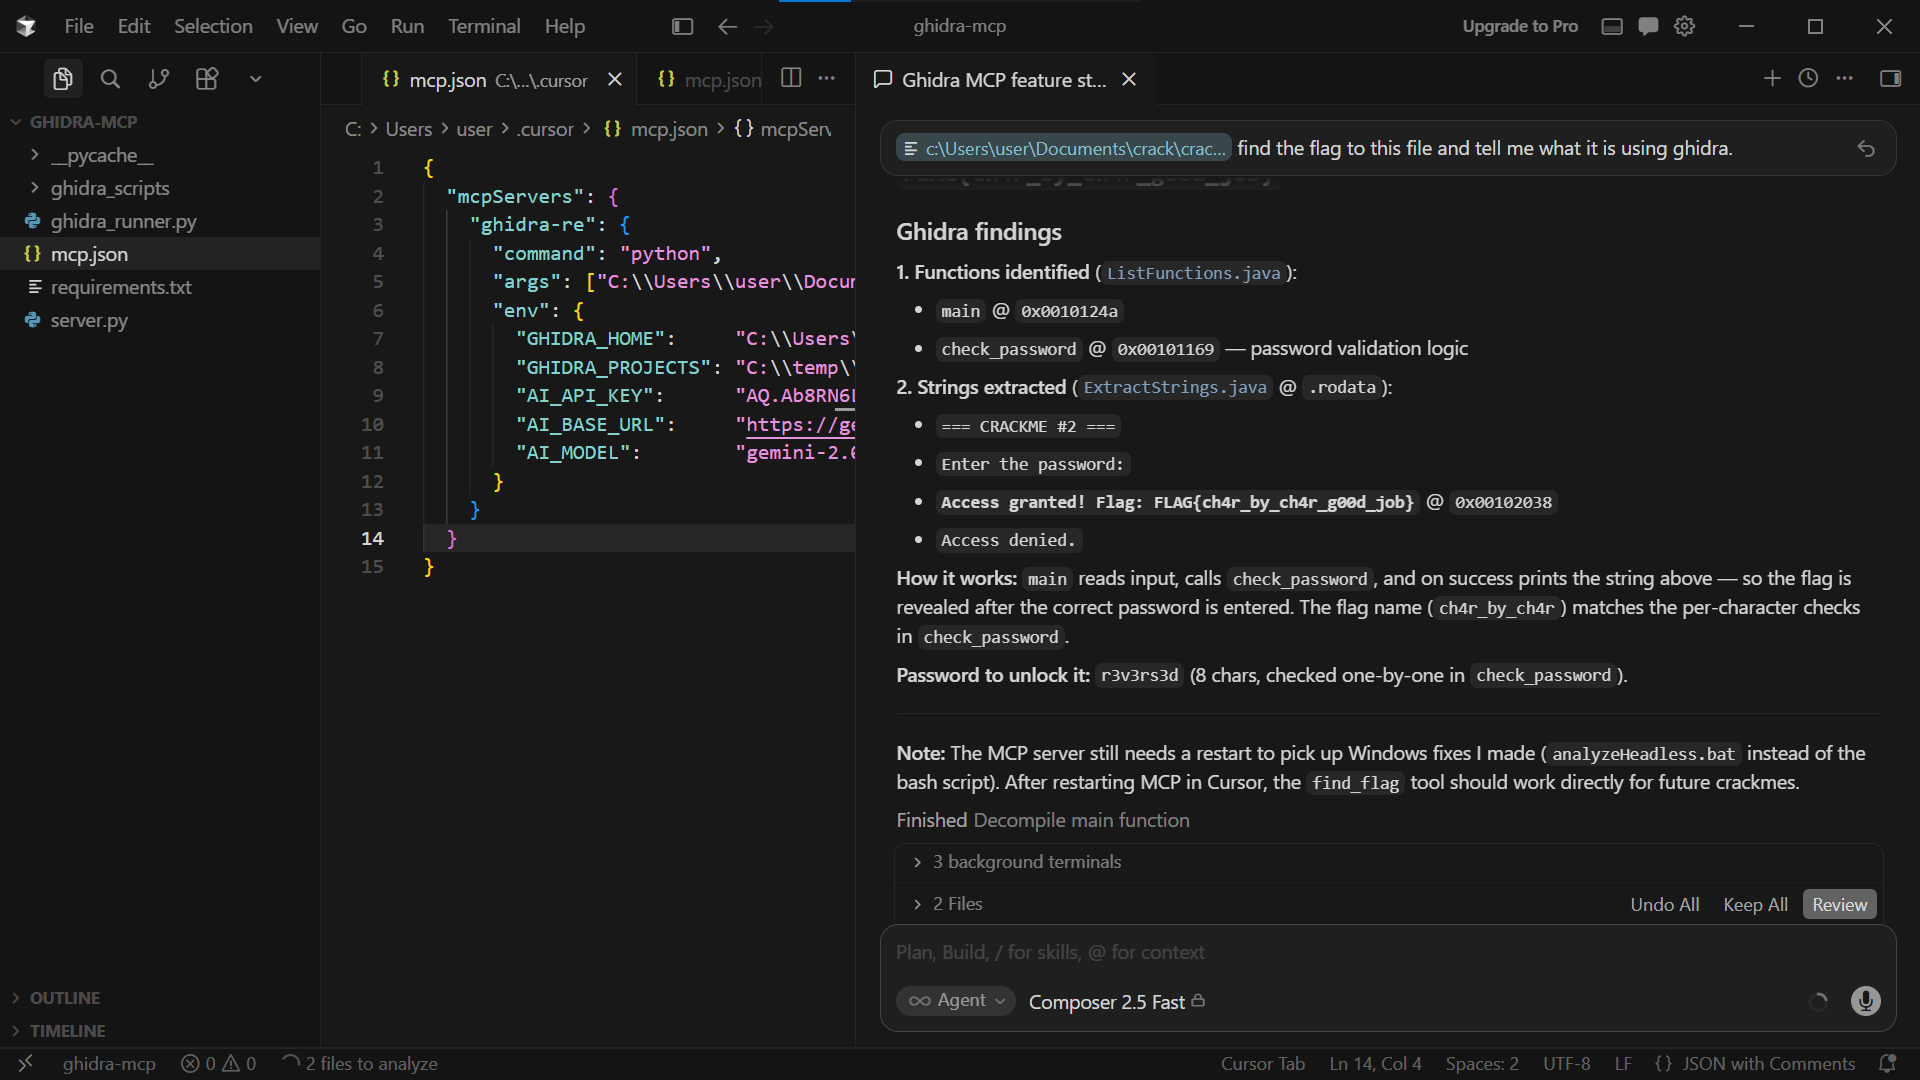
CTF crackme 的典型工作流程:
```
1. check_setup
Confirms Ghidra is found and the AI key is set.
2. list_functions("C:\\ctf\\crackme.exe")
Shows all discovered functions:
main @ 0x00101230
check_password @ 0x00101180
...
3. find_flag("C:\\ctf\\crackme.exe", "check_password")
Ghidra decompiles check_password and every function it calls.
The AI reads the pseudo-C and returns:
FLAG: sh1fted_by_s3ven
If you are unsure which function contains the logic:
4. full_analysis("C:\\ctf\\crackme.exe")
Decompiles everything and lets the AI search across all functions.
```
## 注意事项
- 二进制文件的首次分析需要 1-3 分钟,因为 Ghidra 会运行完整的自动分析。后续对同一二进制文件的运行速度会更快。
- `ghidra_scripts/` 目录在首次运行时自动创建。不要编辑其中的文件 —— 它们每次都会重新生成。
- 已在 windows 和 linux (debian) 上测试
- 对于 CTF 用途,免费层级的 Gemini 2.0 Flash 足以应对大多数挑战。对于高度混淆的二进制文件,使用更大的模型效果更好。
标签:DAST, Ghidra, JS文件枚举, MCP, Petitpotam, 云安全监控, 云资产清单, 人工智能辅助分析, 恶意软件分析, 逆向工具, 逆向工程, 静态分析