Janiru-Sudasinghe/Airgapped-otel-SecOps-Pipeline
GitHub: Janiru-Sudasinghe/Airgapped-otel-SecOps-Pipeline
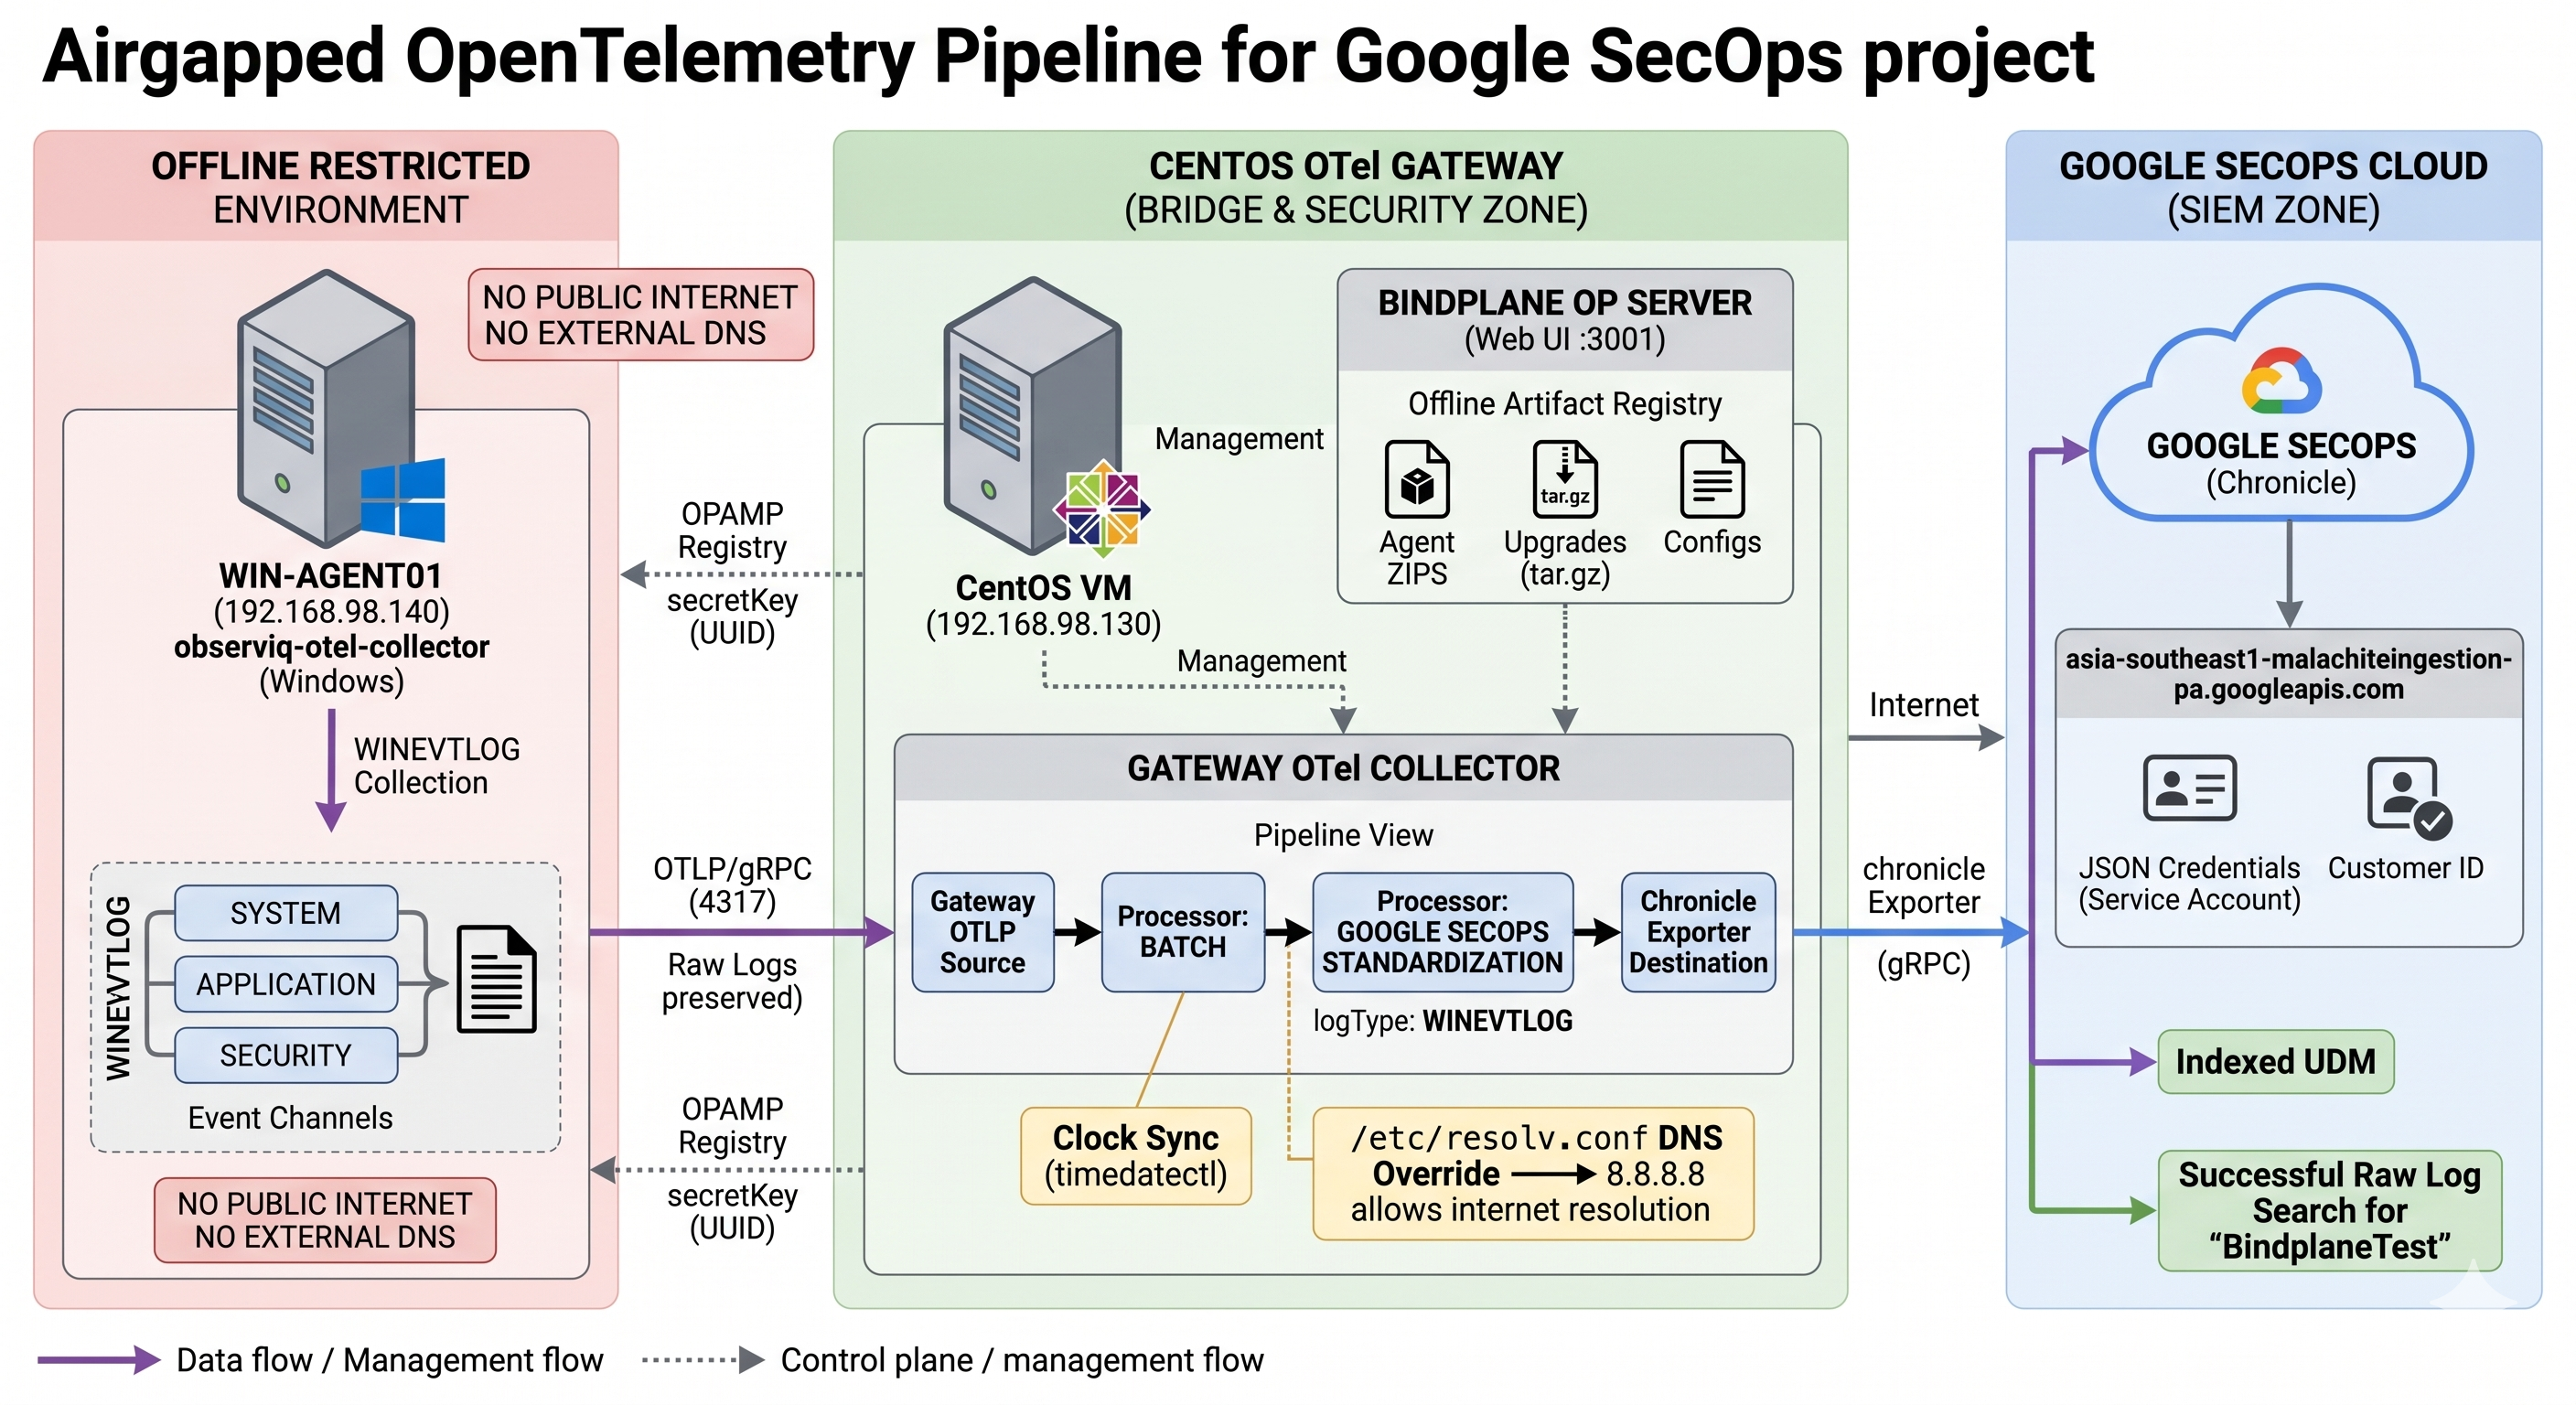
该项目演示了一套在完全物理隔离环境下,通过自托管 Bindplane 和 OpenTelemetry Collector 网关将 Windows 事件日志安全转发至 Google SecOps 进行 SIEM 分析的企业级遥测架构。
Stars: 0 | Forks: 0
# 通过自托管 Bindplane 实现离线环境的 Windows 事件日志转发至 Google SecOps
` |
| Server Host | `0.0.0.0` |
| Server Port | `3001` |
| Remote URL | `http://192.168.98.130:3001` |
| Authentication Method | `single-user` |
| Username / Password | `admin` / `` |
| Database Host / Port | `192.168.98.130`(或 `localhost`)/ `5432` |
| Database Name / User / Password | `bindplane` / `bindplane_user` / `` |
| SSL Mode | `disable` |
**在** `/etc/bindplane/config.yaml` 中**启用离线模式**(添加 `offline: true`;确认 OpAMP `secretKey`):
```
apiVersion: bindplane.observiq.com/v1beta1
offline: true
env: production
auth:
type: system
username: admin
password:
secretKey: # UUID used to enroll collectors
```
```
# 启用 BindPlane 服务以在系统开机时自动启动,并立即启动它
sudo systemctl enable --now bindplane
```
```
# 检查 BindPlane 服务的当前运行状态,以验证其已成功启动且没有错误
sudo systemctl status bindplane
```
```
# 检索并显示安装期间生成的默认 BindPlane 账户凭据(用户名和密码),以便您可以登录 Web 界面
bindplane get account
```
**托管离线 Collector 产物**,以便物理隔离的 Collector 可以在没有互联网的情况下安装:
```
# 在您的主文件夹中创建一个隐藏的 '.bindplane' 目录,用于存储 CLI 配置和缓存
mkdir -p ~/.bindplane
```
```
# 将离线 zip 文件中的 BindPlane CLI 可执行文件直接解压到系统级目录中,以便您可以从任何地方运行 'bindplane' 命令
sudo unzip ~/airgap/bindplane/bindplane-cli*.zip -d /usr/local/bin/
```
```
# 创建一个名为 'airgap' 的新 CLI profile,告知 CLI 如何连接到您的 BindPlane 服务器(请务必将 替换为上一步中的密码)
bindplane profile set airgap --remote-url http://192.168.98.130:3001 --username admin --password
```
```
# 将新创建的 'airgap' profile 设置为您未来所有 CLI 命令的活跃 profile
bindplane profile use airgap
```
```
# 通过检查版本来验证 CLI 是否已正确安装并能与 BindPlane 服务器成功通信
bindplane version
```
```
# 将离线 OpenTelemetry collector artifacts 上传到 BindPlane 服务器,允许您在没有互联网访问的情况下在网络上部署和升级 agents
bindplane upload agent-upgrade ~/airgap/collector/observiq-otel-collector-v1.100.0-artifacts.tar.gz --version v1.100.0
```
🌐 在浏览器中访问 `http://192.168.98.130:3001` 并登录。
### 阶段 3 - Google SecOps 接入配置
☁️ **Google SecOps 控制台:**
1. **SIEM Settings → Collection Agents** → 下载 **Ingestion Authentication File**(service-account JSON)。
2. **SIEM Settings → Profile → Organization Details** → 复制 **Customer ID** 并记录 **GCP Project Number**。
3. 记录网关使用的采集详情:
| 字段 | 值 |
|---|---|
| Name | `google-secops-dest` |
| Region | `asia-southeast1` |
| Endpoint (gRPC) | `asia-southeast1-malachiteingestion-pa.googleapis.com` |
| Customer ID | `` |
| GCP Project Number | `` |
| Log type / parser | `WINEVTLOG` |
| Auth method | `json`(将凭据粘贴到 destination 中) |
### 阶段 4 - 网关 Collector(离线 CentOS)
🔵 **离线 CentOS 服务器:**
```
# 使用离线 bundle 中的 RPM package 安装或升级 observIQ OpenTelemetry Collector
sudo rpm -U ~/airgap/collector/observiq-otel-collector_v1.100.0_linux_amd64.rpm
```
```
# 在 vim 文本编辑器中打开 collector 的 manager 配置文件,以便您可以将其指向您的 BindPlane OP 服务器
sudo vim /opt/observiq-otel-collector/manager.yaml
```
```
endpoint: ws://192.168.98.130:3001/v1/opamp
secret_key:
```
```
# 启用 OpenTelemetry collector 服务以在系统开机时自动启动,并立即启动它
sudo systemctl enable --now observiq-otel-collector
```
```
# 检查 collector 服务的当前运行状态,以确保其平稳运行且通信正常
sudo systemctl status observiq-otel-collector
```
🌐 **Bindplane 控制台** - 确认网关显示为 **Connected**,然后构建网关 pipeline:
- **Create Configuration:** 为其命名为 `Gateway-Pipeline`,Select Platform = **Linux**,点击 Next。
- **Add Source → Select Bindplane Gateway**(默认值 - 监听 `4317`/`4318`)点击 Save。
- **Add Processors → 搜索并添加 Batch**,保存;然后再次搜索并添加 **Google SecOps Standardization**,设置 `logType = WINEVTLOG`,保存。
- **在右侧 Add Destination → 搜索并添加 Google SecOps:** Protocol `gRPC`;Endpoint `asia-southeast1-malachiteingestion-pa.googleapis.com`;Auth `json`(粘贴凭据 JSON);Customer ID ``;Fallback Log Type `WINEVTLOG`;启用 **Retry on Failure** 点击 Save。
- **点击 Apply → 选择网关 Collector → Start Rollout。**
### 阶段 5 - Windows 10 Agent(离线)
⬛ **离线 Windows Agent**(使用管理员权限的 PowerShell / CMD):
```
# 将 Windows 机器重命名为 'WIN-AGENT01' 并立即重启系统以应用新名称
Rename-Computer -NewName WIN-AGENT01 -Restart
```
```
# 测试到 BindPlane 服务器的 UI/API 端口的本地网络连通性,以确保此 agent 能够与管理控制台通信(这应该报告成功)
Test-NetConnection 192.168.98.130 -Port 3001
```
```
# 测试到 BindPlane 服务器的 OpenTelemetry gRPC 端口的本地网络连通性,agent 将把其 metric 和 log 数据发送到该端口(这应该报告成功)
Test-NetConnection 192.168.98.130 -Port 4317
```
```
# 通过确认机器无法访问外部公共 IP 地址来验证 air-gap 隔离是否正在有效工作(这必须失败)
Test-NetConnection 8.8.8.8 -Port 443
```
假设您已经将 observiq-otel-collector-v1.100.0.msi 文件传输到了 C:\offline\,请通过本地暂存的 MSI 静默安装 Agent,并将其指向服务器的 OpAMP endpoint:
```
:: Install the observIQ OpenTelemetry Collector silently from the offline MSI file, configuring it to connect and authenticate with your BindPlane OP management server
msiexec /i "C:\offline\observiq-otel-collector-v1.100.0.msi" /quiet ^
ENABLEMANAGEMENT=1 ^
OPAMPENDPOINT=ws://192.168.98.130:3001/v1/opamp ^
OPAMPSECRETKEY=
```
```
:: Query the Windows Service Control Manager to check the status of the newly installed collector service (you want to see STATE: 4 RUNNING)
sc query observiq-otel-collector :: expect STATE: 4 RUNNING
```
🌐 在 Bindplane 控制台 → **Agents** 中,确认 `WIN-AGENT01` 状态为 **Connected**。
### 阶段 6 - Pipelines (Bindplane GUI)
🌐 **Bindplane 控制台** - 构建 Windows Agent pipeline:
- **Create Configuration:** 为其命名为 `Windows-Server-Logs`,Select Platform = **Windows**。
- **Add →Select Windows Events:** 在 Channels 部分启用 **System**、**Application**、**Security**。在 **Advanced** 下,**开启 Raw Logs** - *必须项;否则 SecOps 会拒绝 WINEVTLOG。*(可选:设置 **Start At → beginning** 以进行回填。)点击 Save。
- **Add Destination → Select Bindplane Gateway (OTLP):** Endpoint/Hostname `192.168.98.130`,Port `4317`,Protocol `gRPC`,TLS **insecure/disabled**(内部 LAN)。
- **Add Processor →Select Batch。** 点击 Save。
- **Apply → 选择 `WIN-AGENT01` → Start Rollout。**
### 阶段 7 - 验证与测试
⬛ **离线 Windows Agent** - 生成测试事件:
```
:: Generate a synthetic "Error" event in the Windows SYSTEM log to verify the OpenTelemetry collector is successfully reading and forwarding System events to BindPlane
eventcreate /T ERROR /ID 999 /L SYSTEM /SO BindplaneTest /D "Air-gap WINEVTLOG test event"
```
```
:: Generate a second synthetic "Error" event, this time in the APPLICATION log, to ensure application-level events are also being captured and routed correctly
eventcreate /T ERROR /ID 999 /L APPLICATION /SO BindplaneTest /D "Air-gap WINEVTLOG test event"
```
🌐 **Bindplane 控制台** - 确认实时吞吐量:`Windows Events → Bindplane Gateway`(Agent pipeline)以及 `Bindplane Gateway → Google SecOps`(网关 pipeline)。
🔵 **离线 CentOS 服务器** - 检查网关导出情况:
```
# 实时持续监控 OpenTelemetry collector 的实时 log 文件,以验证遥测数据是否已成功通过身份验证并导出,且没有出现 401 (Unauthorized) 或 403 (Forbidden) 错误
sudo tail -f /opt/observiq-otel-collector/log/collector.log
# 成功 = chronicle 导出且无 401/403
```
☁️ **Google SecOps 控制台:**
- 针对关键词 `BindplaneTest` 进行 **Raw Log Search**。
- **UDM Search:** 在最近的时间窗口内搜索 `metadata.log_type = "WINEVTLOG"`。
- **SIEM Settings → Health Hub:** 确认 WINEVTLOG 的 **Last Ingested / Last Normalized** 时间是最近的。✅
## ⚙️ 配置参考
Collector 配置是**由 Bindplane GUI 生成并通过 OpAMP 推送的** — 此处仅作为参考包含;请勿在主机上手动编辑它们。
customer_id:
endpoint: asia-southeast1-malachiteingestion-pa.googleapis.com
log_type: WINEVTLOG
raw_log_field: body
retry_on_failure: { enabled: true }
service:
pipelines:
logs/gateway-to-secops:
receivers: [otlp/source0]
processors: [batch/winevtlog, google_secops_standardization/secops]
exporters: [chronicle/SecOps]
```
## 🛠 故障排除
| 症状 | 可能原因 | 修复方法 |
|---|---|---|
| 网关 `403 / PermissionDenied` | 区域 endpoint、Customer ID 或凭据错误 | 验证 `asia-southeast1` endpoint 和 Customer ID;尝试使用多区域 endpoint |
| 网关 `401` | 凭据无效/已过期 | 重新下载 Ingestion Authentication File 并重新粘贴 |
| Agent 显示 **Disconnected** | 到 `:3001` 的 LAN 可达性问题,协议错误 | 重新测试 `Test-NetConnection …:3001`;确保使用 `ws://`(而不是 `wss://`);检查 firewalld 3001 |
| 日志在 Bindplane 中流动,但 **SecOps 中什么都没有** | **Raw Logs 未启用**(最常见)、时钟偏差、时间范围太窄 | 确认推出的配置中包含 `raw: true`;同步时钟;扩大搜索窗口 |
| `:4317` 上出现 `connection refused` | 网关未监听 / 防火墙问题 | 确认网关状态为 Connected,4317/tcp 已开放,OTLP source 已推出 |
## 🔐 安全与密钥处理
每个提交的文件都使用了占位符(``、``、``、``、``、``)。
在任何推送之前,请运行密钥扫描程序(例如 `gitleaks detect`)并确认没有遗留真实密钥。
## 📸 截图
将证据放置在 [`screenshots/`](screenshots/) 中并在此处引用。建议的截图集合:
**在 Windows Agent 上 (⬛):**
1. [`Test-NetConnection`](screenshots/Test-NetConnection.png) 在 `:3001`/`:4317` 上成功,并在互联网上**失败**(证明物理隔离)。
2. [`sc query observiq-otel-collector`](screenshots/sc_query_observiq-otel-collector.png) 显示为 **RUNNING**。
3. [`collector_log`](screenshots/collector_log.png) 尾部显示 OTLP 导出到 `192.168.98.130:4317`。
4. [`Event_Viewer`](screenshots/Event_Viewer.png) 显示测试事件。
**在 Bindplane 控制台中 (🌐):**
1. [`Agents_page`](screenshots/Agents_page.png) - 两个 Collector 均显示 **Connected**。
2. [`Windows_pipeline`](screenshots/Windows_pipeline.png) - `Windows Events → Bindplane Gateway`,带有实时吞吐量。
3. [`Gateway_pipeline`](screenshots/Gateway_pipeline.png) - `Bindplane Gateway → Google SecOps`,带有吞吐量。
**在 Google SecOps 中 (☁️):**
1. [`UDM_Search`](screenshots/UDM_Search.png) 查询 `metadata.log_type = "WINEVTLOG"` 返回了测试事件
## 📂 仓库结构
```
Airgapped-otel-SecOps-Pipeline/
├── README.md # This file
├── docs/
│ └── diagram.png
└── screenshots/
└── ... # Evidence (see Screenshots section)
```
## 📚 经验总结
- **网关正是为此而生的。** 物理隔离的源无法直接访问云 SIEM — 通过单一出口网关进行路由是最简洁、最小化凭据暴露的解决方案。
- **Raw Logs 对** `WINEVTLOG` **来说是不可妥协的**。这是导致“SecOps 中没有日志”的最常见原因。
- **离线模式 + 托管产物**(`offline: true` + `bindplane upload agent-upgrade`)使得完全断网的 Collector 集群能够进行安装和升级。
- **固定版本并校验所有内容。** 物理隔离环境中的可复现性依赖于受控且经过验证的二进制文件。
- **时钟同步至关重要** — 偏差的时钟会使采集到的日志落在您的搜索窗口之外,从而看起来“丢失了”。
## 🔗 参考
- Google SecOps — *Use Bindplane with Google SecOps* · *Collect Microsoft Windows Event logs* · *Ingestion API*
- Bindplane 文档 — *Offline Collector Package Installation* · *Bindplane Gateway* · *Google SecOps (Chronicle) destination* · *Linux/Windows collector installation*
- observIQ — `bindplane-otel-collector` GitHub 发布版 (v1.100.0)
- PostgreSQL — PGDG RHEL 9 仓库
## 👤 作者与许可协议
**Janiru Sudasinghe**
- GitHub: [@Janiru-Sudasinghe](https://github.com/Janiru-Sudasinghe)
- LinkedIn: [Janiru Sudasinghe](https://www.linkedin.com/in/janiru-sudasinghe/?skipRedirect=true)
基于 **MIT License** 发布
configs/gateway/gateway-config.yaml.example (CentOS 网关)
``` # 由 Bindplane 管理(GUI 生成的参考 —— 请勿手动编辑) receivers: otlp/source0: protocols: grpc: { endpoint: 0.0.0.0:4317 } http: { endpoint: 0.0.0.0:4318 } processors: batch/winevtlog: {} google_secops_standardization/secops: logType: WINEVTLOG exporters: chronicle/SecOps: compression: gzip creds:configs/windows-agent/windows-agent-config.yaml.example (Windows Agent)
``` # 由 Bindplane 管理(GUI 生成的参考 —— 请勿手动编辑) receivers: windowseventlog/source0__security: { channel: security, raw: true, start_at: end } windowseventlog/source0__application: { channel: application, raw: true, start_at: end } windowseventlog/source0__system: { channel: system, raw: true, start_at: end } processors: batch/winevtlog: {} exporters: otlp/bindplane_gateway: endpoint: 192.168.98.130:4317 compression: gzip tls: { insecure: true } retry_on_failure: { enabled: true } sending_queue: { enabled: true } service: pipelines: logs/winevtlog: receivers: [windowseventlog/source0__security, windowseventlog/source0__application, windowseventlog/source0__system] processors: [batch/winevtlog] exporters: [otlp/bindplane_gateway] ```标签:Bindplane, GET参数, Google SecOps, OpenTelemetry, 事件转发, 日志收集, 运维监控, 隔离环境