andresMen1274/Malware-Analysis-Threat-Investigation-Environment
GitHub: andresMen1274/Malware-Analysis-Threat-Investigation-Environment
基于 FlareVM 和 REMnux 构建的隔离恶意软件分析环境,用于执行静态与动态恶意软件分析并调查可疑进程、持久化机制及系统活动。
Stars: 0 | Forks: 0
# 恶意软件分析-威胁调查环境
使用 REMnux、FlareVM、Procmon、ProcDOT、Sysmon 和 PEstudio 构建的隔离恶意软件分析环境,用于执行静态和动态恶意软件分析。在虚拟化环境中调查可疑进程、持久化机制、注册表修改、可执行文件行为以及 Windows 系统活动。
## 关键发现
- 使用 FlareVM 和 REMnux 构建了隔离的恶意软件分析环境。
- 使用 PEstudio 比较了加壳与未加壳的可执行文件。
- 使用 Regshot 和 Procmon 观察了注册表、文件系统和进程活动。
- 根据捕获的进程活动生成了 ProcDOT 可视化图表。
## 配置
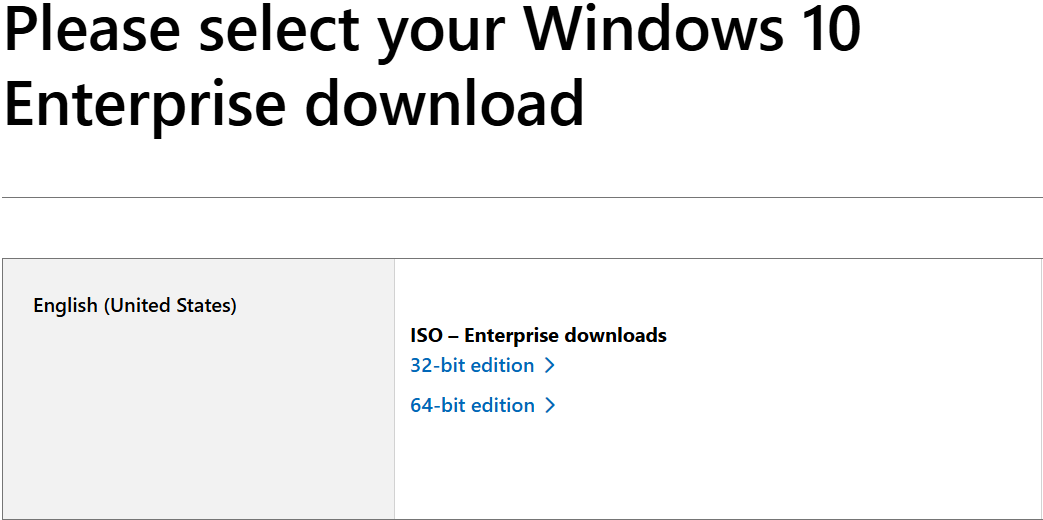
首先,我们需要下载 Virtual Box,然后下载 Windows 10 企业版。这可以通过访问 Windows 网站并创建一个免费帐户来完成,该帐户允许用户下载 Windows 10 企业版。我将使用美国 64 位版本。
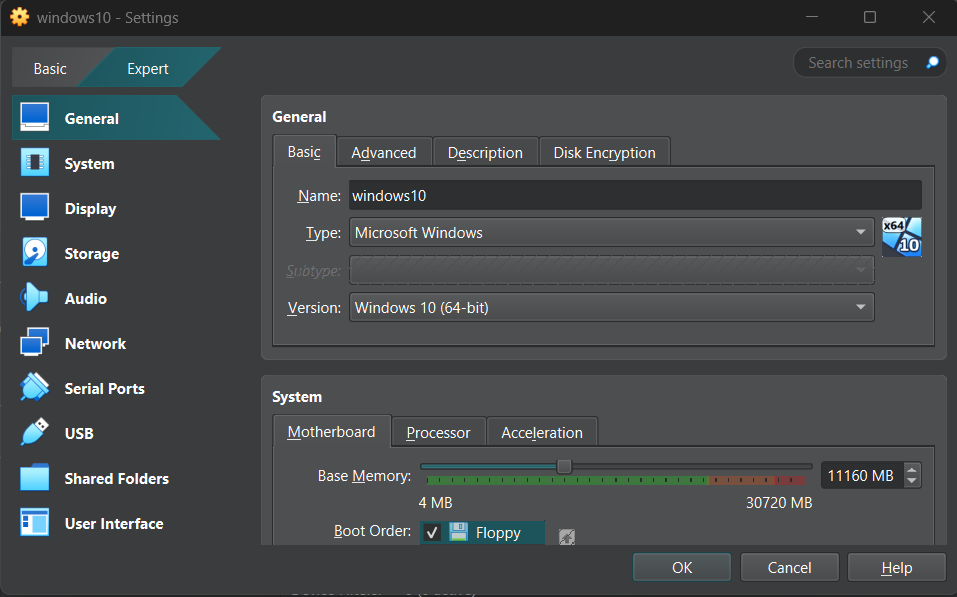
 下载完成后,我们将创建虚拟机。该虚拟机命名为 windows10,并分配了 4 个处理器和 11 GB 内存。
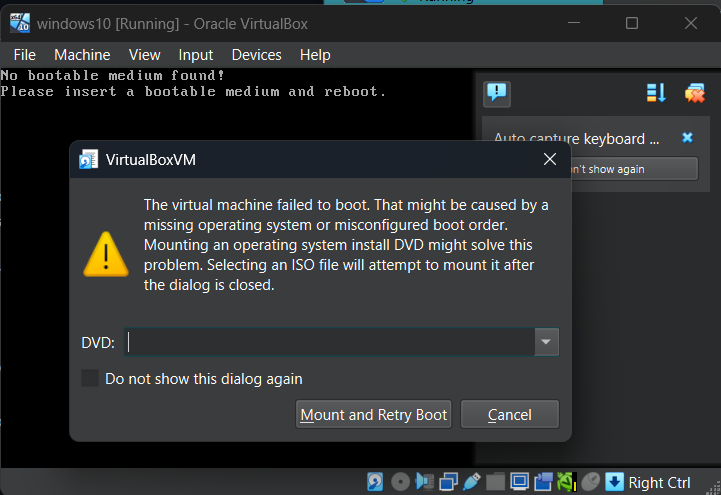
 由于在创建虚拟机时没有挂载 ISO 镜像,因此在启动虚拟机时会出现一条错误消息。
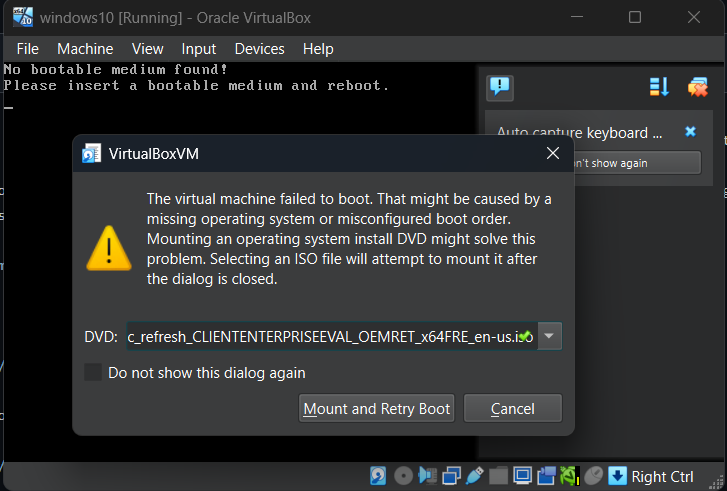
 为了修复这个错误,我们选择之前下载的 Windows 10 企业版 ISO 镜像。然后我们将其挂载并重启系统,使 ISO 镜像生效。
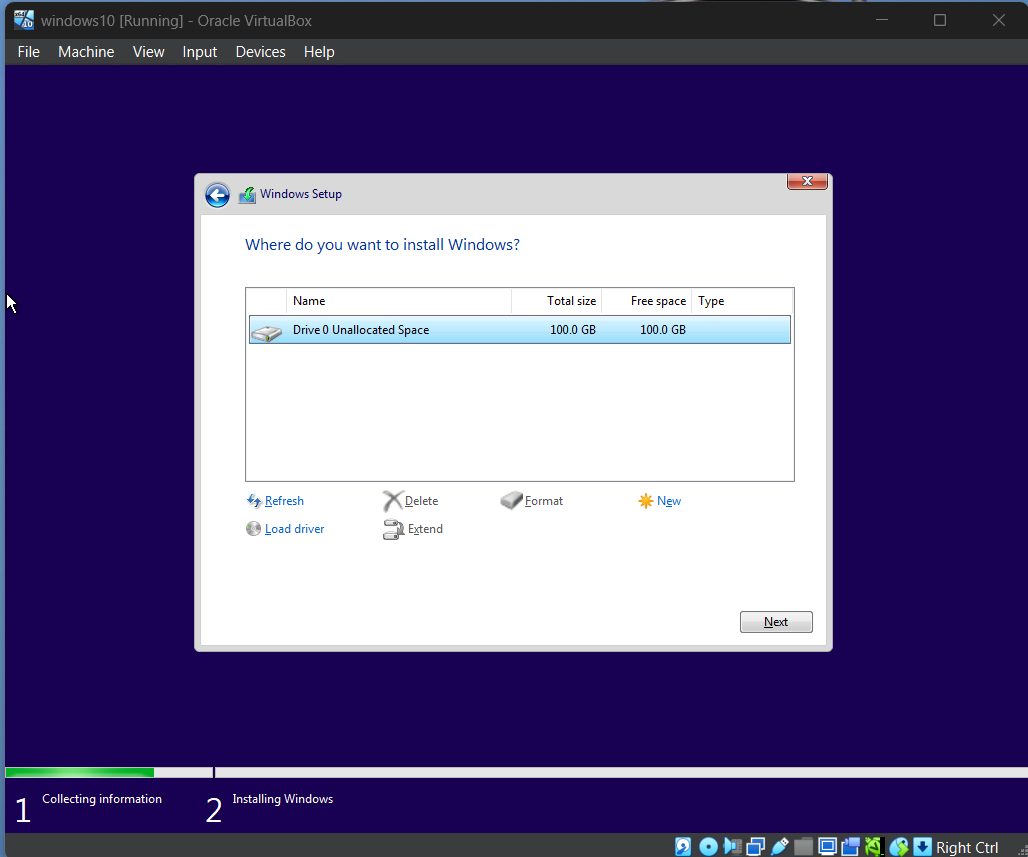
 现在 Windows 10 的安装已经开始。为了完成机器配置,我们将 Windows 10 下载到我们之前分配了 100 GB 的虚拟硬盘空间中。
 然后安装过程完成后,Windows 10 虚拟机现在就配置好了。接下来我们要下载 FlareVM,为此我们打开虚拟机并进入 microsoft edge。然后去 google 搜索 Flare vm github 仓库并下载该仓库。接下来我们将其解压。
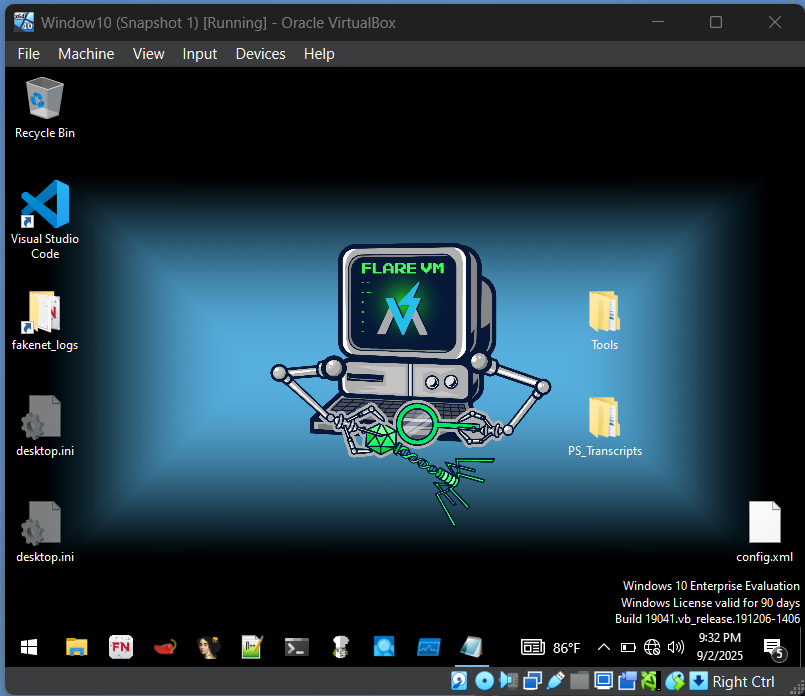
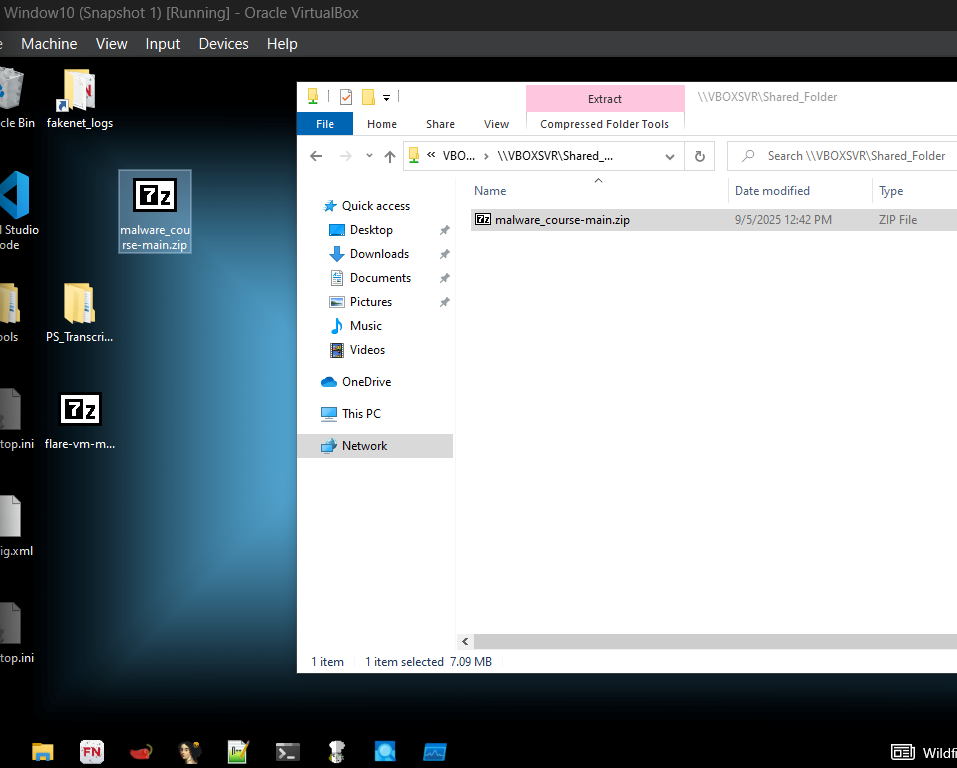
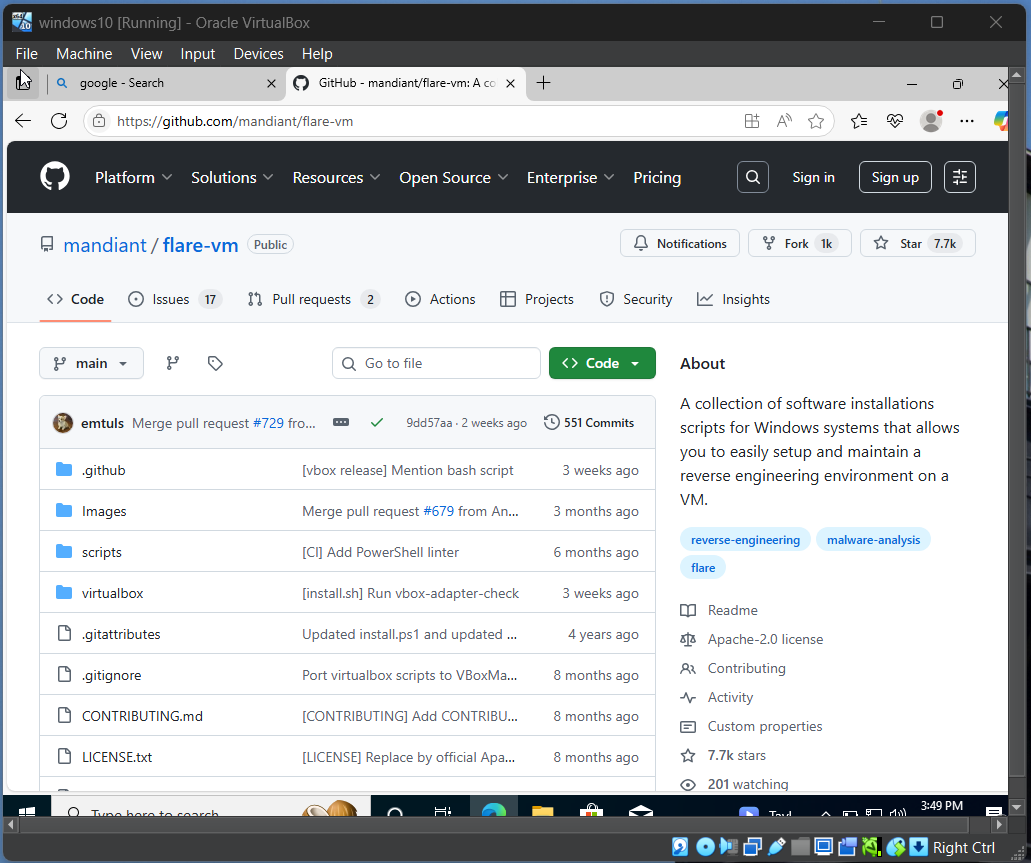 解压后的内容应如图所示。
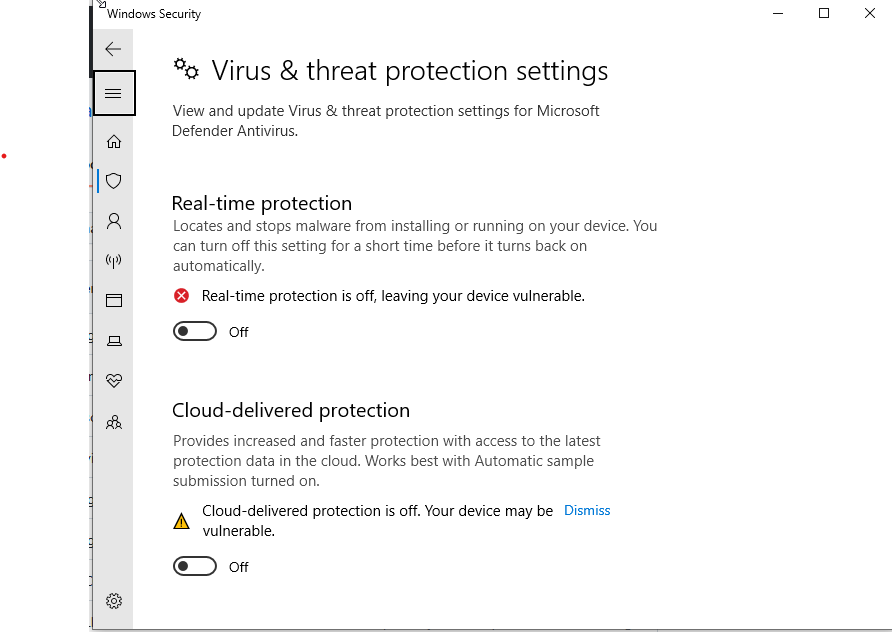
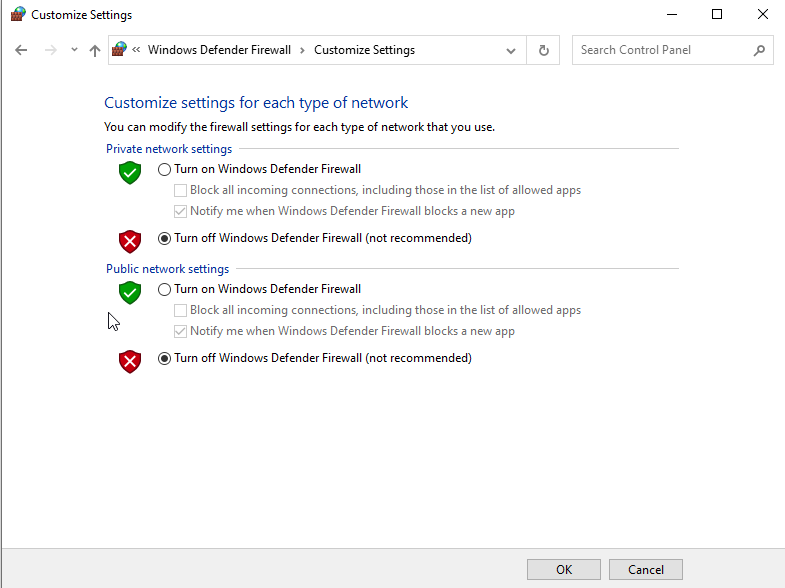
 接下来,我们将通过关闭所有病毒和威胁防护设置来关闭 Windows Defender。然后我们将禁用所有 Windows 防火墙设置并应用它们。这一切都是为了能顺利安装 FlareVM。
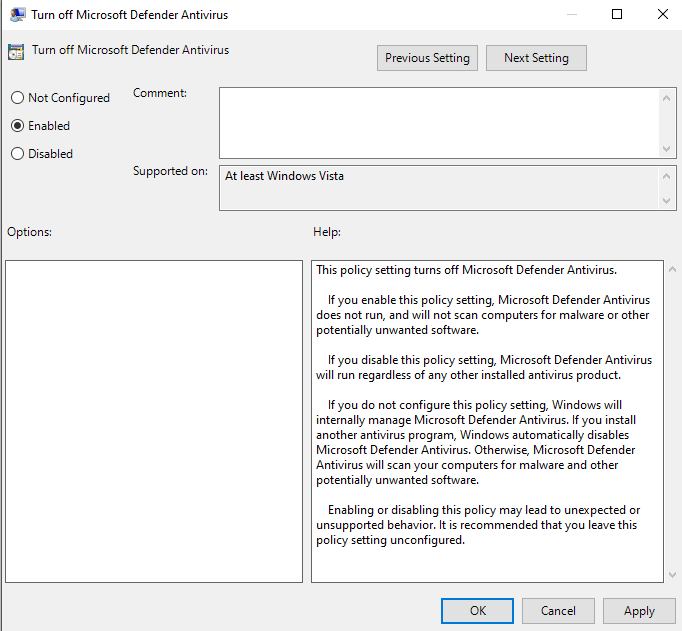
 接下来,我们在 Windows 设置中关闭所有防病毒保护,然后禁用 Windows 防火墙。接着我们进入组策略,找到 Microsoft Defender Antivirus 并启用它。
 然后我们将文件下载为 zip 压缩包并解压所有内容。接下来,我们以管理员身份打开 windows powershell 并进入 FlareVM 目录。我们在这个目录中运行三个脚本。它们分别是:
Unblock-File .\install.ps1
Set-ExecutionPolicy Unrestricted -Force
.\install.ps1
经过数小时的安装后,虚拟机现在已经成为 Flare VM。下载完成后,我们迅速将网络更改为仅主机网络,以禁止互联网连接,并对虚拟机的当前状态进行快照。
然后我们将文件下载为 zip 压缩包并解压所有内容。接下来,我们以管理员身份打开 windows powershell 并进入 FlareVM 目录。我们在这个目录中运行三个脚本。它们分别是:
Unblock-File .\install.ps1
Set-ExecutionPolicy Unrestricted -Force
.\install.ps1
经过数小时的安装后,虚拟机现在已经成为 Flare VM。下载完成后,我们迅速将网络更改为仅主机网络,以禁止互联网连接,并对虚拟机的当前状态进行快照。
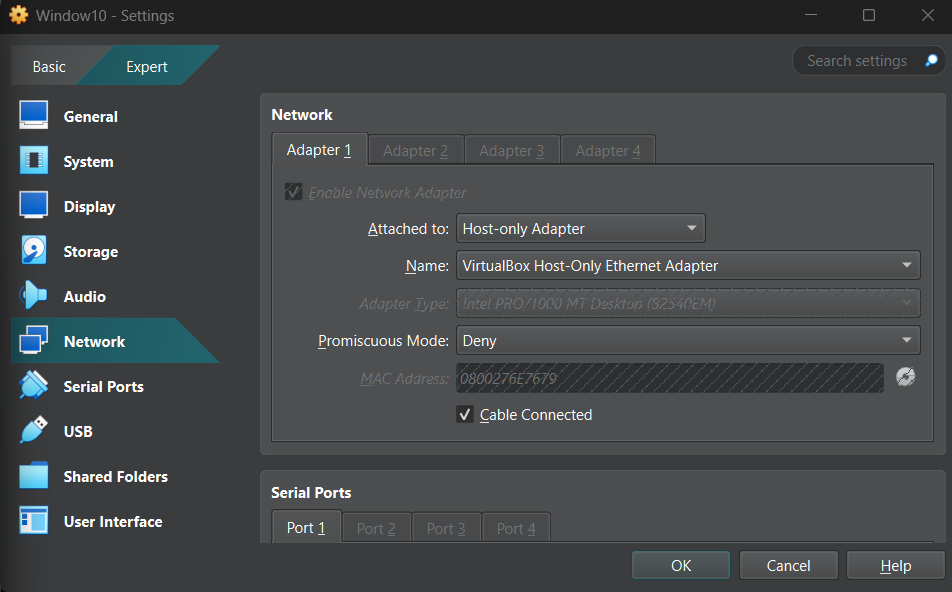
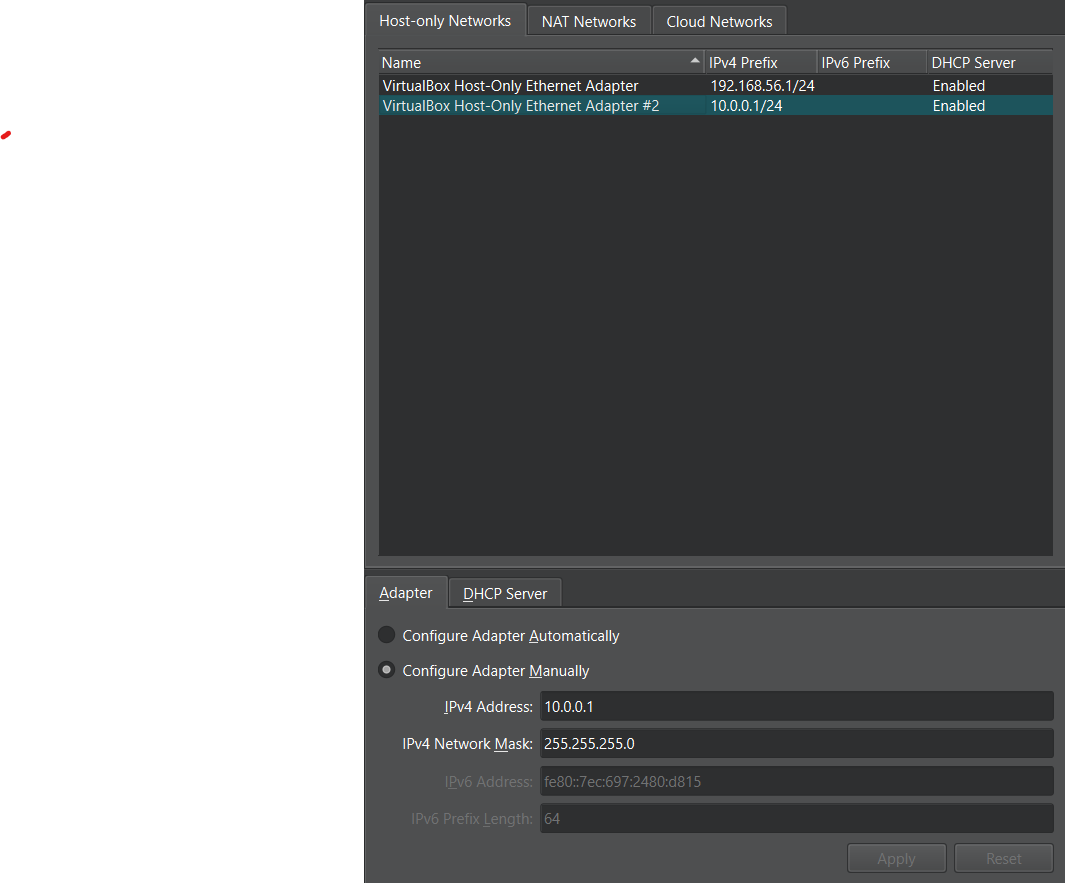
 现在我们将安装 REMnux,为此我们访问 REMnux 官方网站并选择 VirtualBox OVA 下载。然后允许其下载并导入到 VirtualBox 中。完成此操作后,我们将通过运行脚本 sudo apt update 来更新 REMnux。所有内容更新完成后,我们将通过运行 sudo apt upgrade 来升级所有应用程序,并允许所有应用程序进行升级。现在 REMnux 机器已更新,我们将创建网络。为此,我们转到 VirtualBox 菜单并选择 tools 和 Network Manager。我们创建一个新的仅主机网络并为其分配一个 IP 地址。
 为了确保网络正常运行,我将检查两台虚拟机的 IP 地址并让它们相互 ping。
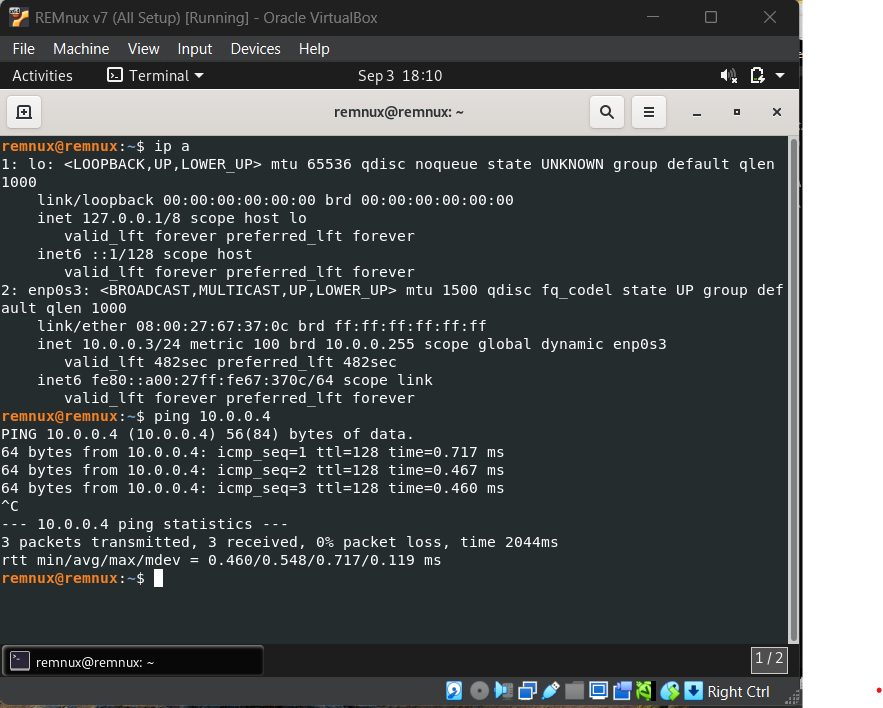
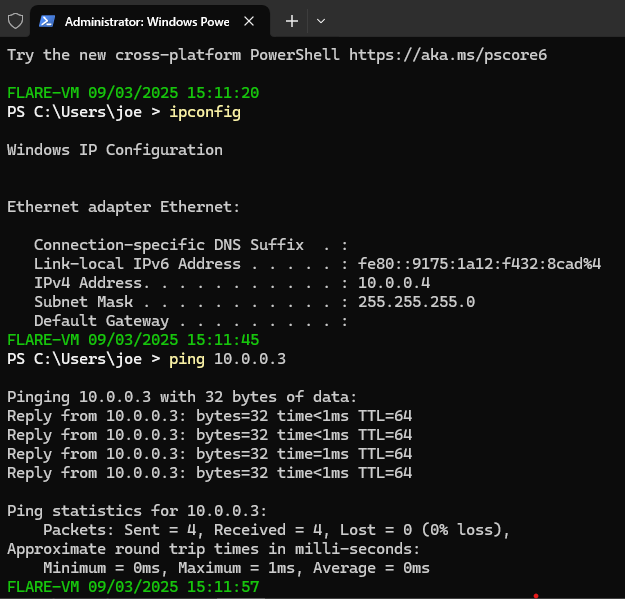 由于两次 ping 都成功了,我们知道虚拟机之间可以互相通信。为了确保虚拟机没有连接到互联网,我们将尝试 ping Google,如果不成功,我们就知道我们没有连接到互联网。
 然后我们将对每台虚拟机进行快照,这样做是为了在部署恶意软件后我们可以将虚拟机恢复到原始状态。为了模拟网络连接,我们将使用 inetsim。为此,我们将导航到 REMnux 虚拟机并输入 inetsim。
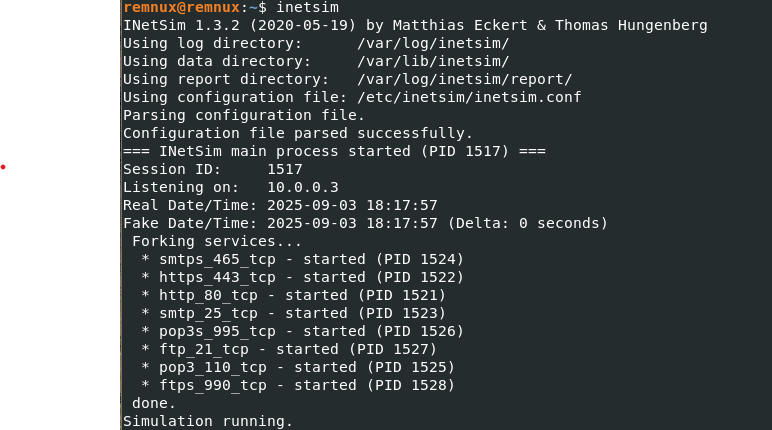 为了确保它正常工作,我们将输入 REMnux 虚拟机的 IP 地址。
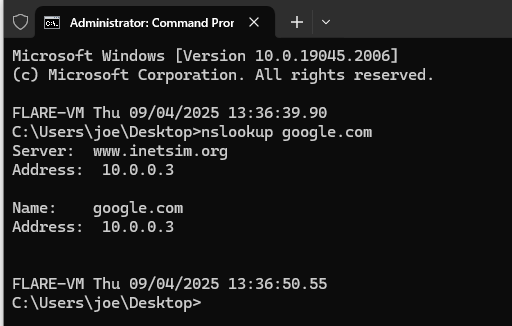
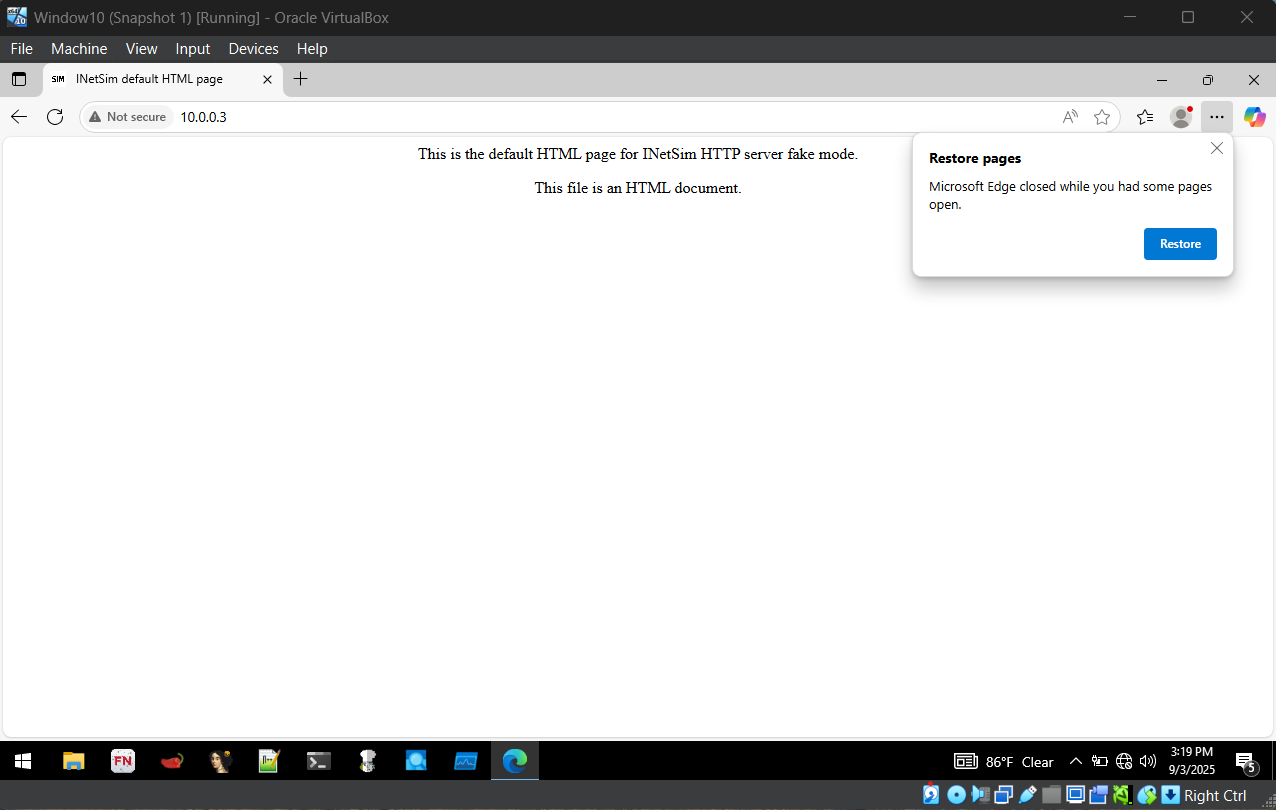 现在我们将配置一个伪造的 DNS 服务器,这是通过进入 REMnux 并输入命令 sudo nano /etc/inetsim/inetsim.conf 并将 IP 地址更改为 10.0.0.3 来完成的。然后导航到 FlareVM,在网络设置中将 IPv4 DNS 服务器更改为 REMnux 机器的 IP 地址,即 10.0.0.3。然后为了测试这一点,我们将检查 google 的连接,此时应该会显示一个伪造的网页。
 ## 静态恶意软件分析
在这个实验中,我将在 FlareVm 和 REMnux 上对恶意软件进行静态分析。
在下载恶意软件之前,我将在我的宿主机和虚拟机 FlareVM 之间创建一个共享文件夹。为此,我在宿主机上创建一个名为 shared 的文件夹,然后从 github 将恶意软件 zip 文件下载到该文件夹中。然后导航到 settings,接着进入 shared folder,并添加包含恶意软件 zip 文件的文件夹。
## 静态恶意软件分析
在这个实验中,我将在 FlareVm 和 REMnux 上对恶意软件进行静态分析。
在下载恶意软件之前,我将在我的宿主机和虚拟机 FlareVM 之间创建一个共享文件夹。为此,我在宿主机上创建一个名为 shared 的文件夹,然后从 github 将恶意软件 zip 文件下载到该文件夹中。然后导航到 settings,接着进入 shared folder,并添加包含恶意软件 zip 文件的文件夹。
 完成此操作后,打开 FlareVM 并打开 file manager。然后将给定文件复制到 FlareVM 中。
 完成此操作后,从 FlareVM 中移除共享文件夹,因为恶意软件有能力修改此文件夹。
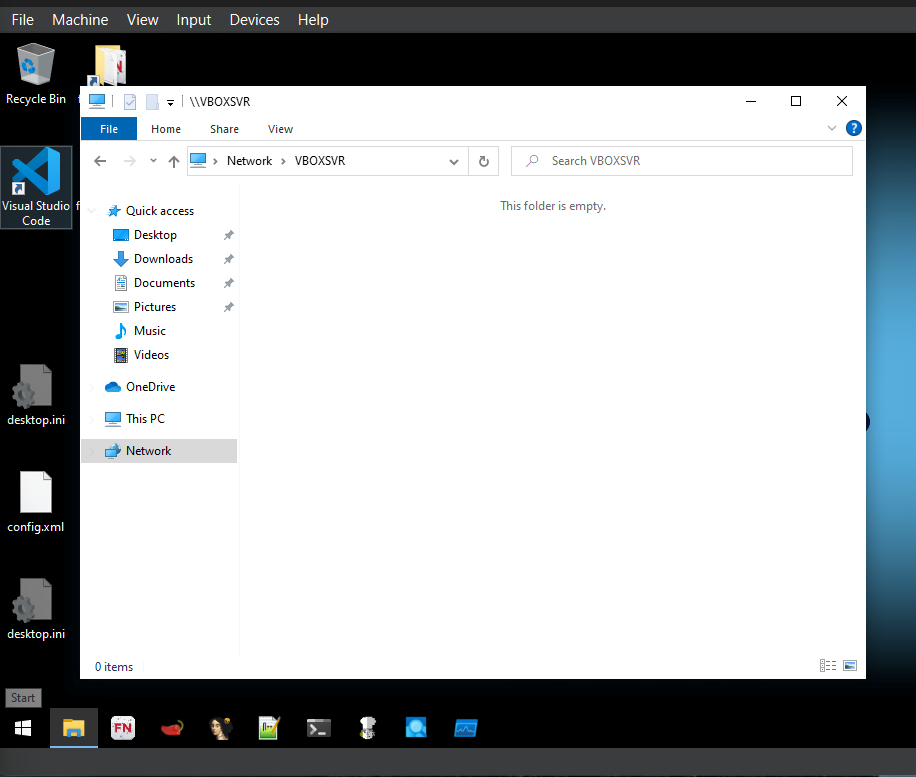
 为了确保共享文件夹已删除,请转到 file manager 并选择 vboxuser。该文件夹应该是空的,因为没有共享文件夹。
 完成此操作后,进入 FlareVM 并解压文件。然后我们将对虚拟机的当前状态进行快照,并开始恶意软件分析。
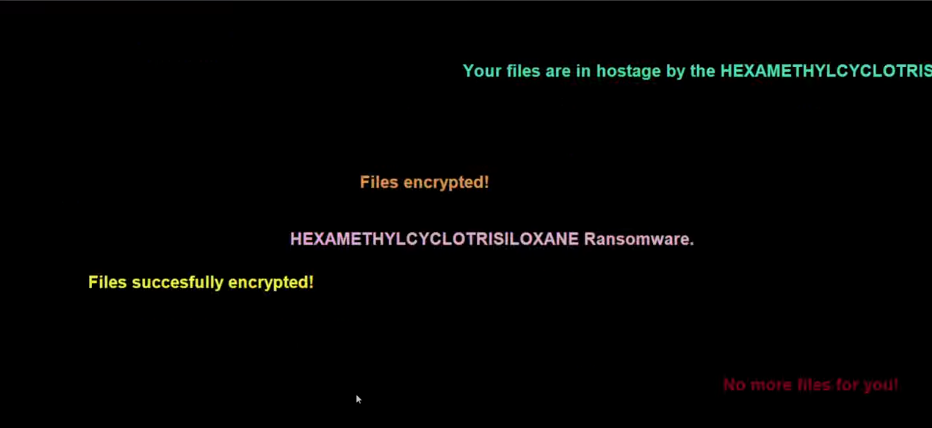
我们将要分析的恶意软件是 Crypto Locker 勒索软件。它于 2023 年出现,通过 zip 附件或发票的形式传播。执行后,它会迅速开始加密文件,并给出一条消息,说明文件已被加密,释放它们的唯一方法是通过支付赎金。
为了释放恶意软件,我导航到 TrialStroke 然后解压勒索软件。完成此操作后,我现在将执行恶意软件。这是执行恶意软件后的结果,现在由于我对预配置的机器进行了快照,我现在将恢复它。
完成此操作后,进入 FlareVM 并解压文件。然后我们将对虚拟机的当前状态进行快照,并开始恶意软件分析。
我们将要分析的恶意软件是 Crypto Locker 勒索软件。它于 2023 年出现,通过 zip 附件或发票的形式传播。执行后,它会迅速开始加密文件,并给出一条消息,说明文件已被加密,释放它们的唯一方法是通过支付赎金。
为了释放恶意软件,我导航到 TrialStroke 然后解压勒索软件。完成此操作后,我现在将执行恶意软件。这是执行恶意软件后的结果,现在由于我对预配置的机器进行了快照,我现在将恢复它。
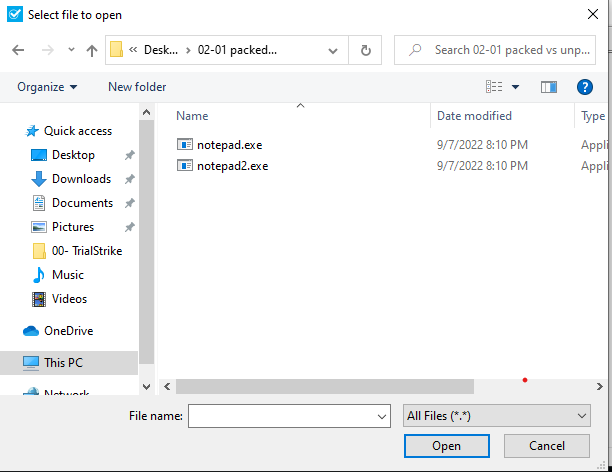
 我现在将释放另一个可以进行分析的恶意软件。首先我解压文件,这种恶意软件的执行方式是通过重命名。重命名恶意软件后,它将变成一个可执行文件。我将使用 pestudio 分析两个文件。我将分析恶意软件加壳。这是指恶意软件被加壳的时候。本质上,恶意软件被封装在加密中,防病毒软件将无法检测到它。文件被加壳的一个指标是当它异常小时。
 我打开两个 pestudio 窗口并进行分析以研究恶意软件。
未加壳文件
我打开两个 pestudio 窗口并进行分析以研究恶意软件。
未加壳文件
 加壳文件
加壳文件
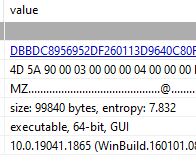 文件被加壳的第一个指标是其大小比对应的文件小得多。在这个例子中,未加壳的文件具有更多的字节数和较小的熵值。而加壳文件包含较低的字节数和较高的熵值。这是加壳文件的明显标志。
未加壳文件
文件被加壳的第一个指标是其大小比对应的文件小得多。在这个例子中,未加壳的文件具有更多的字节数和较小的熵值。而加壳文件包含较低的字节数和较高的熵值。这是加壳文件的明显标志。
未加壳文件
 加壳文件
加壳文件
 在未加壳的文件中,我们可以看到文件的入口点位于文本编辑器中。在加壳文件中,我们可以看到系统上的一个不同入口点。这是文件被加壳并可能包含恶意软件的另一个指标。
未加壳文件
在未加壳的文件中,我们可以看到文件的入口点位于文本编辑器中。在加壳文件中,我们可以看到系统上的一个不同入口点。这是文件被加壳并可能包含恶意软件的另一个指标。
未加壳文件
 加壳文件
加壳文件
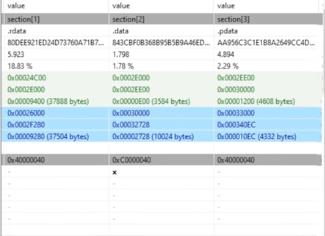
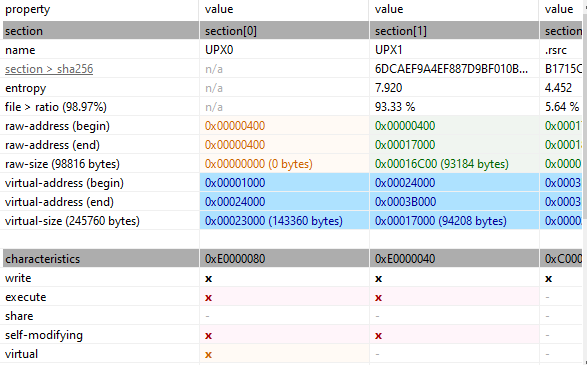 在这张照片中,我们可以看到未加壳的文件具有正确的 text 和 data 节区。此外,它只有读写权限。在加壳文件中,我们可以看到节区是 UPX0 和 UPX1,这是加壳文件的标志。而且,权限是不同的,包括执行和自修改权限。
## 动态恶意软件分析
在这个项目中,我将分析恶意软件如何实时感染系统。此外,我将学习工具和恶意软件的生命周期。
我将在 FlareVM 和 REMnux 上进行此操作。
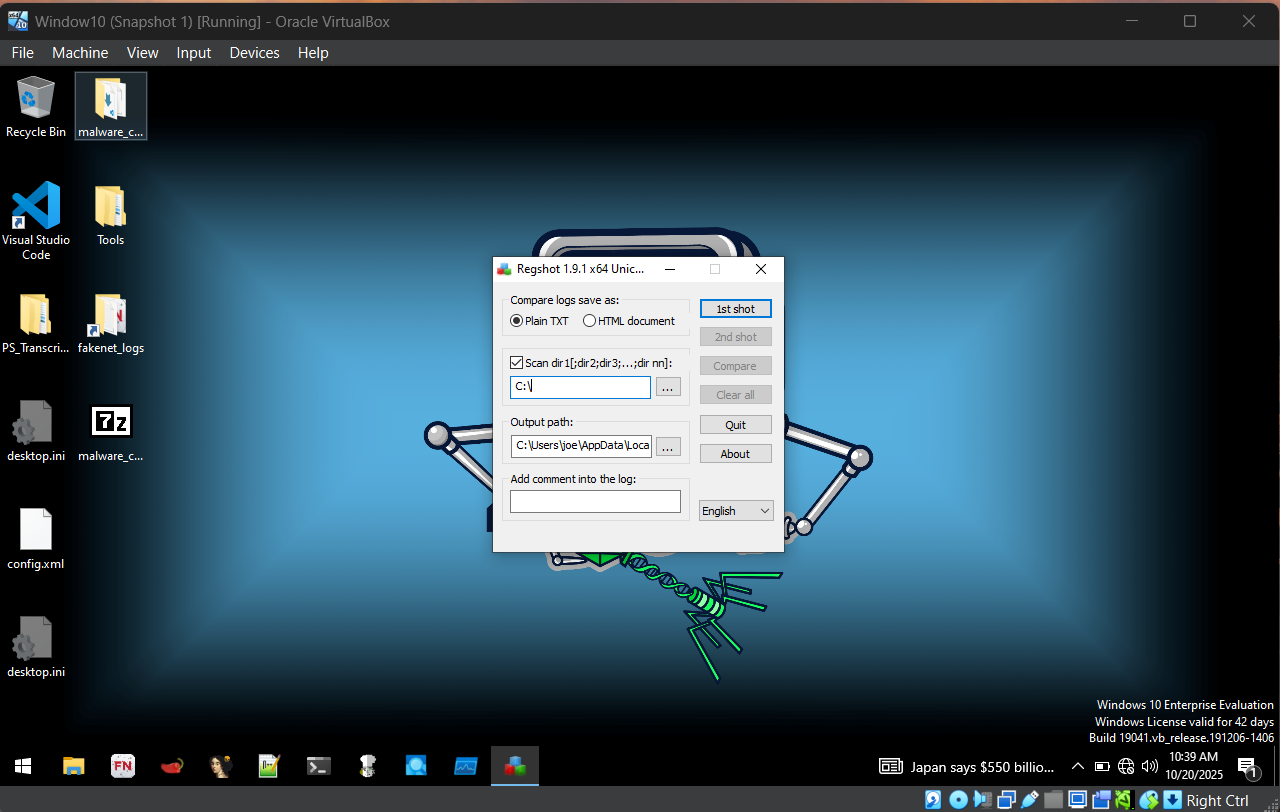
在上一个实验中通过共享文件夹成功传输恶意软件后。确保从虚拟机中移除共享文件夹并解压恶意软件文件夹。在本教程中,我将分析一个名为 Koreplug 的恶意软件。在执行恶意软件之前,我将使用工具 Regshot。这是一个实用工具,用于记录恶意软件在指定目录中所做的所有更改。我将在部署恶意软件之前使用它来查看所有被更改的文件。
在这张照片中,我们可以看到未加壳的文件具有正确的 text 和 data 节区。此外,它只有读写权限。在加壳文件中,我们可以看到节区是 UPX0 和 UPX1,这是加壳文件的标志。而且,权限是不同的,包括执行和自修改权限。
## 动态恶意软件分析
在这个项目中,我将分析恶意软件如何实时感染系统。此外,我将学习工具和恶意软件的生命周期。
我将在 FlareVM 和 REMnux 上进行此操作。
在上一个实验中通过共享文件夹成功传输恶意软件后。确保从虚拟机中移除共享文件夹并解压恶意软件文件夹。在本教程中,我将分析一个名为 Koreplug 的恶意软件。在执行恶意软件之前,我将使用工具 Regshot。这是一个实用工具,用于记录恶意软件在指定目录中所做的所有更改。我将在部署恶意软件之前使用它来查看所有被更改的文件。
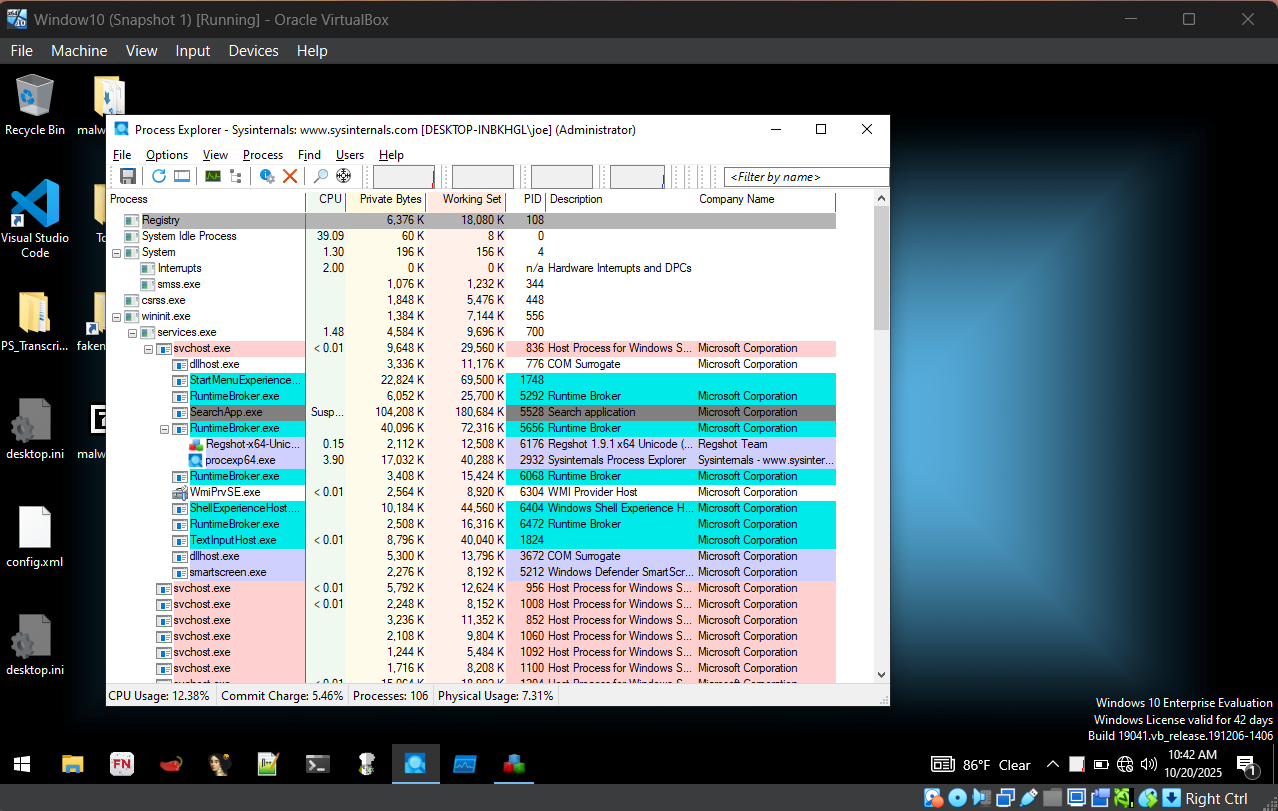
 我将用来分析恶意软件的另一个工具叫做 process explorer。该工具以树状结构显示 Windows 系统中所有正在运行的进程。此外,它还允许用户查看运行进程的属性,如映像文件、性能,并检查进程已建立的 TCP/IP 连接。
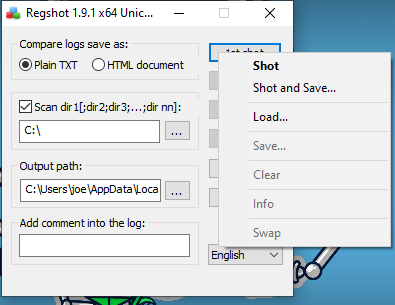
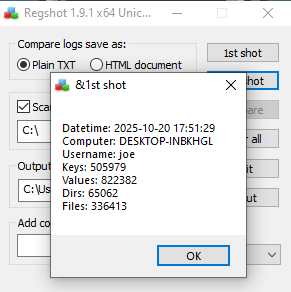
 现在我已经介绍了这些工具,我将使用 regshot 进行快照。
 这是快照的结果。
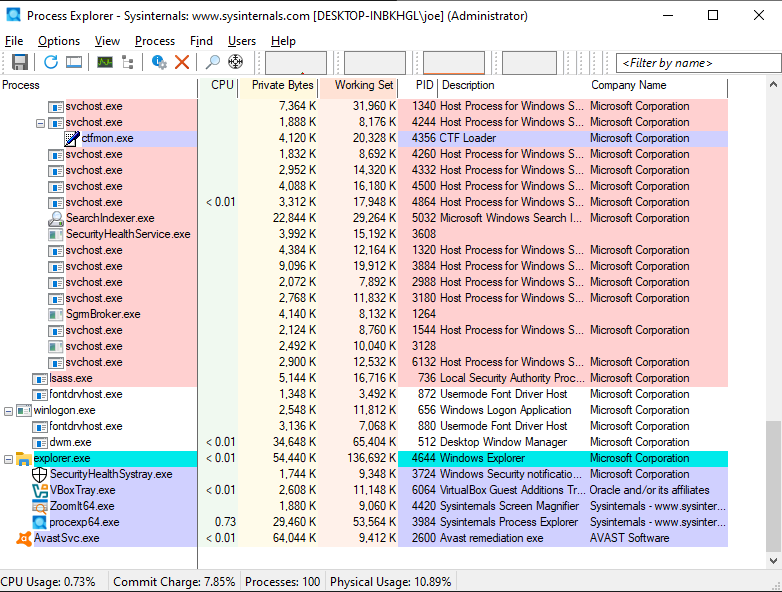
 现在我们将以管理员身份执行恶意软件,使其在系统中拥有完全权限。完成此操作后,我们现在将检查 process explorer。我们现在可以看到恶意软件正作为一个进程运行。
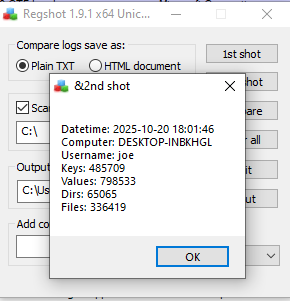
 现在我们将使用 regshot 拍摄另一个快照,以检查文件是否已被更改。
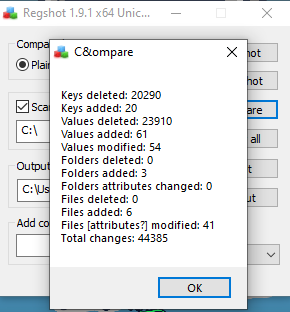
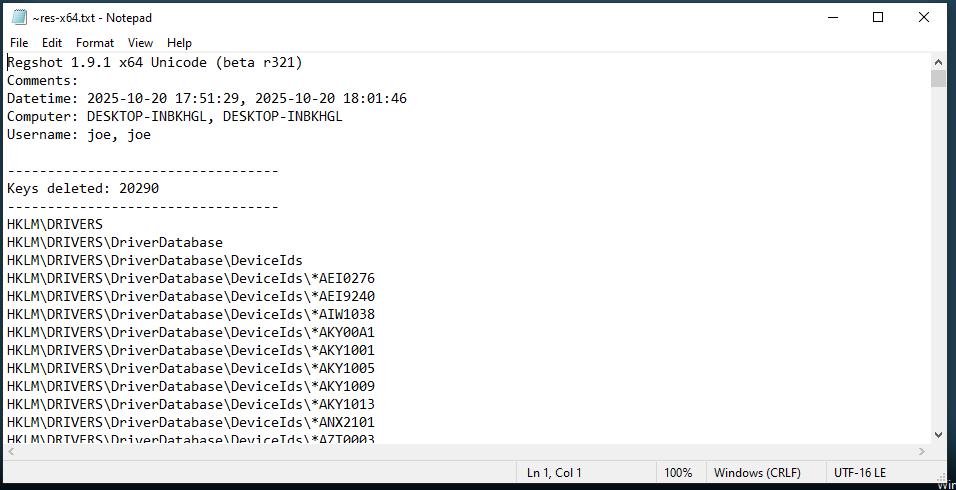
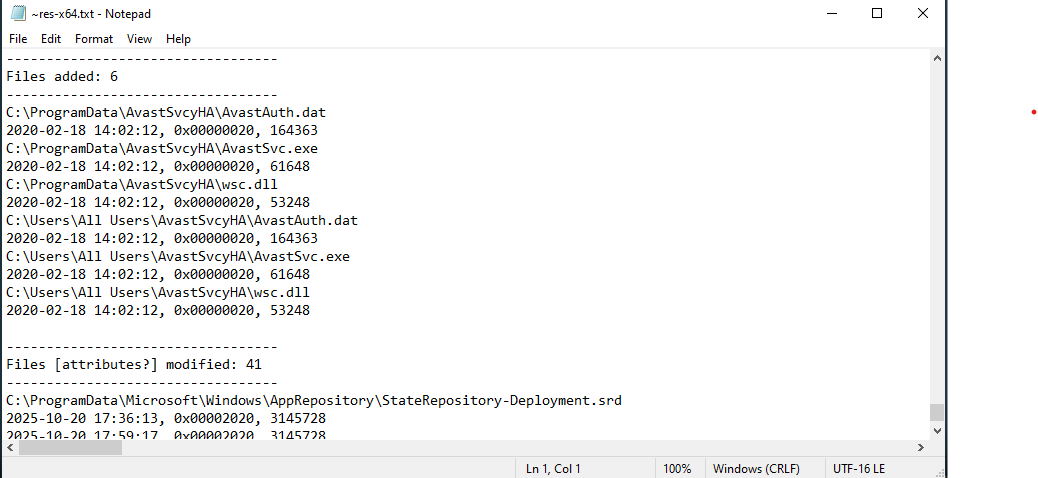
 拍摄快照后,我们将比较第一个和第二个快照。为此,选择 compare,它将显示发生的更改。要查看所做的更改,我们将选择 compare 并选择 output,它将显示所有添加和删除的键。此外,还会显示添加和删除的文件。
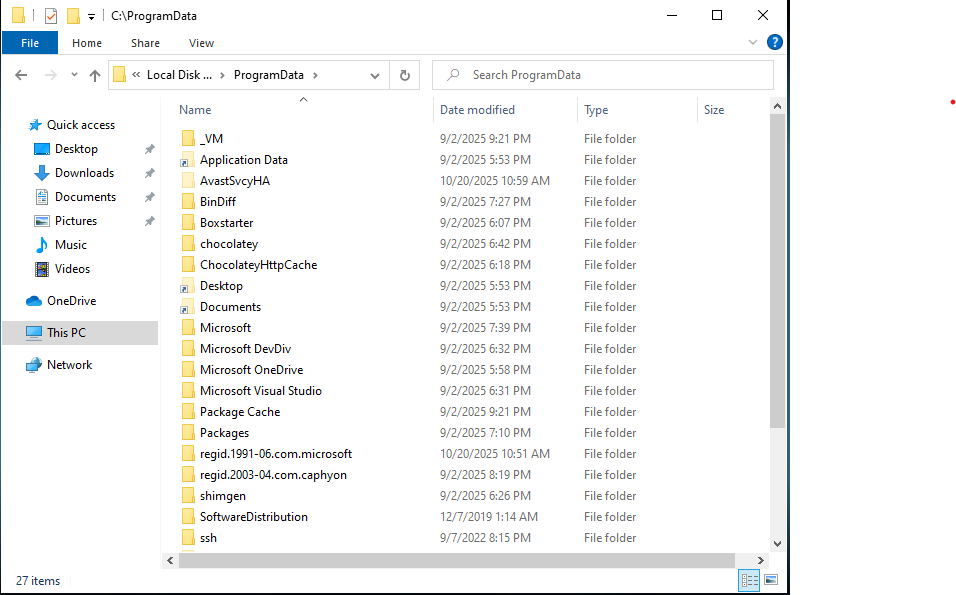
 为了检查恶意软件是否正在执行,我们将导航到 file explorer。然后选择 local disk 和 program data 以查看当前正在运行的程序。我们可以看到添加了一个新文件夹,其中包含恶意软件。完成此操作后,我们确定恶意软件确实感染了 Windows 文件系统。
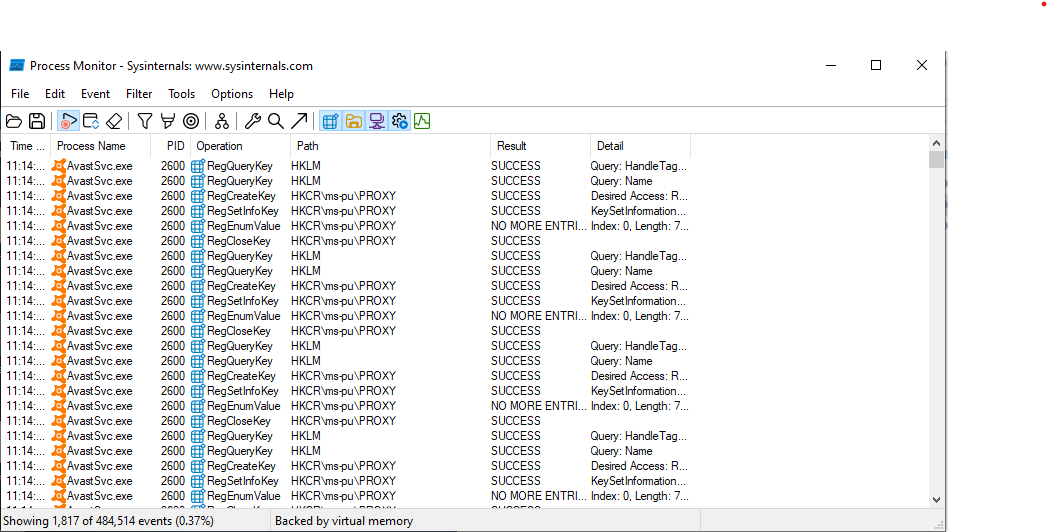
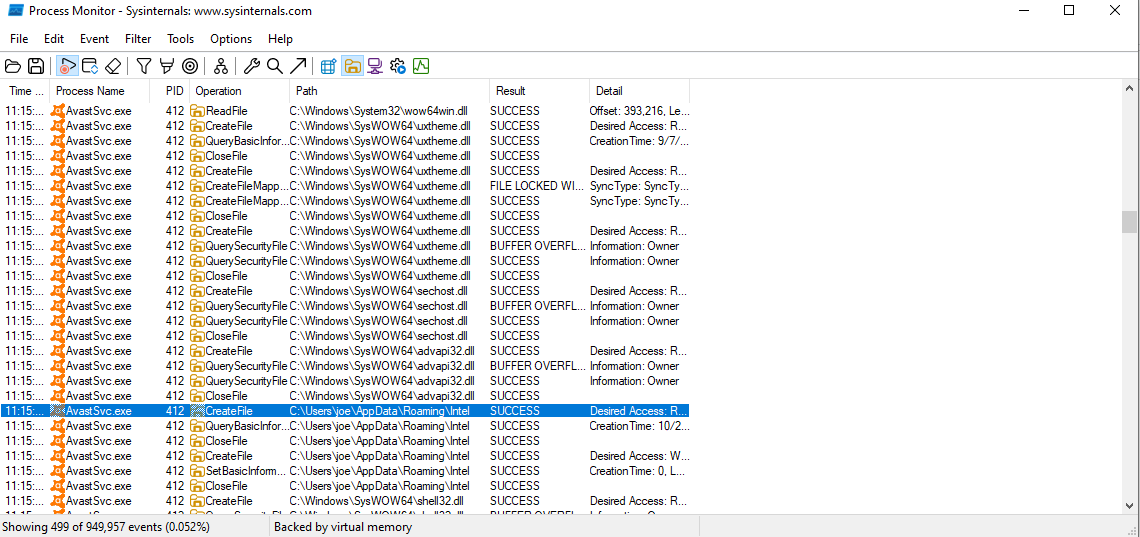
 现在我们将使用 procmon,这是一个记录 Windows 子系统中所有进程更改的工具。为了查看更改,我们将再次启动恶意软件以查看系统中的更改。现在我们将导航到 procmon 并按进程名称 (AvastSwc.exe) 过滤日志。现在我们可以看到恶意软件所做的所有更改。
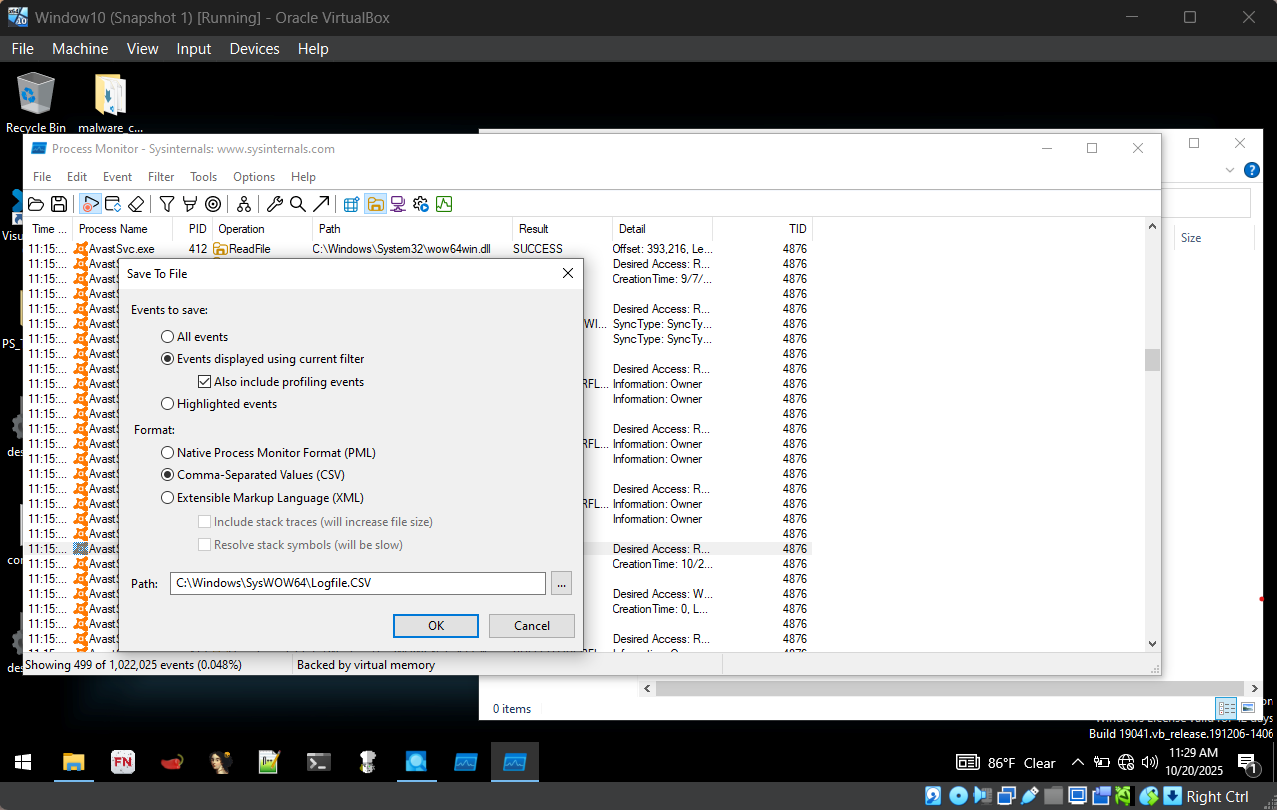
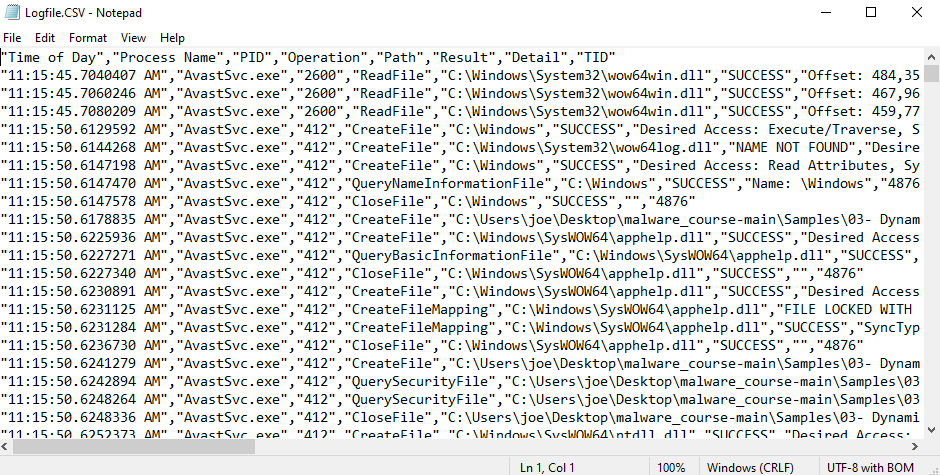
 我们可以看到恶意软件创建了一个名为 intel 的文件。我们将创建一个 .csv 文件来查看发生的所有事情。导航到 options 并选择 column。然后选择 thread IDS 并选择 ok。完成此操作后,选择 save 并确保它使用当前过滤器保存显示的事件,并将其格式化为 .csv 文件。
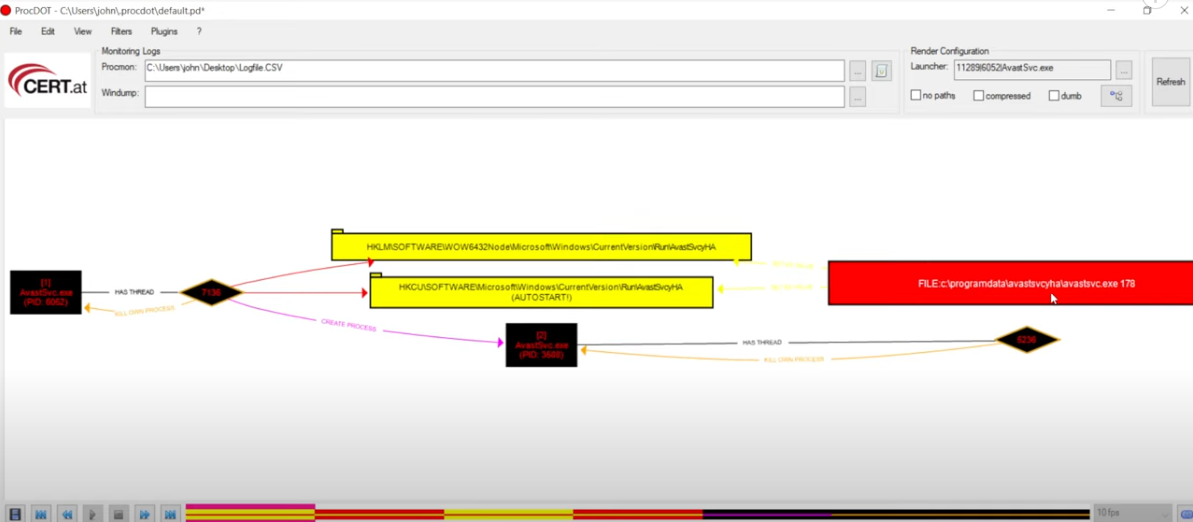
 完成此操作后,我们将使用 procdot。Procdot 是一款创建交互式图表以分析系统和网络活动的软件。首先选择我们创建的 .csv 文件,同时选择部署的恶意软件。然后将创建一个交互式图表。
下载完成后,我们将创建虚拟机。该虚拟机命名为 windows10,并分配了 4 个处理器和 11 GB 内存。
由于在创建虚拟机时没有挂载 ISO 镜像,因此在启动虚拟机时会出现一条错误消息。
为了修复这个错误,我们选择之前下载的 Windows 10 企业版 ISO 镜像。然后我们将其挂载并重启系统,使 ISO 镜像生效。
现在 Windows 10 的安装已经开始。为了完成机器配置,我们将 Windows 10 下载到我们之前分配了 100 GB 的虚拟硬盘空间中。
然后安装过程完成后,Windows 10 虚拟机现在就配置好了。接下来我们要下载 FlareVM,为此我们打开虚拟机并进入 microsoft edge。然后去 google 搜索 Flare vm github 仓库并下载该仓库。接下来我们将其解压。
解压后的内容应如图所示。
接下来,我们将通过关闭所有病毒和威胁防护设置来关闭 Windows Defender。然后我们将禁用所有 Windows 防火墙设置并应用它们。这一切都是为了能顺利安装 FlareVM。
接下来,我们在 Windows 设置中关闭所有防病毒保护,然后禁用 Windows 防火墙。接着我们进入组策略,找到 Microsoft Defender Antivirus 并启用它。
然后我们将文件下载为 zip 压缩包并解压所有内容。接下来,我们以管理员身份打开 windows powershell 并进入 FlareVM 目录。我们在这个目录中运行三个脚本。它们分别是:
Unblock-File .\install.ps1
Set-ExecutionPolicy Unrestricted -Force
.\install.ps1
经过数小时的安装后,虚拟机现在已经成为 Flare VM。下载完成后,我们迅速将网络更改为仅主机网络,以禁止互联网连接,并对虚拟机的当前状态进行快照。
现在我们将安装 REMnux,为此我们访问 REMnux 官方网站并选择 VirtualBox OVA 下载。然后允许其下载并导入到 VirtualBox 中。完成此操作后,我们将通过运行脚本 sudo apt update 来更新 REMnux。所有内容更新完成后,我们将通过运行 sudo apt upgrade 来升级所有应用程序,并允许所有应用程序进行升级。现在 REMnux 机器已更新,我们将创建网络。为此,我们转到 VirtualBox 菜单并选择 tools 和 Network Manager。我们创建一个新的仅主机网络并为其分配一个 IP 地址。
为了确保网络正常运行,我将检查两台虚拟机的 IP 地址并让它们相互 ping。
由于两次 ping 都成功了,我们知道虚拟机之间可以互相通信。为了确保虚拟机没有连接到互联网,我们将尝试 ping Google,如果不成功,我们就知道我们没有连接到互联网。
为了确保它正常工作,我们将输入 REMnux 虚拟机的 IP 地址。
现在我们将配置一个伪造的 DNS 服务器,这是通过进入 REMnux 并输入命令 sudo nano /etc/inetsim/inetsim.conf 并将 IP 地址更改为 10.0.0.3 来完成的。然后导航到 FlareVM,在网络设置中将 IPv4 DNS 服务器更改为 REMnux 机器的 IP 地址,即 10.0.0.3。然后为了测试这一点,我们将检查 google 的连接,此时应该会显示一个伪造的网页。
## 静态恶意软件分析
在这个实验中,我将在 FlareVm 和 REMnux 上对恶意软件进行静态分析。
在下载恶意软件之前,我将在我的宿主机和虚拟机 FlareVM 之间创建一个共享文件夹。为此,我在宿主机上创建一个名为 shared 的文件夹,然后从 github 将恶意软件 zip 文件下载到该文件夹中。然后导航到 settings,接着进入 shared folder,并添加包含恶意软件 zip 文件的文件夹。
完成此操作后,打开 FlareVM 并打开 file manager。然后将给定文件复制到 FlareVM 中。
完成此操作后,从 FlareVM 中移除共享文件夹,因为恶意软件有能力修改此文件夹。
为了确保共享文件夹已删除,请转到 file manager 并选择 vboxuser。该文件夹应该是空的,因为没有共享文件夹。
完成此操作后,进入 FlareVM 并解压文件。然后我们将对虚拟机的当前状态进行快照,并开始恶意软件分析。
我们将要分析的恶意软件是 Crypto Locker 勒索软件。它于 2023 年出现,通过 zip 附件或发票的形式传播。执行后,它会迅速开始加密文件,并给出一条消息,说明文件已被加密,释放它们的唯一方法是通过支付赎金。
为了释放恶意软件,我导航到 TrialStroke 然后解压勒索软件。完成此操作后,我现在将执行恶意软件。这是执行恶意软件后的结果,现在由于我对预配置的机器进行了快照,我现在将恢复它。
我现在将释放另一个可以进行分析的恶意软件。首先我解压文件,这种恶意软件的执行方式是通过重命名。重命名恶意软件后,它将变成一个可执行文件。我将使用 pestudio 分析两个文件。我将分析恶意软件加壳。这是指恶意软件被加壳的时候。本质上,恶意软件被封装在加密中,防病毒软件将无法检测到它。文件被加壳的一个指标是当它异常小时。
我打开两个 pestudio 窗口并进行分析以研究恶意软件。
未加壳文件
加壳文件
文件被加壳的第一个指标是其大小比对应的文件小得多。在这个例子中,未加壳的文件具有更多的字节数和较小的熵值。而加壳文件包含较低的字节数和较高的熵值。这是加壳文件的明显标志。
未加壳文件
加壳文件
在这张照片中,我们可以看到未加壳的文件具有正确的 text 和 data 节区。此外,它只有读写权限。在加壳文件中,我们可以看到节区是 UPX0 和 UPX1,这是加壳文件的标志。而且,权限是不同的,包括执行和自修改权限。
## 动态恶意软件分析
在这个项目中,我将分析恶意软件如何实时感染系统。此外,我将学习工具和恶意软件的生命周期。
我将在 FlareVM 和 REMnux 上进行此操作。
在上一个实验中通过共享文件夹成功传输恶意软件后。确保从虚拟机中移除共享文件夹并解压恶意软件文件夹。在本教程中,我将分析一个名为 Koreplug 的恶意软件。在执行恶意软件之前,我将使用工具 Regshot。这是一个实用工具,用于记录恶意软件在指定目录中所做的所有更改。我将在部署恶意软件之前使用它来查看所有被更改的文件。
我将用来分析恶意软件的另一个工具叫做 process explorer。该工具以树状结构显示 Windows 系统中所有正在运行的进程。此外,它还允许用户查看运行进程的属性,如映像文件、性能,并检查进程已建立的 TCP/IP 连接。
现在我已经介绍了这些工具,我将使用 regshot 进行快照。
这是快照的结果。
现在我们将以管理员身份执行恶意软件,使其在系统中拥有完全权限。完成此操作后,我们现在将检查 process explorer。我们现在可以看到恶意软件正作为一个进程运行。
现在我们将使用 regshot 拍摄另一个快照,以检查文件是否已被更改。
拍摄快照后,我们将比较第一个和第二个快照。为此,选择 compare,它将显示发生的更改。要查看所做的更改,我们将选择 compare 并选择 output,它将显示所有添加和删除的键。此外,还会显示添加和删除的文件。
为了检查恶意软件是否正在执行,我们将导航到 file explorer。然后选择 local disk 和 program data 以查看当前正在运行的程序。我们可以看到添加了一个新文件夹,其中包含恶意软件。完成此操作后,我们确定恶意软件确实感染了 Windows 文件系统。
现在我们将使用 procmon,这是一个记录 Windows 子系统中所有进程更改的工具。为了查看更改,我们将再次启动恶意软件以查看系统中的更改。现在我们将导航到 procmon 并按进程名称 (AvastSwc.exe) 过滤日志。现在我们可以看到恶意软件所做的所有更改。
我们可以看到恶意软件创建了一个名为 intel 的文件。我们将创建一个 .csv 文件来查看发生的所有事情。导航到 options 并选择 column。然后选择 thread IDS 并选择 ok。完成此操作后,选择 save 并确保它使用当前过滤器保存显示的事件,并将其格式化为 .csv 文件。
完成此操作后,我们将使用 procdot。Procdot 是一款创建交互式图表以分析系统和网络活动的软件。首先选择我们创建的 .csv 文件,同时选择部署的恶意软件。然后将创建一个交互式图表。
标签:DAST, 云资产清单, 威胁调查, 安全沙箱, 恶意软件分析, 虚拟化环境, 逆向工程