Rishabh1623/blackfriday-ready-infra
GitHub: Rishabh1623/blackfriday-ready-infra
一个经过 500 并发用户负载测试验证的生产级 AWS 电商基础设施项目,通过预热池、数据库代理和双层缓存解决了大促期间流量暴增导致的冷启动、连接耗尽和性能崩溃问题。
Stars: 0 | Forks: 0
# 黑色星期五就绪的基础设施
这个项目正是为解决上述场景而生的。它是一个完整的、生产级的 AWS 基础设施,专为那些会压垮大多数电商技术栈的流量模式而构建:突然暴增 10 倍的流量峰值、持续数小时的高负载、伪装成购物者的恶意爬虫洪水,以及在今年中最繁忙的那个夜晚 8 点,你根本无法去修补扩容问题的残酷现实。
这里的一切都是真实的——已经部署、在 500 个并发用户下通过了负载测试,并被证明是稳定可靠的。这不是一篇教程。也不是一个简单示例。这是一个你真正可以运行的参考架构。







| 已处理请求 | 峰值并发用户 | 错误率 | p95 响应时间 | 结账成功率 |
|---|---|---|---|---|
| 31 分钟内 406,309 次 | 500 VUs | 1.84% | 69ms | 95.4% |
## 此项目解决的问题
大多数基础设施在崩溃之前都运行得很好。一个典型的电商技术栈在“黑色星期五”失败的原因通常是可以预见且能避免的:
**冷启动延迟扼杀了第一波流量。** Auto Scaling 会对负载做出反应——但新的 EC2 实例需要 2 到 4 分钟才能完成引导。等它们准备就绪时,损害已经造成。你的早期购物者会遇到 504 错误。而且他们不会再回来了。
**数据库连接被耗尽。** 在满负荷状态下(20 个实例 × workers × 连接池),你很容易针对一个仅支持约 85 个连接的数据库发起超过 1,600 次连接尝试。每个应用实例都会开始抛出 `FATAL: too many connections`。整个网站不仅会变慢,而是会直接宕机。
**爬虫在真实客户之前耗尽了你的容量。** 黑色星期五吸引了各种抓取器、库存机器人和撞库攻击者。如果没有在边缘节点进行速率限制,它们就会消耗 EC2、RDS 和缓存连接——而且你还得为它们的消耗买单。
**告警总是在问题发生之后才触发。** 当 CPU 警报触发时,你的值班工程师已经在处理愤怒的 Slack 消息了。你需要在事件发生之前就内置可观测性,而不是事后再来弥补。
该架构解决了上述所有四个问题——针对每一个问题都做出了具体且有文档记录的设计决策。
## 效果验证
在 **500 个并发虚拟用户** 下进行了负载测试,持续 31 分钟,总请求量 406,309 次:
| 测量指标 | 结果 | 目标 | 结论 |
|---|---|---|---|
| 整体错误率 | 1.84% | < 5% | 通过 |
| p95 响应时间 | 69ms | < 3,000ms | 通过 |
| 商品目录 p95 | 4ms | < 2,000ms | 通过 |
| 库存查询 p95 | 64ms | < 2,000ms | 通过 |
| 结账 p95 | 129ms | < 3,000ms | 通过 |
| 结账成功率 | 95.4% | > 90% | 通过 |
零停机时间。零数据库连接错误。在整个峰值负载期间,缓存命中率保持在 80% 以上。
### 控制台证据
| | |
|---|---|
| 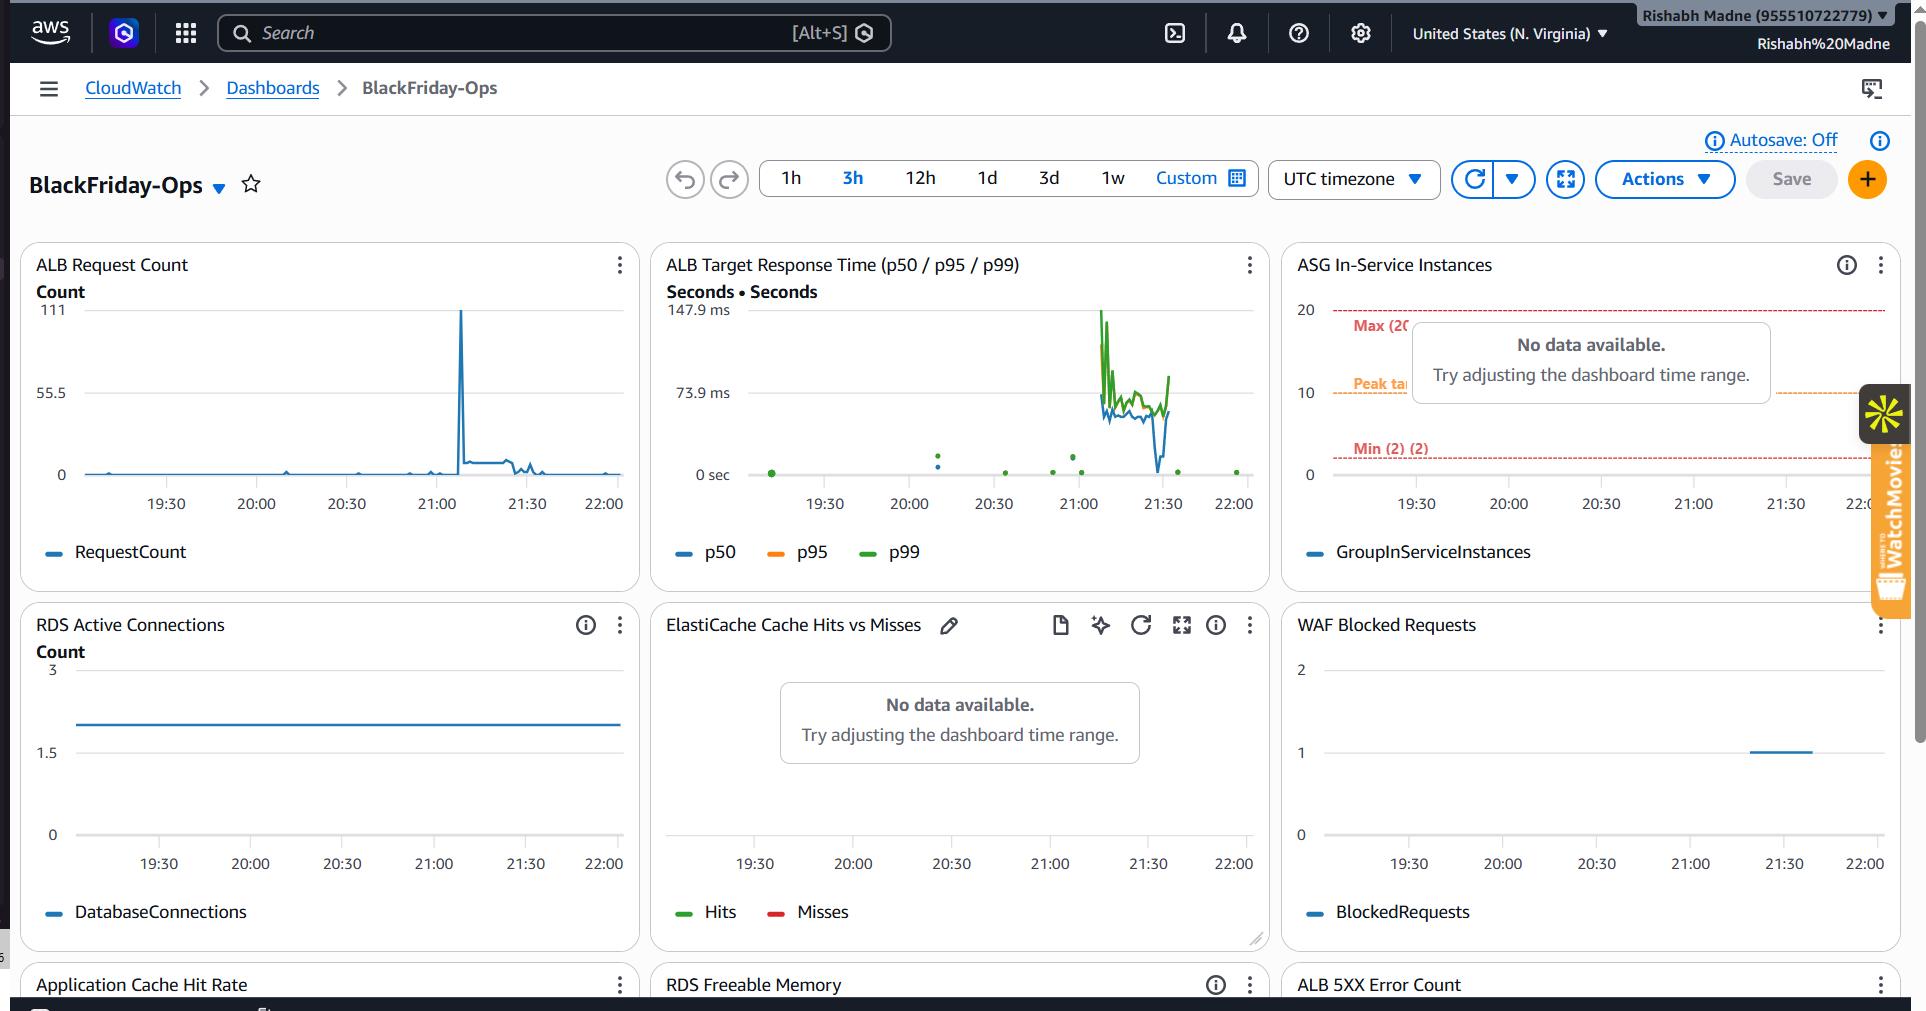 | 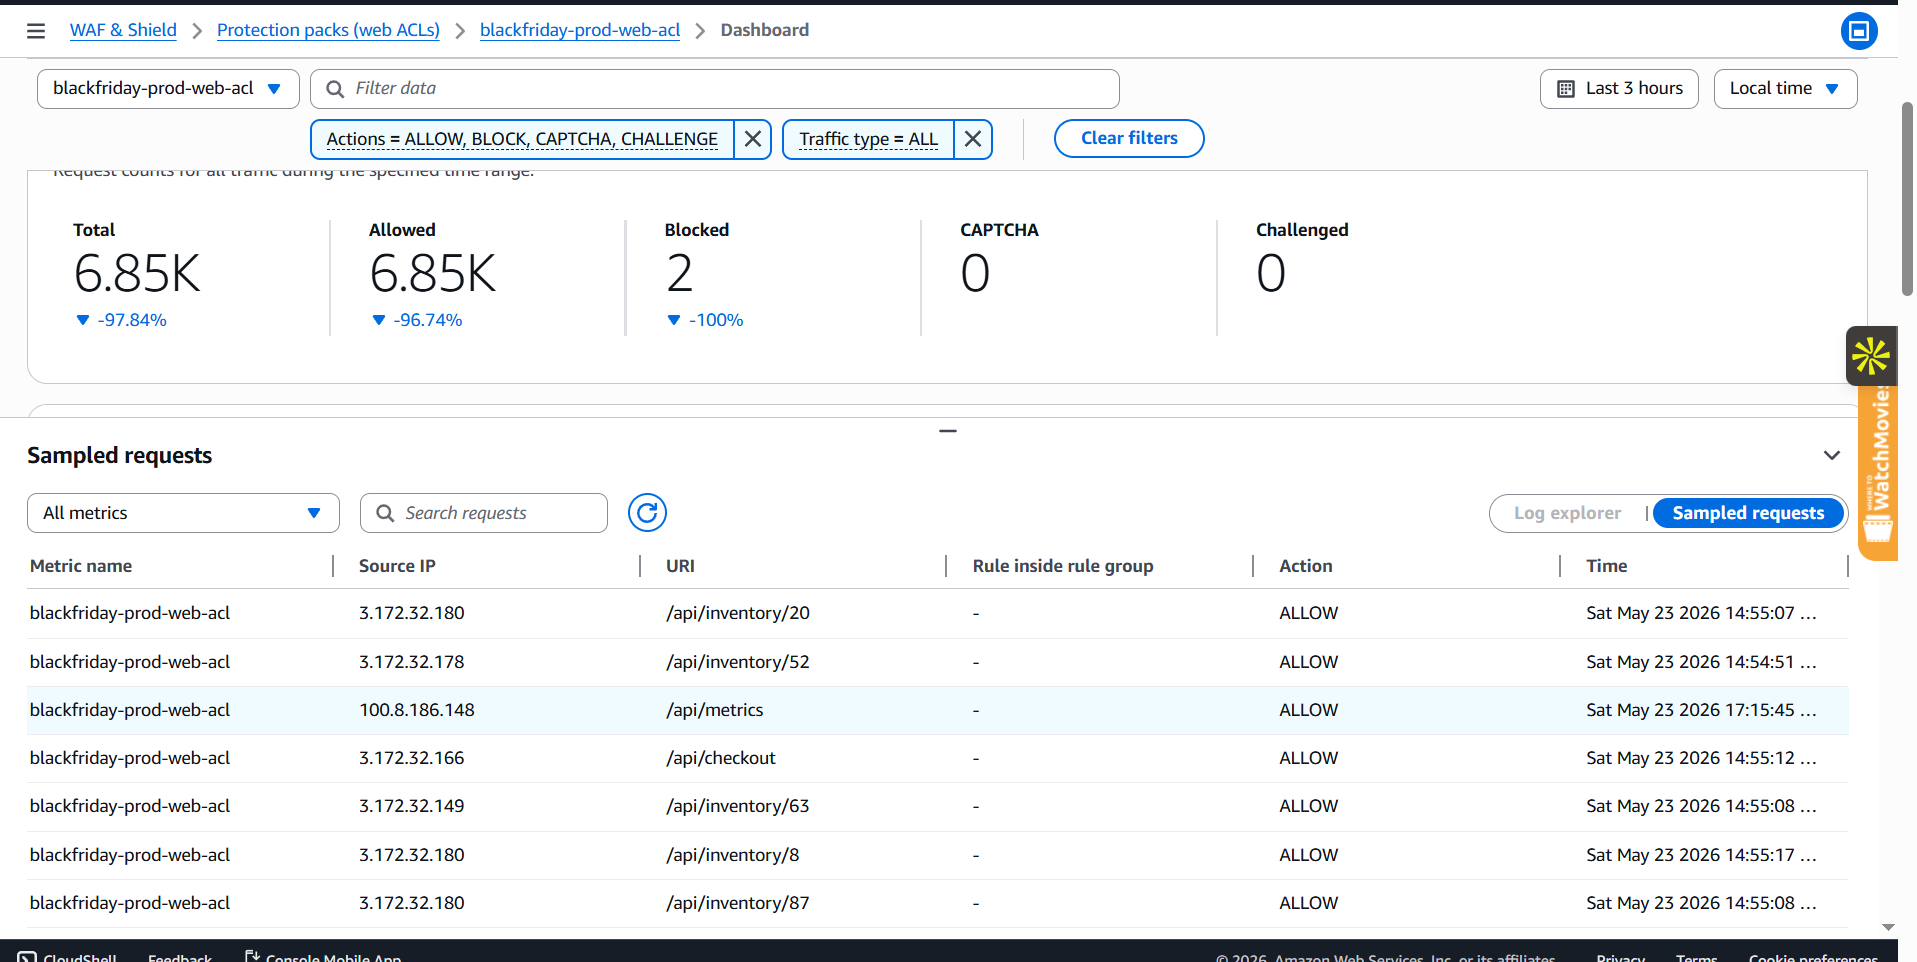 |
| **CloudWatch — 峰值期间的实时指标** | **WAF — 正在被拦截的机器人流量** |
| 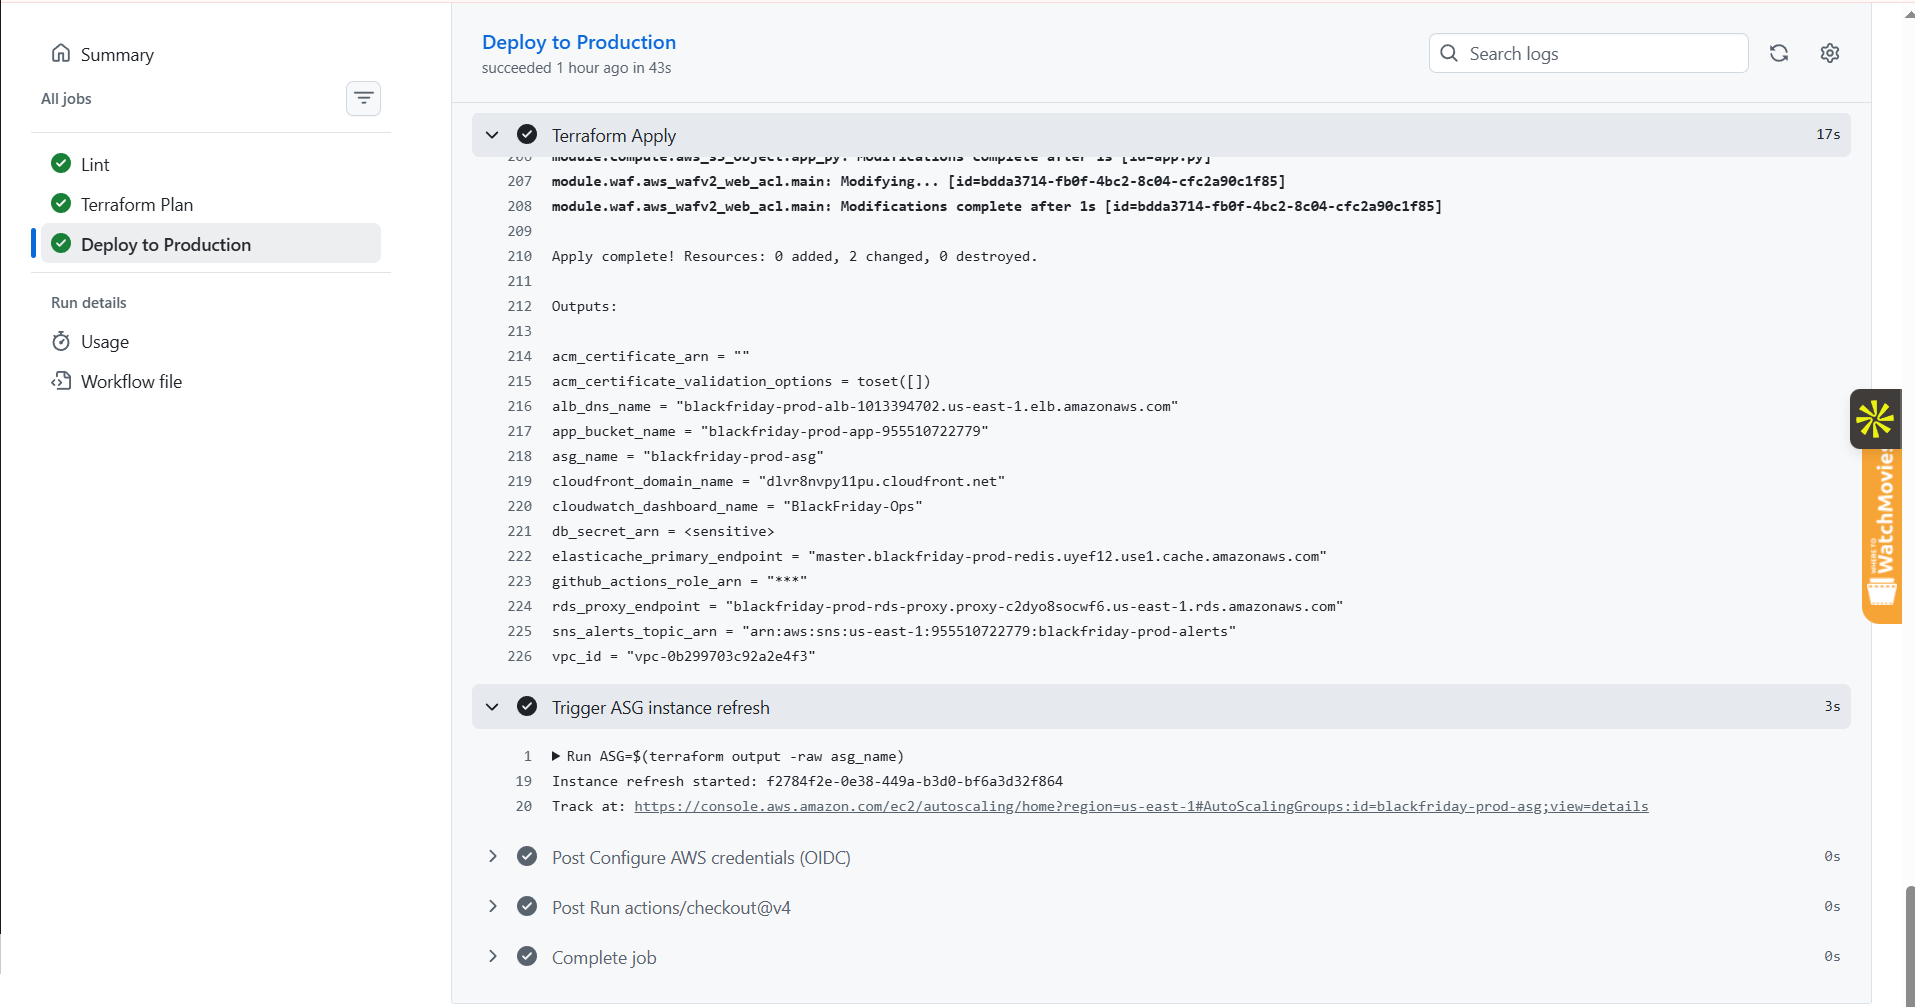 | 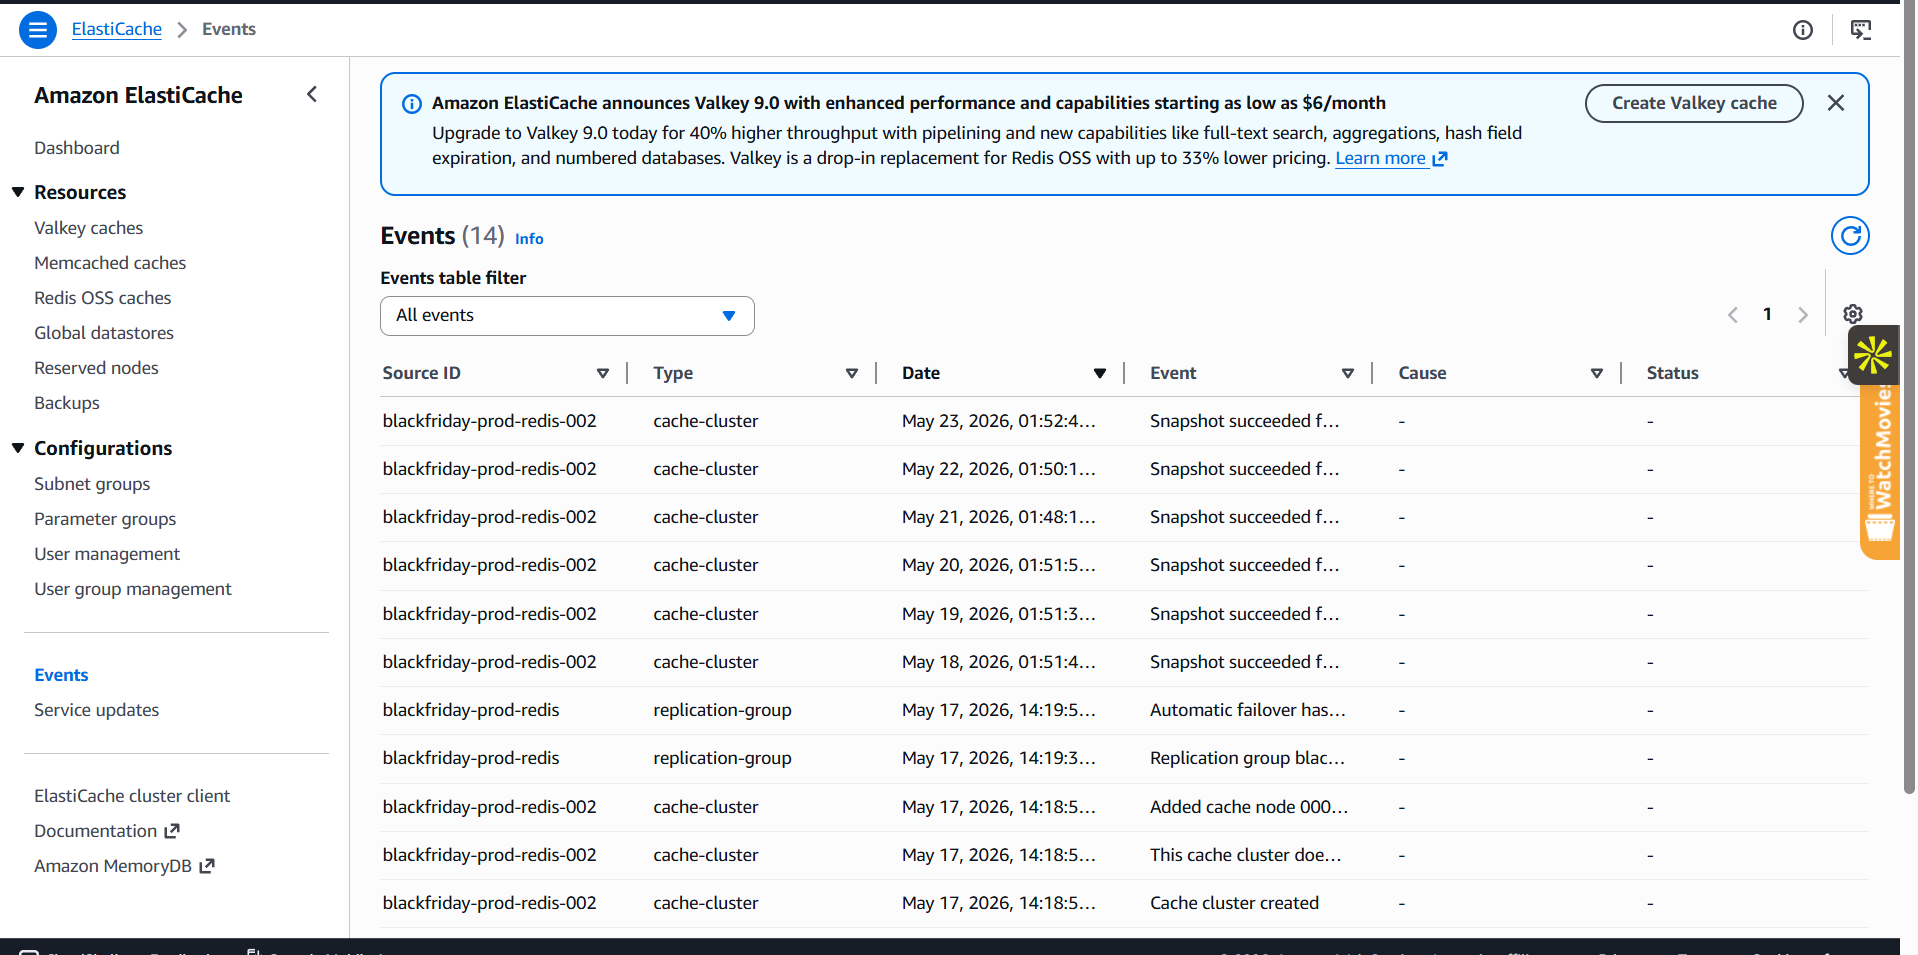 |
| **ASG — 负载下实例正在扩容** | **ElastiCache — Redis 维持着缓存命中率** |
| 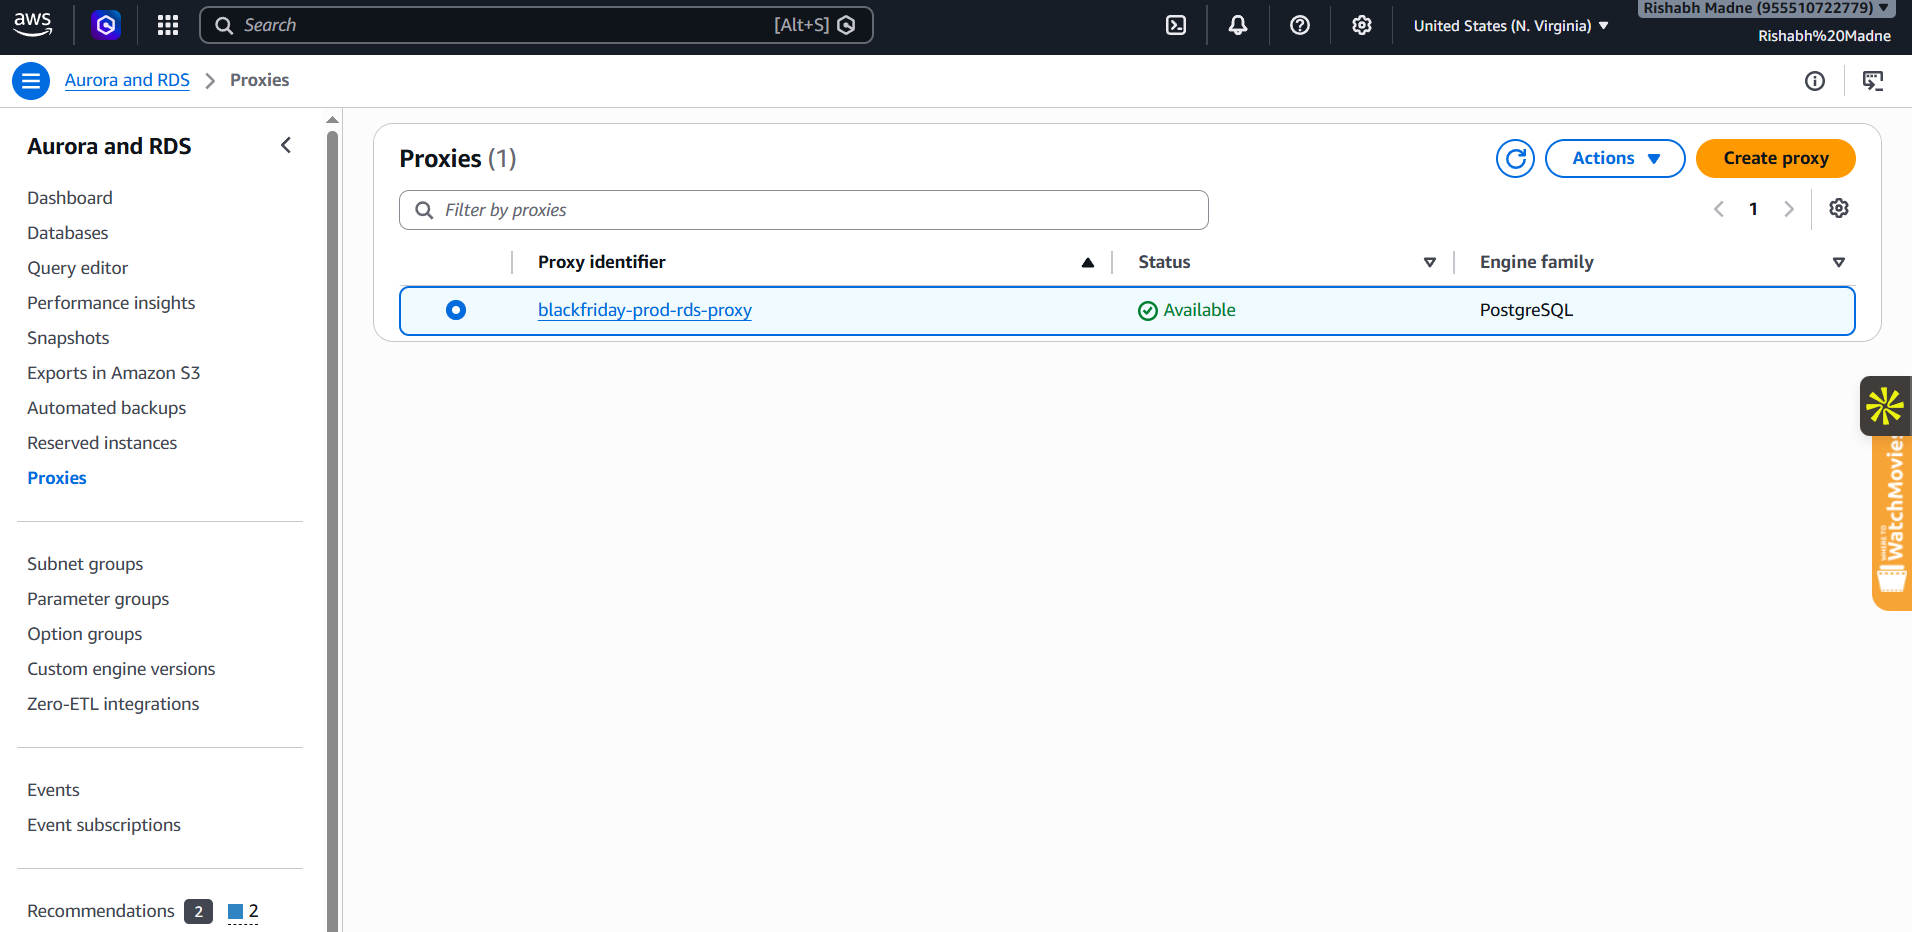 | 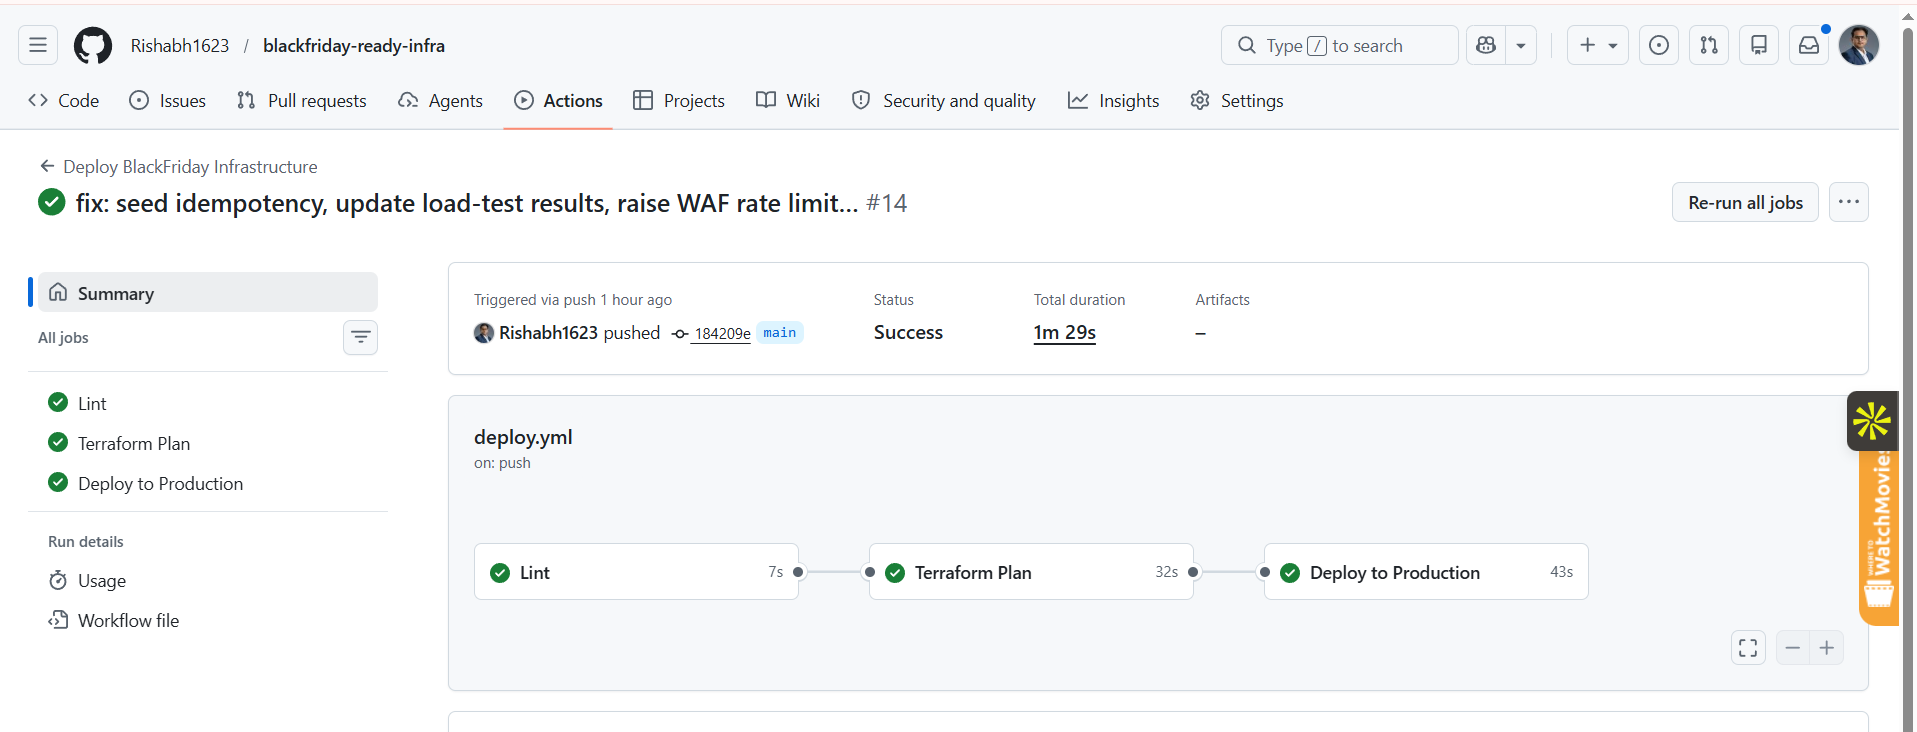 |
| **RDS Proxy — 峰值负载下的连接池** | **GitHub Actions — 无密钥部署流水线全绿** |
## 构建方式
```
┌─────────────────────────────────────────┐
│ Internet (Users) │
└───────────────────┬─────────────────────┘
│ HTTPS (TLS 1.2+)
┌───────────────────▼─────────────────────┐
│ CloudFront (PriceClass_100) │
│ /api/products* TTL=300s │
│ /api/inventory* TTL=0 (bypass) │
│ /api/checkout* TTL=0 (bypass) │
└───────────────────┬─────────────────────┘
│
┌───────────────────▼─────────────────────┐
│ WAF WebACL (REGIONAL) │
│ • Rate limit: 2000 req/5min/IP → block │
│ • AWSManagedRulesCommonRuleSet │
│ • AWSManagedRulesSQLiRuleSet │
└───────────────────┬─────────────────────┘
│
┌───────────────────▼─────────────────────┐
│ ALB (3 public subnets, us-east-1) │
│ :80 → 301 redirect to HTTPS │
│ :443 → forward (ACM cert, TLS 1.3) │
└──────────┬────────────────┬─────────────┘
│ │
┌────────────────▼──┐ ┌───▼────────────────┐
│ EC2 t3.medium │ ... │ EC2 t3.medium │
│ FastAPI/uvicorn │ │ FastAPI/uvicorn │
│ (private subnet) │ │ (private subnet) │
└────────┬──────────┘ └───────┬────────────┘
│ ASG: min=2, max=20 │
│ Warm pool: 3 stopped │
│ Pre-baked AMI (~30s boot)│
│ Scale-out: 19:45 UTC │
└──────────┬────────────────┘
│
┌─────────────────────┼──────────────────────┐
│ │ │
┌────────────▼──────────┐ ┌───────▼────────┐ ┌────────▼────────────┐
│ RDS Proxy │ │ ElastiCache │ │ Secrets Manager │
│ borrow_timeout=120s │ │ Redis 7.0 │ │ DB credentials │
│ max_conn_pct=100 │ │ 1P + 1R │ │ (never hardcoded) │
└──────────┬────────────┘ └────────────────┘ └─────────────────────┘
│
┌──────────▼────────────┐ ┌─────────────────────────────────────┐
│ RDS PostgreSQL 15 │ │ CloudWatch Alarms (10) → SNS │
│ db.t3.medium │ │ ALB: 5xx, latency, unhealthy hosts │
│ Encrypted, 7d backup │ │ ASG: CPU │
└───────────────────────┘ │ RDS: CPU, connections, storage │
│ ElastiCache: CPU, hit rate │
└─────────────────────────────────────┘
```

| 层级 | 运行内容 |
|---|---|
| 边缘 / 全球 | CloudFront CDN |
| 安全 | WAF v2 (速率限制 + OWASP 托管规则) |
| 公有子网 | Internet Gateway · ALB · NAT Gateway |
| 计算 | Auto Scaling Group (跨 3 个可用区的 2–20 × EC2 t3.medium) |
| 数据 | RDS Proxy → PostgreSQL 15 · ElastiCache Redis 7.0 |
| 密钥 | Secrets Manager (凭证绝不接触代码或环境变量) |
| 状态 | S3 (应用制品 + Terraform 状态) · DynamoDB (状态锁) |
| 可观测性 | 10 个 CloudWatch 警报 → SNS → 邮件 |
| CI/CD | GitHub Actions 与 OIDC (不存储 AWS 密钥) |
## 为什么做出这些设计决策
### 1. 预热池与计划扩容 — 解决冷启动问题
当流量激增时,Auto Scaling 会做出反应。但是,启动一个新的 EC2 实例、安装 Python、拉取应用代码并启动服务器需要 2 到 4 分钟。第一批购物者会在这些实例准备好之前就涌入。
解决方法:预热池持有 3 个预初始化的停止实例,它们可以在约 30 秒内启动。计划操作在峰值前 15 分钟的 19:45 UTC 预扩容到 10 个实例。预构建的 AMI 在启动时完全跳过了 `pip install`。
**成本:** 预热池每月约 $20–30。如果你的高峰时段发生变化,需要更新 cron 计划。
### 2. RDS Proxy — 防止连接耗尽的死亡螺旋
在 ASG 满负荷下:20 个实例 × 4 个 workers × 20 个连接池 = **1,600 个潜在的数据库连接**。运行在 `db.t3.medium` 上的 PostgreSQL 只能处理约 85 个。如果没有代理,每个应用实例都会同时出现 `FATAL: too many connections`。
RDS Proxy 将所有这些应用连接多路复用到数据库的实际限制上。`borrow_timeout=120s` 在负载下将请求排队,而不是立即失败。
**成本:** 每月约 $11。每次查询增加约 1ms。
### 3. 两层缓存 (CloudFront + Redis) — 让数据库避开关键路径
商品目录读取占流量的 60%。该数据每天变化几次,而不是每次请求都在变。在峰值负载下从 RDS 服务每次读取都会浪费连接、增加延迟,并放大所有其他的故障。
CloudFront 在边缘节点缓存 `/api/products*` 300 秒。Redis 在进程内缓存相同数据 300 秒。库存和结账绕过这两层——它们需要实时数据。
**成本:** 商品数据可能会存在长达 5 分钟的滞后。更新商品时的缓存失效需要显式清除 CloudFront。
### 4. WAF 速率限制 — 在爬虫到达你的服务器之前拦截它们
黑色星期五是库存机器人、抓取器和撞库攻击者的超级碗。如果没有保护,爬虫流量会消耗 EC2 workers、RDS 连接和 Redis 连接——从而降低你试图服务的那批真实购物者的体验。
WAF 会拦截每 5 分钟超过 2,000 次请求的 IP。AWS 托管规则集涵盖了 OWASP Top 10 和 SQL 注入模式。规则同时应用于 CloudFront(边缘)和 ALB。
**成本:** 托管规则可能会产生误报,需要进行调优。约 $10/规则/月 + $1/百万请求。
### 5. 全面采用 HTTPS — 结账的不可妥协项
一个处理凭证和支付意向的电商网站绝对不能提供 HTTP 服务。这是不可商量的。
ACM 证书采用 DNS 验证。ALB 443 端口使用 `ELBSecurityPolicy-TLS13-1-2-2021-06`(首选 TLS 1.3)。80 端口发出永久性的 301 重定向。CloudFront 对每个缓存行为强制执行 `redirect-to-https`。证书和 HTTPS 监听器是有条件的——在没有域名进行测试时,该技术栈可以在 `domain_name = ""` 的情况下干净地部署。
### 6. 10 个 CloudWatch 警报 — 比你的客户更早知道
静默故障是最糟糕的。缓存崩溃、RDS CPU 激增或 ALB 背后的实例不健康,都可能在购物者看到错误的同时,在几分钟内未被发现。
10 个警报涵盖了完整的技术栈:ALB 错误率、P99 延迟、ASG CPU、RDS 连接和存储、ElastiCache CPU 以及缓存命中率。所有警报都发布到一个带有邮件订阅的 SNS topic 上。缓存命中率使用了指标数学计算(`CacheHits / (CacheHits + CacheMisses) * 100`),因为单一指标无法反映真实情况。
**生产环境中需要填补的空白:** SNS 邮件只是一个起点。接入 PagerDuty 或 OpsGenie 以实现适当的值班升级机制。
### 7. GitHub Actions 与 OIDC — GitHub Secrets 中不存放任何密钥
存储在 GitHub Secrets 中的长期有效的 AWS 访问密钥是供应链攻击的常见来源。如果密钥泄露,爆炸半径会很大,而且轮换也非常痛苦。
GitHub Actions 通过 OIDC (`sts:AssumeRoleWithWebIdentity`) 假定一个 IAM 角色——任何地方都不存储凭证。信任策略通过在 `sub` claim 上使用 `StringLike` 将作用域限制在这个特定的 repo 上。流水线流程:lint → `terraform plan`(作为 PR 评论发布)→ `terraform apply` → S3 制品上传 → 合并到 `main` 时执行 ASG 实例刷新。
**注意:** 这里为了演示简便使用了 `AdministratorAccess`。在生产环境中请缩小其权限范围。
## 自行部署
### 前置条件
| 工具 | 版本 |
|---|---|
| Terraform | 1.6+ |
| AWS CLI | 2.x |
| Python | 3.11+ |
| k6 | 0.50+ |
### 第 1 步:引导 Terraform Backend
```
ACCOUNT_ID=$(aws sts get-caller-identity --query Account --output text)
REGION=us-east-1
BUCKET="blackfriday-tfstate-${ACCOUNT_ID}"
aws s3api create-bucket --bucket "$BUCKET" --region "$REGION"
aws s3api put-bucket-versioning \
--bucket "$BUCKET" \
--versioning-configuration Status=Enabled
aws s3api put-bucket-encryption \
--bucket "$BUCKET" \
--server-side-encryption-configuration \
'{"Rules":[{"ApplyServerSideEncryptionByDefault":{"SSEAlgorithm":"AES256"}}]}'
aws dynamodb create-table \
--table-name blackfriday-tfstate-lock \
--attribute-definitions AttributeName=LockID,AttributeType=S \
--key-schema AttributeName=LockID,KeyType=HASH \
--billing-mode PAY_PER_REQUEST \
--region "$REGION"
```
更新 `terraform/backend.tf` — 将 `blackfriday-tfstate-REPLACE_WITH_ACCOUNT_ID` 替换为 `blackfriday-tfstate-${ACCOUNT_ID}`。
### 第 2 步:部署基础设施
```
cd terraform/
terraform init
terraform plan -out=tfplan
terraform apply tfplan
```
预计需要 15–20 分钟。RDS 和 RDS Proxy 是配置最慢的资源。
### 第 3 步:获取输出
```
ALB_DNS=$(terraform output -raw alb_dns_name)
CF_DOMAIN=$(terraform output -raw cloudfront_domain_name)
RDS_PROXY=$(terraform output -raw rds_proxy_endpoint)
CACHE_HOST=$(terraform output -raw elasticache_primary_endpoint)
SECRET_ARN=$(terraform output -raw db_secret_arn)
ASG_NAME=$(terraform output -raw asg_name)
SNS_TOPIC=$(terraform output -raw sns_alerts_topic_arn)
GH_ROLE=$(terraform output -raw github_actions_role_arn)
```
### 第 4 步:初始化数据库
```
SECRET=$(aws secretsmanager get-secret-value \
--secret-id "$SECRET_ARN" --query SecretString --output text)
export DB_HOST="$RDS_PROXY"
export DB_NAME="blackfriday"
export DB_USER=$(echo "$SECRET" | python3 -c "import sys,json; print(json.load(sys.stdin)['username'])")
export DB_PASSWORD=$(echo "$SECRET" | python3 -c "import sys,json; print(json.load(sys.stdin)['password'])")
cd ../app/
pip3 install -r requirements.txt
python3 seed.py
```
### 第 5 步:验证 API
```
# 健康检查 — 返回 instance ID、version 和 timestamp
curl https://$CF_DOMAIN/health
# Product list — 第一次调用 MISS,第二次调用 HIT
curl -I https://$CF_DOMAIN/api/products
curl -I https://$CF_DOMAIN/api/products # X-Cache: Hit from CloudFront
# Inventory(始终实时,bypasses cache)
curl https://$CF_DOMAIN/api/inventory/1
# HTTP 重定向至 HTTPS
curl -I http://$CF_DOMAIN/health # 301
```
### 第 6 步:使用自定义域名启用 HTTPS (可选)
```
terraform apply \
-var="domain_name=yourdomain.com" \
-var="route53_zone_id=Z1234567890ABC"
```
这会创建一个 ACM 证书,将 DNS 验证记录添加到 Route53,在 ALB 上启用 HTTPS 监听器,并将你的域名添加为 CloudFront 别名——所有这些都在一次 apply 中完成。
如果没有域名,该技术栈会通过默认的 `*.cloudfront.net` 证书提供 HTTPS。
### 第 7 步:设置 CI/CD (GitHub Actions1. 在 GitHub 中添加仓库 secret:
- **Name:** `AWS_DEPLOY_ROLE_ARN`
- **Value:** 运行 `terraform output github_actions_role_arn`
2. 确认 SNS 订阅——在收件箱中检查 `no-reply@sns.amazonaws.com` 并点击 **Confirm subscription**。
3. 推送到 `main` 分支——完整的流水线将自动运行:lint → plan → deploy → ASG 实例刷新。Pull request 会获得一份作为 PR 评论发布的 `terraform plan` diff。
### 第 8 步:运行负载测试
```
cd ../load-test/
k6 run --env BASE_URL="https://$CF_DOMAIN" k6-script.js
```
测试分为三个阶段运行:baseline → ramp → 500 VU 持续峰值。实时观察 ASG 的扩容和预热池的激活。
### 第 9 步:导入 CloudWatch Dashboard
```
ALB_ARN_SUFFIX=$(terraform -chdir=terraform output -raw alb_arn_suffix 2>/dev/null || echo "")
sed \
-e "s|\${ALB_ARN_SUFFIX}|$ALB_ARN_SUFFIX|g" \
-e "s|\${ASG_NAME}|$ASG_NAME|g" \
-e "s|\${DB_INSTANCE_ID}|blackfriday-prod-postgres|g" \
-e "s|\${ELASTICACHE_ID}|blackfriday-prod-redis|g" \
-e "s|\${WAF_ACL_NAME}|blackfriday-prod-web-acl|g" \
-e "s|\${AWS_REGION}|us-east-1|g" \
monitoring/cloudwatch-dashboard.json > /tmp/dashboard-filled.json
aws cloudwatch put-dashboard \
--dashboard-name BlackFriday-Ops \
--dashboard-body file:///tmp/dashboard-filled.json
echo "Dashboard: https://console.aws.amazon.com/cloudwatch/home#dashboards:name=BlackFriday-Ops"
```
## 仓库结构
```
blackfriday-ready-infra/
├── .github/
│ └── workflows/
│ └── deploy.yml # CI/CD: lint → plan → deploy → instance refresh
│
├── terraform/ # All infrastructure as code
│ ├── main.tf # Root module — wires all modules together
│ ├── variables.tf # Input variables (region, env, instance types, domain)
│ ├── outputs.tf # Exported values (ALB DNS, CloudFront domain, role ARN, etc.)
│ ├── backend.tf # S3 + DynamoDB remote state config
│ └── modules/
│ ├── networking/ # VPC, subnets (public/private), IGW, NAT, route tables, SGs
│ ├── compute/ # ALB, HTTPS listener, ASG, warm pool, scheduled scaling
│ │ └── user_data.sh.tpl # EC2 bootstrap: installs Python, pulls app from S3
│ ├── acm/ # ACM certificate + DNS validation (Route53 or manual)
│ ├── rds/ # PostgreSQL 15, RDS Proxy, Secrets Manager integration
│ ├── elasticache/ # Redis 7.0 replication group (1 primary + 1 replica)
│ ├── cloudfront/ # CloudFront distribution + cache behaviours per path
│ ├── waf/ # WAFv2 WebACL: rate limit + managed rule sets
│ └── monitoring/ # CloudWatch alarms (10) + SNS email topic
│
├── app/
│ ├── app.py # FastAPI app: /health, /api/products, /api/inventory, /api/checkout
│ ├── requirements.txt # Python dependencies (fastapi, uvicorn, psycopg2, redis)
│ └── seed.py # Populates RDS with 100 sample products
│
├── load-test/
│ ├── k6-script.js # k6 load test: 3 phases (baseline → ramp → 500 VU peak)
│ └── results/
│ └── summary.json # Actual test results from last run
│
├── monitoring/
│ └── cloudwatch-dashboard.json # CloudWatch dashboard definition (import via CLI)
│
└── docs/
├── architecture-decisions.md # Detailed ADRs for all key design choices
├── blackfriday-architecture.drawio # Editable draw.io architecture diagram (22 connections)
├── architecture.md # Mermaid flowchart version of the architecture
└── architecture_diagram.py # Python diagrams-library script (generates PNG)
```
## 监控与警报
### 峰值期间需要关注的指标
当流量到来且涉及真金白银时,这些才是至关重要的指标:
| 指标 | 警告 | 严重 | 位置 |
|---|---|---|---|
| ALB P99 延迟 | > 500ms | > 2000ms | CloudWatch 警报 |
| ASG 服务中实例数 | — | = max (20) | Auto Scaling 控制台 |
| RDS 连接数 | > 60 | > 80 | CloudWatch 警报 |
| 缓存命中率 | < 80% | < 50% | CloudWatch 警报 |
| WAF 拦截请求数 | > 1000/min | > 10000/min | WAF 控制面板 |
| ALB 5XX 错误 | > 10/min | > 100/min | CloudWatch 警报 |
| RDS 可用存储 | < 10GB | < 5GB | CloudWatch 警报 |
### 预配的警报
10 个警报由 `modules/monitoring/` 自动创建,并通过 SNS 连接到邮件:
| 警报 | 指标 | 阈值 |
|---|---|---|
| ALB ELB 5xx 错误 | `HTTPCode_ELB_5XX_Count` | 60 秒内 > 50 |
| ALB target 5xx 错误 | `HTTPCode_Target_5XX_Count` | 60 秒内 > 50 |
| ALB P99 响应时间 | `TargetResponseTime` p99 | 2 个周期内 > 2s |
| ALB 不健康主机 | `UnHealthyHostCount` | 2 个周期内 > 0 |
| ASG CPU 过高 | `CPUUtilization` | 2×5分钟内 > 80% |
| RDS CPU 过高 | `CPUUtilization` | 3×5分钟内 > 80% |
| RDS 连接数过高 | `DatabaseConnections` | 2×5分钟内 > 80 |
| RDS 可用存储过低 | `FreeStorageSpace` | < 5 GiB |
| ElastiCache CPU 过高 | `EngineCPUUtilization` | 3×5分钟内 > 65% |
| 缓存命中率过低 | `CacheHits / (CacheHits + CacheMisses)` | 3×5分钟内 < 80% |
更改警报邮件的方法:`terraform apply -var="alert_email=you@example.com"`
## 成本估算
在 us-east-1 区域运行完整技术栈,每月估算成本:
| 资源 | 配置 | 预估成本 |
|---|---|---|
| EC2 ASG (基线) | 2× t3.medium | ~$60 |
| EC2 预热池 | 3× t3.medium 已停止 (仅计算 EBS) | ~$9 |
| EC2 ASG (峰值, 3h/天) | +8× t3.medium | ~$30 |
| ALB | 1× ALB | ~$16 |
| NAT Gateway | 1× NAT + 数据传输 | ~$32 |
| RDS PostgreSQL | db.t3.medium + 20GB gp3 | ~$50 |
| RDS Proxy | db.t3.medium (2 vCPU) | ~$22 |
| ElastiCache Redis | 2× cache.t3.micro | ~$25 |
| CloudFront | PriceClass_100, 1000万请求/月 | ~$10 |
| WAF | 3 个规则 + 1000万请求/月 | ~$41 |
| ACM 证书 | 1 个证书 | 免费 |
| SNS + CloudWatch | 10 个警报 + 邮件 | ~$1 |
| Secrets Manager | 1 个 secret | ~$0.40 |
| CloudWatch Logs/Dashboard | Dashboard + 日志 | ~$5 |
| **总计** | | **~$301/月** |
## 故障排除
**`terraform apply` 在 RDS Proxy 失败 — "Secrets Manager secret not found"**
重新运行 `terraform apply`。Secret 传播是最终一致的,第二次运行就会成功。
**EC2 实例启动但健康检查失败**
- 确认应用代码位于 S3 中:`aws s3 ls s3://blackfriday-prod-app-/`
- 确认 IAM 角色拥有 `s3:GetObject` 和 `secretsmanager:GetSecretValue` 权限
- 通过 SSM 检查实例日志:`aws ssm start-session --target `
**GitHub Actions OIDC 失败 — "Could not load credentials from any providers"**
- 确认已在 GitHub 仓库的 Settings → Secrets → Actions 中设置了 `AWS_DEPLOY_ROLE_ARN`
- 确认存在 IAM OIDC 提供程序:`aws iam list-open-id-connect-providers`
- 检查角色信任策略,确保在 `sub` 条件中允许了 `repo:/:*`
**ACM 证书卡在 `PENDING_VALIDATION`**
```
terraform output acm_certificate_validation_options
```
在你的 DNS 提供商处添加显示的 CNAME 记录。如果使用的是 Route53,请设置 `route53_zone_id`,Terraform 会自动处理。
**CloudFront 返回过期的商品数据**
```
aws cloudfront create-invalidation \
--distribution-id \
--paths "/api/products*"
```
**WAF 拦截了正常流量**
在 `terraform/modules/waf/main.tf` 中将违规规则的 `override_action` 从 `none` 切换为 `count`,重新部署,并在重新启用阻止模式之前检查 WAF 日志,以识别触发该规则的特定规则。
## 销毁环境
```
cd terraform/
# 首先移除删除保护
aws rds modify-db-instance \
--db-instance-identifier blackfriday-prod-postgres \
--no-deletion-protection \
--apply-immediately
terraform destroy
```
标签:AWS, DPI, ECS, Syscall, Terraform, Web开发, 性能测试, 搜索引擎查询, 测试用例, 漏洞利用检测, 电商架构, 自动化运维, 请求拦截, 逆向工具, 高可用架构