NIHAR-SARKAR/CHAI

GitHub: NIHAR-SARKAR/CHAI

一款基于 MCP 协议的自主渗透测试服务器,通过多提供商 LLM 决策引擎驱动工具链编排,实现从侦察到报告的自动化安全测试流程。

Stars: 8 | Forks: 7

# CHAI Cyber Host Artificial Intelligence (C.H.A.I) 一个生产就绪的、自主的渗透测试 MCP (Model Context Protocol) 服务器,内置 AI 决策引擎、多提供商 LLM 支持以及可扩展的插件架构。专为运行 Kali Linux ARM64 的 Raspberry Pi 4/5 设计。
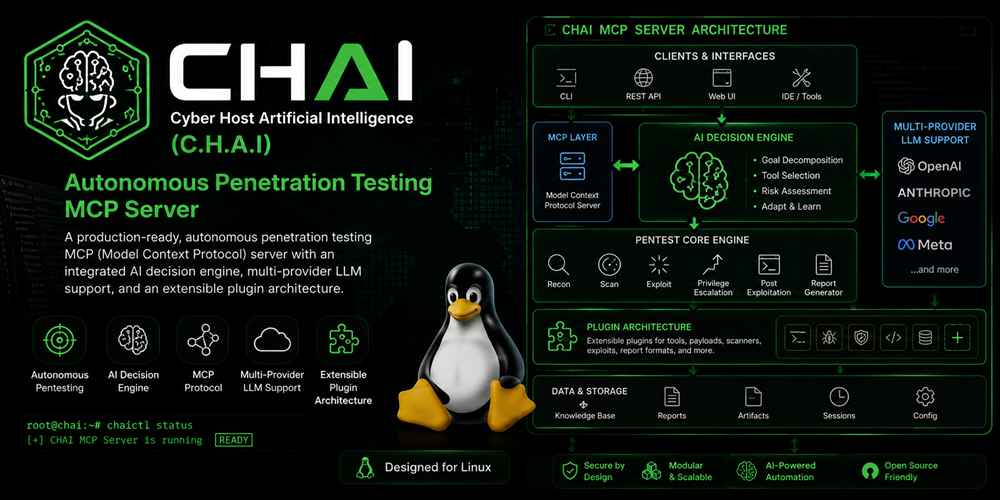
## 架构概览 ``` External Client (CHAI / any MCP tool) │ MCP stdio/SSE ▼ ┌─────────────────────────────────────────┐ │ MCP Security Server │ │ │ │ run_autonomous_scan() │ │ │ │ │ ┌────▼────────────────────┐ │ │ │ execution_loop.py │ │ │ │ (local, no LLM here) │ │ │ │ tool1 → tool2 → tool3 │ │ │ └────┬────────────────────┘ │ │ │ at phase boundaries only │ │ ┌────▼────────────────────┐ │ │ │ ai_planner.py │ │ │ │ plan / evaluate / │◄─────────┼── llm/provider_factory.py │ │ summarize │ │ (Azure / OpenAI / Claude / │ └─────────────────────────┘ │ Bedrock / OpenRouter / HF) │ │ │ All tools, safety, sandbox unchanged │ └─────────────────────────────────────────┘ ``` **设计理念:THIN BRAIN, THICK LOOP** - 内部 LLM 仅在**决策边界**触发,而非每一步都触发 - 本地 `execution_loop` 在 LLM 调用之间确定性地处理工具链 - 保持较低的 token 使用量(每次完整渗透测试约 6-10 次调用),并在 Pi 4 上具有可接受的延迟 ## 功能 ### 多提供商 LLM 支持 - **Azure OpenAI**(通过 Azure AI Foundry 支持 GPT-4.1, GPT-4o, GPT-5+, Kimi, DeepSeek) - **Direct OpenAI**(GPT-4.1, GPT-4o 等) - **Anthropic Claude**(Sonnet, Opus) - **Amazon Bedrock**(通过 AWS 支持 Claude, Titan, Llama) - **OpenRouter**(一把钥匙访问 100+ 模型) - **HuggingFace**(通过 Inference API 支持 DeepSeek, Qwen, Llama) ### AI 决策引擎 - **plan()**:根据发现结果决定下一步测试什么 - **evaluate()**:决定继续还是停止 - **summarize_for_report()**:生成执行摘要和修复优先级 ### 安全与沙盒 - 带有 rlimit 限制的 **firejail** 配置文件 - 用于资源限制的 **Linux cgroups** - **受限用户**(`pentester`)执行 - **分层安全策略**(Tier 1/2/3) - 对所有命令和 AI 决策进行**不可变的审计日志记录** ### 插件系统 - 从 `plugins/bundled/` 和 `plugins/external/` 自动发现插件 - 即插即用架构 —— 无需更改核心代码 - 内置插件:Feroxbuster, Metasploit, Burp Suite API ### 数据库 - **仅使用 SQLite** —— 无需 Neo4j、Redis 或 Postgres - 使用 WAL 模式以获得更好的并发性 - 包含 50+ 种攻击技术和递归 CTE 链查询的知识图谱 ## 项目结构 ``` CHAI/ ├── main.py # FastMCP server entry point ├── config.py # Configuration loader ├── config.yaml # Main configuration (no secrets) ├── .security.yml # API keys (git-ignored) ├── requirements.txt # Python dependencies ├── app_context.py # Application context singleton │ ├── llm/ # Multi-provider LLM adapter layer │ ├── base_provider.py # Abstract base class │ ├── provider_factory.py # Provider selection with fallback │ ├── prompt_templates.py # All LLM prompts (versioned) │ └── providers/ │ ├── azure_openai.py # Azure OpenAI │ ├── openai_direct.py # Direct OpenAI │ ├── anthropic_claude.py # Claude │ ├── amazon_bedrock.py # AWS Bedrock │ ├── openrouter.py # OpenRouter │ └── huggingface.py # HuggingFace │ ├── core/ # Core engine │ ├── session_manager.py # SQLite session CRUD + state machine │ ├── safety_policy.py # Command validation, tier system │ ├── process_controller.py # firejail/cgroups/chroot wrapper │ ├── audit_logger.py # Immutable audit logging │ ├── ai_planner.py # LLM decision engine (3 call types) │ └── execution_loop.py # Local chain runner │ ├── kb/ # Knowledge Base │ ├── graph_db.py # Attack graph with recursive CTE │ ├── playbook_loader.py # Playbook section extraction │ └── vector_search.py # Vector/BM25 search │ ├── tools/ # Security testing tools │ ├── base.py # Base tool class │ ├── recon.py # Reconnaissance │ ├── scan.py # Vulnerability scanning │ ├── injection.py # Injection testing │ ├── auth.py # Authentication testing │ ├── network.py # Network testing │ ├── poc.py # PoC generation │ ├── exec.py # Custom command execution │ ├── analyze.py # Findings analysis │ ├── report.py # Report generation │ └── autonomous.py # Autonomous scan orchestrator │ ├── plugins/ # Plugin system │ ├── plugin_base.py # Base class │ ├── plugin_loader.py # Auto-discovery loader │ └── bundled/ │ ├── feroxbuster_plugin.py # Directory bruteforcer │ ├── metasploit_plugin.py # Metasploit Framework │ └── burp_api_plugin.py # Burp Suite Pro API │ ├── models/ # Data models │ ├── session.py # Session and Finding models │ └── schemas.py # Pydantic schemas │ ├── utils/ # Utilities │ ├── command_parser.py # Command parsing │ ├── output_parser.py # Tool output parsing │ └── cvss_calculator.py # CVSS v3.1 calculator │ └── data/ # Database schemas & profiles ├── init_sessions.sql # Session DB schema + AI decisions table ├── init_graph.sql # Knowledge graph (50+ nodes) └── firejail/ └── pentest.profile # Firejail sandbox profile ``` ## 安装说明 ### 前置条件 - 任何 Linux 机器 / 运行 Kali Linux ARM64 的 Raspberry Pi 4/5(裸机,无 Docker) - Python 3.11+ - 已安装 firejail - Kali Linux 渗透测试工具(nmap, sqlmap, nuclei, ffuf 等) ### 设置 ``` # 克隆仓库 git clone https://github.com/NIHAR-SARKAR/CHAI.git cd CHAI # 创建虚拟环境 python -m venv .venv source .venv/bin/activate -- linux .venv\Scripts\activate -- windows # 安装依赖 pip install -r requirements.txt # 配置 secrets cp .security.yml.example .security.yml chmod 600 .security.yml # 使用你的 API keys 编辑 .security.yml # 创建所需目录 ### linux sudo mkdir -p /opt/sessions /opt/logs /opt/kb /opt/mcp-security-server/plugins/external sudo chown -R $(whoami) /opt/sessions /opt/logs /opt/kb ### windows PowerSheel New-Item -ItemType Directory -Force -Path "C:\opt\sessions" New-Item -ItemType Directory -Force -Path "C:\opt\logs" New-Item -ItemType Directory -Force -Path "C:\opt\kb" New-Item -ItemType Directory -Force -Path "C:\opt\mcp-security-server\plugins\external" icacls "C:\opt" /grant "$env:USERNAME:(OI)(CI)F" /Ts -- Grant current user full permissions # 安装 firejail profile sudo cp data/firejail/pentest.profile /etc/firejail/ # 运行服务器 python main.py --transport streamable-http ```

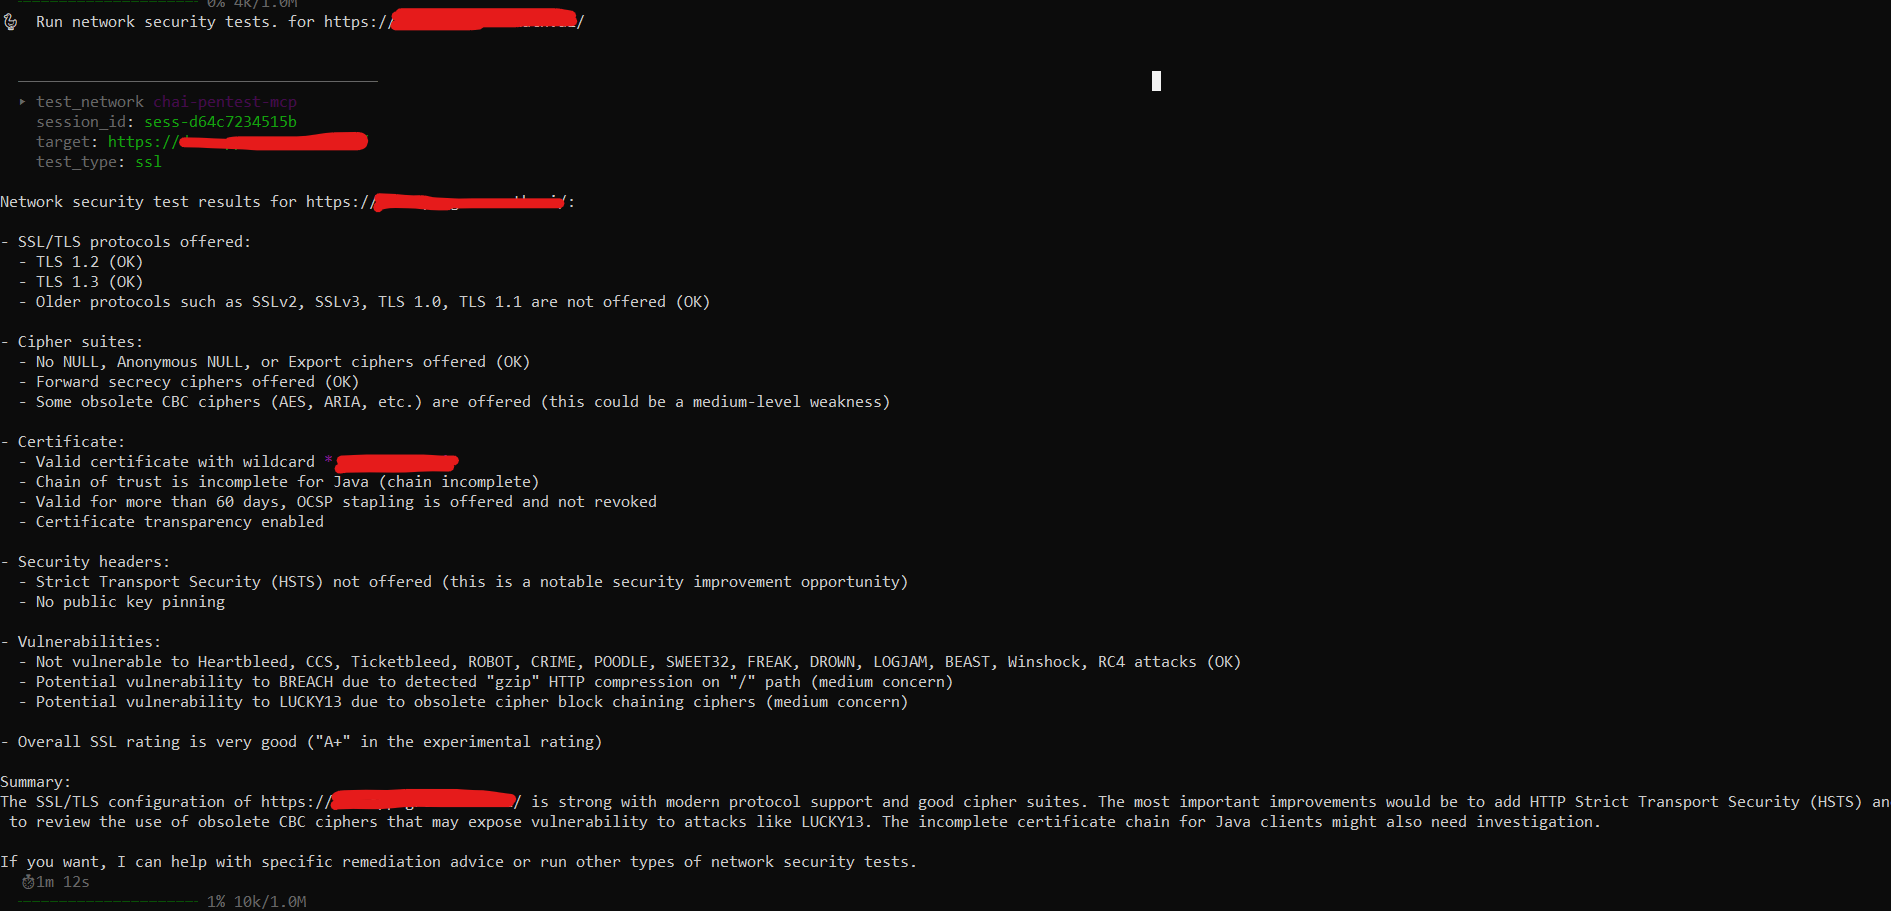
## 配置 ### config.yaml(主配置) 编辑 `config.yaml` 以配置: - 服务器传输协议(stdio 或 SSE) - 沙盒限制(RAM, CPU, 超时) - LLM 提供商选择 - 插件启用/禁用 关键部分: ``` llm: active_provider: "azure_openai" # Change to your preferred provider fallback_provider: "openrouter" # Optional fallback ai_planner: max_phases: 4 # Max autonomous phases stop_on_critical: true # Stop on critical findings plugins: bundled: feroxbuster: true metasploit: false # Disabled by default (Tier 3) burp_api: false # Needs Burp Pro API key ``` ### .security.yml(密钥) ``` # 绝不提交此文件 azure_openai: api_key: "your-azure-key" openai: api_key: "your-openai-key" anthropic: api_key: "your-anthropic-key" # ... 其他每个 provider 依此类推 ``` ### CHAI 集成 添加到你的 CHAI `config.json` 中: **stdio 传输:** ``` { "tools": { "mcp": { "servers": { "chai-security": { "transport": "stdio", "command": "python", "args": ["-m", "main.py"], "cwd": "/opt/mcp-security-server", "env": { "PYTHONPATH": "/opt/mcp-security-server" }, "discovery": "deferred" } } } } } ``` **SSE 传输(用于远程 Pi 访问):** ``` { "tools": { "mcp": { "servers": { "chai-security": { "transport": "sse", "url": "http://raspberrypi.local:9010/sse" } } } } } ``` ## 用法 ### 初始化会话 ``` initialize_session( target="https://target.example.com", test_type="web_app", scope=["target.example.com"] ) # 返回: {"session_id": "sess-abc-123", ...} ``` ### 运行自主扫描(一次调用,完成测试) ``` run_autonomous_scan( session_id="sess-abc-123", max_phases=4, stop_on_critical=True, generate_report=True, provider_override=None # Uses config.yaml active_provider ) # 内部流程: plan → [recon → scan → inject] → evaluate → plan → [...] → report # 约 15-30 分钟后返回: # { # "phases_completed": 3, # "total_findings": 12, # "critical_count": 1, # "high_count": 4, # "report_path": "/opt/sessions/reports/sess-abc-123.md", # "status": "complete" # } ``` ### 手动工具调用 ``` # Reconnaissance run_recon(session_id="sess-abc-123", target="target.example.com", recon_type="passive") # Vulnerability scanning scan_vulnerabilities(session_id="sess-abc-123", target="target.example.com", scanner="nuclei") # Injection testing test_injection(session_id="sess-abc-123", target="target.example.com", injection_type="sqli") # 认证测试 test_authentication(session_id="sess-abc-123", target="target.example.com", test_type="bypass") # 网络测试 test_network(session_id="sess-abc-123", target="target.example.com", test_type="ssl") # 自定义命令 execute_command(session_id="sess-abc-123", command="nmap -sV target.example.com") # 运行 plugin run_plugin(session_id="sess-abc-123", plugin_name="feroxbuster", target="https://target.example.com") # 生成报告 generate_report(session_id="sess-abc-123", format="markdown") # 检查状态 get_session_status(session_id="sess-abc-123") # 紧急停止 emergency_stop(session_id="sess-abc-123") ``` ## 添加新的 LLM 提供商 **第 1 步** — 创建 `llm/providers/gemini.py`: ``` from llm.base_provider import BaseLLMProvider, LLMResponse class GeminiProvider(BaseLLMProvider): def __init__(self, config): ... @property def provider_name(self): return "gemini" async def complete(self, ...): ... async def health_check(self): ... ``` **第 2 步** — 在 `llm/provider_factory.py` 中添加一个 `case`: ``` case "gemini": from llm.providers.gemini import GeminiProvider return GeminiProvider(config) ``` **第 3 步** — 将配置块添加到 `config.yaml`: ``` llm: gemini: enabled: true model: "gemini-2.5-pro" api_base: "https://generativelanguage.googleapis.com/v1beta/openai" ``` **第 4 步** — 将密钥添加到 `.security.yml`: ``` gemini: api_key: "" ``` **第 5 步** — 在 `config.yaml` 中更改 `active_provider: "gemini"`。 **这样就完成了。无需更改其他文件。** ## 添加新的渗透测试插件 **第 1 步** — 创建 `plugins/external/gospider_plugin.py`: ``` from plugins.plugin_base import PentestPlugin, PluginMetadata, PluginResult class GospiderPlugin(PentestPlugin): @property def metadata(self): return PluginMetadata( name="gospider", display_name="GoSpider Web Crawler", version="1.1.6", description="Fast web spider", tier="tier1", requires_binary="gospider", tags=["web", "recon", "crawler"], ) async def run(self, session_id, target, args, process_controller, safety_policy, session_manager): # Build command, validate through safety_policy, execute via process_controller ... ``` **第 2 步** — 重启服务器。插件将自动加载。 **这样就完成了。无需对核心应用进行任何更改。** ## LLM 调用预算 对于 4 阶段的自主扫描: - 第 1 阶段:plan() + evaluate() = 2 次调用 - 第 2 阶段:plan() + evaluate() = 2 次调用 - 第 3 阶段:plan() + evaluate() = 2 次调用 - 第 4 阶段:plan() + evaluate() = 2 次调用 - 报告:summarize_for_report() = 1 次调用 - **总计:每次完整渗透测试约 9 次 LLM 调用** 这保持了较低的 token 使用量,并在 Raspberry Pi 4 上具有可接受的延迟。 ## 安全与合规 - **命令黑名单**:拦截危险命令(如 rm -rf /,fork bombs 等) - **分级系统**:根据风险对工具进行分类(Tier 1/2/3) - **范围检查**:根据定义的范围验证命令 - **速率限制**:按层级限制并发执行 - **沙盒**:所有命令均通过带有资源限制的 firejail 运行 - **审计追踪**:记录每一个命令和 AI 决策,且不可变 ## 许可证 MIT 许可证 — 详情请参阅 LICENSE 文件。 ![许可证: MIT](https://img.shields.io/badge/License-MIT-yellow.svg) ## 贡献 1. Fork 该仓库 2. 创建一个功能分支 3. 进行更改 4. 添加测试 (pytest) 5. 提交 pull request ## 支持 对于问题和疑问: - GitHub Issues: [https://github.com/NIHAR-SARKAR/CHAI/issues](https://github.com/NIHAR-SARKAR/CHAI/issues) - 文档: [https://github.com/NIHAR-SARKAR/CHAI/blob/main/README.md](https://github.com/NIHAR-SARKAR/CHAI/blob/main/README.md) - 网站链接: [https://aithread.in](https://aithread.in)
标签:AI智能体, DLL 劫持, MCP Server, 大语言模型, 实时处理, 密码管理, 插件系统, 网络调试, 自动化, 逆向工具