Rdx1S/ShadowSentryS3
GitHub: Rdx1S/ShadowSentryS3
一款基于 ESP32-S3 的自包含边缘硬件蜜罐,通过模拟多种网络服务来诱捕并记录本地网络中的恶意扫描与攻击行为。
Stars: 2 | Forks: 0
# ShadowSentry S3
**🌐 语言:** **English** · [Українська](README.uk.md)


ShadowSentry S3 是一个自包含的 **边缘欺骗** 硬件蜜罐。它将一块 ESP32-S3 开发板(约 $5)变成一个隐形的陷阱,用于捕获本地网络中的僵尸网络、扫描器和恶意软件。不需要 Raspberry Pi,不需要云服务器,也不需要外部数据库——所有的处理和日志记录都在一块芯片上完成。
## 工作原理
得益于双核 Xtensa LX7 处理器,该项目被划分为两个隔离的世界:
| 核心 | 角色 | 任务 |
|------|------|-------|
| **Core 0** — 黑客世界 | 接收攻击 | RTSP :554 · HTTP :80 · Telnet :23 · SSH :22 · FTP :21 |
| **Core 1** — 管理员世界 | 管理与告警 | 管理面板 :9999 · Telegram · SPIFFS |
```
Attacker / bot
│
├─ Port 554 (RTSP) → Fake Hikvision DS-2CD camera ─┐
├─ Port 80 (HTTP) → Fake Hikvision NVR login page │
├─ Port 23 (Telnet) → Fake Ubuntu 20.04 server ├──► log_store → SPIFFS
├─ Port 22 (SSH) → Fake OpenSSH 8.9p1 │ │
└─ Port 21 (FTP) → Fake vsFTPd 3.0.5 ─┘ ▼
Telegram Alert
│
Admin Panel :9999
(Dark-mode Dashboard)
```
### 捕获内容
| 协议 | 捕获信息 | 示例 |
|----------|----------|---------|
| RTSP | 用户名 + 密码 | 来自 Basic Auth 头的 `admin:12345` |
| HTTP | 用户名 + 密码 + **路径 + User-Agent** | NVR 登录 POST 表单;每个请求(GET/POST/其他)都通过路径和扫描器的 User-Agent 进行指纹识别 |
| Telnet | 用户名 + 密码 | 交互式登录提示(最多尝试 5 次) |
| SSH | 客户端版本字符串 | `SSH-2.0-OpenSSH_7.4p1 Debian-10` |
| FTP | 用户名 + 密码 | `USER admin` / `PASS password` (RFC 959) |
## 环境要求
### 硬件
- **ESP32-S3** DevKit(任何具有 ≥ 4 MB Flash 的开发板)
- 用于烧录的 USB 数据线
- 2.4 GHz Wi-Fi 网络
### 软件
| 组件 | 版本 |
|-----------|---------|
| [ESP-IDF](https://docs.espressif.com/projects/esp-idf/en/stable/esp32s3/) | **v5.2+** |
| Python | 3.8+ |
| CMake | 3.16+ |
## 安装 ESP-IDF
### macOS / Linux
```
git clone --recursive https://github.com/espressif/esp-idf.git ~/esp/esp-idf
cd ~/esp/esp-idf
git checkout v5.2.1
./install.sh esp32s3
. ./export.sh
```
### Windows
下载并运行 [ESP-IDF Windows 安装程序](https://dl.espressif.com/dl/esp-idf/)。
## 配置
```
# 复制配置模板
cp main/config.h.example main/config.h
# 根据你的设置进行编辑
nano main/config.h
```
所有参数都存放在 **同一个文件** 中 —— `main/config.h`:
```
// Network identity (what shows up in the router's device list)
#define DEVICE_HOSTNAME "Hikvision-NVR"
// Wi-Fi
#define WIFI_SSID "YourWiFiSSID"
#define WIFI_PASSWORD "YourWiFiPassword"
// Telegram (get it from @BotFather)
#define TELEGRAM_BOT_TOKEN "YOUR_BOT_TOKEN"
#define TELEGRAM_CHAT_ID "YOUR_CHAT_ID"
// Admin panel → http://:9999
#define ADMIN_PASSWORD "changeme1"
#define ADMIN_PORT 9999
// Honeypot ports
#define RTSP_PORT 554
#define HTTP_PORT 80
#define TELNET_PORT 23
#define SSH_PORT 22
#define FTP_PORT 21
```
### 获取 Telegram Bot Token
1. 向 [@BotFather](https://t.me/BotFather) 发送 `/newbot`
2. 复制返回的 token 到 `TELEGRAM_BOT_TOKEN`
3. 向你的 bot 发送任意消息,然后打开:
`https://api.telegram.org/bot/getUpdates`
4. 找到 `"chat":{"id":...}` —— 这就是你的 `TELEGRAM_CHAT_ID`
## 编译与烧录
```
# 1. Clone the repository
git clone https://github.com/Rdx1S/ShadowSentryS3.git
cd ShadowSentryS3
# 2. 激活 ESP-IDF
. ~/esp/esp-idf/export.sh
# 3. 复制并填写 config
cp main/config.h.example main/config.h
nano main/config.h
# 4. Build 和 flash(将 /dev/ttyUSB0 替换为你的端口)
idf.py -p /dev/ttyUSB0 flash monitor
```
### 查找端口
| 操作系统 | 命令 |
|----|---------|
| Linux | `ls /dev/ttyUSB*` 或 `ls /dev/ttyACM*` |
| macOS | `ls /dev/cu.usb*` |
| Windows | 设备管理器 → 端口 (COM 和 LPT) |
## 首次启动
烧录后,监视器会显示:
```
I (426) MAIN: ╔══════════════════════════════════════╗
I (428) MAIN: ║ ShadowSentry S3 v1.0 ║
I (434) MAIN: ║ Edge Deception HoneyPot ║
I (439) MAIN: ║ ESP32-S3 | ESP-IDF v5.x ║
I (444) MAIN: ╚══════════════════════════════════════╝
I (1827) WIFI: IP acquired: 192.168.1.105
I (1830) WIFI: Admin panel → http://192.168.1.105:9999
I (1842) WIFI: mDNS started → http://hikvision-nvr.local:9999
I (1904) RTSP: Honeypot listening on port 554
I (1910) HTTP: Honeypot listening on port 80
I (1916) TELNET: Honeypot listening on port 23
I (1924) SSH: Honeypot listening on port 22
I (1930) FTP: Honeypot listening on port 21
I (1938) ADMIN: Admin panel on port 9999
```
打开浏览器 → `http://192.168.1.105:9999`
登录:`admin` / `ADMIN_PASSWORD` 中设置的密码。
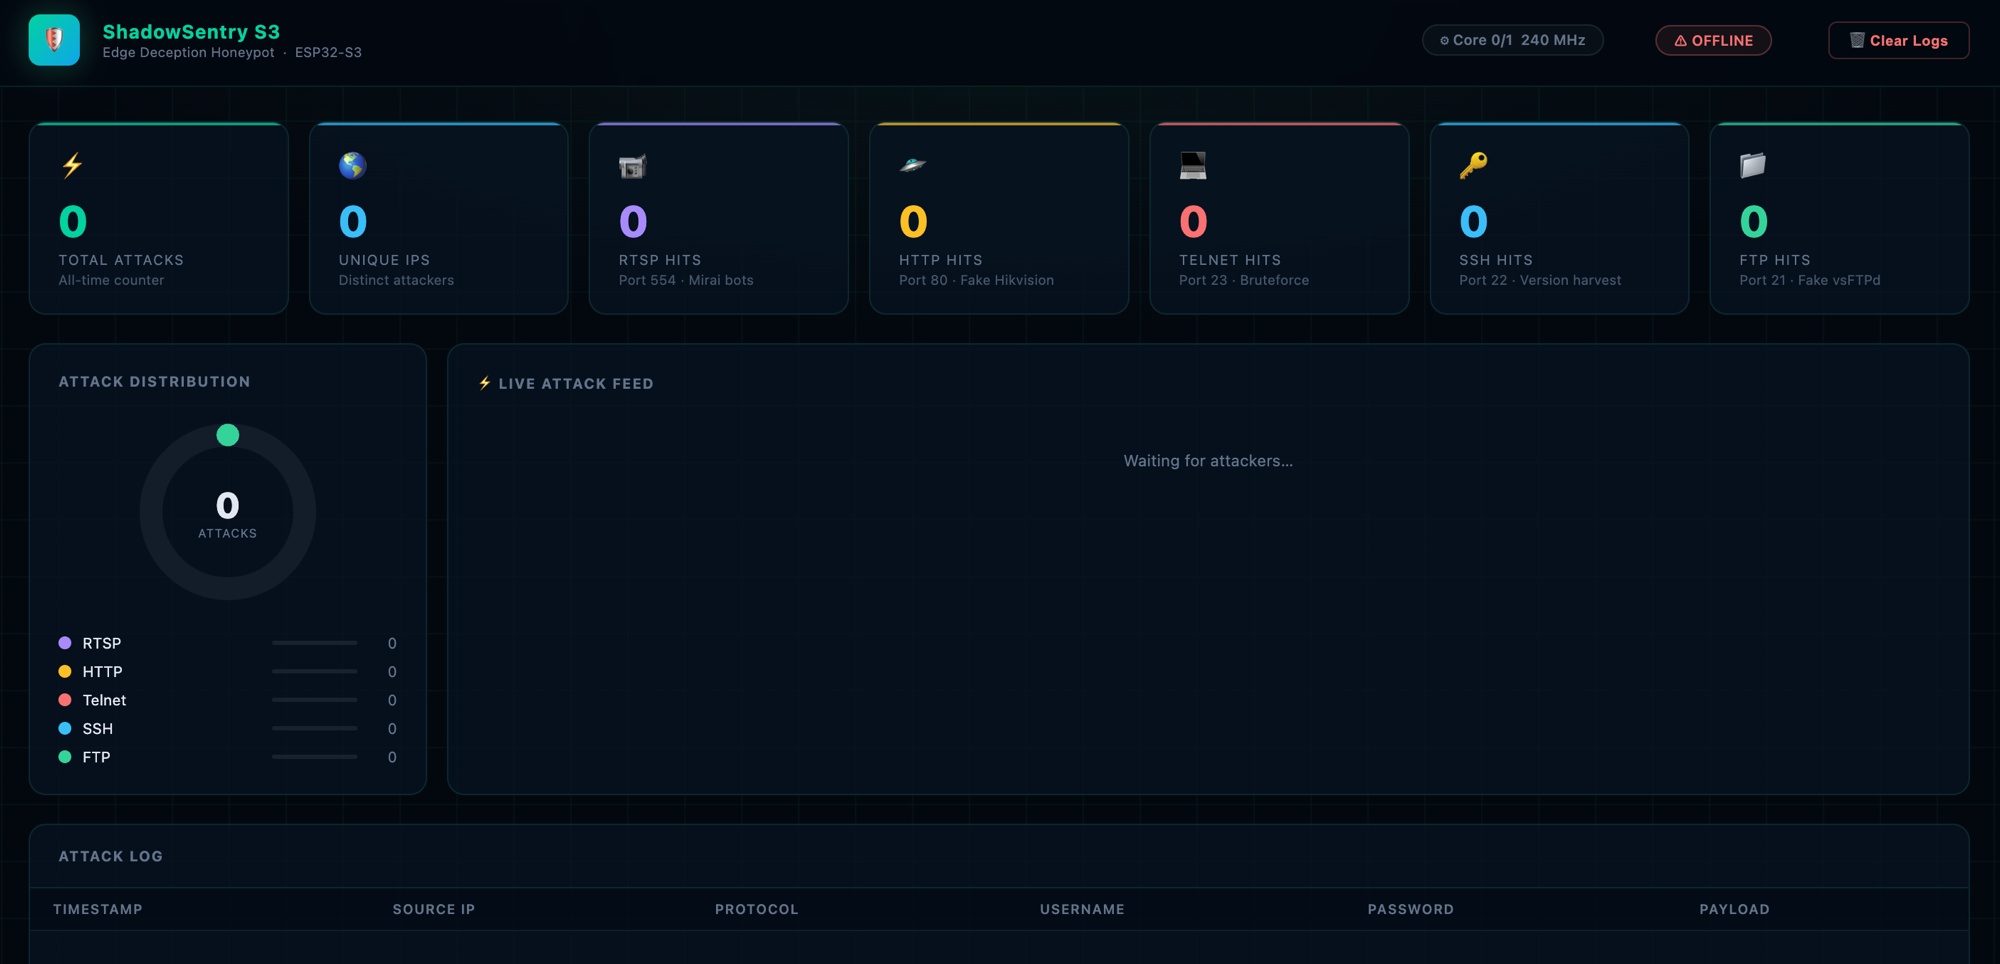
## 管理面板
这是一个每 10 秒自动刷新一次的深色模式 Web 界面:
- **6 个统计卡片** — 总计、独立 IP、RTSP、HTTP、Telnet、SSH、FTP
- **环形图** — 实时按协议划分攻击比例
- **攻击表** — 时间戳、IP、**MAC + 厂商**、协议、捕获的凭证、payload
- **页脚** — 设备运行时间、可用堆内存、Wi-Fi 信号强度 (RSSI)
- **清除按钮** — 擦除 Flash 中的日志
### REST API
| 方法 | Endpoint | 描述 |
|--------|----------|-------------|
| `GET` | `/api/attacks` | 攻击日志 + 统计信息 (JSON) |
| `GET` | `/api/status` | 运行时间 / 堆内存 / RSSI (JSON) |
| `POST` | `/api/clear` | 清除日志 |
所有 endpoint 都受到 HTTP Basic Auth 保护(`admin` / `ADMIN_PASSWORD`)。
## 项目结构
```
ShadowSentryS3/
├── CMakeLists.txt ESP-IDF root build file
├── sdkconfig.defaults ESP32-S3 defaults (240 MHz, dual-core)
├── partitions.csv NVS(24KB) + App(3MB) + SPIFFS(1MB)
└── main/
├── config.h.example ← Configuration template (copy to config.h)
├── config.h ← Real settings (in .gitignore)
├── idf_component.yml Managed dependencies (espressif/mdns)
├── main.c Entry point, task distribution across cores
├── wifi_manager.c/h Wi-Fi STA, DHCP hostname, SNTP, mDNS
├── index.html Dashboard HTML (embedded into the firmware)
├── CMakeLists.txt
├── honeypot/ ── Core 0 — Hacker World ──────────────
│ ├── rtsp_trap.c/h Port 554, Fake Hikvision, Base64 creds
│ ├── http_trap.c/h Port 80, Fake NVR login page
│ ├── telnet_trap.c/h Port 23, Fake Ubuntu 20.04
│ ├── ssh_trap.c/h Port 22, Fake OpenSSH, client fingerprint
│ └── ftp_trap.c/h Port 21, Fake vsFTPd 3.0.5, full creds
├── admin/ ── Core 1 — Admin World ───────────────
│ ├── admin_panel.c/h Port 9999, HTTP Basic Auth, REST API
│ └── telegram.c/h Async FreeRTOS queue → Telegram Bot API
└── storage/
└── log_store.c/h RAM ring buffer (200 entries) + SPIFFS
```
## 如何检测攻击
任何合法的家庭网络设备(笔记本电脑、手机、智能电视)**绝不会**连接到 ESP32 开发板上的 554、80、23、22 或 21 端口。
典型检测场景:
| 威胁 | 行为 | 检测时间 |
|--------|-----------|----------------|
| Mirai / Mozi 僵尸网络 | 暴力破解 RTSP/Telnet/FTP | < 5 秒 |
| 勒索软件横向移动 | 子网扫描 | < 5 秒 |
| SSH 扫描器 | 22 端口上的版本指纹识别 | < 1 秒 |
| Web 扫描器 | 80 端口上的 GET / | < 1 秒 |
| 手动扫描 (nmap) | 任意端口上的 SYN | < 1 秒 |
## ESP-IDF 依赖项
所有组件均随 ESP-IDF 提供 —— 无需单独安装:
- `lwIP` — TCP/IP 协议栈,raw sockets
- `FreeRTOS` — 多任务处理,队列
- `esp_http_client` — Telegram Bot API
- `mbedTLS` — 用于 Basic Auth 的 Base64 解码
- `SPIFFS` — Flash 文件系统
- `esp_netif_sntp` — 时间同步
其中一个组件由组件管理器自动获取(在 `main/idf_component.yml` 中声明,在首次构建时下载):
- `espressif/mdns` — `.local` 域名解析(通过域名访问管理面板)
## 故障排除
**无法连接到 Wi-Fi**
```
ESP32-S3 supports 2.4 GHz only. Check the SSID/password in config.h.
```
**`idf.py: command not found`**
```
. ~/esp/esp-idf/export.sh
```
**/dev/ttyUSB0 权限拒绝 (Linux)**
```
sudo usermod -a -G dialout $USER
# 登出并重新登录
```
**`SPIFFS: mount failed` 错误**
```
idf.py -p /dev/ttyUSB0 erase-flash
idf.py -p /dev/ttyUSB0 flash
```
**Telegram 不发送告警**
```
Make sure the bot isn't blocked and you sent it /start.
TELEGRAM_CHAT_ID is a number (can be negative for groups).
```
## 许可证
MIT — 自由使用、修改和分发。
标签:ESP32, ESP-IDF, 威胁情报, 客户端加密, 嵌入式系统, 开发者工具, 插件系统, 物联网, 网络测绘, 蜜罐, 证书利用