
# agentgg
**Agentic SAST. 白盒测试。适配 CI。**
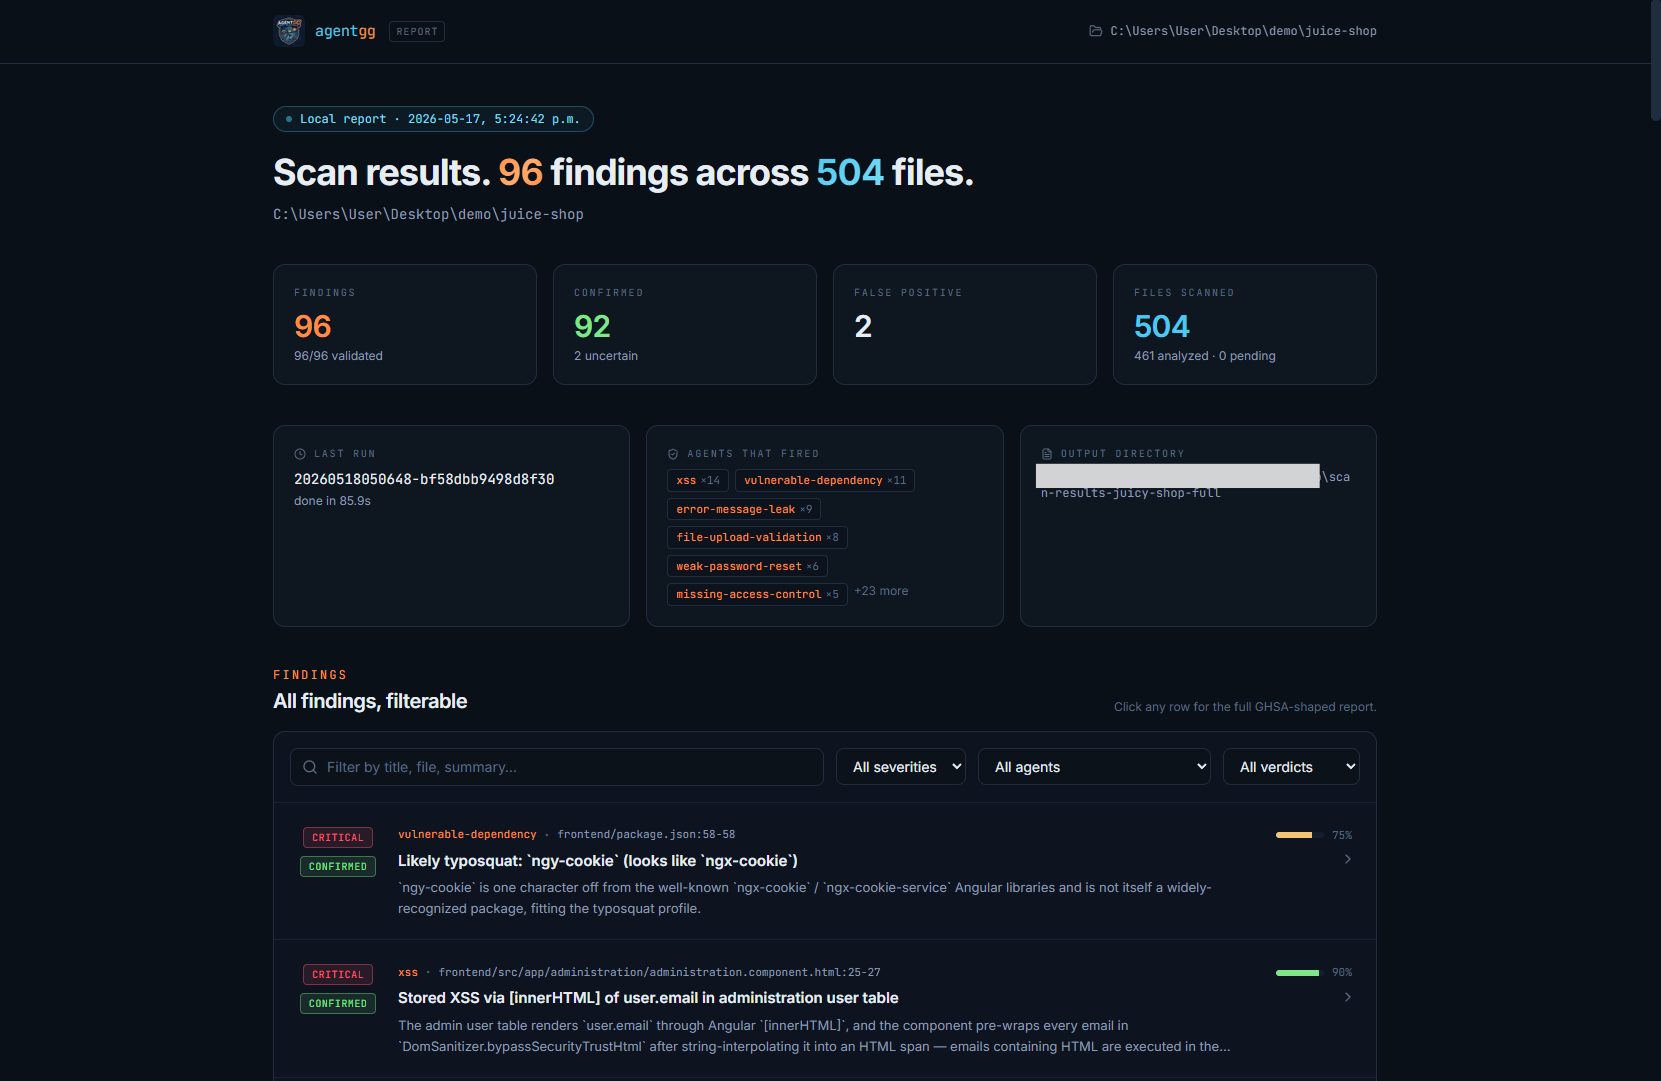
`agentgg` 是一款 Agentic SAST 扫描器。它的 agent 能够对你的代码进行推理——它们会跟踪 import,检查 call graph,并在标记之前确认发现的问题,而不是像传统 SAST 那样进行模式匹配。目录会在首次扫描时从 [agentgg-dev/agentgg-agents](https://github.com/agentgg-dev/agentgg-agents) 自动下载。你可以对整个代码库或 git diff 运行以进行 PR 审查。每个 agent 都是一个启用了工具的调查过程(Read/Glob/Grep),它会声明**在哪里**查看(文件类型、路径、内容 regex)以及一个可选的**前置条件**,用于决定是否值得在此代码库上运行。每次扫描都以快速的 **recon** 阶段开始,为 agent 提供项目概况。中断的扫描可以在重新运行时恢复:已完成的 agent 会被跳过,只有新的或变更的工作才会再次发送给 LLM。过往的安全事件可以通过 `agentgg create` 成为新的检测器,该命令会将安全报告提炼成一个可复用、适配于代码库的 agent。
**[agentgg.dev](https://agentgg.dev)** · [Agents 目录](https://github.com/agentgg-dev/agentgg-agents) · [报告 Bug](https://github.com/agentgg-dev/agentgg/issues/new/choose) · [报告安全问题](https://github.com/agentgg-dev/agentgg/security)
## 目录
- [安装](#install)
- [快速开始](#quick-start)
- [扫描运行机制](#how-a-scan-runs)
- [Agent 模板](#agent-templates)
- [从过往报告编写 Agent](#authoring-agents-from-past-reports)
- [提供商](#providers)
- [示例](#examples)
- [GitHub Actions](#github-actions)
- [报告格式](#report-format)
- [命令](#commands)
- [扫描参数参考](#scan-flag-reference)
- [许可证](#license)
## 安装
```
npm install -g agentgg
```
从源码安装:
```
git clone https://github.com/agentgg-dev/agentgg
cd agentgg
pnpm install
pnpm --filter agentgg build:bundle
cd packages/cli && pnpm link --global # exposes the `agentgg` command (run `pnpm setup` once if it has no global bin dir)
```
全局命令是指向 `packages/cli` 的链接,因此后续的 `pnpm --filter agentgg build` 会自动生效——无需重新链接。
要求 Node.js 20+ 和 pnpm 9+。有关开发工作流,请参阅 [CONTRIBUTING.md](https://github.com/agentgg-dev/agentgg/blob/main/CONTRIBUTING.md)。
## 快速开始
```
agentgg init # one-time: pick a provider, paste a key
agentgg scan ./src -o ./out # scan everything (validate/score/dedup on by default)
agentgg scan ./src --diff origin/main...HEAD -o ./out # PR-style: scan only what changed
agentgg status ./out # what got found / validated / when
agentgg view ./out # browse findings in a local web UI
agentgg scan ./src --serve -o ./out # scan, then boot the UI when done
```
扫描结果会存放在 `./out/` 目录下:
```
out/
├── summary.md ← human report
├── findings/... ← one .md per finding (GHSA-shaped)
└── state/ ← what `status` and `revalidate` read
├── scan.json ← root path + timestamps
├── recon.json ← the recon brief (phase 1)
├── plan.json ← which agents queued / skipped + why (phase 2)
├── runs/
.json ← one per scan / recon / revalidate / score / summary
├── agents/.json← per-agent resume sidecar
└── files/.json ← FileRecord per scanned source file
```
`state/` 目录是实现恢复、状态查看和重新验证功能的关键。使用相同的 `-o` 参数重新运行 `scan` 会跳过未发生更改的文件。使用不同的 `-o` 则表示进行全新的扫描。
## 扫描运行机制
一次扫描分为三个阶段,每个阶段都会在 `state/` 目录下写入一个持久化的产物,以便检查各个步骤(并可在日后用于分发):
1. **Recon** —— 快速且启用工具的调查会运行一次,并将简洁的项目简报写入 `state/recon.json`:包含项目是什么、使用的语言、框架、身份验证模型以及集成情况。该简报会被输入到后续阶段,以便 agent 在开始时就对项目有清晰的认知。此阶段会在多次运行间缓存;使用 `--re-recon` 可强制刷新。
2. **前置条件** —— 在**任何 agent 运行之前**,系统会检查每个选定的 agent,以决定是否值得在*当前*代码库上运行,并将排队/跳过的决定(及其原因)写入 `state/plan.json`。
3. **运行 → 验证 → 评分 → 去重 → 报告** —— 每个排队的 agent 会分批在其文件集上运行;随后,可选的验证、评分和去重步骤会对发现的问题进行分类、评级和聚类;最后生成 `summary.md` 和 `findings/*.md`。去重是最后的汇总步骤:它会将不同 agent 发现的、具有相同根本原因的问题按源文件进行分组,并将它们折叠到一个主要问题下,从而在报告中合并显示。
中断的扫描可以恢复:在重新运行时会跳过已完成的 agent(其发现结果会直接从磁盘读取);只有新的或发生更改的工作才会再次调用 LLM。更改范围(`--diff`、`--exclude` 等)或 recon 简报会导致受影响的 agent 失效并重新运行。
**Recon 和计划是被复用的,而不仅仅是恢复。** 当现有的 `state/recon.json` 已经涵盖了该项目(相同的根目录 + 技术栈指纹)时,将跳过调查;当匹配的 `state/plan.json` 已经涵盖了你的 `-t` 选择时,前置条件循环也会被跳过——扫描只会运行计划中已经排队的 agent。`--re-recon` 会强制重新计算这两者。
**各个阶段也可以独立运行**,它们都在同一个 `--output` 目录下操作:
- `agentgg recon -o ` 仅运行阶段 1–2(写入 `recon.json` 和 `plan.json`,不进行检测)——这是一次对扫描运行内容的低成本预览,也是一个持久的计划→执行交接过程。
- `agentgg revalidate ` / `agentgg score ` / `agentgg dedup ` / `agentgg summary ` 会在已经持久化的发现结果上运行验证 / 评分 / 去重 / 报告步骤。
此外,在执行 `scan` 时也可以内联跳过这两个阶段:
- `--no-recon` 会跳过调查**和**前置条件循环,无条件地运行每一个 `-t` 指定的 agent,且不提供项目简报。
- `--no-summary` 会跳过报告渲染(发现结果仍会持久化到 `state/files/*` 中);以后可以通过 `agentgg summary` 进行渲染。`revalidate` 和 `score` 也接受 `--no-summary` 参数,因此你可以将报告推迟到最后的单一显式渲染步骤中。
## Agent 模板
每个 agent 都是同一种形式——一个 markdown 文件(包含 YAML frontmatter 和 prompt 主体),由三部分组成:**前置条件**、**位置(where)**和**指令**。系统没有执行模式的概念。
```
---
slug: sql-injection
name: SQL Injection
description: SQL built from untrusted input instead of parameterized queries.
noiseTier: normal
precondition: # 1. should this agent run on THIS repo?
regex:
patterns:
- regex: "\\.(query|execute)\\s*\\("
in: ["**/*.{ts,js,py,go,php}"]
# prompt: "Run only if this project talks to a SQL database." # optional LLM gate
where: # 2. which files to run on
extensions: [ts, js, py, go, php]
excludePatterns: ["**/*.{test,spec}.*"]
preFilter: # narrow to files containing a match (regex)
- { regex: "\\.(query|execute)\\s*\\(", label: "raw SQL call" }
references: [CWE-89]
---
You are reviewing source for SQL injection. ... # 3. the instructions
```
**前置条件**(可选)用于决定是否将该 agent 加入队列。`regex` 是一种无需 LLM 的低成本文件系统检查——可以检查文件 `extensions`、哨兵 `files`、`directories` 或内容 `patterns`。`prompt` 是一次性的 LLM 检查,它能够读取 recon 简报。如果两者同时存在,则表示“与”逻辑;如果省略,则表示始终运行。(这取代了以前按技术栈划分的技术门槛:PHP agent 只需将 `.php` 文件是否存在作为前置条件,因此它会在仅包含 Go 代码的代码库中自动跳过。)
**位置(where)**是指 agent 运行的文件集。使用普通的 `extensions`(类似 nuclei 的风格——`ts`、`php`),加上可选的 `filePatterns`/`excludePatterns` 用于复杂的包含/排除规则(globs,或者单纯的目录/文件路径——指定目录将匹配其下的所有内容),以及 `preFilter` regex 用于缩小范围至包含匹配项的文件(并将这些行作为锚点提供给模型)。如果 `where` 为空,则表示所有文件。匹配到的文件会按 `maxFilesPerBatch`(默认为 5)指定的批次大小进行审查。
**指令**就是 prompt 的主体。每个 agent 都启用了工具功能(Read/Glob/Grep),因此即使它最初是基于特定文件的,它也可以跟踪 import 并将调用者引入其他文件中以确认发现。
模板可以存放在**官方目录**中(`~/.agentgg/agentgg-agents/`;通过 `agentgg agents update` 刷新),可以由**用户自行安装**(`agentgg agents add ./my-agent.md`),或者通过 `-t` 参数**在每次扫描时单独指定**——可以是 slug、`.md` 文件、包含 `.md` 文件的目录,或者是 `.txt` 列表文件。
## 从过往报告编写 Agent
`agentgg create` 可以将过往的安全报告(内部事后总结、GHSA、CVE 分析文章)转化为一个专门针对**当前**代码库定制的可复用 agent。一个启用工具的 LLM 会话会阅读报告,探索代码库以确认该问题在代码中是如何体现的,并生成一个能够在类似反模式再次出现时捕获它的 agent。其目的不是为了重新找到过去的具体 bug——因为那已经被修复了——而是为了捕获未来由其他开发者在不同文件中重新引入的同类问题。
```
agentgg create -c ./src -r ./incidents/2024-q3-sqli.md -o ./generated-agents
```
`--report` 接受与 `-t` 相同的格式输入:单个 `.md` / `.txt` 文件、包含这些文件的目录,或者是一个包含路径列表的 `.txt` 文件。每份报告都会生成一个 agent 文件,命名为 `-.md`(该 hash 值由代码根目录 + 报告路径 + 报告内容计算得出,因此重复运行是幂等的,并且不会在不同报告之间发生冲突)。
```
# 一次性提炼事件报告目录
agentgg create -c ./src -r ./incidents/ -o ./generated-agents
# 使用一次性 model 和 provider 而不保存凭据
agentgg create -c ./src -r ./incidents/2024-q3-sqli.md -o ./out \
--provider anthropic --api-key $ANTHROPIC_API_KEY
```
生成的 agent 仅会被放入 `--output` 目录——它们不会被自动安装。你可以先检查它们,然后通过 `agentgg agents add ./generated-agents` 进行安装。安装后,它们就会出现在 `agentgg agents list` 列表以及随后的每次扫描中。
## 提供商
`agentgg init` 会将凭据写入 `~/.agentgg/config.json`。扫描状态是按输出目录划分的,与此文件无关。
| 提供商 | 凭据 |
|---|---|
| **Anthropic** | API key (`sk-ant-api...`) 或 OAuth (`sk-ant-oat...`, Claude Pro/Max) |
| **OpenAI** | API key |
| **Ollama** | 本地 URL |
| **AWS Bedrock** | AWS 凭据(环境变量 / `~/.aws/credentials` / IAM role) |
| **Google Vertex AI (Model Garden)** | Google ADC (`gcloud auth application-default login` / `GOOGLE_APPLICATION_CREDENTIALS` / GCE/Cloud Run service account) + GCP project ID |
每个 agent 都是多步骤且使用工具的(Read/Glob/Grep),因此发现质量与模型质量成正比。
### AWS Bedrock
`agentgg init --provider bedrock --region us-east-1` 会引导你完成设置。agentgg 会自动获取你现有的 AWS 凭据。任何适用于 AWS CLI 的方式(环境变量、`aws configure`、SSO、IAM role)在这里同样适用。
有两点需要注意:
- **较新的 Claude 模型需要使用推理配置文件。** 默认使用美国配置文件(`us.anthropic.*`);欧洲/亚太地区则使用 `eu.*` / `apac.*`。可以在初始化时进行覆盖。
- **Bedrock 没有免费额度。** 在扫描大型代码库之前,请务必设置 CloudWatch 账单警报。
### Google Vertex AI (Model Garden)
`agentgg init --provider vertex --project my-gcp-project` 会引导你完成设置。agentgg 使用 Google 的[应用默认凭据](https://cloud.google.com/docs/authentication/application-default-credentials)——任何适用于 `gcloud` 的方式(`gcloud auth application-default login`、`GOOGLE_APPLICATION_CREDENTIALS`、GCE/Cloud Run service account)在这里同样适用。不需要 API key。
默认模型为 `zai-org/glm-5-maas`(GLM-5 托管版,兼容 OpenAI)。`init` 向导也提供了 Llama 4 Scout 和 Maverick 选项;你可以通过 `--model ` 使用任何其他可通过 OpenAI 兼容端点访问的 Model Garden MaaS 模型。价格和配额由 Vertex AI Model Garden 管理,而非 agentgg。
注意事项:
- **首次扫描前,请在你的 GCP 项目中启用特定的 Model Garden 发布商模型**(每一个都需要单独开通),并为调用身份授予 `roles/aiplatform.user` 角色。同时,必须启用 `aiplatform.googleapis.com`:`gcloud services enable aiplatform.googleapis.com`。
- **传递与模型匹配的 `--region `。** 每个 Vertex MaaS 模型都发布在特定的区域池中(请在 GCP 控制台查看该模型的 Model Garden 页面了解详情)。默认为 `global`。`init` 向导会为精选模型建议正确的区域。
## 示例
### 选择要运行的 agent
运行默认的 agent 集合(`~/.agentgg/agentgg-agents/base/`):
```
agentgg scan ./src -o ./out
```
每次扫描都会进行 LLM 调用;成本随“文件数 × agent 数量 × 阶段数”的增加而增加。影响成本的最大因素在于控制扫描范围(`--diff`、`--only`、`--exclude`、`--auto-exclude`、`--max-file-size`、`--max-files-per-agent`、`--max-batches`)以及选择运行的 agent(`-t`)。Ollama 支持本地免费运行。`--concurrency` 控制的是并行度,而不是总成本。
运行单个 slug:
```
agentgg scan ./src -t sql-injection -o ./out
```
运行多个 slug在同一个 `-t` 中用逗号分隔:
```
agentgg scan ./src -t sql-injection,hardcoded-secrets,command-injection -o ./out
```
指定磁盘上的自定义 `.md` agent 文件:
```
agentgg scan ./src -t ./my-agents/path-traversal.md -o ./out
```
使用 `.txt` 列表文件(每行一个 slug 或路径):
```
agentgg scan ./src -t ./agents.txt -o ./out
```
### 验证
验证阶段是针对每个发现进行的第二轮 LLM 调用,它会重新阅读源代码,并将其分类为 `confirmed`(已确认)/ `false-positive`(误报)/ `out-of-scope`(超出范围)/ `uncertain`(不确定)。**默认开启**。如果只想运行检测步骤,可以将其关闭:
```
agentgg scan ./src -t sql-injection --no-validate -o ./out
```
每个发现在其 markdown 文件中都会有一个 `validation` 部分,并在 `summary.md` 中显示判定结果统计。
### 范围:根据信任边界过滤发现结果
在验证期间,系统会根据**范围文档**检查发现结果——该文档包含了用于决定某个缺陷是否真正可被利用的信任边界规则。系统会自动应用内置的默认范围,因此 `out-of-scope`(超出范围)是一个开箱即用的有效判定结果:
```
agentgg scan ./src -o ./out # validation + built-in default scope, both on by default
```
你可以使用自定义策略(任意文本文件:安全策略、审计范围文档、内部笔记)来覆盖它,或者完全关闭范围过滤:
```
agentgg scan ./src --scope ./scope.md -o ./out # your scope instead of the default
agentgg scan ./src --no-scope -o ./out # no scope filtering at all
```
范围仅在执行验证时起作用。由于验证默认开启,默认范围也会应用于普通的 `scan` 以及任何 `revalidate`(它始终会进行验证)。仅检测运行(`--no-validate`)则永远不会参考该范围。
### 评分
CVSS 3.1 评分阶段会为每个发现结果赋予一个严重程度。在 `scan` 期间**默认开启**;可以通过 `--no-score` 关闭,或者之后再运行 `agentgg score ./out`。
```
agentgg scan ./src -o ./out # scoring on by default
agentgg scan ./src --no-score -o ./out # skip scoring
```
### 仅重新运行验证阶段
先进行检测,之后再进行验证(或者使用不同的模型 / 范围):
```
agentgg scan ./src -t sql-injection -o ./out # detect only
agentgg revalidate ./out # validate pending (uses the default scope)
agentgg revalidate ./out --scope ./scope.md # re-classify with your scope
agentgg revalidate ./out --no-scope # re-classify with no scope filtering
agentgg revalidate ./out --force # re-classify everything (already-validated too)
```
### 先规划,后执行
单独运行 recon + 前置条件规划,以预览扫描将要执行的操作。简报和计划会被写入 `--output`,随后的 `scan` 会复用这两者——无需进行第二次调查,也无需进行第二次前置条件检查:
```
agentgg recon ./src -t base -o ./out # phase 1–2 only: writes recon.json + plan.json
agentgg scan ./src -t base -o ./out # reuses the brief + plan, runs the queued agents
```
`recon` 会运行与 `scan` 相同的默认 `--auto-exclude` 步骤(并将选定的 globs 记录在 `plan.json` 中),因此预览能真实反映扫描将会跳过的内容。传入 `--no-auto-exclude` 可以规划整个文件树。
若要完全跳过 recon 和门槛检查,并准确运行你传入的 agent(无项目简报,无前置条件过滤):
```
agentgg scan ./src -t sql-injection --no-recon -o ./out
```
### 将报告推迟到最后执行
`scan` / `revalidate` / `score` 中的每一个在完成时都会重新渲染 `summary.md`。传入 `--no-summary` 可以跳过这些中间渲染过程,并在最后只显式生成一次报告:
```
agentgg scan ./src -t base -o ./out --no-summary
agentgg revalidate ./out --no-summary
agentgg score ./out --no-summary
agentgg summary ./out # render summary.md + findings/*.md once
```
无论如何,发现结果都会持久化到 `state/files/*` 中,因此 `agentgg summary` 可以随时重建报告。
### 强制全新运行
恢复是自动进行的。若要绕过缓存:
```
agentgg scan ./src -t sql-injection -o ./out --rescan # re-analyze every file
agentgg scan ./src -t sql-injection --validate --revalidate-all -o ./out
```
### 仅扫描更改的内容
`--diff ` 会将扫描范围限定在特定的变更集中。它接受任何 git 支持的参数(单纯的引用或范围),其中的点号决定了具体的含义:
| 形式 | 含义 | 适用场景 |
|---|---|---|
| `--diff ` | 该提交自身的更改(父提交 → 该提交) | 审查单个提交 |
| `--diff a..b` | 两个引用之间的端到端差异 | 你想要获取字面上的差异,即使 `a` 已经发生了更新 |
| `--diff a...b` | `a` 和 `b` 的合并基点 → `b` | 审查 PR(与 GitHub 的“Files changed”选项卡相匹配) |
agent 在 `--diff` 下的行为:
- 每个 agent 的候选文件列表会**与变更文件集取交集**,因此未更改的文件不会产生任何 LLM 调用成本。
- 提交信息 + 补丁会被**作为焦点提示注入到 agent 的 prompt 中**。工具的使用不受限制,因此 agent 可以向外追踪调用者和 import 以获取上下文。
```
# 仅审查最新的 commit
agentgg scan ./src --diff HEAD -o ./out
# 针对 main 进行 PR review(三点比较,推荐)
git fetch origin main
agentgg scan ./src --diff origin/main...HEAD -o ./out
# 审查他人的 PR
git fetch origin pull/123/head:pr-123
git checkout pr-123
agentgg scan ./src --diff origin/main...HEAD -o ./out
# 与 template 结合使用
agentgg scan ./src -t sql-injection --diff origin/main...HEAD -o ./out
```
`--diff` 的值是每个 agent 恢复范围的一部分。更改该值(或者进行变基导致合并基点移动)会使恢复失效并重新运行 agent。
大于 64 MB 的补丁(通常是外部依赖代码或生成的文件提交)将被拒绝。请缩小扫描范围或手动审查它们。
### 检查扫描状态
```
agentgg status ./out # human-readable
agentgg status ./out --json # machine-readable
```
输出内容包括:扫描的根目录、文件数量统计(已分析 / 已验证 / 待处理)、总的发现数量、判定结果分布以及最近的运行记录。
```
agentgg status ./out
# 扫描状态:/path/to/out
# 根目录: /path/to/src
# 已追踪文件: 37
# # 状态
# 已分析: 30
# 已验证: 30
# 待处理: 7
# # 发现
# 总计: 12
# 已验证: 12/12
# 判定: confirmed=8, false-positive=4
# # 最近运行(共 3 次)
# 20260514001435-4e8b5e55 scan done 88.2s files: 37 findings: 12
# ...
```
### 限制扫描内容
覆盖默认的 glob 排除规则 / 限制在特定路径:
```
agentgg scan ./src --exclude "**/migrations/**" --exclude "vendor/**" -o ./out
agentgg scan ./src --only "src/api/**/*.ts" --only "src/handlers/**/*.ts" -o ./out
agentgg scan ./src --max-file-size 200 -o ./out # skip files larger than 200 KB (default 500)
agentgg scan ./src --max-files-per-agent 30 -o ./out # each agent reviews at most 30 files (default 300)
agentgg scan ./src --max-batches 50 -o ./out # run at most 50 agent batches this scan (default 250)
agentgg scan ./src --no-max-files-per-agent --no-max-batches --no-max-file-size -o ./out # disable every cap (fully uncapped)
```
默认情况下,扫描会跳过一组内置的排除项目——lockfile、压缩 bundle、二进制资源、`node_modules`、`dist`、`.git` 以及扫描结果目录。传入 `--no-default-excludes` 可扫描所有内容,或者也可以在单个 agent 上设置 `where.useDefaultExcludes: false`。CLI 的 `--exclude` 路径始终被视为已删除(对所有 agent 不可见)。
自动排除(**默认开启**;可通过 `--no-auto-exclude` 禁用)允许模型在扫描开始前挑选要跳过的额外非运行时文件夹——包括测试、fixtures、文档、生成的输出以及外部依赖目录。它会在 recon 之前对目录结构进行一次低成本的扫描,因此 recon 和每个 agent 都会继承其结果。它的选择总是会被记录下来(在 `--verbose` 模式下会提供每个文件夹的原因),并与任何手动指定的 `--exclude` 路径结合使用;它只会排除文件夹,绝不会将它们添加回来。
`--max-files-per-agent` 是针对单个 agent 的上限(**默认为 300**):当 agent 的 `where` 解析出的候选文件数超过此限制时,它会审查(按遍历器的确定性扫描顺序)前 `` 个文件并丢弃其余部分,而不是直接跳过。这是一种保护机制,防止某个范围过于宽泛的 agent 在大型代码库上导致成本或时间失控。传入 `--no-max-files-per-agent` 可禁用此上限。它与 `--max-files-per-batch` 不同,后者仅设置打包到单个 LLM 会话中的文件数量。
`--max-batches` 是针对整个扫描过程中 agent 批次的上限(**默认为 250**)。一旦所有的 `(agent, batch)` 对被加入队列,池子就会被截断为 `` 个(按入队顺序),其余的会在任何 LLM 调用运行之前被丢弃。被丢弃批次的 agent 不会写入完成旁路文件,因此随后的扫描会从本次停止的地方继续——这是一种将大型扫描分摊到多次运行中,或者限制单次运行成本的方法。传入 `--no-max-batches` 可禁用此上限。它与 `--concurrency` 不同,后者限制的是并行运行的批次数,而不是总共运行的批次数。
`--max-file-size`(**默认为 500 KB**)会在任何 agent 看到文件之前跳过大于此限制的文件。传入 `--no-max-file-size` 可扫描任意大小的文件。
### 使用一次性凭据或模型而不保存
适用于凭据来自 Secrets 而非已保存配置的 CI 运行场景。
```
agentgg scan ./src \
--provider anthropic \
--api-key $ANTHROPIC_API_KEY \
--model claude-opus-4-7 \
-o ./out
```
`--api-key`、`--oauth-token`、`--base-url`、`--region`、`--project` 和 `--model` 都可作为一次性覆盖参数。每个参数都限定在其对应的提供商范围内;如果传入的参数不适用(例如在 `--provider openai` 时使用 `--region`),将会触发严重错误,而不是被静默忽略。
### 管理 agent
```
agentgg agents list # table of built-ins + custom
agentgg agents list --json # machine-readable
agentgg agents info sql-injection # show prompt + frontmatter
agentgg agents add ./my-agent.md # install into ~/.agentgg/agents/custom/
agentgg agents add ./agents-dir/ # install every .md in a dir
agentgg agents remove my-agent # uninstall by slug
agentgg agents lint # lint installed official tree
agentgg agents lint ./agentgg-agents # lint an arbitrary tree (pre-commit-friendly)
```
## GitHub Actions
在每次 Pull Request 上运行 agentgg,并将范围限定于 diff:
```
# .github/workflows/agentgg.yml
name: agentgg PR review
on:
pull_request:
jobs:
scan:
runs-on: ubuntu-latest
steps:
- uses: actions/checkout@v4
with:
fetch-depth: 0 # required so --diff can compute the merge base
- uses: actions/setup-node@v4
with:
node-version: 20
- run: npm install -g agentgg
- run: |
agentgg scan . \
--diff ${{ github.event.pull_request.base.sha }}...${{ github.sha }} \
--validate \
-o ./scan-results
env:
ANTHROPIC_API_KEY: ${{ secrets.ANTHROPIC_API_KEY }}
- uses: actions/upload-artifact@v4
if: always()
with:
name: agentgg-findings
path: ./scan-results
```
将你的提供商凭据存储为仓库 Secret(`Settings → Secrets and variables → Actions`)。示例中使用了 Anthropic。若要使用 OpenAI,请将 `ANTHROPIC_API_KEY` 替换为 `OPENAI_API_KEY`(并添加 `--provider openai`);有关 Bedrock 的配置请参考 AWS Bedrock 部分;若要使用 Vertex AI,请配合 [google-github-actions/auth](https://github.com/google-github-actions/auth) 使用 `--provider vertex --project `。
扫描结果会存放在 `agentgg-findings` 工作流构件中供下载。若要在发现确认的问题时阻止合并,请解析 `./scan-results/summary.md`(或 `findings/` 目录下的每个结果文件),并在后续步骤中执行 `exit 1`。
## 报告格式
每个发现结果都是位于 `./out/findings/` 下的一个 markdown 文件,采用 GHSA 风格:
```
#
**Agent:** `sql-injection`
**Vuln class:** `sql-injection`
**File:** `src/login.ts`
**Lines:** 12–14
**Confidence:** 90%
**Severity:** High (CVSS 7.5)
**Validation:** `confirmed`
### 摘要
One sentence stating the issue + impact.
### 详情
Full analysis with code excerpts.
### PoC
Concrete reproduction (HTTP request, payload, command).
### 影响
Vulnerability class, who's affected, what an attacker gets.
### 验证
**Verdict:** `confirmed`
Short reasoning citing the unsafe code element.
### 参考
- CWE-89
```
`summary.md` 会进行汇总:包括每个 agent 的发现数量、验证判定结果分布,以及指向每个发现结果的链接。
## 命令
| 命令 | 功能说明 |
|---|---|
| `agentgg init` | 一次性设置向导。选择提供商(Anthropic / OpenAI / Ollama / Bedrock / Vertex)并粘贴凭据。重新运行可合并其他提供商,而不会覆盖原有配置。 |
| `agentgg recon <path>` | 仅运行阶段 1–2——即 recon 调查 + 前置条件规划——并将 `recon.json` 和 `plan.json` 写入 `--output`。不进行检测。这是一次针对扫描运行内容的低成本预览;在同一 `--output` 上进行的后续 `scan` 会复用该简报和计划。 |
| `agentgg scan <path>` | 运行安全扫描:recon → 前置条件门槛 → 运行队列中的 agent → 验证 → 评分 → 报告,并将发现结果和状态写入 `--output`。支持 `--diff` 用于 PR 审查,支持 `--validate` 进行二次分类(默认应用内置的信任边界范围——可通过 `--scope` 覆盖,或通过 `--no-scope` 禁用),支持 `--no-recon` 在无门槛的情况下运行每个 `-t` agent,以及 `--no-summary` 以推迟报告生成。复用缓存的 recon 简报和计划;默认支持恢复。 |
| `agentgg status [output-dir]` | 打印扫描输出目录的摘要:文件统计(已分析 / 已验证 / 待处理)、发现数量、验证判定结果、近期运行记录。传入 `--json` 可获取机器可读格式。 |
| `agentgg revalidate [output-dir]` | 针对已存在于磁盘上的发现结果重新运行验证阶段。完全跳过检测。适用于使用不同模型、范围进行验证,或在编辑了验证器 prompt 之后使用。`--no-summary` 可推迟报告渲染。 |
| `agentgg score [output-dir]` | 对已持久化的发现结果进行独立的 CVSS 3.1 评分。agent 会挑选 8 个基础指标;评分和严重性分级是确定性地计算得出的。`--no-summary` 可推迟报告渲染。 |
| `agentgg dedup [output-dir]` | 对磁盘上的发现结果进行去重:按源文件将跨 agent 的同根本原因发现进行分组,将它们折叠到一个主要结果下,并给其余结果打上 `dedup` 标记,以便在报告中折叠显示。传入 `--delete-duplicates` 可物理删除标记的重复项;`--no-summary` 可推迟报告渲染。 |
| `agentgg create` | 将过往的安全报告(`.md`/`.txt`、包含这些文件的目录或 `.txt` 列表文件)提炼成一个可复用的 `.md` agent,且专为该报告来源的代码库量身定制。独立运行:无 `state/` 目录,不支持扫描恢复。接受 `-c <code-path>`、`-r <report-path>`、`-o <output-dir>` 参数。每份报告生成一个 `<slug>-<hash>.md`;可通过 `agentgg agents add` 进行安装。 |
| `agentgg summary [output-dir]` | 根据持久化的发现结果渲染 `summary.md` 和 `findings/*.md`。不使用 LLM,不进行检测。可与 `scan/revalidate/score/dedup --no-summary` 配合使用,以便在最后一次性渲染报告。 |
| `agentgg view [output-dir]` | 在本地端口启动内置的 Next.js 查看器,以便在 Web UI 中浏览发现的结果。 |
| `agentgg agents list` | 列出已安装的 agent(官方 + 用户安装)。传入 `--json` 可获取机器可读格式。 |
| `agentgg agents info <slug>` | 打印 agent 的完整 frontmatter 和 prompt 主体。 |
| `agentgg agents add <file-or-dir>` | 将一个 agent(或目录中的所有 `.md` 文件)安装到 `~/.agentgg/agents/custom/`。 |
| `agentgg agents remove <slug>` | 通过 slug 卸自定义 agent。 |
| `agentgg agents update` | 从 [agentgg-agents](https://github.com/agentgg-dev/agentgg-agents) 仓库下载 / 刷新位于 `~/.agentgg/agentgg-agents/` 的官方目录。 |
| `agentgg agents lint [path]` | 检查 agent 树的 slug 唯一性、文件名与 slug 是否匹配、schema 有效性以及 regex 编译情况。适合在 pre-commit 中使用。 |
| `agentgg config` | 打印当前保存的配置。密钥将被隐藏显示。 |
运行 `agentgg <command> --help` 可获取任何子命令的完整参数列表。
## 扫描参数参考
```
-t, --template <value> slug, .md path, directory, or .txt list file;
comma- or whitespace-separated; repeatable
-o, --output <path> output directory (default ./scan-results/)
--validate / --no-validate second-pass validation phase per finding (on by default; --no-validate for a detection-only run)
--score / --no-score CVSS 3.1 scoring phase (on by default; --no-score to skip)
--scope <path> scope doc the validator consults for trust-boundary rules; overrides the built-in default (enables `out-of-scope`)
--no-scope disable the built-in default scope (skip trust-boundary filtering during validation)
--rescan re-analyze files even if a prior run covered them
--revalidate-all re-validate findings that already have a verdict
--diff <commit> scope scan to a commit or range; each agent's candidate files are intersected with the touched files and the patch is injected as a focus hint (accepts `<ref>`, `a..b`, or `a...b`)
--re-recon re-run the recon pass + precondition plan instead of reusing the cached brief/plan
--no-recon skip the recon survey AND precondition gating; run every -t agent unconditionally
--no-summary skip writing the markdown report (summary.md + findings/*.md); state still persists
--max-files-per-batch <n> candidate files per agent batch (overrides the agent's where.maxFilesPerBatch)
--max-files-per-agent <n> cap the candidate files each agent reviews — keep the first <n> in scan order, drop the rest (guardrail against an over-broad agent; default 300, --no-max-files-per-agent disables)
--no-max-files-per-agent disable the per-agent candidate-file cap (review every file)
--max-batches <n> cap the total agent batches run this scan — keep the first <n> in enqueue order, drop the rest (dropped agents re-run next scan; default 250, --no-max-batches disables)
--no-max-batches disable the whole-scan agent-batch cap (run every batch)
--concurrency <n> max LLM sessions in flight across the whole scan — agent batches, validation, and scoring all draw from one pool (default 5)
--dedup / --no-dedup final de-duplication pass that clusters same-root-cause findings per source file (on by default; --no-dedup to skip)
--delete-duplicates with dedup, physically remove duplicate findings instead of just marking them
--exclude <pattern> path/glob to exclude — treated as deleted (repeatable; additive)
--only <pattern> restrict scan to matching globs (repeatable)
--max-file-size <kb> skip files larger than this (default 500; --no-max-file-size disables)
--no-max-file-size don't skip large files (scan files of any size)
--no-default-excludes don't apply the built-in excludes (node_modules, .git, lockfiles, binaries)
--auto-exclude / --no-auto-exclude model picks non-runtime folders (tests, docs, generated, vendored) to skip up front (on by default; logged; --no-auto-exclude to disable)
--serve [port] boot the local web UI when the scan finishes (opt-in; default port 3737)
--provider <name> anthropic | openai | ollama | bedrock | vertex (overrides config default)
--api-key <key> one-shot API key for anthropic / openai (not persisted)
--oauth-token <token> one-shot Anthropic OAuth token (not persisted)
--base-url <url> one-shot Ollama base URL (not persisted)
--region <name> one-shot region: AWS region (Bedrock) or Vertex publisher region pool (e.g. global, us-central1)
--project <id> one-shot GCP project ID for Vertex AI (not persisted)
-v, --verbose verbose output
```
## 许可证
agentgg 采用 Apache License, Version 2.0 授权。有关完整文本,请参阅 [LICENSE](./LICENSE),有关归属声明,请参阅 [NOTICE](./NOTICE)。</div><div><strong>标签:</strong>C2, MITM代理, SAST, 代码安全, 暗色界面, 漏洞枚举, 盲注攻击, 自动化攻击, 错误基检测, 静态代码分析</div></article></div>
<!-- 人机验证 -->
<script>
(function () {
var base = (document.querySelector('base') && document.querySelector('base').getAttribute('href')) || '';
var path = base.replace(/\/?$/, '') + '/cap-wasm/cap_wasm.min.js';
window.CAP_CUSTOM_WASM_URL = new URL(path, window.location.href).href;
})();
</script>
</body>
</html>