
# reNgine v3 插件开发指南

reNgine v3 引入了模块化的插件架构,允许开发者在不修改核心代码库的情况下扩展平台的功能。插件可以添加后端 pipeline、Temporal workflow 以及完整的 UI 页面。
## 插件结构剖析
reNgine 插件是一个目录(打包为自定义签名的 ZIP [.r3n] 以便分发),其结构如下:
```
my-plugin/
├── manifest.yaml # Required — identity, pipeline hooks, UI config
├── tools.yaml # Optional — binary tool dependencies
├── my_engine.yaml # Optional — Django fixture for engine templates
├── backend/ # Optional — Django app (models, API, Temporal workflows)
│ ├── __init__.py
│ ├── models.py
│ ├── api.py
│ ├── api_urls.py # Registers routes at /api/plugins/{slug}/
│ ├── serializers.py
│ ├── migrations/
│ └── temporal_exports.py # Temporal workflow + activity definitions
└── ui/ # Optional — frontend UI source (Vite lib build)
├── package.json
├── vite.config.ts
├── tsconfig.json
└── src/
├── index.ts # Barrel — named exports of all page components
├── api/ # TanStack Query hooks
├── store/ # Zustand state
├── hooks/ # Custom React hooks (WebSocket, etc.)
├── components/ # Shared UI components
└── pages/ # Full page components
```
## 清单文件 (`manifest.yaml`)
`manifest.yaml` 是插件的唯一事实来源。
```
name: "My Plugin"
version: "1.0.0"
author: "Your Name"
icon: "icon.png"
description: "What this plugin does."
runtime:
run_after: "VulnerabilityScan" # Core scan step to run after options are run_before, run_after, standalone
temporal:
workflows:
- "backend.temporal_exports.my_workflow"
activities:
- "backend.temporal_exports.my_activity"
- "backend.temporal_exports.another_activity"
ui:
menu_item: "My Plugin" # Label in the "Plugins" nav group
menu_path: "/my-plugin" # Sub-path under /{projectSlug}/
entry_export: "MyPluginExport"
```
### 序列锚点
```
SubdomainDiscovery | PortScan | FetchURL | VulnerabilityScan | Reporting
```
## 后端开发
### Django App
插件后端是一个标准的 Django app,在安装时会被安装到 `plugins_data/{slug}/backend/` 中。`api/urls.py` 中的动态 URL 加载器会自动发现 `backend/api_urls.py` 并将其挂载到 `/api/plugins/{slug}/`。
```
# backend/api_urls.py
from django.urls import path
from rest_framework import routers
from .api import MyViewSet
router = routers.DefaultRouter()
router.register(r'items', MyViewSet, basename='items')
urlpatterns = router.urls
```
### Temporal Workflow
在 `backend/temporal_exports.py` 中定义 activity,并在 `manifest.yaml temporal.activities` 中列出它们。Temporal orchestrator 会在启动时发现并注册它们。
```
# backend/temporal_exports.py
from temporalio import activity
@activity.defn(name="my_plugin_activity")
async def my_activity(params: dict) -> dict:
...
return {"status": "done"}
```
## UI 开发 — 两种模式
插件有两种添加 UI 的方式:
| 模式 | 用例 | 示例 |
|---------|----------|---------|
| **Component override** | 替换现有的核心组件 | `custom_vuln_badge` 覆盖了 `VulnerabilityBadge` |
| **New pages** | 添加带有导航链接的全新页面 | `erl_temporal` 添加了 Exploit Readiness Dashboard 页面 |
这两种模式都使用相同的 Vite 库构建。区别在于宿主如何集成其输出。
## 模式 1:Component Override(ERL 风格)
当你想要替换核心 UI 中的现有组件时,请使用此模式。
### `manifest.yaml`
```
ui:
overrides:
- name: "VulnerabilityTable"
file: "VulnerabilityTable.js"
```
### `vite.config.ts`
```
import { defineConfig } from 'vite';
import react from '@vitejs/plugin-react';
export default defineConfig({
plugins: [react()],
build: {
lib: {
entry: 'src/VulnerabilityTable.tsx',
name: 'VulnerabilityTable',
fileName: 'VulnerabilityTable',
formats: ['es'],
},
rollupOptions: {
external: ['react', 'react-dom', '@mui/material', 'lucide-react'],
},
outDir: 'dist',
},
});
```
构建生成的文件 (`dist/VulnerabilityTable.js`) 必须有一个 **default export** —— 宿主的 `PluginComponentLoader` 会使用 `module.default`。
## 模式 2:通过 Module Federation 创建新页面(推荐)
当你的插件添加全新的页面或需要自己路由的复杂应用时,请使用此模式。此模式利用 Vite Module Federation 在宿主 shell 内部安全地动态加载应用的 `mount` 点。
### 第 1 步:设置 `vite.config.ts`
使用 `@originjs/vite-plugin-federation` 暴露一个单一的 `mount` 模块。避免共享依赖(`shared: []`),以确保你的插件与宿主版本完全解耦,并避免依赖冲突。
```
import { defineConfig } from 'vite';
import react from '@vitejs/plugin-react';
import federation from '@originjs/vite-plugin-federation';
export default defineConfig({
plugins: [
react(),
federation({
name: 'my_plugin',
filename: 'remoteEntry.js',
exposes: {
'./mount': './src/mount.tsx',
},
shared: []
})
],
build: {
target: 'esnext',
minify: false,
cssCodeSplit: false,
outDir: 'dist',
emptyOutDir: true
}
});
```
### 第 2 步:创建 `mount.tsx` 集成钩子
宿主系统不会直接渲染你的 React 树。相反,它会创建一个空的 `div` 并调用你的 `mount` 函数,将 DOM 元素和任何宿主上下文(例如活动的 `projectSlug`)传递给它。
```
// src/mount.tsx
import { createRoot, Root } from 'react-dom/client';
import App from './App';
let root: Root | null = null;
export const mount = (el: HTMLElement, props: any) => {
root = createRoot(el);
root.render(
);
};
export const unmount = (_el: HTMLElement) => {
if (root) {
root.unmount();
root = null;
}
};
```
### 第 3 步:编写你的 `App.tsx`
现在你可以将插件作为一个完全标准的 React 应用来构建了!
```
// src/App.tsx
import React from 'react';
export default function App({ projectSlug }: { projectSlug: string }) {
return (
My Plugin Dashboard
Active project: {projectSlug}
);
}
```
### 第 4 步:添加 `manifest.yaml` 菜单配置
```
ui:
menu_item: "My Plugin" # Nav label shown under "Plugins"
menu_path: "/my_plugin" # Mapped to the dynamic route /{projectSlug}/plugins/my_plugin
```
当插件启用时,核心 router 会自动检测它并渲染 Module Federation remote loader。
## 构建 Pipeline
```
Source: r3ngine-plugins/{slug}/ui/src/
↓
Build: npm run build (or build_plugins.py)
↓
Output: r3ngine-plugins/{slug}/ui/dist/assets/remoteEntry.js
↓
Package: build_plugins.py → dist/{slug}.zip
↓
Install: AtomicInstaller → plugins_data/{slug}/ + MEDIA_ROOT/plugins/{slug}/ui/
↓
Served: /media/plugins/{slug}/ui/assets/remoteEntry.js
```
### 使用 `build_plugins.py` 构建
```
# 构建并打包单个 plugin
cd r3ngine-plugins
python build_plugins.py active_directory
# 构建所有 plugins
python build_plugins.py
```
### 直接构建 UI(用于开发)
```
cd r3ngine-plugins/active_directory/ui
npm install
npm run build
```
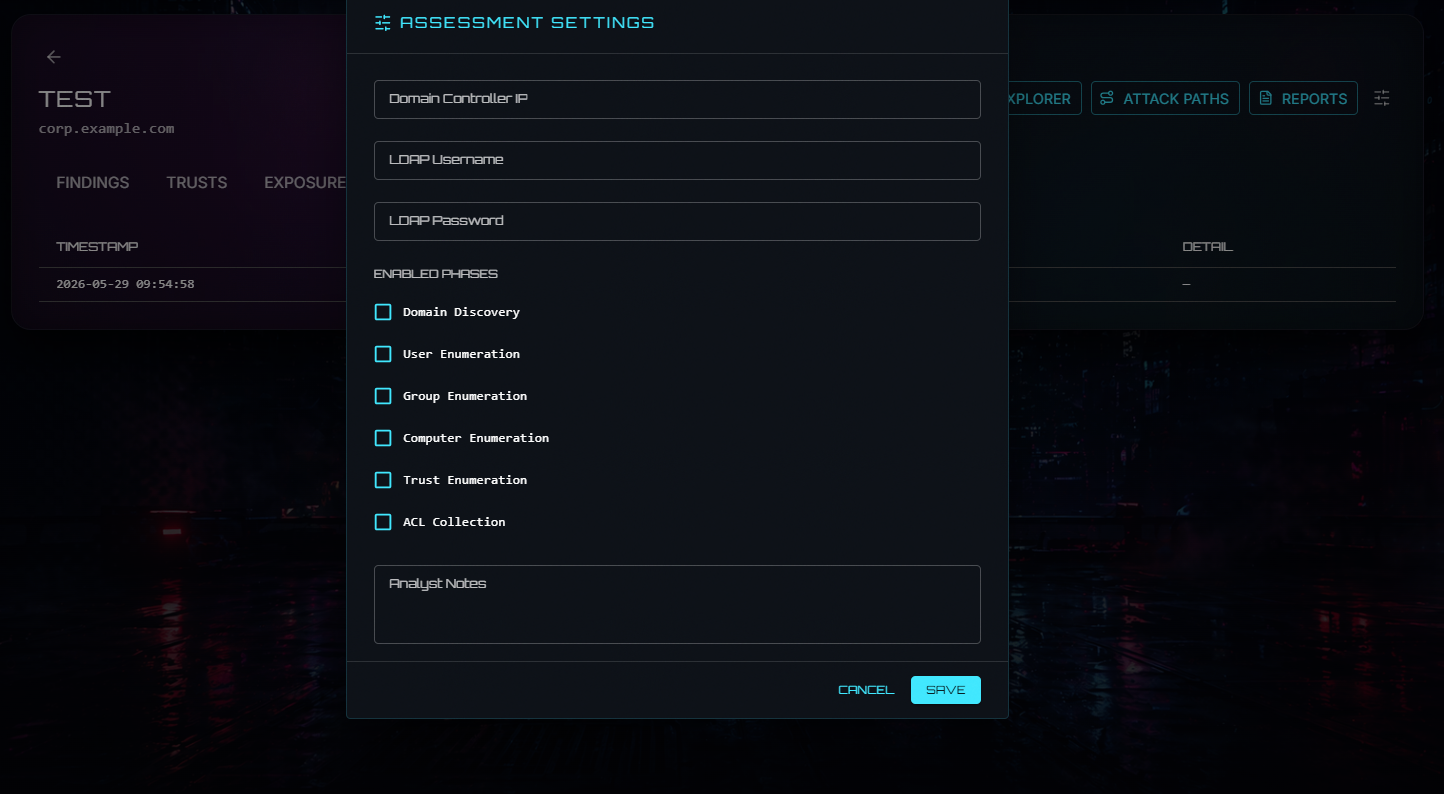
## 完整示例:Active Directory Intelligence 插件
`active_directory` 插件是新页面模式的参考实现。
**后端:** 包含 model(`ADAssessment`、`ADFinding`、`ADTrust`、`ADExposure`)的 Django app,位于 `/api/plugins/active_directory/` 的 REST API,包含 8 个 activity 的 Temporal workflow,以及 Neo4j 图管理器。
**前端页面(从 `ui/src/index.ts` 导出):**
| 导出名称 | 路由 | 描述 |
|-------------|-------|-------------|
| `ADAssessmentsPage` | `/{slug}/active-directory` | 带有创建/启动操作的评估列表 |
| `ADAssessmentDetailPage` | `/{slug}/active-directory/assessment/$id` | Findings、trusts、exposures 标签页 + 导入 |
| `ADGraphExplorerPage` | `/{slug}/active-directory/assessment/$id/graph` | 交互式 Cytoscape 域图谱 |
| `ADTrustAnalyticsPage` | `/{slug}/active-directory/assessment/$id/trusts` | 信任关系表 |
| `ADExposureDashboardPage` | `/{slug}/active-directory/assessment/$id/exposures` | 风险评分的暴露面 |
**打包到 `dist/index.js` 中的主要依赖:**
- `cytoscape` + `react-cytoscapejs`(图可视化)
- `zustand`(UI 状态)
- `@tanstack/react-query`(数据获取)
**宿主提供的 peer 依赖(未打包):**
- `react`, `react-dom`
- `@mui/material`, `@mui/icons-material`
- `lucide-react`
## `package.json` 指南
```
{
"peerDependencies": {
"react": "^18.0.0",
"react-dom": "^18.0.0",
"@mui/material": "^6.0.0",
"@mui/icons-material": "^6.0.0",
"lucide-react": "^0.400.0"
},
"dependencies": {
"@tanstack/react-query": "^5.100.9",
"zustand": "^5.0.0",
"cytoscape": "^3.33.3"
},
"devDependencies": {
"vite": "^5.0.0",
"@vitejs/plugin-react": "^4.0.0",
"typescript": "^5.0.0"
}
}
```
- `peerDependencies` → 列在 `rollupOptions.external` 中 → 运行时由宿主提供,不打包
- `dependencies` → 打包到 `dist/index.js` 中
- 不要将 `react` 或 `@mui/material` 添加到 `dependencies` 中 —— 宿主提供一个实例;打包另一个实例会导致 React hook 错误
## 开发工作流
1. **本地编写源码** —— 所有插件代码都位于宿主机上的 `r3ngine-plugins/{slug}/` 中
2. **构建 UI** —— `cd r3ngine-plugins/{slug}/ui && npm run build`
3. **同步到 container** —— `docker cp r3ngine-plugins/{slug} r3ngine-web-1:/usr/src/app/plugins_data/`
4. **将 UI 同步到 media** —— `docker exec r3ngine-web-1 python manage.py sync_plugin_ui`
5. **在浏览器中测试** —— 导航到 `/{projectSlug}/my-plugin`
6. **提交** —— 将插件文件提交到 `r3ngine-plugins/` 仓库;将宿主路由更改提交到主 `r3ngine` 仓库
## 工具依赖 (`tools.yaml`)
```
tools:
- name: "my-tool"
binary: "my-tool"
install_type: "pip3"
install_command: "pip3 install my-tool"
validation_command: "my-tool --version"
```
工具会被安装到 worker container 上的 `plugins_data/{slug}/` 中。
## 提示
- 检查 `reNgine.opsec_utils` 以获取代理轮换和隐蔽工具
- 在 Temporal activity 中使用 `_send_ws_update(assessment_id, type, payload)` 可通过 WebSocket 推送实时进度
- 插件的 WebSocket endpoint:`ws[s]://{host}/ws/plugins/{slug}/{assessment_id}/`
- 插件 UI 中的所有数据获取都应使用 `credentials: 'include'` 以传递会话 cookie
# Active Directory 插件
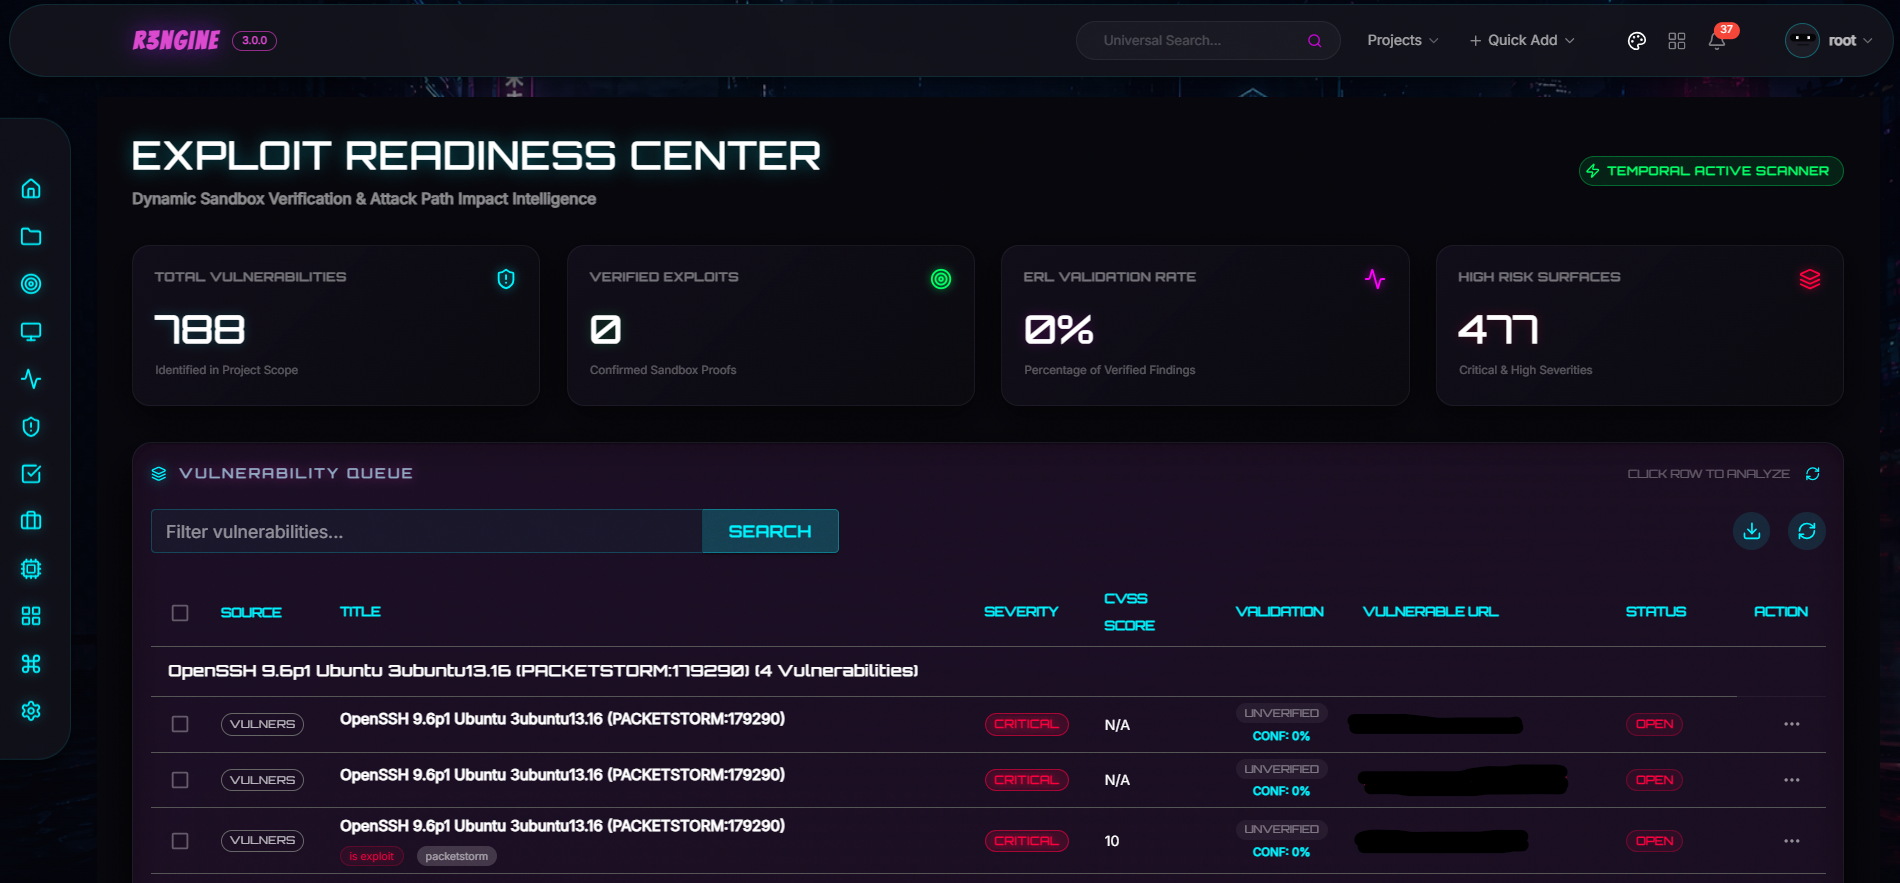
# Exploit Readiness Layer 插件
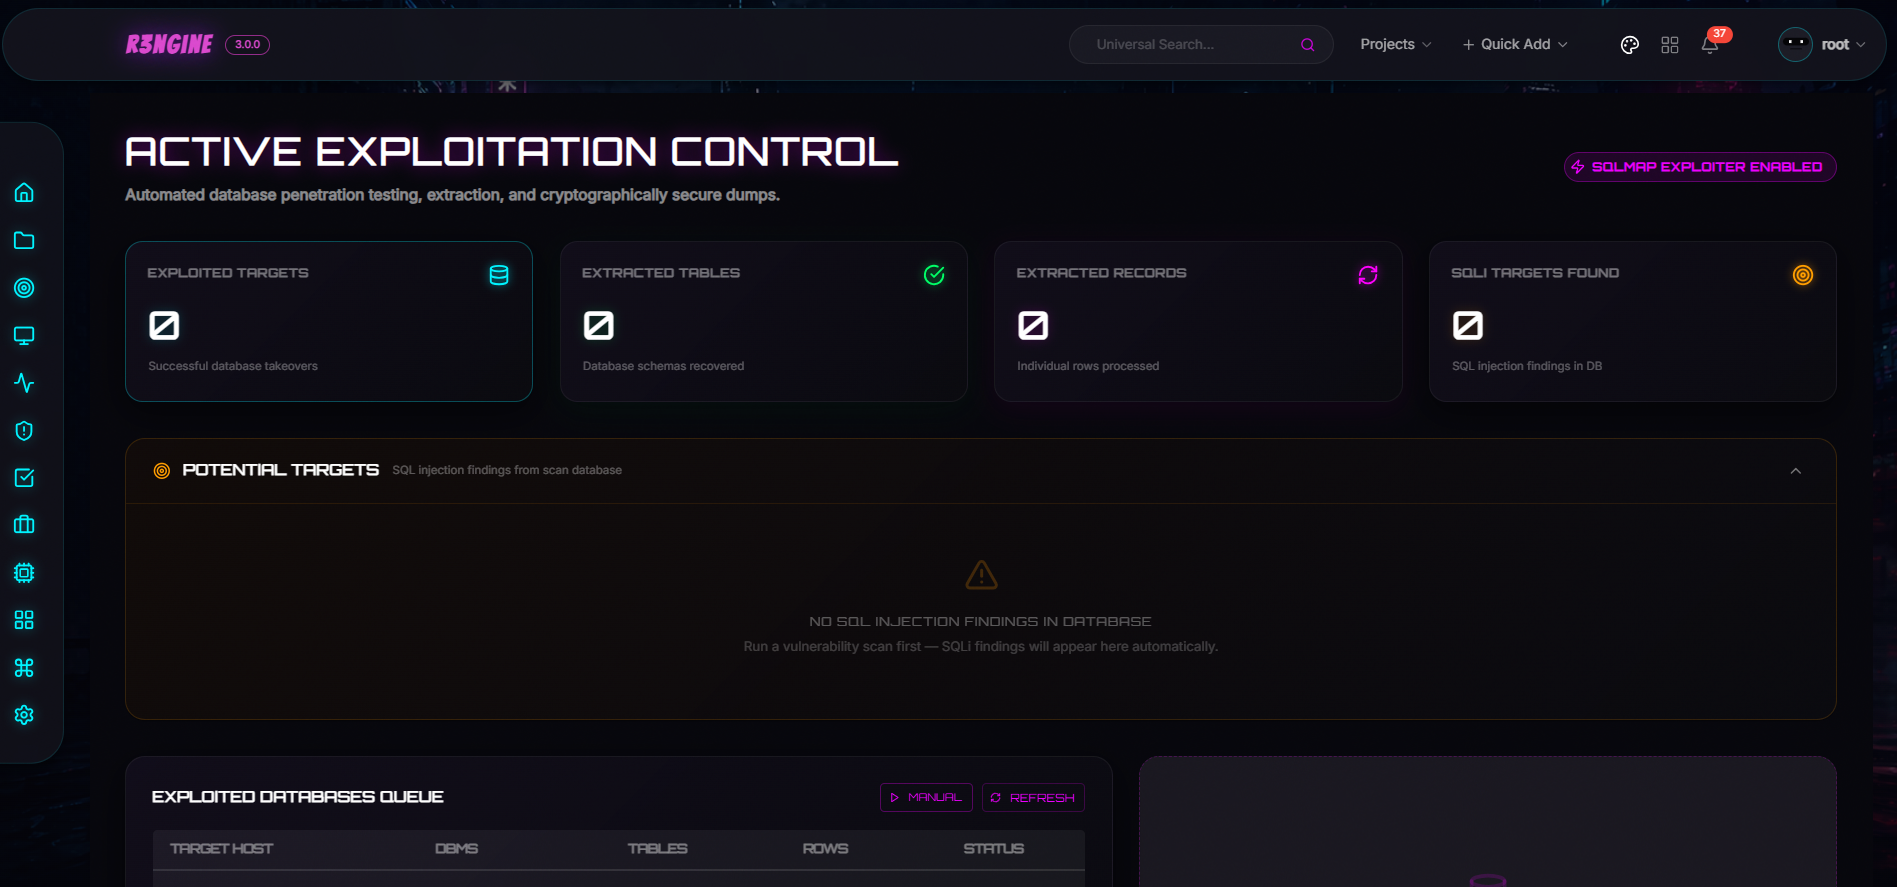
# Active Exploitation 插件
# Burp Suite Professional Integration 插件
# Credential Intelligence 插件
通过 brutus、netexec、kerbrute 和 hashcat 进行高级身份验证测试和密码审计。
# Email Security 插件
SMTP open relay、user enumeration、STARTTLS 以及 SPF/DKIM/DMARC 策略检查。在 Tier 2 端口扫描之后自动运行。
# Metasploit Integration 插件
独立的 Metasploit 集成,提供双向交互式终端和自动化的 Temporal 驱动模板扫描。